csv
source and are kept in sync when you re-upload, which makes CSV import a
lightweight alternative to a full HR-system connector when you just need to load a
list of people. You start an import from Directory → Users.
CSV import is repeatable - re-upload an updated file whenever your list changes. If your HR system is the system of
record for who works at your company, connect it instead so the directory stays
current automatically - see when to use HR sync.
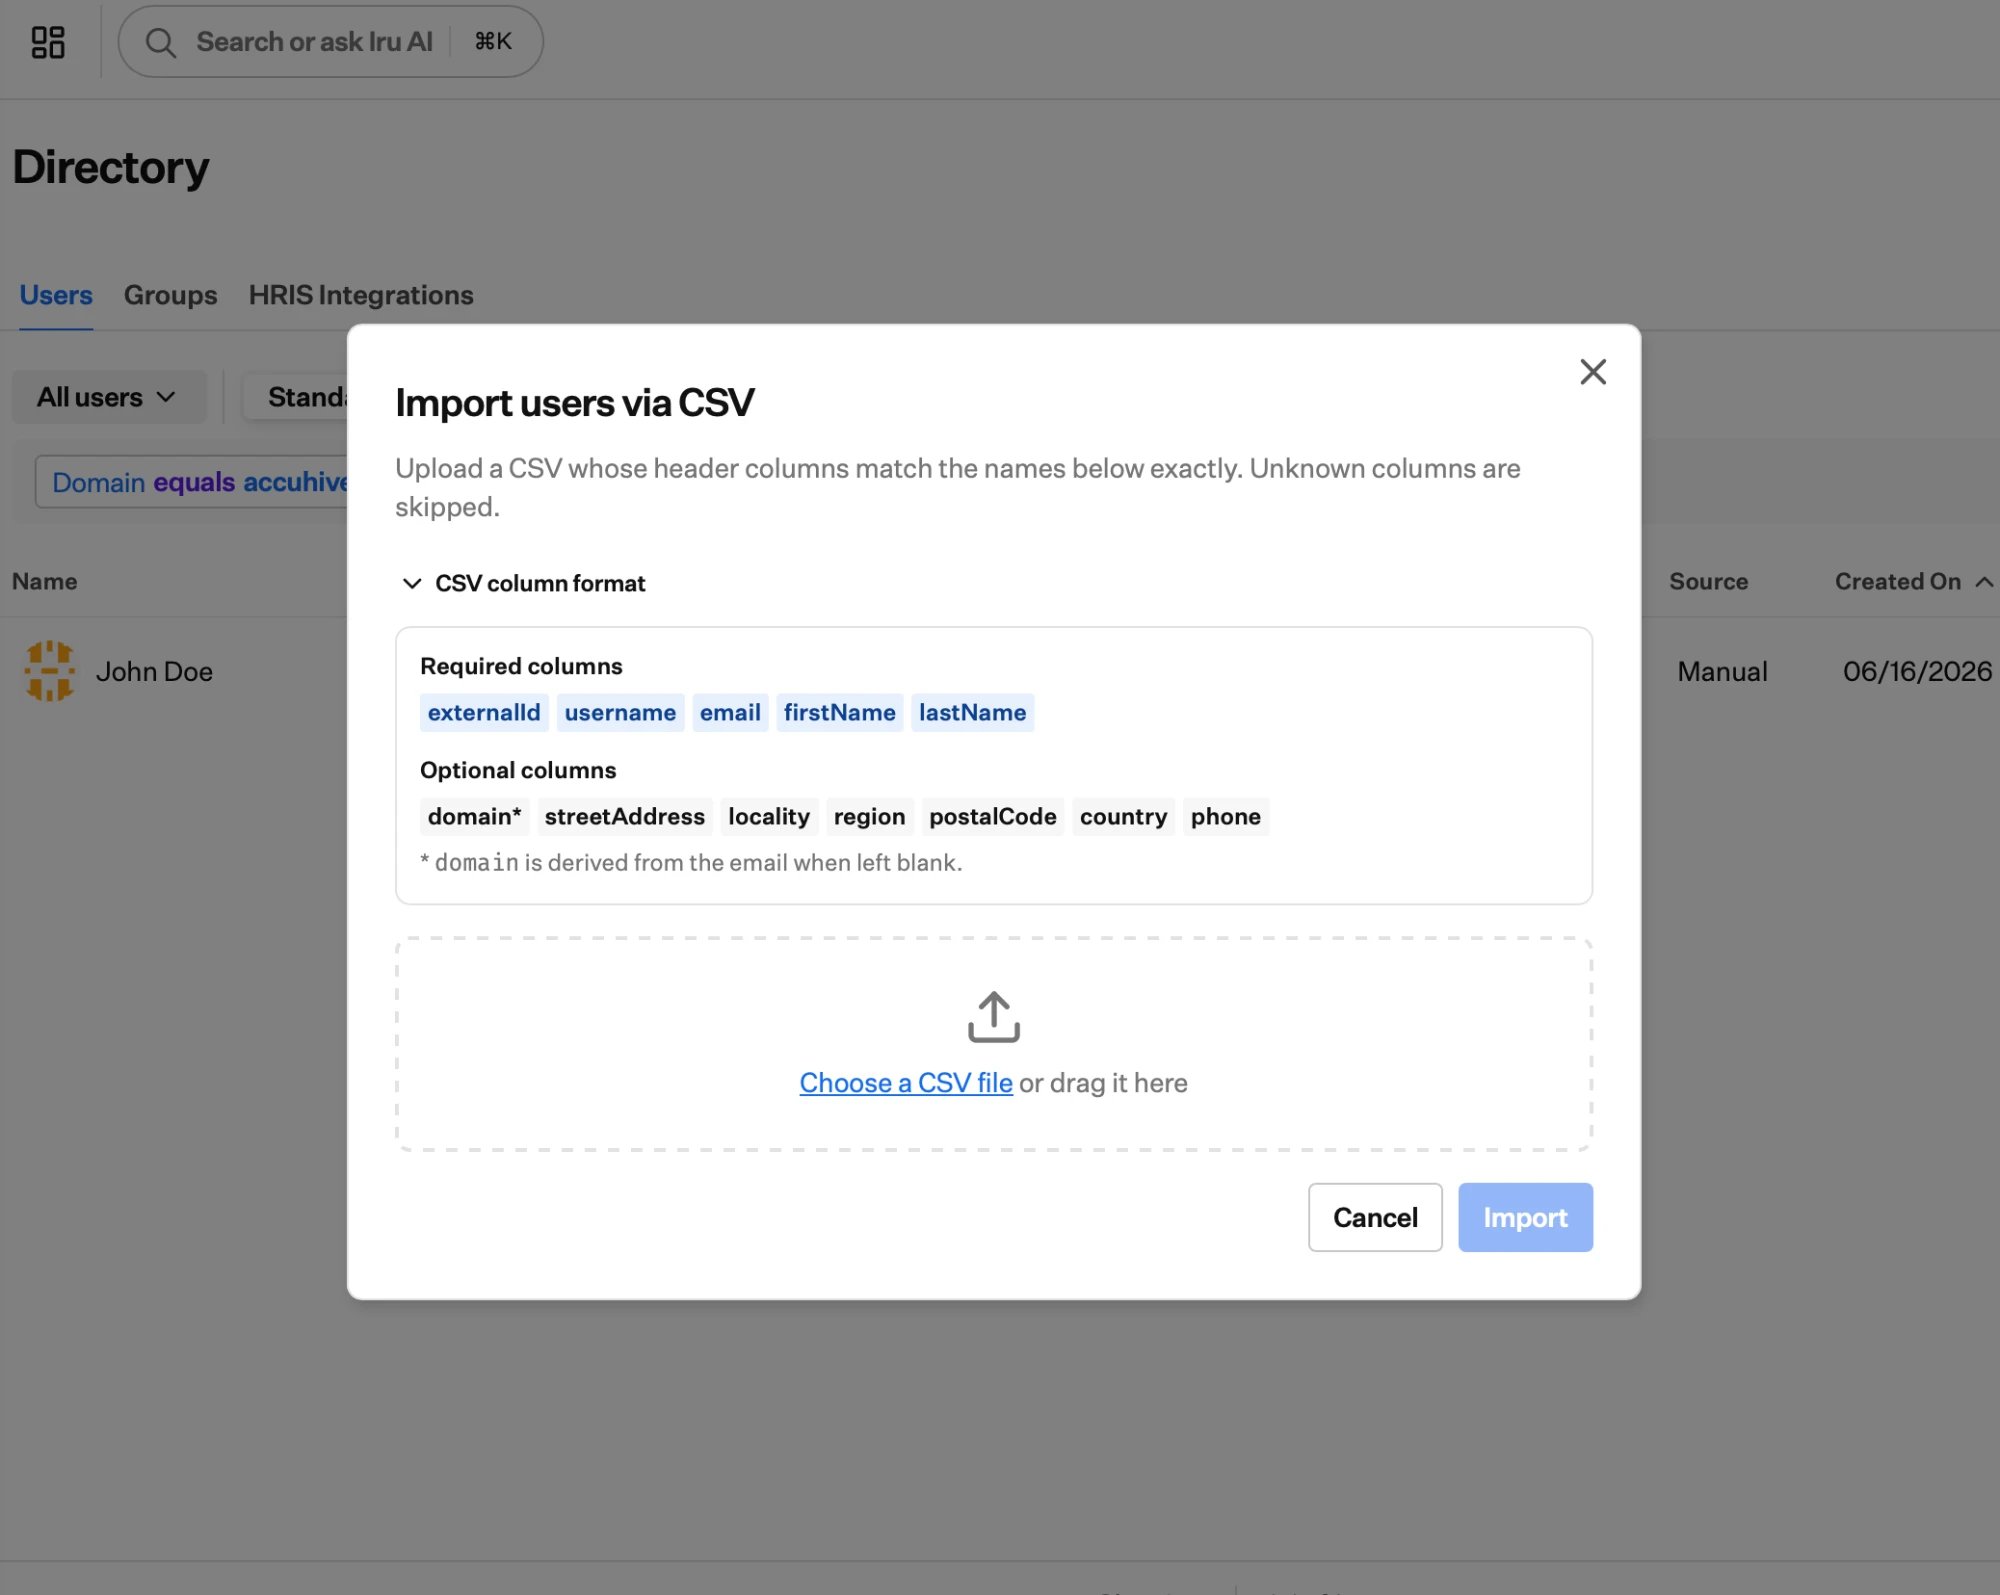
File requirements
| Requirement | Detail |
|---|---|
| Format | Comma-separated values (.csv). |
| Encoding | UTF-8. A leading byte-order mark (as Excel adds) is accepted and ignored. |
| First row | A header row naming the columns. |
| Header names | Case-sensitive and must match exactly - externalId, not ExternalID. |
| Unknown columns | Skipped. Columns that aren’t in the list below are ignored; only the documented columns are imported, and custom attributes can’t be set via CSV. |
| Maximum rows | 50,000 data rows per upload. |
| Maximum file size | 16 MB. |
Columns
Required
Every row must have a non-empty value for all of these.| Column | Description | Rules | Example |
|---|---|---|---|
externalId | Your stable identifier for the user - the key used to match them on re-upload. | Non-empty; unique within the file. | EMP-10482 |
username | The user’s login username. | Non-empty. | jane.doe |
email | The user’s primary email address. | A valid, bare address - no display name (Jane <jane@acme.com> is rejected). | jane.doe@acme.com |
firstName | Given name. | Non-empty. | Jane |
lastName | Family name. | Non-empty. | Doe |
Optional
Leave the cell blank, or omit the column entirely, when not needed.| Column | Description | Rules | Example |
|---|---|---|---|
domain | The user’s domain. | If blank, derived from the part of email after the @. Set it only when it should differ. | acme.com |
streetAddress | Street line of the address. | Free text. | 1 Market St |
locality | City / town. | Free text. | San Francisco |
region | State / province / region. | Free text. | CA |
postalCode | Postal / ZIP code. | Free text. | 94105 |
country | Country. | Free text (e.g. an ISO country code). | US |
phone | Phone number. | Normalized to E.164 - see Phone numbers. | +14155550101 |
Field behavior
Domain derivation
- If
domainis blank, it’s taken from the email -jane.doe@acme.com→acme.com. - If
domainis provided, that value is used as-is. - A domain that doesn’t already exist is created automatically.
Phone numbers
Phone values are normalized to E.164 (a leading+, country code, then digits,
with no spaces or punctuation) - the same way phone numbers are stored everywhere
else in the product.
| You enter | Stored as | Why |
|---|---|---|
4155550101 | +14155550101 | No country code → the default +1 (North America) is added. |
(415) 555-0101 | +14155550101 | Separators removed, +1 added. |
14155550101 | +14155550101 | Recognized as a North American number that already includes the 1. |
+14155550101 | +14155550101 | Already E.164 - kept as-is. |
+44 7911 123456 | +447911123456 | International (+ present) - country code kept, separators removed. |
1-800-FLOWERS | rejected | Contains letters. |
555-0101 | rejected | Too few digits to be a valid number. |
Addresses
An address is recorded whenever any address column has a value - a partial address (say, onlylocality and country) is fine, and the missing parts are
left blank. If every address column is blank, no address is stored.
Run the import
Start the import
In Directory → Users, choose to import via CSV. The dialog shows the
expected columns.
Upload and validate
Iru validates the whole file first. If it passes, the rows are accepted and
your users are created or updated in the background. If validation fails, you
stay in the dialog with a report to fix - nothing is imported.
Create vs. update - re-uploading
Users are matched onexternalId within the csv source:
- A new
externalIdcreates a new user. New users are given theend-userrole. - An existing
externalIdupdates that user’s details from the row. Updating does not change their role or group memberships.
externalId must be unique.
Re-upload the complete current file each time, not just the rows you changed
- each import is matched on
externalId.
Validation and errors
Validation happens in two stages. Until the file is fully accepted, nothing is imported.File problems (the whole file is rejected)
File problems (the whole file is rejected)
The file itself can’t be processed - for example a duplicate column, a
missing required column, an empty file, a header with no data rows, or more
rows than the limit. Fix the file and upload again.
Row problems (still nothing imported)
Row problems (still nothing imported)
The file is well-formed but one or more rows are invalid. You get a list of
every problem, each with the line (the header is line 1, so the first
data row is line 2), the column at fault (blank for whole-row issues), and
a message. For example:
Fix the listed rows and re-upload.
| Line | Column | Message |
|---|---|---|
| 3 | email | is not a valid email address |
| 5 | username | is required |
| 8 | phone | is not a valid phone number |
| 9 | externalId | is duplicated in this file |
Apply errors (after a clean file is accepted)
Apply errors (after a clean file is accepted)
Once a file is accepted, rows are applied in the background. A row can still
fail at this stage - for example an email that’s already in use by another
user, or a value conflicting with a
unique attribute. These apply
errors are recorded against the import batch; each shows the row’s
externalId and username, the error, and which batch it belongs to. Correct
those rows and re-import them.Example file
- CSV-001 - every field provided; the phone normalizes to
+14155550101. - CSV-002 - blank
domain, so it’s derived asacme.com. - CSV-003 - only the required fields; no address or phone.
- CSV-004 - a partial address and an international phone (
+44…). - CSV-005 - phone only, with no country code → stored as
+13105550105.
When to use HR sync instead
You can re-upload a CSV whenever your list changes, and Iru re-checks every row. For hands-off, continuous provisioning, connect your HR system as the authoritative record instead.| CSV import | HR system sync | |
|---|---|---|
| Trigger | You upload a file | Runs automatically on a schedule |
| Keeps current? | When you re-upload | Yes - re-syncs automatically |
| Create / update | Both, matched on externalId | Both, automatically |
| Removal | Manual | Can remove people as they’re offboarded |
| Best for | Initial loads, ad-hoc additions | Ongoing lifecycle automation |
You can use both - many teams seed the directory with a CSV to get going, then
connect their HR system to take over keeping everyone current. Setup is covered
in Directory Sync.
Next steps
Connect your HR system
Automate creates, updates, and removals on a schedule.
Design your schema first
Decide required and unique attributes so imports land cleanly.
Manage individual users
Edit, suspend, and invite the people you’ve imported.
Organize into groups
Turn your imported users into assignable groups.