

This guide applies to iOS devices, iPadOS devices, and visionOS devices
Apple Business Manager is now Apple Business. Apple School Manager is unchanged. For more information, see Introducing Apple Business and Apple Business Manager is now Apple Business.
About Self Service for iOS, iPadOS, and visionOS
Self Service is an app on iOS, iPadOS, and visionOS that lets users discover and install IT-approved applications.As of April 8, 2026, apps were updated from Kandji 


How It Works
Self Service is distributed through Apple Business or Apple School Manager and automatically installs on managed devices. Users browse available applications, install approved software, and view device information.Acquiring Licenses for Self Service from Apple Business or Apple School Manager
Before installing Iru Self Service on iOS, iPadOS, and visionOS devices, acquire licenses for the app. Follow the instructions to add apps from Apps and Books to Iru Endpoint, and search for “Iru Self Service”, or the app ID of 1579981636, in Apple Business or Apple School Manager. Be sure to acquire enough licenses for each iOS, iPadOS, and visionOS device you wish to have Self Service installed on.Installing Self Service
Add the Iru Self Service Library Item to Blueprints you’re using for iOS, iPadOS, and visionOS devices, either from the Iru Self Service Library Item in Library, or individually on each Blueprint as needed. Self Service will then install automatically on company-owned supervised devices. For devices enrolled through the Iru Endpoint Enrollment Portal, users will need to agree to install Self Service on their devices when prompted.Configuring Return to Service in Self Service
After erase, Return to Service advances the device through Setup Assistant and re-enrolls it without user intervention. For more on Return to Service, including Preserve managed apps and Retry enrollment, see Erase an Apple Device.1
Select Add to Self Service
Under Options, check Add to Self Service. Select this checkbox first. You must select it before you can configure the other Return to Service options.
2
Optionally select a Wi-Fi profile
Optionally, select a Wi-Fi profile under Select a Wi-Fi profile for re-enrollment (optional) so the device can join a network after erase.
3
Optionally check Preserve managed apps
On iPhone and iPad devices running iOS 26 or iPadOS 26 or later, optionally check Preserve managed apps to keep managed apps on the device through the erase so the device does not need to download them again after it re-enrolls. App data and all user-created data are still erased.This setting only takes effect if the device is enrolled through Automated Device Enrollment with Allow app preservation during Return to Service turned on in the Automated Device Enrollment Library Item.
4
Optionally check Retry enrollment
On iPhone and iPad devices running iOS 27 or iPadOS 27 or later, optionally check Retry enrollment in the Return to Service section of the Iru Self Service Library Item. If enrollment fails after erase, the device retries automatically, with an increasing delay of up to 5 minutes between attempts. Users do not see this option. The Self Service app uses the setting you configure.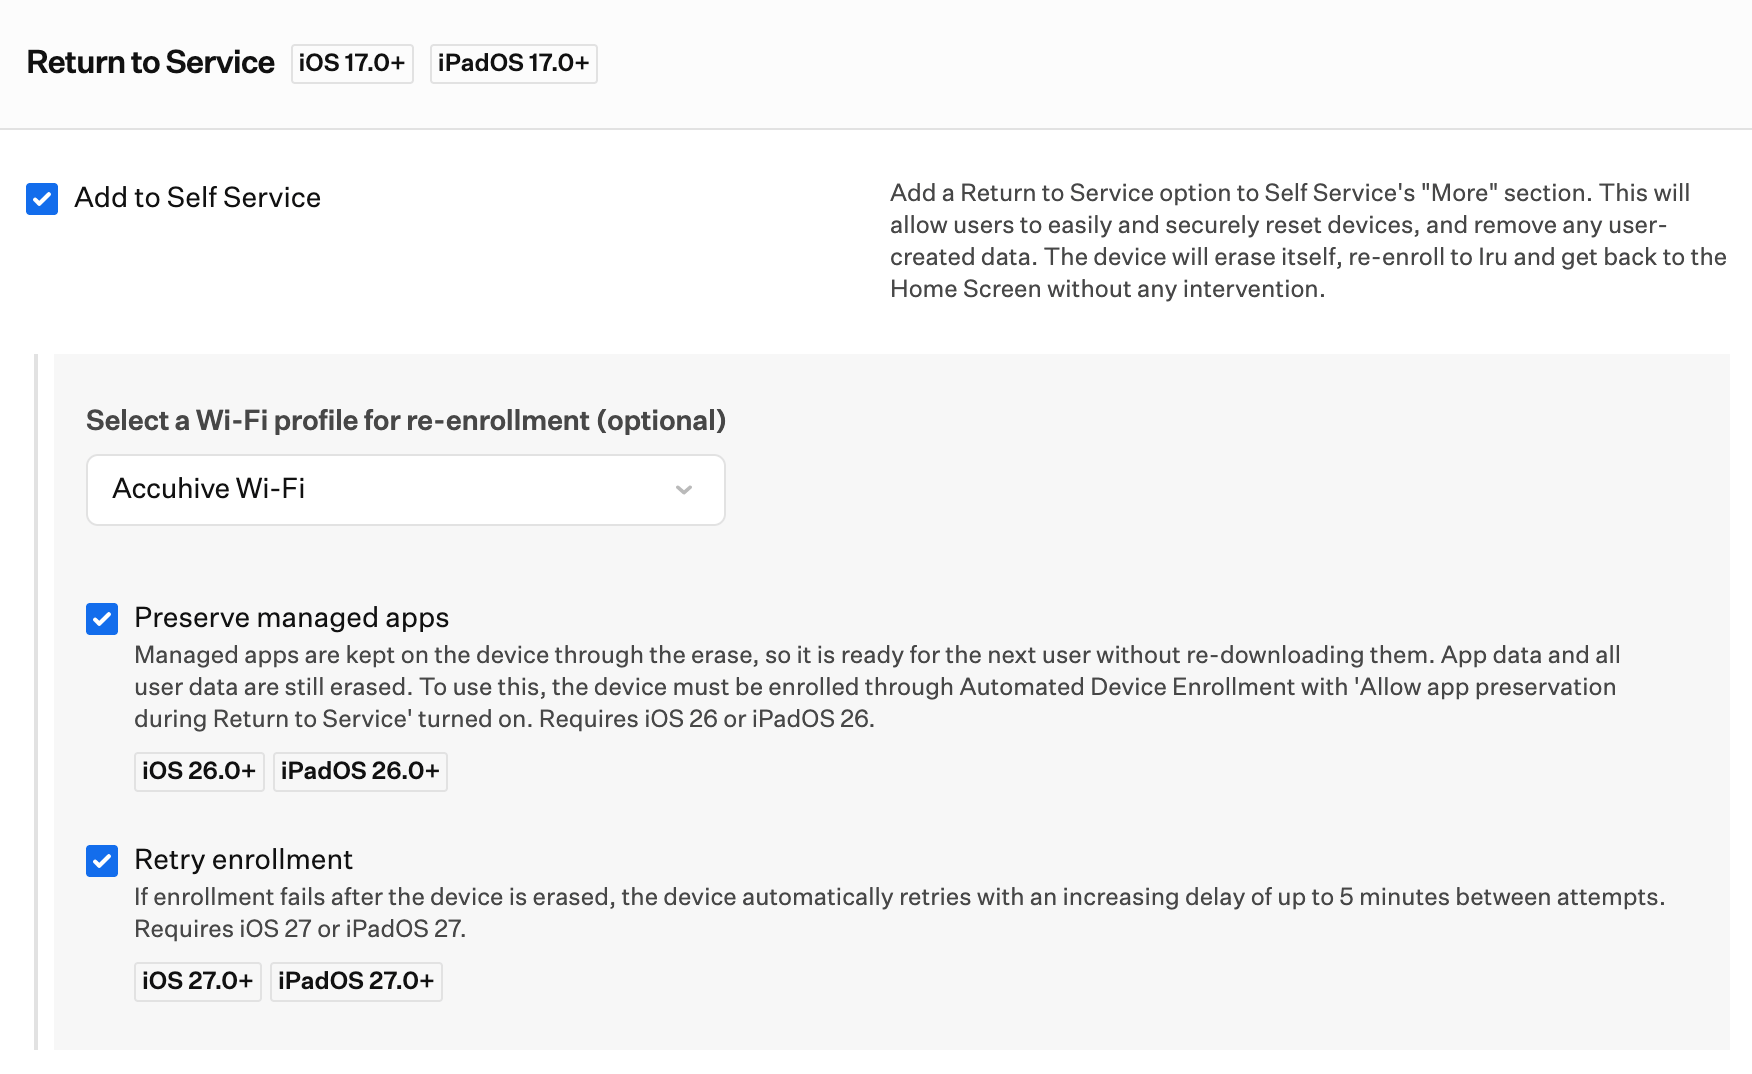
Return to Service in Self Service Considerations
Activation Lock and Enterprise Wi-Fi
For more on Return to Service, including Activation Lock and Enterprise Wi-Fi, see Erase an Apple Device.
Cellular and Ethernet
Cellular devices and devices connected via Ethernet do not require the Wi-Fi profile.
Wi-Fi profile scope
Only Wi-Fi profiles scoped to the same Blueprint appear in the drop-down, including Custom Profiles with Wi-Fi payloads. This keeps Wi-Fi payloads from being orphaned on devices.
SCEP payloads
Profiles that include a SCEP payload are not included.
Preserve managed apps
Preserve managed apps requires iOS 26 or iPadOS 26 or later on iPhone and iPad. It only takes effect on devices enrolled through Automated Device Enrollment with Allow app preservation during Return to Service enabled in the Automated Device Enrollment Library Item.
Retry enrollment
Retry enrollment requires iOS 27 or iPadOS 27 or later on iPhone and iPad. It only works if the device is enrolled through Automated Device Enrollment (ADE). You set it on the Iru Self Service Library Item. Users do not see or change it.
Opening Self Service
iPhone and iPad
1
Open from Home Screen
Tap the Iru Self Service icon on your Home Screen to open the app.
2
Search for App
If you don’t see the app, swipe down from the top of the screen to reveal the search field and search for Iru Self Service.
3
Configure Analytics
The first time you open Self Service, the Analytics and Crash Reports screen appears. Configure the settings as you wish, then tap Continue.
visionOS
1
Open from Home View
Open Home View, select Apps View in the tab bar, then look at the app and tap to open it.
2
Search for App
If you don’t see the app, open Control Center, tap the Search button, then enter “Iru Self Service” and tap the result to open the app.
3
Configure Analytics
The first time you open Self Service, the Analytics and Crash Reports screen appears. Configure the settings as you wish, then tap Continue.
Navigating Self Service
Self Service has several tabs at the bottom of the screen and will automatically open to the Library tab, which is the primary screen that users will interact with.1
Browse Library
Within the Library tab, All is always displayed. Recommended appears only when at least one assigned item is marked as recommended in Self Service settings. Additional categories display when an app in that category is assigned to the device’s Blueprint.
- All: Always displayed; includes all items available in Self Service
- Recommended: Displayed only when one or more assigned items are marked as recommended
- Admins can add categories in the Iru Endpoint web app in Library → Self Service Settings tab. A category will display on a device only if an app within that category is added to the Blueprint that the device is in
2
View Device Information
Access the Device Info tab to see useful information about the device, such as serial number, model, and installed OS version.
3
Search for Applications
Use the Search tab to search for and install any app available in Self Service.
4
Access Additional Options
Navigate to the More tab which includes an About screen (which displays the version information for the Self Service app itself), Privacy, and Activity. Open Activity to see previously installed app versions and the dates when they were installed.
Installing Available Applications
Apps available for Self Service installation will display an icon, name, and description.1
Install Application
Tap Get to install the application from the Self Service Library screen.
2
Reinstall if Needed
After installing an app, the button will change from Get to Reinstall.
3
View App Details
Tap the app icon for additional information about the app.
Concepts
These are the parts of Self Service on the device, and the controls you use for it in Iru Endpoint.Search
Search
Users can search for and install any available app through the Search tab.
Device information
Device information
The Device Info tab shows the serial number, model, and OS version.
Activity
Activity
Activity shows previously installed app versions and the dates they were installed.
Analytics
Analytics
Users can configure analytics and crash report settings on first launch.
Home Screen
Home Screen
Self Service appears on the device Home Screen.
App management
App management
Users can reinstall apps and view app details.
Platforms
Platforms
Self Service works on iOS, iPadOS, and visionOS devices.
Administrative control
Administrative control
You can configure categories and recommended items in the Iru Endpoint web app.
Considerations
Review these requirements and limits before you assign Self Service and before you use Return to Service.License management
License management
Ensure sufficient licenses are acquired from Apple Business or Apple School Manager for all devices.
Automatic installation
Automatic installation
Self Service installs automatically on company-owned supervised devices.
User consent
User consent
Users need to agree to install Self Service on devices enrolled through the Iru Endpoint Enrollment Portal.
Return to Service
Return to Service
After erase, the device re-enrolls automatically. On iOS 27 or iPadOS 27 or later, you can check Retry enrollment on the Iru Self Service Library Item. It only works if the device is enrolled through Automated Device Enrollment (ADE). On iOS 26 or iPadOS 26 or later, you can also check Preserve managed apps if the device enrolled through Automated Device Enrollment with Allow app preservation during Return to Service enabled.
Wi-Fi configuration
Wi-Fi configuration
Configure Wi-Fi profiles for devices that need network access after erase.
Category management
Category management
Categories display on devices only if apps within those categories are added to the device’s Blueprint.
Removing apps from the Home Screen
Removing apps from the Home Screen
If a Home Screen Layout Library Item includes an App Store app installed through Self Service, users cannot remove it from the Home Screen while that Library Item is assigned. For Apple apps, users can still delete the app from Settings > General > iPhone Storage (or iPad Storage on iPad).
Related Articles
Iru Brand Update
Learn about the Iru brand update including the new name, visual identity, and what has changed. Understand the transition timeline and impact on your account.
Add Apps from Apps and Books to Iru Endpoint
Add apps from Apps and Books in Apple Business to your Iru Endpoint Library. Search the App Store, purchase licenses, and assign apps to device Blueprints.
Erase an Apple Device
Send the Erase Device command from Iru Endpoint to macOS, iOS, iPadOS, tvOS, and visionOS devices, and use Return to Service to re-enroll eligible devices.
Configure the Home Screen Layout Library Item
Configure the Home Screen Layout Library Item in Iru Endpoint to arrange app icons on supervised iOS and iPadOS devices. Set pages, folders, and dock apps.