Apple Business Manager is now Apple Business. Apple School Manager is unchanged. For more information, see Introducing Apple Business and Apple Business Manager is now Apple Business.
About ADE Token Management
Automated Device Enrollment (ADE) tokens require periodic renewal and management to maintain device enrollment capabilities. This process allows you to efficiently manage multiple ADE tokens using API automation, reducing manual effort and ensuring consistent token lifecycle management.How It Works
ADE token management involves using the Iru Endpoint API through Postman to perform bulk operations on multiple tokens. The process includes configuring API access, setting up environment variables, downloading tokens from Apple Business or Apple School Manager, and using automated workflows to renew, update, or delete tokens efficiently.Prerequisites
- Access to Iru Endpoint with API token creation permissions
- Postman application installed and configured
- Access to Apple Business or Apple School Manager
- Multiple ADE tokens that need renewal or management
- Basic understanding of API operations and Postman workflows
Configuring an Iru Endpoint API token
Prepare an API token and store it in a secure location. You can read more about this in our Iru Endpoint API article. You can skip this section if you already have an API token prepared.Create or modify an API token
Create a new API token or modify an existing one with the required permissions.
Open API tokens
In your Iru Endpoint tenant, click your name at the bottom of the left navigation, then select Access → API tokens.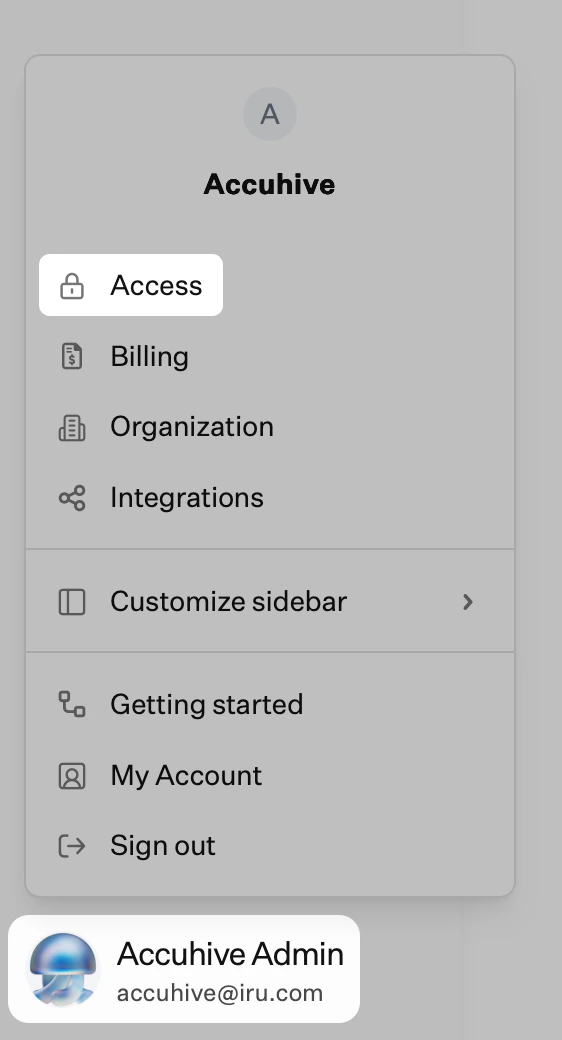
Preparing Postman
Most of the steps moving forward will be performed inside the Postman application on your device. You can skip this section if you already have Postman configured.Verify Collection Structure
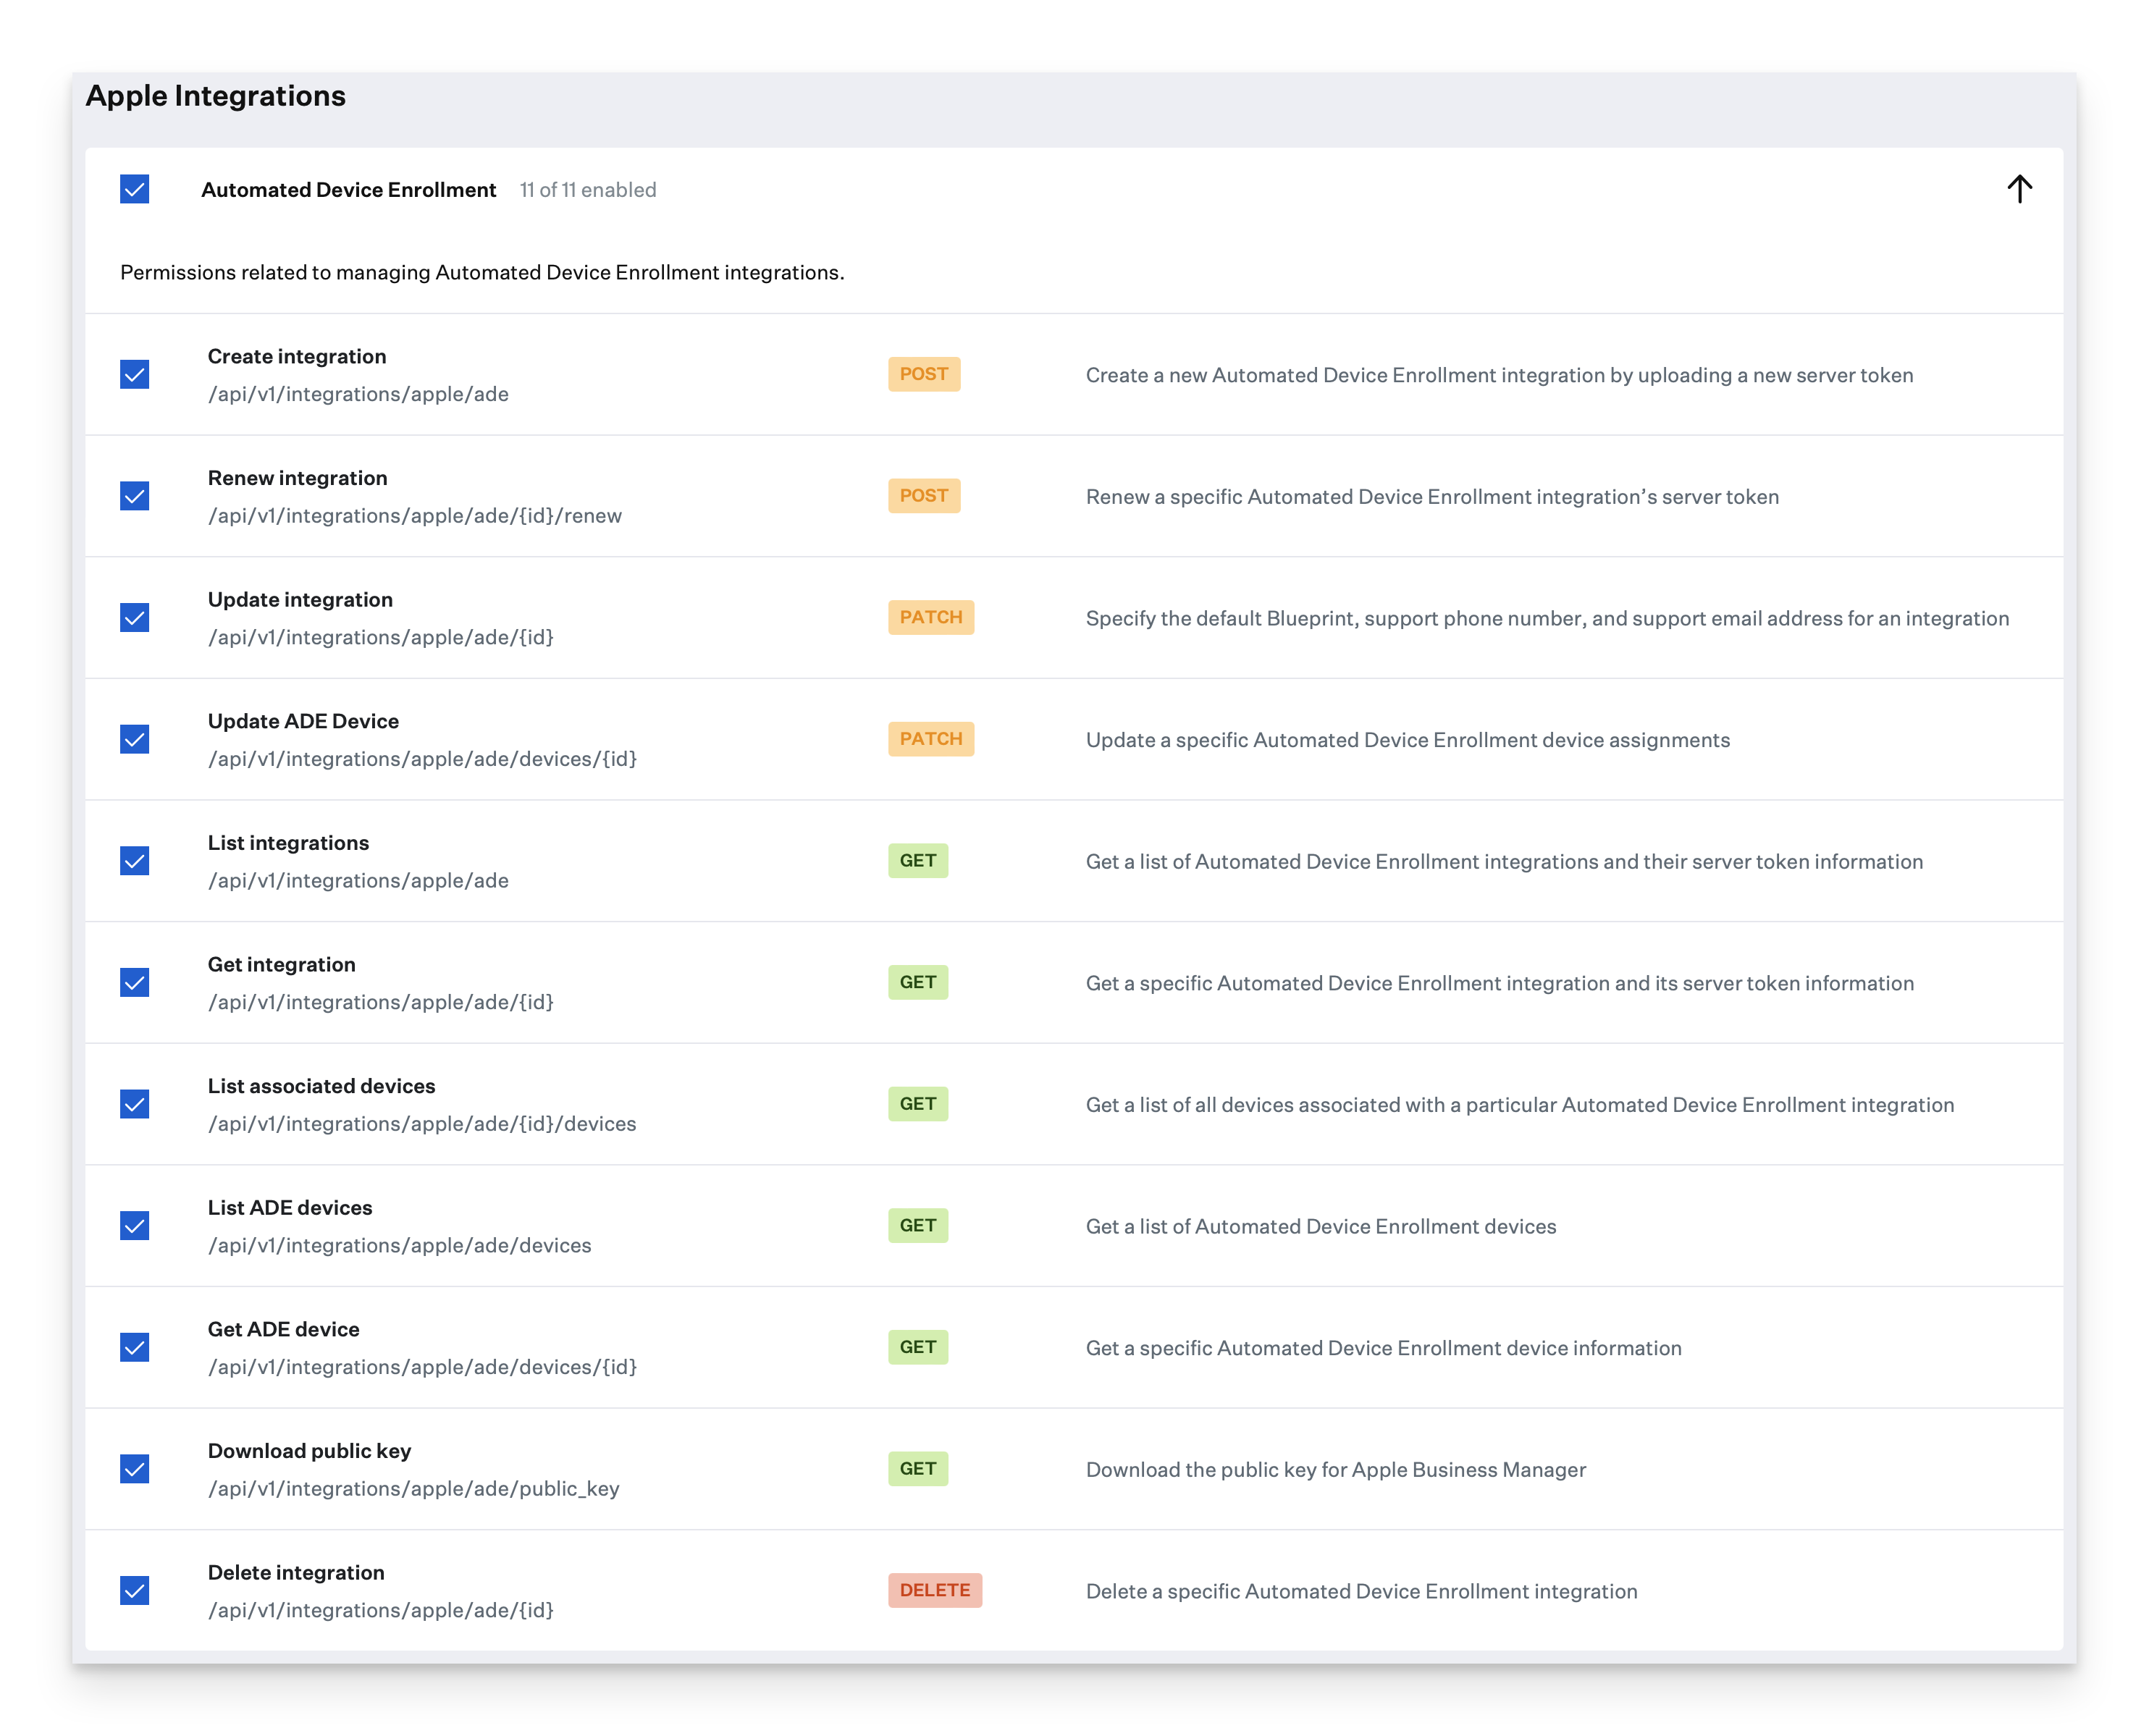
Check your Collection for the Automated Device Enrollment integrations folder.
Define API URL
Define your API URL if undefined in the Iru Endpoint API folder at the top of the collection.
Configuring Postman Environment Variables
Now that the basics of Postman have been configured, you will need to define some Environment Variables in Postman to keep track of the Automated Device Enrollment servers.Create Environment Variables
In Postman, click the Environments tab in the left sidebar, then click Create Environment to create a new environment. Name your environment (e.g., “Iru Endpoint API”) and add the following variables:
- Variable:
base_url- Initial Value:
https://<subdomain>.api.iru.com/api/v1 - Current Value:
https://<subdomain>.api.iru.com/api/v1
- Initial Value:
Replace
<subdomain> with your tenant’s actual subdomain, or copy the base URL directly from your tenant. The URL shown in your tenant may use the api.kandji.io domain. Both <subdomain>.api.iru.com and <subdomain>.api.kandji.io will work without modification.- Variable:
token- Initial Value:
your_api_token_here - Current Value:
your_api_token_here
- Initial Value:
Add to Existing Variables
If you already have environment variables configured, you can add the new items to the existing variables.
List ADE Integrations
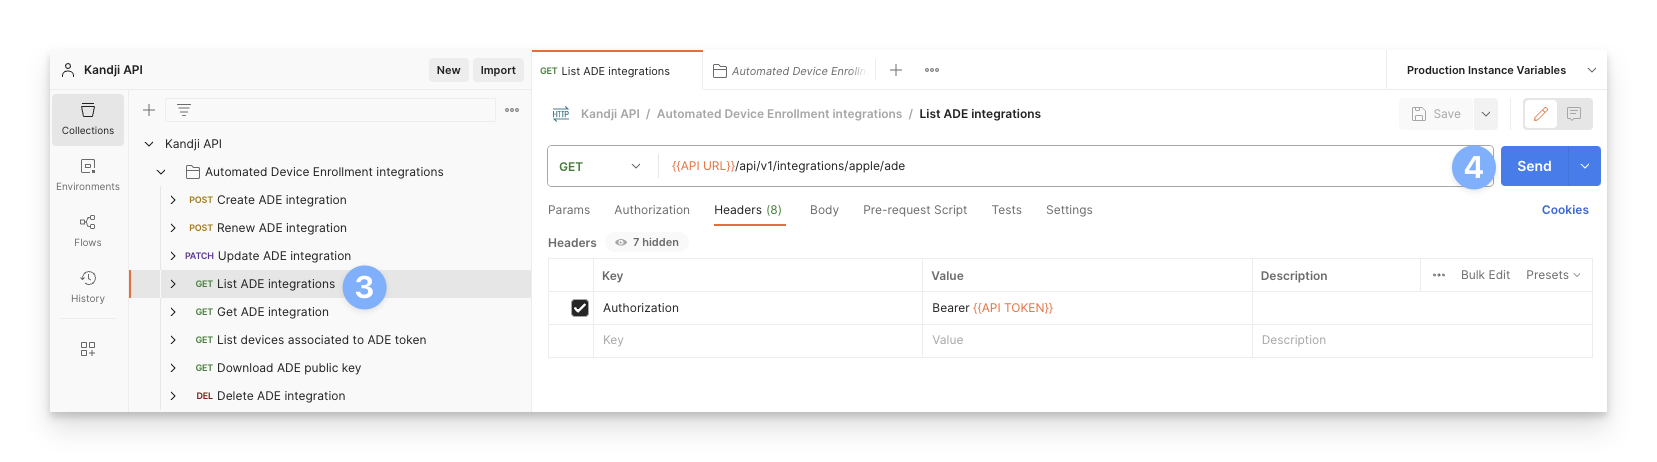
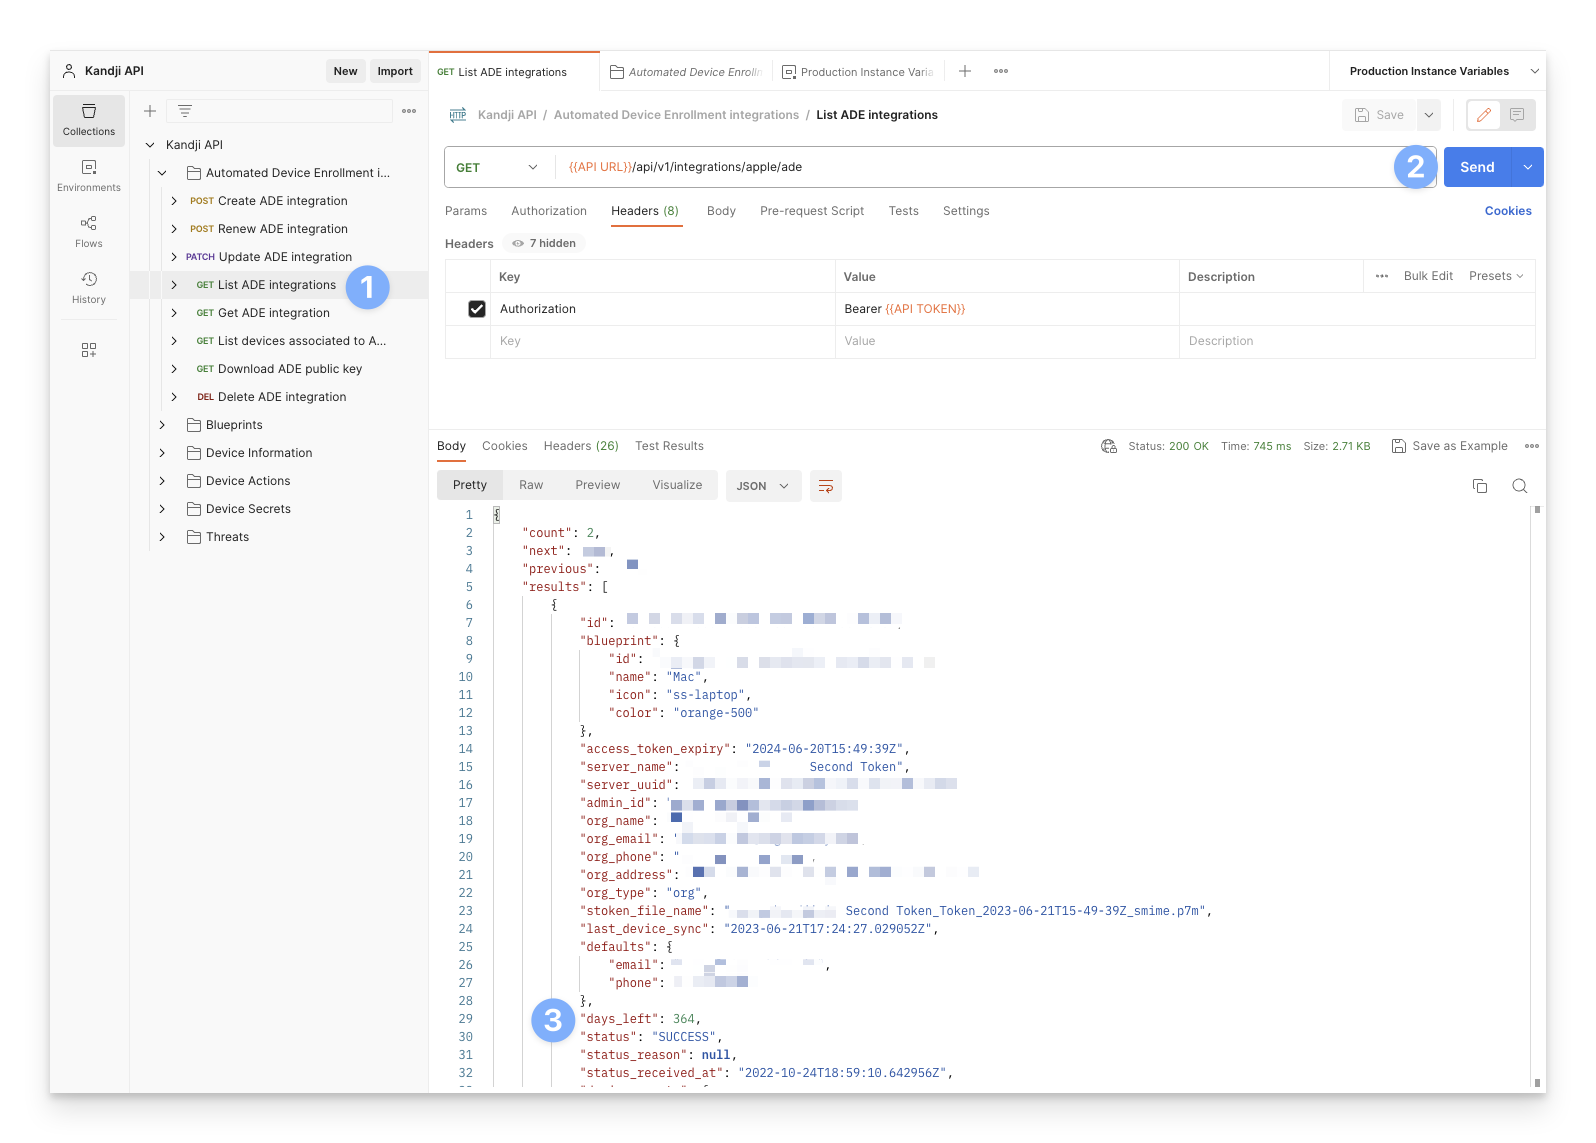
Navigate to Iru Endpoint API > Automated Device Enrollment Integrations > GET List ADE Integrations in the Collection.
Copy Token IDs
In the Body section of the Results, copy the top-level IDs of each Automated Device Enrollment token.
Create Token Variables
For each token ID, create an environment variable with a naming scheme such as
ade_token_1, ade_token_2, etc., incrementing the number for each token.Note Server Names
Make a note of the associated 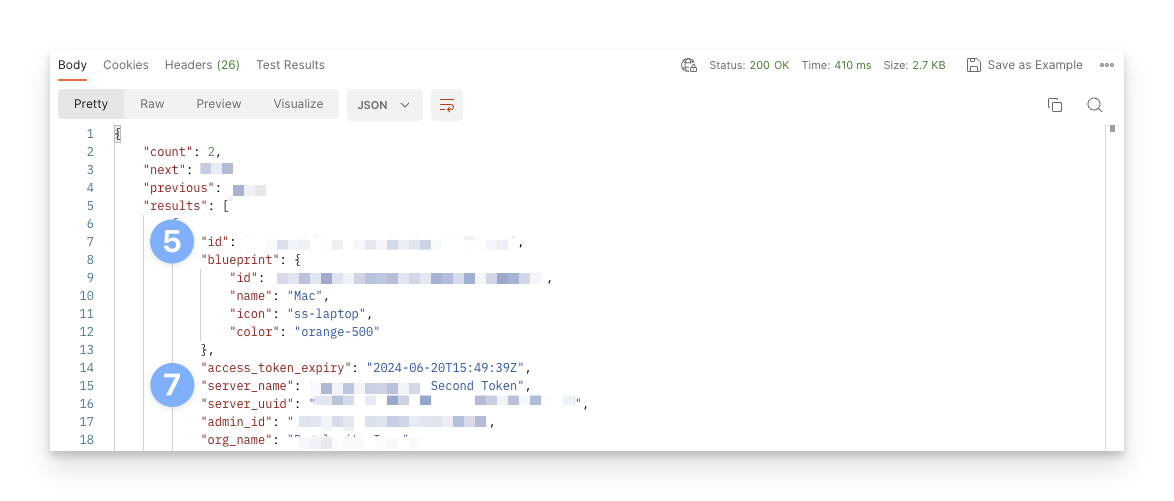
server_name for each token. You will need this information when downloading the tokens from Apple Business or Apple School Manager.Set Variable Values
Paste the ID value for each token into the corresponding
ade_token_# variable (e.g., ade_token_1, ade_token_2).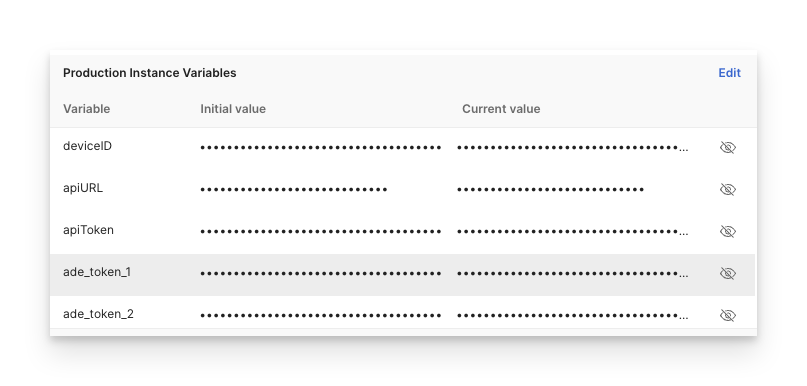
Downloading ADE Tokens
Access Apple Business or Apple School Manager
Sign in to your Apple Business or Apple School Manager account.
Select the matching device management service
In the Management Services list, select the service whose name matches the first ADE integration’s 
server_name from the list you made earlier in Postman.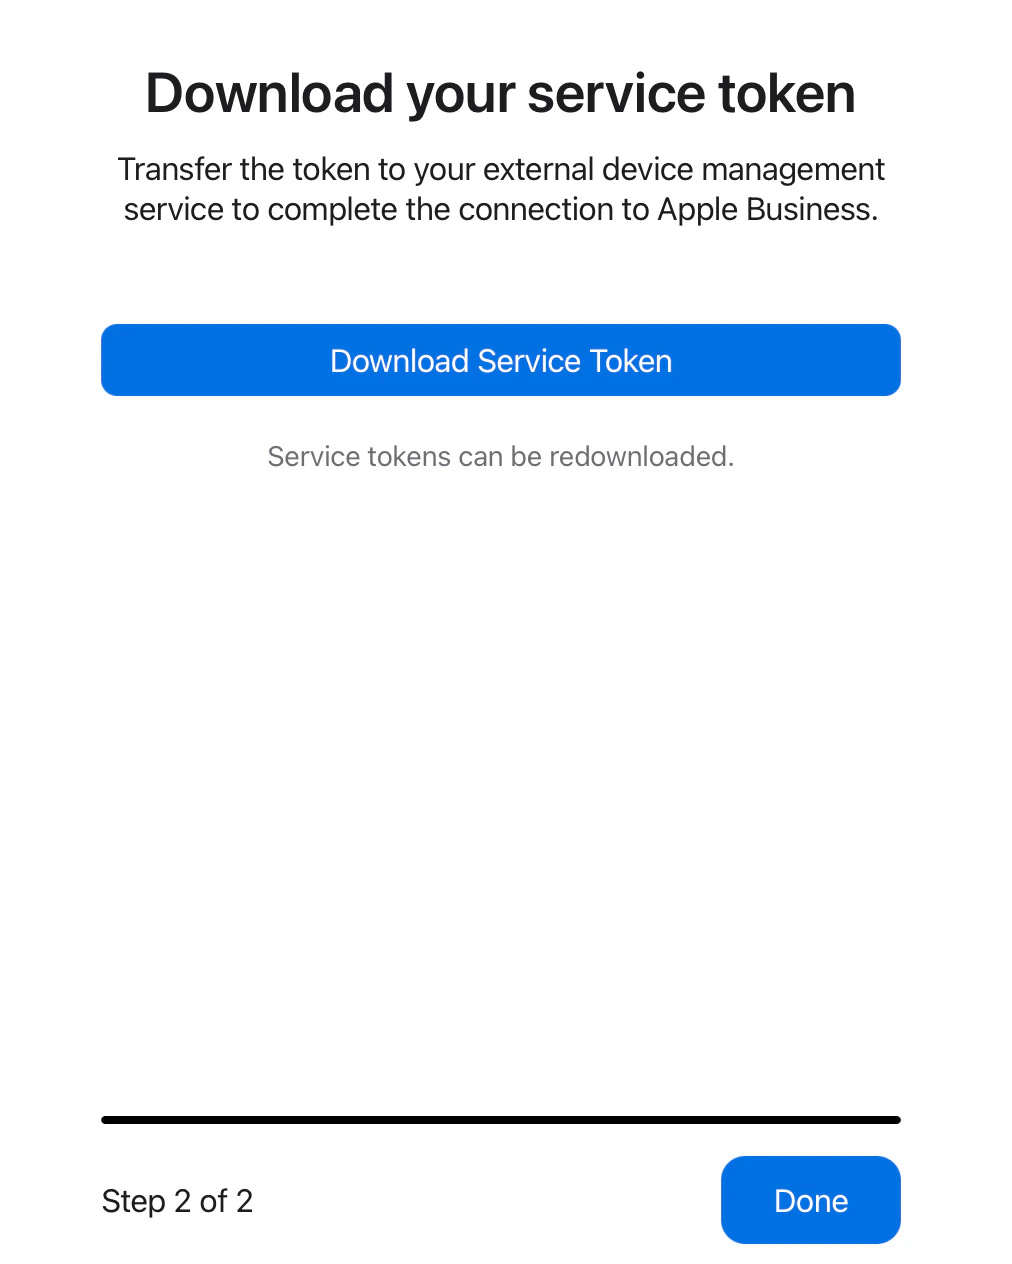
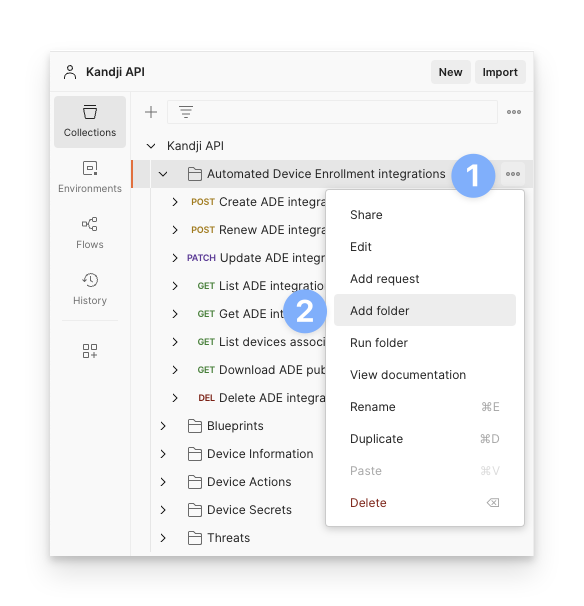
Creating Postman Folder Template
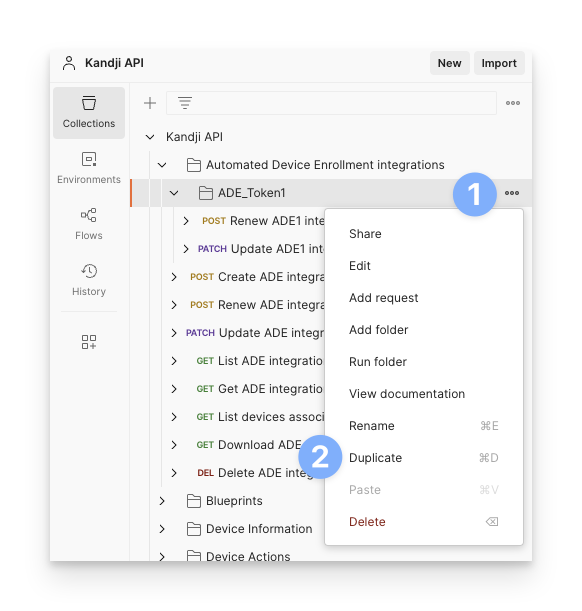
Creating folders in Postman will make it easier to keep track of your Automated Device Enrollment tokens.Access Folder Options
Click on the ellipsis next to the Automated Device Enrollment Integrations folder.
Select Integration Items
Navigate to the Automated Device Enrollment Integrations folder and select the Renew ADE Integration and Update ADE Integration items.
Modifying Renew Item
Rename Item
Rename it to Renew ADE1 Integration (or Renew ADE2 Integration, etc., based on your token number).
Update Address Bar
In the section to the right, click on the address bar to the left of the Send button.
Update Token Variable
Select the text inside
{{ade_token_ade}} and update it to {{ade_token_1}} (or {{ade_token_2}}, etc., based on your token number).Enter Token Details
Enter the 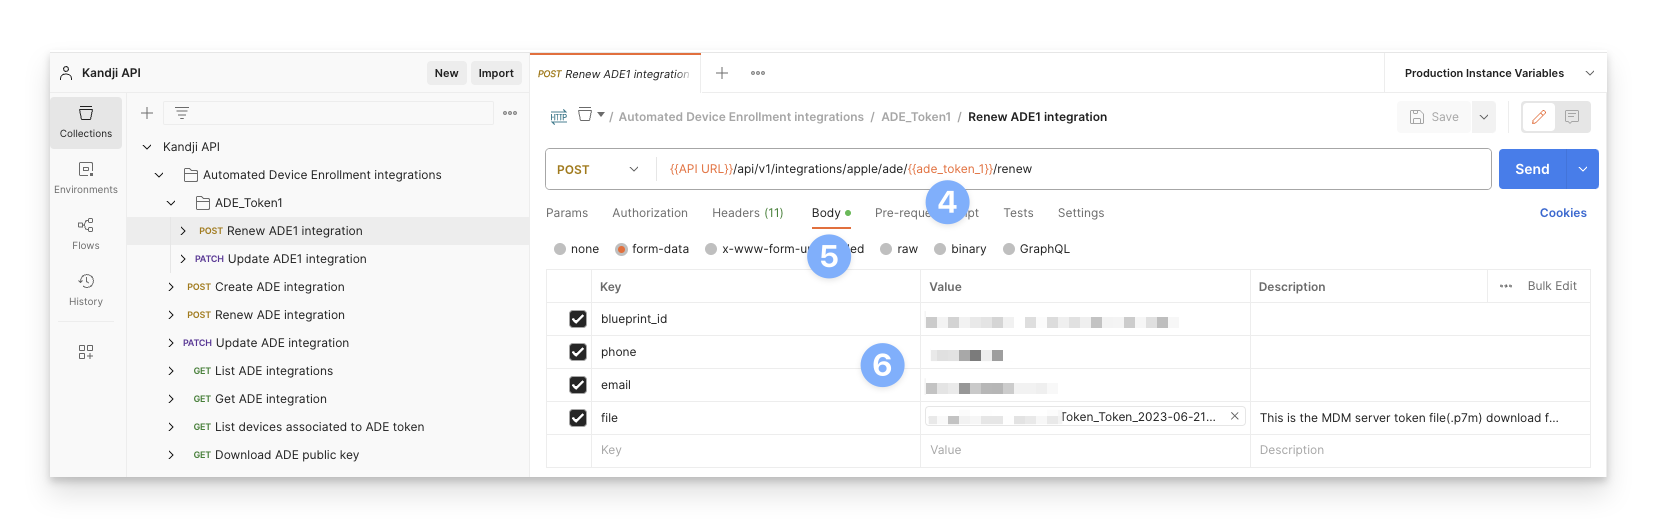
blueprint_id, phone, and email that should be associated with the token.Modifying Update Item
Rename Item
Rename it to Update ADE1 Integration (or Update ADE2 Integration, etc., based on your token number).
Update Address Bar
In the section to the right, click on the address bar to the left of the Send button.
Update Token Variable
Select the text inside
{{ade_token_ade}} and update it to {{ade_token_1}} (or {{ade_token_2}}, etc., based on your token number).Enter Update Information
This is where you can enter new
blueprint_id, phone, and email information.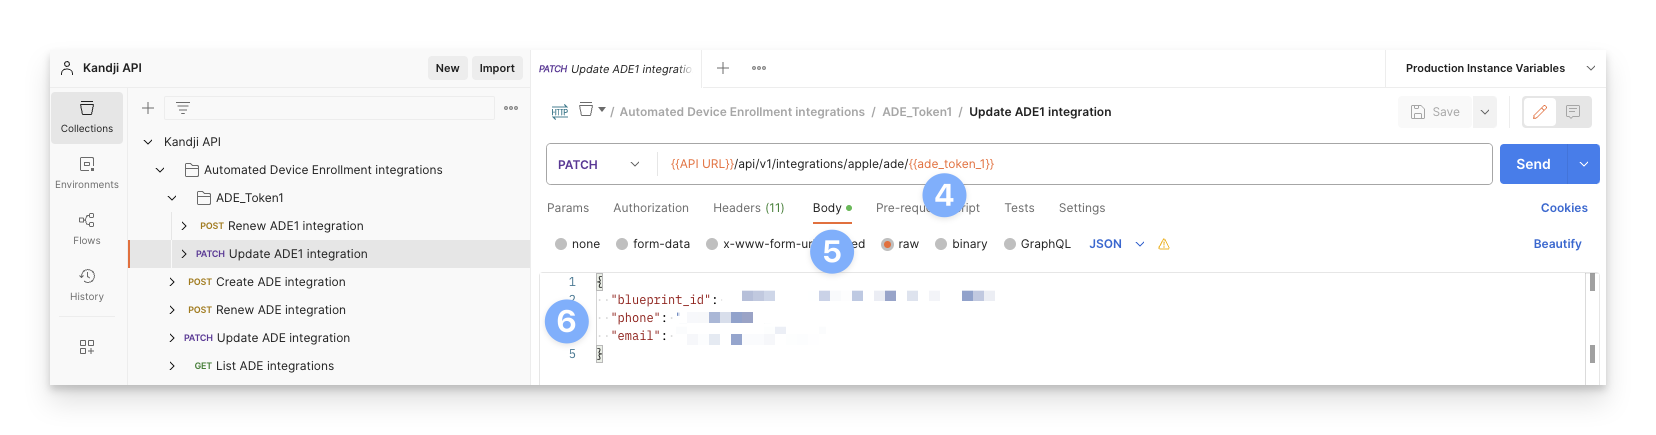
Duplicating ADE_Token Folder
Renewing ADE Integration
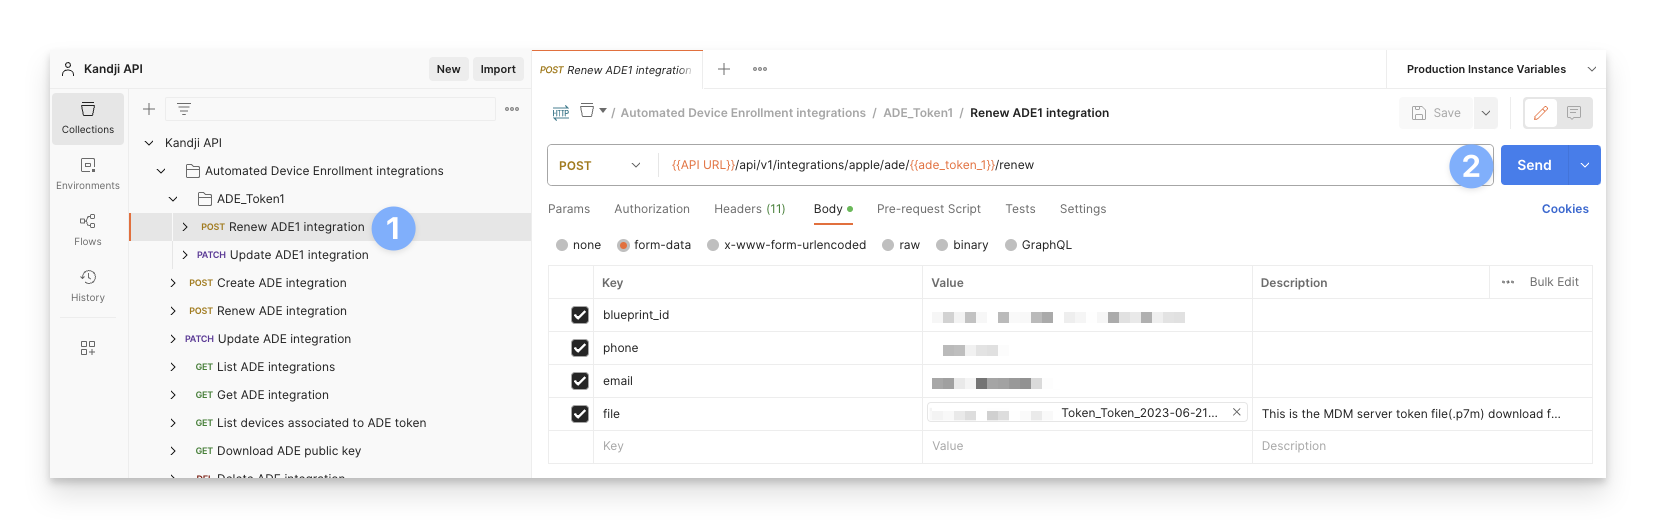
Now that everything is configured, you can send the Renew command.Select Renew Command
Navigate to the specific token folder you created (e.g., ADE_Token1, ADE_Token2, etc.) and select the Renew ADE1 Integration (or Renew ADE2 Integration, etc.) item that corresponds to your token number.
Updating ADE Integration
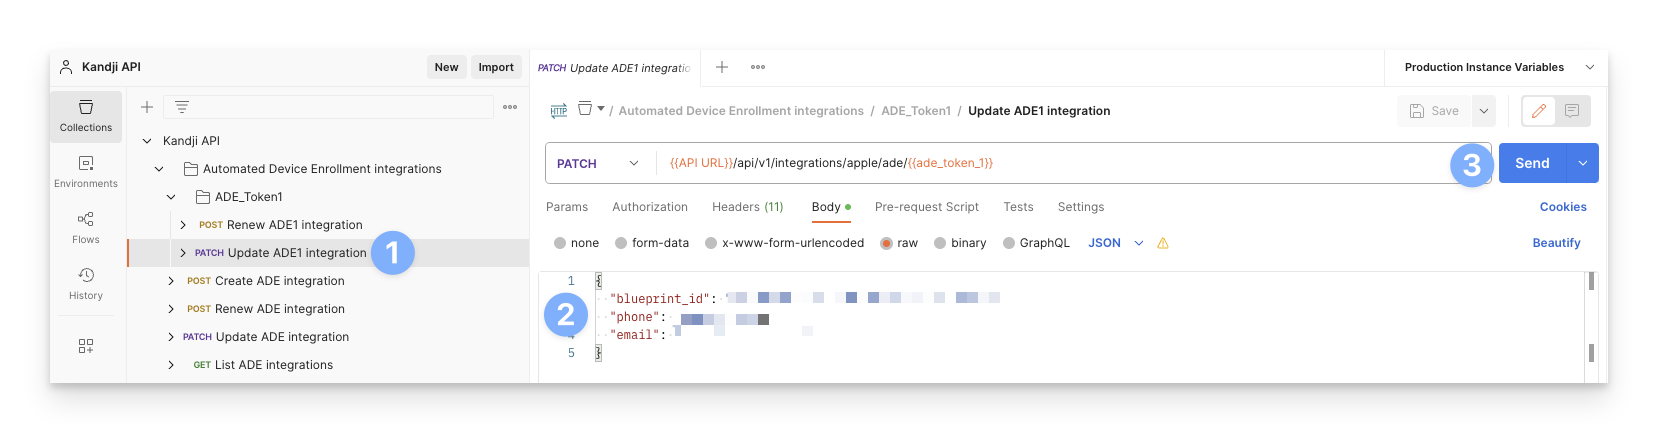
Updating the ADE Integration will allow you to change the associated Blueprint ID, phone number, and email address.Select Update Command
Navigate to the specific token folder you created (e.g., ADE_Token1, ADE_Token2, etc.) and select the Update ADE1 Integration (or Update ADE2 Integration, etc.) item that corresponds to your token number.
Checking Current Integrations
Iru Endpoint API > Automated Device Enrollment Integrations > GET List ADE Integrations command will give us all current ADE integrations so that we can verify that the integration was Renewed or Updated successfully.Select List Command
Select Iru Endpoint API > Automated Device Enrollment Integrations > GET List ADE Integrations in the Collection.
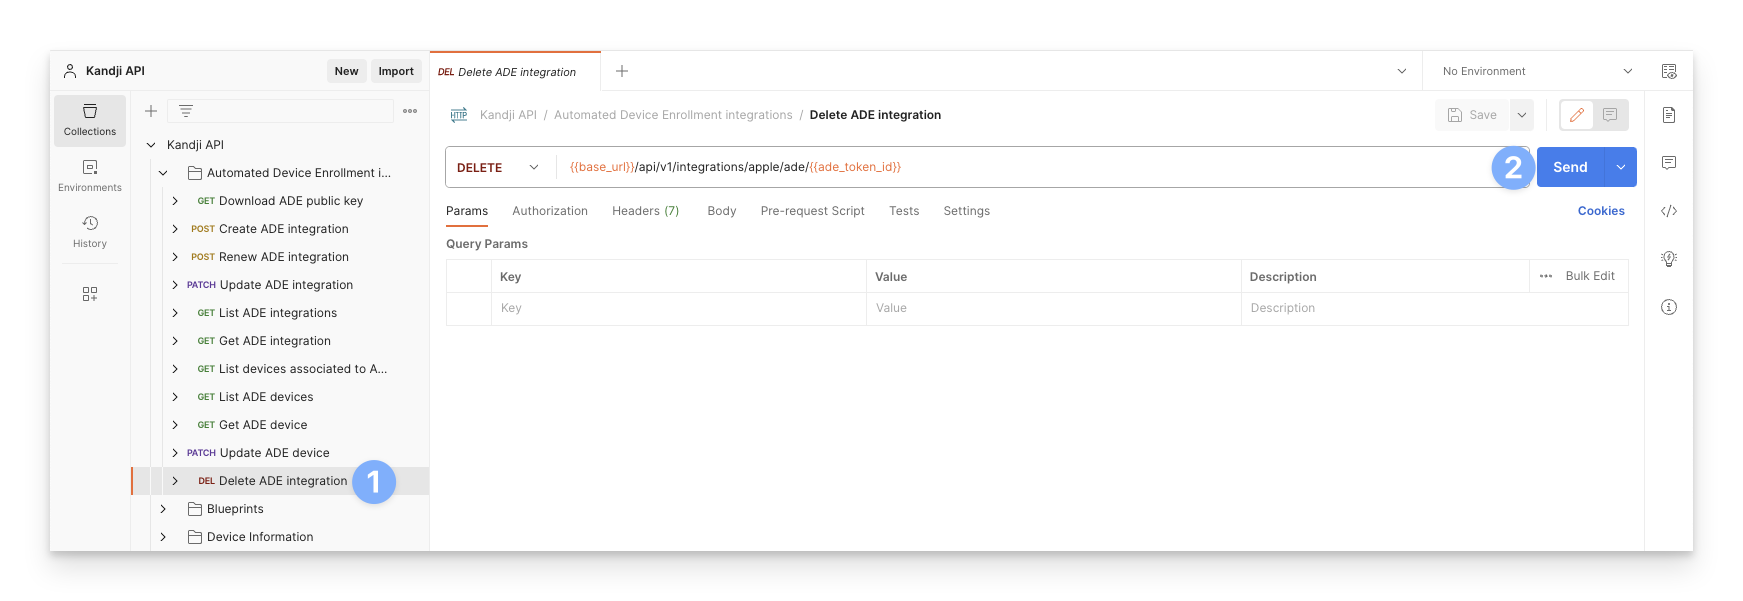
Deleting Integration
Iru Endpoint API > Automated Device Enrollment Integrations > DEL Delete ADE Integration command will delete the ADE integration associated with the supplied ADE Token ID.Select Delete Command
Select Iru Endpoint API > Automated Device Enrollment Integrations > DEL Delete ADE Integration in the Collection.
Considerations
API security, Postman, and environment setup
API security, Postman, and environment setup
- API Token Security: Ensure API tokens are stored securely and have appropriate permissions for ADE operations
- Postman Configuration: Proper Postman setup is essential for successful API operations
- Environment Variables: Use environment variables to manage multiple token IDs efficiently
- Error Handling: Be prepared to troubleshoot API errors and token validation issues
Tokens, files, and Apple portal access
Tokens, files, and Apple portal access
- Token Lifecycle: ADE tokens have expiration dates and require periodic renewal to maintain enrollment capabilities
- Token File Management: Keep track of downloaded .p7m files and associate them with correct token IDs
- Apple Business or Apple School Manager access: Ensure you can sign in to the portal and download tokens
- Verification Process: Always verify successful operations by checking integration status and token expiration
Bulk operations and access control
Bulk operations and access control
- Bulk Operations: Use folder templates to efficiently manage multiple tokens
- Access Control: Ensure only authorized personnel have access to token management operations
Testing, monitoring, and continuity
Testing, monitoring, and continuity
- Testing: Test operations on a small scale before performing bulk operations
- Monitoring: Regularly monitor token expiration dates and renewal schedules
- Documentation: Keep records of token configurations and associated server names
- Backup Strategy: Maintain backups of token configurations and API settings