

AD CS certificate deployment supports Mac computers, iPhone, iPad, Apple TV devices, and Apple Vision Pro
About Identity Certificates
In 802.1X authentication, identity certificates authenticate the client and the server. They are particularly significant in the EAP-TLS (Extensible Authentication Protocol-Transport Layer Security) method. EAP-TLS uses digital certificates to authenticate both the client (supplicant) and the server (authentication server). This mutual authentication guarantees that both parties trust each other’s identity before establishing a secure connection.Identity certificates can be used in both the Wi-Fi Library Item and Ethernet Library Item.
Configure an Identity Certificate
Certain types of authentication require or allow you to specify an identity certificate to verify the device’s identity. These certificates can come from various sources. For network authentication, make sure the identity certificates include the Client Authentication entitlement in their Extended Key Usage (EKU). Work with your network administrator to ensure the certificate service and templates are properly configured for your network. If you use Microsoft Active Directory Certificate Services, you can issue identity certificates through the AD CS integration overview. AD CS servers are added during AD CS integration configuration, and certificate requests rely on the configured AD CS computer certificate template.Obtain an identity certificate using AD CS
You can obtain identity certificates using Microsoft Active Directory Certificate Services.To deploy AD CS certificates, the AD CS integration must be configured first.
1
Select AD CS identity source
For Identity certificate, choose AD CS Certificate.
2
Open AD CS configuration
Select Configure AD CS Certificate to open the AD CS configuration drawer.
3
Enter certificate name
Enter a Certificate name. This appears on the configuration profile in System Settings.
4
Enter certificate subject
Enter a Certificate subject. This usually identifies the device within the certificate authority. You can use a static value or a global variable such as
$SERIAL_NUMBER.5
Configure subject alternative names
Add any required Subject Alternative Names (SANs) to send in the certificate request.
6
Add strong mapping URI when required
To support strong certificate mapping requirements from Windows update KB5014754, add this URI SAN value:
$ADCS_STRONG_MAPPING_ID. For full guidance, see Active Directory Strong Certificate Mapping Configuration.7
Set template and AD CS server
Enter the Template name for the AD CS computer certificate template used to generate AD CS certificates, then select an AD CS server from the dropdown.
8
Select key size and private key options
Select a Key size. Optionally choose Allow apps to access the private key and Prevent the private key data from being extracted from the keychain based on your security requirements.
9
Save configuration
Select Done.
Obtain an Identity Certificate Using SCEP
Using the Simple Certificate Enrollment Protocol (SCEP), you can obtain identity certificates.1
Select SCEP Certificate Type
If you wish to have the client device acquire an identity certificate from a SCEP service, choose SCEP for an Identity certificate.
2
Configure SCEP Certificate
Select Configure SCEP Certificate. A drawer opens to allow you to configure SCEP options.
3
Configure SCEP Server Details
Enter the URL for the SCEP server for URL. Optionally, specify a Name as needed by your SCEP server (often the name of the CA where the SCEP service is requesting a certificate). Optionally, enter the pre-shared key as the Challenge the SCEP server expects. Optionally, enter the expected Fingerprint of the certificate authority’s certificate.
4
Configure Certificate Subject
Optionally, provide the name you want to appear as the certificate identity’s Subject. You can use a static value or a global variable, such as CN=$EMAIL.
5
Configure Subject Alternative Names
Select Specify Subject Alternative Names (SAN) if you want to provide SANs for the certificate identity. For each SAN you would like to provide, select Add SAN Type, select the SAN type you want to add: DNS Name, RFC 822 Name, Uniform Resource Identifier, or NT Principal Name, and enter the associated value you would like to add for each SAN type. You can use a static value or use a global variable.
6
Configure Key Settings
Choose the Key size. Work with your network administrator to ensure you choose a compatible key size; longer keys generally provide stronger security. For Key usage, choose whether to allow the keys to be used for Signing, Encryption, Both signing and encryption, or None. Work with your network administrator to determine which entitlements are necessary.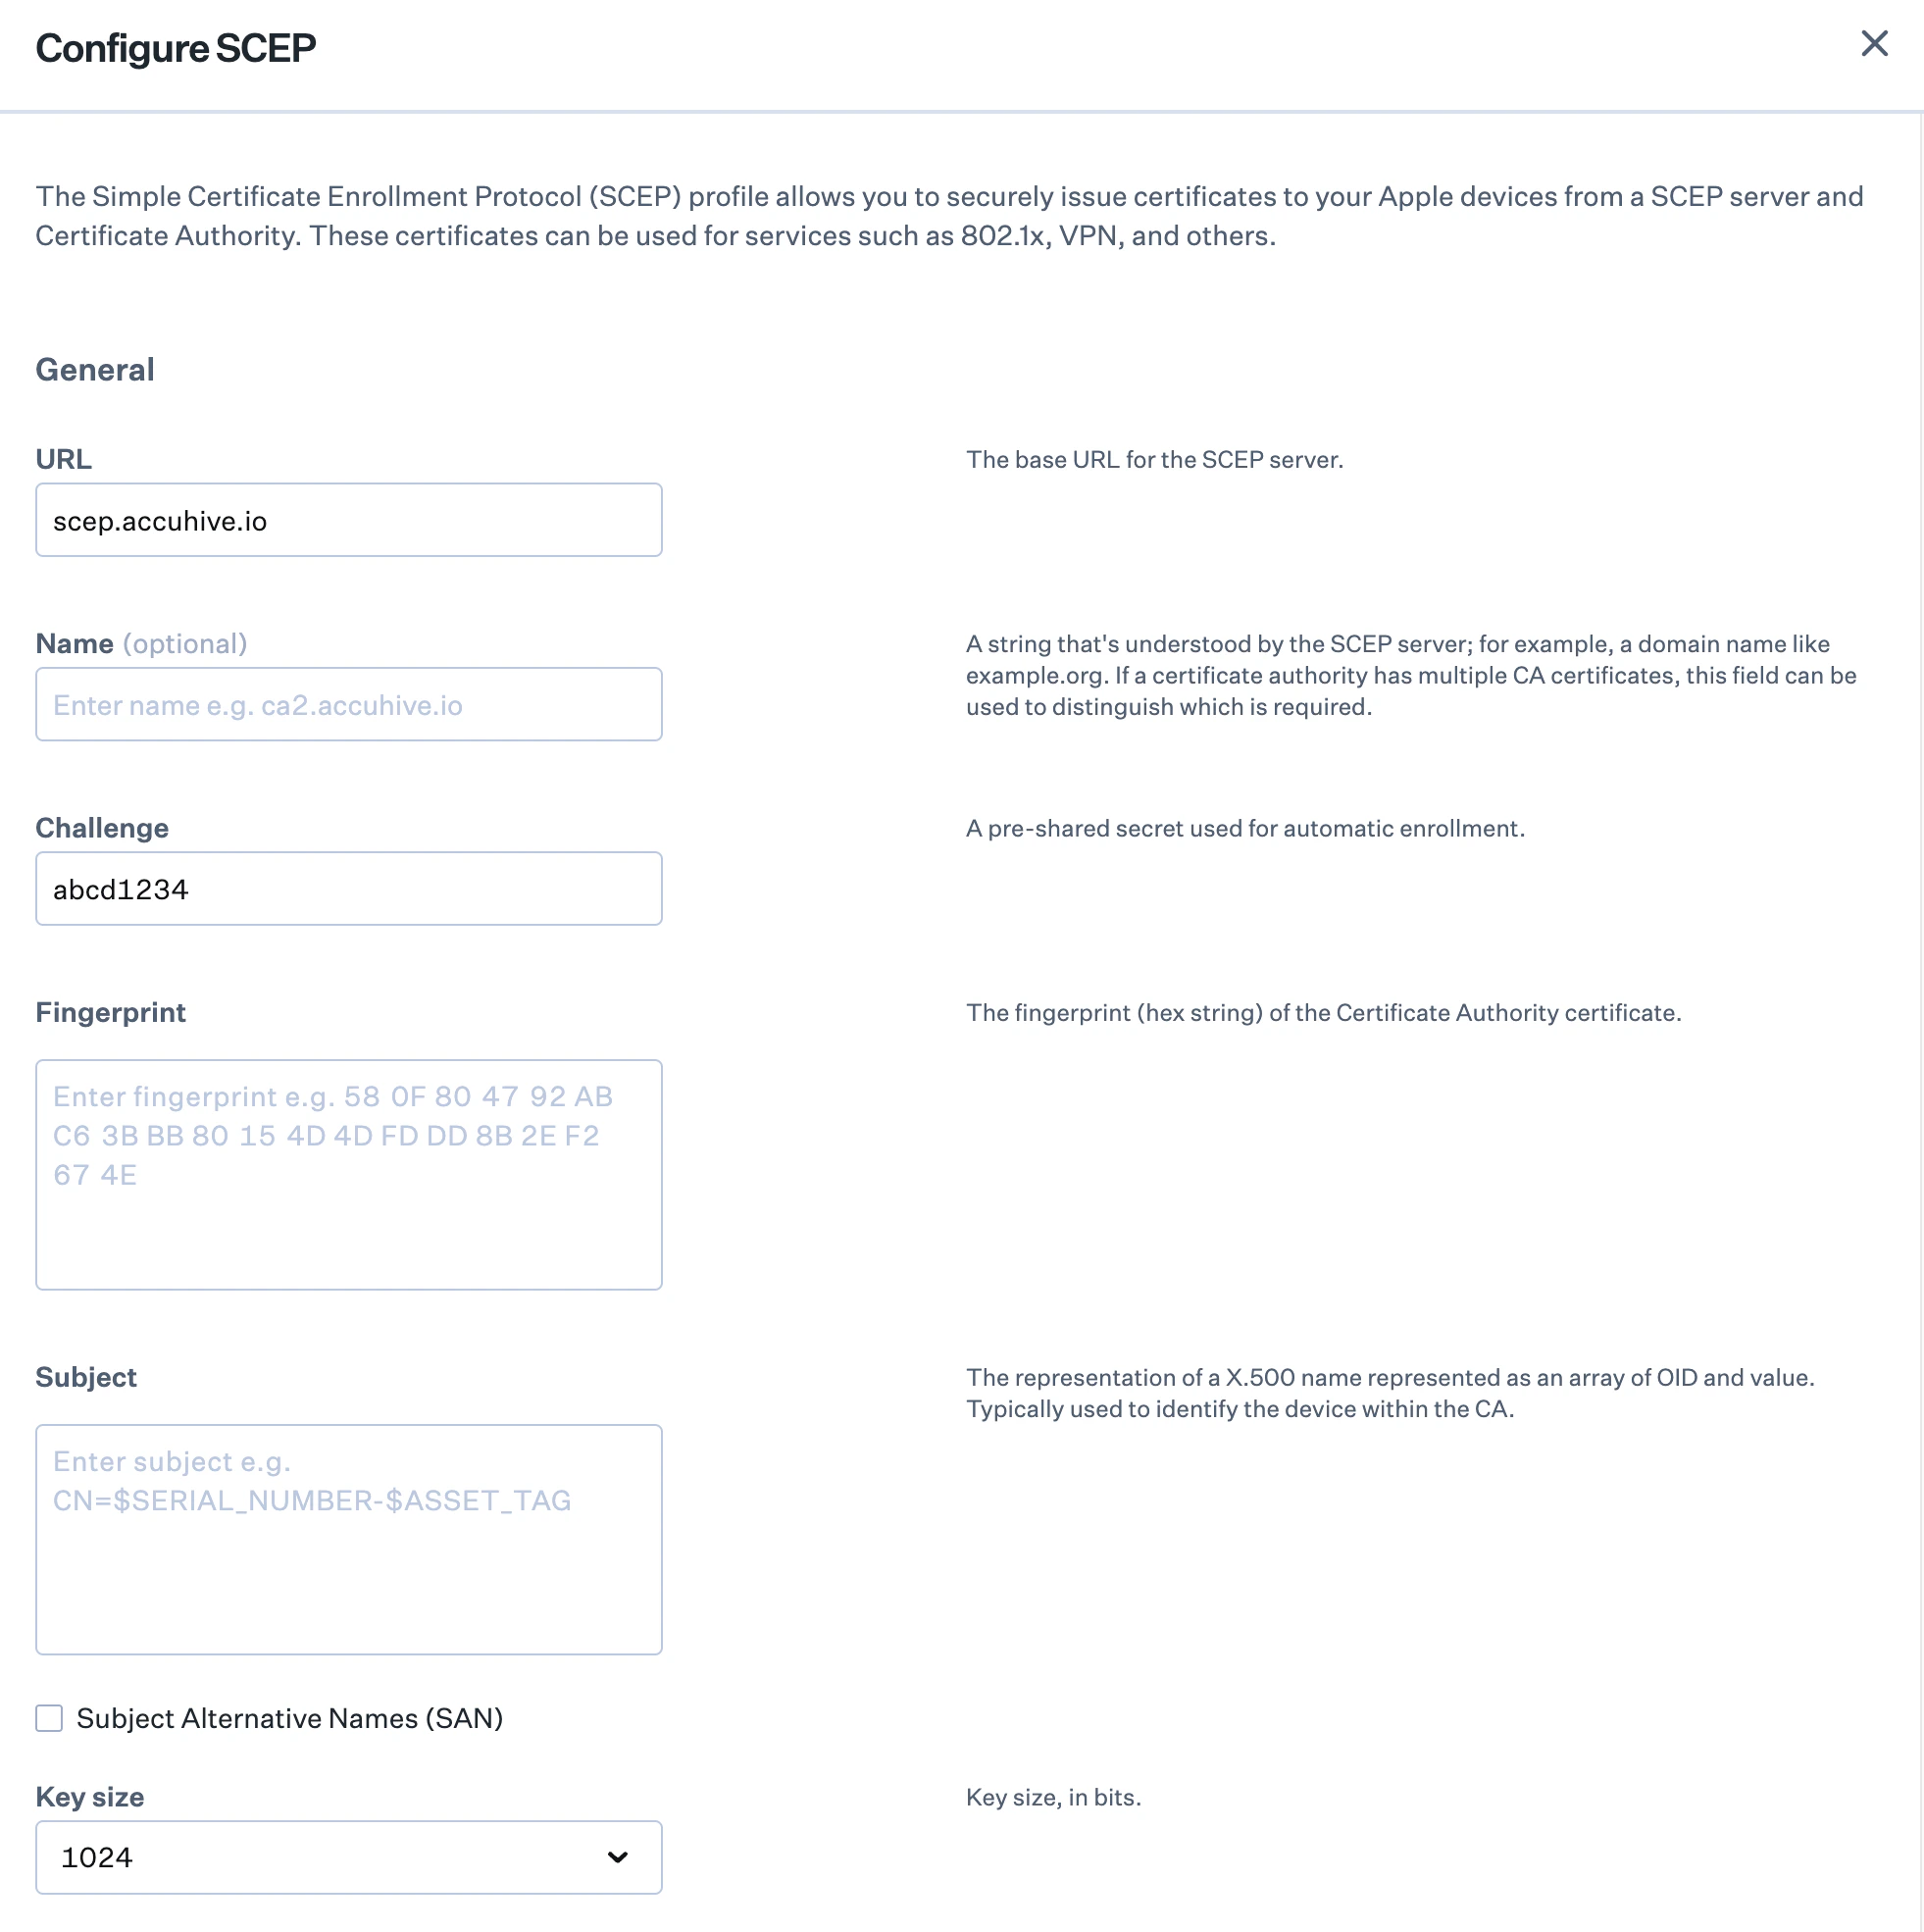
7
Configure Retry Settings
If you want the device to retry obtaining a certificate if the first attempt fails automatically, select Retries, then enter the number of retries to attempt. The default is 3. If you want to introduce a delay between retries, select Retry delay and specify the number of seconds between retries. The default is a 10-second delay between retries.
8
Configure Security and Access Settings
Select Don’t allow key to be extracted to prevent exporting the certificate identity’s private key from the macOS Keychain. Select Allow access to all apps if you want to automatically allow all apps to access and use the certificate identity’s private key.
9
Configure Certificate Management
Select Certificate expiration notification and specify the number of days before the certificate expires to start notifying the user. The default is to notify the user 14 days before expiration. Select Automatic profile redistribution to automatically renew the certificate the specified number of days before it expires. The default is to automatically renew the certificate 30 days before expiration.
When Automatic profile redistribution is enabled, specify a user global variable in the Subject Alternative Names (SAN) if user information is required in the certificate. This is necessary because the Wi-Fi Library Item ID is added to the Common Name in the certificate’s subject to track certificate renewal.
10
Save SCEP Configuration
Select Done to save the SCEP certificate configuration.
Import a PKCS #12 File
You can provide a single identity certificate for all configured devices by uploading a PKCS #12 formatted file. This means all devices will use the same certificate, making it harder for network administrators to identify individual devices by their login. However, it also means that if the certificate is compromised, it can be used to access the network. Revoking this certificate will block all configured devices from accessing the network.1
Select PKCS #12 Certificate Type
If you wish to provide a certificate in PKCS #12 format, choose PKCS #12 for the Identity certificate.
2
Configure PKCS #12 Certificate
Select Configure PKCS #12 to open the Configure PKCS #12 drawer.
3
Upload certificate
Upload the PKCS #12 encoded certificate for Certificate (drag file or choose file). Accepted file types are
.p12 and .pfx.4
Enter certificate password
In the Certificate password field, enter the password for the certificate.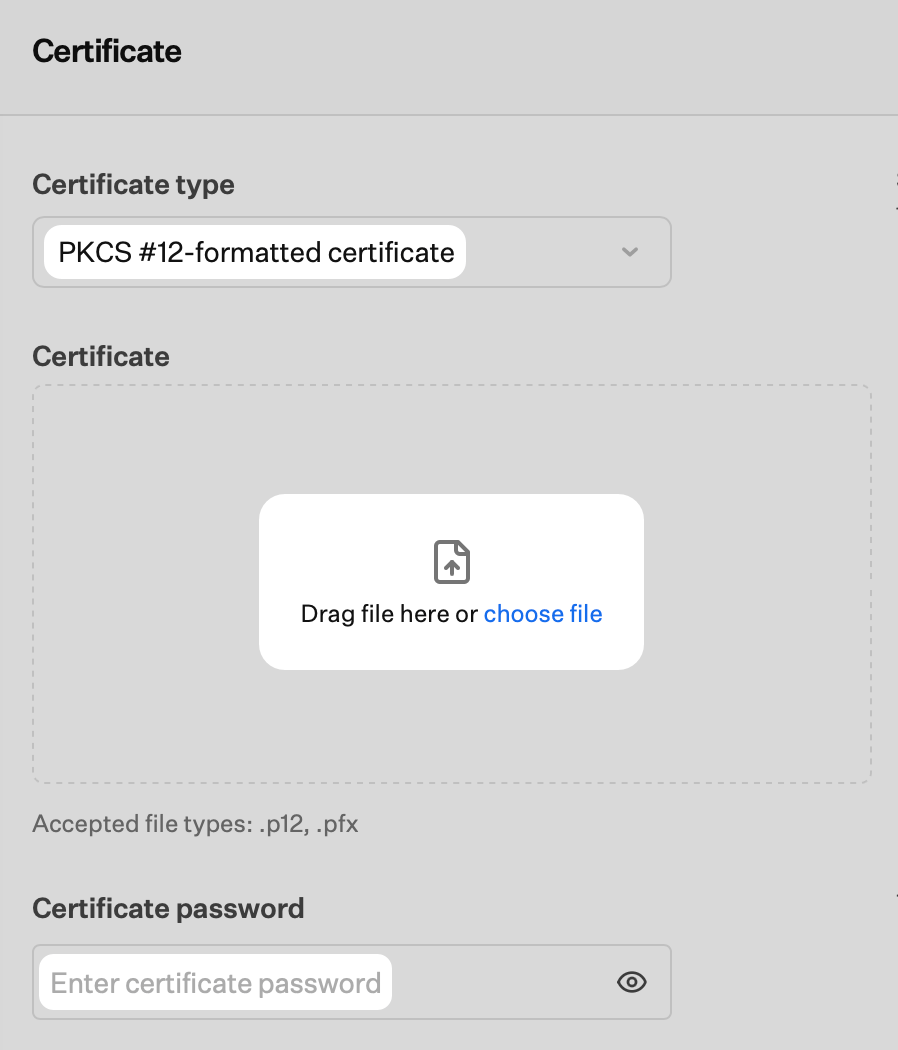
5
Configure Apple only settings
Expand Apple only settings, then configure the following as needed: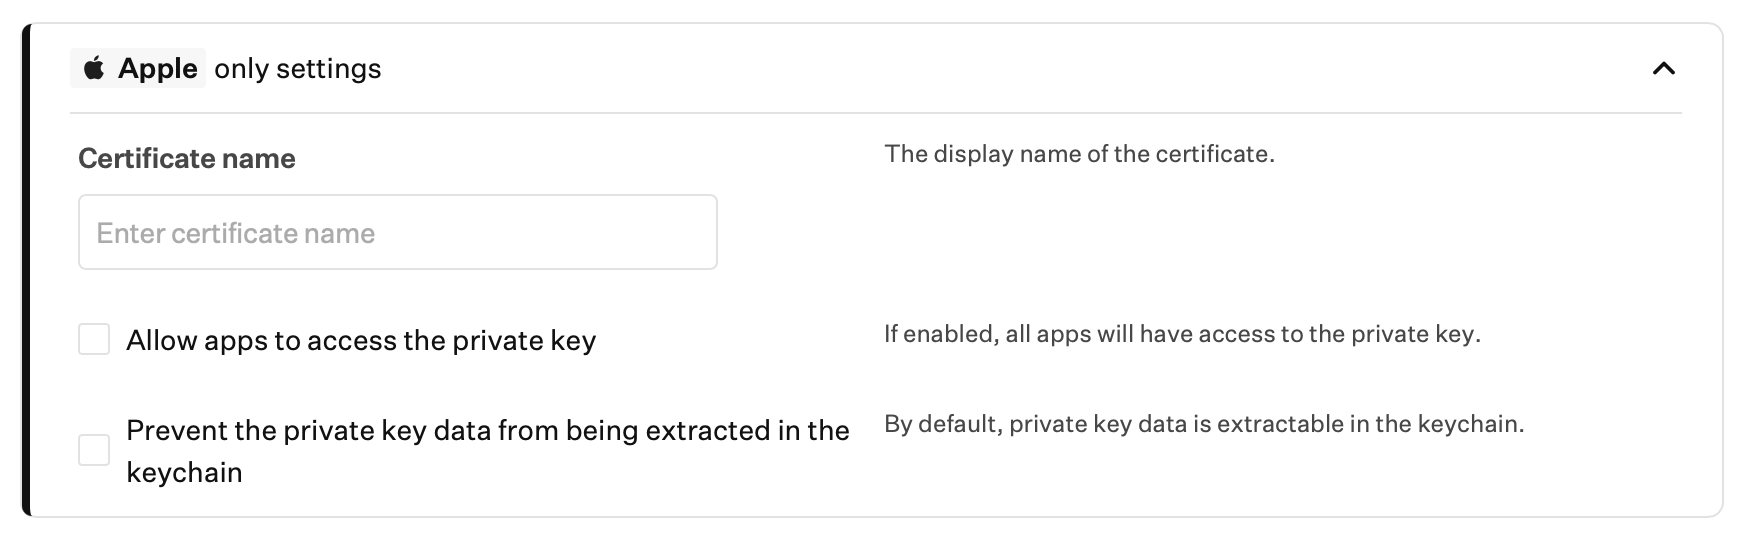
- Certificate name: Enter the display name of the certificate.
- Allow apps to access the private key: Select this option if you want all apps to have access to the private key.
- Prevent the private key data from being extracted in the keychain: Select this option if you do not want private key data to be extractable from the keychain. By default, private key data is extractable.
6
Complete the configuration
Select Done to complete the PKCS #12 certificate configuration.
Related Articles
Network Authentication Overview
Compare Wi-Fi authentication types and when to use enterprise vs non-enterprise options
Configure the Wi-Fi Library Item
Configure the Wi-Fi Library Item for network deployment
Configure the Ethernet Library Item
Configure 802.1X authentication for wired networks
Configure EAP Extensible Authentication Protocol Types
Configure EAP types for 802.1X authentication