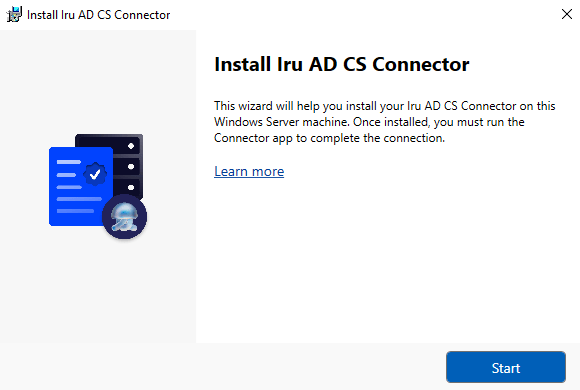
About the AD CS Connector
This article explains how to install and register the Iru Endpoint AD CS Connector on a domain-joined Windows Server. The Connector does not install on Mac computers or Windows client endpoints. After the Connector is Active and Connected in Iru Endpoint, AD CS-issued certificates are delivered to enrolled Mac computers and Windows devices through Library Items. For updating an updated Connector on Iru Endpoint or migrating from Kandji with AD CS, see Updating the Iru AD CS Connector and Migrating from Kandji to Iru with AD CS in AD CS Integration: Overview.How It Works
The Connector uses the WebSocket protocol over TCP port 443 for a persistent connection to Iru Endpoint and the Microsoft Remote Procedure Call (RPC) framework to communicate with your AD CS deployment. After registration, the Connector fulfills certificate requests initiated from Iru Endpoint.Prerequisites
Confirm the following before you install the Connector on Windows Server.AD CS certificate templates
AD CS certificate templates
Network paths and firewall rules
Network paths and firewall rules
subdomain.gateway.iru.com, subdomain.gateway.eu.iru.com, subdomain.clients.*), and adcsconn endpoints as documented there. Do not rely on Auth0 allowlists alone for the updated Connector. Your network must allow traffic between Iru Endpoint, the Connector host, and AD CS, including HTTPS from the Connector to Iru Endpoint without SSL inspection breaking that path.Legacy Connector still on the network
Legacy Connector still on the network
SSL inspection
SSL inspection
Integration started and installer source
Integration started and installer source
Connector host: OS, .NET, TPM, WebView, domain
Connector host: OS, .NET, TPM, WebView, domain
Windows Server and Iru admin access
Windows Server and Iru admin access
AD CS Connector Server Requirements
Install on a physical or virtual Windows Server that meets the following:Operating system
Operating system
.NET
.NET
TPM or vTPM
TPM or vTPM
WebView runtime
WebView runtime
Active Directory domain
Active Directory domain
Installation
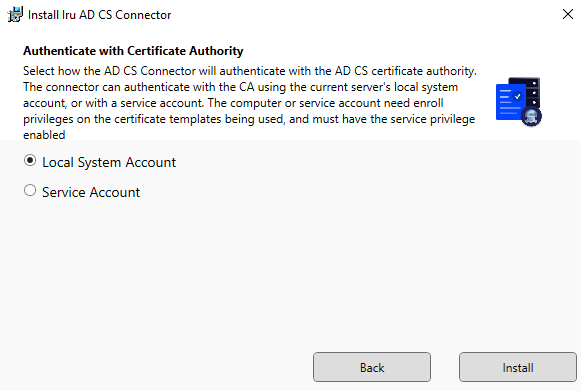
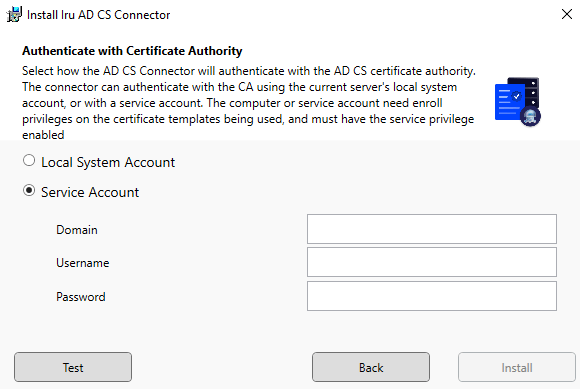
Configure Authentication
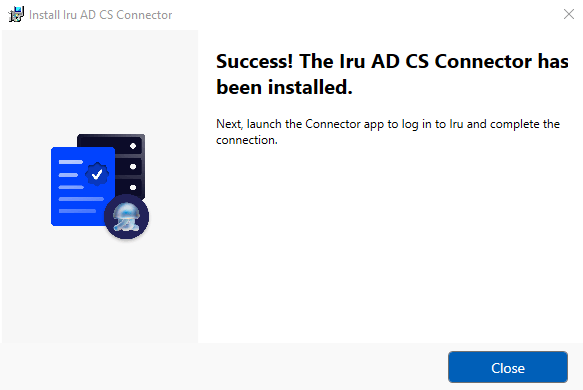
Initialization
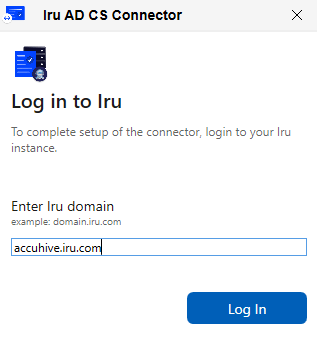
Launch Connector application
Enter tenant URL
Open the registration URL
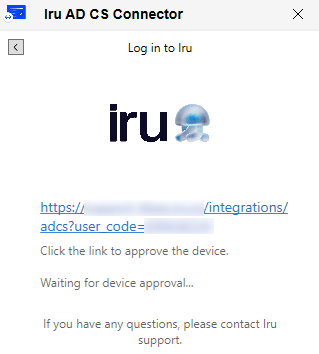
If registration URL is unavailable
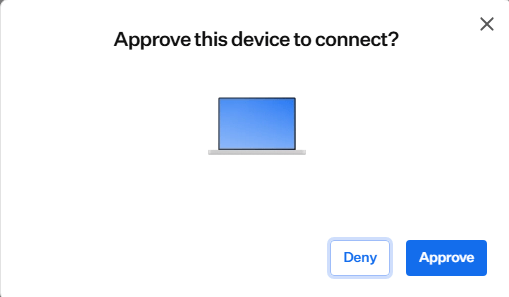
Approve registration in Iru Endpoint
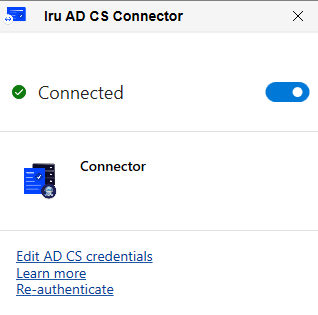
Confirm Connector status
Add issuing CAs and assign servers
Add AD CS servers and assign them to the Connector
When the Connector is Active in Iru Endpoint and Connected from the Windows host:Add each issuing CA
ca_server_fqdn\issuing_ca_name in Server name (for example, subordinateca.example.com\Contoso Issuing CA). The issuing CA name appears in the Certificate Authority console on the issuing CA server. Click Add for each server. New servers show Disconnected until you assign them to an Active, Connected Connector.Deliver certificates to Mac computers and Windows devices
When at least one Connector is Active and Connected, and your AD CS servers are assigned, Iru Endpoint can deliver AD CS-backed Library Items to enrolled devices.Select a certificate-capable Library Item
Configure AD CS settings
Assign to Blueprints
Next Steps
After the Connector is Active, Connected, and AD CS servers are assigned:Add strong certificate mapping when required
Create or update Library Items
Review the AD CS rollout order (optional)
Add another Connector host
Open the integration
Install on the additional server
Updating the AD CS Connector
On Windows Server, upgrading the Iru Endpoint AD CS Connector on an Iru tenant uses the workflow in Updating the Iru AD CS Connector in AD CS Integration: Overview. If you are moving from Kandji with AD CS, follow Migrating from Kandji to Iru with AD CS instead. That path includes tenant upgrade, uninstalling the legacy Connector, and registering the updated Connector.Uninstalling the AD CS Connector
You can remove the Connector and Edge runtime from Control Panel > Programs and Features. On Windows Server 2019 and later, you can use Settings > Apps > Installed apps instead.Open Programs and Features or Installed apps
Confirm Uninstallation
Troubleshooting
Connector shows Something went wrong
Connector shows Something went wrong
C:\ProgramData\iru and contact Iru Support.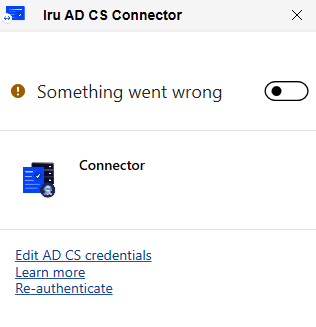
Authentication fails or the Connector shows Try Again
Authentication fails or the Connector shows Try Again
- Close Iru Endpoint AD CS Connector from the Windows notification area or Task Manager.
- Open File Explorer and go to
%LOCALAPPDATA%\Iru(for exampleC:\Users\<username>\AppData\Local\Iru). - Delete all files and folders inside Iru.
- Open Iru Endpoint AD CS Connector again and repeat Initialization, starting at Enter tenant URL.
C:\ProgramData\iru for this step. That directory stores Connector logs and service files, not WebView sign-in cache. See Review data directory contents in this section.If authentication still fails after you clear %LOCALAPPDATA%\Iru, collect logs from C:\ProgramData\iru and contact Iru Support.Connector stays Pending in Iru Endpoint
Connector stays Pending in Iru Endpoint
Registration URL expired when you approve registration
Registration URL expired when you approve registration
C:\ProgramData\iru if needed) using Uninstalling the AD CS Connector. Then download the latest installer from Integrations > Active Directory Certificate Services and repeat Installation and Initialization on that host.Cannot assign AD CS servers
Cannot assign AD CS servers
Connector shows Connected but devices do not receive certificates
Connector shows Connected but devices do not receive certificates
Check installation path
Check installation path
C:\Program Files\Iru\AD CS Connector.Review data directory contents
Review data directory contents
C:\ProgramData\iru. This is a hidden directory on the Windows server.Inspect Windows event logs
Inspect Windows event logs
Event Viewer > Applications and Services Logs > Iru.Enable Windows installer logging
Enable Windows installer logging
Validate Connector service status
Validate Connector service status
services.msc).Restart the Connector process
Restart the Connector process
Best Practices
Maintain reliable network paths
Disable SSL inspection
Use a dedicated service account
Keep the updated Connector current
Considerations
Use the correct Iru Endpoint tenant
Use the correct Iru Endpoint tenant
Active Directory domain binding
Active Directory domain binding
Check Connector logs for troubleshooting
Check Connector logs for troubleshooting
C:\ProgramData\iru on the Windows server (this directory is hidden by default). Use these logs together with the Connector application and Windows Event Viewer when you diagnose connection, authentication, or certificate issues.Confirm TPM status in PowerShell
Confirm TPM status in PowerShell
Get-Tpm. Confirm TpmPresent, TpmEnabled, and TpmActivated reflect a usable TPM. For property definitions, see the Microsoft Get-Tpm reference. For VMs, confirm vTPM is enabled in the hypervisor settings. If TPM is unavailable, resolve firmware, hypervisor, or guest settings before production use.If Connector logs include System.Security.Cryptography.CryptographicException with the following message, TPM may not be enabled or ready for use; rerun the checks above and review firmware settings: