This Library Item is available for Mac computers
What is Liftoff?
Liftoff is a feature designed to streamline and enhance the initial setup experience for Mac computers. It automates the configuration process, ensuring that freshly enrolled Mac computers are transformed into enterprise-ready devices with all necessary apps, settings, and security controls in place before the user starts using them.How Liftoff Works
If you use Automated Device Enrollment (ADE) and want specific Library Items to install during Setup Assistant before Liftoff, configure Install Library Items during Setup Assistant in the Automated Device Enrollment Library Item. See Install Library Items during Setup Assistant in Configuring Apple Enrollment for how that option differs from Liftoff and how both behave when assigned to the same Blueprint.
- Custom Scripts
- Custom Printers
- Custom Apps
- Auto Apps
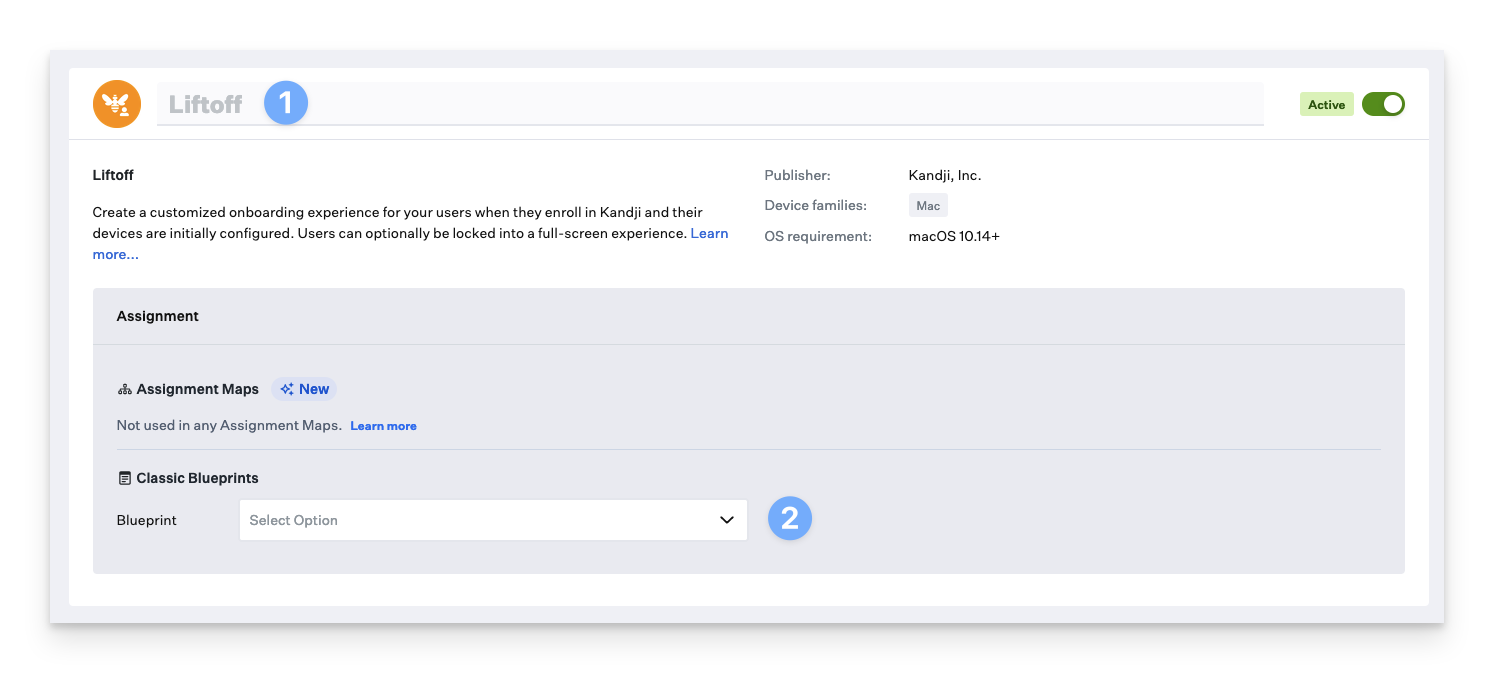
Create a Liftoff Library Item
Custom Apps or Custom Scripts that wait on user input can potentially be blocked from view and cause Liftoff to hang until the agent check-in times out.
Select Enrollment Trigger
Select your Enrollment trigger. The available options include:
- All enrollments: Liftoff will be presented regardless of enrollment type
- Automated Device Enrollment only: Liftoff will only be presented to devices enrolled via Automated Device Enrollment
- Manual enrollment only: Liftoff will only be presented to devices enrolled via Manual device enrollment
Upload Logo
Upload a Logo—a graphic that will appear in the upper-left corner of Liftoff. This is optional. The default image is for light mode.
- If you also wish to include an icon for dark mode, select Add Dark mode logo after uploading your light mode logo. This icon will be used instead of the main logo when the user enables Dark Mode.
Select Display Mode
Select a Display mode. We recommend using Window mode for initial testing for easy troubleshooting. Your display mode options are:
- Full screen: Liftoff will be presented in Full screen mode and will prevent the use of the Mac until the initial agent check-in is completed. You can use the exit password to exit Liftoff early
- Window: Liftoff will be presented in windowed mode. This will not prevent the use of the Mac, but Liftoff will be locked to the forefront. You can use the exit password to exit Liftoff early
Configure Exit Password
An Exit password is automatically generated. Learn how to use the exit password above. Users can exit Liftoff by pressing Cmd+Shift+K+J+D.
Generate new password
To replace the existing exit password, click Generate new password and then click Save. A replaced exit password is not logged.
Customize Install Screen
Customize the Install screen header and subheader; see the Customize the Install Screen section below.
Switch to Light Mode or Dark Mode preview (Install screen)
Switch between Light Mode and Dark Mode previews to see how the Install screen will appear.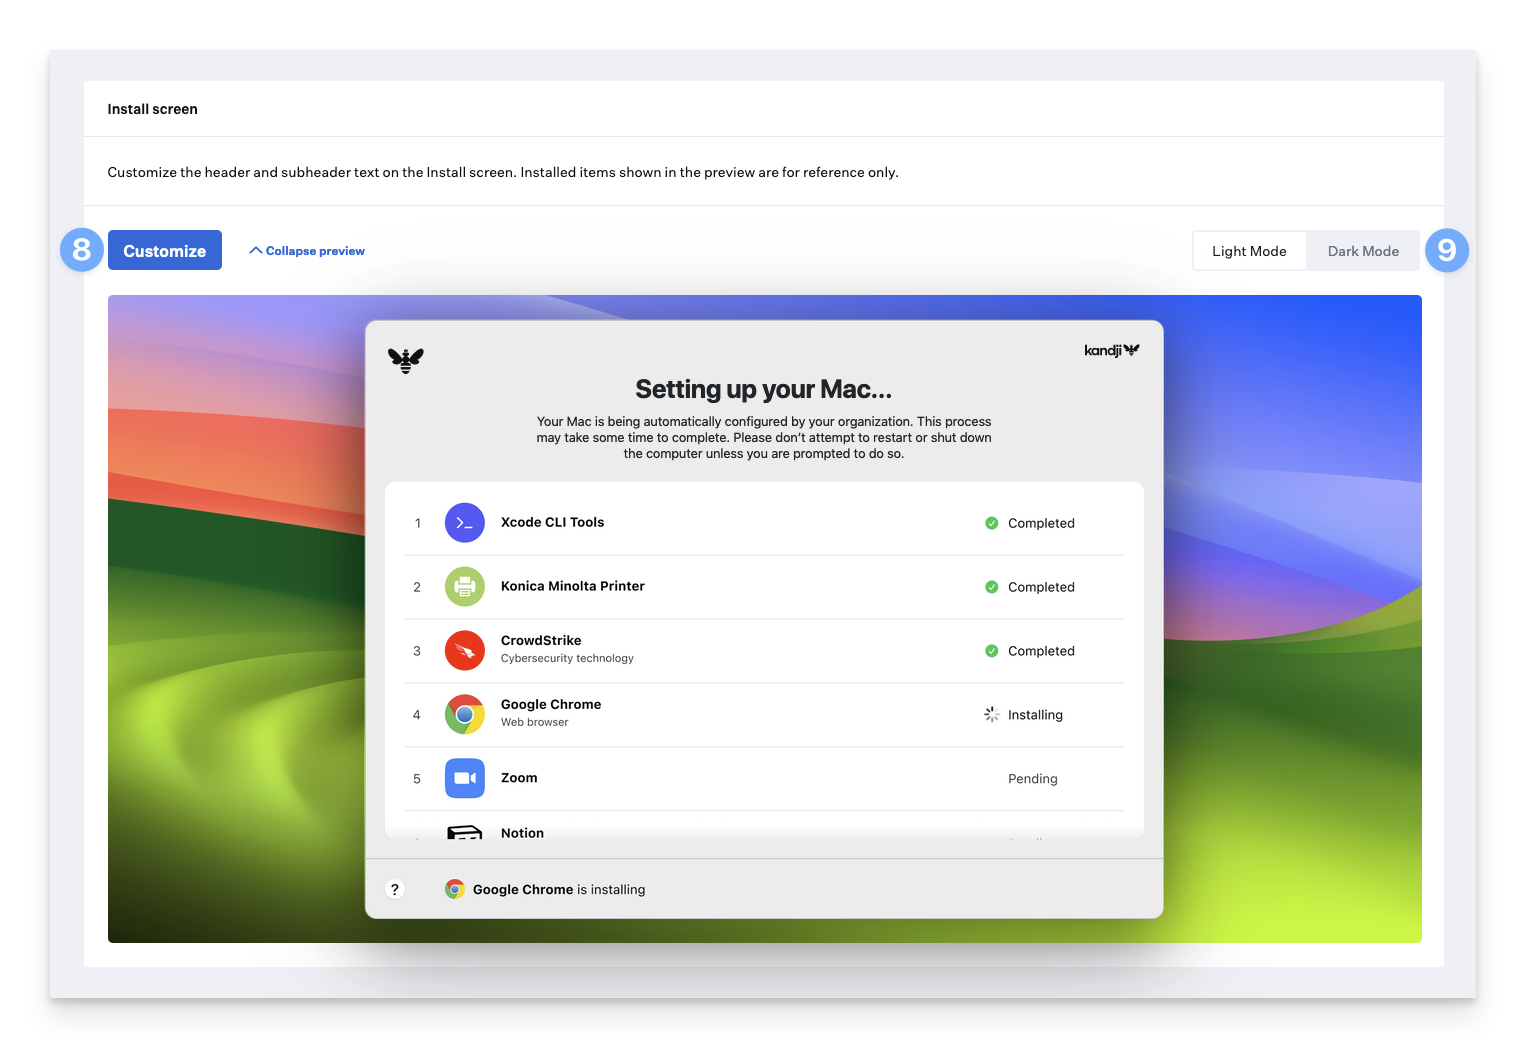
Customize Help Screen
Customize the Help screen header and body; see the Customize the Help Screen section below.
Switch to Light Mode or Dark Mode preview (Help screen)
Switch between Light Mode and Dark Mode previews to see how the Help screen will appear.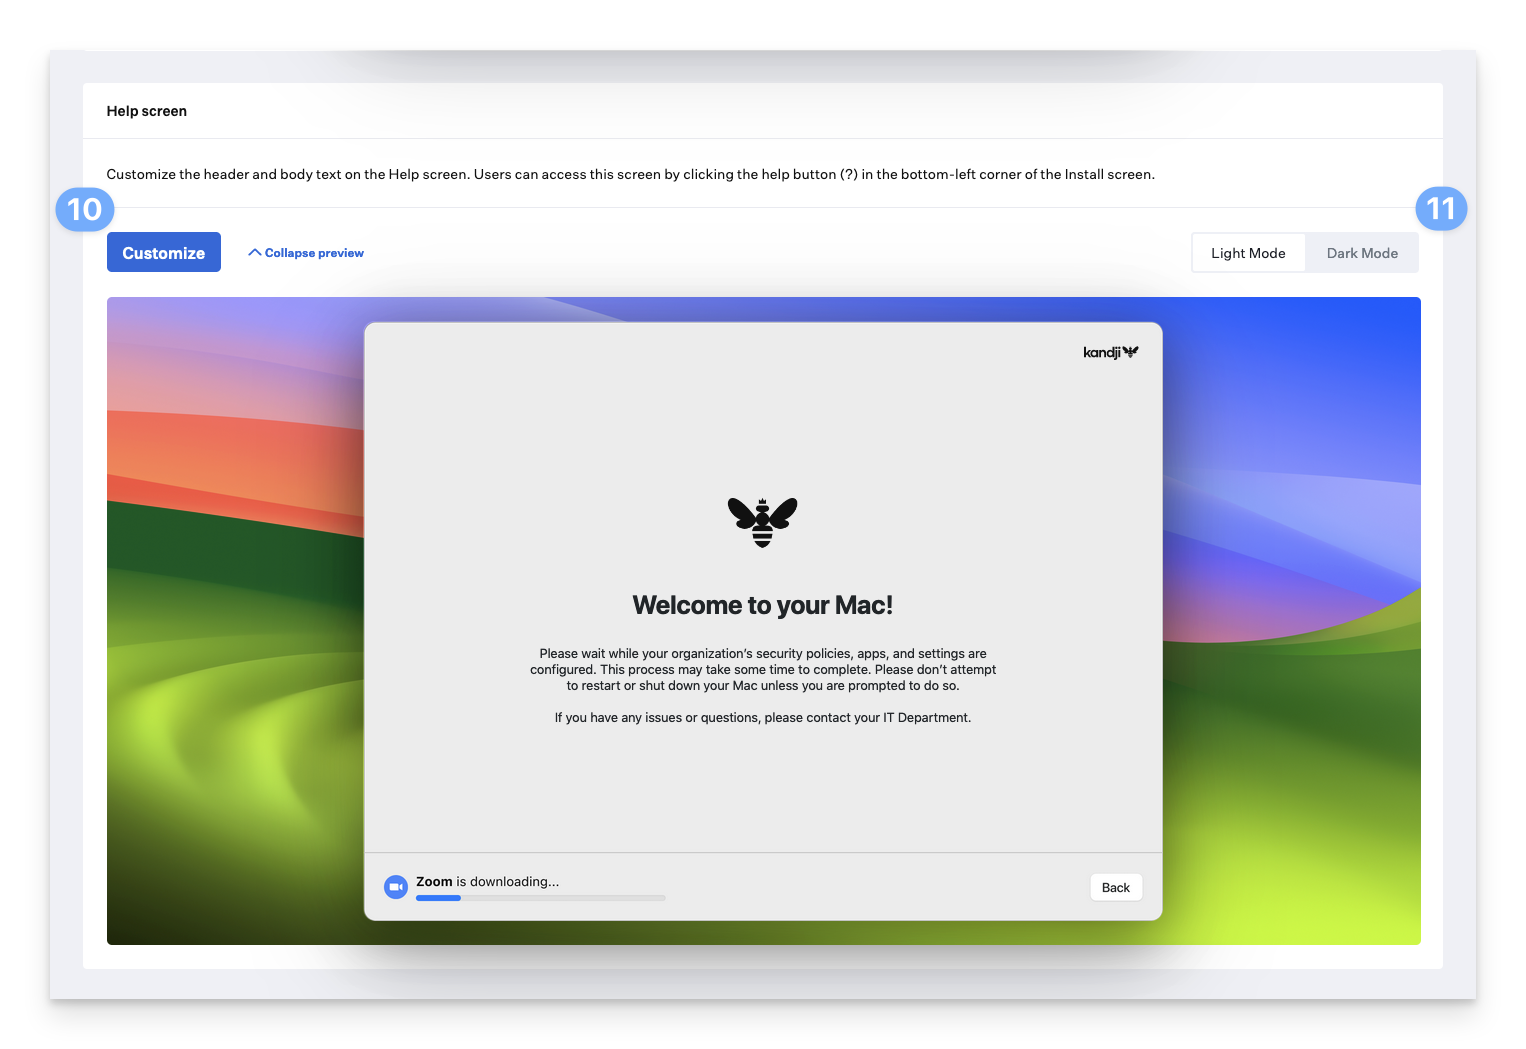
Configure Complete Screen
You can optionally turn off the Complete screen. If the Complete screen is not enabled, Liftoff will exit after completion.
Customize the Complete screen header, subheader, and cards
See the Customize the Complete Screen section below.
Switch to Light Mode or Dark Mode preview (Complete screen)
Switch between Light Mode and Dark Mode previews to see how the Complete screen will appear.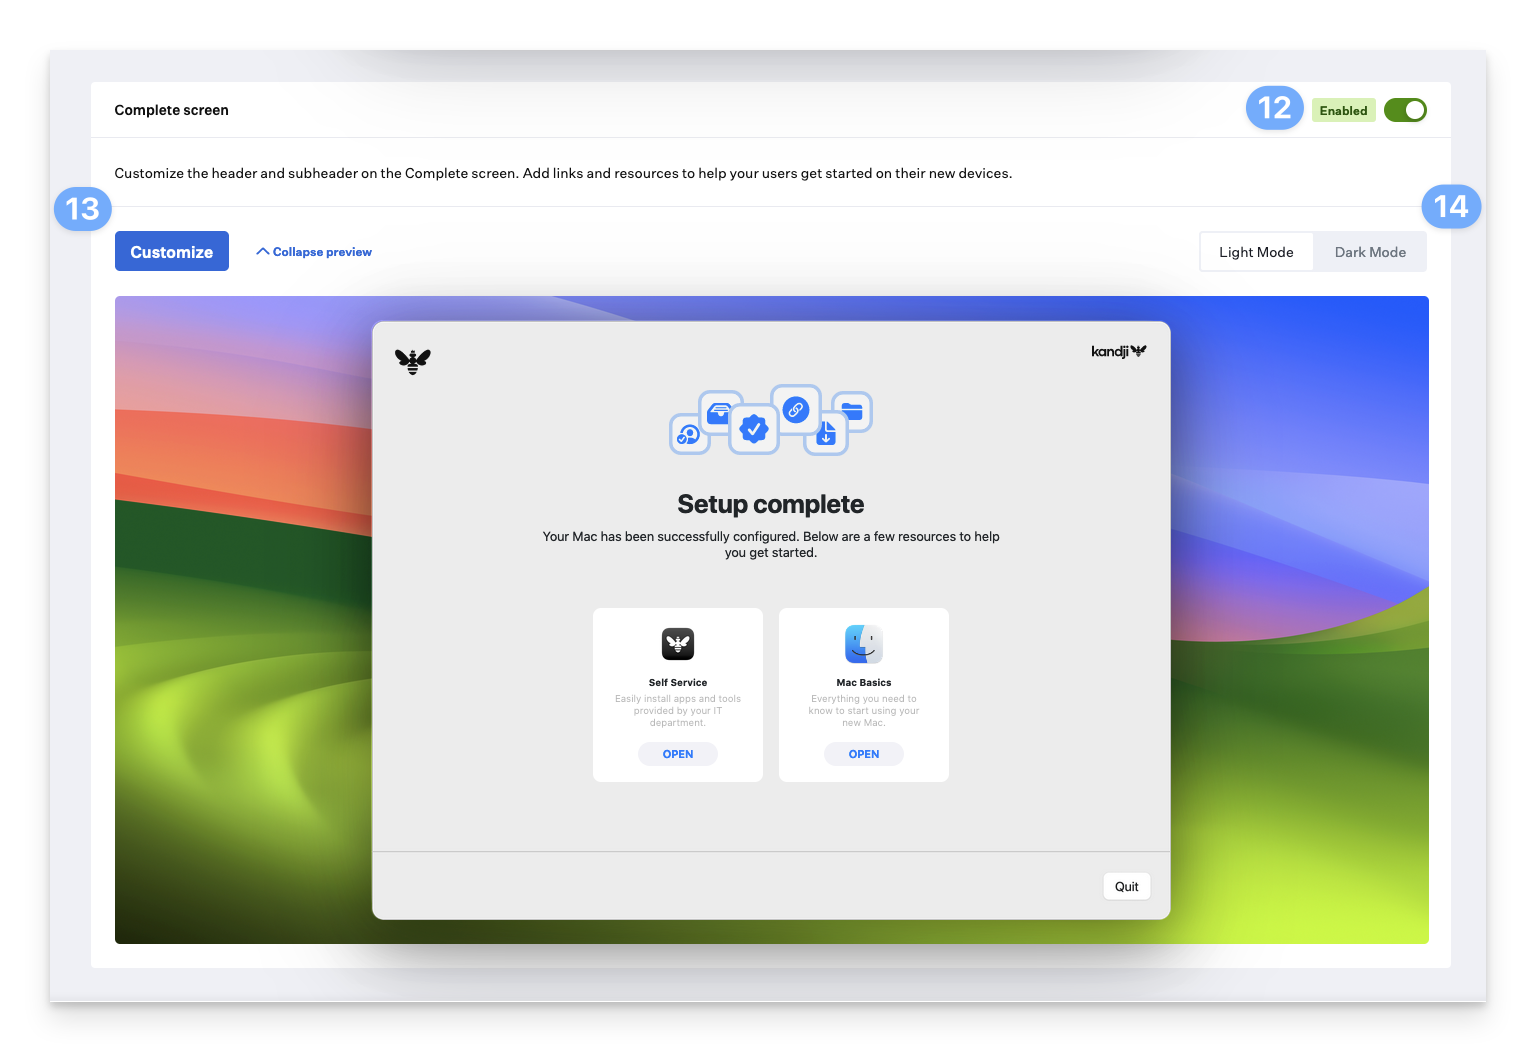
Customizing Liftoff
Customize the Install Screen
The Install screen’s header and subheader can be customized. As you update the text on the right side of the window, the preview on the left is automatically updated to provide a preview of how it will be displayed for your users.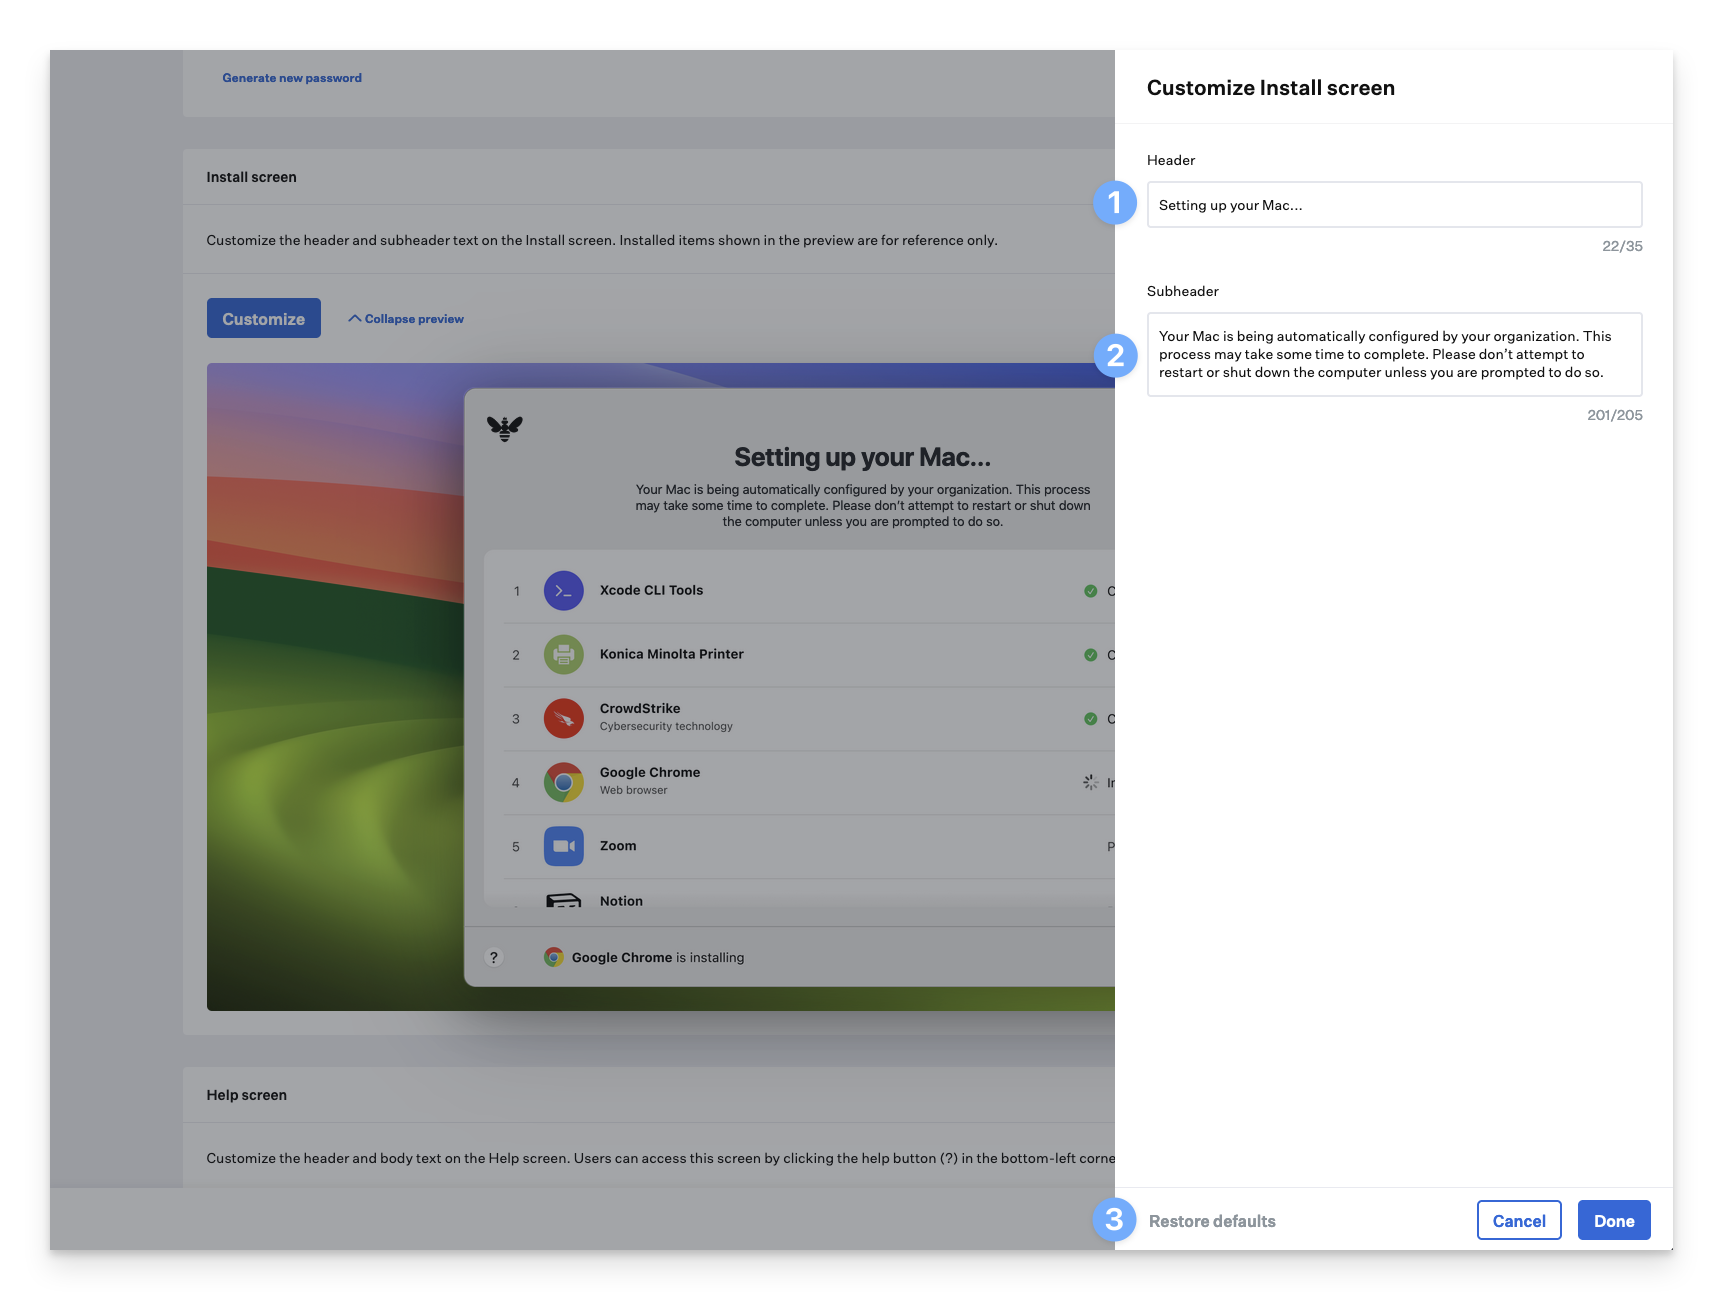
Customize the Help Screen
The Help screen’s header and subheader can be customized. Note that as you update the text on the right side of the window, the preview on the left is automatically updated to provide a preview of how it will be displayed for your users.
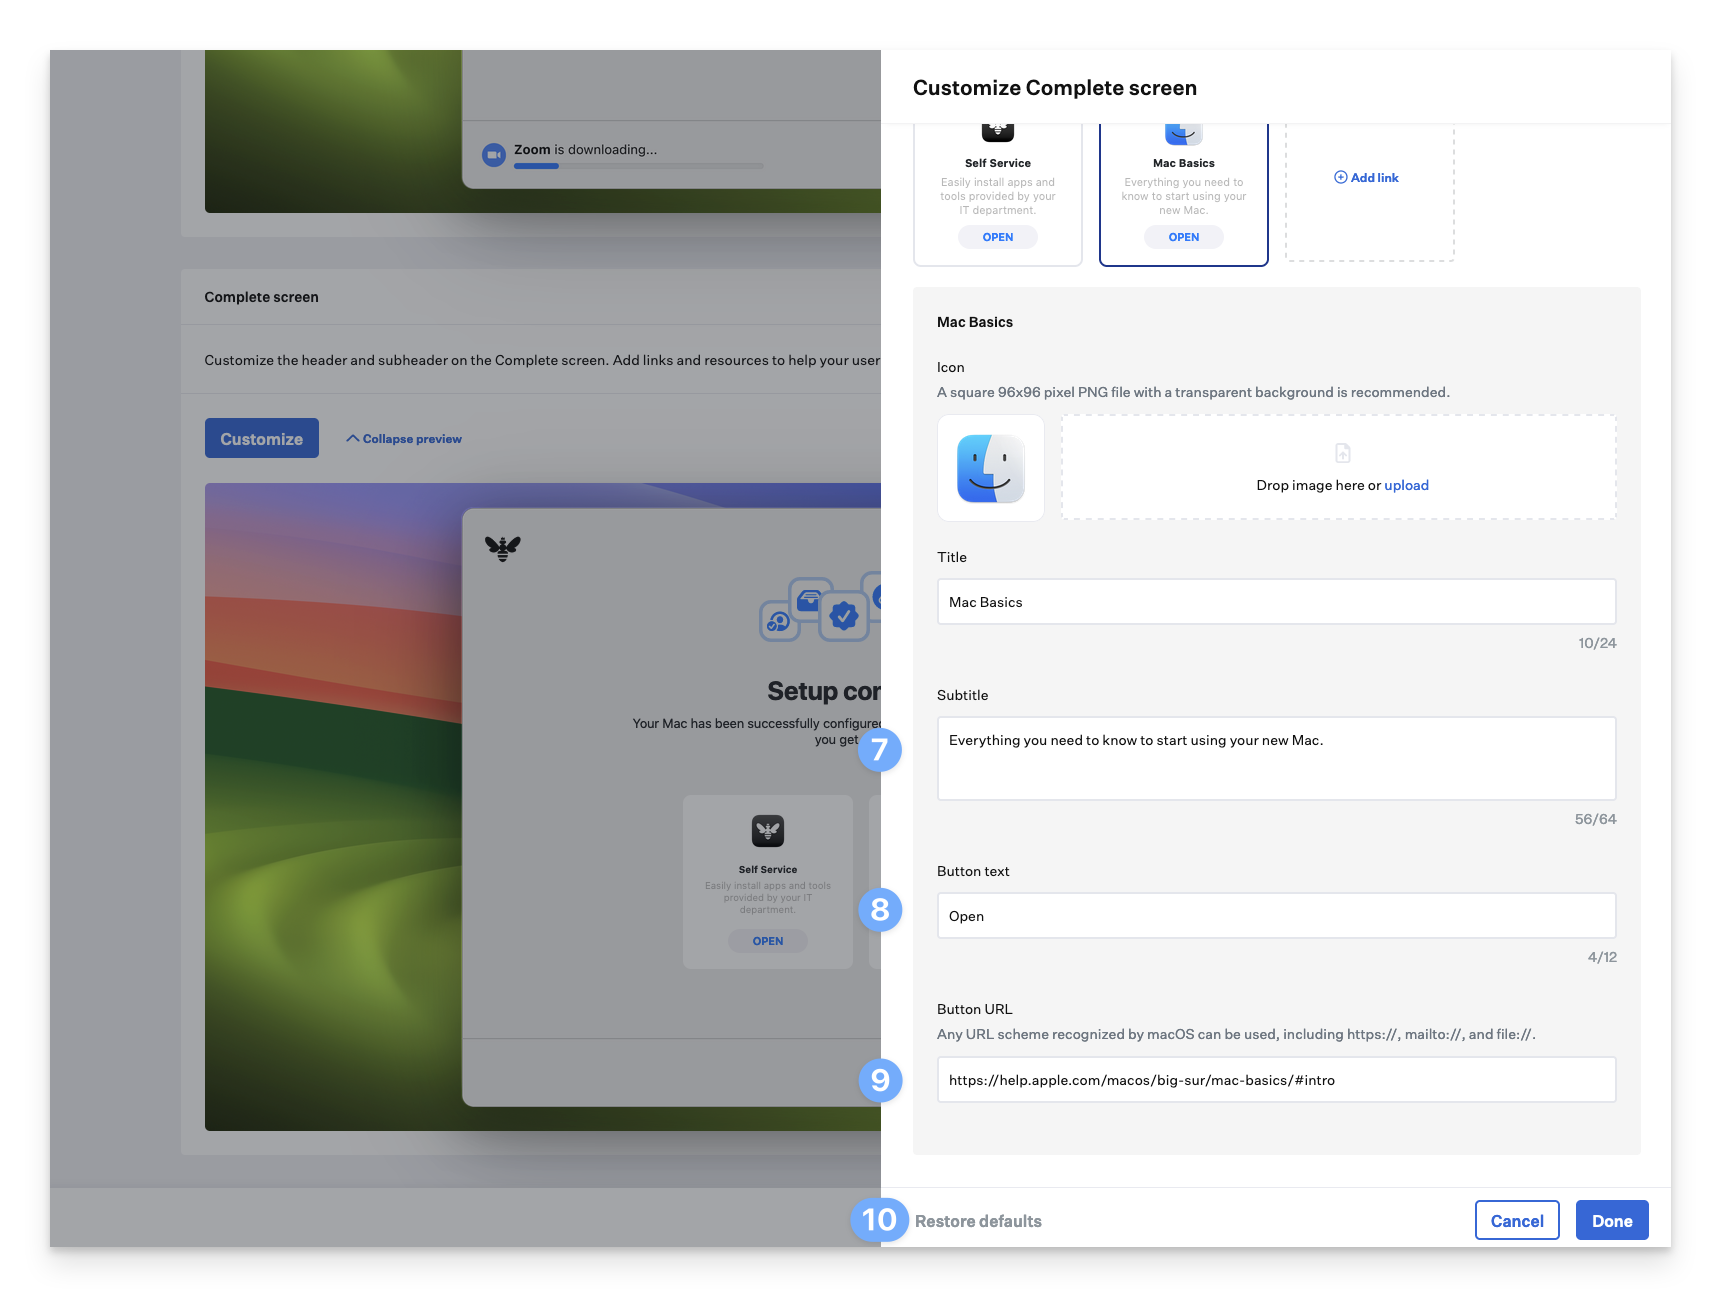
Customize the Complete Screen
The Complete screen’s header and subheader can be customized. Note that as you update the text on the right side of the window, the preview on the left is automatically updated to provide a preview of how it will be displayed for your users.Reorganize or delete links
Click and drag the drag-and-drop icon to reorganize the links. Click the trash icon to delete a link.
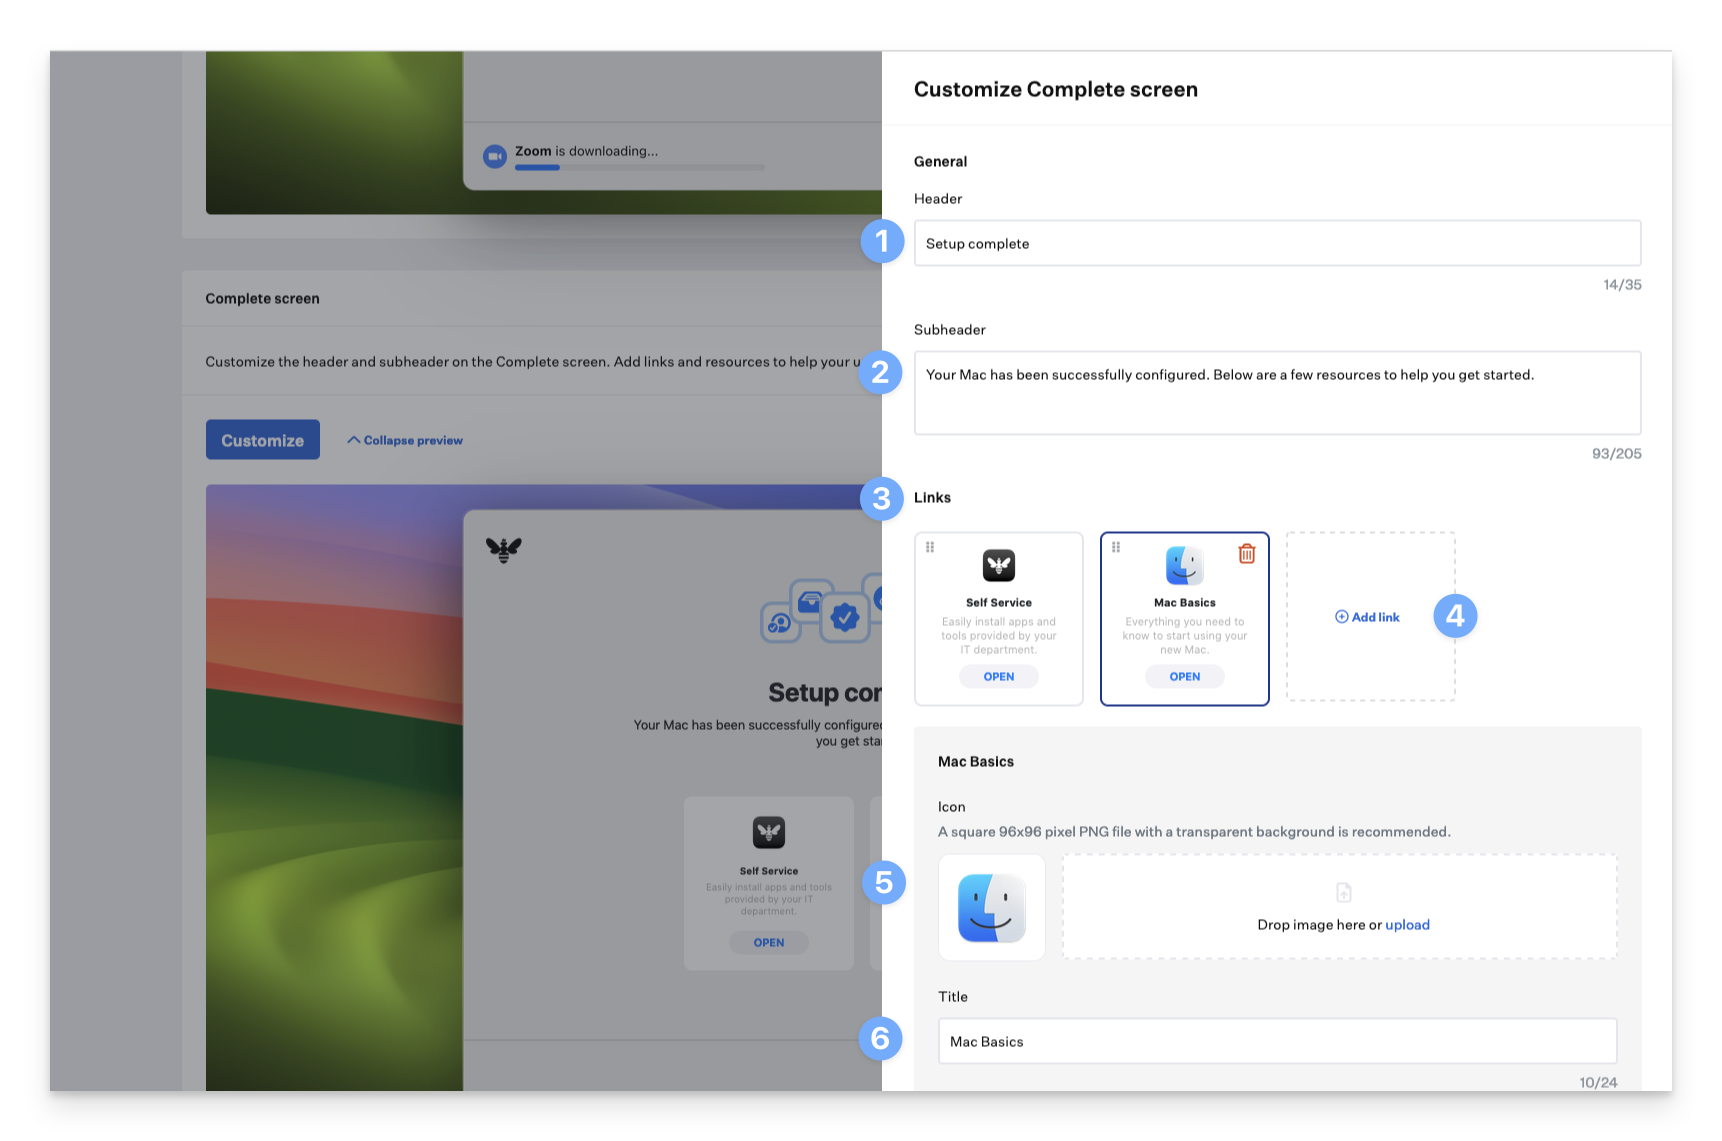
Specify button URL
Specify a Button URL for the link, which will be launched when the user clicks the button (required). Button URLs support the following URL schemes:
-
http:// or https://
- Opens in the default browser, which is Safari unless the user has selected a different one.
-
mailto://
- Opens in the default mail app, which is Mail unless the user has selected a different one.
- On iOS and iPadOS, if the user hasn’t yet configured a mail account, tapping a mailto:// bookmark results in an error.
-
file:// (only supported on macOS) For more information about file paths in macOS, please refer to Apple’s documentation.
- Opens a file from a specified path.
- Using three consecutive slashes, such as file:///path/to/file when defining file paths is recommended.
Exit Password
Liftoff has an exit password that can be used when Liftoff is in Full Screen or Window mode. In either case, the exit password can be used in the following scenarios:- The exit password can be used to unlock Full-screen mode, which allows for troubleshooting if Library Items are not installed as intended. This is only applicable when using full-screen mode.
-
The exit password can be used to quit the app through the menu bar before the agent run completes; this additionally unloads the launch agent.
- This can be done after using the exit password to release Liftoff from Full Screen or Window mode. Window mode initially does not allow an early exit or show the Quit option in the menu bar.
- To open the Exit Password prompt, press these keys simultaneously: Command-Shift-K-J-D.

Liftoff Logic Flow
Evaluation of Liftoff Library Item
- If there’s no Liftoff configuration in the Blueprint, the Iru Agent will note that Liftoff is not eligible and won’t try to retrieve the configuration again.
- If a Liftoff configuration is present in the Blueprint, the details will be fetched.
Enrollment Triggers
- Automated Device Enrollment Only or Manual Device Enrollment Only: The agent will check the Mac’s enrollment type. If it doesn’t match the criteria, the agent will record that Liftoff is not eligible and won’t try to retrieve the configuration again.
- All Enrollments: The agent will skip evaluating the enrollment type.
Eligibility Check
- If the enrollment criteria are met, the agent will evaluate the duration of the Mac’s enrollment.
- If the Mac has been enrolled for more than 1 hour, the agent will record that Liftoff is not eligible and won’t try to retrieve the configuration again.
- If all criteria are satisfied, the macOS agent will load the LaunchAgent to start Liftoff and initiate an initial check-in.
Running Parameters with Liftoff
- If there’s no Liftoff configuration in the Blueprint, the Iru Agent will run all Parameters and then all Library Items in the Blueprint.
- If a Liftoff configuration is present in the Blueprint, the Iru Agent will run all Library Items first, followed by all Parameters in the Blueprint.
Other Considerations
Device Localization
When a user configures their macOS device to use one of the supported languages as its primary language, Liftoff displays localized text for non-customizable strings. No admin configuration is required to enable this capability. The following languages are supported:- Chinese (Simplified)
- French / French (Canada)
- German
- Italian
- Japanese
- Portuguese
- Portuguese (Brazil)
- Spanish