> ## Documentation Index
> Fetch the complete documentation index at: https://docs.iru.com/llms.txt
> Use this file to discover all available pages before exploring further.
# Entra ID를 사용한 Platform SSO 구성
> Microsoft Entra ID 통합을 위해 Iru Endpoint에서 Platform SSO Library Item을 설정합니다. Microsoft Entra ID 자격 증명 및 토큰 기반 SSO로 Mac 로그인을 활성화합니다.
Platform SSO는 Mac 컴퓨터에서 사용할 수 있습니다
### Platform SSO란 무엇입니까?
Platform SSO를 사용하면 사용자가 하드웨어 바인딩 키, 스마트 카드 또는 IdP 암호를 사용하여 Mac 컴퓨터에 로그인할 수 있습니다. macOS에서 Microsoft 회사 또는 학교 계정에 대한 Single Sign-On을 제공하여 Apple 기기용 Microsoft Enterprise SSO 플러그인을 향상시킵니다.
전체 Platform SSO 설정 목록은 [Platform Single Sign-On 구성](/ko/endpoint/library/library-items-profiles/configure-platform-single-sign-on)을 참조하세요. Microsoft의 개요는 [macOS Platform Single Sign-on](https://learn.microsoft.com/en-us/entra/identity/devices/macos-psso)을 참조하세요.
### Company Portal Auto App 추가 및 구성
이 Library Item을 Iru Endpoint Library에 추가하려면 [Library 개요](/ko/endpoint/library/library-items-profiles/library-overview) 문서에 설명된 단계를 따르세요.
원하는 [Blueprints](/ko/endpoint/getting-started/blueprints-and-library/configuring-blueprints)에 할당합니다.
**Installation Method**를 Continuously Enforce로 설정합니다.
**Version Enforcement** 설정을 지정합니다.
**저장** 버튼을 선택합니다.
### Login Window Library Item 추가 및 구성
이 Library Item을 Iru Endpoint Library에 추가하려면 [Library 개요](/ko/endpoint/library/library-items-profiles/library-overview) 문서에 설명된 단계를 따르세요.
Login Window Library Item의 **이름**을 입력합니다.
원하는 [Blueprints](/ko/endpoint/getting-started/blueprints-and-library/configuring-blueprints)에 할당합니다.
**User Visibility**에서 **Display username and password fields**를 선택합니다.
**저장** 버튼을 선택합니다.
### Single Sign-on Extension Library Item 추가 및 구성
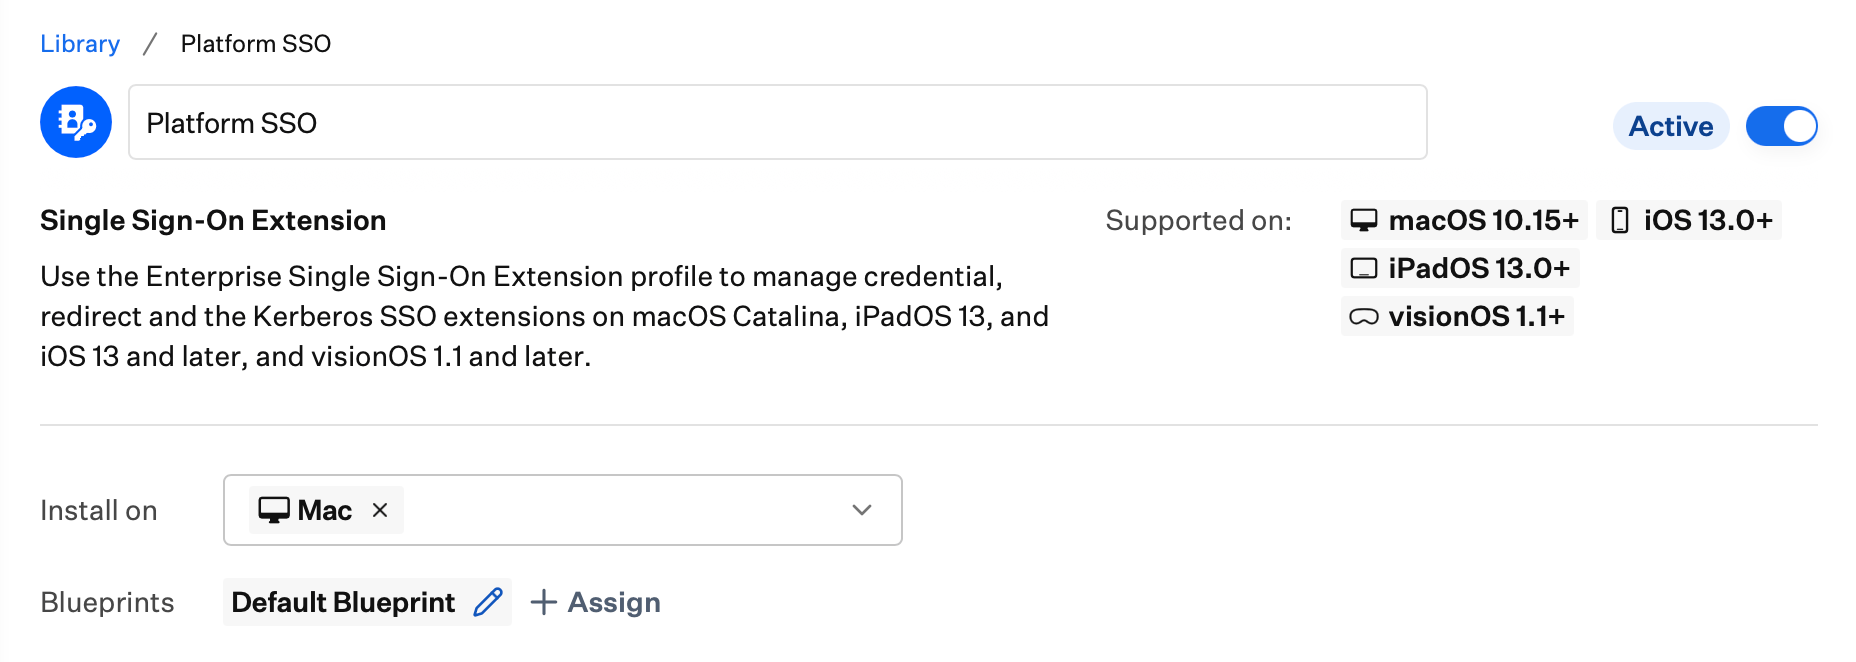
이 Library Item을 Iru Endpoint Library에 추가하려면 [Library 개요](/ko/endpoint/library/library-items-profiles/library-overview) 문서에 설명된 단계를 따르세요.
새 Library Item의 **이름**을 입력합니다.
**설치 대상** 플랫폼으로 **Mac**을 선택합니다.
원하는 [Blueprints](/ko/endpoint/getting-started/blueprints-and-library/configuring-blueprints)에 할당합니다.
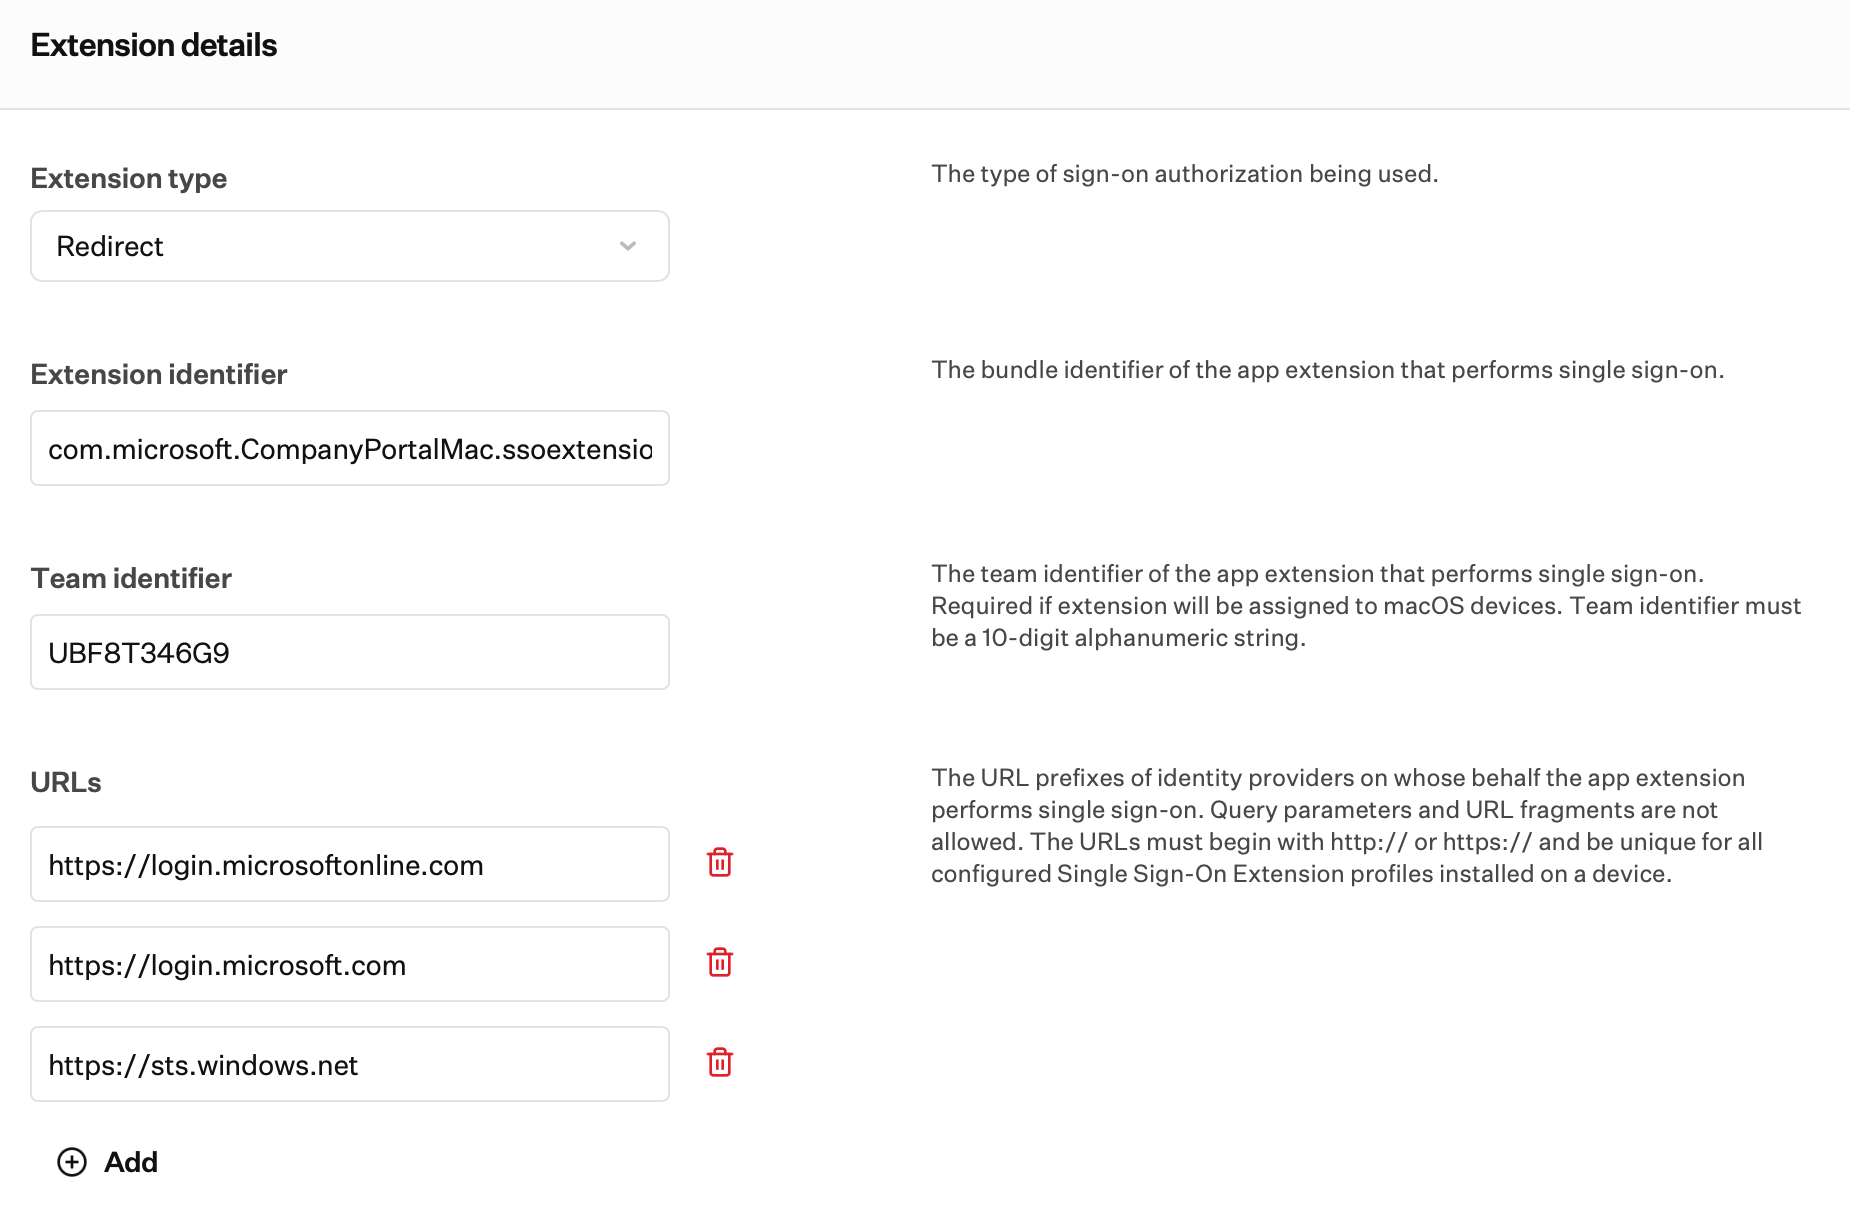
 **확장 유형**에서 **Redirect**를 선택합니다.
**Extension identifier**에 다음을 입력합니다.
```text theme={null}
com.microsoft.CompanyPortalMac.ssoextension
```
**Team identifier**에 다음을 입력합니다.
```text theme={null}
UBF8T346G9
```
다음 URL을 **URLs** 필드에 붙여 넣습니다.
```text theme={null}
https://login.microsoftonline.com
```
```text theme={null}
https://login.microsoft.com
```
```text theme={null}
https://sts.windows.net
```
**확장 유형**에서 **Redirect**를 선택합니다.
**Extension identifier**에 다음을 입력합니다.
```text theme={null}
com.microsoft.CompanyPortalMac.ssoextension
```
**Team identifier**에 다음을 입력합니다.
```text theme={null}
UBF8T346G9
```
다음 URL을 **URLs** 필드에 붙여 넣습니다.
```text theme={null}
https://login.microsoftonline.com
```
```text theme={null}
https://login.microsoft.com
```
```text theme={null}
https://sts.windows.net
```
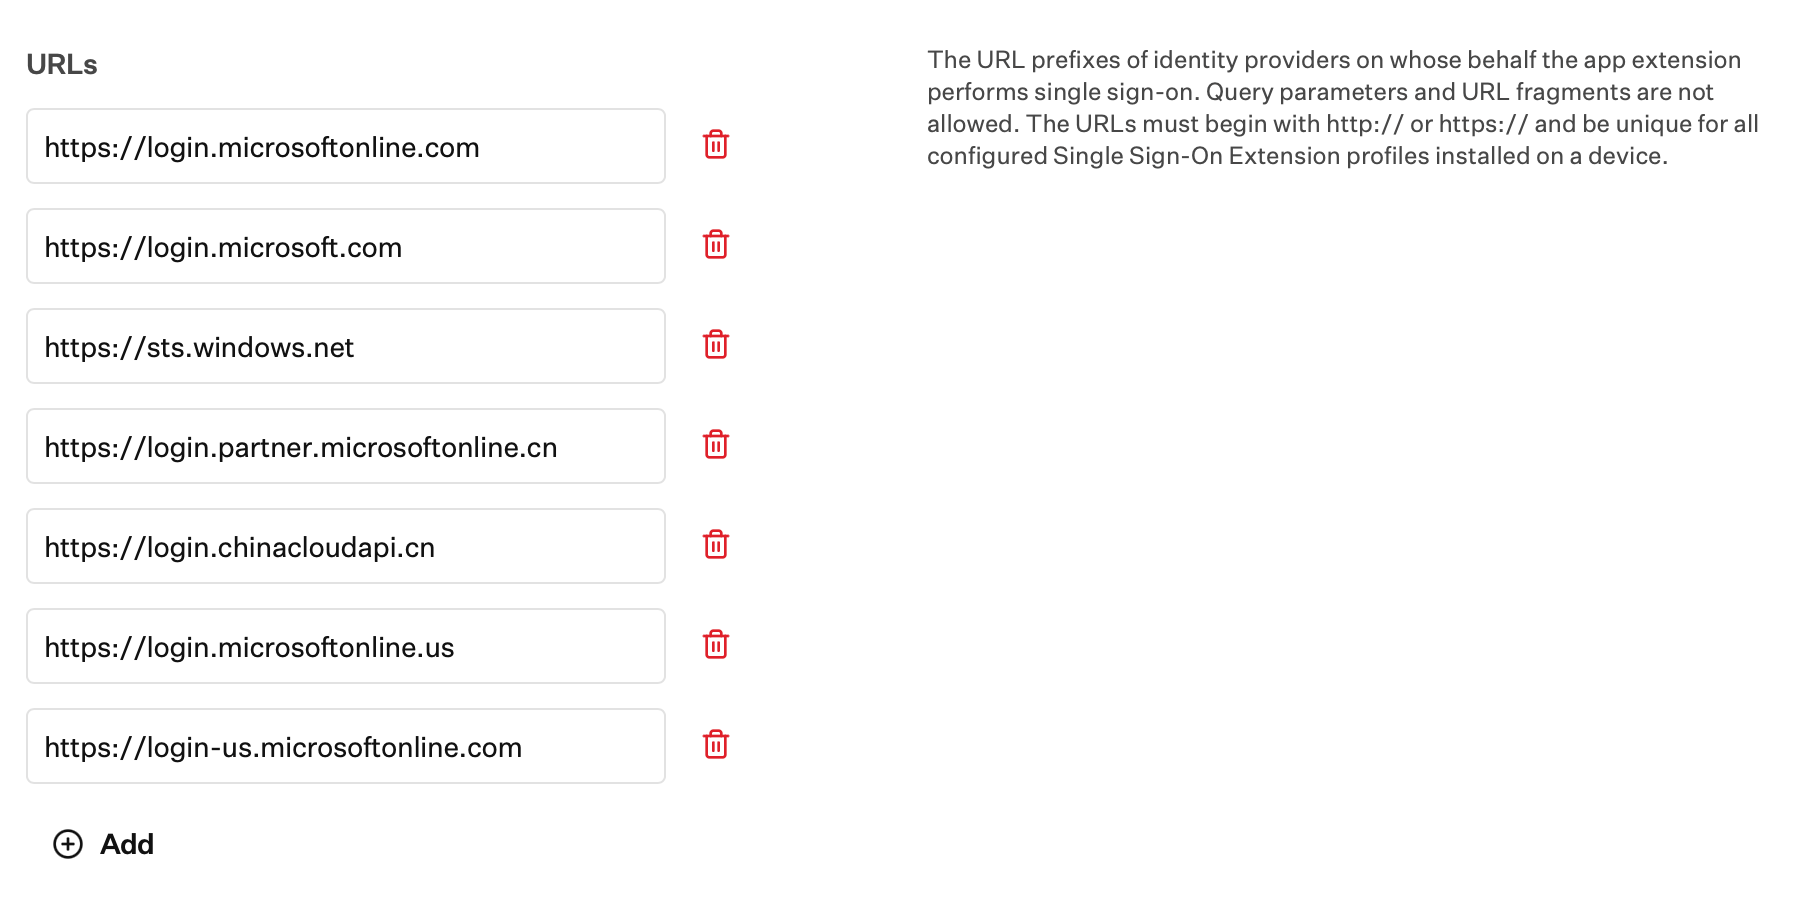
 소버린 클라우드 도메인을 사용하는 경우 다음 URL을 추가로 포함합니다.
```text theme={null}
https://login.partner.microsoftonline.cn
```
```text theme={null}
https://login.chinacloudapi.cn
```
```text theme={null}
https://login.microsoftonline.us
```
```text theme={null}
https://login-us.microsoftonline.com
```
소버린 클라우드 도메인을 사용하는 경우 다음 URL을 추가로 포함합니다.
```text theme={null}
https://login.partner.microsoftonline.cn
```
```text theme={null}
https://login.chinacloudapi.cn
```
```text theme={null}
https://login.microsoftonline.us
```
```text theme={null}
https://login-us.microsoftonline.com
```
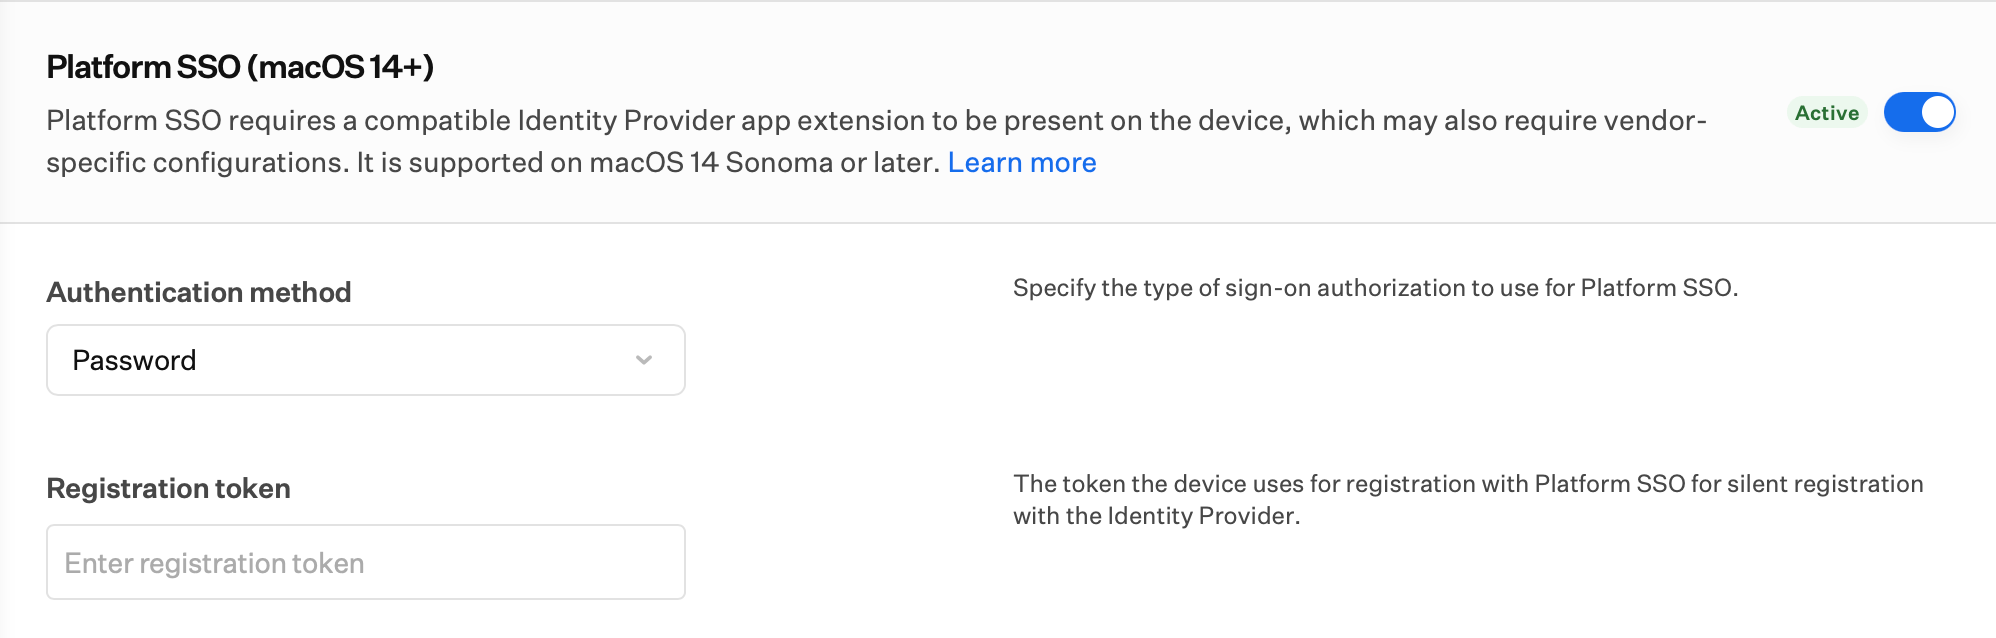
 **Platform SSO** 스위치를 켭니다.
**Authentication Method**를 선택합니다. 조직에 어떤 방법을 사용해야 하는지에 대한 정보는 [Microsoft 지원 문서](https://learn.microsoft.com/en-us/mem/intune/configuration/platform-sso-macos#step-1---decide-the-authentication-method)를 참조하세요.
ID 공급자가 요구하는 경우 필요에 따라 **Registration token**을 입력합니다. Mac은 이 값을 ID 공급자와의 Platform SSO 등록에 사용하며, ID 공급자와 SSO 확장이 지원하는 경우 자동 등록에도 사용합니다.
**Platform SSO** 스위치를 켭니다.
**Authentication Method**를 선택합니다. 조직에 어떤 방법을 사용해야 하는지에 대한 정보는 [Microsoft 지원 문서](https://learn.microsoft.com/en-us/mem/intune/configuration/platform-sso-macos#step-1---decide-the-authentication-method)를 참조하세요.
ID 공급자가 요구하는 경우 필요에 따라 **Registration token**을 입력합니다. Mac은 이 값을 ID 공급자와의 Platform SSO 등록에 사용하며, ID 공급자와 SSO 확장이 지원하는 경우 자동 등록에도 사용합니다.
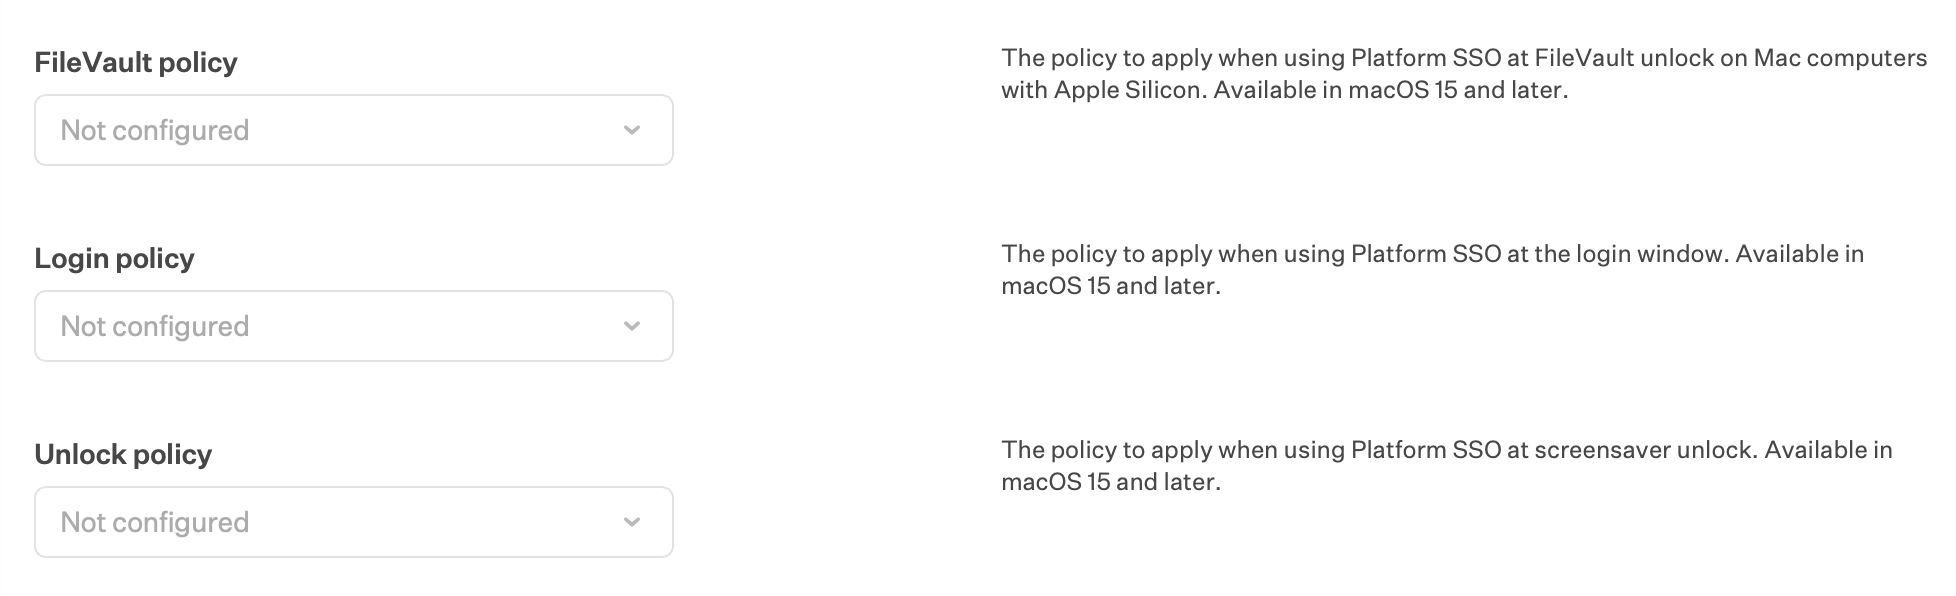
 필요에 따라 macOS 15 이상에 대한 추가 선택적 설정을 활성화합니다.
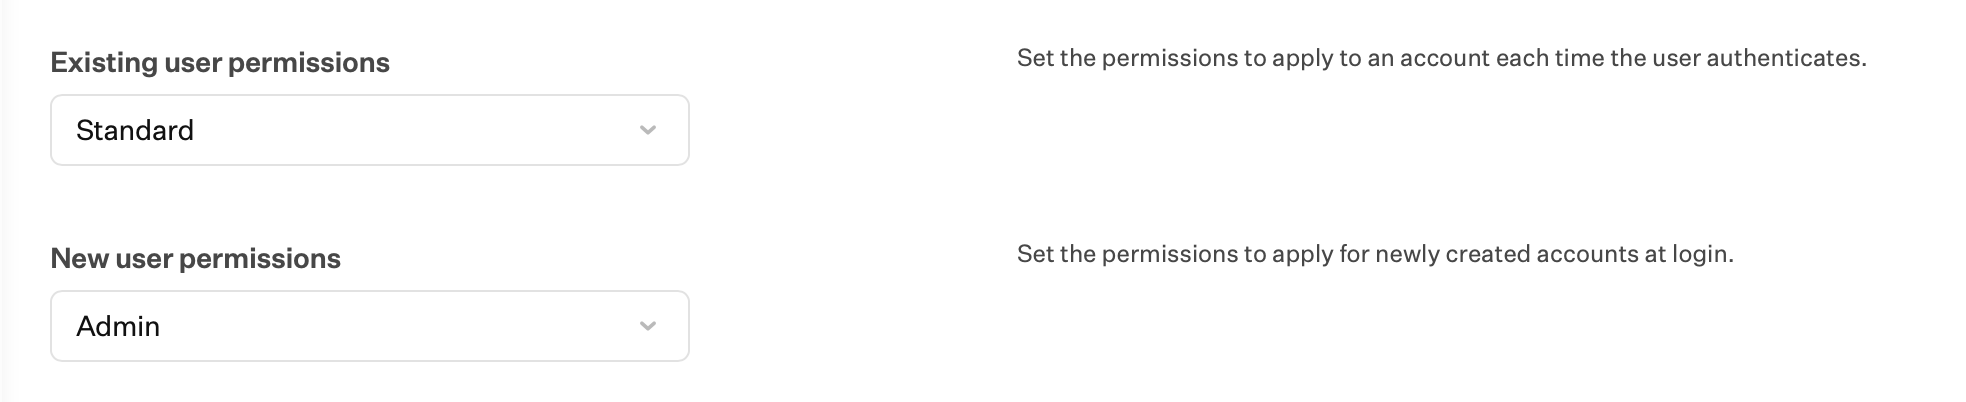
 **Existing Users**에 대한 기본 권한을 설정합니다.
**New Users**에 대한 기본 권한을 설정합니다.
**Existing Users**에 대한 기본 권한을 설정합니다.
**New Users**에 대한 기본 권한을 설정합니다.
 **Shared Device Keys** 체크박스를 선택합니다.
\*\*Allow authorization (with identity provider account)\*\*을 활성화합니다. 이를 통해 사용자는 Microsoft Entra ID 자격 증명을 사용하여 시스템 권한 부여 프롬프트와 상호 작용할 수 있습니다.
사용자의 로컬 계정을 자동으로 생성하려면 **Allow creation of new users at login**을 활성화합니다. 로컬 계정을 생성하려면 FileVault 잠금이 해제된 상태로 로그인 화면에서 기기가 인터넷에 연결되어 있어야 하며, Iru에 해당 기기에 대한 유효한 Bootstrap 토큰이 있어야 합니다.
**Shared Device Keys** 체크박스를 선택합니다.
\*\*Allow authorization (with identity provider account)\*\*을 활성화합니다. 이를 통해 사용자는 Microsoft Entra ID 자격 증명을 사용하여 시스템 권한 부여 프롬프트와 상호 작용할 수 있습니다.
사용자의 로컬 계정을 자동으로 생성하려면 **Allow creation of new users at login**을 활성화합니다. 로컬 계정을 생성하려면 FileVault 잠금이 해제된 상태로 로그인 화면에서 기기가 인터넷에 연결되어 있어야 하며, Iru에 해당 기기에 대한 유효한 Bootstrap 토큰이 있어야 합니다.
 선택하면 기기 UDID와 일련번호가 Platform SSO 증명에 포함됩니다. macOS 15.4 이상에서 사용할 수 있습니다.
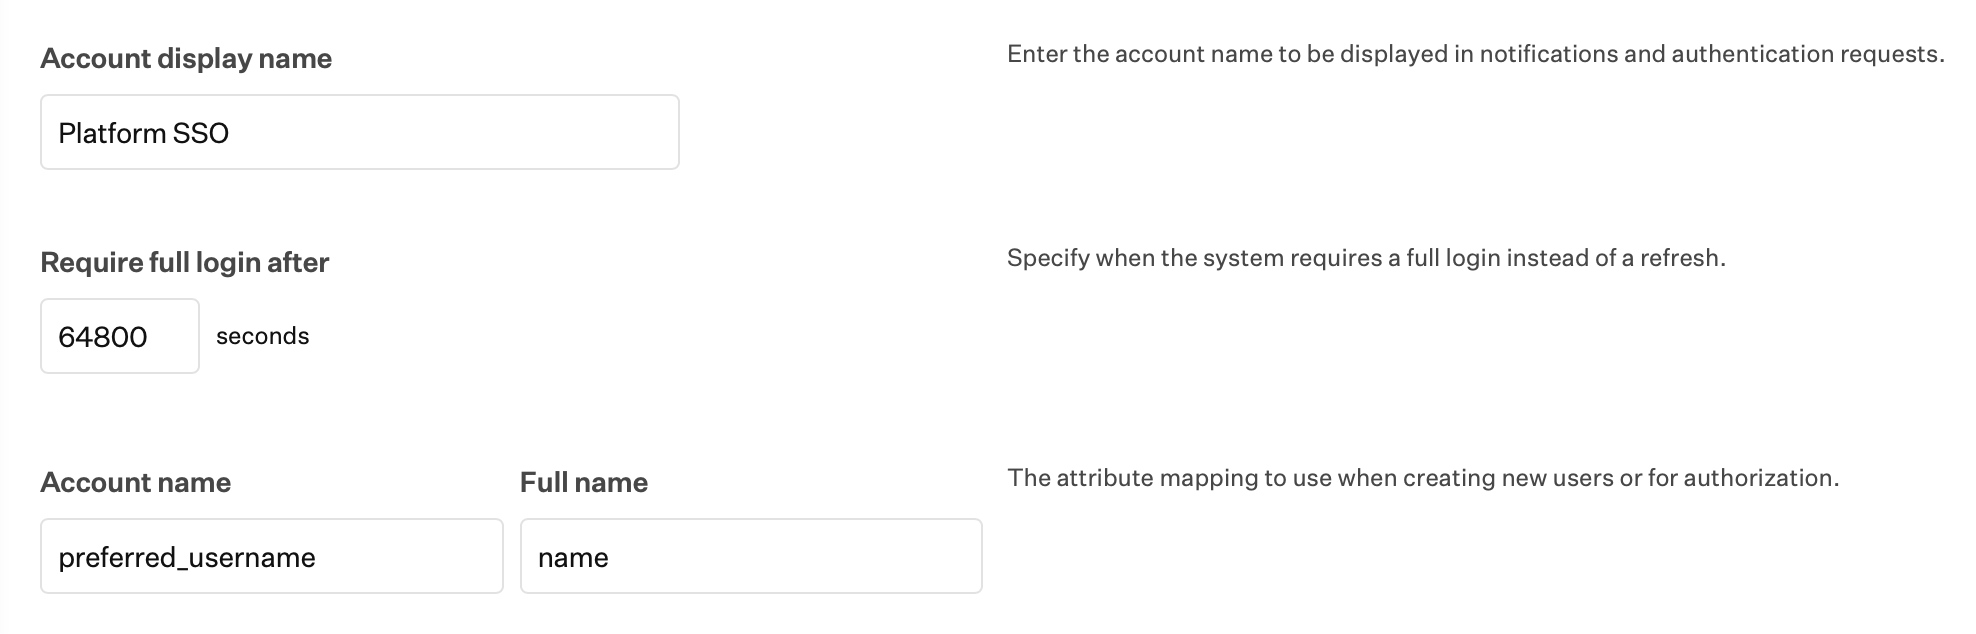
**Account display name**을 입력합니다.
**Require full login after**에 Mac이 새로 고침 대신 전체 로그인을 요구하기까지의 시간(초)을 입력합니다.
**Account name**에 다음을 입력합니다.
```text theme={null}
preferred_username
```
**전체 이름**에 다음을 입력합니다.
```text theme={null}
name
```
선택하면 기기 UDID와 일련번호가 Platform SSO 증명에 포함됩니다. macOS 15.4 이상에서 사용할 수 있습니다.
**Account display name**을 입력합니다.
**Require full login after**에 Mac이 새로 고침 대신 전체 로그인을 요구하기까지의 시간(초)을 입력합니다.
**Account name**에 다음을 입력합니다.
```text theme={null}
preferred_username
```
**전체 이름**에 다음을 입력합니다.
```text theme={null}
name
```
 원하는 경우 **관리자 그룹**, **추가 그룹** 및 **권한 부여 권한**.을 구성합니다.
Microsoft는 [현재](https://learn.microsoft.com/en-us/mem/intune/configuration/platform-sso-macos#more-platform-sso-settings-you-can-configure) 신규 및 기존 사용자에 대해 고정 Standard 및 Admin 값만 지원합니다.
* **관리자 그룹**은 기기에서 관리자 액세스 권한을 가져야 하는 Microsoft Entra ID의 그룹입니다. 이러한 그룹은 특정 사용자에게 상승된 권한을 부여하는 데 사용됩니다
* **추가 그룹**은 기기의 로컬 디렉터리에 생성할 사용자 지정 그룹입니다. 이러한 그룹은 사용자를 구성하고 특정 설정이나 권한을 적용하는 데 사용할 수 있습니다
* **Authorization rights**는 권한 부여 권한을 하나의 그룹에 매핑합니다. 각 권한은 한 번만 지정할 수 있습니다. 예를 들어 프린터 관리를 그룹에 매핑할 수 있습니다.
**저장** 버튼을 선택합니다.
### Setup Assistant 중 등록 활성화(macOS 26 이상)
macOS 26부터 Platform SSO가 Setup Assistant 중에 실행될 수 있으므로 Mac이 등록 흐름의 더 이른 단계에서 ID 공급자에 등록할 수 있습니다. 이 섹션에서는 설정 중 등록, 첫 번째 사용자 생성, 프로필 사진 동기화 및 **Enable Authenticated Guest Mode Quick Login**을 구성할 수 있습니다.
Automated Device Enrollment로 Platform SSO를 배포하는 경우 [Automated Device Enrollment Library Item](/ko/endpoint/enrollment/apple/configuring-apple-enrollment)의 **Mac** 섹션에서 **Primary account type**을 **Skip primary account creation**으로 설정하지 마세요. Setup Assistant는 사용자가 로컬 계정 암호를 설정하는 단계입니다. 기본 계정 생성을 건너뛰면 해당 단계가 실행되지 않아 암호가 설정되지 않으며 등록이 중단될 수 있습니다.
Apple silicon 탑재 Mac 컴퓨터 및 일부 다른 모델은 계정 자격 증명을 [Secure Enclave](https://support.apple.com/guide/security/the-secure-enclave-sec59b0b31ff/web)에 저장합니다. Secure Enclave가 포함된 기기는 Apple 문서를 참조하세요. 기본 계정 생성 건너뛰기는 Platform SSO가 아닌 **Passport** 워크플로를 위한 것입니다. 대신 Passport를 사용하는 경우 [기본 계정 생성](/ko/endpoint/library/passport/passport-compatibility-with-macos-and-iru-endpoint-features#primary-account-creation)을 참조하세요.
**Library**에서 앞서 생성한 기존 **Single Sign-on Extension** Library Item을 열고 **편집**을 선택한 다음 **Mac macOS 26 and later** 섹션으로 이동합니다.
Setup Assistant가 진행되는 동안 Platform SSO 등록이 실행되도록 **Enable registration during Setup Assistant**에 대해 **예**를 선택합니다.
**Create first user during Setup Assistant**의 경우, Mac이 Platform SSO를 사용하여 Setup Assistant 중에 첫 번째 로컬 계정을 생성해야 한다면 **예**를 선택합니다. 조직에서 첫 번째 계정을 다른 방식으로 프로비저닝하는 경우 해당 워크플로에 맞게 이 설정을 조정하세요.
이 설정 흐름 중에 Mac이 SSO 확장에 사용자의 로그인 프로필 사진을 요청해야 하는지에 따라 **Synchronize profile picture**를 구성합니다.
**Enable Authenticated Guest Mode Quick Login**의 기본값은 **구성되지 않음**입니다. 사용자가 ID 공급자 자격 증명으로 임시 로그인하는 공유 Mac 컴퓨터에서는 **예**를 선택합니다. 일반 단일 사용자 Mac 컴퓨터의 경우 **구성되지 않음**으로 두거나 **아니요**를 선택합니다.
**새 사용자 인증 방법**에서 **암호**, **Smart card**, **OpenID** 또는 이들의 조합을 선택합니다. **OpenID**는 macOS 27 이상에서 사용할 수 있으며 모든 **인증 방법**과 함께 추가할 수 있습니다. **OpenID**를 선택하면 **Mac macOS 27 and later**에 **웹 로그인 URL 허용 목록**이 표시됩니다.
**OpenID**를 사용하려는 경우 ID 공급자에 문의하여 Platform SSO와 함께 OpenID를 지원하는지 확인하세요.
**새 사용자 인증 방법**에 **OpenID**가 포함된 경우, 저장하기 전에 **Mac macOS 27 and later**의 **웹 로그인 URL 허용 목록**에 URL을 하나 이상 추가합니다. [웹 로그인(macOS 27 이상)](/ko/endpoint/library/library-items-profiles/configure-platform-single-sign-on#web-login-macos-27-and-later)을 참조하세요. **저장**을 선택합니다.
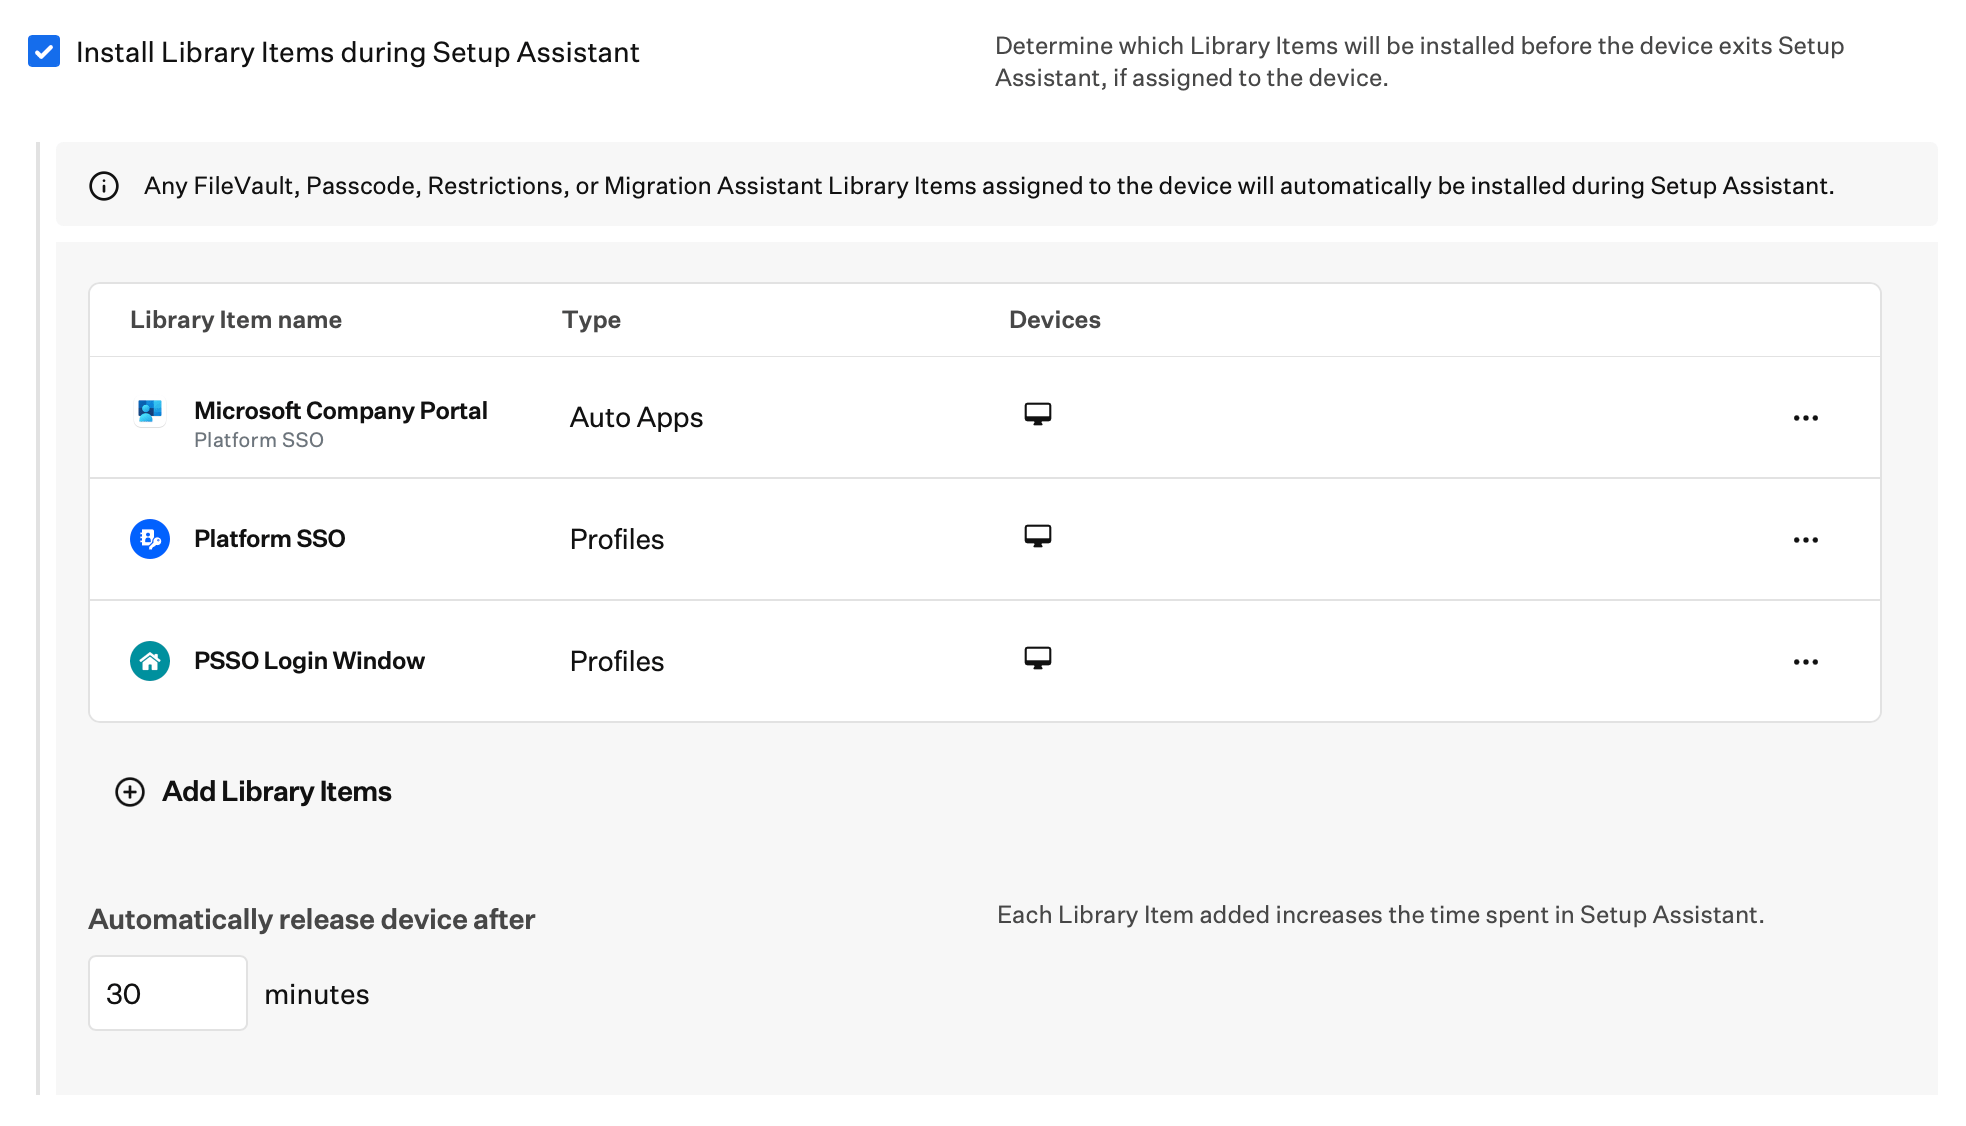
**Automated Device Enrollment** Library Item에서 **Mac**에 대해 **설정 지원 중에 Library Items 설치**를 켭니다. 이 가이드에서 구성한 **Company Portal Auto App**, **Login Window** 및 **Single Sign-on Extension** Library Items를 추가하여 등록 설정 중에 설치되도록 합니다. 자세한 내용은 [Setup Assistant 중 Library Items 설치](/ko/endpoint/enrollment/apple/configuring-apple-enrollment#install-library-items-during-setup-assistant)를 참조하세요. 기기가 **Configuring** 상태에서 멈춘 경우 [Setup Assistant에 보류된 기기 수동 해제](/ko/endpoint/enrollment/apple/configuring-apple-enrollment#manually-release-devices-held-in-setup-assistant)를 참조하세요.
원하는 경우 **관리자 그룹**, **추가 그룹** 및 **권한 부여 권한**.을 구성합니다.
Microsoft는 [현재](https://learn.microsoft.com/en-us/mem/intune/configuration/platform-sso-macos#more-platform-sso-settings-you-can-configure) 신규 및 기존 사용자에 대해 고정 Standard 및 Admin 값만 지원합니다.
* **관리자 그룹**은 기기에서 관리자 액세스 권한을 가져야 하는 Microsoft Entra ID의 그룹입니다. 이러한 그룹은 특정 사용자에게 상승된 권한을 부여하는 데 사용됩니다
* **추가 그룹**은 기기의 로컬 디렉터리에 생성할 사용자 지정 그룹입니다. 이러한 그룹은 사용자를 구성하고 특정 설정이나 권한을 적용하는 데 사용할 수 있습니다
* **Authorization rights**는 권한 부여 권한을 하나의 그룹에 매핑합니다. 각 권한은 한 번만 지정할 수 있습니다. 예를 들어 프린터 관리를 그룹에 매핑할 수 있습니다.
**저장** 버튼을 선택합니다.
### Setup Assistant 중 등록 활성화(macOS 26 이상)
macOS 26부터 Platform SSO가 Setup Assistant 중에 실행될 수 있으므로 Mac이 등록 흐름의 더 이른 단계에서 ID 공급자에 등록할 수 있습니다. 이 섹션에서는 설정 중 등록, 첫 번째 사용자 생성, 프로필 사진 동기화 및 **Enable Authenticated Guest Mode Quick Login**을 구성할 수 있습니다.
Automated Device Enrollment로 Platform SSO를 배포하는 경우 [Automated Device Enrollment Library Item](/ko/endpoint/enrollment/apple/configuring-apple-enrollment)의 **Mac** 섹션에서 **Primary account type**을 **Skip primary account creation**으로 설정하지 마세요. Setup Assistant는 사용자가 로컬 계정 암호를 설정하는 단계입니다. 기본 계정 생성을 건너뛰면 해당 단계가 실행되지 않아 암호가 설정되지 않으며 등록이 중단될 수 있습니다.
Apple silicon 탑재 Mac 컴퓨터 및 일부 다른 모델은 계정 자격 증명을 [Secure Enclave](https://support.apple.com/guide/security/the-secure-enclave-sec59b0b31ff/web)에 저장합니다. Secure Enclave가 포함된 기기는 Apple 문서를 참조하세요. 기본 계정 생성 건너뛰기는 Platform SSO가 아닌 **Passport** 워크플로를 위한 것입니다. 대신 Passport를 사용하는 경우 [기본 계정 생성](/ko/endpoint/library/passport/passport-compatibility-with-macos-and-iru-endpoint-features#primary-account-creation)을 참조하세요.
**Library**에서 앞서 생성한 기존 **Single Sign-on Extension** Library Item을 열고 **편집**을 선택한 다음 **Mac macOS 26 and later** 섹션으로 이동합니다.
Setup Assistant가 진행되는 동안 Platform SSO 등록이 실행되도록 **Enable registration during Setup Assistant**에 대해 **예**를 선택합니다.
**Create first user during Setup Assistant**의 경우, Mac이 Platform SSO를 사용하여 Setup Assistant 중에 첫 번째 로컬 계정을 생성해야 한다면 **예**를 선택합니다. 조직에서 첫 번째 계정을 다른 방식으로 프로비저닝하는 경우 해당 워크플로에 맞게 이 설정을 조정하세요.
이 설정 흐름 중에 Mac이 SSO 확장에 사용자의 로그인 프로필 사진을 요청해야 하는지에 따라 **Synchronize profile picture**를 구성합니다.
**Enable Authenticated Guest Mode Quick Login**의 기본값은 **구성되지 않음**입니다. 사용자가 ID 공급자 자격 증명으로 임시 로그인하는 공유 Mac 컴퓨터에서는 **예**를 선택합니다. 일반 단일 사용자 Mac 컴퓨터의 경우 **구성되지 않음**으로 두거나 **아니요**를 선택합니다.
**새 사용자 인증 방법**에서 **암호**, **Smart card**, **OpenID** 또는 이들의 조합을 선택합니다. **OpenID**는 macOS 27 이상에서 사용할 수 있으며 모든 **인증 방법**과 함께 추가할 수 있습니다. **OpenID**를 선택하면 **Mac macOS 27 and later**에 **웹 로그인 URL 허용 목록**이 표시됩니다.
**OpenID**를 사용하려는 경우 ID 공급자에 문의하여 Platform SSO와 함께 OpenID를 지원하는지 확인하세요.
**새 사용자 인증 방법**에 **OpenID**가 포함된 경우, 저장하기 전에 **Mac macOS 27 and later**의 **웹 로그인 URL 허용 목록**에 URL을 하나 이상 추가합니다. [웹 로그인(macOS 27 이상)](/ko/endpoint/library/library-items-profiles/configure-platform-single-sign-on#web-login-macos-27-and-later)을 참조하세요. **저장**을 선택합니다.
**Automated Device Enrollment** Library Item에서 **Mac**에 대해 **설정 지원 중에 Library Items 설치**를 켭니다. 이 가이드에서 구성한 **Company Portal Auto App**, **Login Window** 및 **Single Sign-on Extension** Library Items를 추가하여 등록 설정 중에 설치되도록 합니다. 자세한 내용은 [Setup Assistant 중 Library Items 설치](/ko/endpoint/enrollment/apple/configuring-apple-enrollment#install-library-items-during-setup-assistant)를 참조하세요. 기기가 **Configuring** 상태에서 멈춘 경우 [Setup Assistant에 보류된 기기 수동 해제](/ko/endpoint/enrollment/apple/configuring-apple-enrollment#manually-release-devices-held-in-setup-assistant)를 참조하세요.