> ## Documentation Index
> Fetch the complete documentation index at: https://docs.iru.com/llms.txt
> Use this file to discover all available pages before exploring further.
# Mac에 Bitdefender를 Custom App으로 배포
> Iru Endpoint에서 Bitdefender Endpoint Security Tool을 Custom App으로 Mac 컴퓨터에 배포합니다. 설치 프로그램을 패키징하고, PPPC를 구성하고, 기기에 할당합니다.
이 가이드는 Mac 컴퓨터에 적용됩니다
설치한 특정 애플리케이션 및 버전에 따라 앱 경로, 개인정보 보호 접근 권한 및 시스템 확장 요구 사항이 다를 수 있습니다. 모범 사례로서 프로덕션 환경의 Mac에 배포하기 전에 모든 Custom Apps를 철저히 테스트할 것을 권장합니다.
### 사전 요구 사항
* [Bitdefender 관리자 포털](https://gravityzone.bitdefender.com/)에서 받은 Bitdefender 설치 프로그램 패키지. 패키지 설정에서 **uninstall password**가 설정되어 있는지 확인하십시오
* Intel 기반 Mac 컴퓨터와 Apple silicon이 탑재된 Mac 컴퓨터를 모두 보유한 경우 macOS kit (Intel x86) 및 macOS kit (Apple Silicon) 패키지를 다운로드합니다. install.xml 파일은 하나만 포함하면 됩니다. 이 가이드에서 사용하는 설치 후 스크립트는 두 설치 프로그램 유형을 모두 지원합니다
* 하나의 아키텍처에만 배포하는 경우에도 해당 설치 패키지와 포함된 install.xml 파일이 필요합니다
* Bitdefender PFX 인증서 생성기 스크립트([GitHub 링크](https://github.com/kandji-inc/support/blob/main/custom-apps/bitdefender/bitdefender_cert_generator.zsh))
* Bitdefender 설정 프로파일([GitHub 링크](https://github.com/kandji-inc/support/blob/main/custom-apps/bitdefender/bitdefender_settings.mobileconfig))
* 이 구성 프로파일은 알림에 대한 전체 디스크 접근 권한, [System Extensions](/ko/endpoint/library/library-items-profiles/system-extensions-overview-and-guide), Bitdefender SSL CA 인증서, 개인정보 보호 환경설정(PPPC) 및 네트워크 콘텐츠 필터를 활성화합니다
* Bitdefender macOS 15 이상 설정 프로파일([GitHub 링크](https://github.com/kandji-inc/support/blob/main/custom-apps/bitdefender/bitdefender_settings_macOS15.mobileconfig))
* 이 구성 프로파일에는 macOS 15 이상을 실행하는 기기를 위한 NonRemovableFromUISystemExtensions 필드가 포함되어 있습니다
* Bitdefender 서비스 관리 프로파일([GitHub 링크](https://github.com/kandji-inc/support/blob/main/custom-apps/bitdefender/bitdefender_service_management.mobileconfig))
* 이 구성 프로파일은 Bitdefender에 대한 관리형 백그라운드 항목을 허용합니다
* Bitdefender 감사 및 강제 스크립트([GitHub 링크](https://github.com/kandji-inc/support/blob/main/custom-apps/bitdefender/bitdefender_ae_script.zsh))
* Bitdefender 설치 후 스크립트([GitHub 링크](https://github.com/kandji-inc/support/blob/main/custom-apps/bitdefender/post-install.sh))
### PFX 인증서 생성
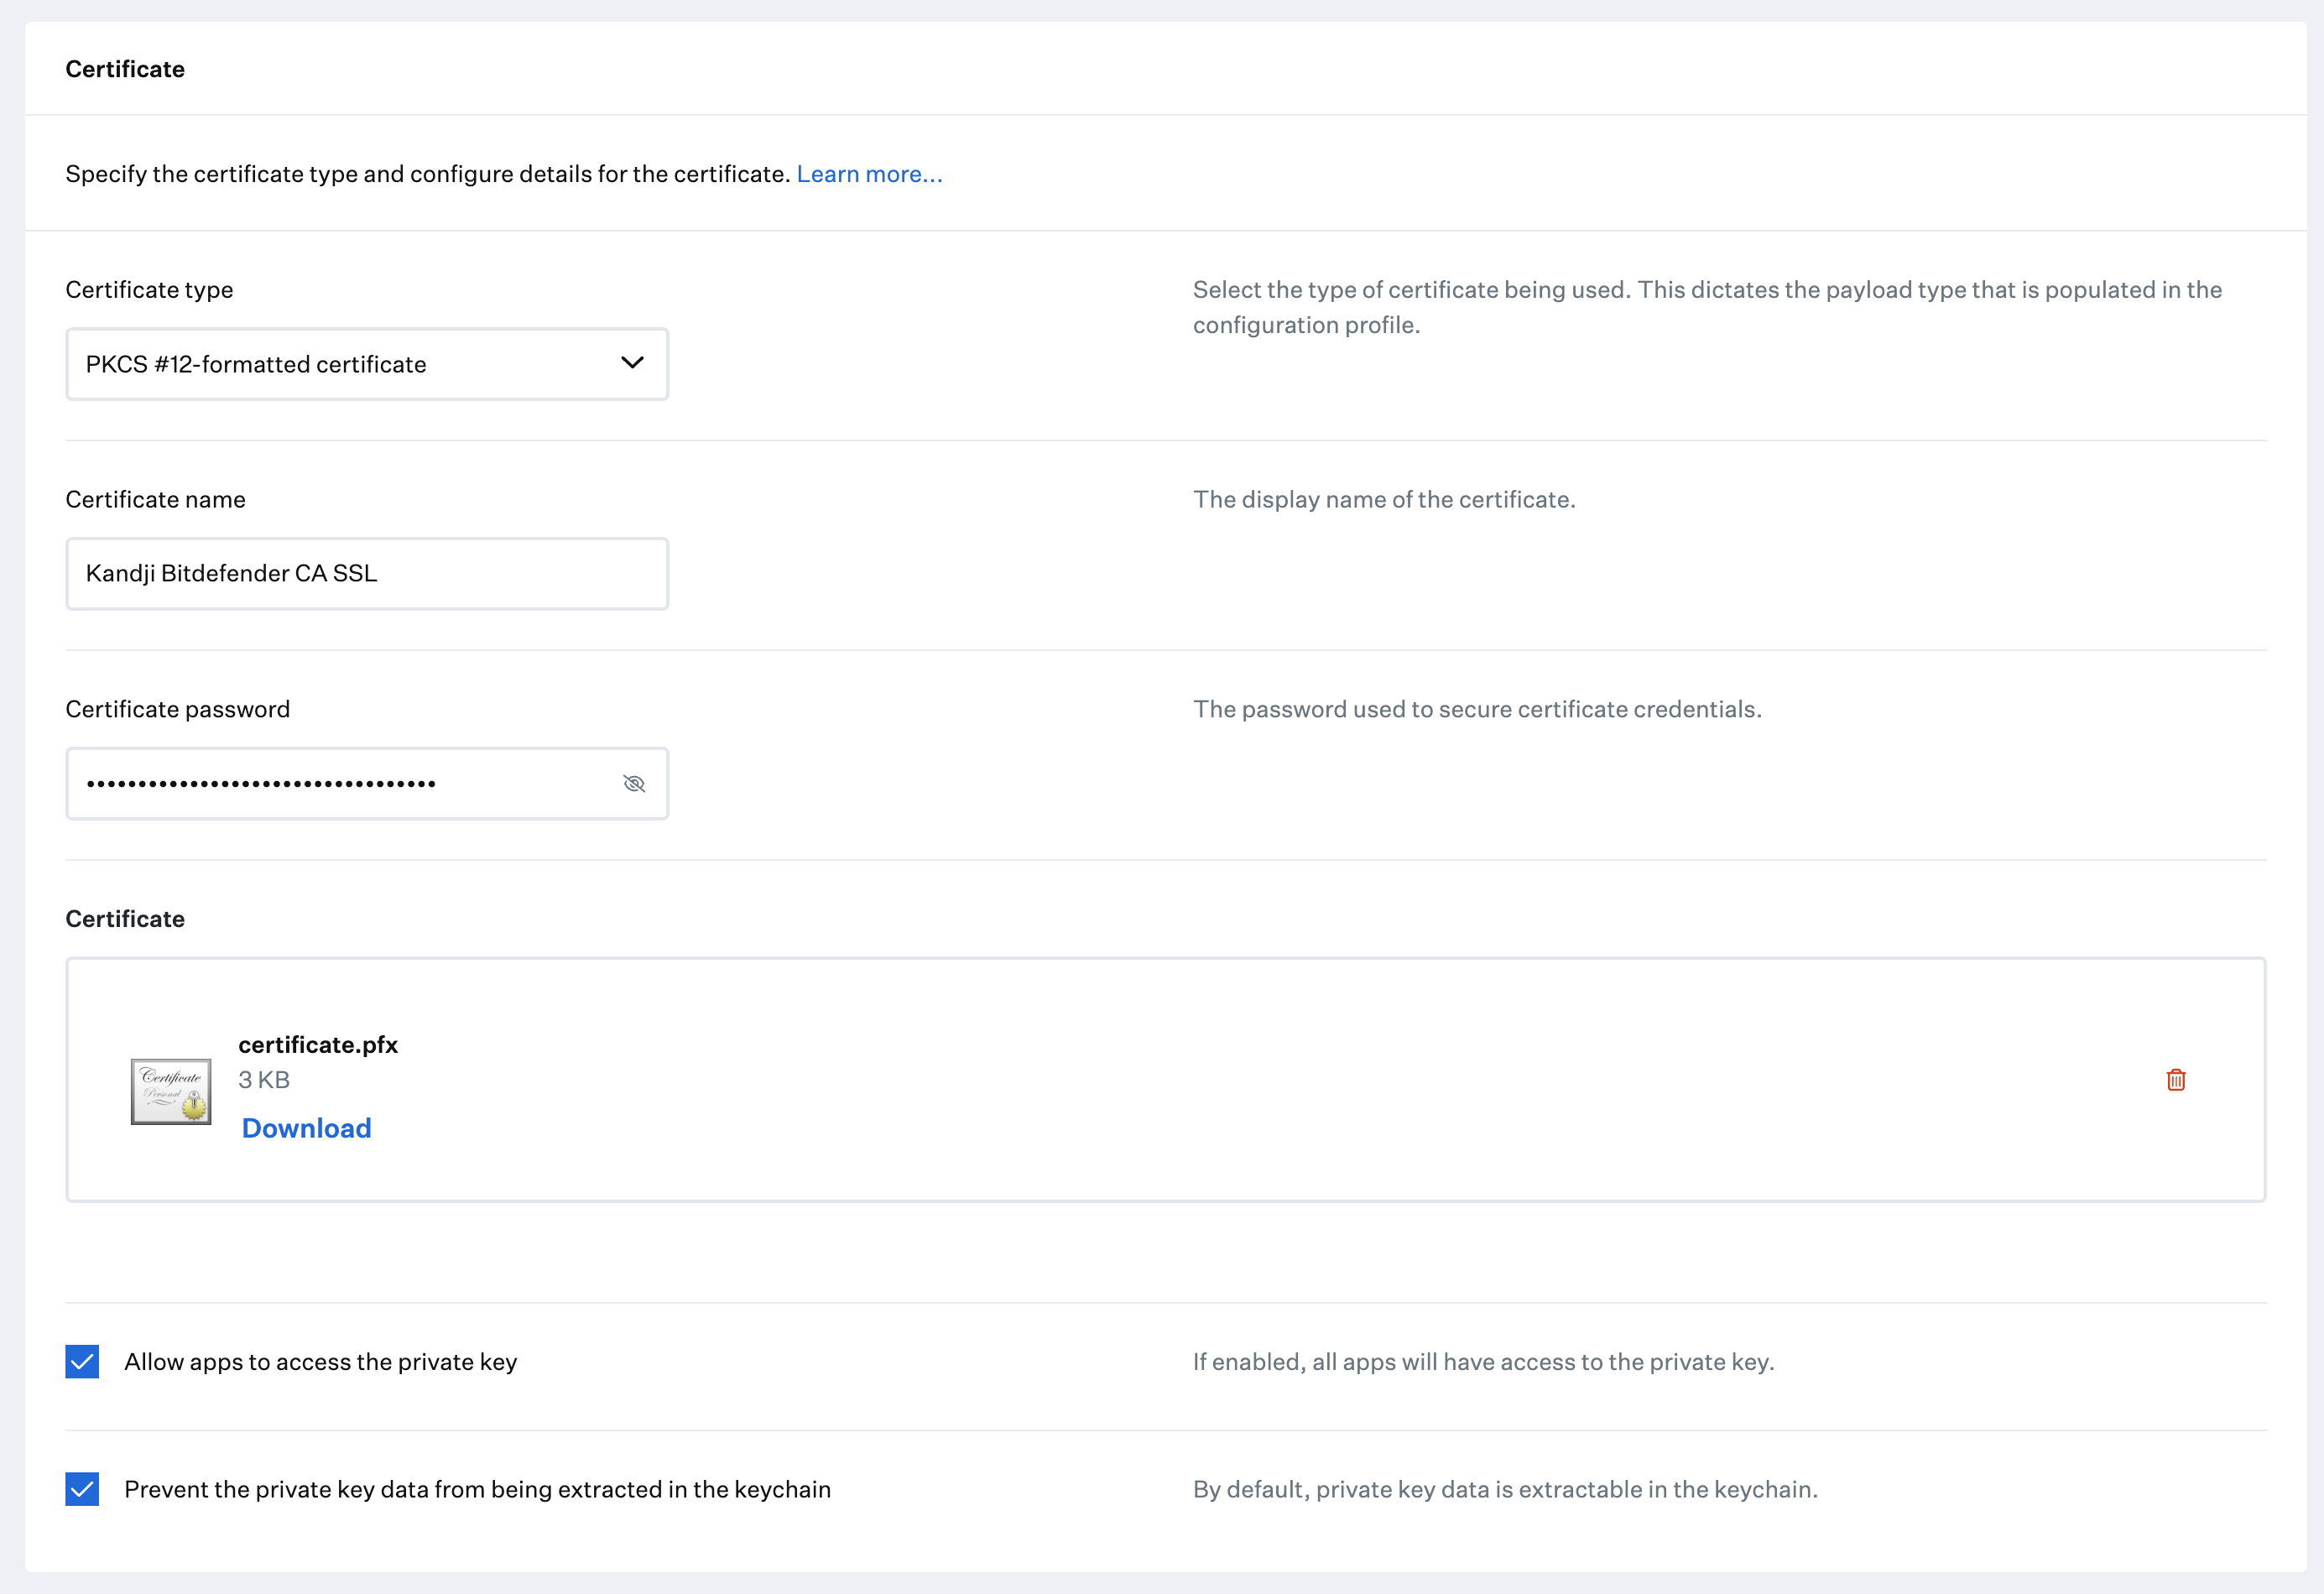
이 섹션에서는 Certificate Library Item으로 Iru Endpoint에 업로드할 수 있는 Bitdefender용 PFX 인증서를 생성하는 과정을 안내합니다.
Bitdefender는 PFX 인증서를 생성하여 macOS에 배포해야 합니다. 이 섹션은 [BitDefender 가이드](https://www.bitdefender.com/business/support/en/77209-157498-install-security-agents---use-cases.html#UUID-00e93090-1040-8119-d7cf-c48320a8d6b7)를 기반으로 하며, 자세한 내용은 해당 가이드를 참조하십시오.
VScode 또는 BBEdit와 같은 텍스트 편집기나 IDE에서 **PFX Certificate Generator script**를 엽니다.
스크립트의 인증서 정보 섹션을 입력합니다.
```bash lines theme={null}
VARIABLES
# Cert info
COUNTRY="" # US - 2 letter country code
STATE="" # Georgia - state or province
LOCAL="" # Atlanta - locality name
ORG_NAME="Endpoint" # Leave as default
CERT_NAME=" BitDefender CA SSL" # Leave as default
```
업데이트된 스크립트를 데스크탑에 저장합니다.
**Terminal.app**을 엽니다.
터미널에서 다음 명령을 실행합니다.
```bash theme={null}
zsh '/Users//Desktop/bitdefender/bitdefender_cert_generator.zsh'
```
메시지가 표시되면 Bitdefender 포털에서 정의한 Bitdefender 설치 프로그램 설정에 사용된 암호를 입력하고 확인합니다.
스크립트가 완료되면 인증서를 생성하는 데 사용된 암호 해시가 표시됩니다. 생성된 해시를 복사하여 Iru Endpoint에서 Certificate Library Item을 생성할 때 암호 필드에 붙여넣습니다.
```bash theme={null}
Password hash: 626cacdec63355c2680dbd6747c8d755
```
데스크탑에서 **certificate.pfx** 파일을 보여주는 Finder.app 창이 열립니다.
이 인증서를 [Certificate Library Item](/ko/endpoint/library/library-items-profiles/configure-the-certificate-library-item)으로 Iru Endpoint에 업로드합니다.
 ### Custom Profile Library Item 추가
이 Library Item을 Iru Endpoint Library에 추가하려면 [Library 개요](/ko/endpoint/library/library-items-profiles/library-overview) 문서에 설명된 단계를 따르십시오.
### Bitdefender 프로파일 구성
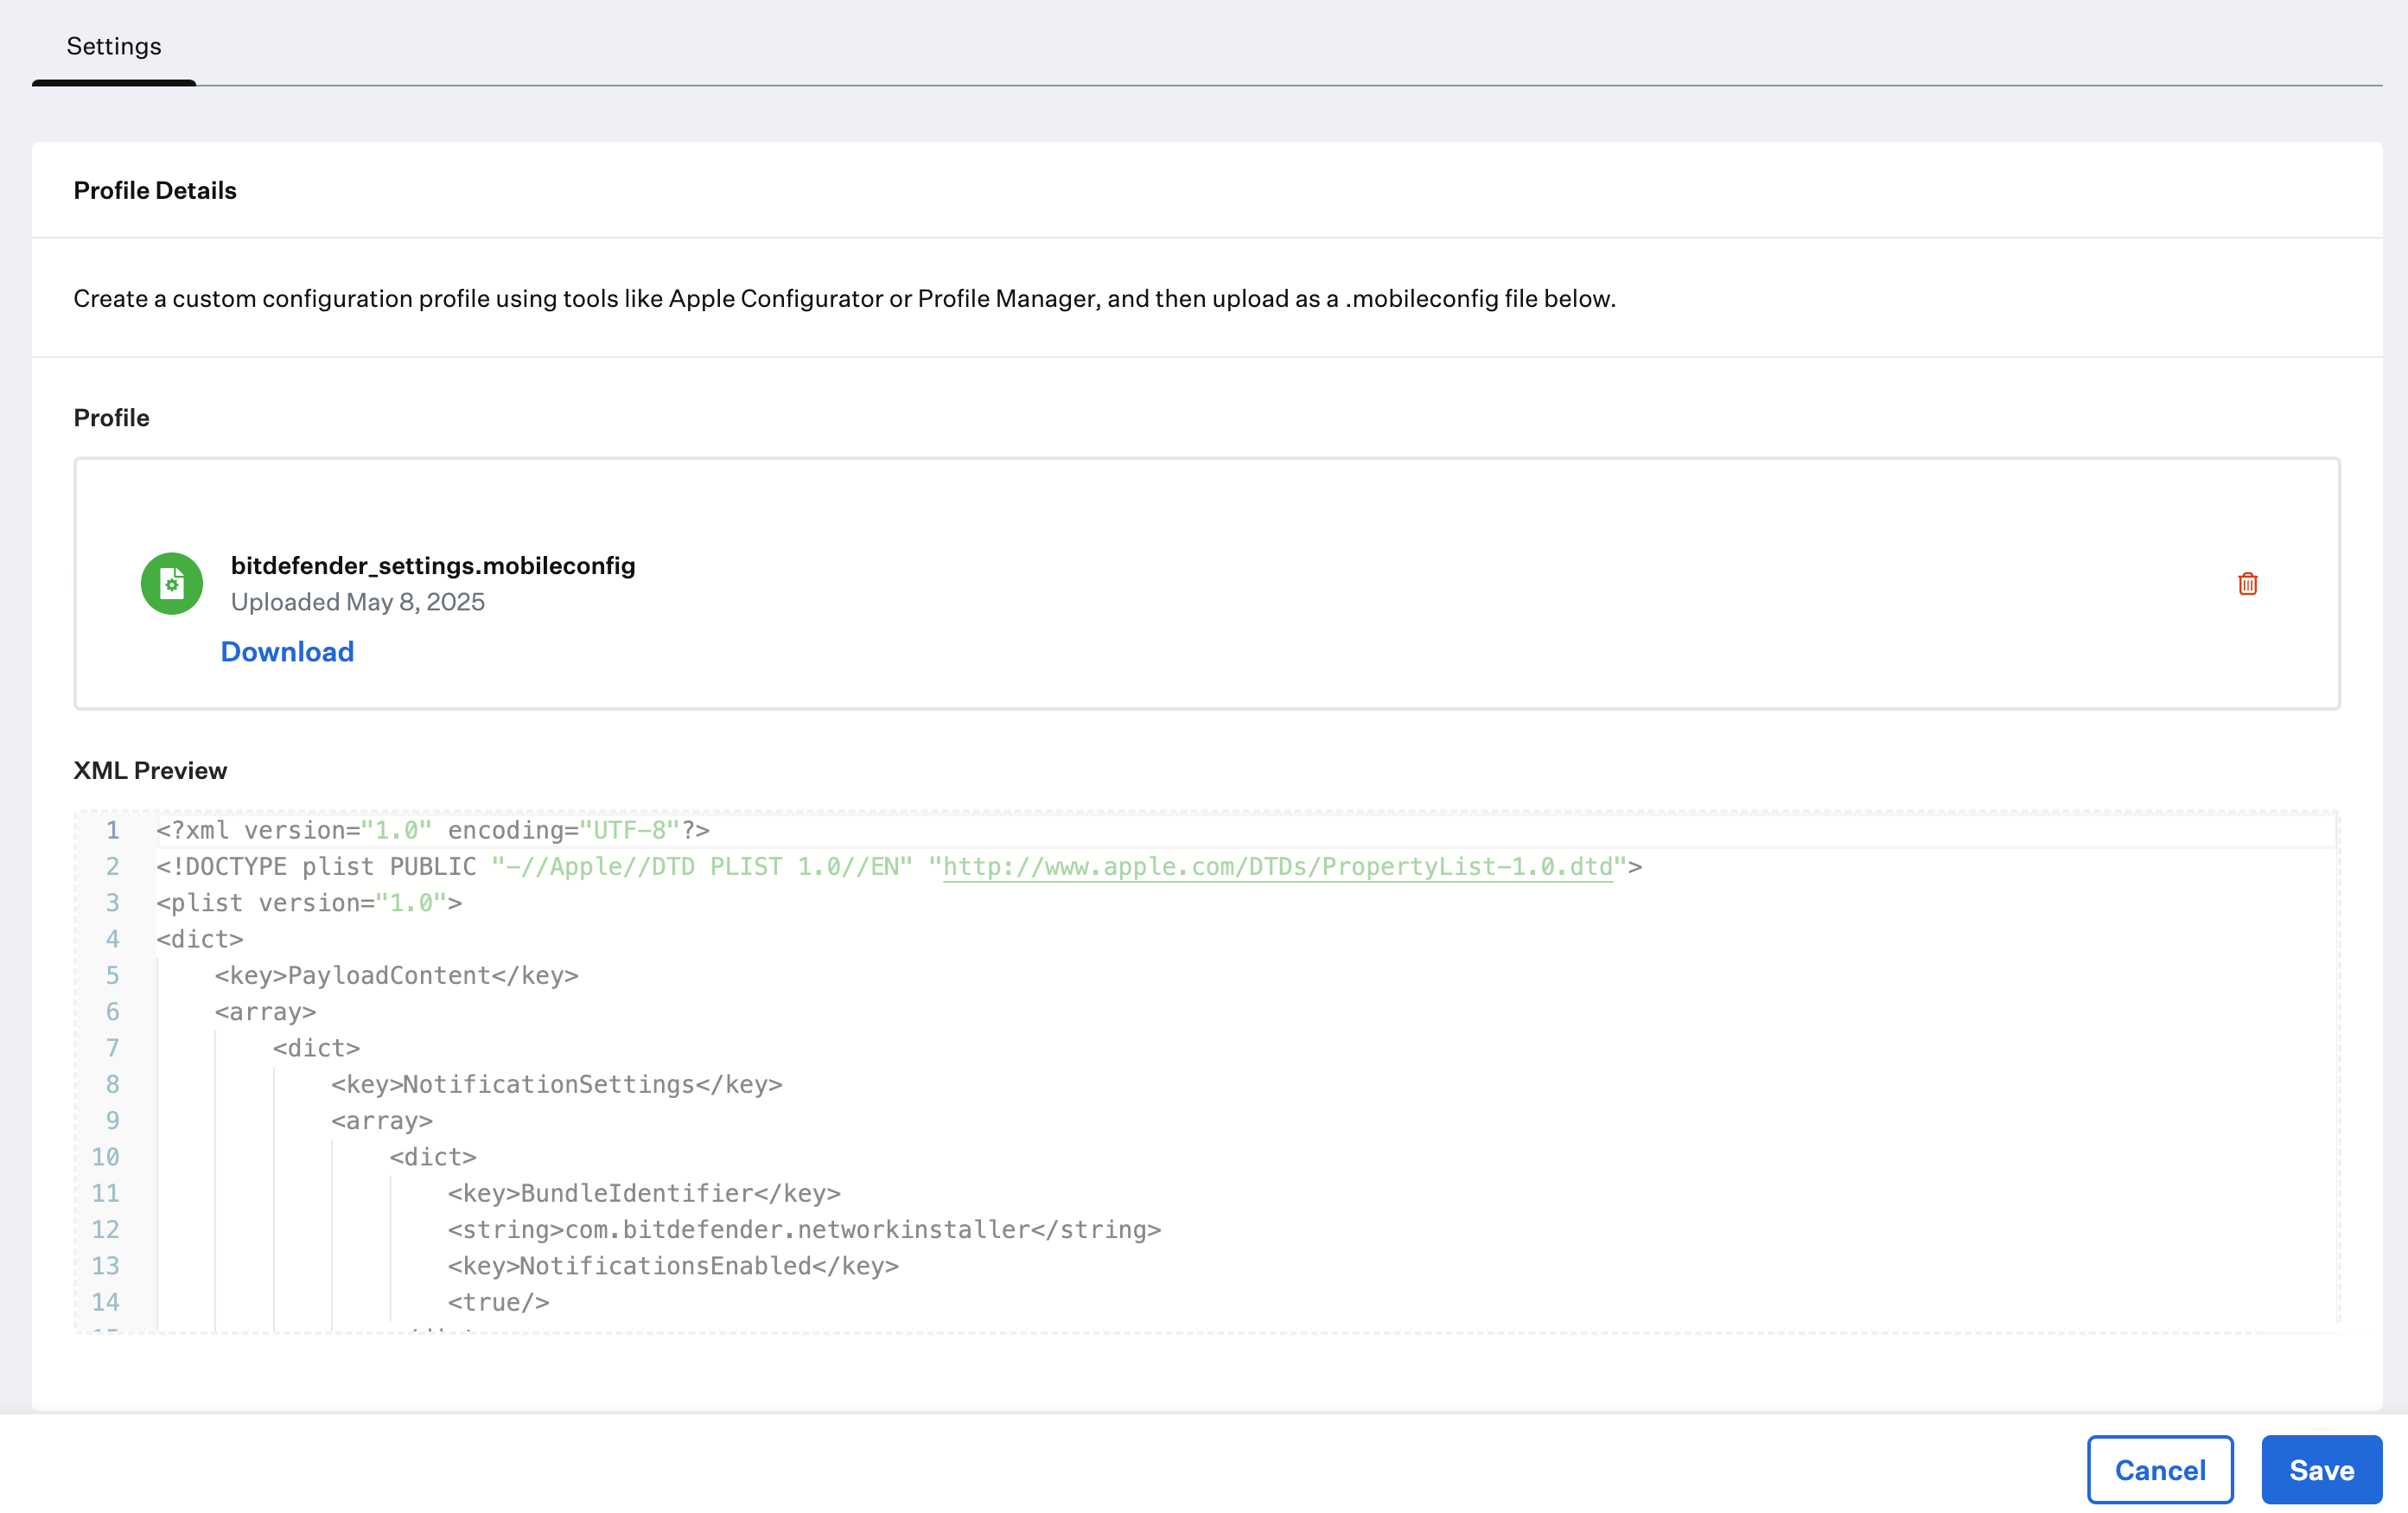
프로파일에 이름을 지정합니다.
**설치 대상**에서 Mac을 선택합니다.
Custom Profile을 Blueprint에 할당합니다.
이전에 다운로드한 `bitdefender_settings.mobileconfig` 파일을 업로드합니다.
**저장**을 선택합니다.
[사전 요구 사항](/ko/endpoint/library/deployment-guides/apple/deploy-bitdefender-endpoint-security-tool-as-a-custom-app#prerequisites) 섹션에서 다운로드한 `bitdefender_settings_macOS15.mobileconfig` 및 `bitdefender_service_management.mobileconfig` 파일에 대해 이전 단계를 반복합니다.
### Custom Profile Library Item 추가
이 Library Item을 Iru Endpoint Library에 추가하려면 [Library 개요](/ko/endpoint/library/library-items-profiles/library-overview) 문서에 설명된 단계를 따르십시오.
### Bitdefender 프로파일 구성
프로파일에 이름을 지정합니다.
**설치 대상**에서 Mac을 선택합니다.
Custom Profile을 Blueprint에 할당합니다.
이전에 다운로드한 `bitdefender_settings.mobileconfig` 파일을 업로드합니다.
**저장**을 선택합니다.
[사전 요구 사항](/ko/endpoint/library/deployment-guides/apple/deploy-bitdefender-endpoint-security-tool-as-a-custom-app#prerequisites) 섹션에서 다운로드한 `bitdefender_settings_macOS15.mobileconfig` 및 `bitdefender_service_management.mobileconfig` 파일에 대해 이전 단계를 반복합니다.
 ### 설치 프로그램 파일 압축
설치 프로그램 파일을 Iru Endpoint에 업로드하기 전에 먼저 파일을 함께 압축해야 합니다.
이전에 Bitdefender 콘솔에서 다운로드한 Bitdefender 설치 프로그램 파일로 이동합니다. Intel 및 Apple ARM DMG 파일을 다운로드한 경우 먼저 마운트한 다음 설치 프로그램 파일을 꺼내야 할 수 있습니다.
설치 프로그램 패키지, **installer.xml** 파일 및 **certificate.pfx** 파일을 데스크탑과 같은 동일한 위치에 둡니다. **installer.xml** 파일은 하나만 필요하며, Intel 다운로드 또는 ARM 다운로드의 파일 중 어느 것을 사용해도 됩니다.
모든 파일을 한 번에 선택합니다.
선택한 파일을 Control-클릭한 다음 메뉴에서 **Compress**를 선택합니다. 대화상자에 압축 진행 상황이 표시됩니다.
동일한 디렉토리에 **Archive.zip** 파일이 생성됩니다. 파일 이름을 **bitdefender\_install.zip**과 같이 자유롭게 변경할 수 있습니다. 이 파일은 다음 섹션에서 Iru Endpoint에 업로드할 파일입니다.
### Custom App
이 Library Item을 Iru Endpoint Library에 추가하려면 [Library 개요](/ko/endpoint/library/library-items-profiles/library-overview) 문서에 설명된 단계를 따르십시오.
Custom App에 이름을 지정합니다. 선택적으로 사용자 지정 아이콘을 추가합니다.
원하는 Blueprint에 할당합니다.
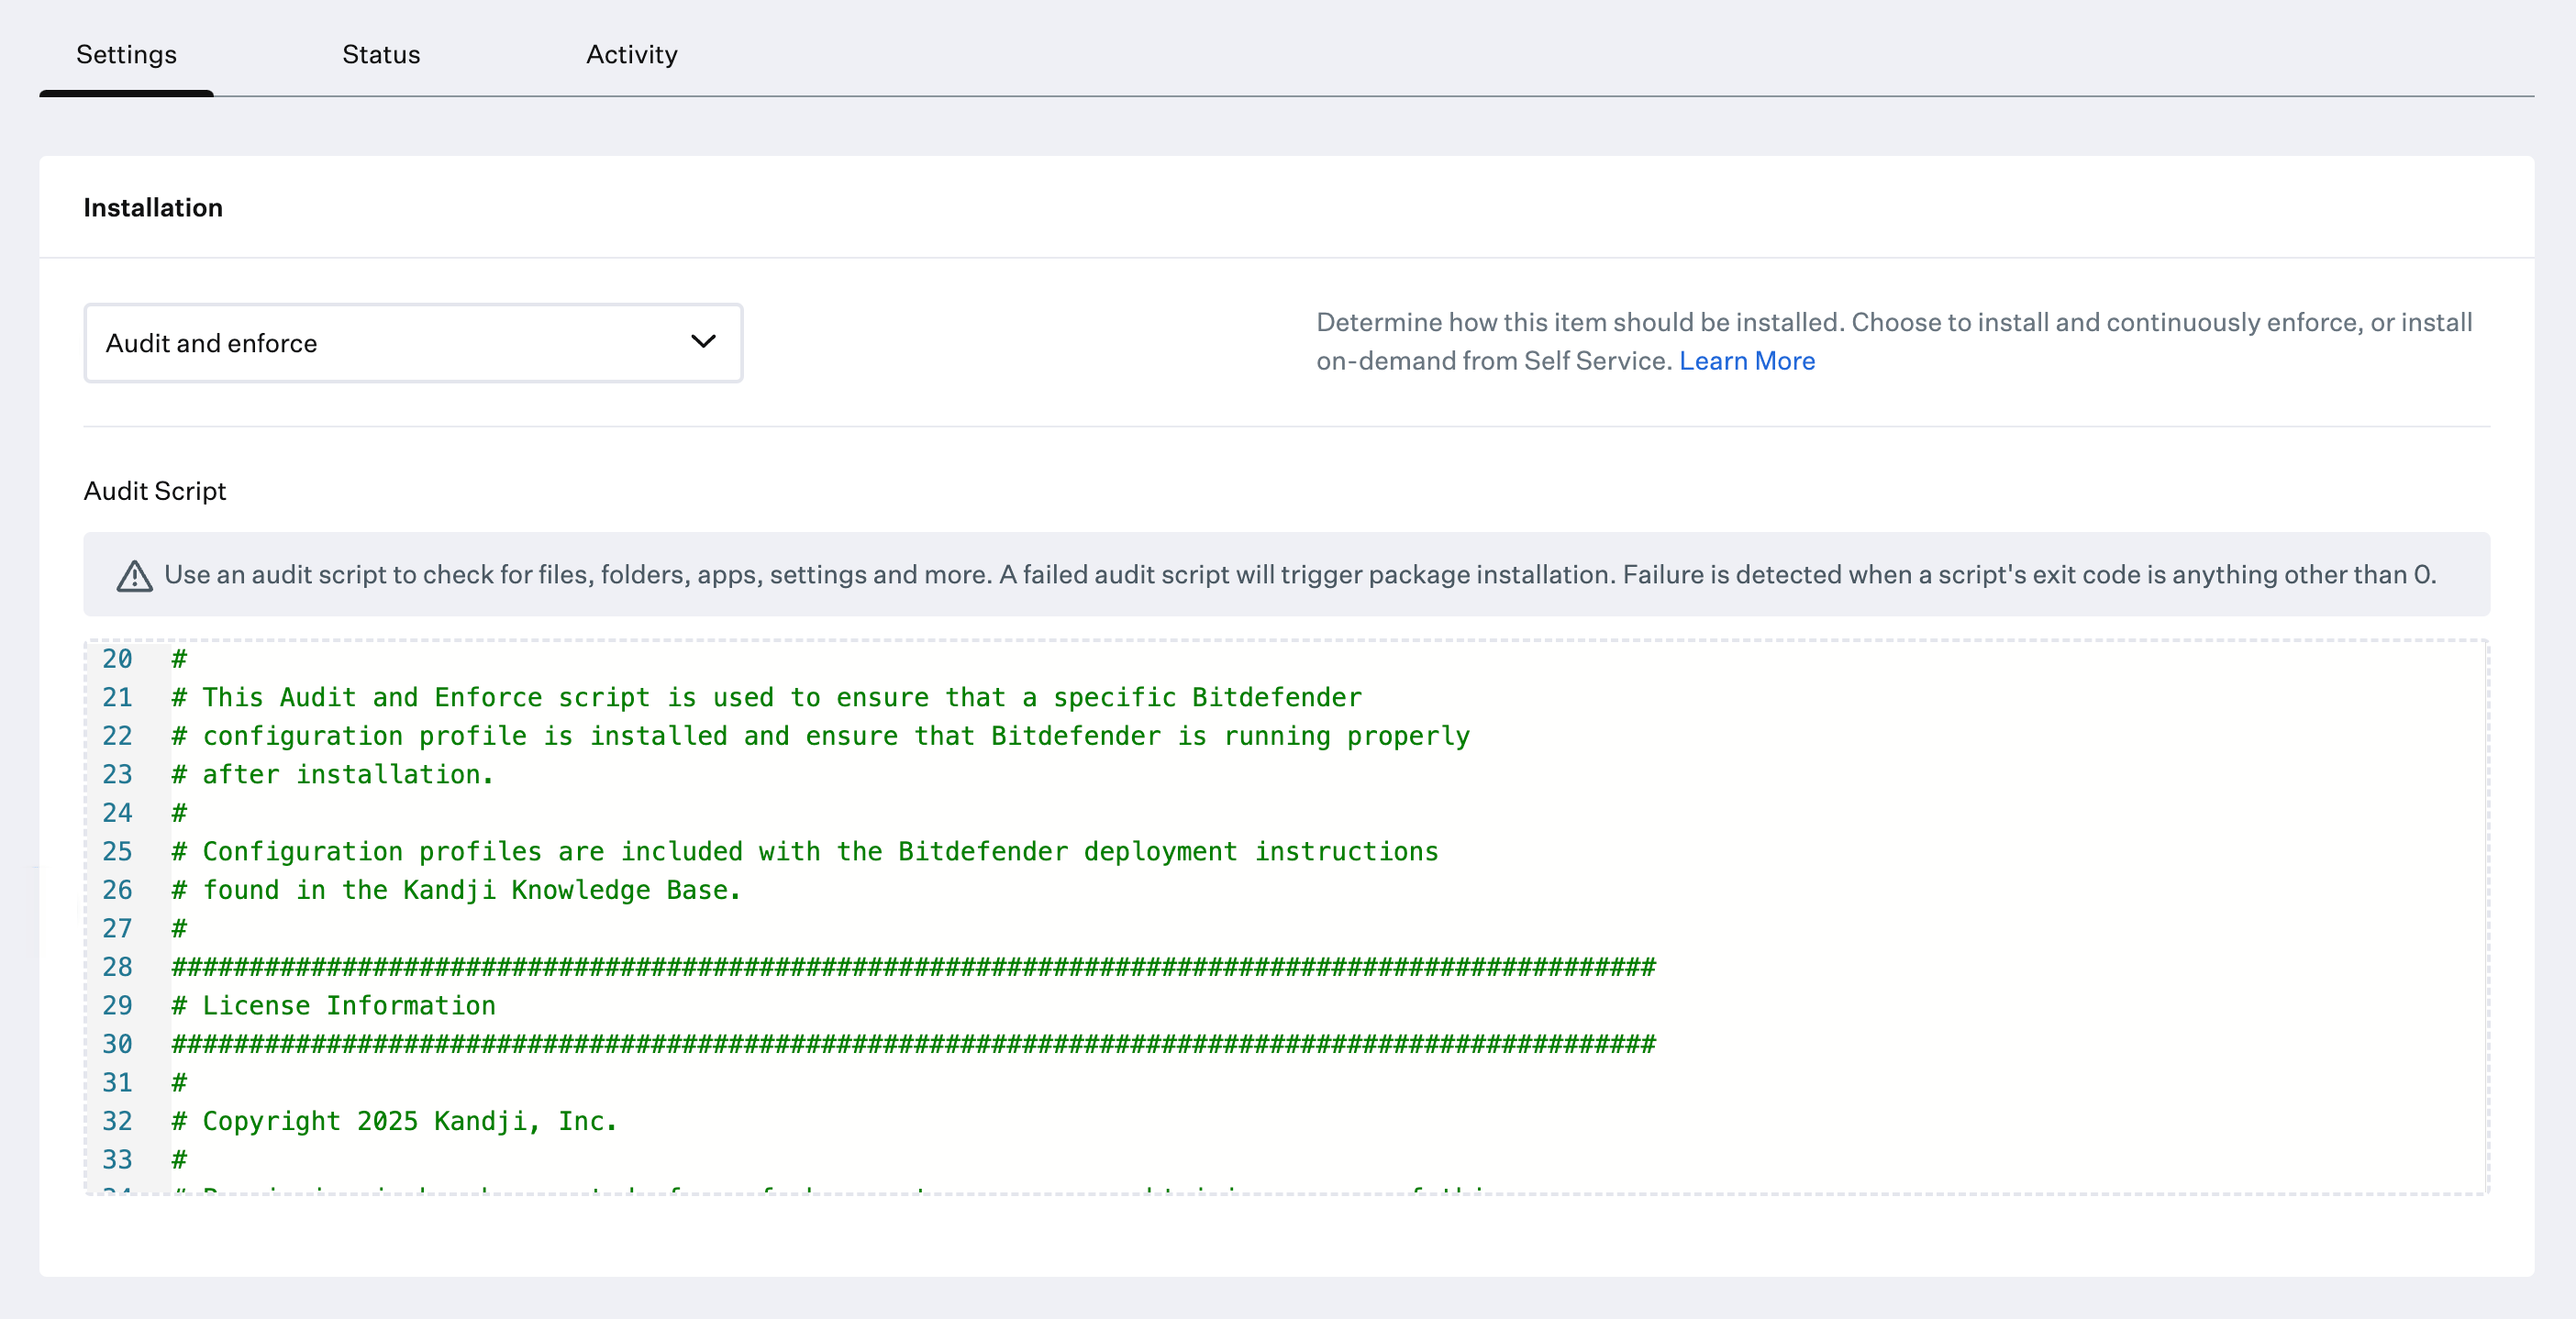
설치 유형을 **Audit and enforce**로 변경합니다.
[사전 요구 사항](/ko/endpoint/library/deployment-guides/apple/deploy-bitdefender-endpoint-security-tool-as-a-custom-app#prerequisites) 섹션에서 다운로드한 bitdefender\_ae\_script.zsh 스크립트를 복사하여 **Audit & Enforce** 텍스트 상자에 붙여넣습니다. 수정할 필요는 없습니다.
이 스크립트는 설치를 시도하기 전에 두 개의 프로파일 식별자와 설치된 Bitdefender 앱의 이름을 찾습니다. 또한 앱이 이미 설치된 컴퓨터에서 두 개의 Launch Daemon을 찾아 앱이 예상대로 실행되고 있는지 확인합니다. 다른 프로파일과 함께 이 스크립트를 사용하려면 프로파일 식별자 접두사 정보를 프로파일에 있는 내용과 일치하도록 업데이트하십시오.
```bash lines theme={null}
Settings Profile prefix: io.kandji.bitdefender.D0DF2C14
Background Service Management Profile prefix: io.kandji.bitdefender.service-management
App name: "Endpoint Security for Mac.app"
Processes: "com.bitdefender.epsecurity.BDLDaemonApp", "com.epsecurity.bdldaemon"
```
### 설치 프로그램 파일 압축
설치 프로그램 파일을 Iru Endpoint에 업로드하기 전에 먼저 파일을 함께 압축해야 합니다.
이전에 Bitdefender 콘솔에서 다운로드한 Bitdefender 설치 프로그램 파일로 이동합니다. Intel 및 Apple ARM DMG 파일을 다운로드한 경우 먼저 마운트한 다음 설치 프로그램 파일을 꺼내야 할 수 있습니다.
설치 프로그램 패키지, **installer.xml** 파일 및 **certificate.pfx** 파일을 데스크탑과 같은 동일한 위치에 둡니다. **installer.xml** 파일은 하나만 필요하며, Intel 다운로드 또는 ARM 다운로드의 파일 중 어느 것을 사용해도 됩니다.
모든 파일을 한 번에 선택합니다.
선택한 파일을 Control-클릭한 다음 메뉴에서 **Compress**를 선택합니다. 대화상자에 압축 진행 상황이 표시됩니다.
동일한 디렉토리에 **Archive.zip** 파일이 생성됩니다. 파일 이름을 **bitdefender\_install.zip**과 같이 자유롭게 변경할 수 있습니다. 이 파일은 다음 섹션에서 Iru Endpoint에 업로드할 파일입니다.
### Custom App
이 Library Item을 Iru Endpoint Library에 추가하려면 [Library 개요](/ko/endpoint/library/library-items-profiles/library-overview) 문서에 설명된 단계를 따르십시오.
Custom App에 이름을 지정합니다. 선택적으로 사용자 지정 아이콘을 추가합니다.
원하는 Blueprint에 할당합니다.
설치 유형을 **Audit and enforce**로 변경합니다.
[사전 요구 사항](/ko/endpoint/library/deployment-guides/apple/deploy-bitdefender-endpoint-security-tool-as-a-custom-app#prerequisites) 섹션에서 다운로드한 bitdefender\_ae\_script.zsh 스크립트를 복사하여 **Audit & Enforce** 텍스트 상자에 붙여넣습니다. 수정할 필요는 없습니다.
이 스크립트는 설치를 시도하기 전에 두 개의 프로파일 식별자와 설치된 Bitdefender 앱의 이름을 찾습니다. 또한 앱이 이미 설치된 컴퓨터에서 두 개의 Launch Daemon을 찾아 앱이 예상대로 실행되고 있는지 확인합니다. 다른 프로파일과 함께 이 스크립트를 사용하려면 프로파일 식별자 접두사 정보를 프로파일에 있는 내용과 일치하도록 업데이트하십시오.
```bash lines theme={null}
Settings Profile prefix: io.kandji.bitdefender.D0DF2C14
Background Service Management Profile prefix: io.kandji.bitdefender.service-management
App name: "Endpoint Security for Mac.app"
Processes: "com.bitdefender.epsecurity.BDLDaemonApp", "com.epsecurity.bdldaemon"
```
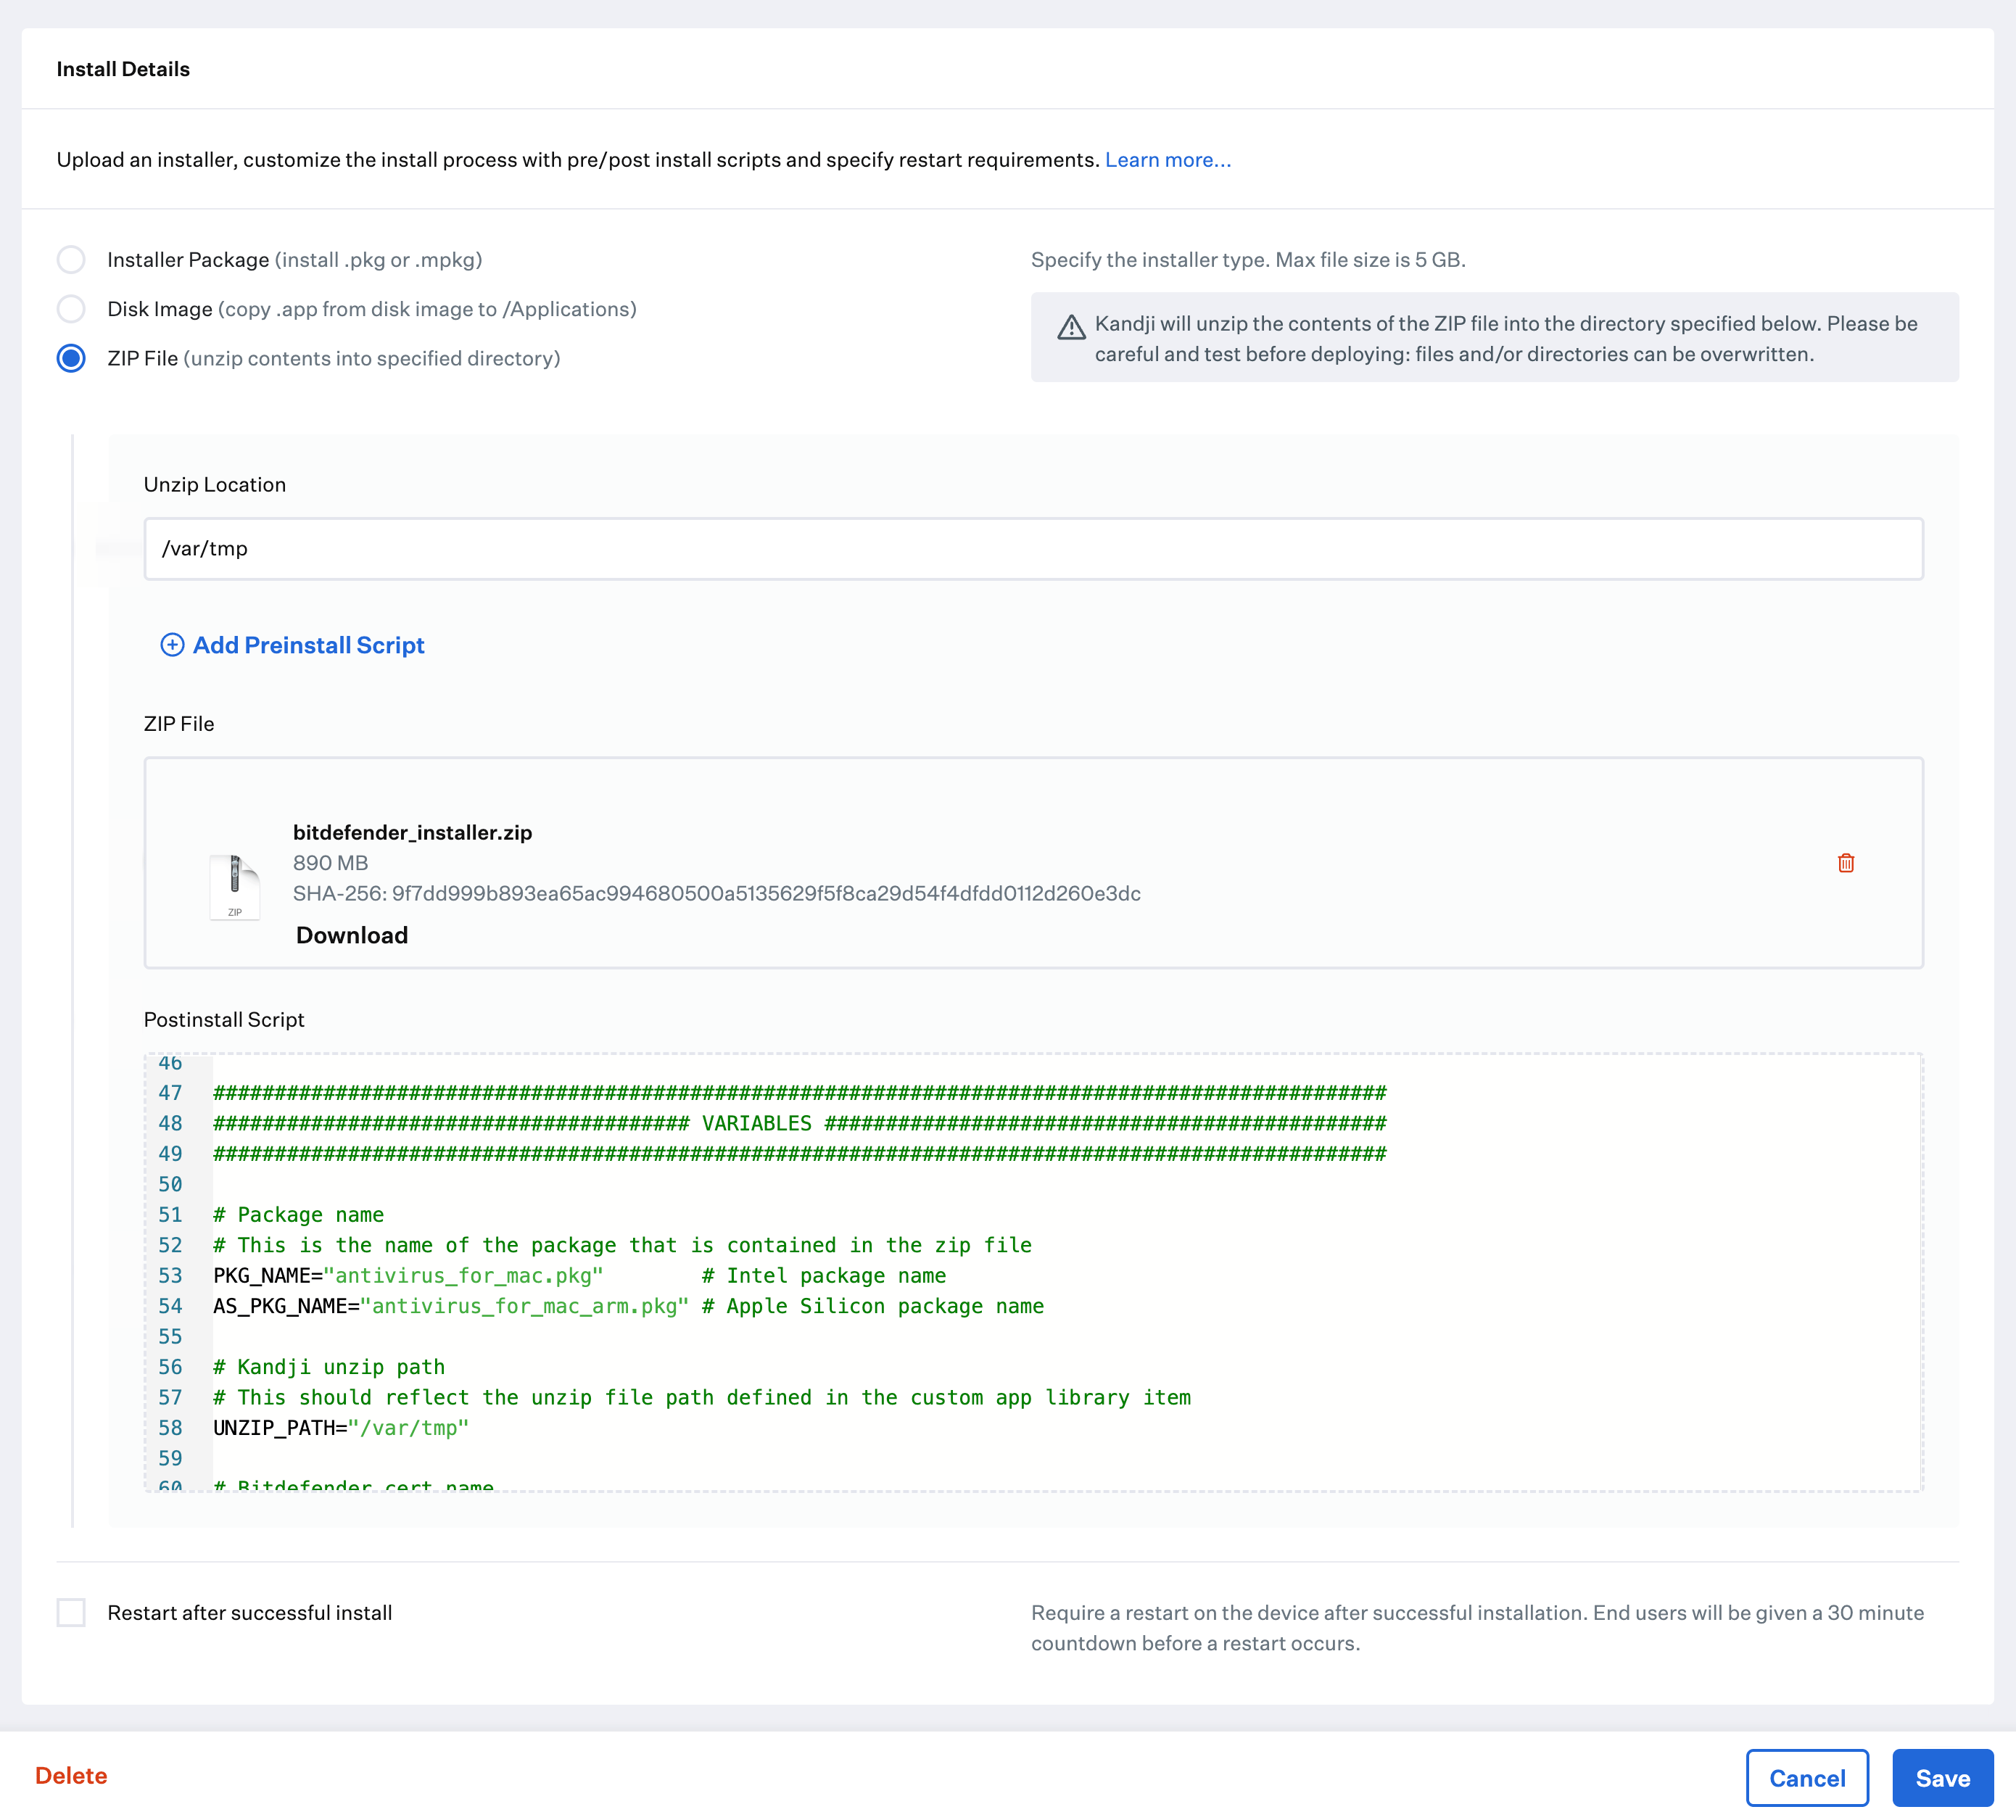
 배포 유형으로 \*\*ZIP File (unzip contents into specified directory)\*\*을 선택합니다.
**Unzip Location**을 **/var/tmp**로 설정합니다.
이전에 다운로드한 설치 프로그램 zip 파일을 업로드합니다.
**Add Postinstall Script**를 선택합니다.
[사전 요구 사항](/ko/endpoint/library/deployment-guides/apple/deploy-bitdefender-endpoint-security-tool-as-a-custom-app#prerequisites) 섹션에서 다운로드한 설치 후 스크립트를 복사하여 설치 후 텍스트 필드에 붙여넣습니다. 맨 위의 #!/bin/sh(shebang) 줄을 포함하여 모든 텍스트를 복사해야 합니다.
* 패키지 이름이 Bitdefender에서 다운로드한 이름과 일치하는지 확인합니다
* 인증서 파일 이름이 Bitdefender KB를 사용하여 생성한 인증서 파일과 일치하는지 확인합니다
**저장**을 선택합니다.
배포 유형으로 \*\*ZIP File (unzip contents into specified directory)\*\*을 선택합니다.
**Unzip Location**을 **/var/tmp**로 설정합니다.
이전에 다운로드한 설치 프로그램 zip 파일을 업로드합니다.
**Add Postinstall Script**를 선택합니다.
[사전 요구 사항](/ko/endpoint/library/deployment-guides/apple/deploy-bitdefender-endpoint-security-tool-as-a-custom-app#prerequisites) 섹션에서 다운로드한 설치 후 스크립트를 복사하여 설치 후 텍스트 필드에 붙여넣습니다. 맨 위의 #!/bin/sh(shebang) 줄을 포함하여 모든 텍스트를 복사해야 합니다.
* 패키지 이름이 Bitdefender에서 다운로드한 이름과 일치하는지 확인합니다
* 인증서 파일 이름이 Bitdefender KB를 사용하여 생성한 인증서 파일과 일치하는지 확인합니다
**저장**을 선택합니다.
 ### Assignment Maps를 사용한 배포
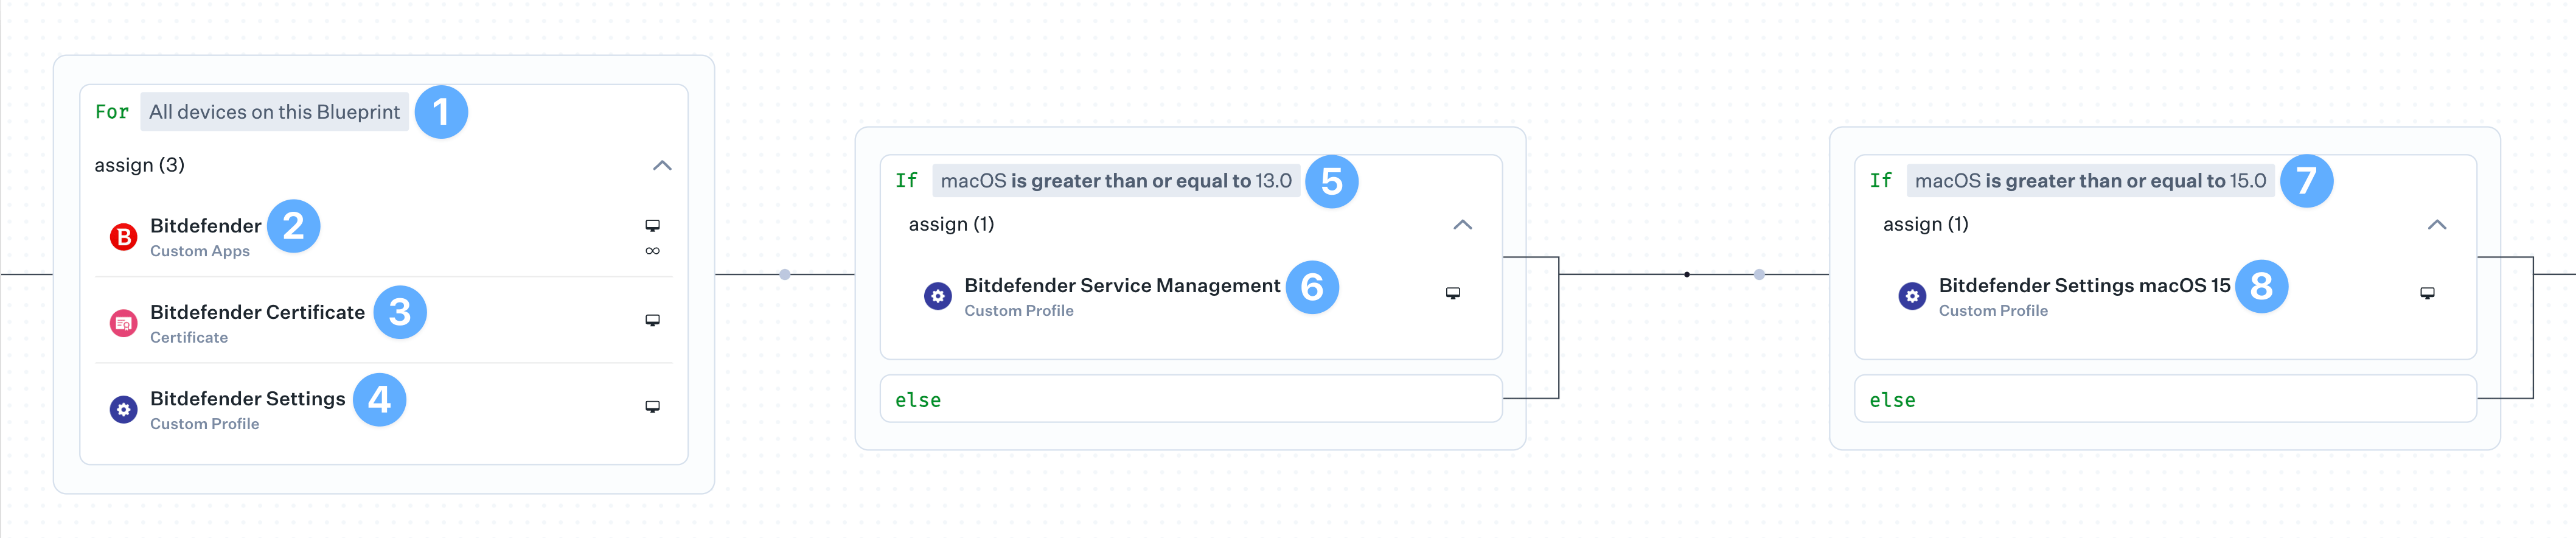
Bitdefender Custom Profile 중 두 개는 올바른 기기에 배포되도록 조건부 로직이 필요합니다. Assignment Map은 하나의 편리한 보기에서 모든 기기에 대한 간편한 솔루션을 제공합니다.
[Blueprint 생성](/ko/endpoint/getting-started/blueprints-and-library/configuring-blueprints) 및 [Blueprint에서 조건부 로직 사용](/ko/endpoint/blueprints/assignment-maps/using-conditional-logic-in-blueprints) 문서를 검토하십시오.
**For All devices on this Blueprint** 조건부 블록으로 시작합니다.
**Bitdefender** **Custom App**을 블록에 할당합니다.
여러 Custom Apps가 필요한 경우 다양한 설치 프로그램 버전에 대한 조건이 있는 조건부 블록을 생성합니다.
**Bitdefender Certificate Library Item**을 조건부 블록에 할당합니다.
**bitdefender\_settings** Custom Profile을 조건부 블록에 할당합니다.
조건부 블록의 상단을 **If macOS is greater than or equal to 13.0**으로 설정합니다.
**bitdefender\_service\_management** Custom Profile을 조건부 블록에 할당합니다.
조건부 블록의 상단을 **If** **macOS is greater than or equal to 15.0**으로 설정합니다.
**bitdefender\_settings\_macOS15** Custom Profile을 조건부 블록에 할당합니다.
### Assignment Maps를 사용한 배포
Bitdefender Custom Profile 중 두 개는 올바른 기기에 배포되도록 조건부 로직이 필요합니다. Assignment Map은 하나의 편리한 보기에서 모든 기기에 대한 간편한 솔루션을 제공합니다.
[Blueprint 생성](/ko/endpoint/getting-started/blueprints-and-library/configuring-blueprints) 및 [Blueprint에서 조건부 로직 사용](/ko/endpoint/blueprints/assignment-maps/using-conditional-logic-in-blueprints) 문서를 검토하십시오.
**For All devices on this Blueprint** 조건부 블록으로 시작합니다.
**Bitdefender** **Custom App**을 블록에 할당합니다.
여러 Custom Apps가 필요한 경우 다양한 설치 프로그램 버전에 대한 조건이 있는 조건부 블록을 생성합니다.
**Bitdefender Certificate Library Item**을 조건부 블록에 할당합니다.
**bitdefender\_settings** Custom Profile을 조건부 블록에 할당합니다.
조건부 블록의 상단을 **If macOS is greater than or equal to 13.0**으로 설정합니다.
**bitdefender\_service\_management** Custom Profile을 조건부 블록에 할당합니다.
조건부 블록의 상단을 **If** **macOS is greater than or equal to 15.0**으로 설정합니다.
**bitdefender\_settings\_macOS15** Custom Profile을 조건부 블록에 할당합니다.