> ## Documentation Index
> Fetch the complete documentation index at: https://docs.iru.com/llms.txt
> Use this file to discover all available pages before exploring further.
# Apple 설정
> Iru Endpoint에서 Apple 플랫폼 통합을 설정합니다. APNs, Apple Business, Automated Device Enrollment, Apps and Books를 구성하십시오.
이 가이드는 Mac 컴퓨터, iPhone, iPad, Apple TV 기기, Apple Vision Pro에 적용됩니다
**Apple Business Manager**는 이제 **Apple Business**입니다. **Apple School Manager**는 변경되지 않았습니다. 자세한 내용은 [Introducing Apple Business](https://www.apple.com/newsroom/2026/03/introducing-apple-business-a-new-all-in-one-platform-for-businesses-of-all-sizes/) 및 [Apple Business Manager is now Apple Business](https://support.apple.com/guide/apple-business-manager/apple-business-manager-is-now-apple-business-axmd79d79dea/web)를 참조하십시오.
Apple 플랫폼 통합을 설정하면 Mac 컴퓨터, iPhone, iPad, Apple TV 기기, Apple Vision Pro를 한곳에서 보호하고 관리할 수 있습니다. Apple Push Notification service(APNs), Automated Device Enrollment(ADE), Apps and Books를 순서대로 구성합니다.
## Apple Push Notification service(APNs) 구성
APNs는 Apple 기기와 통신하는 데 필요합니다. 최상의 결과를 얻으려면 macOS 컴퓨터를 사용하십시오.
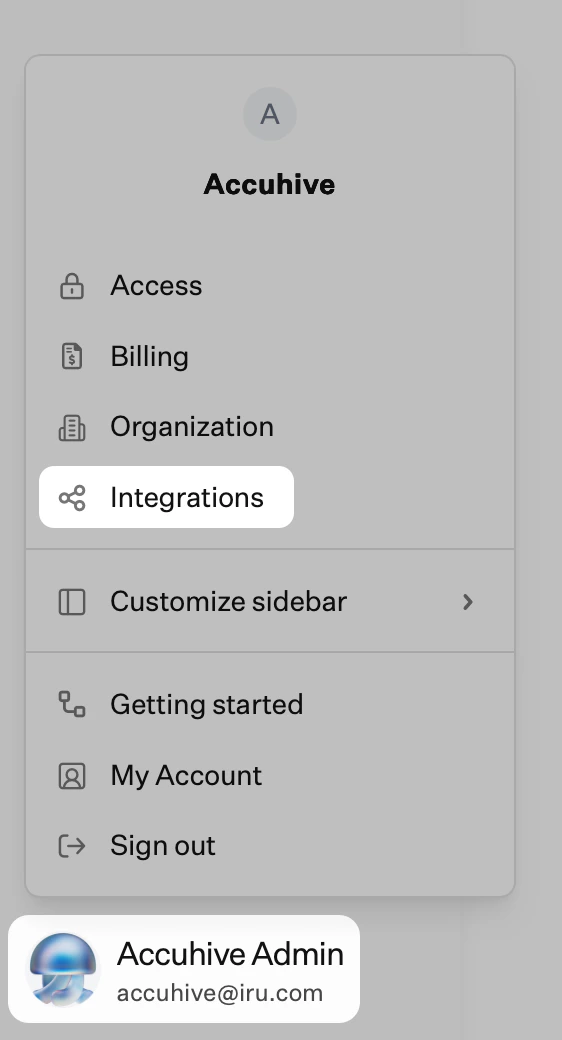
사이드바에서 [**계정 메뉴 버튼**](/ko/iru/platform-overview/account-menu)을 선택한 다음 **통합**을 선택하십시오.
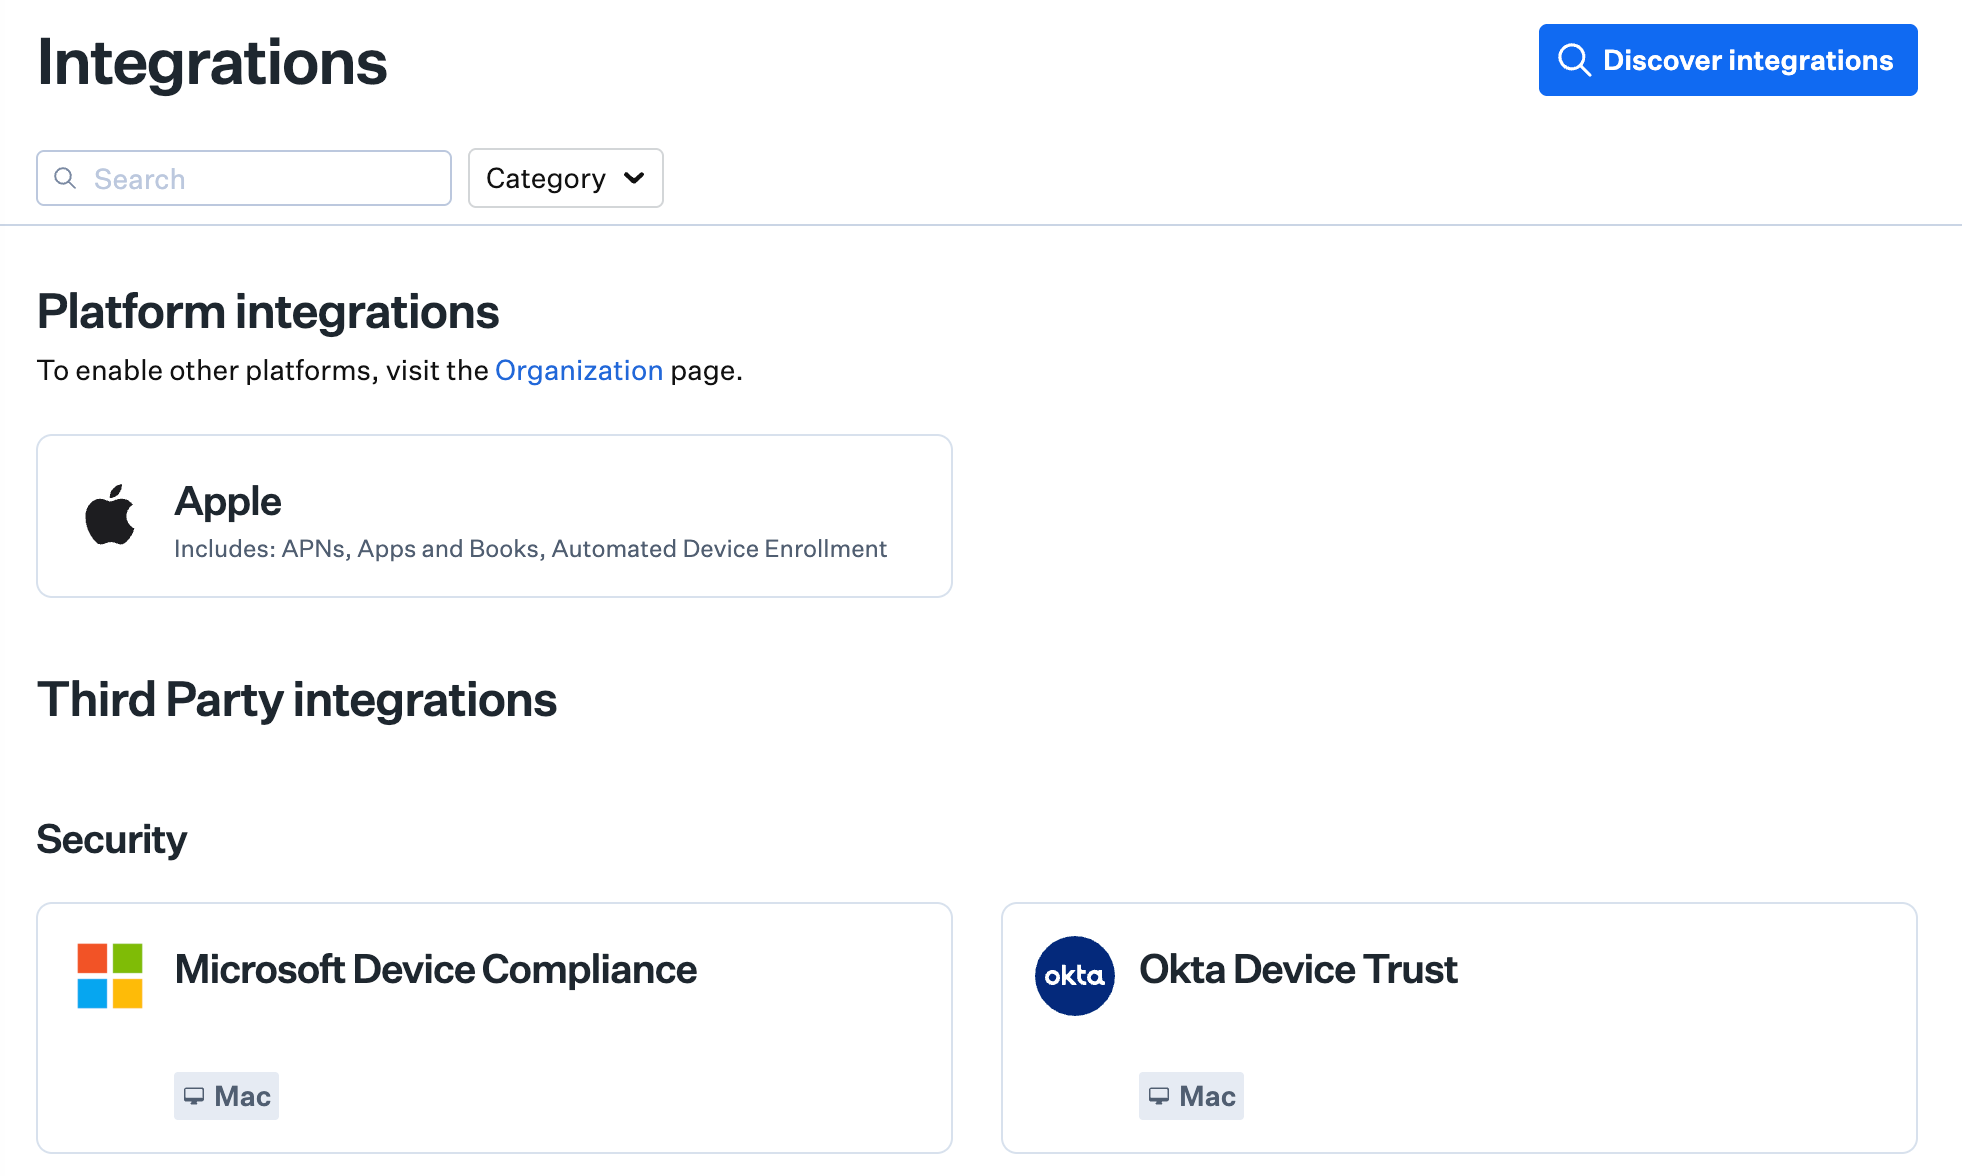
 **플랫폼 통합**에서 **Apple**을 선택하십시오.
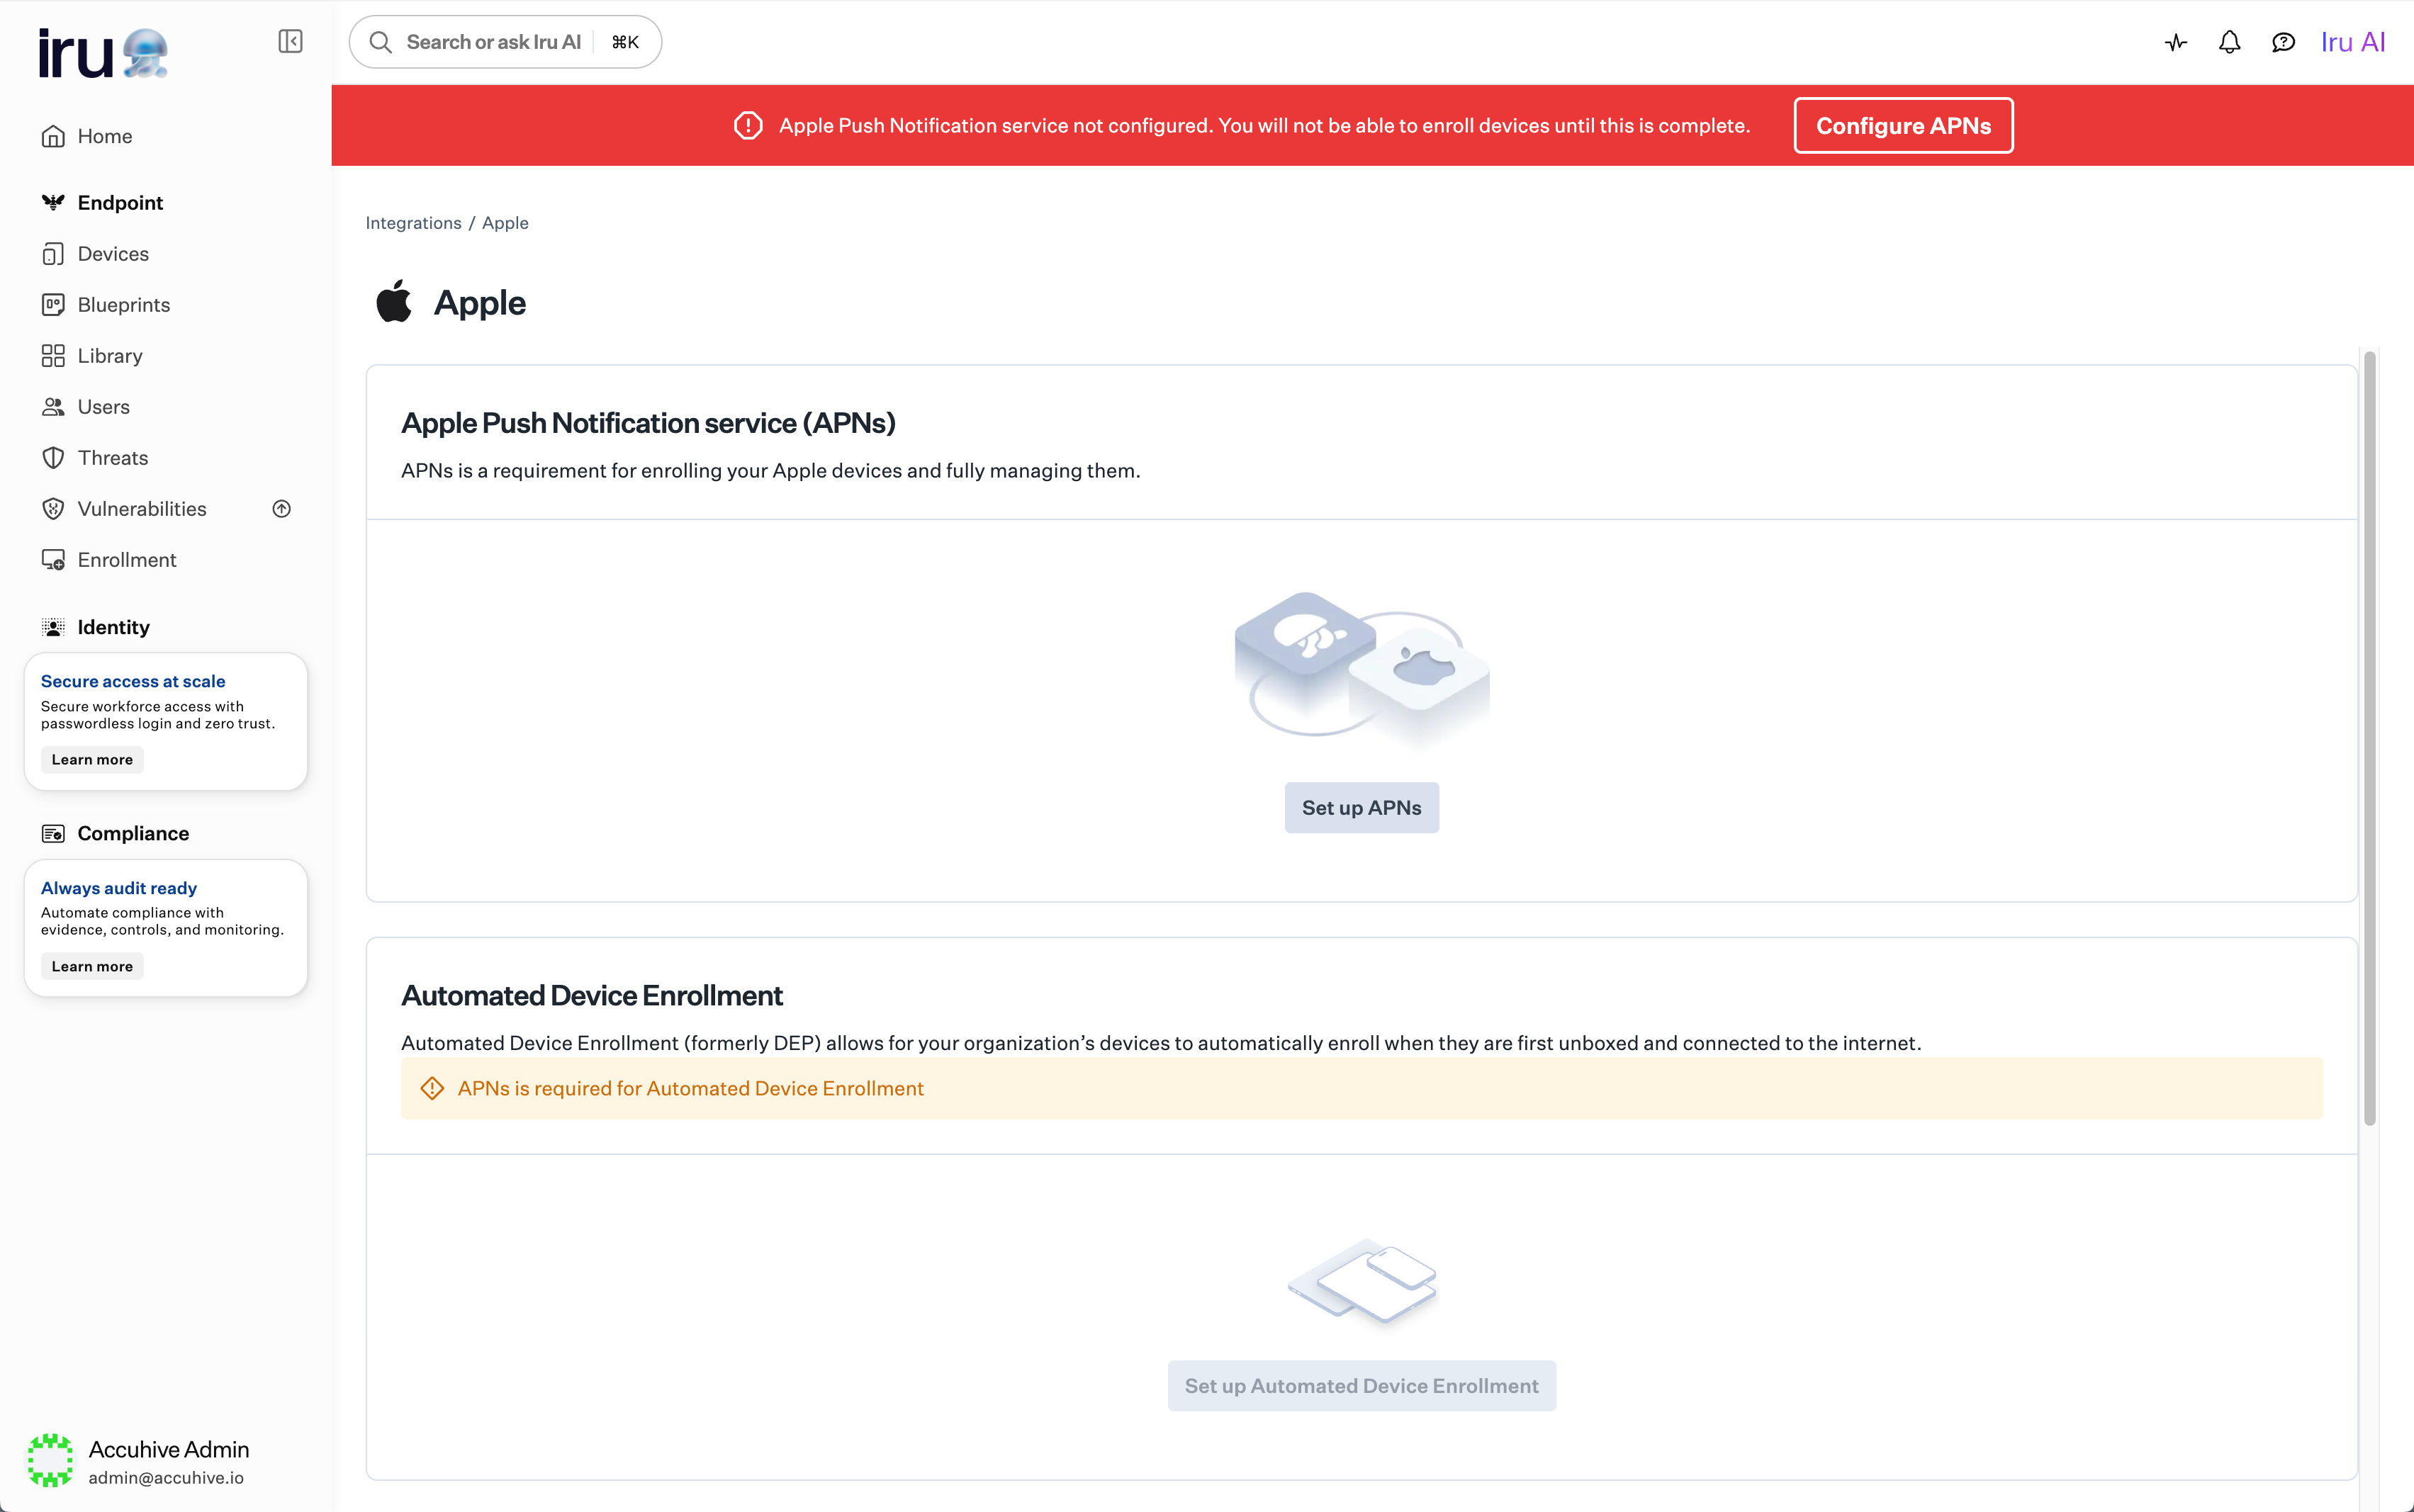
 **Apple Push Notification service** (APNs)에서 **APNs 설정**을 선택하십시오.
 화면의 안내에 따라 새 APNs 인증서를 생성하십시오. 지정된 팀원이 액세스할 수 있는 조직 관리 [Apple Account](/ko/endpoint/enrollment/apple/apple-accounts-overview)를 사용하십시오.
기존 APNs 인증서를 사용하려고 하지 마십시오. Iru Endpoint 전용으로 새 인증서를 생성하십시오.
APNs 인증서는 매년 갱신해야 합니다. Iru Endpoint는 인증서 만료 30일 전부터 Administrator 또는 Account Owner 권한이 있는 팀원에게 이메일 알림을 보냅니다. 갱신 및 문제 해결에 대해서는 [Apple Push Notification service 구성](/ko/endpoint/settings/apple-integrations/configure-apple-push-notification-service)을 참조하십시오.
### Apple Push Notification Service 인증서 갱신
사이드바에서 [**계정 메뉴 버튼**](/ko/iru/platform-overview/account-menu)을 선택한 다음 **통합**을 선택하십시오.
**플랫폼 통합**에서 **Apple**을 선택하십시오.
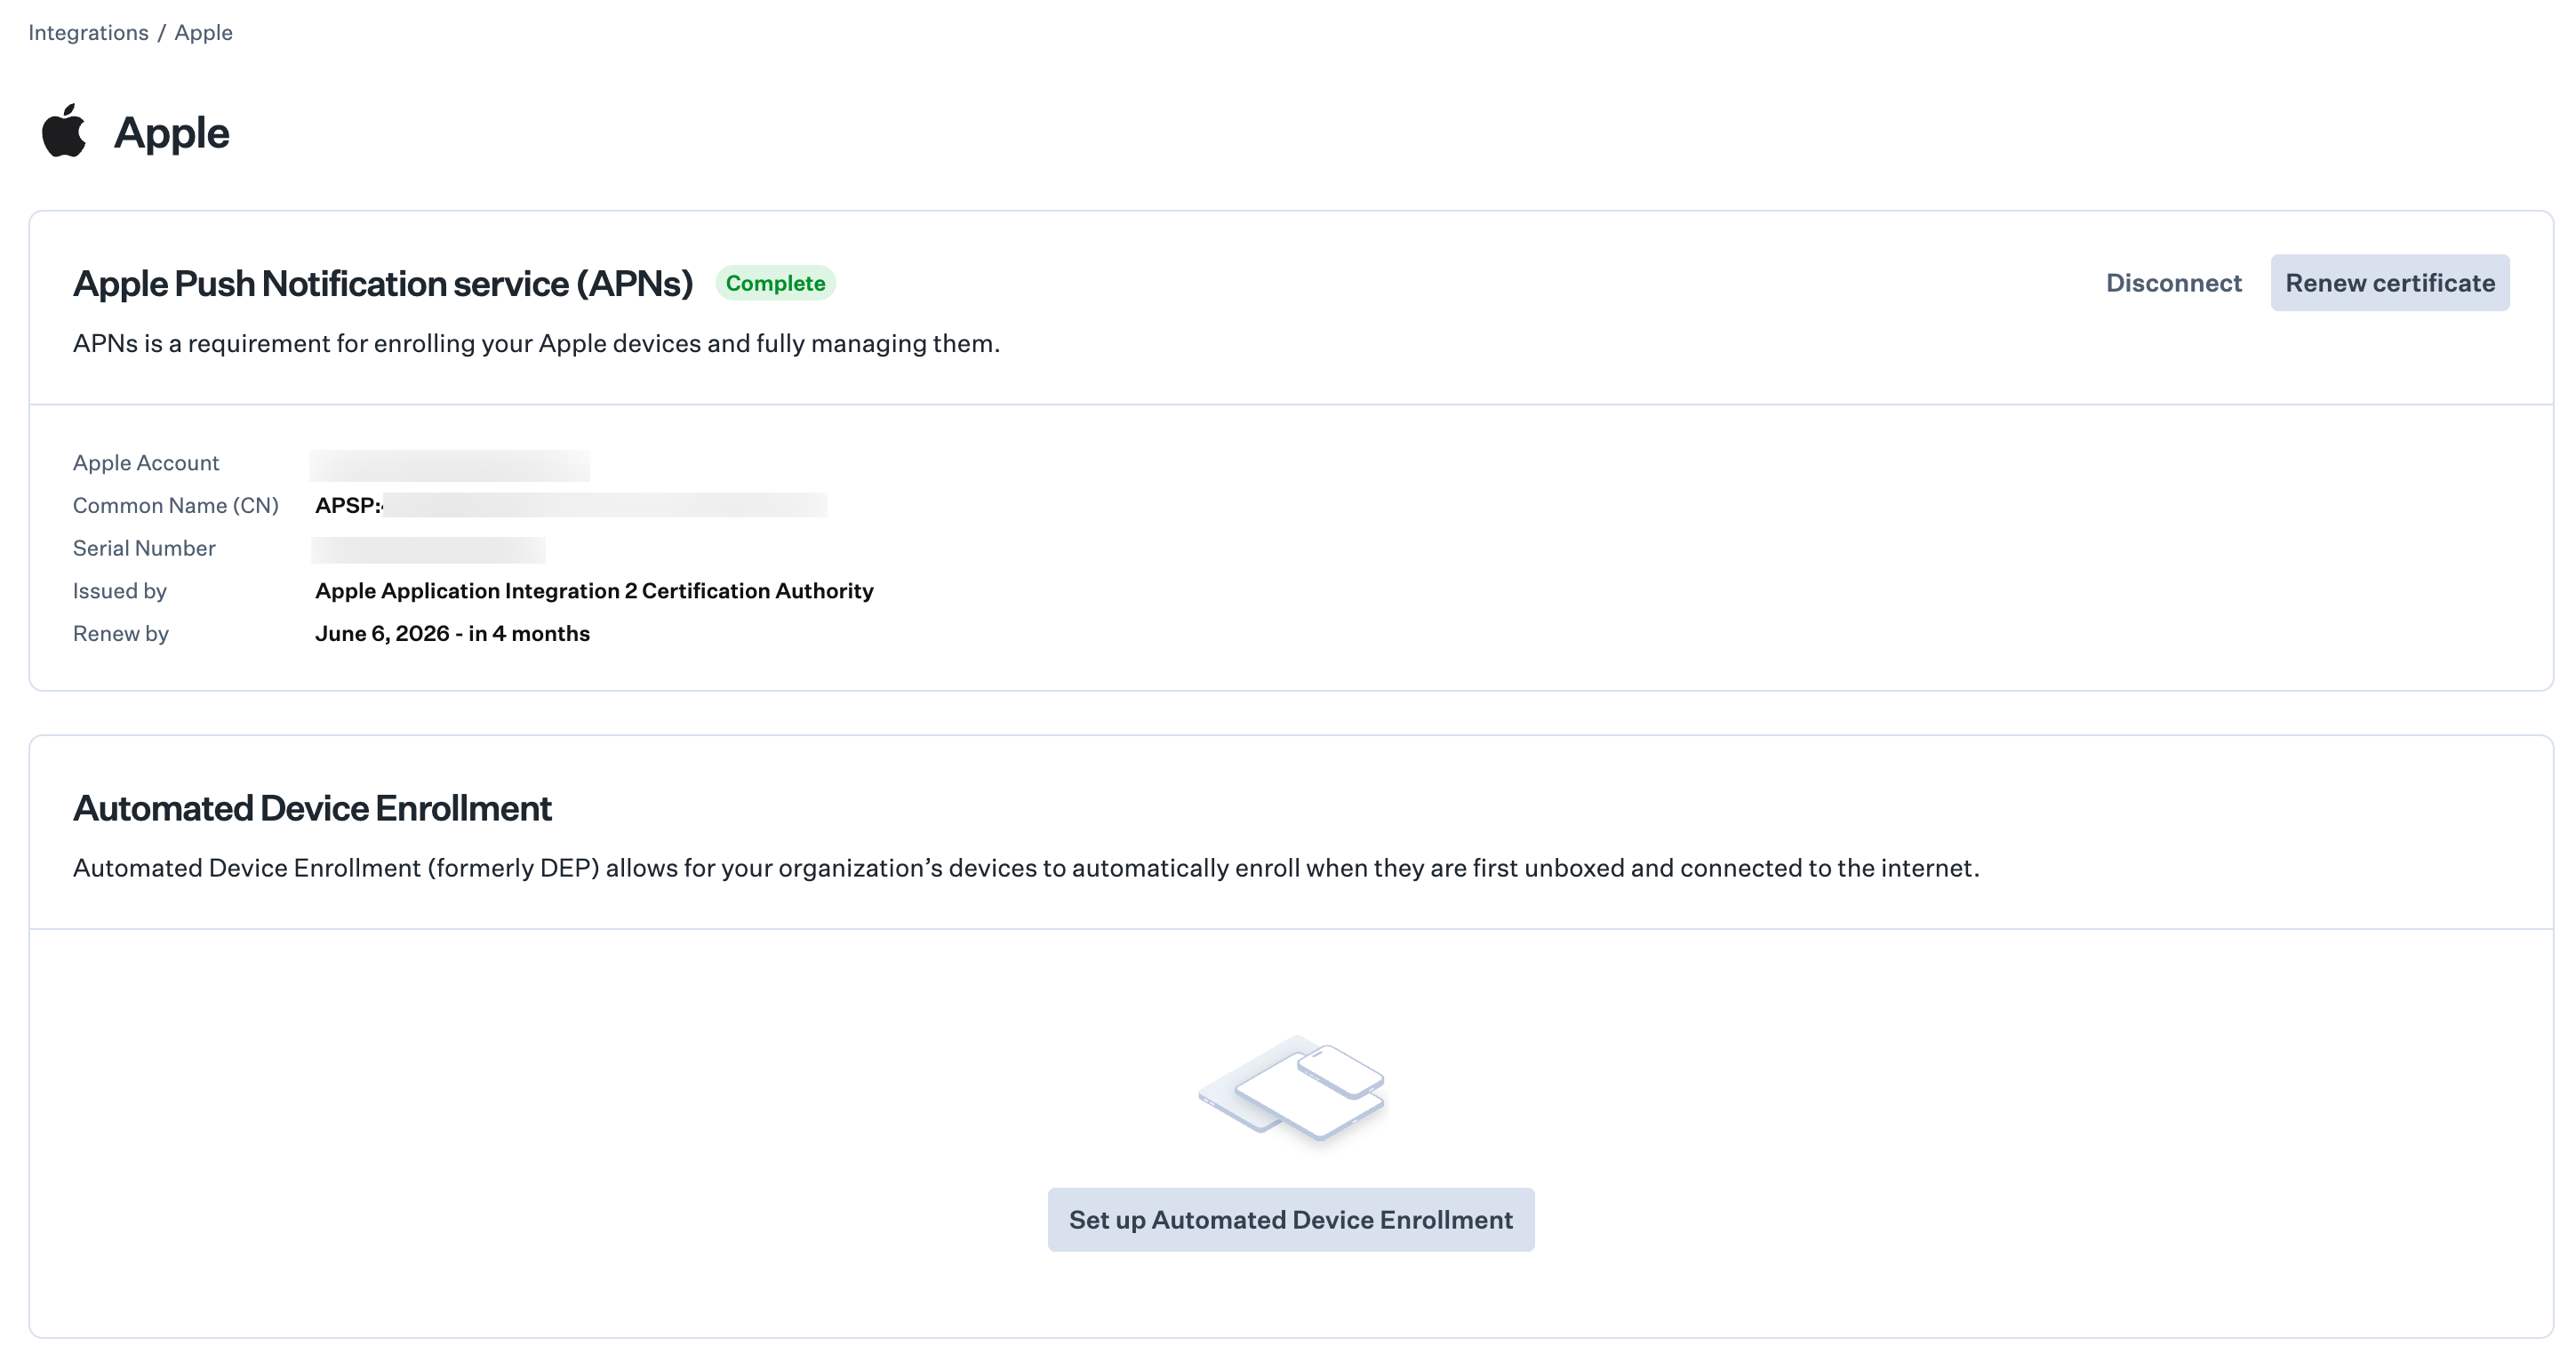
**Apple Push Notification service** (APNs)에서 **인증서 갱신**을 선택하십시오.
화면의 안내에 따라 APNs 인증서를 갱신하십시오.
문제 해결은 [Apple Push Notification Service 구성](/ko/endpoint/settings/apple-integrations/configure-apple-push-notification-service#troubleshoot-apns-certificate-renewal)을 참조하십시오. APNs 연결을 해제하려면 [APNs 연결 해제](/ko/endpoint/settings/apple-integrations/configure-apple-push-notification-service#disconnecting-apns)를 참조하십시오.
## Automated Device Enrollment 구성
Automated Device Enrollment를 사용하면 회사 소유 Apple 기기를 제로 터치 방식으로 배포할 수 있습니다. Automated Device Enrollment를 설정하기 전에 테넌트에 [Apple Push Notification service](/ko/endpoint/settings/apple-integrations/configure-apple-push-notification-service)가 구성되어 있어야 합니다. 다음 단계에서는 Apple 통합 페이지에 표시되는 ADE 토큰을 구성합니다. 이 Iru Endpoint 테넌트에 ADE 토큰이 두 개 이상 필요한 경우 Iru Endpoint API로 추가 토큰을 추가하십시오. [Iru Endpoint API를 사용하여 여러 ADE 토큰 구성](/ko/endpoint/settings/apple-integrations/configure-multiple-automated-device-enrollment-tokens)을 참조하십시오.
조직은 [Apple Business](https://business.apple.com/) 또는 [Apple School Manager](https://school.apple.com/)에 등록합니다(둘 다 무료이며, 확인에 며칠이 걸릴 수 있습니다). Apple 또는 공인 리셀러에서 구입한 기기는 계정에 자동으로 추가됩니다. 기존 기기를 추가하려면 [Apple Business 또는 Apple School Manager에 기기 추가](/ko/endpoint/settings/apple-integrations/adding-devices-to-apple-business-manager)를 참조하십시오.
사이드바에서 [**계정 메뉴 버튼**](/ko/iru/platform-overview/account-menu)을 선택한 다음 **통합**을 선택하십시오.
**플랫폼 통합**에서 **Apple**을 선택하십시오.
**Automated Device Enrollment**에서 **Automated Device Enrollment 설정**을 선택하십시오.
화면의 안내에 따라 새 APNs 인증서를 생성하십시오. 지정된 팀원이 액세스할 수 있는 조직 관리 [Apple Account](/ko/endpoint/enrollment/apple/apple-accounts-overview)를 사용하십시오.
기존 APNs 인증서를 사용하려고 하지 마십시오. Iru Endpoint 전용으로 새 인증서를 생성하십시오.
APNs 인증서는 매년 갱신해야 합니다. Iru Endpoint는 인증서 만료 30일 전부터 Administrator 또는 Account Owner 권한이 있는 팀원에게 이메일 알림을 보냅니다. 갱신 및 문제 해결에 대해서는 [Apple Push Notification service 구성](/ko/endpoint/settings/apple-integrations/configure-apple-push-notification-service)을 참조하십시오.
### Apple Push Notification Service 인증서 갱신
사이드바에서 [**계정 메뉴 버튼**](/ko/iru/platform-overview/account-menu)을 선택한 다음 **통합**을 선택하십시오.
**플랫폼 통합**에서 **Apple**을 선택하십시오.
**Apple Push Notification service** (APNs)에서 **인증서 갱신**을 선택하십시오.
화면의 안내에 따라 APNs 인증서를 갱신하십시오.
문제 해결은 [Apple Push Notification Service 구성](/ko/endpoint/settings/apple-integrations/configure-apple-push-notification-service#troubleshoot-apns-certificate-renewal)을 참조하십시오. APNs 연결을 해제하려면 [APNs 연결 해제](/ko/endpoint/settings/apple-integrations/configure-apple-push-notification-service#disconnecting-apns)를 참조하십시오.
## Automated Device Enrollment 구성
Automated Device Enrollment를 사용하면 회사 소유 Apple 기기를 제로 터치 방식으로 배포할 수 있습니다. Automated Device Enrollment를 설정하기 전에 테넌트에 [Apple Push Notification service](/ko/endpoint/settings/apple-integrations/configure-apple-push-notification-service)가 구성되어 있어야 합니다. 다음 단계에서는 Apple 통합 페이지에 표시되는 ADE 토큰을 구성합니다. 이 Iru Endpoint 테넌트에 ADE 토큰이 두 개 이상 필요한 경우 Iru Endpoint API로 추가 토큰을 추가하십시오. [Iru Endpoint API를 사용하여 여러 ADE 토큰 구성](/ko/endpoint/settings/apple-integrations/configure-multiple-automated-device-enrollment-tokens)을 참조하십시오.
조직은 [Apple Business](https://business.apple.com/) 또는 [Apple School Manager](https://school.apple.com/)에 등록합니다(둘 다 무료이며, 확인에 며칠이 걸릴 수 있습니다). Apple 또는 공인 리셀러에서 구입한 기기는 계정에 자동으로 추가됩니다. 기존 기기를 추가하려면 [Apple Business 또는 Apple School Manager에 기기 추가](/ko/endpoint/settings/apple-integrations/adding-devices-to-apple-business-manager)를 참조하십시오.
사이드바에서 [**계정 메뉴 버튼**](/ko/iru/platform-overview/account-menu)을 선택한 다음 **통합**을 선택하십시오.
**플랫폼 통합**에서 **Apple**을 선택하십시오.
**Automated Device Enrollment**에서 **Automated Device Enrollment 설정**을 선택하십시오.
 설정 마법사에서 Iru Endpoint가 **PEM** 공개 키 파일을 제공할 때까지 계속 진행하십시오(메시지가 표시되면 다운로드하거나 저장). 다음 단계에서 이 파일을 Apple Business 또는 Apple School Manager에 업로드합니다.
기기 관리 서비스를 관리할 수 있는 Managed Apple Account로 [Apple Business](https://business.apple.com) 또는 [Apple School Manager](https://school.apple.com)에 로그인하십시오.
페이지 상단의 **기기** 탭을 선택하십시오.
왼쪽 사이드바에서 **Management**를 선택하십시오.
**Management Services** 목록 하단으로 스크롤하여 **Add device management service** 옆의 **추가**를 선택하십시오.
설정 마법사에서 Iru Endpoint가 **PEM** 공개 키 파일을 제공할 때까지 계속 진행하십시오(메시지가 표시되면 다운로드하거나 저장). 다음 단계에서 이 파일을 Apple Business 또는 Apple School Manager에 업로드합니다.
기기 관리 서비스를 관리할 수 있는 Managed Apple Account로 [Apple Business](https://business.apple.com) 또는 [Apple School Manager](https://school.apple.com)에 로그인하십시오.
페이지 상단의 **기기** 탭을 선택하십시오.
왼쪽 사이드바에서 **Management**를 선택하십시오.
**Management Services** 목록 하단으로 스크롤하여 **Add device management service** 옆의 **추가**를 선택하십시오.
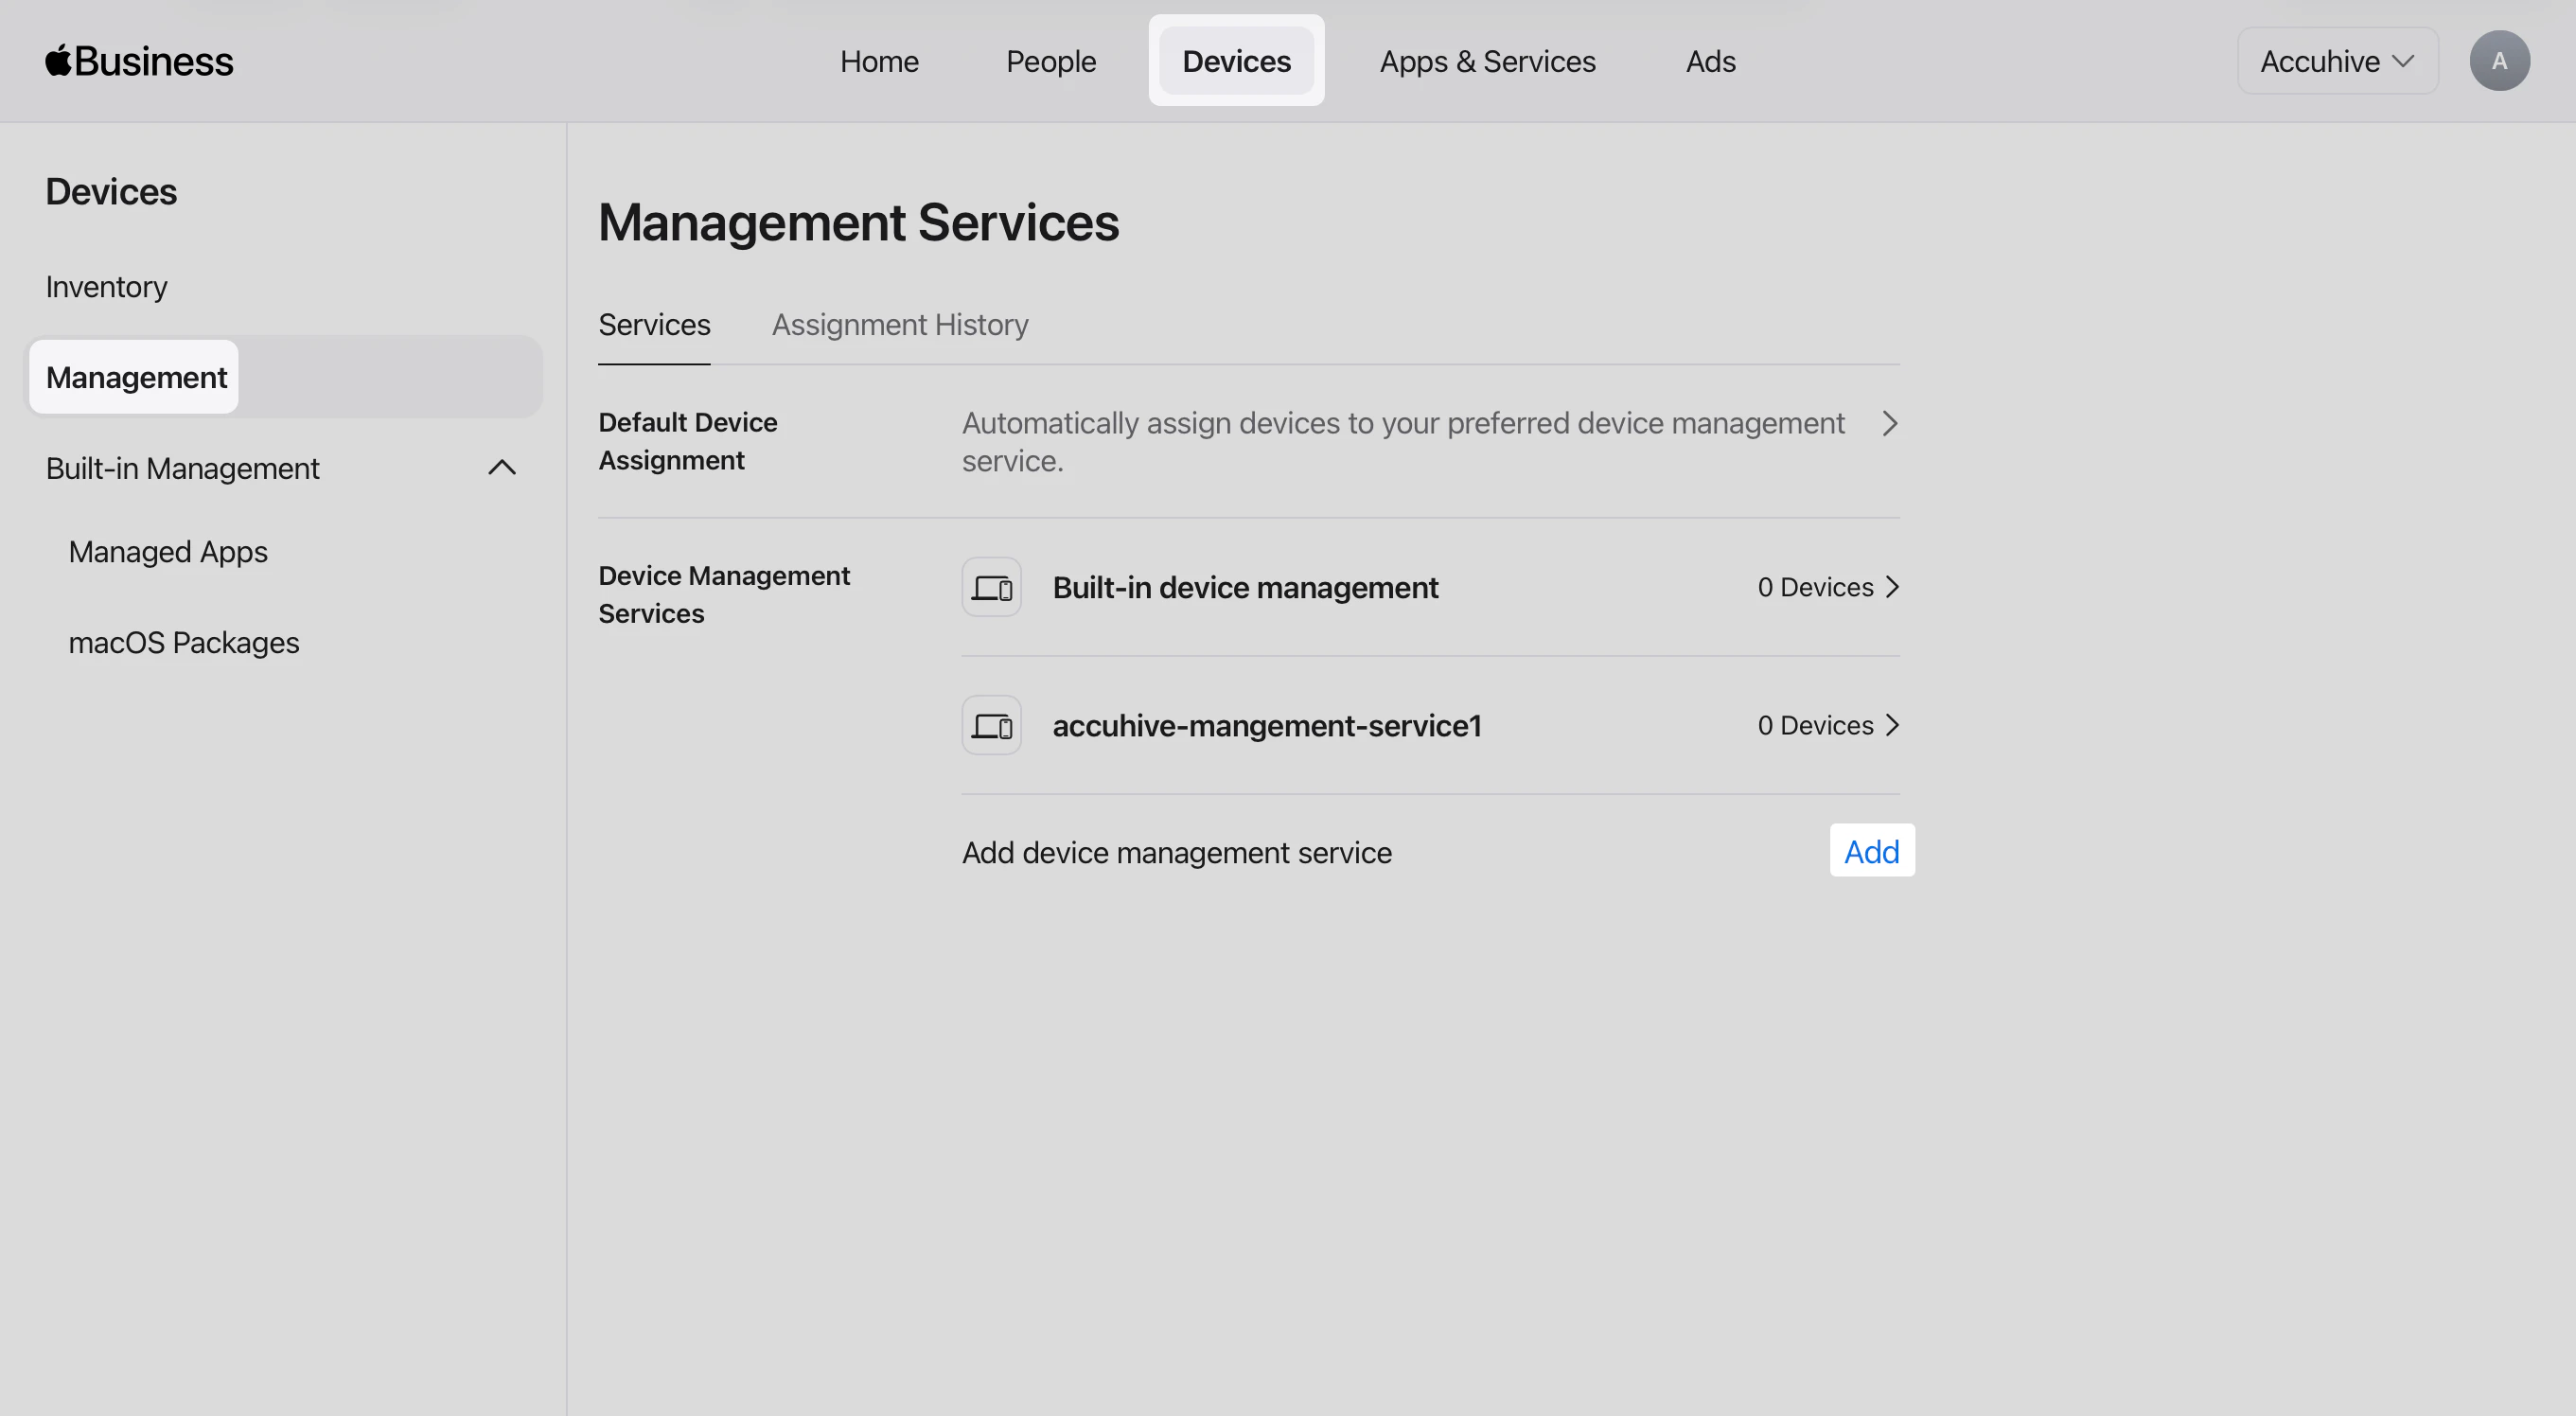 **Service Name** 필드에 이 MDM 통합의 이름을 입력하십시오(예: **Iru Endpoint**).
조직에서 필요한 경우 **Allow this service to release devices**를 선택하십시오.
Iru Endpoint에서 받은 **PEM** 파일을 업로드하십시오.
**다음**을 선택하십시오.
**Service Name** 필드에 이 MDM 통합의 이름을 입력하십시오(예: **Iru Endpoint**).
조직에서 필요한 경우 **Allow this service to release devices**를 선택하십시오.
Iru Endpoint에서 받은 **PEM** 파일을 업로드하십시오.
**다음**을 선택하십시오.
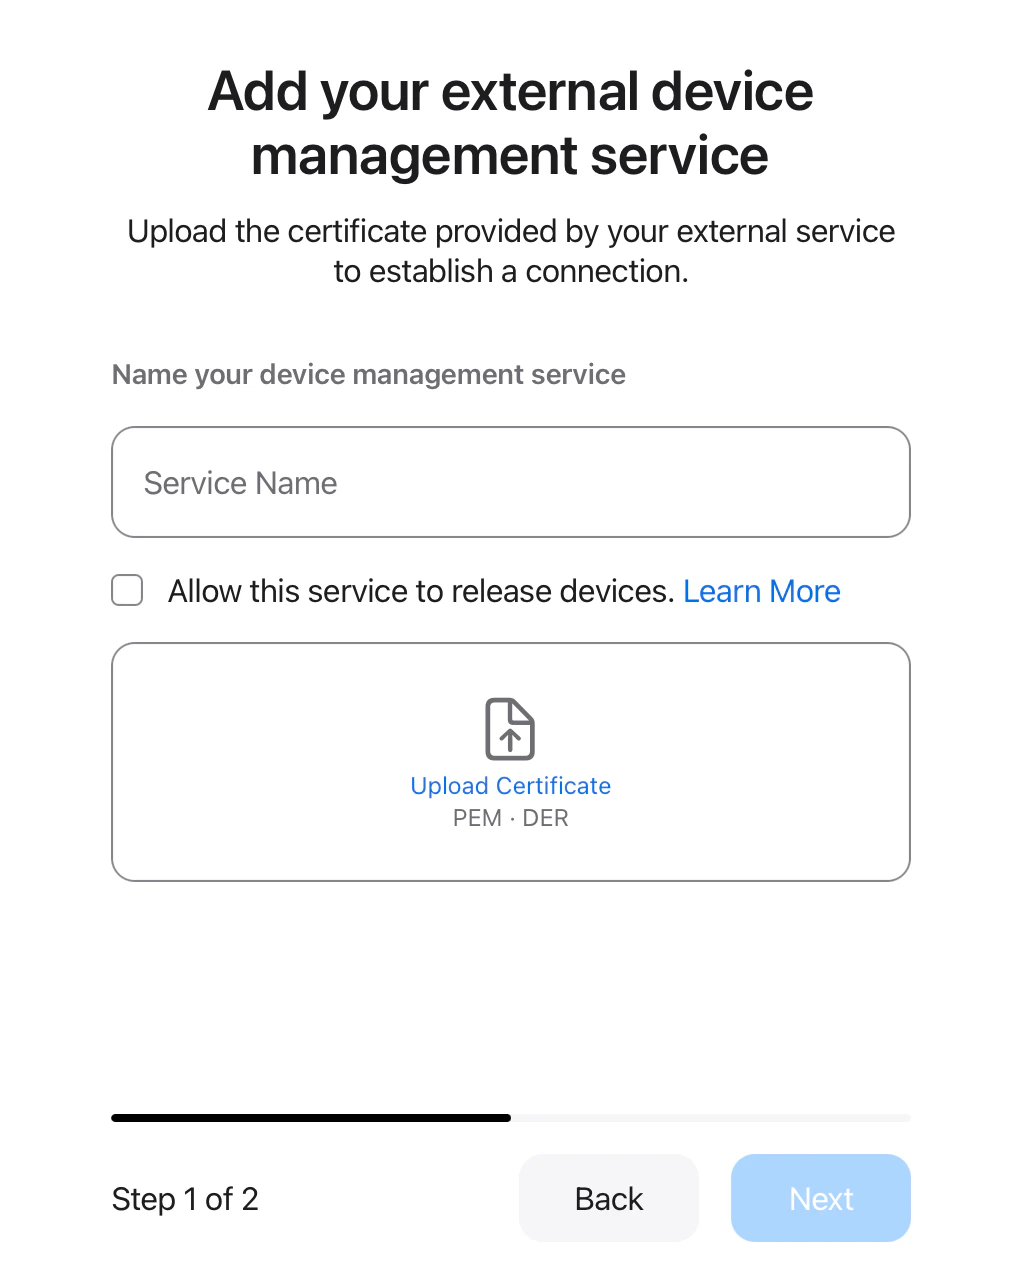 **Download Service Token**을 선택하십시오.
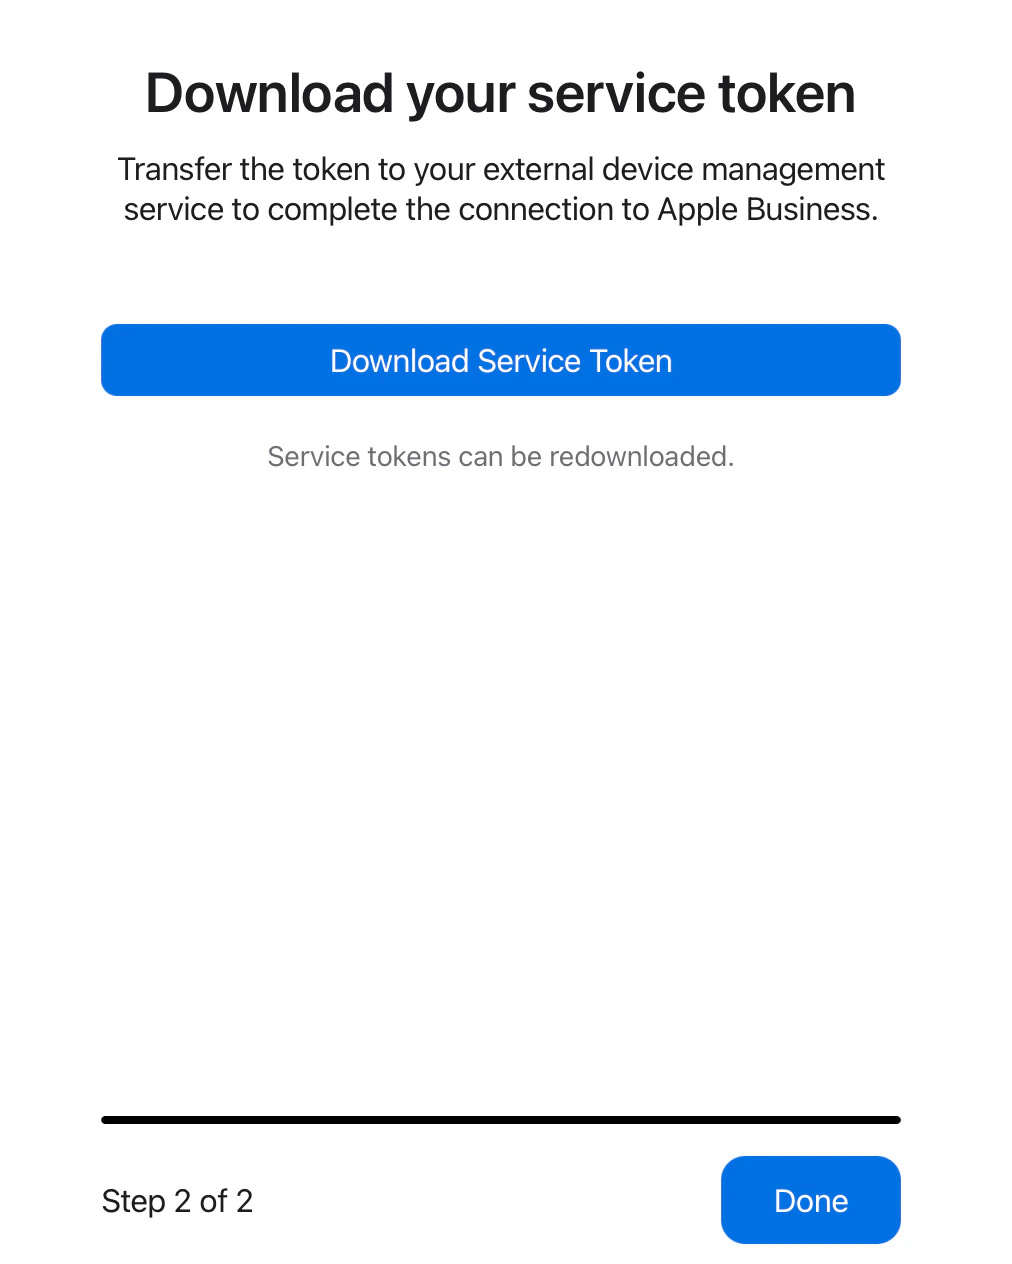 **완료**를 선택하십시오.
Iru Endpoint로 돌아가 메시지가 표시되면 **.p7m** 서비스 토큰 파일을 업로드하십시오.
마법사의 나머지 단계를 완료하고 **완료**를 선택하십시오.
Apple Business 또는 Apple School Manager에서 Iru Endpoint를 모바일 기기 관리(MDM) 서버로 추가하고 기기를 할당하십시오. 할당된 기기는 Iru Endpoint에 **등록 대기 중**으로 표시됩니다.
### Automated Device Enrollment 토큰 갱신
**토큰 갱신**은 Apple 통합 페이지에 표시되는 ADE 토큰을 갱신합니다. 이 테넌트에 이미 ADE 토큰이 두 개 이상 있는 경우 Iru Endpoint API로 추가 토큰을 갱신하십시오. [Iru Endpoint API를 사용하여 ADE 토큰 갱신, 업데이트 또는 삭제](/ko/endpoint/settings/apple-integrations/renew-update-or-delete-multiple-automated-device-enrollment-tokens)를 참조하십시오.
사이드바에서 [**계정 메뉴 버튼**](/ko/iru/platform-overview/account-menu)을 선택한 다음 **통합**을 선택하십시오.
**플랫폼 통합**에서 **Apple**을 선택하십시오.
**Automated Device Enrollment**에서 **토큰 갱신**을 선택하십시오.
화면의 안내에 따라 Automated Device Enrollment 토큰을 갱신하십시오.
자세한 내용은 [Automated Device Enrollment 구성](/ko/endpoint/settings/apple-integrations/configure-automated-device-enrollment#renewing-your-automated-device-enrollment-token)을 참조하십시오. ADE 연결을 해제하려면 [Automated Device Enrollment 연결 해제](/ko/endpoint/settings/apple-integrations/configure-automated-device-enrollment#disconnecting-automated-device-enrollment)를 참조하십시오. 이 테넌트에 ADE 토큰을 더 추가하려면 [Iru Endpoint API를 사용하여 여러 ADE 토큰 구성](/ko/endpoint/settings/apple-integrations/configure-multiple-automated-device-enrollment-tokens)을 참조하십시오.
## Apps and Books 구성
Apps and Books(이전 명칭 Volume Purchase Program(VPP))를 사용하면 App Store 앱을 기기에 배포할 수 있습니다. Apps and Books를 설정하기 전에 테넌트에 [Apple Push Notification service](/ko/endpoint/settings/apple-integrations/configure-apple-push-notification-service)가 구성되어 있어야 합니다.
동일한 Apps and Books 토큰을 여러 MDM 서버에서 공유할 수 없습니다. Apple Business 또는 Apple School Manager에서 Iru Endpoint 테넌트 전용으로 [새 조직 단위를 생성](https://support.apple.com/guide/business/configure-organizational-units-axmfdbe2cb0d/web)하고 전용 토큰을 사용하십시오.
Apple Business 또는 Apple School Manager에서 Iru Endpoint 테넌트용 [새 조직 단위를 생성](https://support.apple.com/guide/business/configure-organizational-units-axmfdbe2cb0d/web)하십시오.
사이드바에서 [**계정 메뉴 버튼**](/ko/iru/platform-overview/account-menu)을 선택한 다음 **통합**을 선택하십시오.
**플랫폼 통합**에서 **Apple**을 선택하십시오.
**Apps and Books**에서 **Apps and Books 설정**을 선택하십시오.
새 창에서 [Apple Business](https://support.apple.com/guide/business/welcome/web) 또는 [Apple School Manager](https://support.apple.com/guide/apple-school-manager/welcome/web)에 로그인하여 통합을 완료하십시오.
Apple Business 또는 Apple School Manager에서 페이지 오른쪽 상단의 **조직 이름**을 선택하십시오.
**설정**을 선택하십시오.
**완료**를 선택하십시오.
Iru Endpoint로 돌아가 메시지가 표시되면 **.p7m** 서비스 토큰 파일을 업로드하십시오.
마법사의 나머지 단계를 완료하고 **완료**를 선택하십시오.
Apple Business 또는 Apple School Manager에서 Iru Endpoint를 모바일 기기 관리(MDM) 서버로 추가하고 기기를 할당하십시오. 할당된 기기는 Iru Endpoint에 **등록 대기 중**으로 표시됩니다.
### Automated Device Enrollment 토큰 갱신
**토큰 갱신**은 Apple 통합 페이지에 표시되는 ADE 토큰을 갱신합니다. 이 테넌트에 이미 ADE 토큰이 두 개 이상 있는 경우 Iru Endpoint API로 추가 토큰을 갱신하십시오. [Iru Endpoint API를 사용하여 ADE 토큰 갱신, 업데이트 또는 삭제](/ko/endpoint/settings/apple-integrations/renew-update-or-delete-multiple-automated-device-enrollment-tokens)를 참조하십시오.
사이드바에서 [**계정 메뉴 버튼**](/ko/iru/platform-overview/account-menu)을 선택한 다음 **통합**을 선택하십시오.
**플랫폼 통합**에서 **Apple**을 선택하십시오.
**Automated Device Enrollment**에서 **토큰 갱신**을 선택하십시오.
화면의 안내에 따라 Automated Device Enrollment 토큰을 갱신하십시오.
자세한 내용은 [Automated Device Enrollment 구성](/ko/endpoint/settings/apple-integrations/configure-automated-device-enrollment#renewing-your-automated-device-enrollment-token)을 참조하십시오. ADE 연결을 해제하려면 [Automated Device Enrollment 연결 해제](/ko/endpoint/settings/apple-integrations/configure-automated-device-enrollment#disconnecting-automated-device-enrollment)를 참조하십시오. 이 테넌트에 ADE 토큰을 더 추가하려면 [Iru Endpoint API를 사용하여 여러 ADE 토큰 구성](/ko/endpoint/settings/apple-integrations/configure-multiple-automated-device-enrollment-tokens)을 참조하십시오.
## Apps and Books 구성
Apps and Books(이전 명칭 Volume Purchase Program(VPP))를 사용하면 App Store 앱을 기기에 배포할 수 있습니다. Apps and Books를 설정하기 전에 테넌트에 [Apple Push Notification service](/ko/endpoint/settings/apple-integrations/configure-apple-push-notification-service)가 구성되어 있어야 합니다.
동일한 Apps and Books 토큰을 여러 MDM 서버에서 공유할 수 없습니다. Apple Business 또는 Apple School Manager에서 Iru Endpoint 테넌트 전용으로 [새 조직 단위를 생성](https://support.apple.com/guide/business/configure-organizational-units-axmfdbe2cb0d/web)하고 전용 토큰을 사용하십시오.
Apple Business 또는 Apple School Manager에서 Iru Endpoint 테넌트용 [새 조직 단위를 생성](https://support.apple.com/guide/business/configure-organizational-units-axmfdbe2cb0d/web)하십시오.
사이드바에서 [**계정 메뉴 버튼**](/ko/iru/platform-overview/account-menu)을 선택한 다음 **통합**을 선택하십시오.
**플랫폼 통합**에서 **Apple**을 선택하십시오.
**Apps and Books**에서 **Apps and Books 설정**을 선택하십시오.
새 창에서 [Apple Business](https://support.apple.com/guide/business/welcome/web) 또는 [Apple School Manager](https://support.apple.com/guide/apple-school-manager/welcome/web)에 로그인하여 통합을 완료하십시오.
Apple Business 또는 Apple School Manager에서 페이지 오른쪽 상단의 **조직 이름**을 선택하십시오.
**설정**을 선택하십시오.
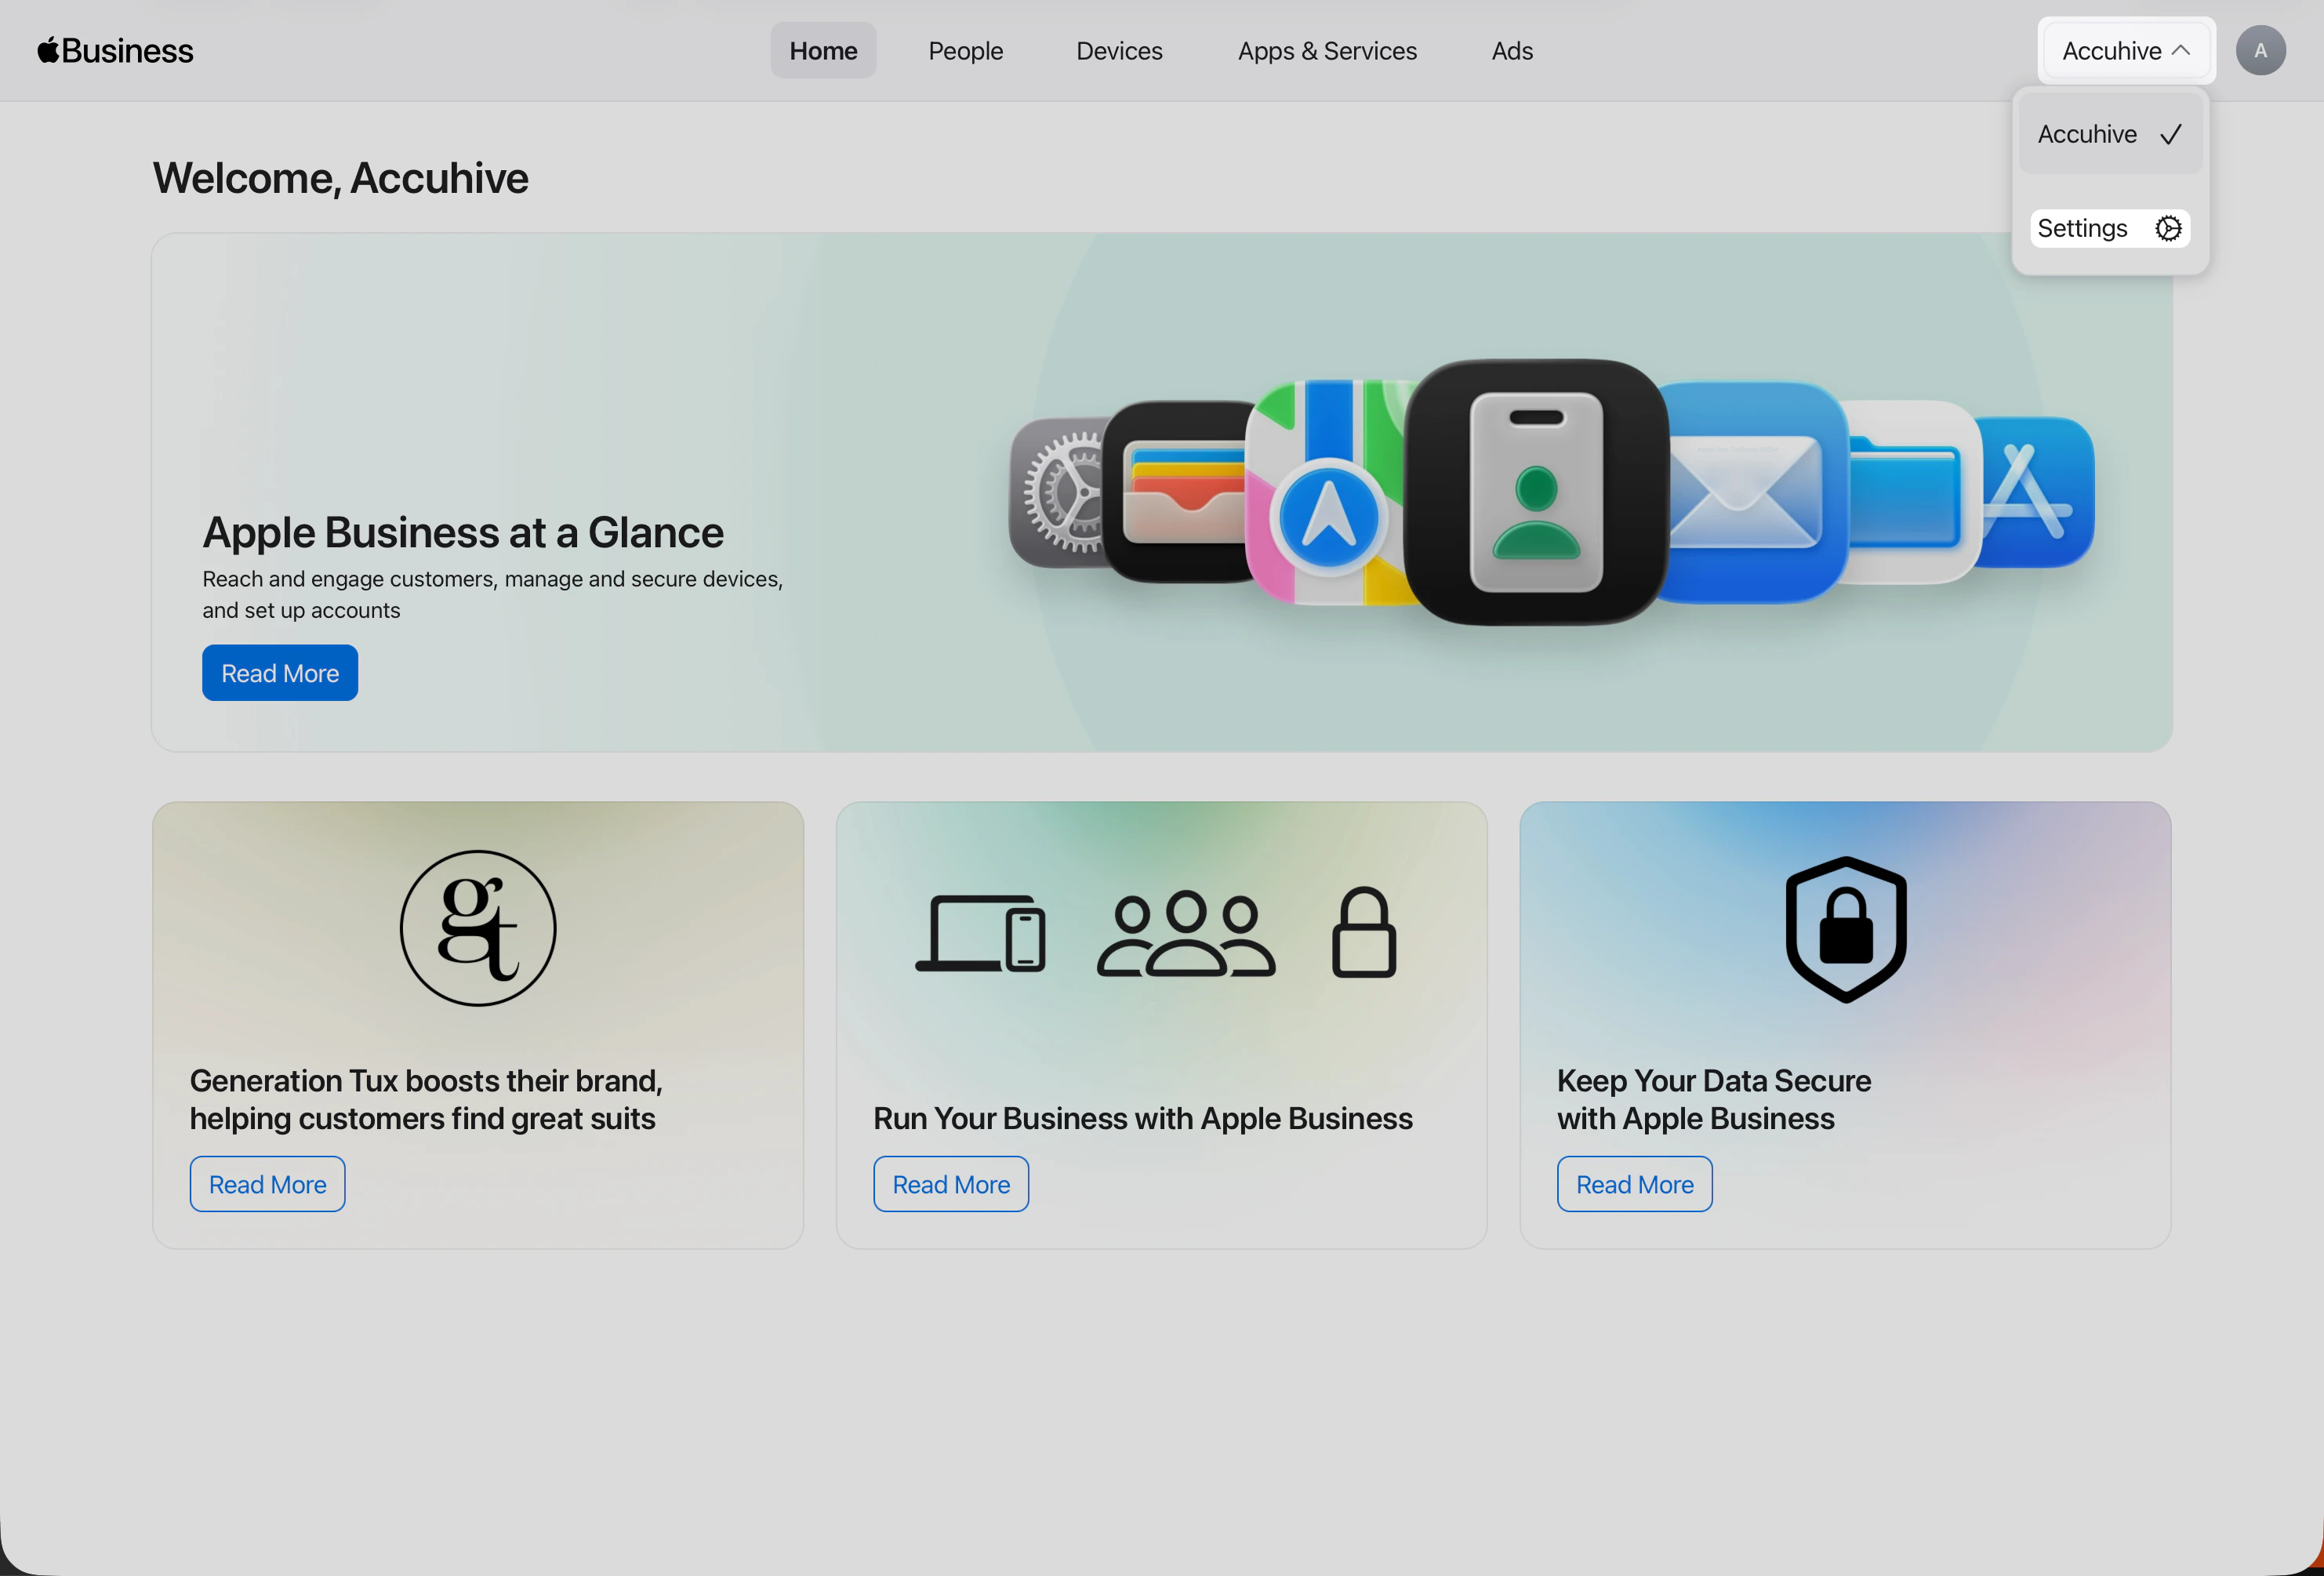 **설정**을 열면 이미 **Payments & Billing** → **Apps & Books**에 있어야 합니다. 이 화면에 조직의 Apps and Books 콘텐츠 토큰이 표시됩니다.
**Content Tokens**에서 Iru Endpoint와 함께 사용할 토큰 옆의 **다운로드**를 선택하십시오.
**설정**을 열면 이미 **Payments & Billing** → **Apps & Books**에 있어야 합니다. 이 화면에 조직의 Apps and Books 콘텐츠 토큰이 표시됩니다.
**Content Tokens**에서 Iru Endpoint와 함께 사용할 토큰 옆의 **다운로드**를 선택하십시오.
 Iru Endpoint Web App으로 돌아가 **토큰**을 업로드하십시오.
**Apps and Books 설정 완료**를 선택하십시오.
### Apps and Books 토큰 갱신
사이드바에서 [**계정 메뉴 버튼**](/ko/iru/platform-overview/account-menu)을 선택한 다음 **통합**을 선택하십시오.
**플랫폼 통합**에서 **Apple**을 선택하십시오.
**Apps and Books**에서 **토큰 갱신**을 선택하십시오.
화면의 안내에 따라 Apps and Books 토큰을 갱신하십시오.
자세한 내용은 [Apps and Books 구성](/ko/endpoint/settings/apple-integrations/configure-apps-and-books#renewing-your-apps-and-books-token)을 참조하십시오. Apps and Books 연결을 해제하려면 [Apps and Books 연결 해제](/ko/endpoint/settings/apple-integrations/configure-apps-and-books#disconnecting-apps-and-books)를 참조하십시오.
각 통합에 대한 자세한 내용은 [Apple Push Notification service 구성](/ko/endpoint/settings/apple-integrations/configure-apple-push-notification-service), [Automated Device Enrollment 구성](/ko/endpoint/settings/apple-integrations/configure-automated-device-enrollment), [Apps and Books 구성](/ko/endpoint/settings/apple-integrations/configure-apps-and-books), [Apple 통합 개요](/ko/endpoint/settings/apple-integrations/apple-integrations-overview)를 참조하십시오.
## 다음 단계
Apple 설정을 완료한 후:
등록 전에 정책과 앱이 준비되도록 Blueprints를 생성하고 구성하십시오. [Blueprints 구성](/ko/endpoint/getting-started/blueprints-and-library/configuring-blueprints) 및 [Library 관리](/ko/endpoint/getting-started/blueprints-and-library/managing-library)를 참조하십시오.
Android 기기나 Windows 컴퓨터도 관리하려면 [Android 설정](/ko/endpoint/getting-started/platform-setup/android-setup) 또는 [Windows 설정](/ko/endpoint/getting-started/platform-setup/windows-setup)을 참조하십시오.
Blueprints가 구성되면 등록을 설정하십시오: [Apple 등록](/ko/endpoint/getting-started/enrollment/apple-enrollment), [Windows 등록](/ko/endpoint/getting-started/enrollment/windows-enrollment) 또는 [Android 등록](/ko/endpoint/getting-started/enrollment/android-enrollment).
Iru Endpoint Web App으로 돌아가 **토큰**을 업로드하십시오.
**Apps and Books 설정 완료**를 선택하십시오.
### Apps and Books 토큰 갱신
사이드바에서 [**계정 메뉴 버튼**](/ko/iru/platform-overview/account-menu)을 선택한 다음 **통합**을 선택하십시오.
**플랫폼 통합**에서 **Apple**을 선택하십시오.
**Apps and Books**에서 **토큰 갱신**을 선택하십시오.
화면의 안내에 따라 Apps and Books 토큰을 갱신하십시오.
자세한 내용은 [Apps and Books 구성](/ko/endpoint/settings/apple-integrations/configure-apps-and-books#renewing-your-apps-and-books-token)을 참조하십시오. Apps and Books 연결을 해제하려면 [Apps and Books 연결 해제](/ko/endpoint/settings/apple-integrations/configure-apps-and-books#disconnecting-apps-and-books)를 참조하십시오.
각 통합에 대한 자세한 내용은 [Apple Push Notification service 구성](/ko/endpoint/settings/apple-integrations/configure-apple-push-notification-service), [Automated Device Enrollment 구성](/ko/endpoint/settings/apple-integrations/configure-automated-device-enrollment), [Apps and Books 구성](/ko/endpoint/settings/apple-integrations/configure-apps-and-books), [Apple 통합 개요](/ko/endpoint/settings/apple-integrations/apple-integrations-overview)를 참조하십시오.
## 다음 단계
Apple 설정을 완료한 후:
등록 전에 정책과 앱이 준비되도록 Blueprints를 생성하고 구성하십시오. [Blueprints 구성](/ko/endpoint/getting-started/blueprints-and-library/configuring-blueprints) 및 [Library 관리](/ko/endpoint/getting-started/blueprints-and-library/managing-library)를 참조하십시오.
Android 기기나 Windows 컴퓨터도 관리하려면 [Android 설정](/ko/endpoint/getting-started/platform-setup/android-setup) 또는 [Windows 설정](/ko/endpoint/getting-started/platform-setup/windows-setup)을 참조하십시오.
Blueprints가 구성되면 등록을 설정하십시오: [Apple 등록](/ko/endpoint/getting-started/enrollment/apple-enrollment), [Windows 등록](/ko/endpoint/getting-started/enrollment/windows-enrollment) 또는 [Android 등록](/ko/endpoint/getting-started/enrollment/android-enrollment).