> ## Documentation Index
> Fetch the complete documentation index at: https://docs.iru.com/llms.txt
> Use this file to discover all available pages before exploring further.
# Iru Endpoint에서 사용자 디렉터리 통합 설정
> 자동 사용자 및 그룹 동기화를 위해 ID 공급자를 Iru Endpoint에 연결합니다. Okta, Microsoft Entra ID, Google 또는 OneLogin과 통합합니다.
조직의 ID 공급자를 연결하여 사용자를 동기화하고 기기를 사용자와 연결합니다. Iru Endpoint에서 [기기에 대한 사용자 할당](/ko/endpoint/devices/device-record-management/assigning-and-unassigning-users-to-devices)은 디렉터리 통합을 통해 이루어지며, 사용자는 IdP에서 동기화됩니다. 디렉터리 통합은 선택 사항이지만 전체 기기의 정확한 인벤토리와 사용자-기기 할당을 위해 권장됩니다.
## 디렉터리 통합 구성
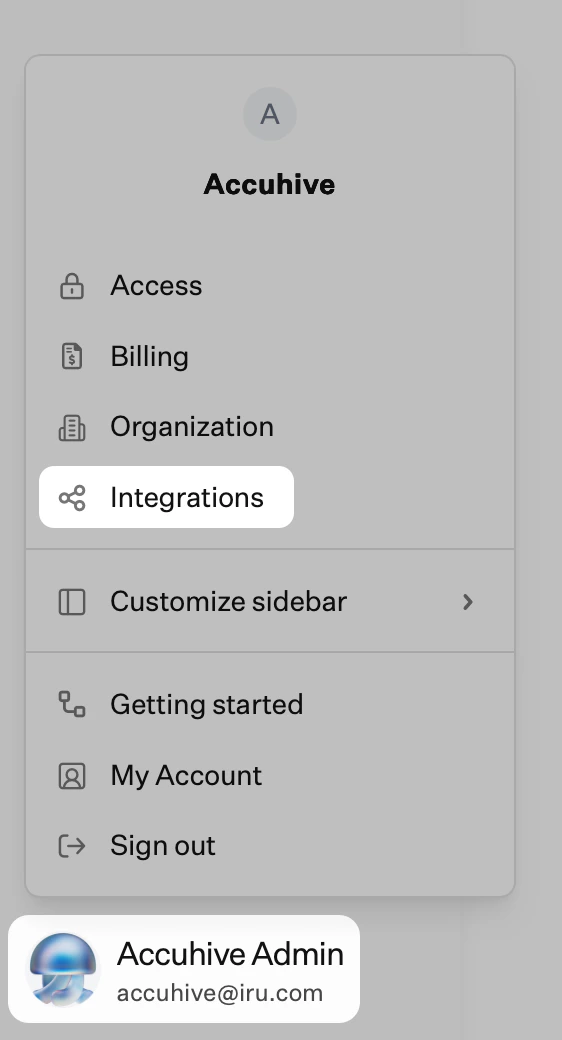
사이드바에서 [**계정 메뉴 버튼**](/ko/iru/platform-overview/account-menu)을 선택한 다음 **통합**을 선택합니다.
 Integrations 페이지 오른쪽 상단에서 **모든 통합 찾아보기**를 선택합니다.
원하는 디렉터리에 대해 **Microsoft Entra ID**, **Google Workspace** 또는 **SCIM protocol** 타일을 선택합니다.
화면의 설정 안내(예: **시작하기**, 통합 이름, IdP로 로그인)를 따릅니다. 디렉터리가 Integrations 페이지에 표시되도록 메시지에 따라 동의하거나 **허용**을 선택합니다.
사용자는 4시간마다 자동으로 동기화됩니다. Iru Endpoint의 **사용자**에 사용자가 표시되는지 확인하세요. 통합의 줄임표 → **Sync users**에서 강제로 동기화할 수 있습니다.
## 지원되는 디렉터리 통합
Iru Endpoint는 다음 디렉터리 통합을 지원합니다.
* **[Microsoft Entra ID](/ko/endpoint/integrations/directory-services/user-directory-integration-with-microsoft-entra-id)**: Microsoft Entra ID(이전 Azure AD)용 기본 통합.
* **[Google Workspace](/ko/endpoint/integrations/directory-services/user-directory-integration-with-google-workspace)**: Google Workspace용 기본 통합.
* **[SCIM 통합](/ko/endpoint/integrations/scim/scim-directory-integration)**: Okta, OneLogin, JumpCloud 등의 공급자용.
## 이점
* **사용자-기기 매핑**: 기기를 사용자와 자동으로 연결합니다.
* **인벤토리 관리**: 누가 어떤 기기를 가지고 있는지 더 잘 추적합니다.
* **자동 할당**: 기기를 사용자에게 자동으로 할당할 수 있습니다.
* **규정 준수 보고**: 사용자 컨텍스트로 더 풍부한 보고를 제공합니다.
## 고려 사항
디렉터리 통합은 **선택 사항**이지만 더 나은 인벤토리 관리를 위해 권장됩니다. Iru Endpoint의 기기 사용자는 디렉터리 통합을 통해서만 생성 및 할당할 수 있습니다.
동기화되면 사용자가 **사용자**에 표시됩니다. Microsoft Entra ID 및 Google Workspace는 4시간마다 자동으로 동기화됩니다.
SCIM을 사용하면 Just-in-Time 프로비저닝 및 프로비저닝 해제가 가능합니다. 설정에 대해서는 [SCIM 디렉터리 통합](/ko/endpoint/integrations/scim/scim-directory-integration)을 참조하세요.
통합하려면 통합할 디렉터리에 대한 관리자 액세스 권한이 있는 계정이 필요합니다.
디렉터리 통합의 개요는 [사용자 디렉터리 통합](/ko/endpoint/integrations/directory-services/user-directory-integration)을 참조하세요. 공급자 설정에 대해서는 [Microsoft Entra ID와 사용자 디렉터리 통합](/ko/endpoint/integrations/directory-services/user-directory-integration-with-microsoft-entra-id) 또는 [Google Workspace와 사용자 디렉터리 통합](/ko/endpoint/integrations/directory-services/user-directory-integration-with-google-workspace)을 참조하세요.
## 다음 단계
디렉터리 통합을 구성한 후:
관리할 플랫폼을 설정합니다. 하나, 둘 또는 세 가지 모두를 활성화할 수 있습니다.
* **[Apple 설정](/ko/endpoint/getting-started/platform-setup/apple-setup)**: APNs, Apple Business 또는 Apple School Manager, Apps and Books 구성
* **[Windows 설정](/ko/endpoint/getting-started/platform-setup/windows-setup)**: Windows 플랫폼 활성화 및 설정 구성
* **[Android 설정](/ko/endpoint/getting-started/platform-setup/android-setup)**: Android 활성화 및 Android Enterprise 구성
[Blueprint 구성](/ko/endpoint/getting-started/blueprints-and-library/configuring-blueprints) 및 [Library 관리](/ko/endpoint/getting-started/blueprints-and-library/managing-library)를 사용하여 등록 전에 정책과 앱을 준비합니다.
Blueprint가 구성되면 [Apple 등록](/ko/endpoint/getting-started/enrollment/apple-enrollment), [Windows 등록](/ko/endpoint/getting-started/enrollment/windows-enrollment) 또는 [Android 등록](/ko/endpoint/getting-started/enrollment/android-enrollment)을 설정합니다.
Integrations 페이지 오른쪽 상단에서 **모든 통합 찾아보기**를 선택합니다.
원하는 디렉터리에 대해 **Microsoft Entra ID**, **Google Workspace** 또는 **SCIM protocol** 타일을 선택합니다.
화면의 설정 안내(예: **시작하기**, 통합 이름, IdP로 로그인)를 따릅니다. 디렉터리가 Integrations 페이지에 표시되도록 메시지에 따라 동의하거나 **허용**을 선택합니다.
사용자는 4시간마다 자동으로 동기화됩니다. Iru Endpoint의 **사용자**에 사용자가 표시되는지 확인하세요. 통합의 줄임표 → **Sync users**에서 강제로 동기화할 수 있습니다.
## 지원되는 디렉터리 통합
Iru Endpoint는 다음 디렉터리 통합을 지원합니다.
* **[Microsoft Entra ID](/ko/endpoint/integrations/directory-services/user-directory-integration-with-microsoft-entra-id)**: Microsoft Entra ID(이전 Azure AD)용 기본 통합.
* **[Google Workspace](/ko/endpoint/integrations/directory-services/user-directory-integration-with-google-workspace)**: Google Workspace용 기본 통합.
* **[SCIM 통합](/ko/endpoint/integrations/scim/scim-directory-integration)**: Okta, OneLogin, JumpCloud 등의 공급자용.
## 이점
* **사용자-기기 매핑**: 기기를 사용자와 자동으로 연결합니다.
* **인벤토리 관리**: 누가 어떤 기기를 가지고 있는지 더 잘 추적합니다.
* **자동 할당**: 기기를 사용자에게 자동으로 할당할 수 있습니다.
* **규정 준수 보고**: 사용자 컨텍스트로 더 풍부한 보고를 제공합니다.
## 고려 사항
디렉터리 통합은 **선택 사항**이지만 더 나은 인벤토리 관리를 위해 권장됩니다. Iru Endpoint의 기기 사용자는 디렉터리 통합을 통해서만 생성 및 할당할 수 있습니다.
동기화되면 사용자가 **사용자**에 표시됩니다. Microsoft Entra ID 및 Google Workspace는 4시간마다 자동으로 동기화됩니다.
SCIM을 사용하면 Just-in-Time 프로비저닝 및 프로비저닝 해제가 가능합니다. 설정에 대해서는 [SCIM 디렉터리 통합](/ko/endpoint/integrations/scim/scim-directory-integration)을 참조하세요.
통합하려면 통합할 디렉터리에 대한 관리자 액세스 권한이 있는 계정이 필요합니다.
디렉터리 통합의 개요는 [사용자 디렉터리 통합](/ko/endpoint/integrations/directory-services/user-directory-integration)을 참조하세요. 공급자 설정에 대해서는 [Microsoft Entra ID와 사용자 디렉터리 통합](/ko/endpoint/integrations/directory-services/user-directory-integration-with-microsoft-entra-id) 또는 [Google Workspace와 사용자 디렉터리 통합](/ko/endpoint/integrations/directory-services/user-directory-integration-with-google-workspace)을 참조하세요.
## 다음 단계
디렉터리 통합을 구성한 후:
관리할 플랫폼을 설정합니다. 하나, 둘 또는 세 가지 모두를 활성화할 수 있습니다.
* **[Apple 설정](/ko/endpoint/getting-started/platform-setup/apple-setup)**: APNs, Apple Business 또는 Apple School Manager, Apps and Books 구성
* **[Windows 설정](/ko/endpoint/getting-started/platform-setup/windows-setup)**: Windows 플랫폼 활성화 및 설정 구성
* **[Android 설정](/ko/endpoint/getting-started/platform-setup/android-setup)**: Android 활성화 및 Android Enterprise 구성
[Blueprint 구성](/ko/endpoint/getting-started/blueprints-and-library/configuring-blueprints) 및 [Library 관리](/ko/endpoint/getting-started/blueprints-and-library/managing-library)를 사용하여 등록 전에 정책과 앱을 준비합니다.
Blueprint가 구성되면 [Apple 등록](/ko/endpoint/getting-started/enrollment/apple-enrollment), [Windows 등록](/ko/endpoint/getting-started/enrollment/windows-enrollment) 또는 [Android 등록](/ko/endpoint/getting-started/enrollment/android-enrollment)을 설정합니다.