> ## Documentation Index
> Fetch the complete documentation index at: https://docs.iru.com/llms.txt
> Use this file to discover all available pages before exploring further.
# SSO 설정
> Iru Endpoint 관리자 액세스를 위한 Single Sign-On(SSO)을 구성합니다. 안전한 로그인을 위해 SAML 또는 기본 통합을 사용하여 ID 공급자를 연결합니다.
팀원이 기존 ID 공급자로 Iru Endpoint 웹 앱에 로그인할 수 있도록 Single Sign-On(SSO)을 설정합니다. 동일한 SSO 연결을 [Automated Device Enrollment(ADE)에서 인증 요구](/ko/endpoint/enrollment/configure-require-authentication-for-enrollment)에 사용할 수 있으므로 관리자 로그인부터 기기 등록까지 안전하고 일관된 액세스를 유지할 수 있습니다.
## SSO 구성
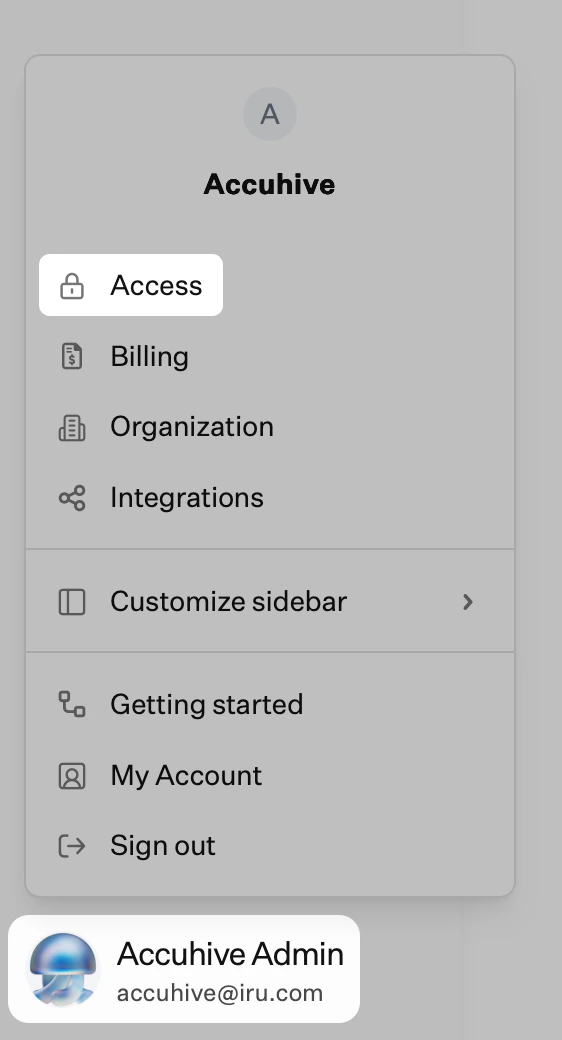
Iru Endpoint의 사이드바에서 [**계정 메뉴 버튼**](/ko/iru/platform-overview/account-menu)을 선택합니다.
메뉴에서 **액세스** 옵션을 선택합니다.
 필요한 경우 **관리자 및 인증** 탭을 선택하고 **인증 방법**까지 스크롤합니다. **+ 인증 방법**를 선택합니다.
표시 이름을 입력하고 연결 유형(**Microsoft Entra ID**, **Google Workspace** 또는 기타 공급자의 경우 **Custom SAML**)을 선택한 다음 **만들기**를 선택합니다.
Iru Endpoint와 ID 공급자에서 구성 안내(예: 리디렉션 URL, 클라이언트 ID, 클라이언트 암호)를 따릅니다. 안내에 따라 Iru Endpoint에서 설정을 완료합니다.
연결이 구성되면 연결 이름 옆의 **줄임표**를 선택하고 **Allow for tenant authentication**을 선택하여 팀원이 SSO로 로그인할 수 있도록 합니다.
다른 인증 방법을 비활성화하기 전에 비공개 브라우저 창에서 로그인을 테스트합니다.
## 지원되는 SSO 연결 유형
Iru Endpoint는 다음 SSO 연결 유형을 지원합니다.
* [Microsoft Entra ID(Native)](/ko/endpoint/integrations/single-sign-on-integrations/single-sign-on-with-microsoft-entra-id-native) 및 [Microsoft Entra ID(SAML)](/ko/endpoint/integrations/single-sign-on-integrations/single-sign-on-with-microsoft-entra-id-saml)
* [Google Workspace(Native)](/ko/endpoint/integrations/single-sign-on-integrations/single-sign-on-with-google-workspace-native) 및 [Google Workspace(SAML)](/ko/endpoint/integrations/single-sign-on-integrations/single-sign-on-with-google-workspace-saml)
* [Okta(SAML)](/ko/endpoint/integrations/single-sign-on-integrations/single-sign-on-with-okta-saml), [JumpCloud(SAML)](/ko/endpoint/integrations/single-sign-on-integrations/single-sign-on-with-jumpcloud-saml), [OneLogin(SAML)](/ko/endpoint/integrations/single-sign-on-integrations/single-sign-on-with-onelogin-saml) 및 [Custom SAML](/ko/endpoint/integrations/single-sign-on-integrations/saml-based-single-sign-on)
## 고려 사항
* \*\*[Passkey, Google Social 및 Microsoft Social](/ko/iru/access/passkeys-and-social-login)\*\*은 기본적으로 계속 사용할 수 있습니다. SSO를 구성하고 테스트한 후에 비활성화할 수 있습니다(줄임표 → **Disable for tenant authentication**).
* SSO 연결은 테넌트 인증에 허용되지 않아도 [등록 중 인증 요구](/ko/endpoint/enrollment/configure-require-authentication-for-enrollment)에 사용할 수 있습니다.
* 팀원은 SSO로 로그인하기 전에 **액세스**에서 초대되어야 합니다. 계정 잠김을 방지하려면 다른 인증 방법을 비활성화하기 전에 비공개 브라우저 창에서 테스트하세요.
각 공급자에 대한 자세한 구성은 [Single Sign-On](/ko/endpoint/integrations/single-sign-on-integrations/single-sign-on)을 참조하세요.
## 다음 단계
SSO를 구성한 후:
사용자를 동기화하려면 [사용자 디렉터리 통합](/ko/endpoint/getting-started/foundation/user-directory-integration)을 참조하세요.
관리할 플랫폼을 설정합니다. 하나, 둘 또는 세 가지 모두를 활성화할 수 있습니다.
* **[Apple 설정](/ko/endpoint/getting-started/platform-setup/apple-setup)**: APNs, Apple Business 또는 Apple School Manager, Apps and Books 구성
* **[Windows 설정](/ko/endpoint/getting-started/platform-setup/windows-setup)**: Windows 플랫폼 활성화 및 설정 구성
* **[Android 설정](/ko/endpoint/getting-started/platform-setup/android-setup)**: Android 활성화 및 Android Enterprise 구성
필요한 경우 **관리자 및 인증** 탭을 선택하고 **인증 방법**까지 스크롤합니다. **+ 인증 방법**를 선택합니다.
표시 이름을 입력하고 연결 유형(**Microsoft Entra ID**, **Google Workspace** 또는 기타 공급자의 경우 **Custom SAML**)을 선택한 다음 **만들기**를 선택합니다.
Iru Endpoint와 ID 공급자에서 구성 안내(예: 리디렉션 URL, 클라이언트 ID, 클라이언트 암호)를 따릅니다. 안내에 따라 Iru Endpoint에서 설정을 완료합니다.
연결이 구성되면 연결 이름 옆의 **줄임표**를 선택하고 **Allow for tenant authentication**을 선택하여 팀원이 SSO로 로그인할 수 있도록 합니다.
다른 인증 방법을 비활성화하기 전에 비공개 브라우저 창에서 로그인을 테스트합니다.
## 지원되는 SSO 연결 유형
Iru Endpoint는 다음 SSO 연결 유형을 지원합니다.
* [Microsoft Entra ID(Native)](/ko/endpoint/integrations/single-sign-on-integrations/single-sign-on-with-microsoft-entra-id-native) 및 [Microsoft Entra ID(SAML)](/ko/endpoint/integrations/single-sign-on-integrations/single-sign-on-with-microsoft-entra-id-saml)
* [Google Workspace(Native)](/ko/endpoint/integrations/single-sign-on-integrations/single-sign-on-with-google-workspace-native) 및 [Google Workspace(SAML)](/ko/endpoint/integrations/single-sign-on-integrations/single-sign-on-with-google-workspace-saml)
* [Okta(SAML)](/ko/endpoint/integrations/single-sign-on-integrations/single-sign-on-with-okta-saml), [JumpCloud(SAML)](/ko/endpoint/integrations/single-sign-on-integrations/single-sign-on-with-jumpcloud-saml), [OneLogin(SAML)](/ko/endpoint/integrations/single-sign-on-integrations/single-sign-on-with-onelogin-saml) 및 [Custom SAML](/ko/endpoint/integrations/single-sign-on-integrations/saml-based-single-sign-on)
## 고려 사항
* \*\*[Passkey, Google Social 및 Microsoft Social](/ko/iru/access/passkeys-and-social-login)\*\*은 기본적으로 계속 사용할 수 있습니다. SSO를 구성하고 테스트한 후에 비활성화할 수 있습니다(줄임표 → **Disable for tenant authentication**).
* SSO 연결은 테넌트 인증에 허용되지 않아도 [등록 중 인증 요구](/ko/endpoint/enrollment/configure-require-authentication-for-enrollment)에 사용할 수 있습니다.
* 팀원은 SSO로 로그인하기 전에 **액세스**에서 초대되어야 합니다. 계정 잠김을 방지하려면 다른 인증 방법을 비활성화하기 전에 비공개 브라우저 창에서 테스트하세요.
각 공급자에 대한 자세한 구성은 [Single Sign-On](/ko/endpoint/integrations/single-sign-on-integrations/single-sign-on)을 참조하세요.
## 다음 단계
SSO를 구성한 후:
사용자를 동기화하려면 [사용자 디렉터리 통합](/ko/endpoint/getting-started/foundation/user-directory-integration)을 참조하세요.
관리할 플랫폼을 설정합니다. 하나, 둘 또는 세 가지 모두를 활성화할 수 있습니다.
* **[Apple 설정](/ko/endpoint/getting-started/platform-setup/apple-setup)**: APNs, Apple Business 또는 Apple School Manager, Apps and Books 구성
* **[Windows 설정](/ko/endpoint/getting-started/platform-setup/windows-setup)**: Windows 플랫폼 활성화 및 설정 구성
* **[Android 설정](/ko/endpoint/getting-started/platform-setup/android-setup)**: Android 활성화 및 Android Enterprise 구성