> ## Documentation Index
> Fetch the complete documentation index at: https://docs.iru.com/llms.txt
> Use this file to discover all available pages before exploring further.
# パートナーダッシュボード
> パートナーダッシュボードを使用して、MSP の子テナントの表示、製品のプロビジョニング、テナントの作成、顧客環境の表示を行います。
### パートナーダッシュボードについて
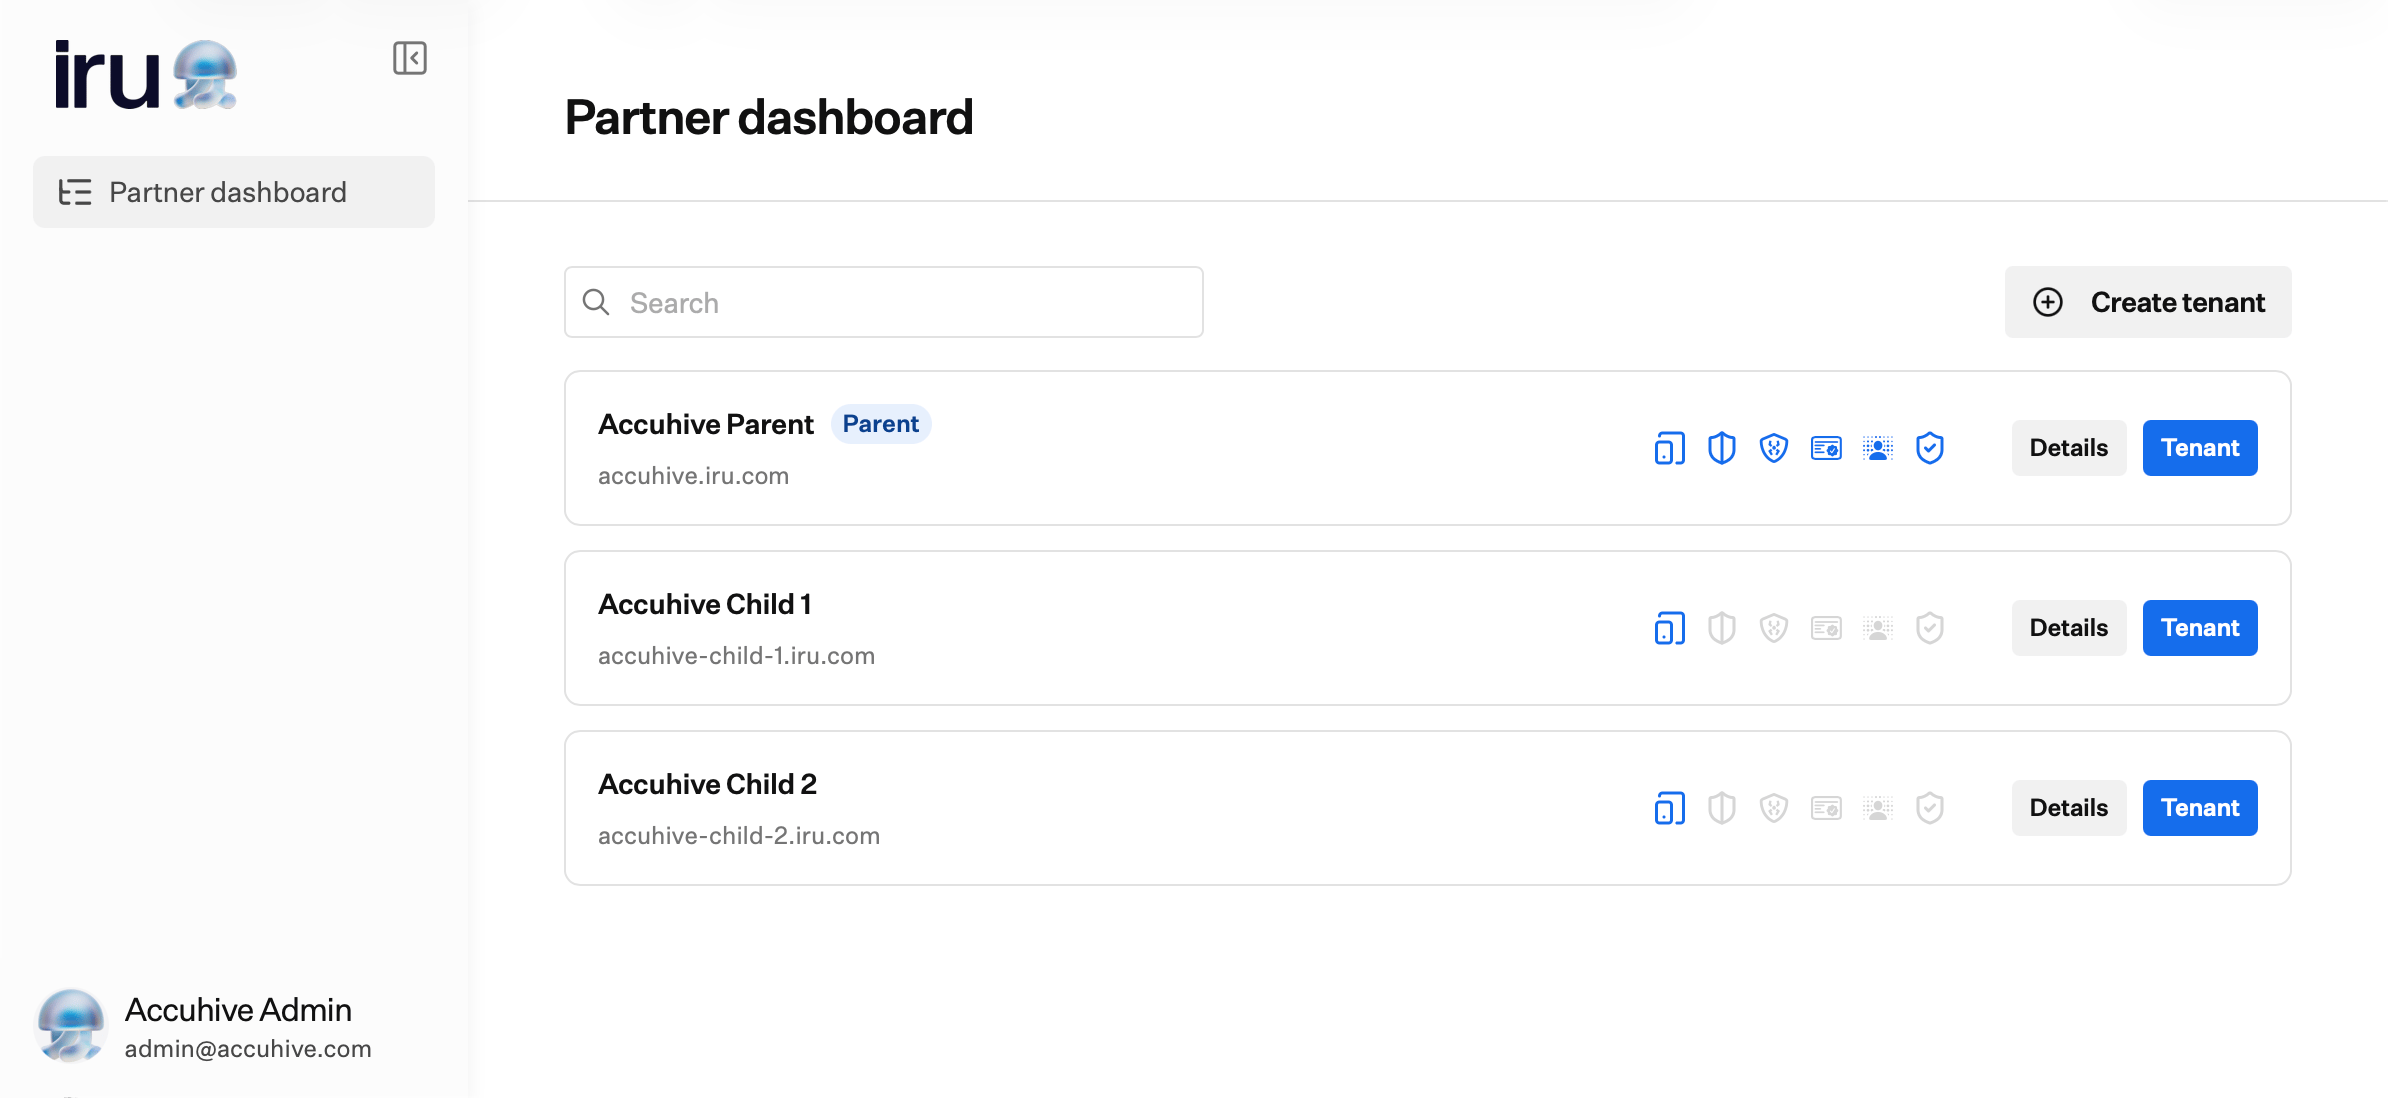
**パートナーダッシュボード** は、[パートナーポータル](/ja/iru/platform-overview/partner-portal-page) のメインのテナント管理ページです。テナントごとに有効になっている製品の確認、プロビジョニングの調整、新しいテナントの作成、子テナントを開いてその環境で作業することができます。
**パートナーポータル** は、MSP の親テナントの **Account Owners** と **Administrators** に対してのみ[アカウントメニュー](/ja/iru/platform-overview/account-menu)に表示されます。他のロールには表示されません。[チームメンバーのロール権限](/ja/iru/access/team-member-role-permissions)を参照してください。
### パートナーダッシュボードを開く方法
サイドバーで [**アカウントメニューボタン**](/ja/iru/platform-overview/account-menu) を選択し、**パートナーポータル** を選択します。
左側のナビゲーションで **パートナーダッシュボード** がまだ選択されていない場合は選択します。
ダッシュボードには、親テナントと、MSP アカウントの下にあるすべての子テナントが一覧表示されます。親テナントに戻るには、アカウントメニューの **ホーム** を使用します。[パートナーポータル](/ja/iru/platform-overview/partner-portal-page#return-to-the-parent-tenant)を参照してください。
 ### テナントの一覧
**検索** を使用して、名前でテナントをフィルタリングします。
各行には次の情報が表示されます。
* **テナント名**と**サブドメイン URL** (例: `customer.iru.com`)
* MSP の親テナントの行にある **Parent** ラベル
* プロビジョニングされた製品の**製品アイコン**。そのテナントで製品が有効な場合はアイコンがカラーで表示され、オフの場合はグレーで表示されます。
* [Endpoint management](/ja/endpoint/getting-started/getting-started)
* [Endpoint detection & response](/ja/endpoint/endpoint-detection-response-edr/endpoint-detection-and-response-edr-overview)
* [Vulnerability management](/ja/endpoint/vulnerability-management/vulnerability-management-overview)
* [Compliance](/ja/compliance/getting-started-with-compliance)
* [Identity](/ja/identity/getting-started/overview)
* [Trust Center](/ja/compliance/trust-center/trust-center-management)
* **詳細** ボタンと **Tenant** ボタン
右上の **+ Create tenant** を選択すると、新しい子テナントを追加できます。子テナントがまだない場合、ダッシュボードには同じ **Create tenant** アクションを含む空の状態が表示されます。
### 子テナントを開く
**パートナーダッシュボード** で、開きたい子テナントを探します。
その行の **Tenant** を選択します。
Iru はブラウザで子テナントを開きます。そのテナントでまだ認証されていない場合は、サインインします。複数のテナントを別々のタブで管理している場合、子テナントのブラウザタブのタイトルにはテナント名が表示されます (例: **Iru | customername**)。
**Organization details** ドロワーからテナントを開くこともできます。行の **詳細** を選択し、ドロワーのヘッダーで **Go to tenant** を選択します。
### テナントの詳細の表示と編集
**パートナーダッシュボード** で、テナントの行の **詳細** を選択します。
**Organization details** ドロワーには次の情報が表示されます。
* **組織名**
* **Company locale** (編集可能なドロップダウン)
* **Subdomain** (読み取り専用。この URL はユーザーがテナントにアクセスする際に使用するもので、変更できません)
* **Provision products**: 親テナントで利用可能な製品のトグル:
* [Endpoint management](/ja/endpoint/getting-started/getting-started)
* [Endpoint detection & response](/ja/endpoint/endpoint-detection-response-edr/endpoint-detection-and-response-edr-overview)
* [Vulnerability management](/ja/endpoint/vulnerability-management/vulnerability-management-overview)
* [Compliance](/ja/compliance/getting-started-with-compliance)
* [Trust Center](/ja/compliance/trust-center/trust-center-management)
* [Identity](/ja/identity/getting-started/overview)
### テナントの一覧
**検索** を使用して、名前でテナントをフィルタリングします。
各行には次の情報が表示されます。
* **テナント名**と**サブドメイン URL** (例: `customer.iru.com`)
* MSP の親テナントの行にある **Parent** ラベル
* プロビジョニングされた製品の**製品アイコン**。そのテナントで製品が有効な場合はアイコンがカラーで表示され、オフの場合はグレーで表示されます。
* [Endpoint management](/ja/endpoint/getting-started/getting-started)
* [Endpoint detection & response](/ja/endpoint/endpoint-detection-response-edr/endpoint-detection-and-response-edr-overview)
* [Vulnerability management](/ja/endpoint/vulnerability-management/vulnerability-management-overview)
* [Compliance](/ja/compliance/getting-started-with-compliance)
* [Identity](/ja/identity/getting-started/overview)
* [Trust Center](/ja/compliance/trust-center/trust-center-management)
* **詳細** ボタンと **Tenant** ボタン
右上の **+ Create tenant** を選択すると、新しい子テナントを追加できます。子テナントがまだない場合、ダッシュボードには同じ **Create tenant** アクションを含む空の状態が表示されます。
### 子テナントを開く
**パートナーダッシュボード** で、開きたい子テナントを探します。
その行の **Tenant** を選択します。
Iru はブラウザで子テナントを開きます。そのテナントでまだ認証されていない場合は、サインインします。複数のテナントを別々のタブで管理している場合、子テナントのブラウザタブのタイトルにはテナント名が表示されます (例: **Iru | customername**)。
**Organization details** ドロワーからテナントを開くこともできます。行の **詳細** を選択し、ドロワーのヘッダーで **Go to tenant** を選択します。
### テナントの詳細の表示と編集
**パートナーダッシュボード** で、テナントの行の **詳細** を選択します。
**Organization details** ドロワーには次の情報が表示されます。
* **組織名**
* **Company locale** (編集可能なドロップダウン)
* **Subdomain** (読み取り専用。この URL はユーザーがテナントにアクセスする際に使用するもので、変更できません)
* **Provision products**: 親テナントで利用可能な製品のトグル:
* [Endpoint management](/ja/endpoint/getting-started/getting-started)
* [Endpoint detection & response](/ja/endpoint/endpoint-detection-response-edr/endpoint-detection-and-response-edr-overview)
* [Vulnerability management](/ja/endpoint/vulnerability-management/vulnerability-management-overview)
* [Compliance](/ja/compliance/getting-started-with-compliance)
* [Trust Center](/ja/compliance/trust-center/trust-center-management)
* [Identity](/ja/identity/getting-started/overview)
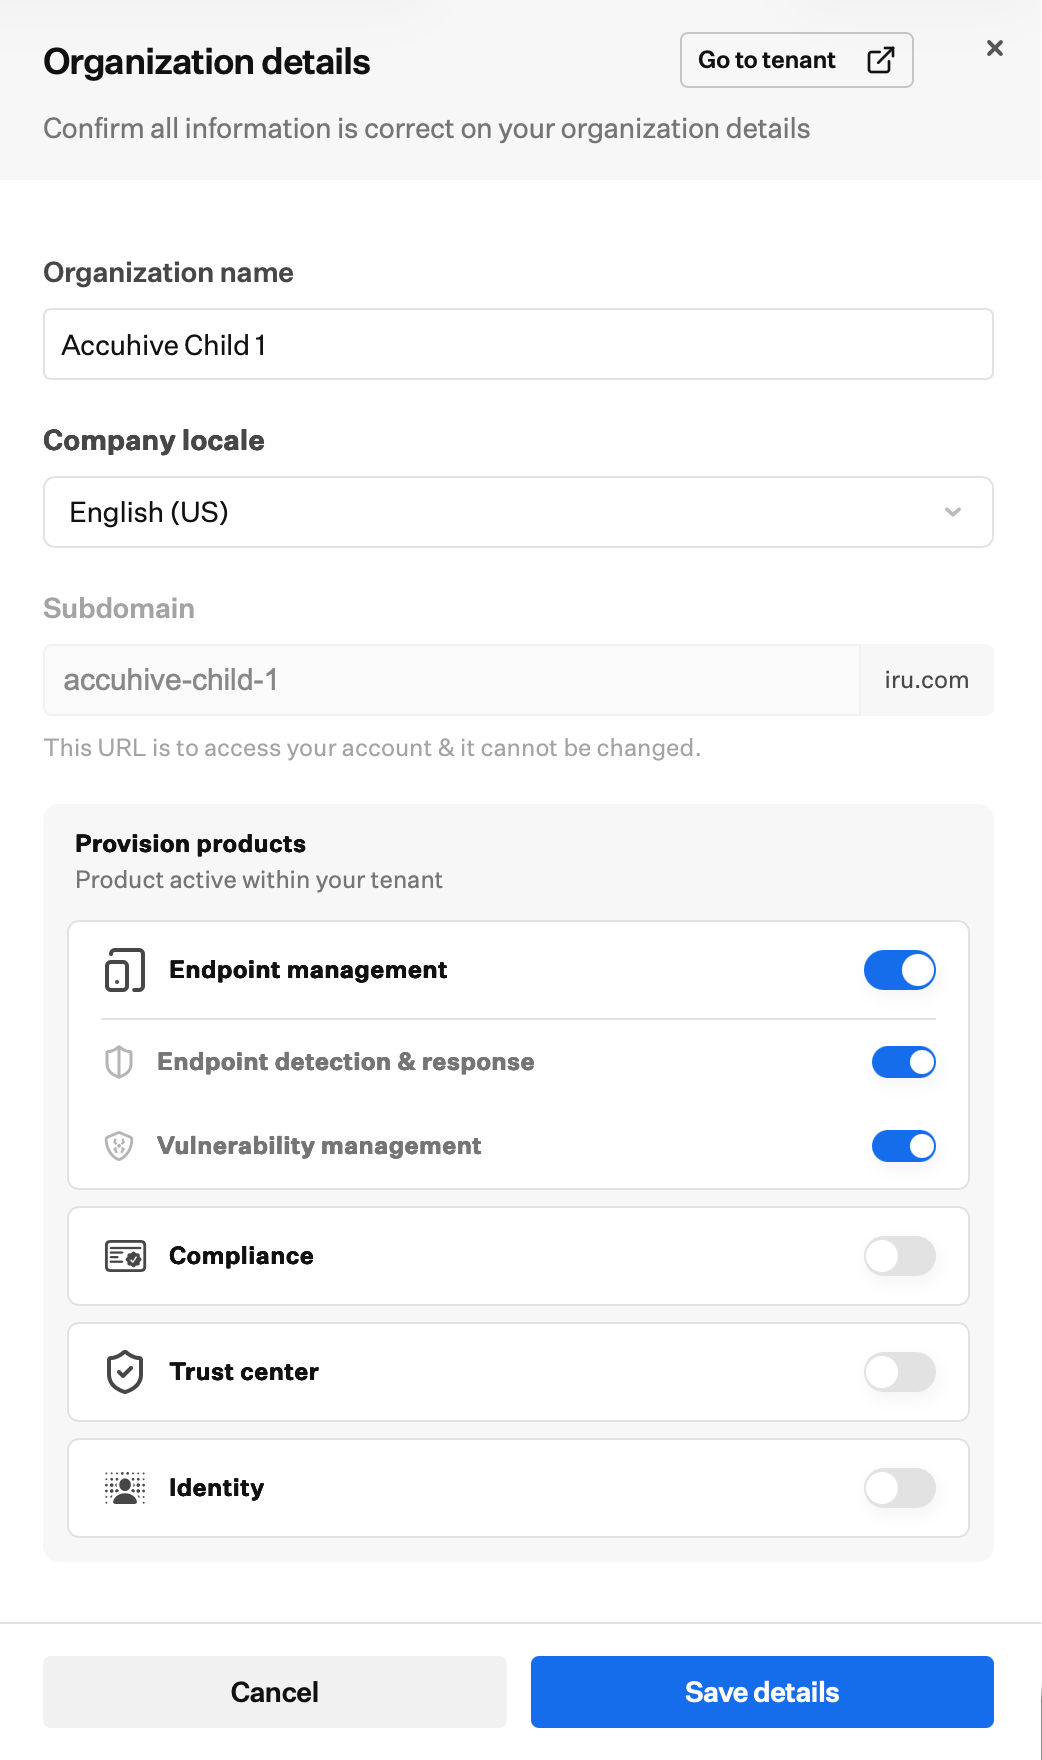 必要に応じて **Organization details** のトグルを調整し、**詳細を保存** を選択します。
**Confirm changes** で、追加および削除される製品の概要を確認します。**Enter tenant subdomain** フィールドにテナントのサブドメインを入力します。
必要に応じて **Organization details** のトグルを調整し、**詳細を保存** を選択します。
**Confirm changes** で、追加および削除される製品の概要を確認します。**Enter tenant subdomain** フィールドにテナントのサブドメインを入力します。
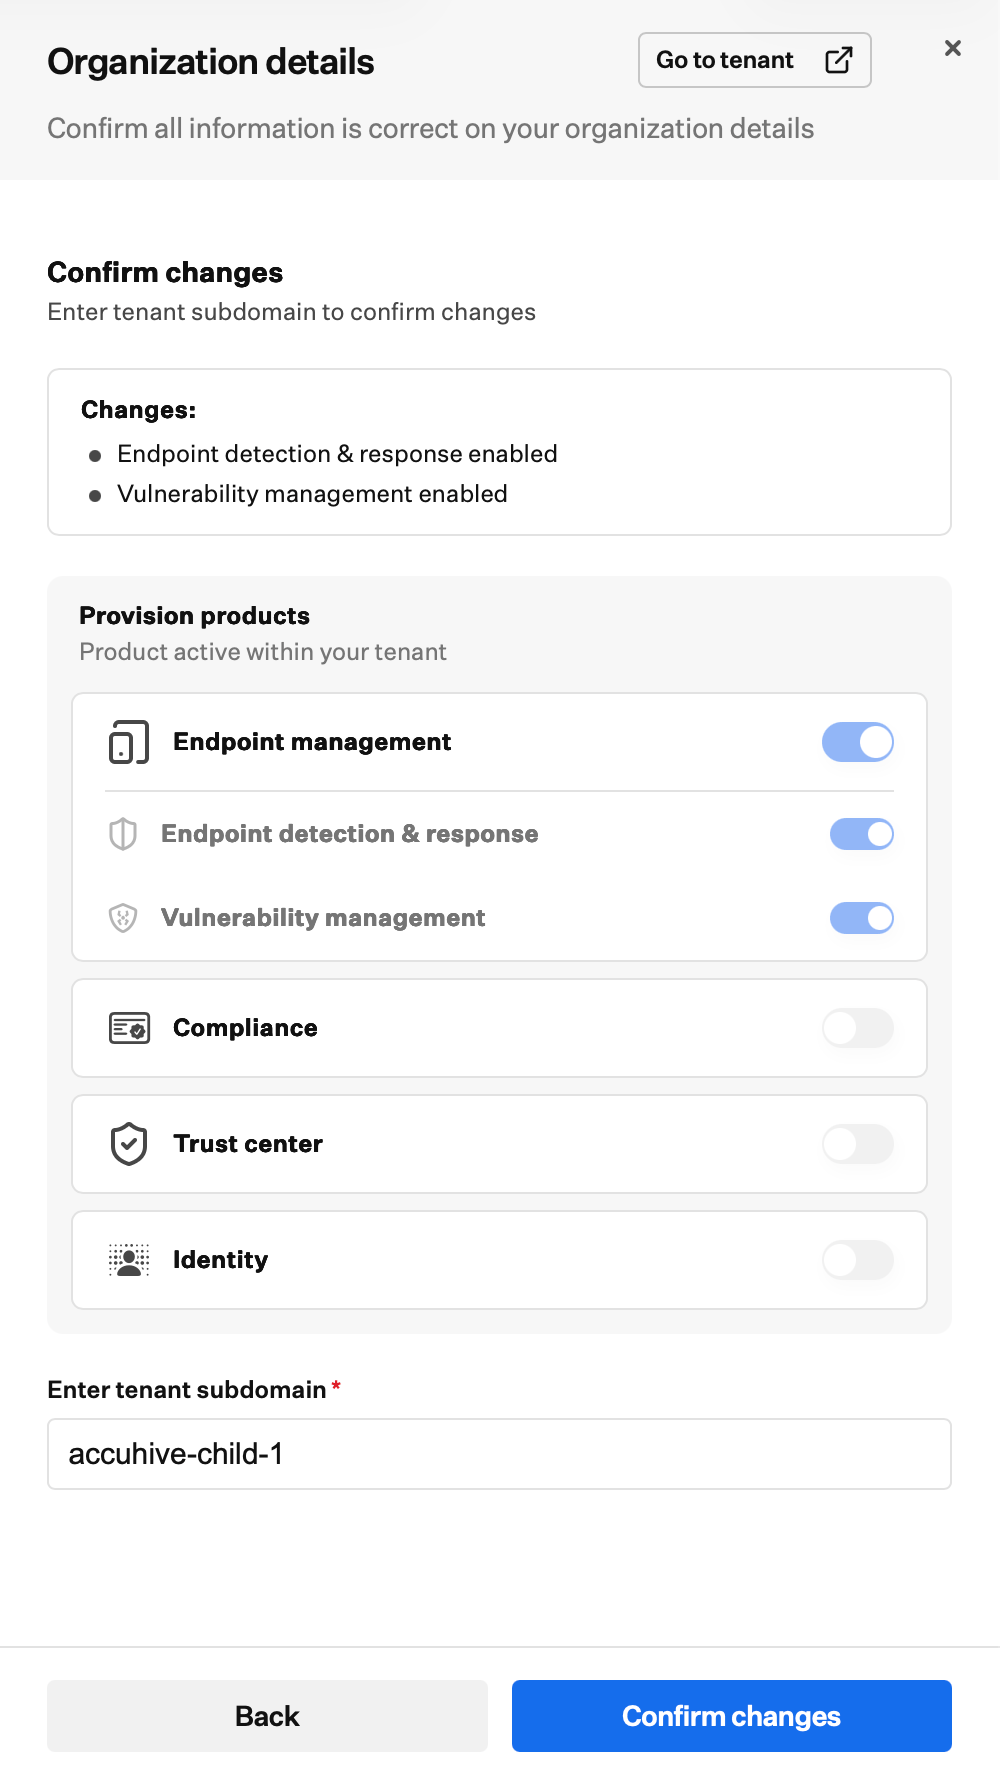 **Confirm changes** を選択します。
テナントの詳細を編集および保存できるかどうかは、MSP の親テナントでのロールによって異なります。[チームメンバーのロール権限](/ja/iru/access/team-member-role-permissions)を参照してください。
### テナントの作成
子テナントを作成する前に、[MSP の請求](/ja/iru/platform-overview/msp-billing)の設定を完了する必要があります。請求が設定されていない場合、テナントを作成しようとすると、まず請求の設定を完了するよう求められます。パートナーポータル のその他の部分は引き続き利用できます。
**パートナーダッシュボード** で **+ Create tenant** を選択します。
**Tenant information** で次の項目を入力します。
* **Account owner**: 親テナントの管理者を選択します
* **組織名**
* **Desired subdomain**: テナントの URL には、この値に `.iru.com` が付いたものが使用されます。作成後は変更できません。
* **NFR (not-for-resale) license** (任意): 登録デバイス数が 10 台に制限された無償のデモテナントを作成します。親テナントの NFR ライセンス数には限りがあります。NFR ライセンスが残っていない場合、このオプションは無効になります。
**Confirm changes** を選択します。
テナントの詳細を編集および保存できるかどうかは、MSP の親テナントでのロールによって異なります。[チームメンバーのロール権限](/ja/iru/access/team-member-role-permissions)を参照してください。
### テナントの作成
子テナントを作成する前に、[MSP の請求](/ja/iru/platform-overview/msp-billing)の設定を完了する必要があります。請求が設定されていない場合、テナントを作成しようとすると、まず請求の設定を完了するよう求められます。パートナーポータル のその他の部分は引き続き利用できます。
**パートナーダッシュボード** で **+ Create tenant** を選択します。
**Tenant information** で次の項目を入力します。
* **Account owner**: 親テナントの管理者を選択します
* **組織名**
* **Desired subdomain**: テナントの URL には、この値に `.iru.com` が付いたものが使用されます。作成後は変更できません。
* **NFR (not-for-resale) license** (任意): 登録デバイス数が 10 台に制限された無償のデモテナントを作成します。親テナントの NFR ライセンス数には限りがあります。NFR ライセンスが残っていない場合、このオプションは無効になります。
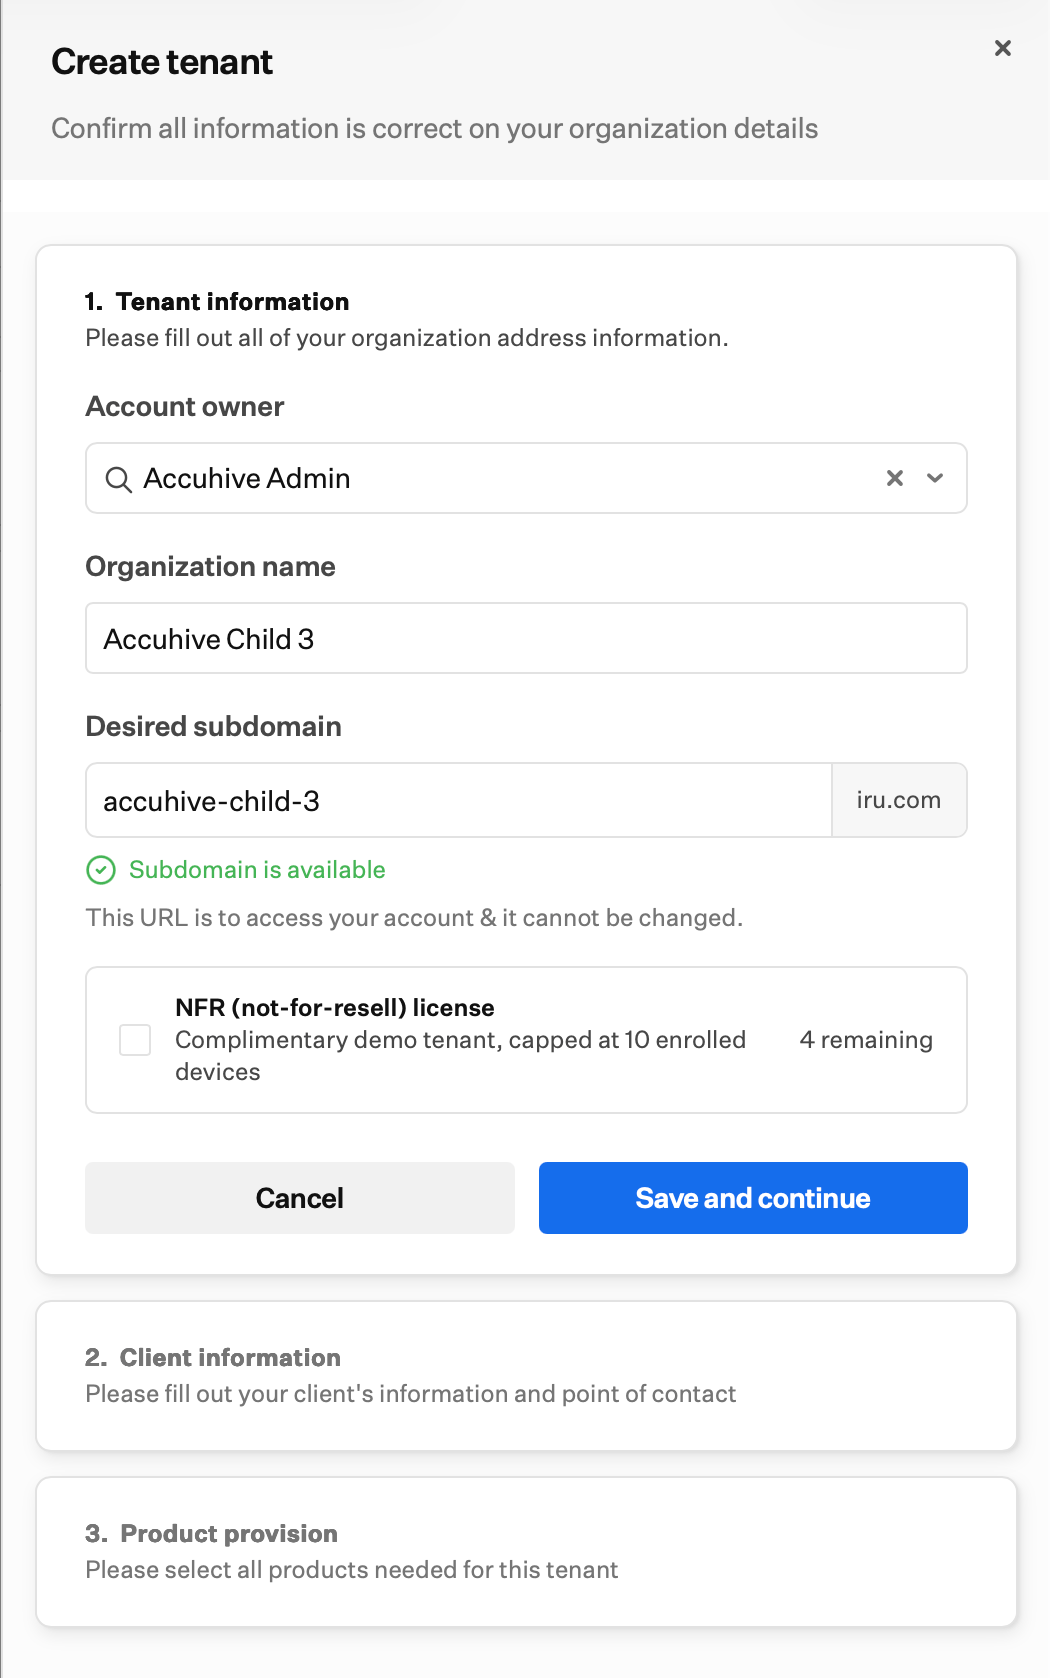 **保存して続行** を選択します。
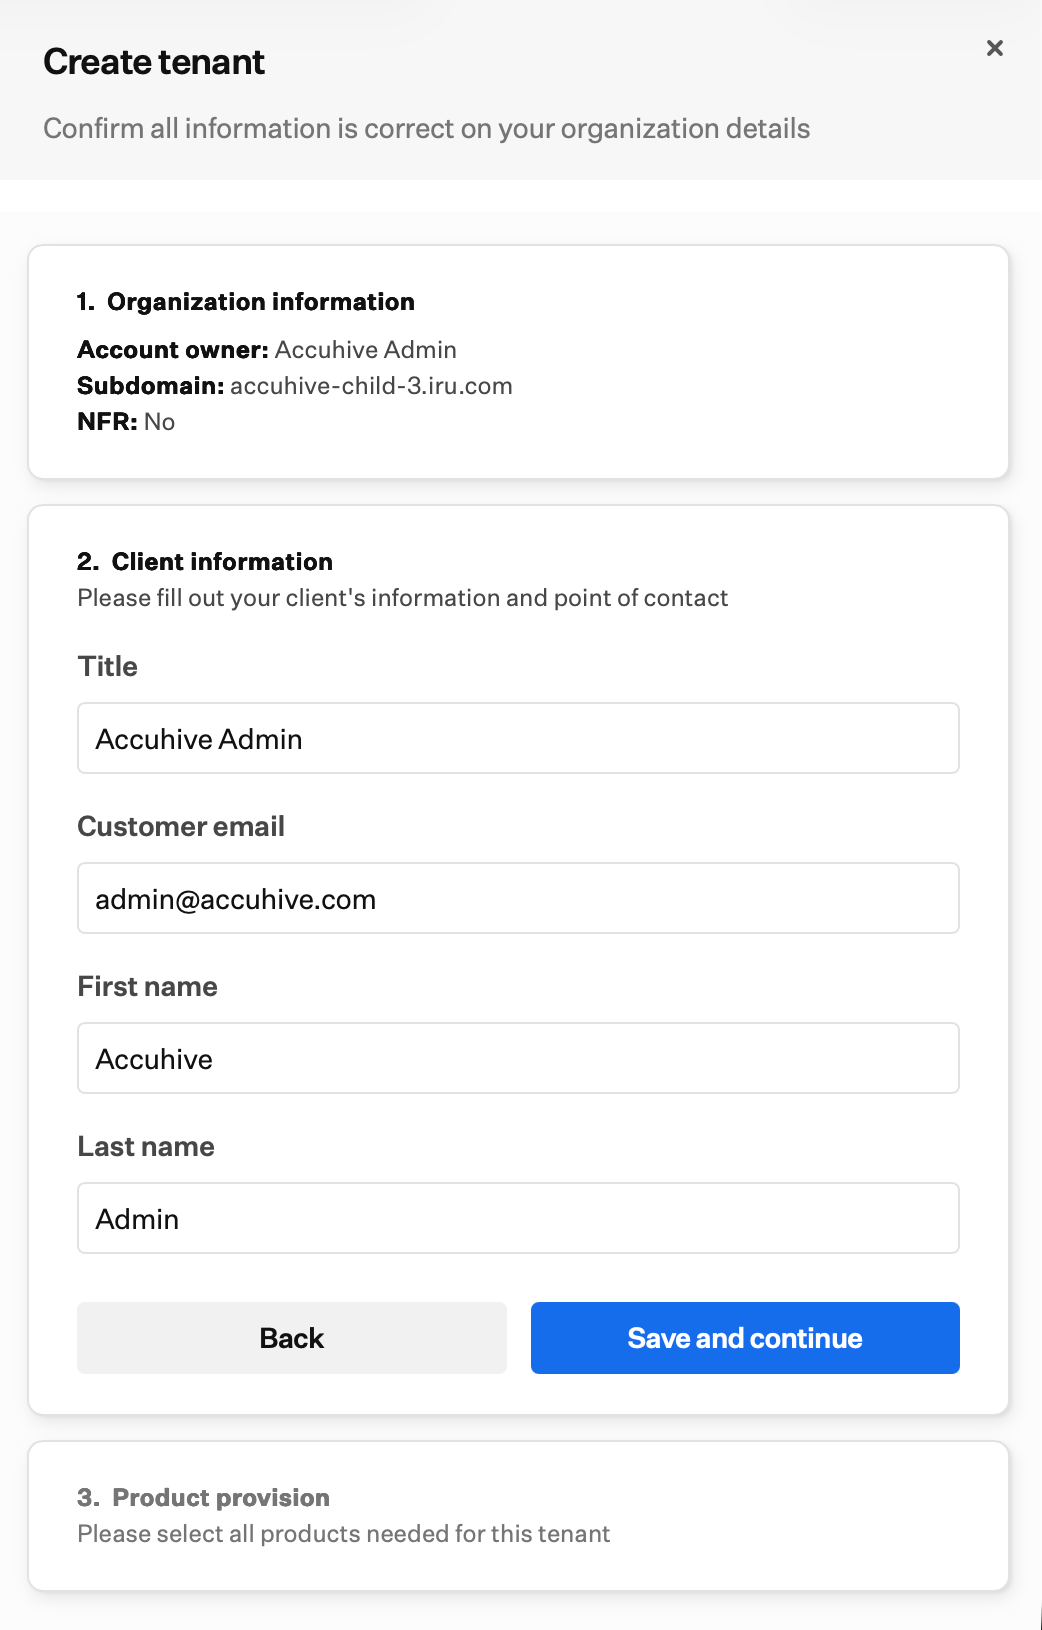
**Client information** で、クライアントの詳細を入力します。
* **役職**
* **顧客のメール**
* **名**
* **姓**
**NFR (not-for-resale) license** を選択した場合、このセクションはスキップされます。
**保存して続行** を選択します。
**Client information** で、クライアントの詳細を入力します。
* **役職**
* **顧客のメール**
* **名**
* **姓**
**NFR (not-for-resale) license** を選択した場合、このセクションはスキップされます。
 **保存して続行** を選択します。
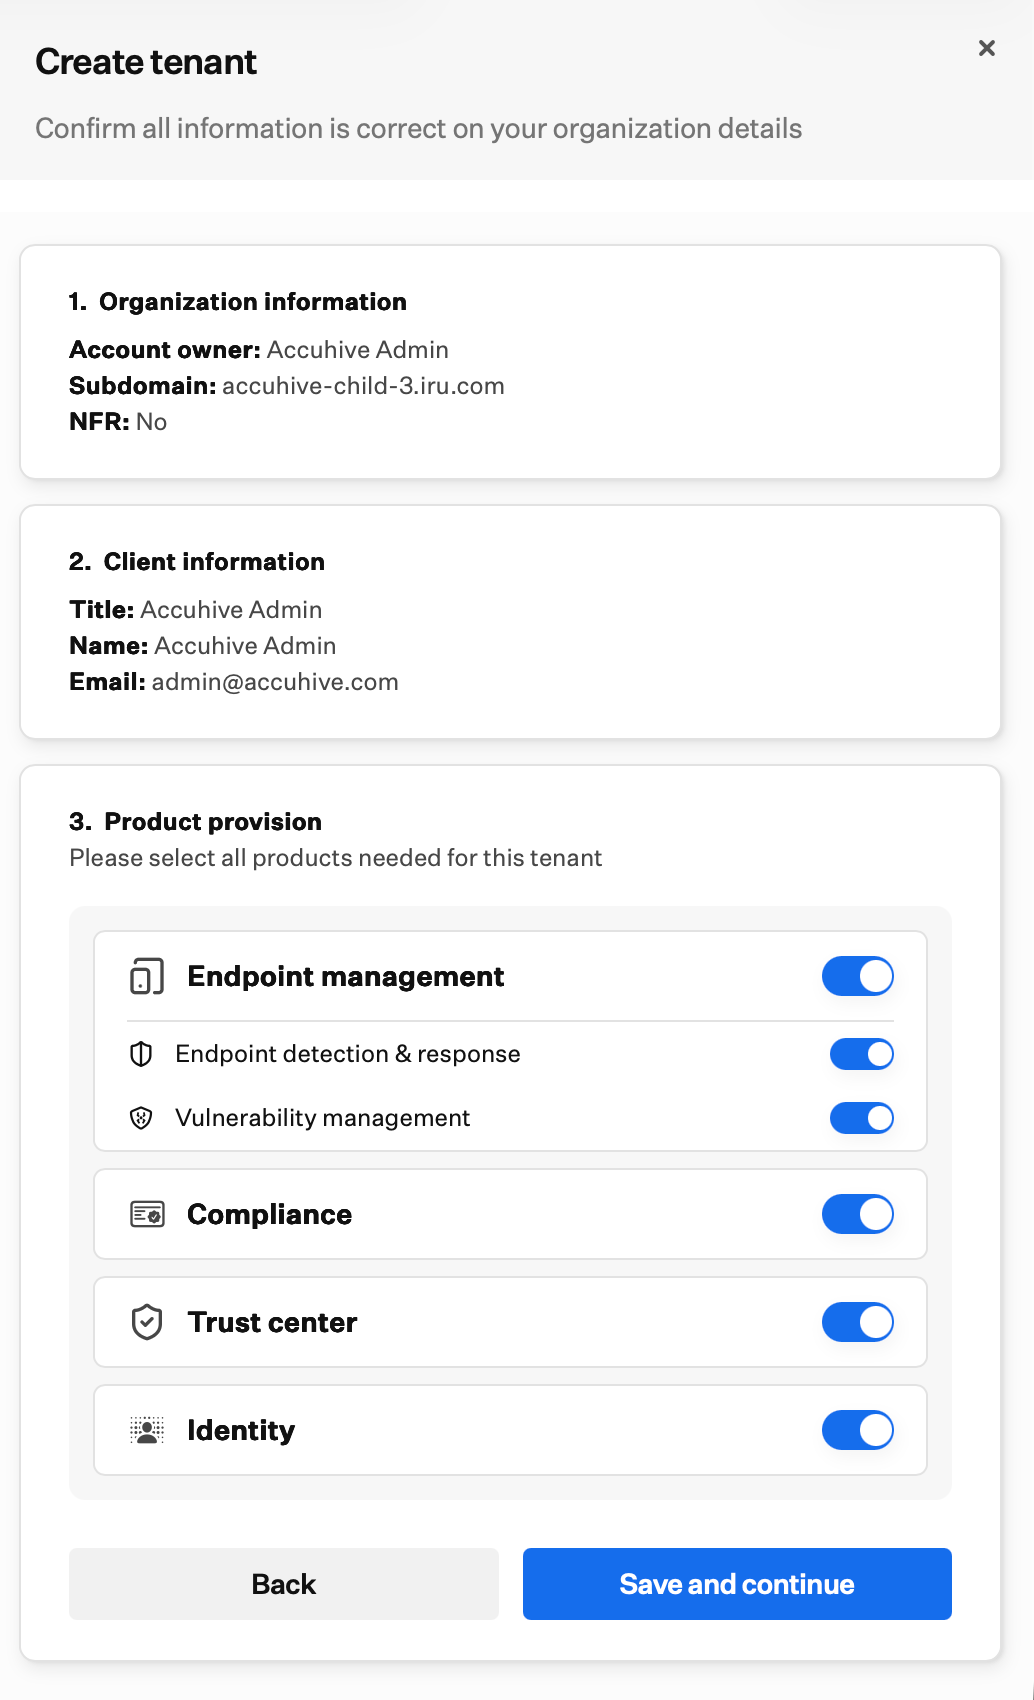
**Product provision** で、このテナントに必要な製品をオンにします。利用可能なトグルは、親テナントでプロビジョニングされている製品と一致します。
* [Endpoint management](/ja/endpoint/getting-started/getting-started)
* [Endpoint detection & response](/ja/endpoint/endpoint-detection-response-edr/endpoint-detection-and-response-edr-overview)
* [Vulnerability management](/ja/endpoint/vulnerability-management/vulnerability-management-overview)
* [Compliance](/ja/compliance/getting-started-with-compliance)
* [Trust Center](/ja/compliance/trust-center/trust-center-management)
* [Identity](/ja/identity/getting-started/overview)
**保存して続行** を選択します。
**Product provision** で、このテナントに必要な製品をオンにします。利用可能なトグルは、親テナントでプロビジョニングされている製品と一致します。
* [Endpoint management](/ja/endpoint/getting-started/getting-started)
* [Endpoint detection & response](/ja/endpoint/endpoint-detection-response-edr/endpoint-detection-and-response-edr-overview)
* [Vulnerability management](/ja/endpoint/vulnerability-management/vulnerability-management-overview)
* [Compliance](/ja/compliance/getting-started-with-compliance)
* [Trust Center](/ja/compliance/trust-center/trust-center-management)
* [Identity](/ja/identity/getting-started/overview)
 **保存して続行** を選択します。
**Organization information**、**Client information**、**Product provision** の概要を確認します。いずれかのセクションの **編集** を使用すると、戻って変更できます。
**保存して続行** を選択します。
**Organization information**、**Client information**、**Product provision** の概要を確認します。いずれかのセクションの **編集** を使用すると、戻って変更できます。
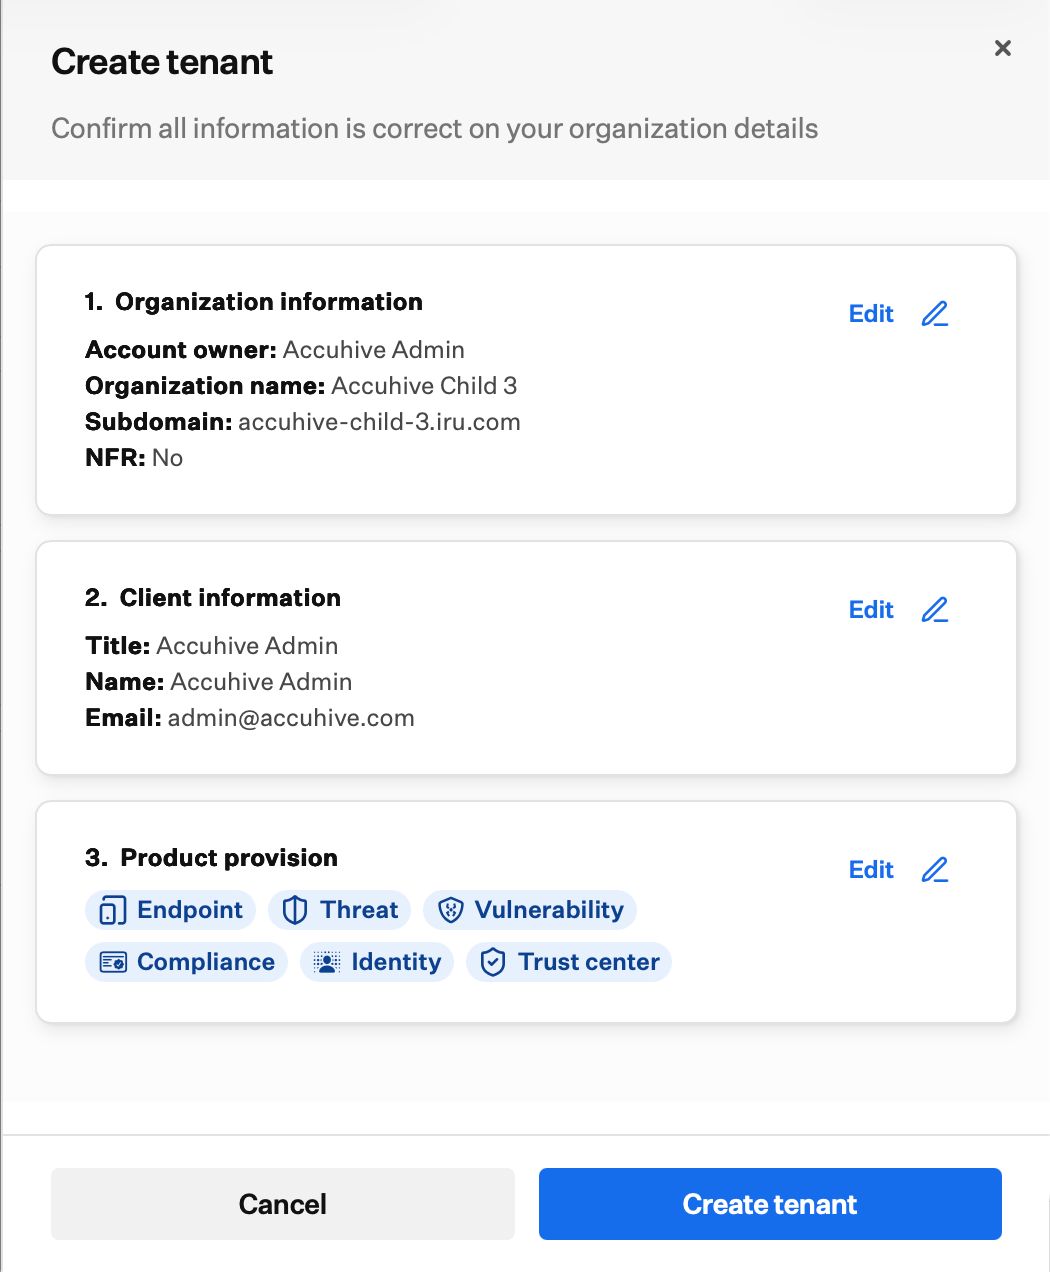 **Create tenant** を選択して子テナントをプロビジョニングするか、**キャンセル** を選択して破棄します。
作成後、新しいテナントが **パートナーダッシュボード** に表示されます。**Tenant** で開くか、**詳細** から製品とロケールを調整します。
### 考慮事項
パートナーダッシュボード は パートナーポータル の一部であり、MSP の親テナントからのみ利用できます。子テナントのアカウントメニューから開くことはできません。[パートナーポータル](/ja/iru/platform-overview/partner-portal-page)を参照してください。
各子テナントには独自のサインインがあります。パートナーポータル は子テナントの URL へのリンクを提供するだけで、テナント間で単一のセッションを共有することはありません。
有効にできるのは、親テナントでプロビジョニングされている製品のみです。子テナントのトグルが、親テナントでサポートされている範囲を超えることはできません。
NFR テナントはデモンストレーション用であり、登録デバイス数は 10 台に制限されています。親テナントには合計 5 つの NFR ライセンスが付与されます。テナント作成フォームには、残りの数が表示されます。
### 関連記事
パートナーポータル を開き、**ホーム** で親テナントに戻ります。
請求の設定、推定支出の確認、請求書のダウンロードを行います。
Account Menu Button から **パートナーポータル** を開きます。
パートナーポータル にアクセスしてテナントを管理できるロール。
新しいテナントのアカウントオーナーとして割り当てることができる管理者を追加します。
**Create tenant** を選択して子テナントをプロビジョニングするか、**キャンセル** を選択して破棄します。
作成後、新しいテナントが **パートナーダッシュボード** に表示されます。**Tenant** で開くか、**詳細** から製品とロケールを調整します。
### 考慮事項
パートナーダッシュボード は パートナーポータル の一部であり、MSP の親テナントからのみ利用できます。子テナントのアカウントメニューから開くことはできません。[パートナーポータル](/ja/iru/platform-overview/partner-portal-page)を参照してください。
各子テナントには独自のサインインがあります。パートナーポータル は子テナントの URL へのリンクを提供するだけで、テナント間で単一のセッションを共有することはありません。
有効にできるのは、親テナントでプロビジョニングされている製品のみです。子テナントのトグルが、親テナントでサポートされている範囲を超えることはできません。
NFR テナントはデモンストレーション用であり、登録デバイス数は 10 台に制限されています。親テナントには合計 5 つの NFR ライセンスが付与されます。テナント作成フォームには、残りの数が表示されます。
### 関連記事
パートナーポータル を開き、**ホーム** で親テナントに戻ります。
請求の設定、推定支出の確認、請求書のダウンロードを行います。
Account Menu Button から **パートナーポータル** を開きます。
パートナーポータル にアクセスしてテナントを管理できるロール。
新しいテナントのアカウントオーナーとして割り当てることができる管理者を追加します。