> ## Documentation Index
> Fetch the complete documentation index at: https://docs.iru.com/llms.txt
> Use this file to discover all available pages before exploring further.
# Apple のセットアップ
> Iru Endpoint で Apple プラットフォーム連携を設定します。APNs、Apple Business、Automated Device Enrollment、Apps and Books を構成します。
このガイドは Mac コンピュータ、iPhone、iPad、Apple TV デバイス、Apple Vision Pro に適用されます
**Apple Business Manager** は **Apple Business** になりました。**Apple School Manager** は変更ありません。詳細については、[Introducing Apple Business](https://www.apple.com/newsroom/2026/03/introducing-apple-business-a-new-all-in-one-platform-for-businesses-of-all-sizes/) および [Apple Business Manager is now Apple Business](https://support.apple.com/guide/apple-business-manager/apple-business-manager-is-now-apple-business-axmd79d79dea/web) を参照してください。
Apple プラットフォーム連携を設定すると、Mac コンピュータ、iPhone、iPad、Apple TV デバイス、Apple Vision Pro を 1 か所から保護・管理できます。Apple Push Notification service(APNs)、Automated Device Enrollment(ADE)、Apps and Books の順に構成します。
## Apple Push Notification service(APNs)を構成する
APNs は Apple デバイスとの通信に必要です。最適な結果を得るには、macOS コンピュータを使用してください。
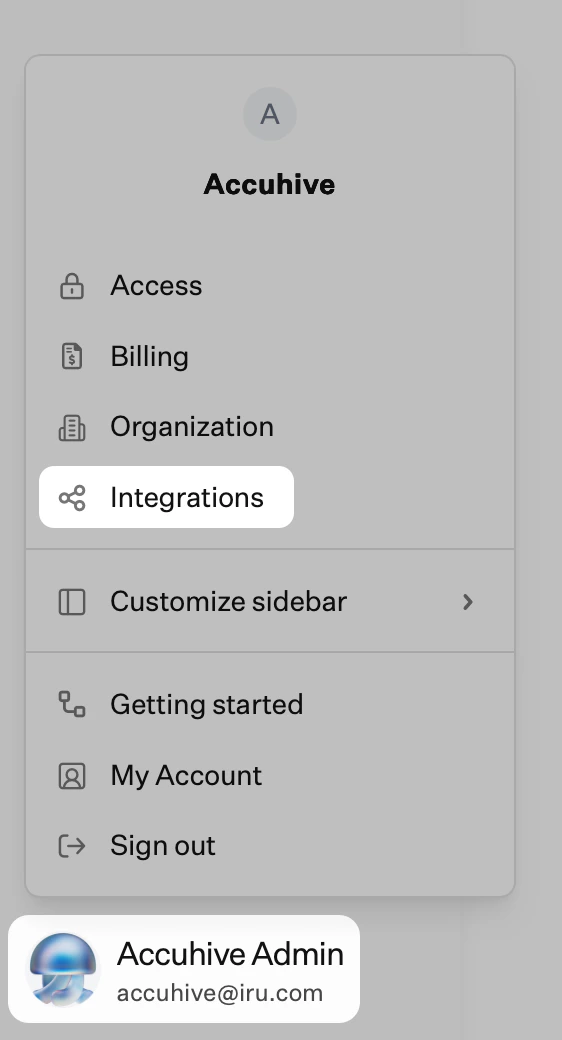
サイドバーで [**アカウントメニューボタン**](/ja/iru/platform-overview/account-menu) を選択し、**インテグレーション** を選択します。
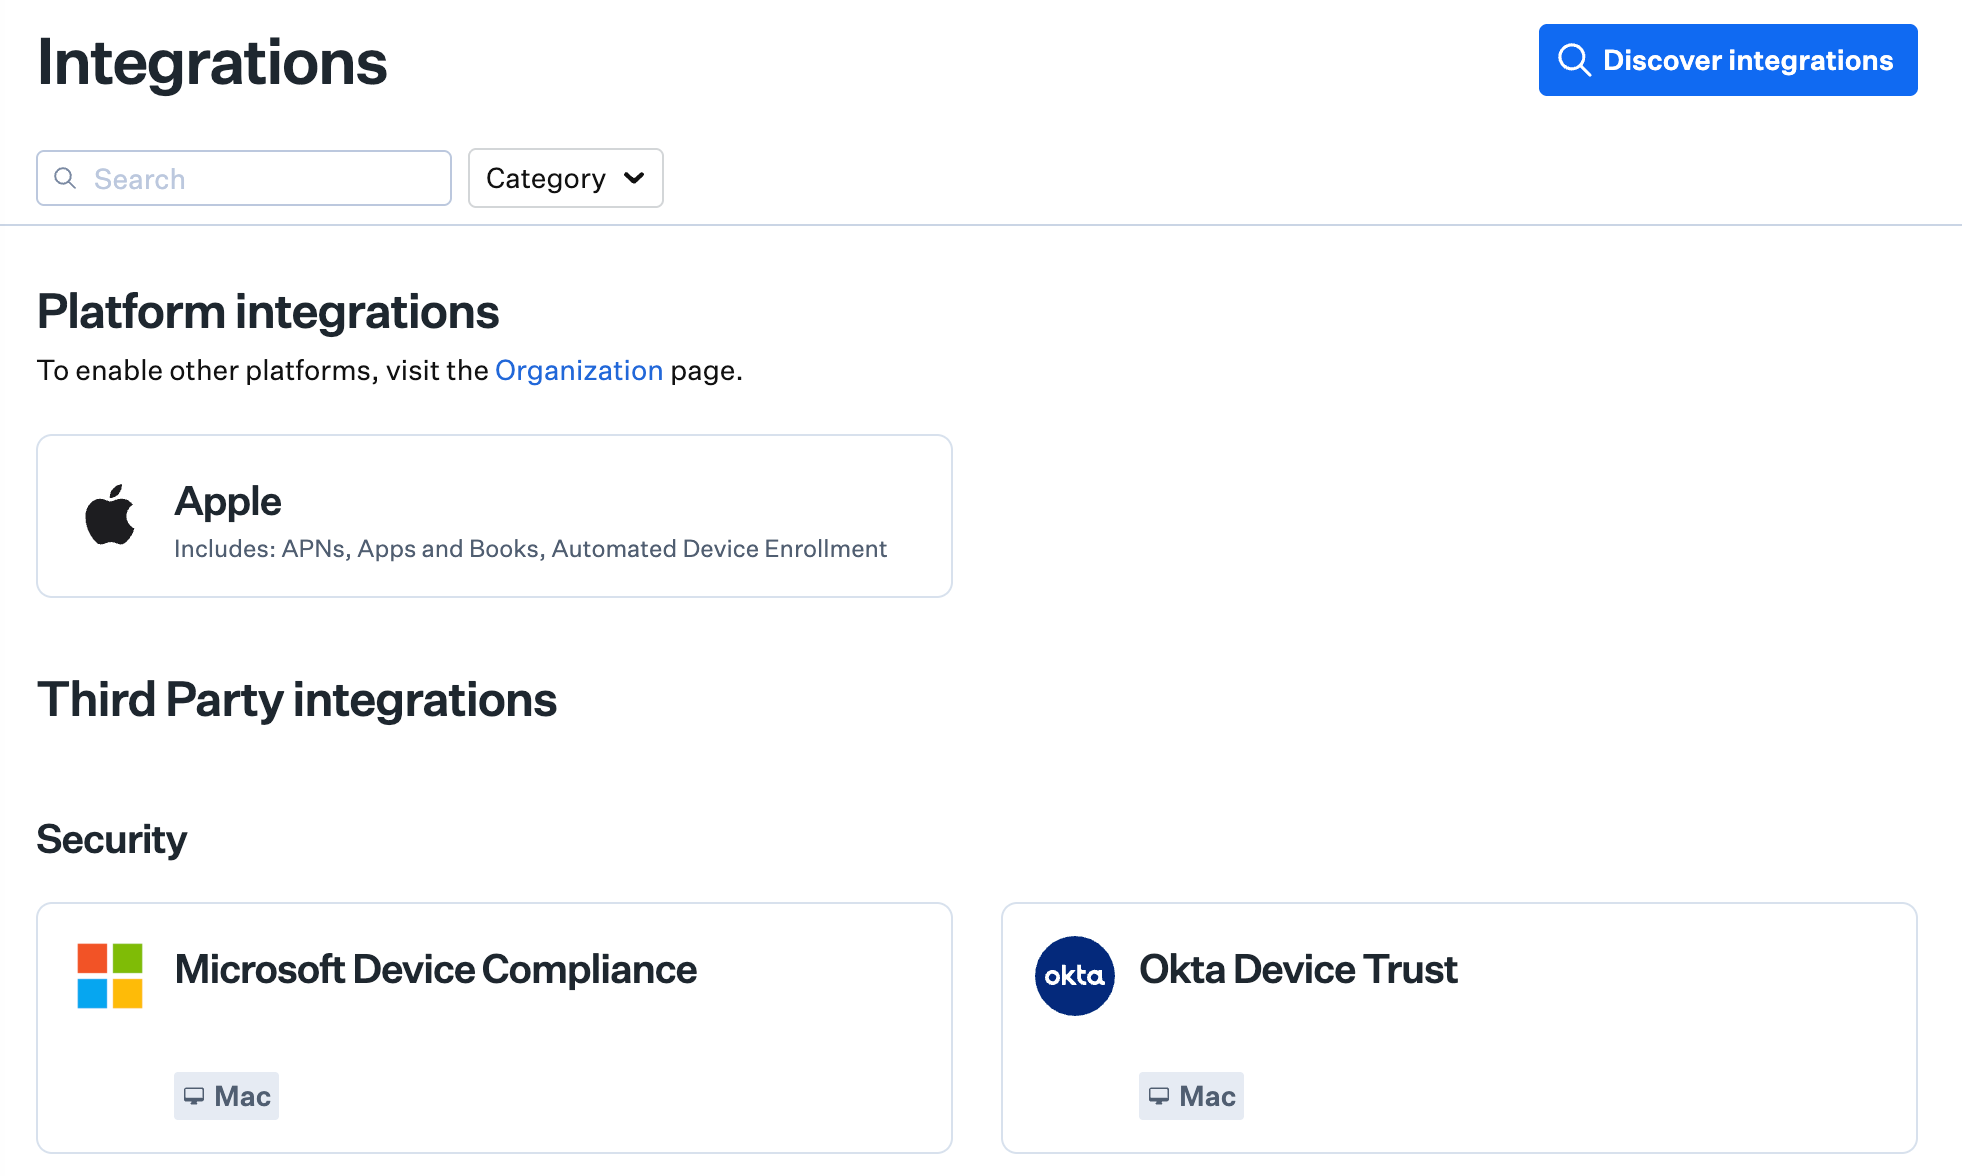
 **プラットフォームインテグレーション** で **Apple** を選択します。
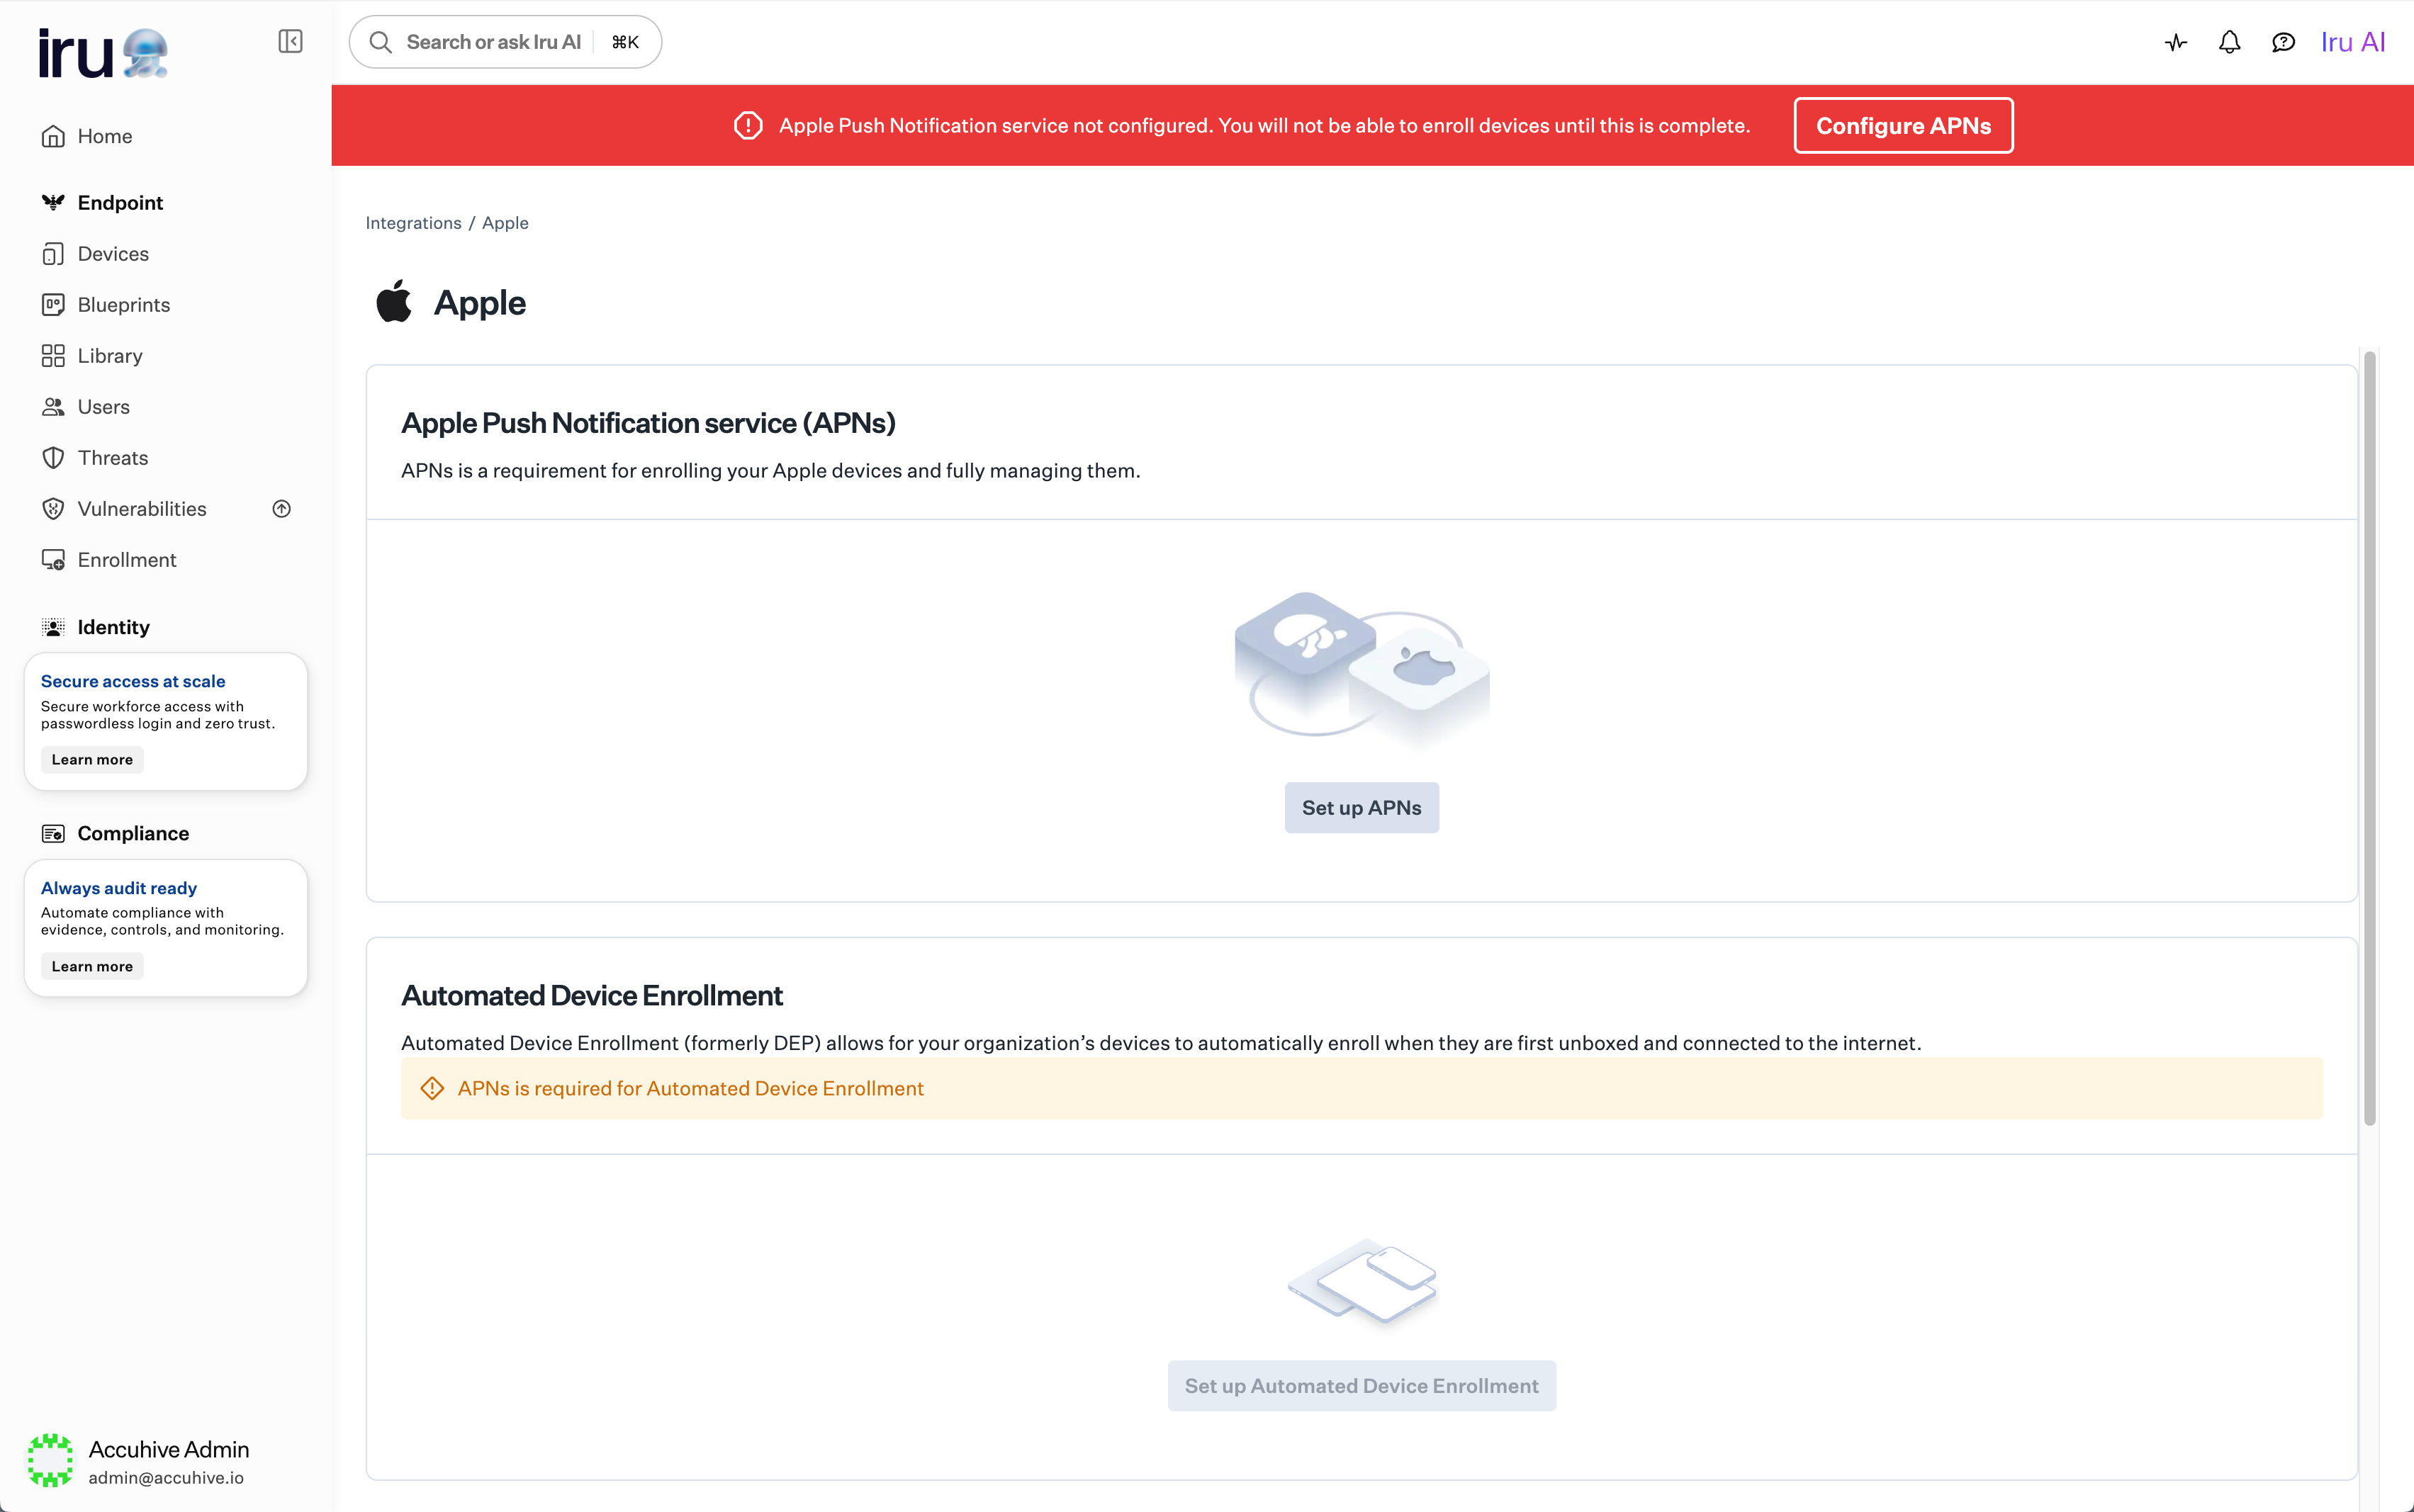
 **Apple Push Notification service** (APNs) で **APNsを設定** を選択します。
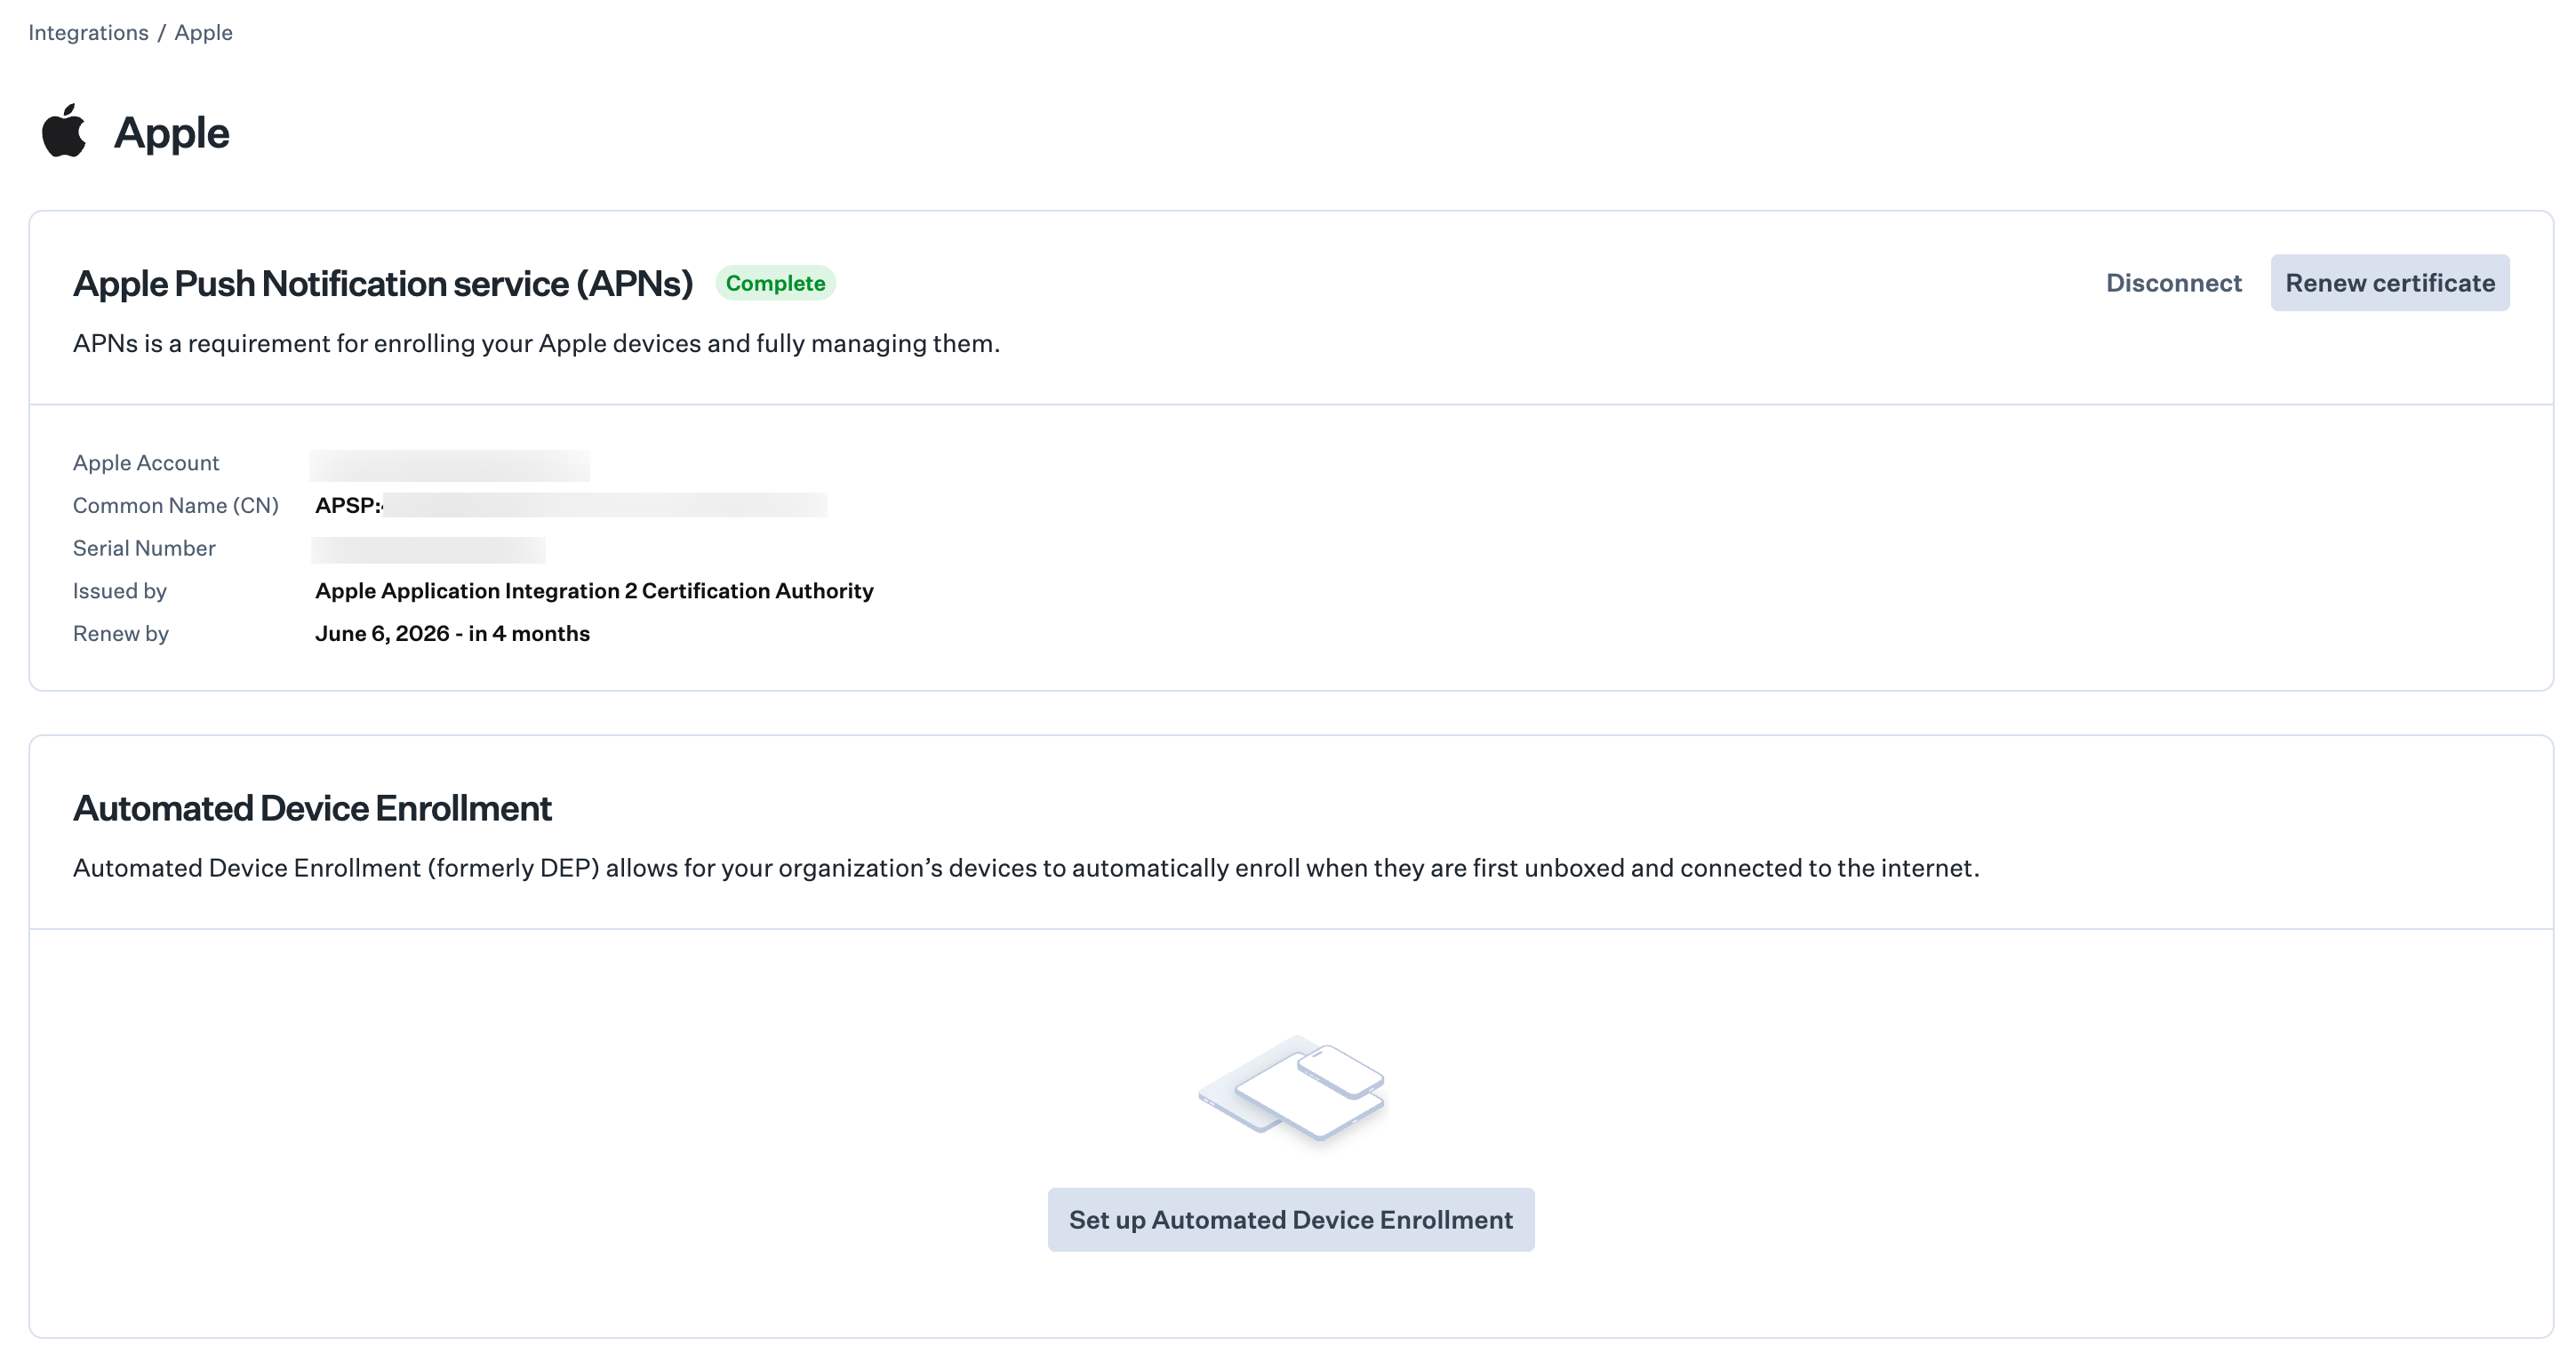
 画面の指示に従って新しい APNs 証明書を作成します。指定されたチームメンバーがアクセスできる、組織で管理された [Apple Account](/ja/endpoint/enrollment/apple/apple-accounts-overview) を使用してください。
既存の APNs 証明書を使用しないでください。Iru Endpoint 専用に新しい証明書を作成してください。
APNs 証明書は毎年更新する必要があります。Iru Endpoint は、証明書の有効期限の 30 日前から、Administrator または Account Owner の権限を持つチームメンバーにリマインダーメールを送信します。更新とトラブルシューティングについては、[Apple Push Notification service の構成](/ja/endpoint/settings/apple-integrations/configure-apple-push-notification-service)を参照してください。
### Apple Push Notification service 証明書を更新する
サイドバーで [**アカウントメニューボタン**](/ja/iru/platform-overview/account-menu) を選択し、**インテグレーション** を選択します。
**プラットフォームインテグレーション** で **Apple** を選択します。
**Apple Push Notification service** (APNs) で **証明書を更新** を選択します。
画面の指示に従って APNs 証明書を更新します。
トラブルシューティングについては、[Apple Push Notification Service の構成](/ja/endpoint/settings/apple-integrations/configure-apple-push-notification-service#troubleshoot-apns-certificate-renewal)を参照してください。APNs の接続を解除するには、[APNs の接続解除](/ja/endpoint/settings/apple-integrations/configure-apple-push-notification-service#disconnecting-apns)を参照してください。
## Automated Device Enrollment を構成する
Automated Device Enrollment を使用すると、会社所有の Apple デバイスをゼロタッチで展開できます。Automated Device Enrollment を設定する前に、テナントで [Apple Push Notification service](/ja/endpoint/settings/apple-integrations/configure-apple-push-notification-service) を構成しておく必要があります。以下の手順では、Apple 連携ページに表示される ADE トークンを構成します。この Iru Endpoint テナントで複数の ADE トークンが必要な場合は、Iru Endpoint API を使用して追加のトークンを追加します。[Iru Endpoint API を使用した複数の ADE トークンの構成](/ja/endpoint/settings/apple-integrations/configure-multiple-automated-device-enrollment-tokens)を参照してください。
組織は [Apple Business](https://business.apple.com/) または [Apple School Manager](https://school.apple.com/) に登録します(どちらも無料です。確認には数日かかる場合があります)。Apple または正規販売店から購入したデバイスは、自動的にアカウントに追加されます。既存のデバイスを追加するには、[Apple Business または Apple School Manager へのデバイスの追加](/ja/endpoint/settings/apple-integrations/adding-devices-to-apple-business-manager)を参照してください。
サイドバーで [**アカウントメニューボタン**](/ja/iru/platform-overview/account-menu) を選択し、**インテグレーション** を選択します。
**プラットフォームインテグレーション** で **Apple** を選択します。
**Automated Device Enrollment** で **Automated Device Enrollmentを設定** を選択します。
画面の指示に従って新しい APNs 証明書を作成します。指定されたチームメンバーがアクセスできる、組織で管理された [Apple Account](/ja/endpoint/enrollment/apple/apple-accounts-overview) を使用してください。
既存の APNs 証明書を使用しないでください。Iru Endpoint 専用に新しい証明書を作成してください。
APNs 証明書は毎年更新する必要があります。Iru Endpoint は、証明書の有効期限の 30 日前から、Administrator または Account Owner の権限を持つチームメンバーにリマインダーメールを送信します。更新とトラブルシューティングについては、[Apple Push Notification service の構成](/ja/endpoint/settings/apple-integrations/configure-apple-push-notification-service)を参照してください。
### Apple Push Notification service 証明書を更新する
サイドバーで [**アカウントメニューボタン**](/ja/iru/platform-overview/account-menu) を選択し、**インテグレーション** を選択します。
**プラットフォームインテグレーション** で **Apple** を選択します。
**Apple Push Notification service** (APNs) で **証明書を更新** を選択します。
画面の指示に従って APNs 証明書を更新します。
トラブルシューティングについては、[Apple Push Notification Service の構成](/ja/endpoint/settings/apple-integrations/configure-apple-push-notification-service#troubleshoot-apns-certificate-renewal)を参照してください。APNs の接続を解除するには、[APNs の接続解除](/ja/endpoint/settings/apple-integrations/configure-apple-push-notification-service#disconnecting-apns)を参照してください。
## Automated Device Enrollment を構成する
Automated Device Enrollment を使用すると、会社所有の Apple デバイスをゼロタッチで展開できます。Automated Device Enrollment を設定する前に、テナントで [Apple Push Notification service](/ja/endpoint/settings/apple-integrations/configure-apple-push-notification-service) を構成しておく必要があります。以下の手順では、Apple 連携ページに表示される ADE トークンを構成します。この Iru Endpoint テナントで複数の ADE トークンが必要な場合は、Iru Endpoint API を使用して追加のトークンを追加します。[Iru Endpoint API を使用した複数の ADE トークンの構成](/ja/endpoint/settings/apple-integrations/configure-multiple-automated-device-enrollment-tokens)を参照してください。
組織は [Apple Business](https://business.apple.com/) または [Apple School Manager](https://school.apple.com/) に登録します(どちらも無料です。確認には数日かかる場合があります)。Apple または正規販売店から購入したデバイスは、自動的にアカウントに追加されます。既存のデバイスを追加するには、[Apple Business または Apple School Manager へのデバイスの追加](/ja/endpoint/settings/apple-integrations/adding-devices-to-apple-business-manager)を参照してください。
サイドバーで [**アカウントメニューボタン**](/ja/iru/platform-overview/account-menu) を選択し、**インテグレーション** を選択します。
**プラットフォームインテグレーション** で **Apple** を選択します。
**Automated Device Enrollment** で **Automated Device Enrollmentを設定** を選択します。
 セットアップウィザードで、Iru Endpoint が **PEM** 公開鍵ファイルを提供するまで進みます(プロンプトが表示されたらダウンロードまたは保存します)。このファイルは、次の手順で Apple Business または Apple School Manager にアップロードします。
デバイス管理サービスを管理できる Managed Apple Account で [Apple Business](https://business.apple.com) または [Apple School Manager](https://school.apple.com) にサインインします。
ページ上部の **デバイス** タブを選択します。
左側のサイドバーで **Management** を選択します。
**Management Services** リストの一番下までスクロールし、**Add device management service** の横にある **追加** を選択します。
セットアップウィザードで、Iru Endpoint が **PEM** 公開鍵ファイルを提供するまで進みます(プロンプトが表示されたらダウンロードまたは保存します)。このファイルは、次の手順で Apple Business または Apple School Manager にアップロードします。
デバイス管理サービスを管理できる Managed Apple Account で [Apple Business](https://business.apple.com) または [Apple School Manager](https://school.apple.com) にサインインします。
ページ上部の **デバイス** タブを選択します。
左側のサイドバーで **Management** を選択します。
**Management Services** リストの一番下までスクロールし、**Add device management service** の横にある **追加** を選択します。
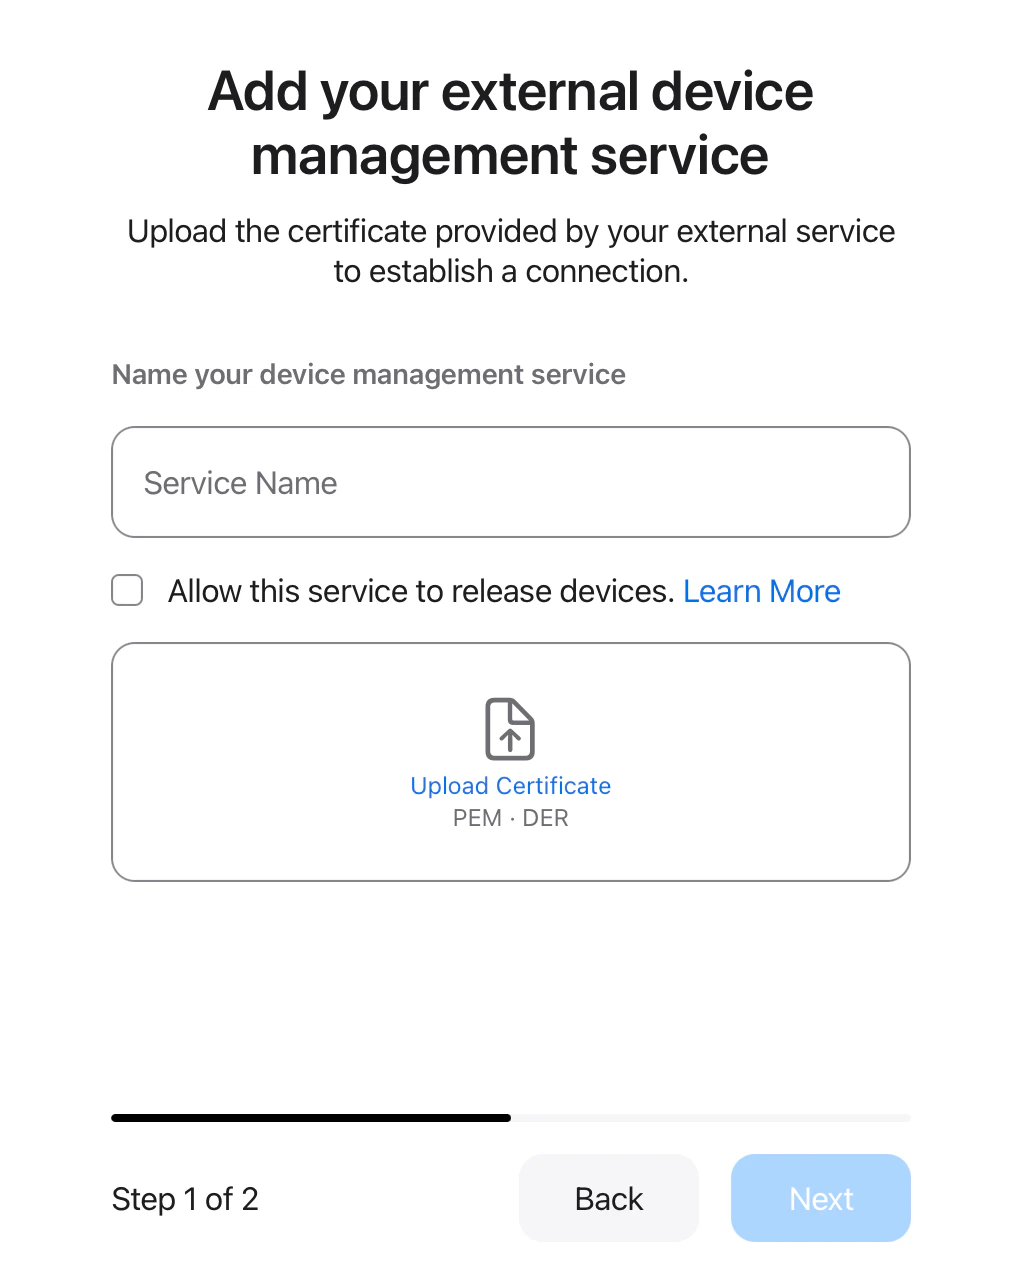
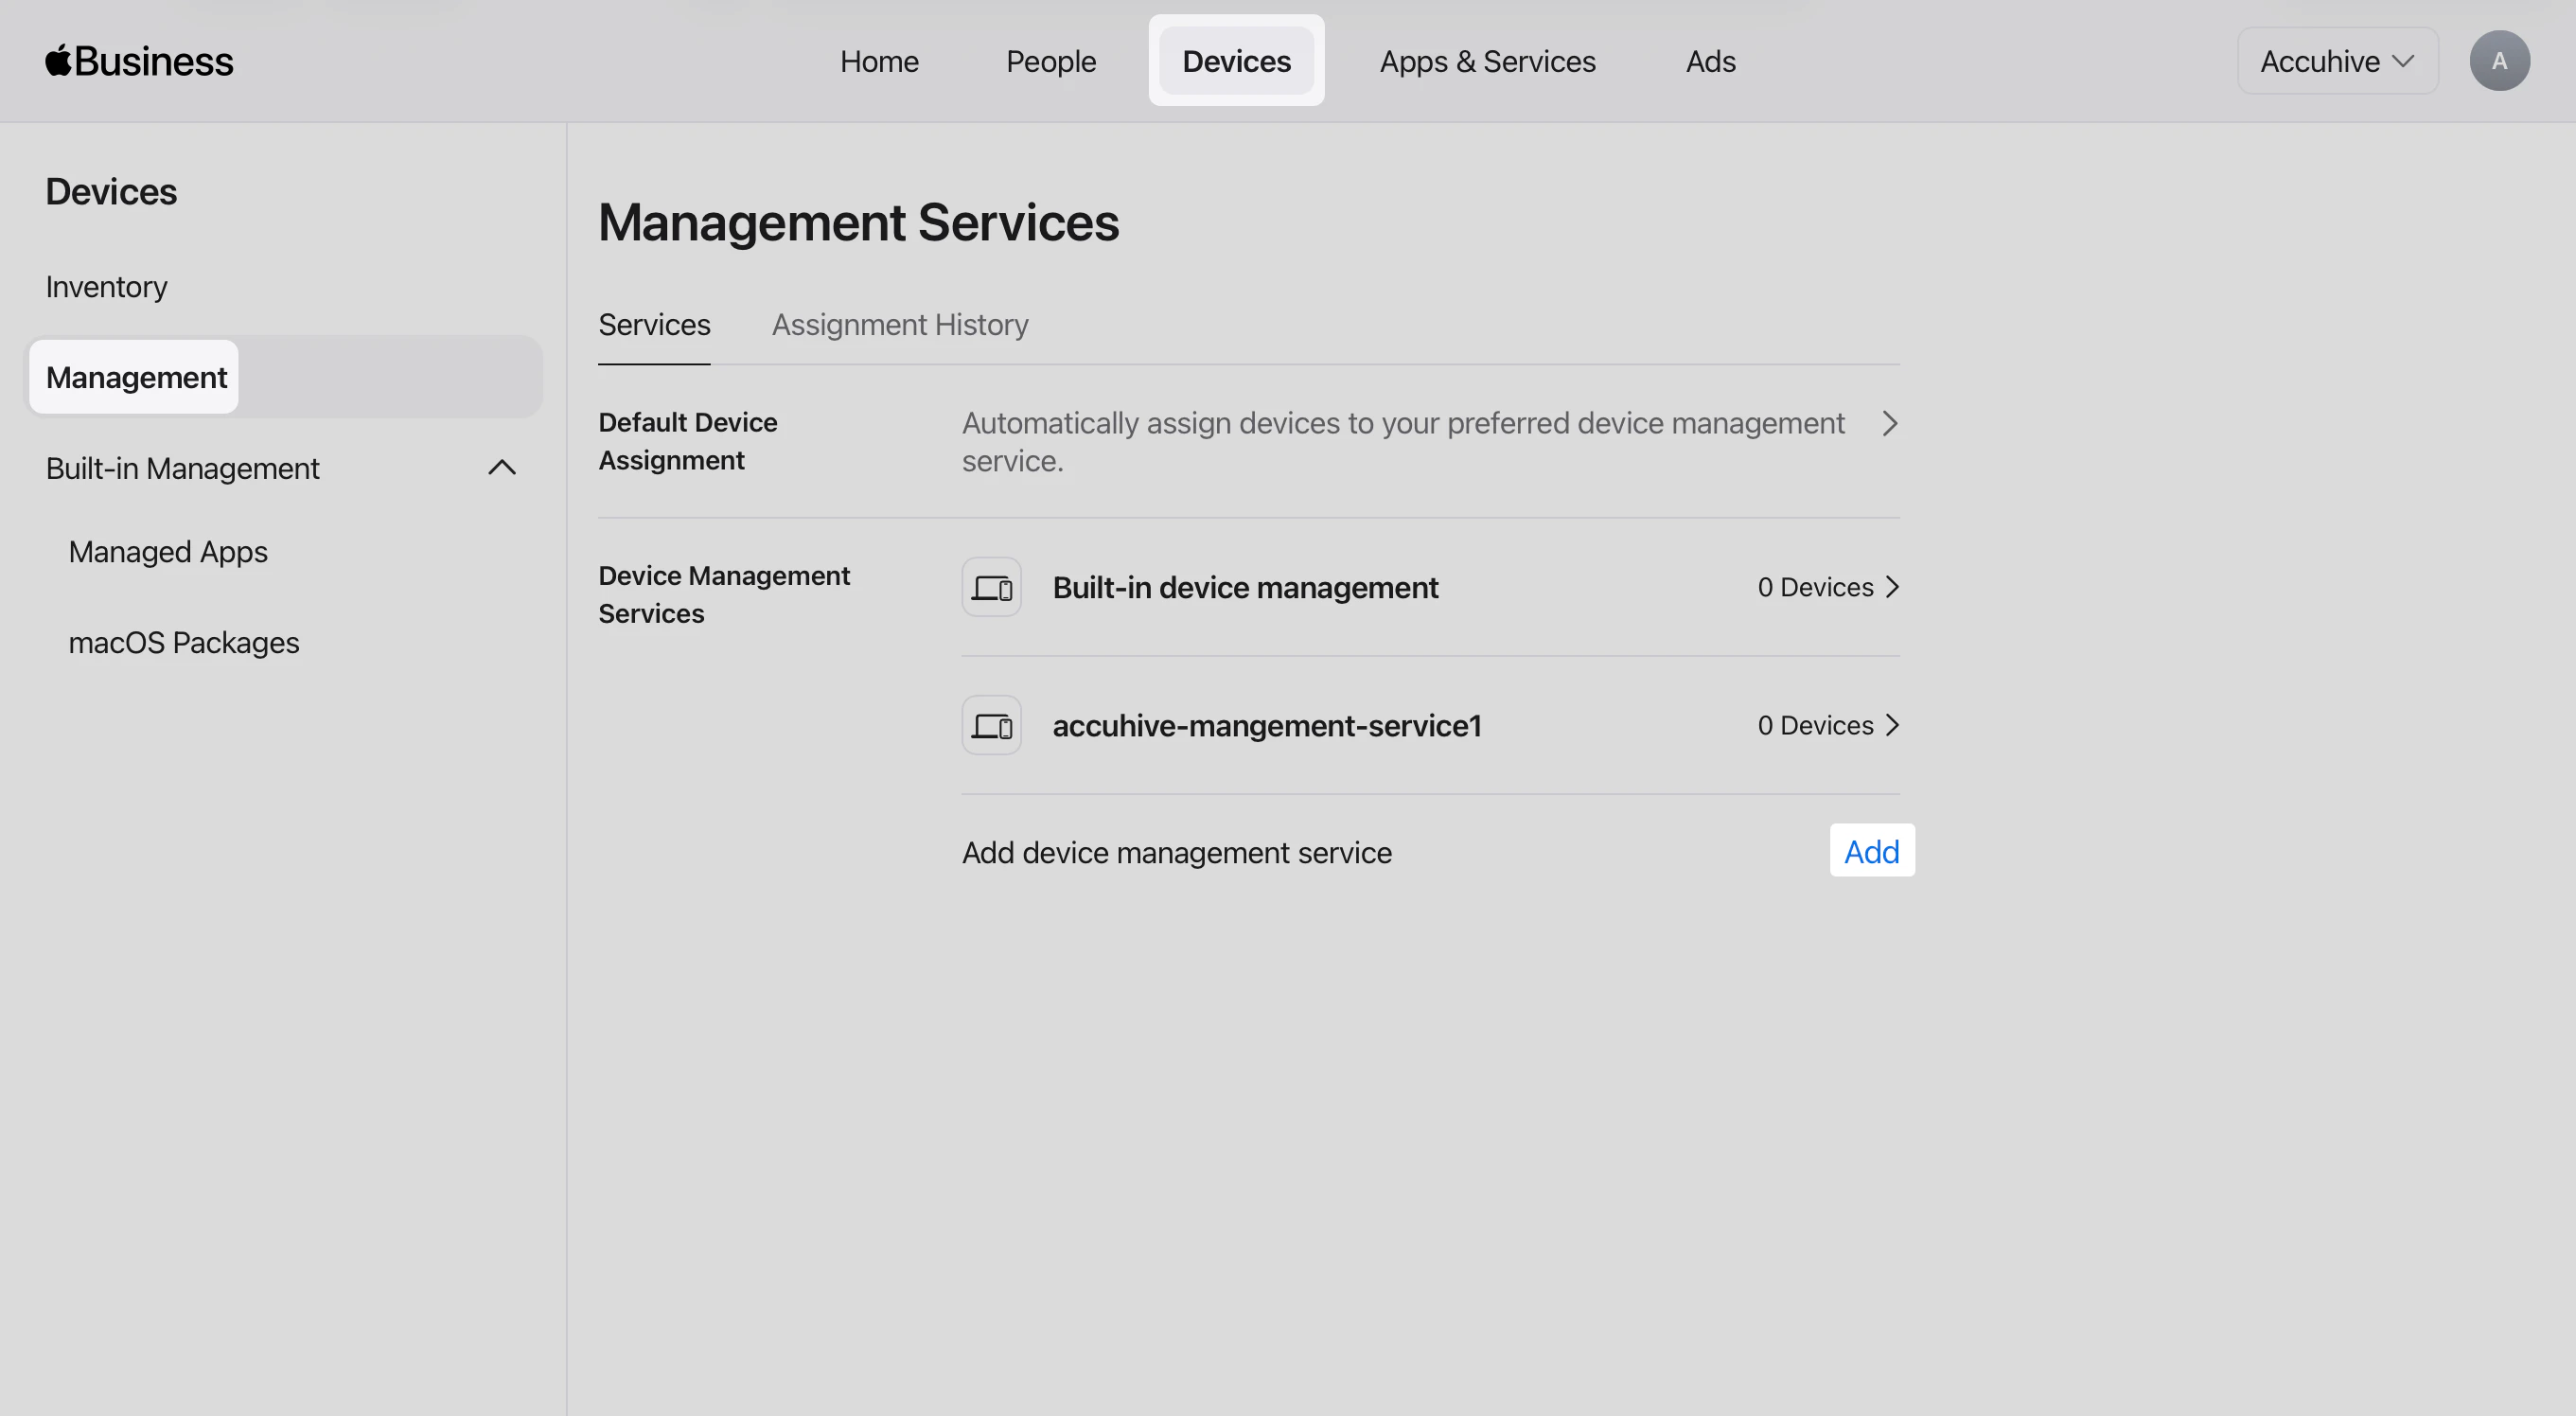 **Service Name** フィールドに、この MDM 連携の名前(例: **Iru Endpoint**)を入力します。
組織で必要な場合は、**Allow this service to release devices** を選択します。
Iru Endpoint から取得した **PEM** ファイルをアップロードします。
**次へ** を選択します。
**Service Name** フィールドに、この MDM 連携の名前(例: **Iru Endpoint**)を入力します。
組織で必要な場合は、**Allow this service to release devices** を選択します。
Iru Endpoint から取得した **PEM** ファイルをアップロードします。
**次へ** を選択します。
 **Download Service Token** を選択します。
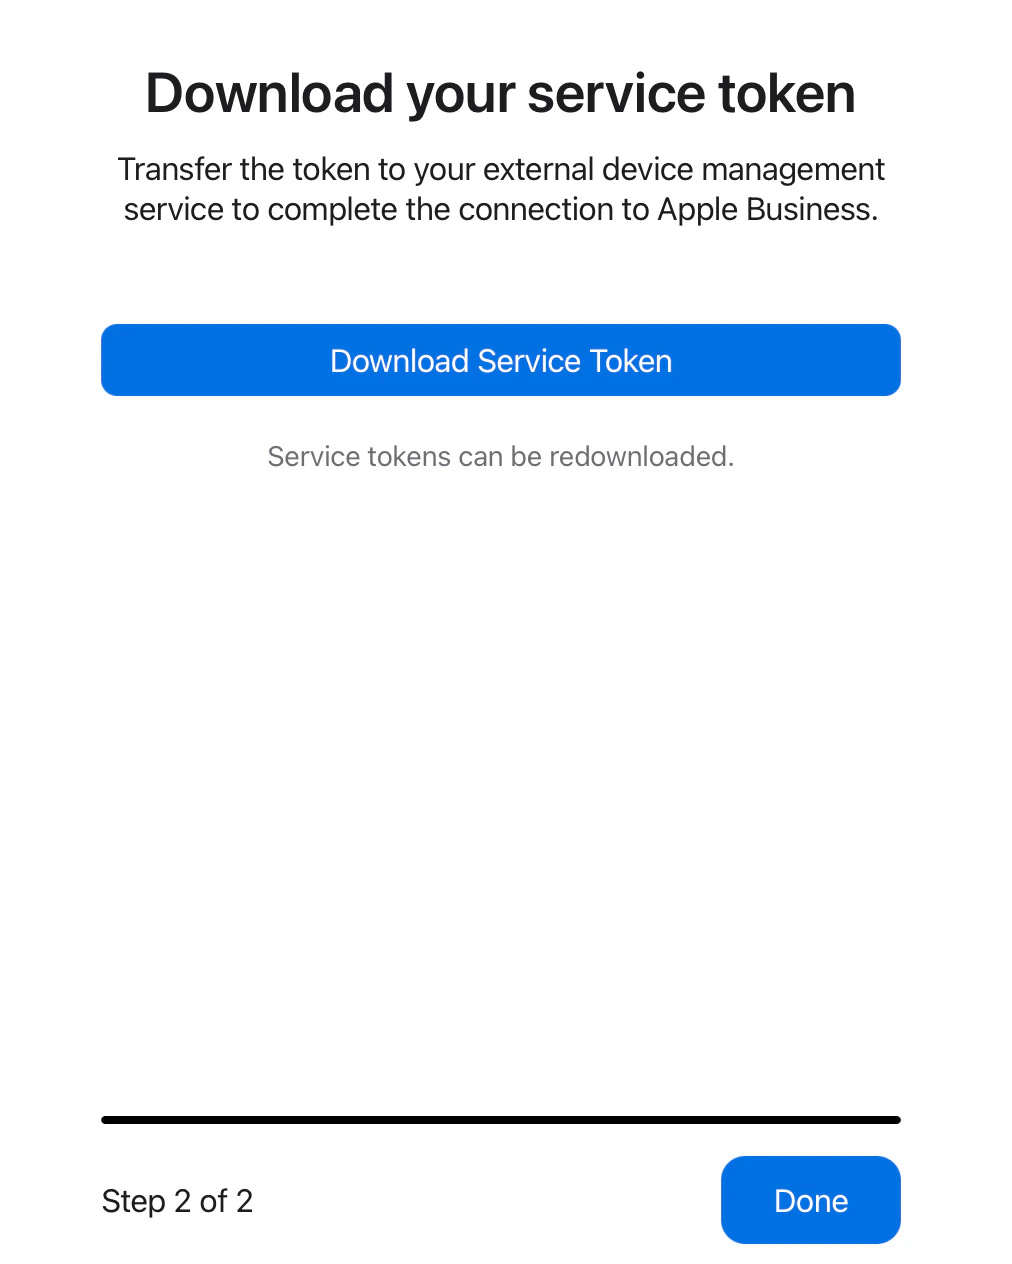 **完了** を選択します。
Iru Endpoint に戻り、プロンプトが表示されたら **.p7m** サービストークンファイルをアップロードします。
ウィザードの残りの手順を完了し、**完了** を選択します。
Apple Business または Apple School Manager で、Iru Endpoint をモバイルデバイス管理(MDM)サーバーとして追加し、デバイスを割り当てます。割り当てられたデバイスは、Iru Endpoint に **登録待ち** として表示されます。
### Automated Device Enrollment トークンを更新する
**トークンを更新** は、Apple 連携ページに表示される ADE トークンを更新します。このテナントにすでに複数の ADE トークンがある場合は、Iru Endpoint API を使用して追加のトークンを更新します。[Iru Endpoint API を使用した ADE トークンの更新、変更、削除](/ja/endpoint/settings/apple-integrations/renew-update-or-delete-multiple-automated-device-enrollment-tokens)を参照してください。
サイドバーで [**アカウントメニューボタン**](/ja/iru/platform-overview/account-menu) を選択し、**インテグレーション** を選択します。
**プラットフォームインテグレーション** で **Apple** を選択します。
**Automated Device Enrollment** で **トークンを更新** を選択します。
画面の指示に従って Automated Device Enrollment トークンを更新します。
詳細については、[Automated Device Enrollment の構成](/ja/endpoint/settings/apple-integrations/configure-automated-device-enrollment#renewing-your-automated-device-enrollment-token)を参照してください。ADE の接続を解除するには、[Automated Device Enrollment の接続解除](/ja/endpoint/settings/apple-integrations/configure-automated-device-enrollment#disconnecting-automated-device-enrollment)を参照してください。このテナントに ADE トークンを追加するには、[Iru Endpoint API を使用した複数の ADE トークンの構成](/ja/endpoint/settings/apple-integrations/configure-multiple-automated-device-enrollment-tokens)を参照してください。
## Apps and Books を構成する
Apps and Books(旧称 Volume Purchase Program(VPP))を使用すると、App Store のアプリをデバイスに配布できます。Apps and Books を設定する前に、テナントで [Apple Push Notification service](/ja/endpoint/settings/apple-integrations/configure-apple-push-notification-service) を構成しておく必要があります。
同じ Apps and Books トークンを複数の MDM サーバーで共有することはできません。Apple Business または Apple School Manager で Iru Endpoint テナント専用の[新しい組織単位を作成](https://support.apple.com/guide/business/configure-organizational-units-axmfdbe2cb0d/web)し、専用のトークンを使用してください。
Apple Business または Apple School Manager で、Iru Endpoint テナント用の[新しい組織単位を作成](https://support.apple.com/guide/business/configure-organizational-units-axmfdbe2cb0d/web)します。
サイドバーで [**アカウントメニューボタン**](/ja/iru/platform-overview/account-menu) を選択し、**インテグレーション** を選択します。
**プラットフォームインテグレーション** で **Apple** を選択します。
**Apps and Books** で **Apps and Booksを設定** を選択します。
新しいウィンドウで [Apple Business](https://support.apple.com/guide/business/welcome/web) または [Apple School Manager](https://support.apple.com/guide/apple-school-manager/welcome/web) にサインインして連携を完了します。
Apple Business または Apple School Manager で、ページ右上の**組織名**を選択します。
**設定** を選択します。
**完了** を選択します。
Iru Endpoint に戻り、プロンプトが表示されたら **.p7m** サービストークンファイルをアップロードします。
ウィザードの残りの手順を完了し、**完了** を選択します。
Apple Business または Apple School Manager で、Iru Endpoint をモバイルデバイス管理(MDM)サーバーとして追加し、デバイスを割り当てます。割り当てられたデバイスは、Iru Endpoint に **登録待ち** として表示されます。
### Automated Device Enrollment トークンを更新する
**トークンを更新** は、Apple 連携ページに表示される ADE トークンを更新します。このテナントにすでに複数の ADE トークンがある場合は、Iru Endpoint API を使用して追加のトークンを更新します。[Iru Endpoint API を使用した ADE トークンの更新、変更、削除](/ja/endpoint/settings/apple-integrations/renew-update-or-delete-multiple-automated-device-enrollment-tokens)を参照してください。
サイドバーで [**アカウントメニューボタン**](/ja/iru/platform-overview/account-menu) を選択し、**インテグレーション** を選択します。
**プラットフォームインテグレーション** で **Apple** を選択します。
**Automated Device Enrollment** で **トークンを更新** を選択します。
画面の指示に従って Automated Device Enrollment トークンを更新します。
詳細については、[Automated Device Enrollment の構成](/ja/endpoint/settings/apple-integrations/configure-automated-device-enrollment#renewing-your-automated-device-enrollment-token)を参照してください。ADE の接続を解除するには、[Automated Device Enrollment の接続解除](/ja/endpoint/settings/apple-integrations/configure-automated-device-enrollment#disconnecting-automated-device-enrollment)を参照してください。このテナントに ADE トークンを追加するには、[Iru Endpoint API を使用した複数の ADE トークンの構成](/ja/endpoint/settings/apple-integrations/configure-multiple-automated-device-enrollment-tokens)を参照してください。
## Apps and Books を構成する
Apps and Books(旧称 Volume Purchase Program(VPP))を使用すると、App Store のアプリをデバイスに配布できます。Apps and Books を設定する前に、テナントで [Apple Push Notification service](/ja/endpoint/settings/apple-integrations/configure-apple-push-notification-service) を構成しておく必要があります。
同じ Apps and Books トークンを複数の MDM サーバーで共有することはできません。Apple Business または Apple School Manager で Iru Endpoint テナント専用の[新しい組織単位を作成](https://support.apple.com/guide/business/configure-organizational-units-axmfdbe2cb0d/web)し、専用のトークンを使用してください。
Apple Business または Apple School Manager で、Iru Endpoint テナント用の[新しい組織単位を作成](https://support.apple.com/guide/business/configure-organizational-units-axmfdbe2cb0d/web)します。
サイドバーで [**アカウントメニューボタン**](/ja/iru/platform-overview/account-menu) を選択し、**インテグレーション** を選択します。
**プラットフォームインテグレーション** で **Apple** を選択します。
**Apps and Books** で **Apps and Booksを設定** を選択します。
新しいウィンドウで [Apple Business](https://support.apple.com/guide/business/welcome/web) または [Apple School Manager](https://support.apple.com/guide/apple-school-manager/welcome/web) にサインインして連携を完了します。
Apple Business または Apple School Manager で、ページ右上の**組織名**を選択します。
**設定** を選択します。
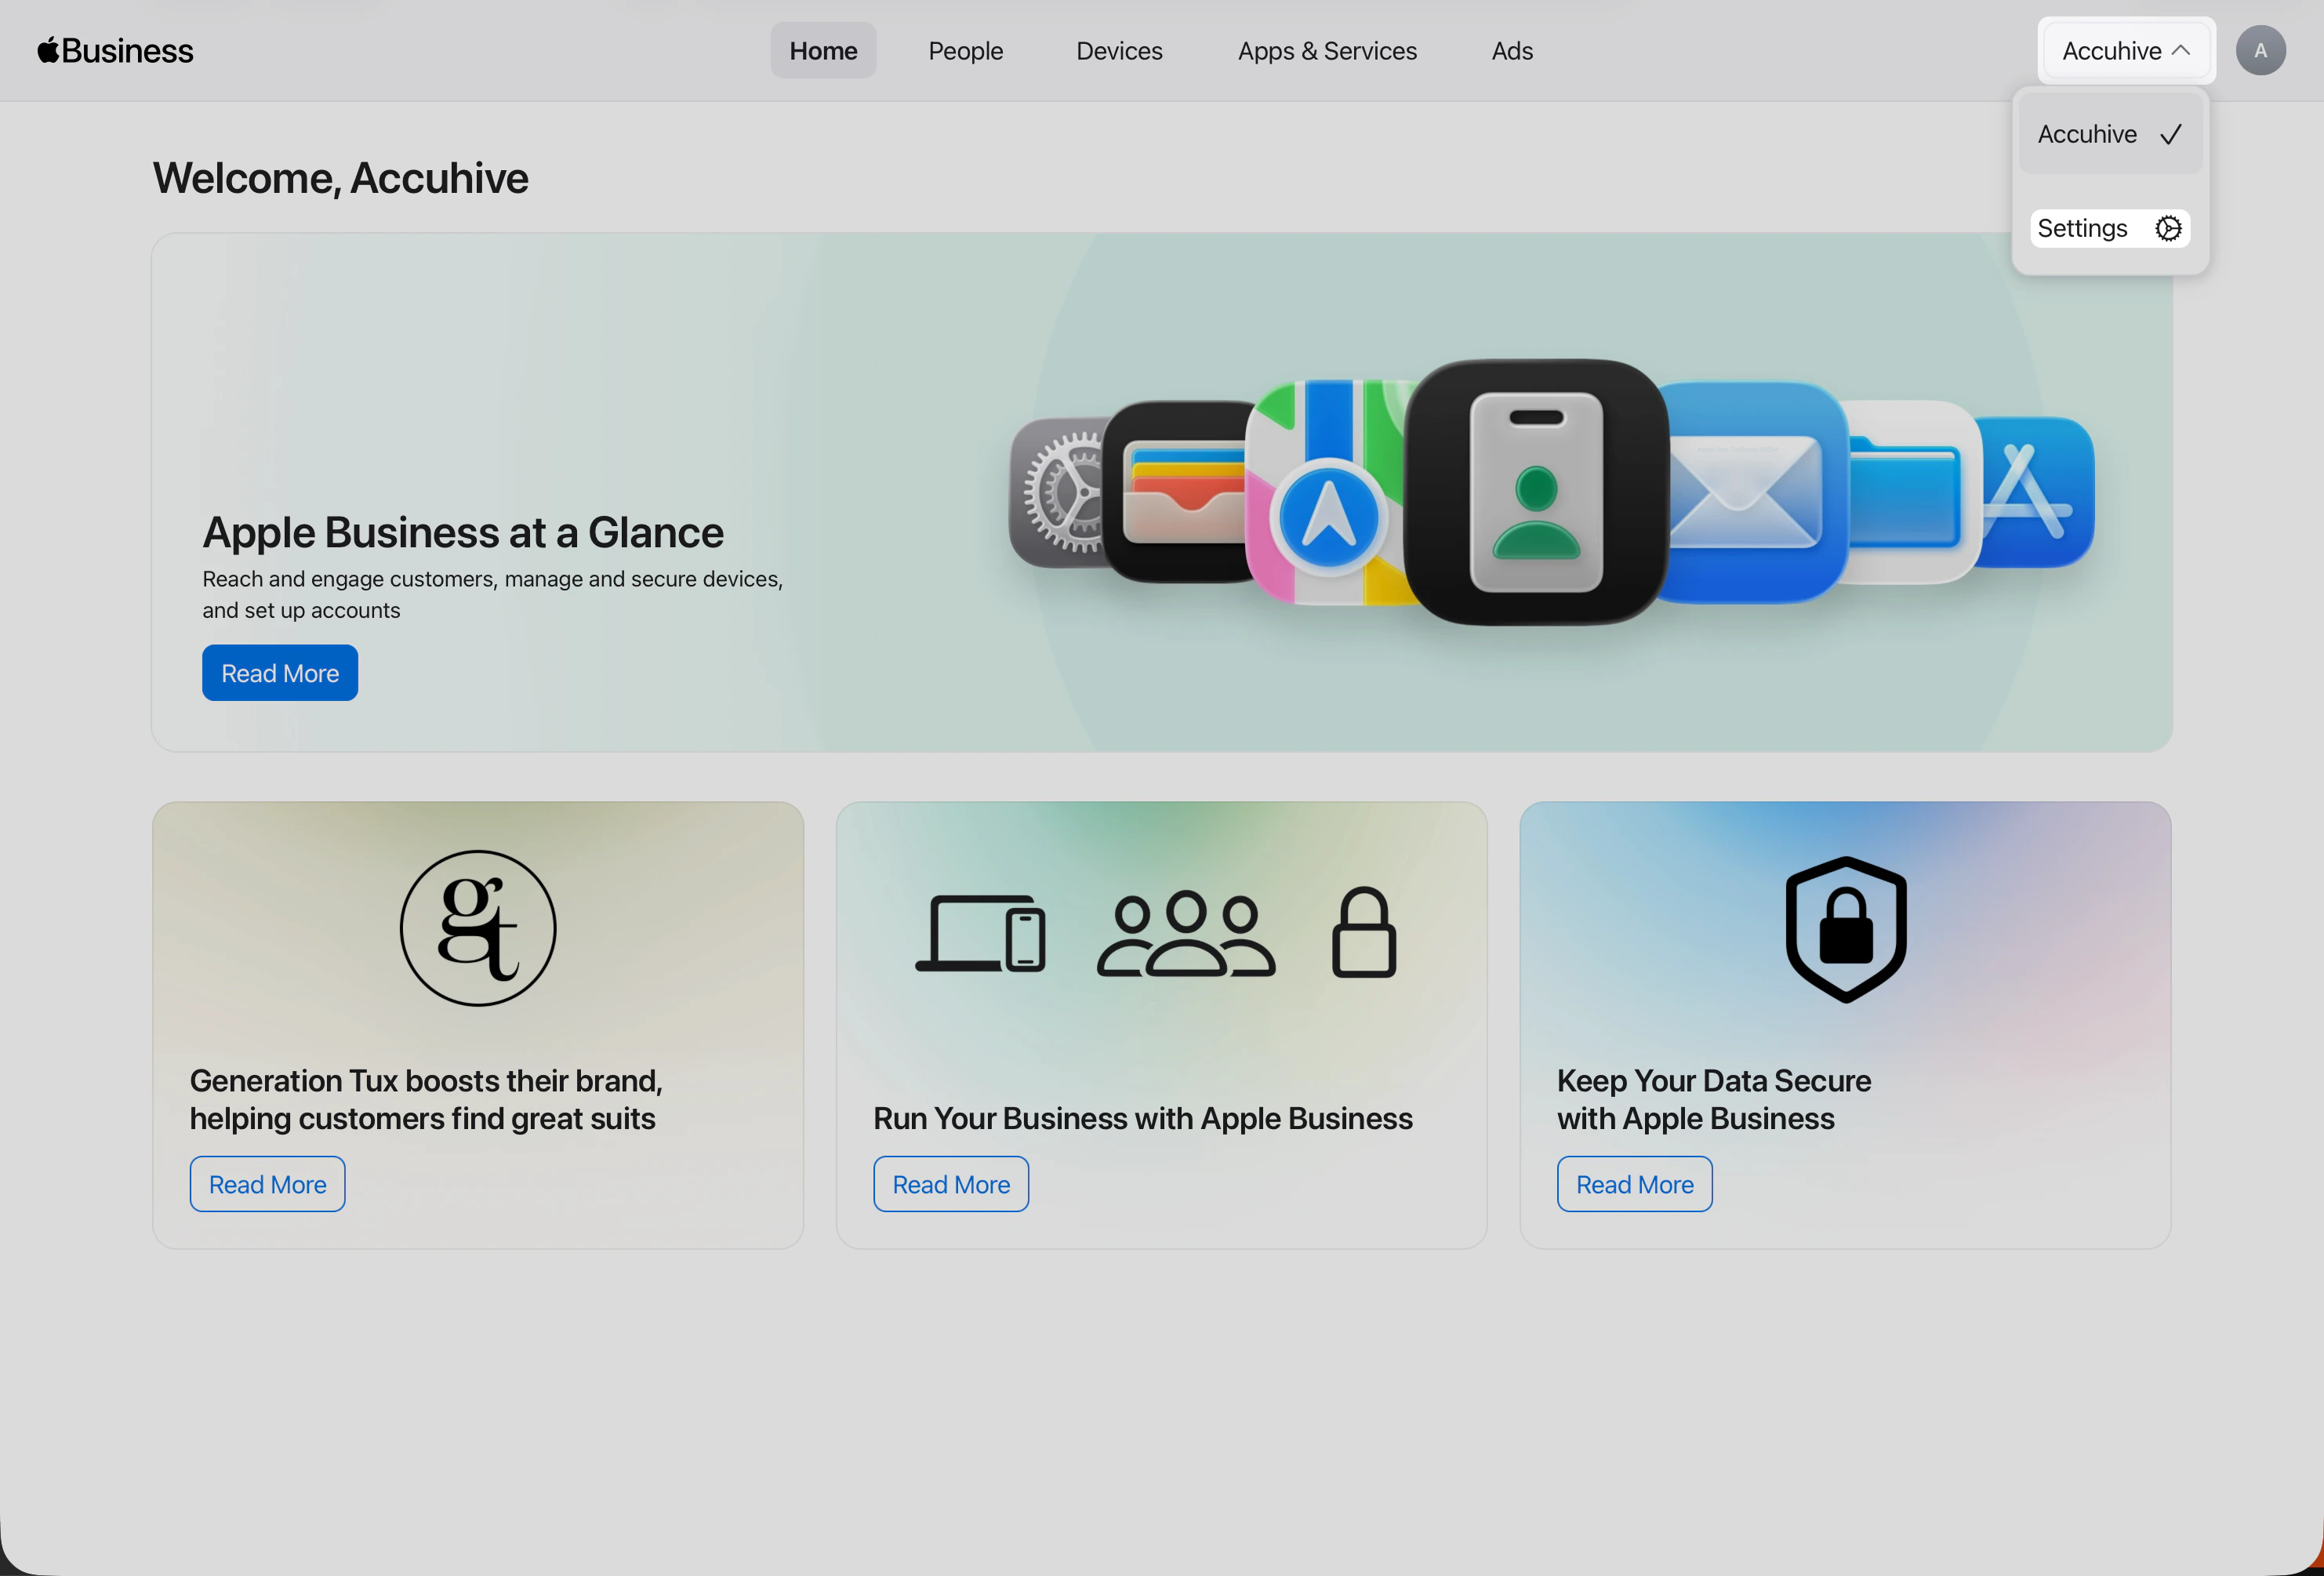 **設定** を開くと、すでに **Payments & Billing** → **Apps & Books** が表示されているはずです。この画面に組織の Apps and Books コンテンツトークンが表示されます。
**Content Tokens** で、Iru Endpoint で使用するトークンの横にある **ダウンロード** を選択します。
**設定** を開くと、すでに **Payments & Billing** → **Apps & Books** が表示されているはずです。この画面に組織の Apps and Books コンテンツトークンが表示されます。
**Content Tokens** で、Iru Endpoint で使用するトークンの横にある **ダウンロード** を選択します。
 Iru Endpoint Web App に戻り、**トークン**をアップロードします。
**Apps and Booksのセットアップを完了** を選択します。
### Apps and Books トークンを更新する
サイドバーで [**アカウントメニューボタン**](/ja/iru/platform-overview/account-menu) を選択し、**インテグレーション** を選択します。
**プラットフォームインテグレーション** で **Apple** を選択します。
**Apps and Books** で **トークンを更新** を選択します。
画面の指示に従って Apps and Books トークンを更新します。
詳細については、[Apps and Books の構成](/ja/endpoint/settings/apple-integrations/configure-apps-and-books#renewing-your-apps-and-books-token)を参照してください。Apps and Books の接続を解除するには、[Apps and Books の接続解除](/ja/endpoint/settings/apple-integrations/configure-apps-and-books#disconnecting-apps-and-books)を参照してください。
各連携の詳細については、[Apple Push Notification service の構成](/ja/endpoint/settings/apple-integrations/configure-apple-push-notification-service)、[Automated Device Enrollment の構成](/ja/endpoint/settings/apple-integrations/configure-automated-device-enrollment)、[Apps and Books の構成](/ja/endpoint/settings/apple-integrations/configure-apps-and-books)、および [Apple 連携の概要](/ja/endpoint/settings/apple-integrations/apple-integrations-overview)を参照してください。
## 次のステップ
Apple のセットアップを完了した後:
登録前にポリシーとアプリが準備できるよう、Blueprints を作成・構成します。[Blueprints の構成](/ja/endpoint/getting-started/blueprints-and-library/configuring-blueprints)および [Library の管理](/ja/endpoint/getting-started/blueprints-and-library/managing-library)を参照してください。
Android デバイスや Windows コンピュータも管理する場合は、[Android のセットアップ](/ja/endpoint/getting-started/platform-setup/android-setup)または [Windows のセットアップ](/ja/endpoint/getting-started/platform-setup/windows-setup)を参照してください。
Blueprints を構成したら、登録を設定します: [Apple の登録](/ja/endpoint/getting-started/enrollment/apple-enrollment)、[Windows の登録](/ja/endpoint/getting-started/enrollment/windows-enrollment)、または [Android の登録](/ja/endpoint/getting-started/enrollment/android-enrollment)。
Iru Endpoint Web App に戻り、**トークン**をアップロードします。
**Apps and Booksのセットアップを完了** を選択します。
### Apps and Books トークンを更新する
サイドバーで [**アカウントメニューボタン**](/ja/iru/platform-overview/account-menu) を選択し、**インテグレーション** を選択します。
**プラットフォームインテグレーション** で **Apple** を選択します。
**Apps and Books** で **トークンを更新** を選択します。
画面の指示に従って Apps and Books トークンを更新します。
詳細については、[Apps and Books の構成](/ja/endpoint/settings/apple-integrations/configure-apps-and-books#renewing-your-apps-and-books-token)を参照してください。Apps and Books の接続を解除するには、[Apps and Books の接続解除](/ja/endpoint/settings/apple-integrations/configure-apps-and-books#disconnecting-apps-and-books)を参照してください。
各連携の詳細については、[Apple Push Notification service の構成](/ja/endpoint/settings/apple-integrations/configure-apple-push-notification-service)、[Automated Device Enrollment の構成](/ja/endpoint/settings/apple-integrations/configure-automated-device-enrollment)、[Apps and Books の構成](/ja/endpoint/settings/apple-integrations/configure-apps-and-books)、および [Apple 連携の概要](/ja/endpoint/settings/apple-integrations/apple-integrations-overview)を参照してください。
## 次のステップ
Apple のセットアップを完了した後:
登録前にポリシーとアプリが準備できるよう、Blueprints を作成・構成します。[Blueprints の構成](/ja/endpoint/getting-started/blueprints-and-library/configuring-blueprints)および [Library の管理](/ja/endpoint/getting-started/blueprints-and-library/managing-library)を参照してください。
Android デバイスや Windows コンピュータも管理する場合は、[Android のセットアップ](/ja/endpoint/getting-started/platform-setup/android-setup)または [Windows のセットアップ](/ja/endpoint/getting-started/platform-setup/windows-setup)を参照してください。
Blueprints を構成したら、登録を設定します: [Apple の登録](/ja/endpoint/getting-started/enrollment/apple-enrollment)、[Windows の登録](/ja/endpoint/getting-started/enrollment/windows-enrollment)、または [Android の登録](/ja/endpoint/getting-started/enrollment/android-enrollment)。