> ## Documentation Index
> Fetch the complete documentation index at: https://docs.iru.com/llms.txt
> Use this file to discover all available pages before exploring further.
# Iru Endpointでユーザーディレクトリ連携を設定する
> IDプロバイダをIru Endpointに接続して、ユーザーとグループを自動的に同期します。Okta、Microsoft Entra ID、Google、OneLoginと連携します。
組織のIDプロバイダを接続して、ユーザーを同期し、デバイスをユーザーに関連付けます。Iru Endpointでの[デバイスへのユーザーの割り当て](/ja/endpoint/devices/device-record-management/assigning-and-unassigning-users-to-devices)はディレクトリ連携を通じて行われ、ユーザーはIdPから同期されます。ディレクトリ連携はオプションですが、デバイス群全体の正確なインベントリとユーザーとデバイスの割り当てのために推奨されます。
## ディレクトリ連携を設定する
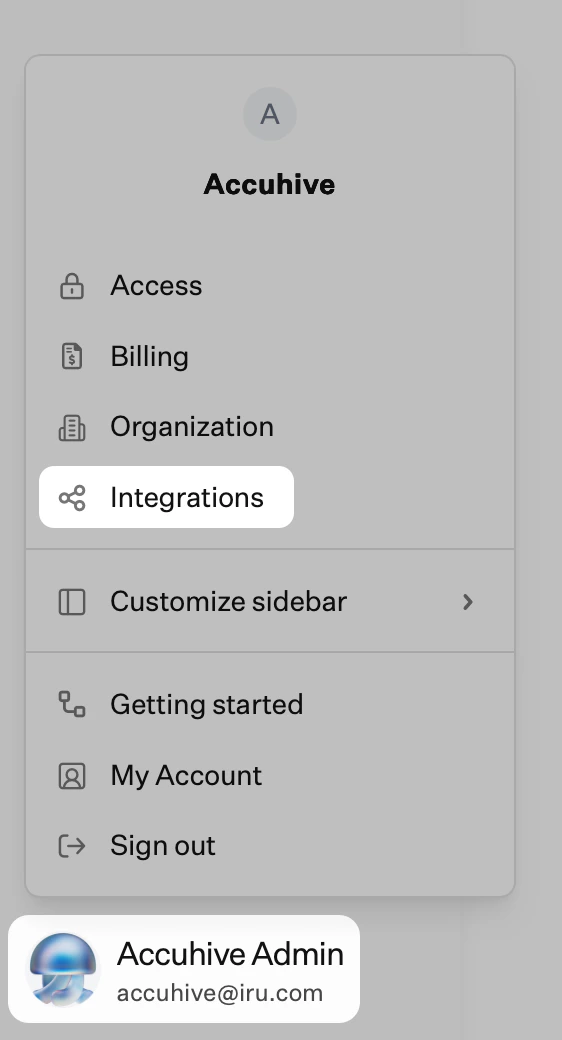
サイドバーで[**アカウントメニューボタン**](/ja/iru/platform-overview/account-menu)を選択し、**インテグレーション**を選択します。
 Integrationsページの右上にある**すべてのインテグレーションを参照**を選択します。
目的のディレクトリの**Microsoft Entra ID**、**Google Workspace**、または**SCIM protocol**タイルを選択します。
画面上のセットアップ(**開始する**、連携名、IdPでのサインインなど)に従います。ディレクトリがIntegrationsページに表示されるよう、求められたら同意するか**許可**を選択します。
ユーザーは4時間ごとに自動的に同期されます。Iru Endpointの**ユーザー**にユーザーが表示されることを確認します。連携の省略記号 → **Sync users**から強制的に同期することもできます。
## サポートされているディレクトリ連携
Iru Endpointは、以下のディレクトリ連携をサポートしています。
* **[Microsoft Entra ID](/ja/endpoint/integrations/directory-services/user-directory-integration-with-microsoft-entra-id)**: Microsoft Entra ID(旧Azure AD)とのネイティブ連携。
* **[Google Workspace](/ja/endpoint/integrations/directory-services/user-directory-integration-with-google-workspace)**: Google Workspaceとのネイティブ連携。
* **[SCIM連携](/ja/endpoint/integrations/scim/scim-directory-integration)**: Okta、OneLogin、JumpCloudなどのプロバイダ向け。
## メリット
* **ユーザーとデバイスのマッピング**: デバイスをユーザーに自動的に関連付けます。
* **インベントリ管理**: 誰がどのデバイスを持っているかをより適切に追跡できます。
* **自動割り当て**: デバイスをユーザーに自動的に割り当てることができます。
* **コンプライアンスレポート**: ユーザーのコンテキストを含む、より充実したレポートを作成できます。
## 考慮事項
ディレクトリ連携は**オプション**ですが、より適切なインベントリ管理のために推奨されます。Iru Endpointのデバイスユーザーは、ディレクトリ連携を通じてのみ作成および割り当てできます。
ユーザーは同期されると**ユーザー**に表示されます。Microsoft Entra IDとGoogle Workspaceは4時間ごとに自動的に同期されます。
SCIMを使用すると、ジャストインタイムのプロビジョニングとプロビジョニング解除が可能です。設定については、[SCIMディレクトリ連携](/ja/endpoint/integrations/scim/scim-directory-integration)を参照してください。
連携には、連携するディレクトリへの管理者アクセス権を持つアカウントが必要です。
ディレクトリ連携の概要については、[ユーザーディレクトリ連携](/ja/endpoint/integrations/directory-services/user-directory-integration)を参照してください。プロバイダの設定については、[Microsoft Entra IDとのユーザーディレクトリ連携](/ja/endpoint/integrations/directory-services/user-directory-integration-with-microsoft-entra-id)または[Google Workspaceとのユーザーディレクトリ連携](/ja/endpoint/integrations/directory-services/user-directory-integration-with-google-workspace)を参照してください。
## 次のステップ
ディレクトリ連携を設定したら、以下を行います。
管理する予定のプラットフォームを設定します。1つ、2つ、または3つすべてを有効にできます。
* **[Appleのセットアップ](/ja/endpoint/getting-started/platform-setup/apple-setup)**: APNs、Apple BusinessまたはApple School Manager、Apps and Booksを設定します
* **[Windowsのセットアップ](/ja/endpoint/getting-started/platform-setup/windows-setup)**: Windowsプラットフォームを有効にして設定を構成します
* **[Androidのセットアップ](/ja/endpoint/getting-started/platform-setup/android-setup)**: Androidを有効にしてAndroid Enterpriseを設定します
[Blueprintsを設定する](/ja/endpoint/getting-started/blueprints-and-library/configuring-blueprints)と[Libraryの管理](/ja/endpoint/getting-started/blueprints-and-library/managing-library)を使用して、登録前にポリシーとアプリを準備します。
Blueprintsを設定したら、[Appleの登録](/ja/endpoint/getting-started/enrollment/apple-enrollment)、[Windowsの登録](/ja/endpoint/getting-started/enrollment/windows-enrollment)、または[Androidの登録](/ja/endpoint/getting-started/enrollment/android-enrollment)を設定します。
Integrationsページの右上にある**すべてのインテグレーションを参照**を選択します。
目的のディレクトリの**Microsoft Entra ID**、**Google Workspace**、または**SCIM protocol**タイルを選択します。
画面上のセットアップ(**開始する**、連携名、IdPでのサインインなど)に従います。ディレクトリがIntegrationsページに表示されるよう、求められたら同意するか**許可**を選択します。
ユーザーは4時間ごとに自動的に同期されます。Iru Endpointの**ユーザー**にユーザーが表示されることを確認します。連携の省略記号 → **Sync users**から強制的に同期することもできます。
## サポートされているディレクトリ連携
Iru Endpointは、以下のディレクトリ連携をサポートしています。
* **[Microsoft Entra ID](/ja/endpoint/integrations/directory-services/user-directory-integration-with-microsoft-entra-id)**: Microsoft Entra ID(旧Azure AD)とのネイティブ連携。
* **[Google Workspace](/ja/endpoint/integrations/directory-services/user-directory-integration-with-google-workspace)**: Google Workspaceとのネイティブ連携。
* **[SCIM連携](/ja/endpoint/integrations/scim/scim-directory-integration)**: Okta、OneLogin、JumpCloudなどのプロバイダ向け。
## メリット
* **ユーザーとデバイスのマッピング**: デバイスをユーザーに自動的に関連付けます。
* **インベントリ管理**: 誰がどのデバイスを持っているかをより適切に追跡できます。
* **自動割り当て**: デバイスをユーザーに自動的に割り当てることができます。
* **コンプライアンスレポート**: ユーザーのコンテキストを含む、より充実したレポートを作成できます。
## 考慮事項
ディレクトリ連携は**オプション**ですが、より適切なインベントリ管理のために推奨されます。Iru Endpointのデバイスユーザーは、ディレクトリ連携を通じてのみ作成および割り当てできます。
ユーザーは同期されると**ユーザー**に表示されます。Microsoft Entra IDとGoogle Workspaceは4時間ごとに自動的に同期されます。
SCIMを使用すると、ジャストインタイムのプロビジョニングとプロビジョニング解除が可能です。設定については、[SCIMディレクトリ連携](/ja/endpoint/integrations/scim/scim-directory-integration)を参照してください。
連携には、連携するディレクトリへの管理者アクセス権を持つアカウントが必要です。
ディレクトリ連携の概要については、[ユーザーディレクトリ連携](/ja/endpoint/integrations/directory-services/user-directory-integration)を参照してください。プロバイダの設定については、[Microsoft Entra IDとのユーザーディレクトリ連携](/ja/endpoint/integrations/directory-services/user-directory-integration-with-microsoft-entra-id)または[Google Workspaceとのユーザーディレクトリ連携](/ja/endpoint/integrations/directory-services/user-directory-integration-with-google-workspace)を参照してください。
## 次のステップ
ディレクトリ連携を設定したら、以下を行います。
管理する予定のプラットフォームを設定します。1つ、2つ、または3つすべてを有効にできます。
* **[Appleのセットアップ](/ja/endpoint/getting-started/platform-setup/apple-setup)**: APNs、Apple BusinessまたはApple School Manager、Apps and Booksを設定します
* **[Windowsのセットアップ](/ja/endpoint/getting-started/platform-setup/windows-setup)**: Windowsプラットフォームを有効にして設定を構成します
* **[Androidのセットアップ](/ja/endpoint/getting-started/platform-setup/android-setup)**: Androidを有効にしてAndroid Enterpriseを設定します
[Blueprintsを設定する](/ja/endpoint/getting-started/blueprints-and-library/configuring-blueprints)と[Libraryの管理](/ja/endpoint/getting-started/blueprints-and-library/managing-library)を使用して、登録前にポリシーとアプリを準備します。
Blueprintsを設定したら、[Appleの登録](/ja/endpoint/getting-started/enrollment/apple-enrollment)、[Windowsの登録](/ja/endpoint/getting-started/enrollment/windows-enrollment)、または[Androidの登録](/ja/endpoint/getting-started/enrollment/android-enrollment)を設定します。