> ## Documentation Index
> Fetch the complete documentation index at: https://docs.iru.com/llms.txt
> Use this file to discover all available pages before exploring further.
# SSOのセットアップ
> Iru Endpointの管理者アクセス用にシングルサインオン(SSO)を設定します。SAMLまたはネイティブ連携を使用してIDプロバイダを接続し、安全にログインします。
シングルサインオン(SSO)を設定して、チームメンバーが既存のIDプロバイダでIru Endpoint Web Appにサインインできるようにします。同じSSO接続を[Automated Device Enrollment(ADE)での認証要求](/ja/endpoint/enrollment/configure-require-authentication-for-enrollment)にも使用できるため、管理者のサインインからデバイスの登録まで、安全で一貫したアクセスを維持できます。
## SSOを設定する
Iru Endpointのサイドバーで[**アカウントメニューボタン**](/ja/iru/platform-overview/account-menu)を選択します。
メニューで**アクセス**オプションを選択します。
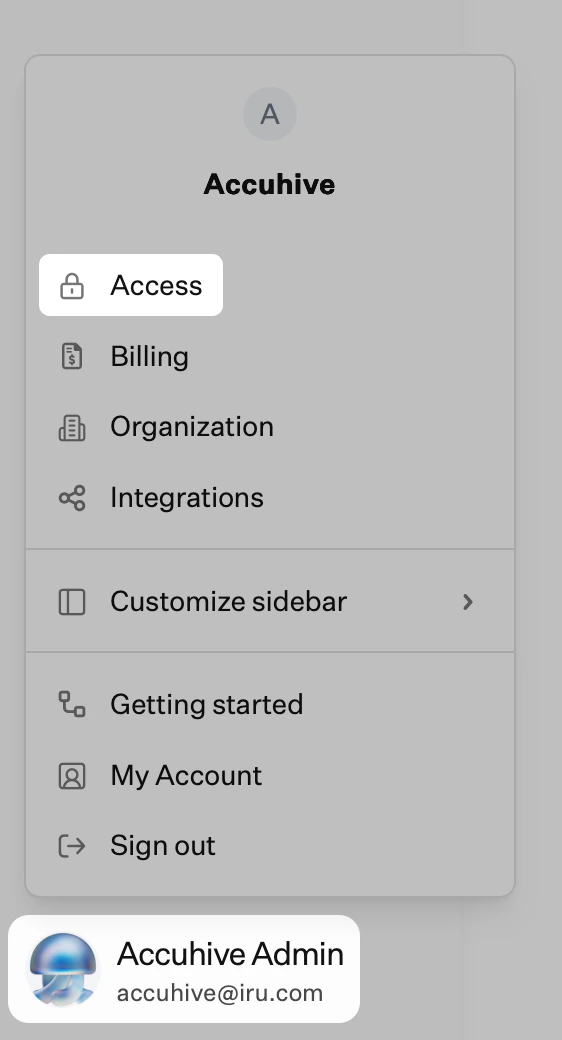 (必要に応じて)**管理と認証**タブを選択し、**認証方法**までスクロールします。**+ 認証方法**を選択します。
表示名を入力し、接続の種類(**Microsoft Entra ID**、**Google Workspace**、またはその他のプロバイダの場合は**Custom SAML**)を選択して、**作成**を選択します。
Iru EndpointとIDプロバイダで設定のプロンプト(リダイレクトURL、クライアントID、クライアントシークレットなど)に従います。指示に従ってIru Endpointで設定を完了します。
接続が設定されたら、接続名の横にある**省略記号**を選択し、**Allow for tenant authentication**を選択して、チームメンバーがSSOでサインインできるようにします。
他の認証方法を無効にする前に、プライベートブラウザウインドウでサインインをテストします。
## サポートされているSSO接続の種類
Iru Endpointは、以下のSSO接続の種類をサポートしています。
* [Microsoft Entra ID(ネイティブ)](/ja/endpoint/integrations/single-sign-on-integrations/single-sign-on-with-microsoft-entra-id-native)および[Microsoft Entra ID(SAML)](/ja/endpoint/integrations/single-sign-on-integrations/single-sign-on-with-microsoft-entra-id-saml)
* [Google Workspace(ネイティブ)](/ja/endpoint/integrations/single-sign-on-integrations/single-sign-on-with-google-workspace-native)および[Google Workspace(SAML)](/ja/endpoint/integrations/single-sign-on-integrations/single-sign-on-with-google-workspace-saml)
* [Okta(SAML)](/ja/endpoint/integrations/single-sign-on-integrations/single-sign-on-with-okta-saml)、[JumpCloud(SAML)](/ja/endpoint/integrations/single-sign-on-integrations/single-sign-on-with-jumpcloud-saml)、[OneLogin(SAML)](/ja/endpoint/integrations/single-sign-on-integrations/single-sign-on-with-onelogin-saml)、および[カスタムSAML](/ja/endpoint/integrations/single-sign-on-integrations/saml-based-single-sign-on)
## 考慮事項
* \*\*[パスキー、Googleソーシャルログイン、Microsoftソーシャルログイン](/ja/iru/access/passkeys-and-social-login)\*\*は、デフォルトで引き続き利用できます。SSOを設定してテストした後に無効にできます(省略記号 → **Disable for tenant authentication**)。
* SSO接続は、テナント認証で許可されていなくても、[登録時の認証要求](/ja/endpoint/enrollment/configure-require-authentication-for-enrollment)に使用できます。
* チームメンバーがSSOでサインインするには、事前に**アクセス**で招待されている必要があります。ロックアウトを避けるため、他の認証方法を無効にする前にプライベートブラウザウインドウでテストしてください。
各プロバイダの詳細な設定については、[シングルサインオン](/ja/endpoint/integrations/single-sign-on-integrations/single-sign-on)を参照してください。
## 次のステップ
SSOを設定したら、以下を行います。
ユーザーを同期するには、[ユーザーディレクトリ連携](/ja/endpoint/getting-started/foundation/user-directory-integration)を参照してください。
管理する予定のプラットフォームを設定します。1つ、2つ、または3つすべてを有効にできます。
* **[Appleのセットアップ](/ja/endpoint/getting-started/platform-setup/apple-setup)**: APNs、Apple BusinessまたはApple School Manager、Apps and Booksを設定します
* **[Windowsのセットアップ](/ja/endpoint/getting-started/platform-setup/windows-setup)**: Windowsプラットフォームを有効にして設定を構成します
* **[Androidのセットアップ](/ja/endpoint/getting-started/platform-setup/android-setup)**: Androidを有効にしてAndroid Enterpriseを設定します
(必要に応じて)**管理と認証**タブを選択し、**認証方法**までスクロールします。**+ 認証方法**を選択します。
表示名を入力し、接続の種類(**Microsoft Entra ID**、**Google Workspace**、またはその他のプロバイダの場合は**Custom SAML**)を選択して、**作成**を選択します。
Iru EndpointとIDプロバイダで設定のプロンプト(リダイレクトURL、クライアントID、クライアントシークレットなど)に従います。指示に従ってIru Endpointで設定を完了します。
接続が設定されたら、接続名の横にある**省略記号**を選択し、**Allow for tenant authentication**を選択して、チームメンバーがSSOでサインインできるようにします。
他の認証方法を無効にする前に、プライベートブラウザウインドウでサインインをテストします。
## サポートされているSSO接続の種類
Iru Endpointは、以下のSSO接続の種類をサポートしています。
* [Microsoft Entra ID(ネイティブ)](/ja/endpoint/integrations/single-sign-on-integrations/single-sign-on-with-microsoft-entra-id-native)および[Microsoft Entra ID(SAML)](/ja/endpoint/integrations/single-sign-on-integrations/single-sign-on-with-microsoft-entra-id-saml)
* [Google Workspace(ネイティブ)](/ja/endpoint/integrations/single-sign-on-integrations/single-sign-on-with-google-workspace-native)および[Google Workspace(SAML)](/ja/endpoint/integrations/single-sign-on-integrations/single-sign-on-with-google-workspace-saml)
* [Okta(SAML)](/ja/endpoint/integrations/single-sign-on-integrations/single-sign-on-with-okta-saml)、[JumpCloud(SAML)](/ja/endpoint/integrations/single-sign-on-integrations/single-sign-on-with-jumpcloud-saml)、[OneLogin(SAML)](/ja/endpoint/integrations/single-sign-on-integrations/single-sign-on-with-onelogin-saml)、および[カスタムSAML](/ja/endpoint/integrations/single-sign-on-integrations/saml-based-single-sign-on)
## 考慮事項
* \*\*[パスキー、Googleソーシャルログイン、Microsoftソーシャルログイン](/ja/iru/access/passkeys-and-social-login)\*\*は、デフォルトで引き続き利用できます。SSOを設定してテストした後に無効にできます(省略記号 → **Disable for tenant authentication**)。
* SSO接続は、テナント認証で許可されていなくても、[登録時の認証要求](/ja/endpoint/enrollment/configure-require-authentication-for-enrollment)に使用できます。
* チームメンバーがSSOでサインインするには、事前に**アクセス**で招待されている必要があります。ロックアウトを避けるため、他の認証方法を無効にする前にプライベートブラウザウインドウでテストしてください。
各プロバイダの詳細な設定については、[シングルサインオン](/ja/endpoint/integrations/single-sign-on-integrations/single-sign-on)を参照してください。
## 次のステップ
SSOを設定したら、以下を行います。
ユーザーを同期するには、[ユーザーディレクトリ連携](/ja/endpoint/getting-started/foundation/user-directory-integration)を参照してください。
管理する予定のプラットフォームを設定します。1つ、2つ、または3つすべてを有効にできます。
* **[Appleのセットアップ](/ja/endpoint/getting-started/platform-setup/apple-setup)**: APNs、Apple BusinessまたはApple School Manager、Apps and Booksを設定します
* **[Windowsのセットアップ](/ja/endpoint/getting-started/platform-setup/windows-setup)**: Windowsプラットフォームを有効にして設定を構成します
* **[Androidのセットアップ](/ja/endpoint/getting-started/platform-setup/android-setup)**: Androidを有効にしてAndroid Enterpriseを設定します