> ## Documentation Index
> Fetch the complete documentation index at: https://docs.iru.com/llms.txt
> Use this file to discover all available pages before exploring further.
# Passkeys & Social Login
> Sign in to Iru using passkeys or social login providers. Set up passwordless authentication with biometrics, security keys, or Google and Apple accounts.
### About Passkeys and Social Login
Passkeys and social login provide straightforward ways to configure access to your Iru tenant. Users can create their own passkeys, or use their existing Google or Microsoft account to access your tenant. While they're easy to configure, they do have inherent limitations compared to configuring a [Single Sign-On](/en/endpoint/integrations/single-sign-on-integrations/single-sign-on) authentication method. If you're looking to [Require Authentication](/en/endpoint/enrollment/configure-require-authentication-for-enrollment#manual-enrollment) for enrollment, passkeys and social login can only be used for manual enrollments.
This article covers passkeys for signing into **Iru Endpoint** and managing authentication under **Access**. For passkeys your people use to sign into **Iru Identity** applications, see [Authenticators](/en/identity/authentication/authenticators) and [Manage authenticators](/en/identity/end-user/manage-authenticators).
### How Passkeys and Social Login Work
**Passkeys** use standards-based technology that eliminates shared secrets, making them resistant to phishing attacks. When a user registers a **passkey**, it's stored in their credential manager and can be synced across their devices. During login, the credential manager authenticates the user without requiring a password.
**Social login** allows users to authenticate using their existing Google or Microsoft accounts. For Microsoft Social, authentication matches users based on their User Principal Name (UPN) in Microsoft Entra ID, not just their email address. Google Social and Microsoft Social can be limited to specific domains for additional security.
### Passkeys
Designed to replace traditional passwords, passkeys offer a more secure and user-friendly way to sign into websites and applications. You can see Apple's [About the security of passkeys](https://support.apple.com/en-us/102195) and [Use passkeys to sign in to websites and apps on iPhone](https://support.apple.com/guide/iphone/use-passkeys-to-sign-in-to-websites-and-apps-iphf538ea8d0/ios) pages for more information.
#### Send Authentication Registration Request
Admins and Account Owners can send authentication registration requests to users so they can register a passkey.
In Iru Endpoint, in the sidebar, click the [**Account Menu Button**](/en/iru/platform-overview/account-menu).
Click the **Access** option in the menu.
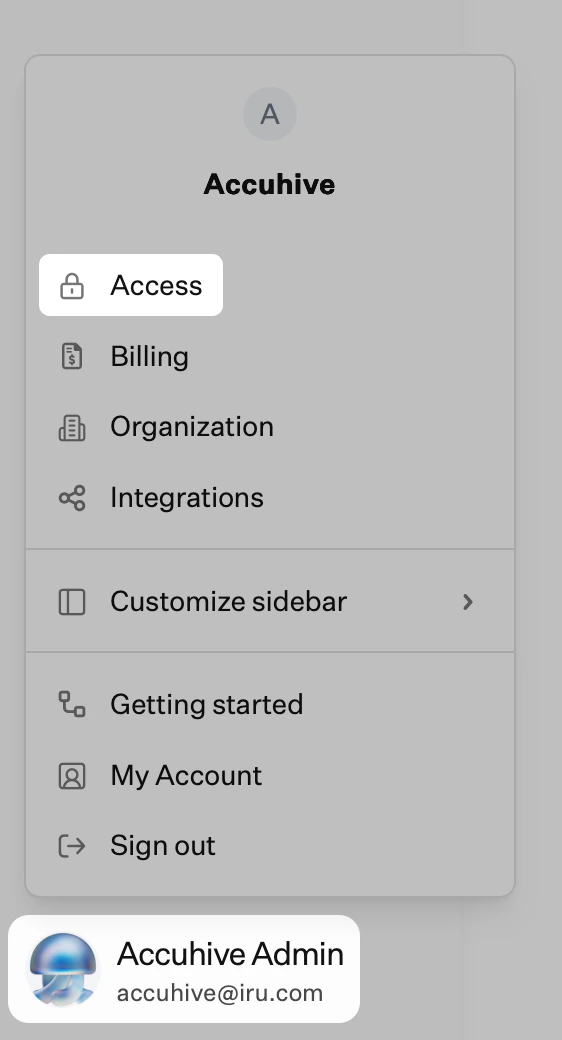 Click the **ellipsis** (⋮) next to the user you would like to send the authentication registration request to.
From the ellipsis (⋮) menu, select **Manage authenticators**.
Click the **Send Authentication Registration** button.
Click the **Accept** button in the invitation email.
Click the **Passkey** button under the **Register a Passkey** section.
Follow the prompts for your preferred credential manager to register the passkey.
You can now choose the **Passkey** button at the Iru login page.
Choose your passkey from your credential manager to authenticate.
#### Register a New Passkey
You can register additional passkeys for your account without an administrator sending a registration request. You may register multiple passkeys per user account.
In the sidebar, click the **Account Menu Button**, then select **My Account**.
Click the **ellipsis** (⋮) next to the user you would like to send the authentication registration request to.
From the ellipsis (⋮) menu, select **Manage authenticators**.
Click the **Send Authentication Registration** button.
Click the **Accept** button in the invitation email.
Click the **Passkey** button under the **Register a Passkey** section.
Follow the prompts for your preferred credential manager to register the passkey.
You can now choose the **Passkey** button at the Iru login page.
Choose your passkey from your credential manager to authenticate.
#### Register a New Passkey
You can register additional passkeys for your account without an administrator sending a registration request. You may register multiple passkeys per user account.
In the sidebar, click the **Account Menu Button**, then select **My Account**.
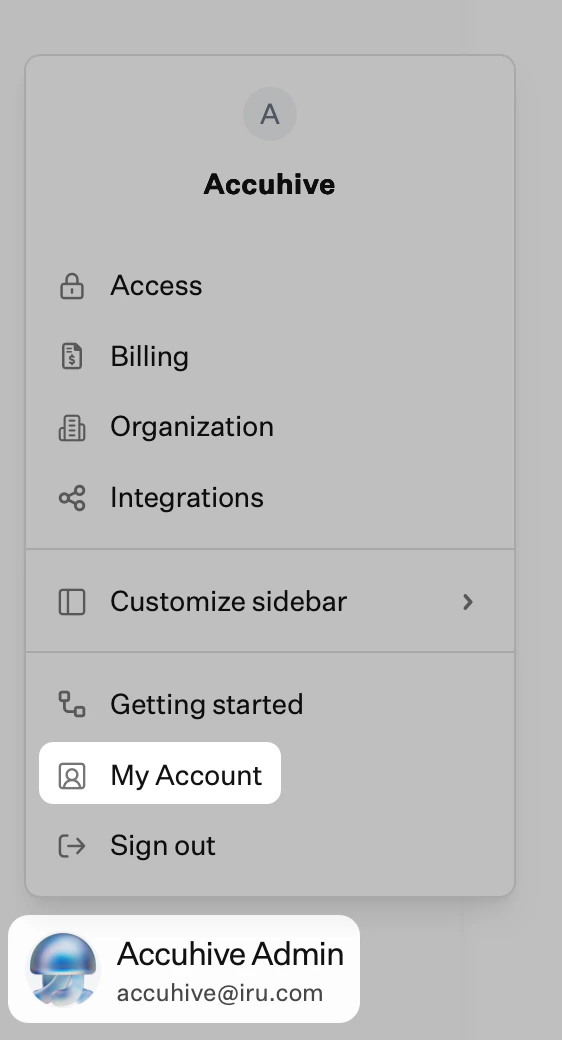 In the My Account page, click **Authenticators**.
Click the **+ Authenticator** button.
If you see a notice that you cannot add additional authenticators without an existing one, contact an administrator to send a registration link as described in the [Send Authentication Registration Request](/en/iru/access/passkeys-and-social-login#send-authentication-registration-request) section.
In the Add authenticator dialog, click the **Passkey** button.
Follow the prompts to save the passkey in your preferred credential manager.
When prompted, authenticate using an existing passkey. If your existing passkey is stored in a different credential manager, select it from that credential manager when prompted.
Follow the prompts to complete the passkey registration.
#### Credential Managers
It's important to save your passkeys in a way that allows you to access them across multiple devices. Most popular credential managers, such as 1Password and Apple's Passwords app, support saving and synchronizing passkeys. When registering passkeys, if the expected credential managers do not prompt to save the passkey, check the settings of the related app or browser extension to ensure that prompts to save passkeys are enabled. If you have multiple credential manager browser extensions enabled, you may need to disable the other extensions to avoid conflicts.
On macOS, if you are prompted for a passkey but the prompt does not include the passkey you previously created, open **System Settings > Privacy & Security > Passkeys Access for Web Browsers** and turn on access for the browser you are using. Then close and re-open your browser and try authenticating again. Identity app users see the same tip in [Accessing your apps](/en/identity/end-user/accessing-your-apps#find-and-open-an-app).
#### Manage Your Passkeys
You can suspend or delete your registered passkeys.
In the sidebar, click the **Account Menu Button**, then select **My Account**.
In the My Account page, click **Authenticators**.
Click the disclosure triangle (⌄) to the right of the authenticator you would like to suspend.
Click **Suspend authenticator** to temporarily disable the authenticator.
You must suspend an authenticator before you can delete it.
Now that the authenticator is suspended, you can click **Delete authenticator** to completely remove it.
Click **Yes, delete** to complete deleting the authenticator.
You can also click **Unsuspend authenticator** if the wrong authenticator was suspended.
#### Manage Passkeys for Team Members
You can suspend, delete, and reset all of the registered passkeys for team members.
In Iru Endpoint, in the sidebar, click the **Account Menu Button**.
Click the **Access** option in the menu.
Click the **ellipsis** (⋮) next to the user you would like to manage.
From the ellipsis (⋮) menu, select **Manage authenticators**.
If you want to remove all passkey registrations from a user, click the **Reset all** button.
This action will remove all authenticators for the given user. Registering a new authenticator will be required to log in. See [Iru Account Recovery](/en/iru/access/iru-account-recovery) for recovery options.
Click the disclosure triangle (⌄) to the right of the authenticator you would like to suspend.
Click **Suspend authenticator** to temporarily disable the authenticator.
You must suspend an authenticator before you can delete it.
Now that the authenticator is suspended, you can click **Delete authenticator** to completely remove it.
Click **Yes, delete** to complete deleting the authenticator.
You can also click **Unsuspend authenticator** if the wrong authenticator was suspended.
### Social Login
**Social login** allows users to authenticate using their existing Google or Microsoft accounts without needing to configure complex [Single Sign-On](/en/endpoint/integrations/single-sign-on-integrations/single-sign-on) authentication methods. There are two social login options available in Iru: Microsoft Social and Google Social.
#### Limit Authentication to Domain
For Google Social and Microsoft Social, you can optionally limit authentication to one or more domains. This allows you to restrict social logins to your organization's specific domains.
Another level of security you can add after limiting to specific domains is to enable Multi-Factor Authentication for the social login platforms. Learn more about using MFA for signing in with Google Workspace and Office 365:
* [Google 2-Step Verification](https://www.google.com/landing/2step/)
* [Set up 2-step verification for Office 365](https://support.office.com/en-us/article/set-up-2-step-verification-for-office-365-ace1d096-61e5-449b-a875-58eb3d74de14)
To use a social login method for Require Authentication during enrollment, you'll need to limit that method to specific domains. See [Configure Require Authentication for Enrollment](/en/endpoint/enrollment/configure-require-authentication-for-enrollment#manual-enrollment) for more information.
#### Microsoft Social
When using the Microsoft Social authentication method, the match between the user in Iru and the user in Microsoft is based on the User Principal Name (UPN). This is an important distinction because a user's email address and UPN could be different. In cases where the email address in Microsoft Entra ID matches the email of the user in Iru, it will still fail if the UPN of the related user in Microsoft Entra ID does not match.
### Manage Tenant Authentication
You can either allow or disallow Passkey, Google Social, and Microsoft Social tenant authentication methods individually. You cannot disallow the authentication method that was used to access your current session.
### Related Articles
Help team members regain access when they lose a passkey or authenticator
Configure SSO and manage Passkey, Google Social, and Microsoft Social tenant authentication
How passkeys and Iru Access work for Iru Identity application sign-in
End-user guide for passkeys, Iru Access, and backup devices
In the My Account page, click **Authenticators**.
Click the **+ Authenticator** button.
If you see a notice that you cannot add additional authenticators without an existing one, contact an administrator to send a registration link as described in the [Send Authentication Registration Request](/en/iru/access/passkeys-and-social-login#send-authentication-registration-request) section.
In the Add authenticator dialog, click the **Passkey** button.
Follow the prompts to save the passkey in your preferred credential manager.
When prompted, authenticate using an existing passkey. If your existing passkey is stored in a different credential manager, select it from that credential manager when prompted.
Follow the prompts to complete the passkey registration.
#### Credential Managers
It's important to save your passkeys in a way that allows you to access them across multiple devices. Most popular credential managers, such as 1Password and Apple's Passwords app, support saving and synchronizing passkeys. When registering passkeys, if the expected credential managers do not prompt to save the passkey, check the settings of the related app or browser extension to ensure that prompts to save passkeys are enabled. If you have multiple credential manager browser extensions enabled, you may need to disable the other extensions to avoid conflicts.
On macOS, if you are prompted for a passkey but the prompt does not include the passkey you previously created, open **System Settings > Privacy & Security > Passkeys Access for Web Browsers** and turn on access for the browser you are using. Then close and re-open your browser and try authenticating again. Identity app users see the same tip in [Accessing your apps](/en/identity/end-user/accessing-your-apps#find-and-open-an-app).
#### Manage Your Passkeys
You can suspend or delete your registered passkeys.
In the sidebar, click the **Account Menu Button**, then select **My Account**.
In the My Account page, click **Authenticators**.
Click the disclosure triangle (⌄) to the right of the authenticator you would like to suspend.
Click **Suspend authenticator** to temporarily disable the authenticator.
You must suspend an authenticator before you can delete it.
Now that the authenticator is suspended, you can click **Delete authenticator** to completely remove it.
Click **Yes, delete** to complete deleting the authenticator.
You can also click **Unsuspend authenticator** if the wrong authenticator was suspended.
#### Manage Passkeys for Team Members
You can suspend, delete, and reset all of the registered passkeys for team members.
In Iru Endpoint, in the sidebar, click the **Account Menu Button**.
Click the **Access** option in the menu.
Click the **ellipsis** (⋮) next to the user you would like to manage.
From the ellipsis (⋮) menu, select **Manage authenticators**.
If you want to remove all passkey registrations from a user, click the **Reset all** button.
This action will remove all authenticators for the given user. Registering a new authenticator will be required to log in. See [Iru Account Recovery](/en/iru/access/iru-account-recovery) for recovery options.
Click the disclosure triangle (⌄) to the right of the authenticator you would like to suspend.
Click **Suspend authenticator** to temporarily disable the authenticator.
You must suspend an authenticator before you can delete it.
Now that the authenticator is suspended, you can click **Delete authenticator** to completely remove it.
Click **Yes, delete** to complete deleting the authenticator.
You can also click **Unsuspend authenticator** if the wrong authenticator was suspended.
### Social Login
**Social login** allows users to authenticate using their existing Google or Microsoft accounts without needing to configure complex [Single Sign-On](/en/endpoint/integrations/single-sign-on-integrations/single-sign-on) authentication methods. There are two social login options available in Iru: Microsoft Social and Google Social.
#### Limit Authentication to Domain
For Google Social and Microsoft Social, you can optionally limit authentication to one or more domains. This allows you to restrict social logins to your organization's specific domains.
Another level of security you can add after limiting to specific domains is to enable Multi-Factor Authentication for the social login platforms. Learn more about using MFA for signing in with Google Workspace and Office 365:
* [Google 2-Step Verification](https://www.google.com/landing/2step/)
* [Set up 2-step verification for Office 365](https://support.office.com/en-us/article/set-up-2-step-verification-for-office-365-ace1d096-61e5-449b-a875-58eb3d74de14)
To use a social login method for Require Authentication during enrollment, you'll need to limit that method to specific domains. See [Configure Require Authentication for Enrollment](/en/endpoint/enrollment/configure-require-authentication-for-enrollment#manual-enrollment) for more information.
#### Microsoft Social
When using the Microsoft Social authentication method, the match between the user in Iru and the user in Microsoft is based on the User Principal Name (UPN). This is an important distinction because a user's email address and UPN could be different. In cases where the email address in Microsoft Entra ID matches the email of the user in Iru, it will still fail if the UPN of the related user in Microsoft Entra ID does not match.
### Manage Tenant Authentication
You can either allow or disallow Passkey, Google Social, and Microsoft Social tenant authentication methods individually. You cannot disallow the authentication method that was used to access your current session.
### Related Articles
Help team members regain access when they lose a passkey or authenticator
Configure SSO and manage Passkey, Google Social, and Microsoft Social tenant authentication
How passkeys and Iru Access work for Iru Identity application sign-in
End-user guide for passkeys, Iru Access, and backup devices