> ## Documentation Index
> Fetch the complete documentation index at: https://docs.iru.com/llms.txt
> Use this file to discover all available pages before exploring further.
# Self Service for macOS
> Configure Self Service for macOS in Iru Endpoint. Let users install approved apps, run scripts, and access resources from the Self Service application.
This guide applies to Mac computers
### About Self Service for macOS
Self Service is an application that lets IT administrators manage a personalized App Store for their organization. Users can download and install IT-approved software on their Mac computers, giving them more control over their devices and reducing the need for IT intervention.
As of **April 8, 2026**, apps were updated from **Kandji** 
 to **Iru**
  branding. The **Iru Endpoint** menu bar icon also changed from **Kandji** to **Iru** branding. The **Self Service** app name changed from **Kandji Self Service** to **Iru Self Service**. Please update **scripts, automations, and utilities** that still reference the old app names. The app name and path in this guide match the current release. For more information, see [Iru Brand Update](/en/iru/platform-overview/iru-brand-update) and [Upgrade to Iru](/en/iru/platform-overview/upgrade-to-iru).
### How It Works
You can make various software titles, scripts, and bookmarks available to end users through the Iru Endpoint Web App. When Mac computers enroll in Iru Endpoint, the Self Service app automatically installs. End users can then access the app from the Iru Endpoint Menu Bar, Application search, or their Applications folder. They can search through the available items and install them as needed.
### Self Service Security events
End users can view quarantined files and blocked processes on their Mac by opening **Self Service** and selecting **Security events** in the left-hand navigation. For setup and behavior, see [Configure the EDR Library Item](/en/endpoint/endpoint-detection-response-edr/configure-the-edr-library-item#self-service-security-events).
### Launching Self Service
Self Service can be opened from either the menu bar, Application search, the /Applications folder in Finder, or URL. The path to the Self Service app is:
```
/Applications/Iru Self Service.app
```
If an Iru Agent update is pending, Self Service for macOS will automatically close after 15 minutes of user inactivity.
#### Launching Self Service from the Menu Bar
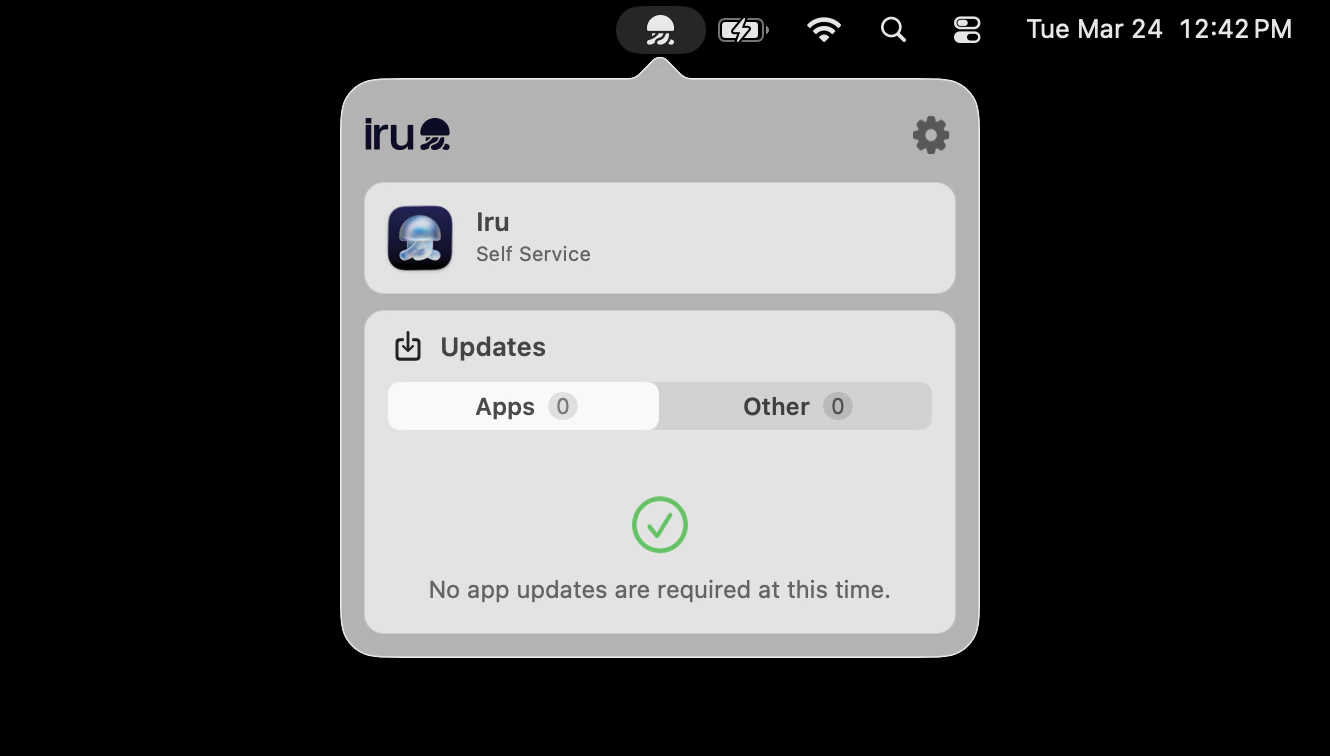
In the menu bar, click the **Iru Endpoint** logo.
Hover over **Iru Self Service** and click **Open**.
branding. The **Iru Endpoint** menu bar icon also changed from **Kandji** to **Iru** branding. The **Self Service** app name changed from **Kandji Self Service** to **Iru Self Service**. Please update **scripts, automations, and utilities** that still reference the old app names. The app name and path in this guide match the current release. For more information, see [Iru Brand Update](/en/iru/platform-overview/iru-brand-update) and [Upgrade to Iru](/en/iru/platform-overview/upgrade-to-iru).
### How It Works
You can make various software titles, scripts, and bookmarks available to end users through the Iru Endpoint Web App. When Mac computers enroll in Iru Endpoint, the Self Service app automatically installs. End users can then access the app from the Iru Endpoint Menu Bar, Application search, or their Applications folder. They can search through the available items and install them as needed.
### Self Service Security events
End users can view quarantined files and blocked processes on their Mac by opening **Self Service** and selecting **Security events** in the left-hand navigation. For setup and behavior, see [Configure the EDR Library Item](/en/endpoint/endpoint-detection-response-edr/configure-the-edr-library-item#self-service-security-events).
### Launching Self Service
Self Service can be opened from either the menu bar, Application search, the /Applications folder in Finder, or URL. The path to the Self Service app is:
```
/Applications/Iru Self Service.app
```
If an Iru Agent update is pending, Self Service for macOS will automatically close after 15 minutes of user inactivity.
#### Launching Self Service from the Menu Bar
In the menu bar, click the **Iru Endpoint** logo.
Hover over **Iru Self Service** and click **Open**.
 #### Launching Self Service from Application search
In the Dock, click **Application search**.
Click **Iru Self Service**.
#### Launching Self Service from Application search
In the Dock, click **Application search**.
Click **Iru Self Service**.
 #### Launching Self Service from Finder
In the Dock, click **Finder**.
In the Finder window sidebar, click **Applications** to open the Applications folder.
Double-click **Iru Self Service**.
#### Launching Self Service from Finder
In the Dock, click **Finder**.
In the Finder window sidebar, click **Applications** to open the Applications folder.
Double-click **Iru Self Service**.
 #### Launching Self Service from a URL
In a web browser, enter the following URL then press Return:
```
iru://open-app/self-service
```
### Navigating Self Service
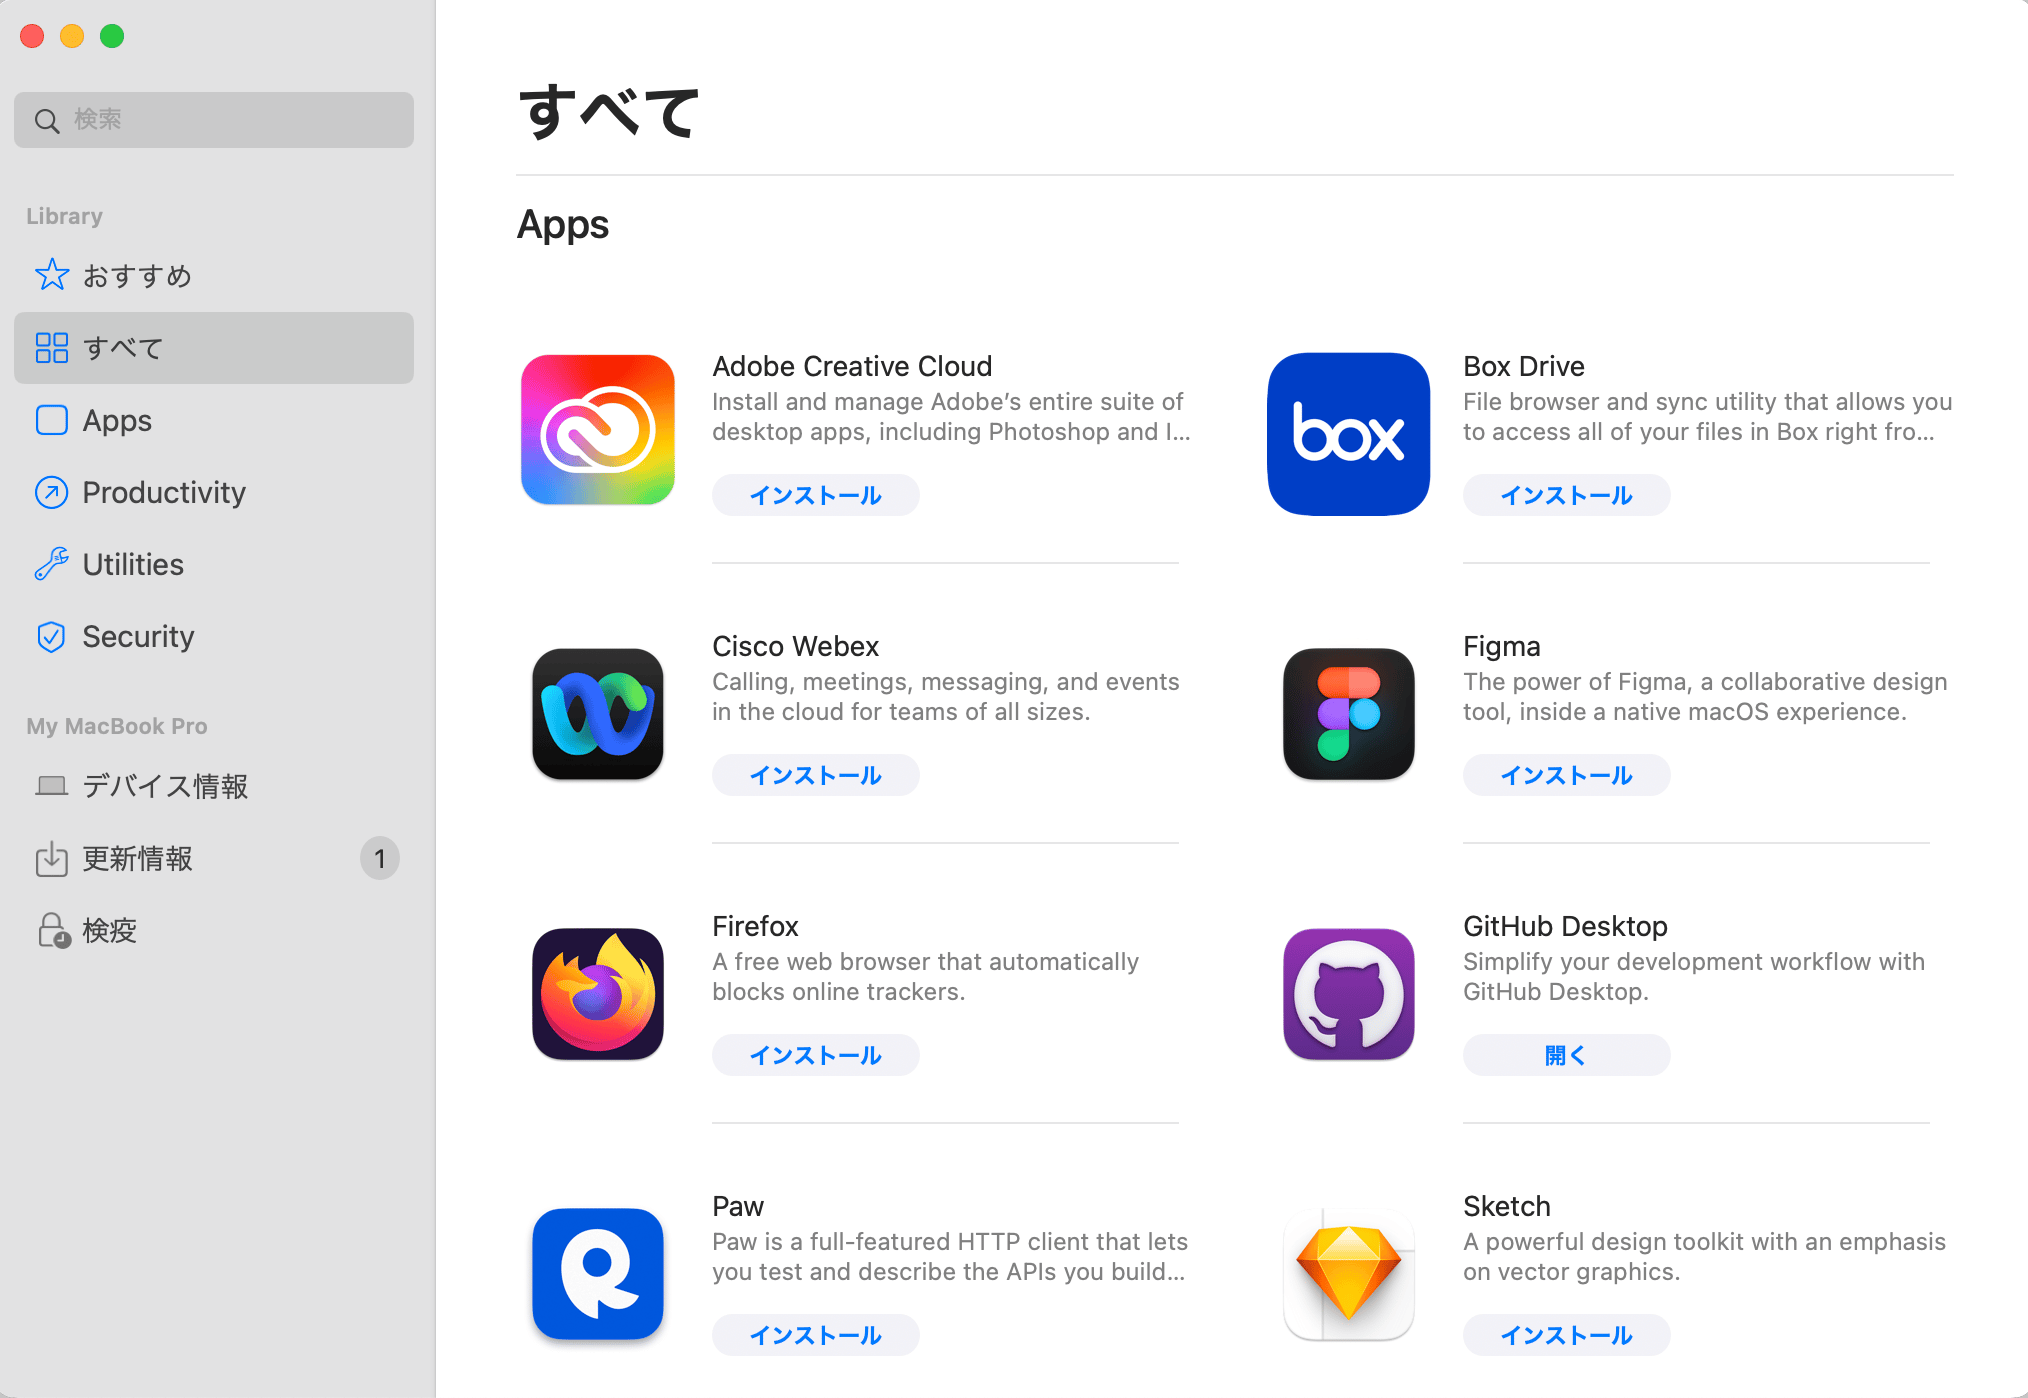
To navigate within Self Service, use the navigation bar on the left side of the app window. The All category is always visible, and any additional categories will automatically appear based on the Library Items assigned to the device.
Use the **Search** function to find available items in Self Service.
Navigate through the **Library** section which includes:
* **All**: This category includes all items available to your device in Self Service
* **Recommended**: Items marked as recommended by your IT administrator are listed here, indicated by a star icon next to their name
* **Bookmarks**: Access links to essential work resources provided by your IT administrator
* **Additional Categories**: Depending on your organization's setup, you may see other categories tailored to specific needs
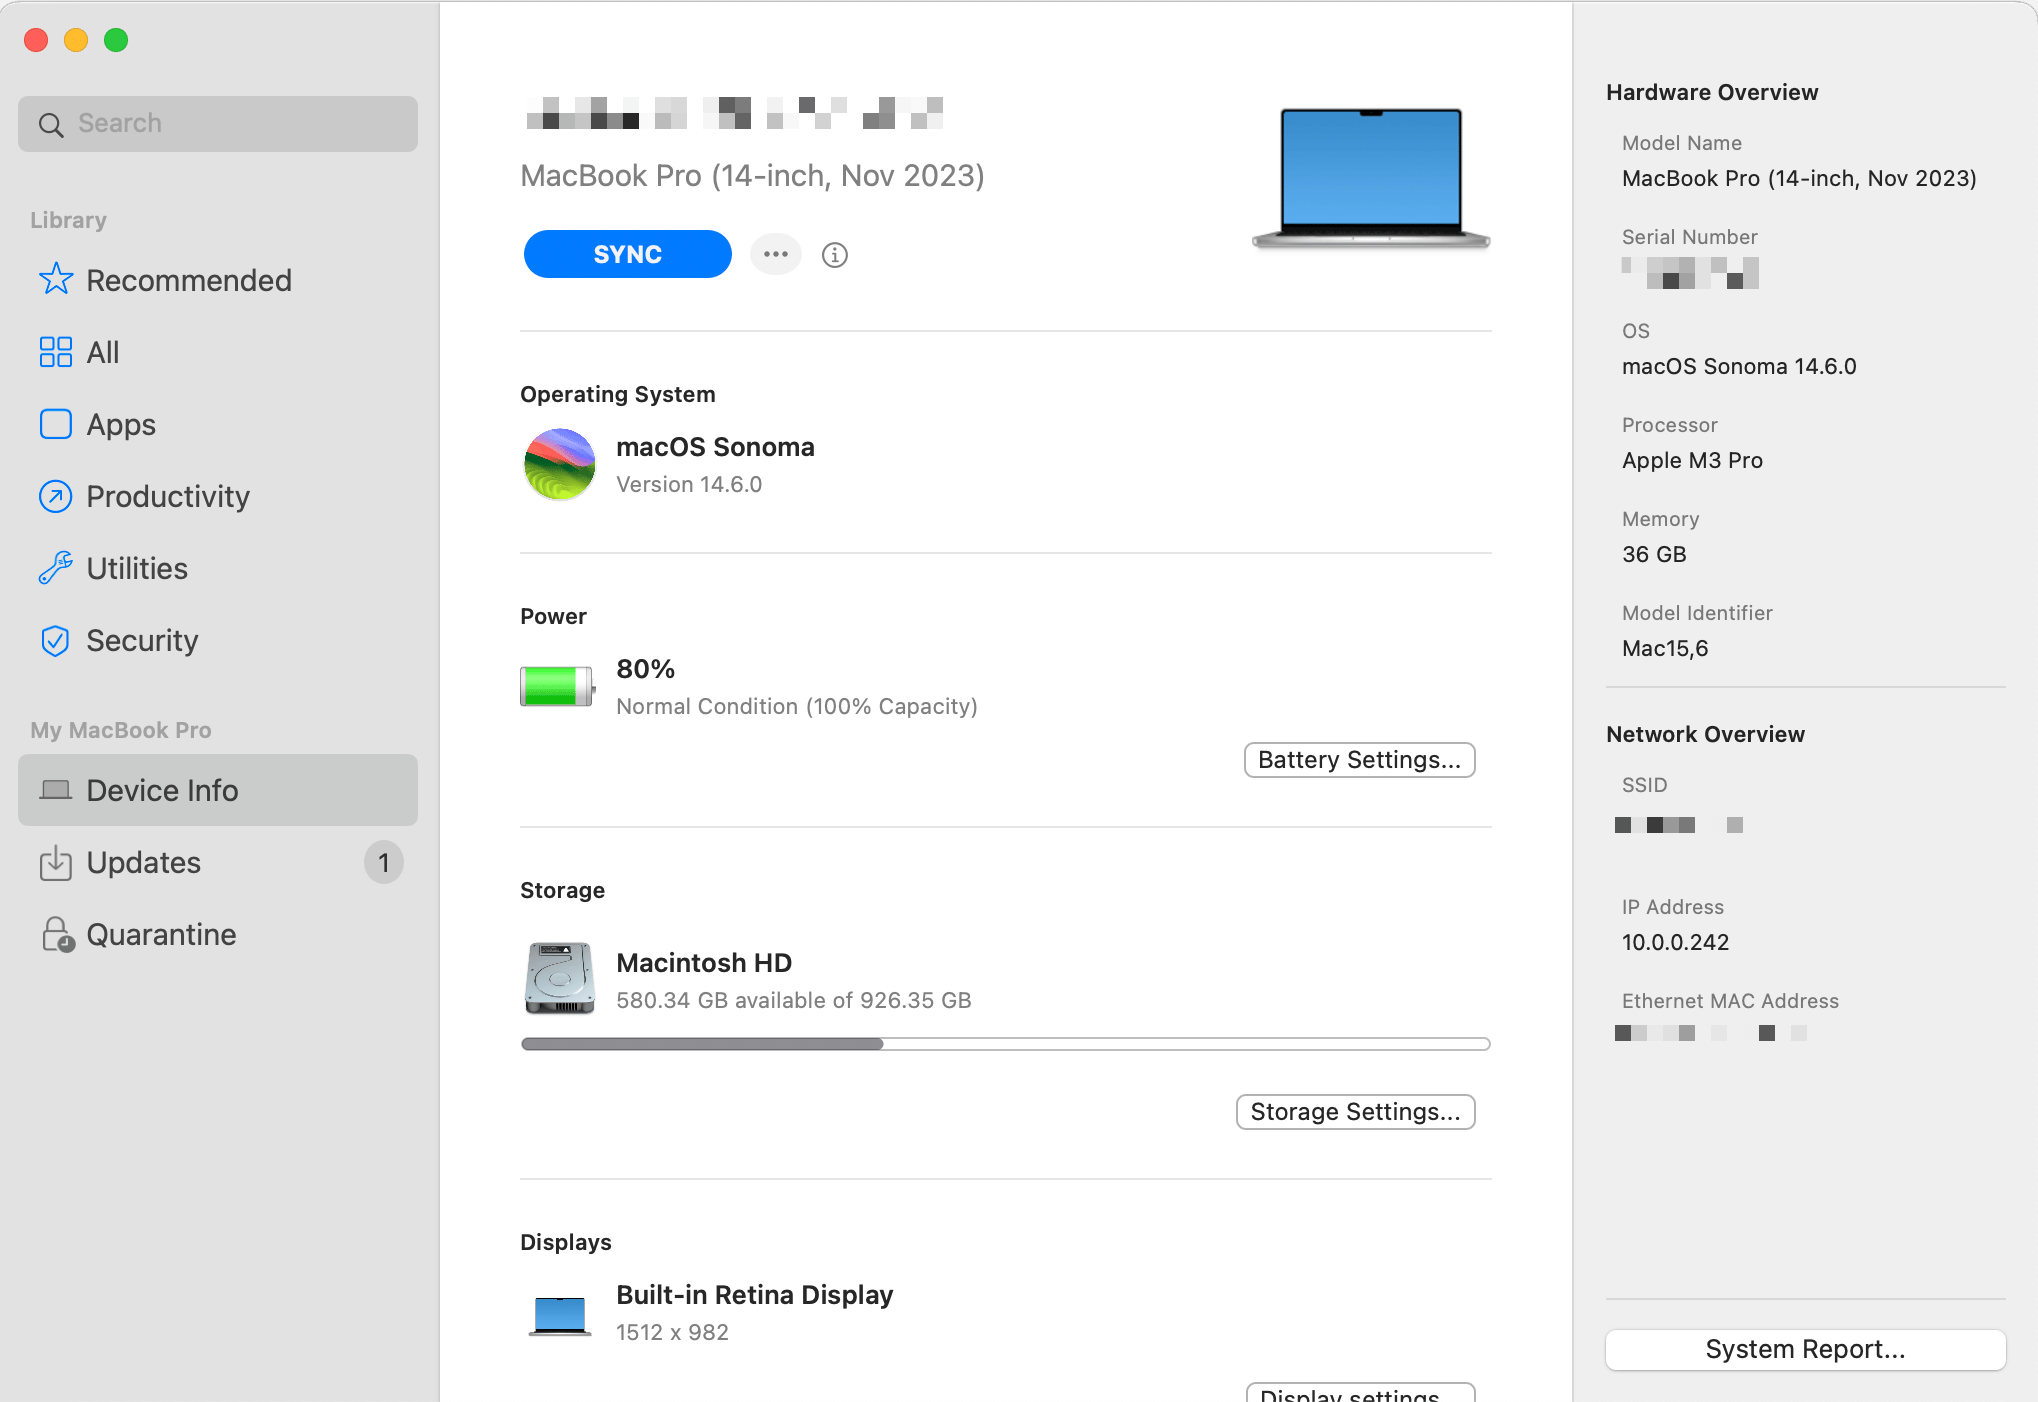
Access the **Device Info** section to see key device information—such as OS version, power percentage, storage capacity, and connected displays—on a single page. Use the **Sync** button to initiate device check-ins when requested by your IT administrators.
#### Launching Self Service from a URL
In a web browser, enter the following URL then press Return:
```
iru://open-app/self-service
```
### Navigating Self Service
To navigate within Self Service, use the navigation bar on the left side of the app window. The All category is always visible, and any additional categories will automatically appear based on the Library Items assigned to the device.
Use the **Search** function to find available items in Self Service.
Navigate through the **Library** section which includes:
* **All**: This category includes all items available to your device in Self Service
* **Recommended**: Items marked as recommended by your IT administrator are listed here, indicated by a star icon next to their name
* **Bookmarks**: Access links to essential work resources provided by your IT administrator
* **Additional Categories**: Depending on your organization's setup, you may see other categories tailored to specific needs
Access the **Device Info** section to see key device information—such as OS version, power percentage, storage capacity, and connected displays—on a single page. Use the **Sync** button to initiate device check-ins when requested by your IT administrators.
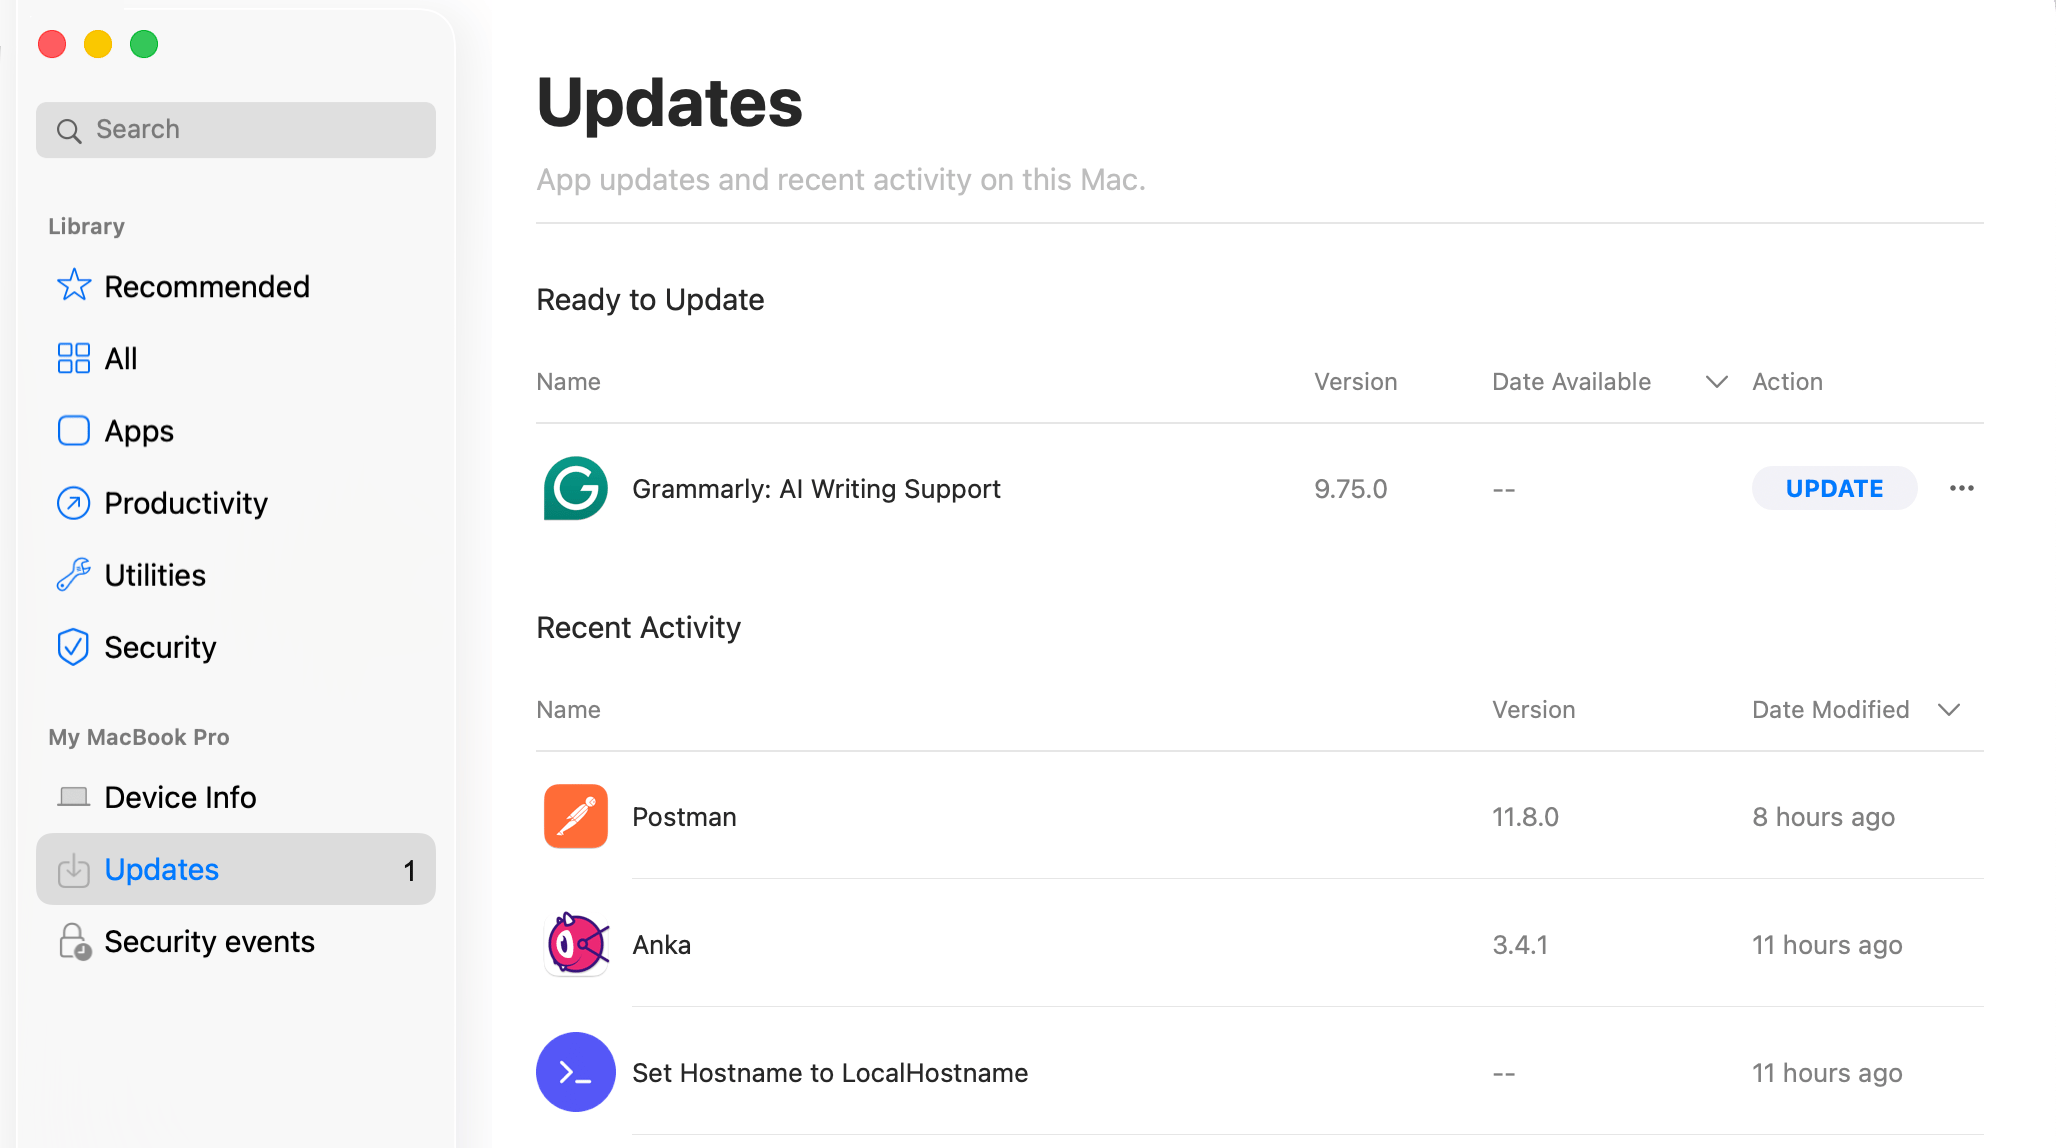
 Use the **Updates** tab to see your recently updated apps, as well as apps that are ready to update.
 ### Installing Available Applications
Apps that are available for Self Service installation will display their app icon, app name, app description, and an install button.
### Installing Available Applications
Apps that are available for Self Service installation will display their app icon, app name, app description, and an install button.
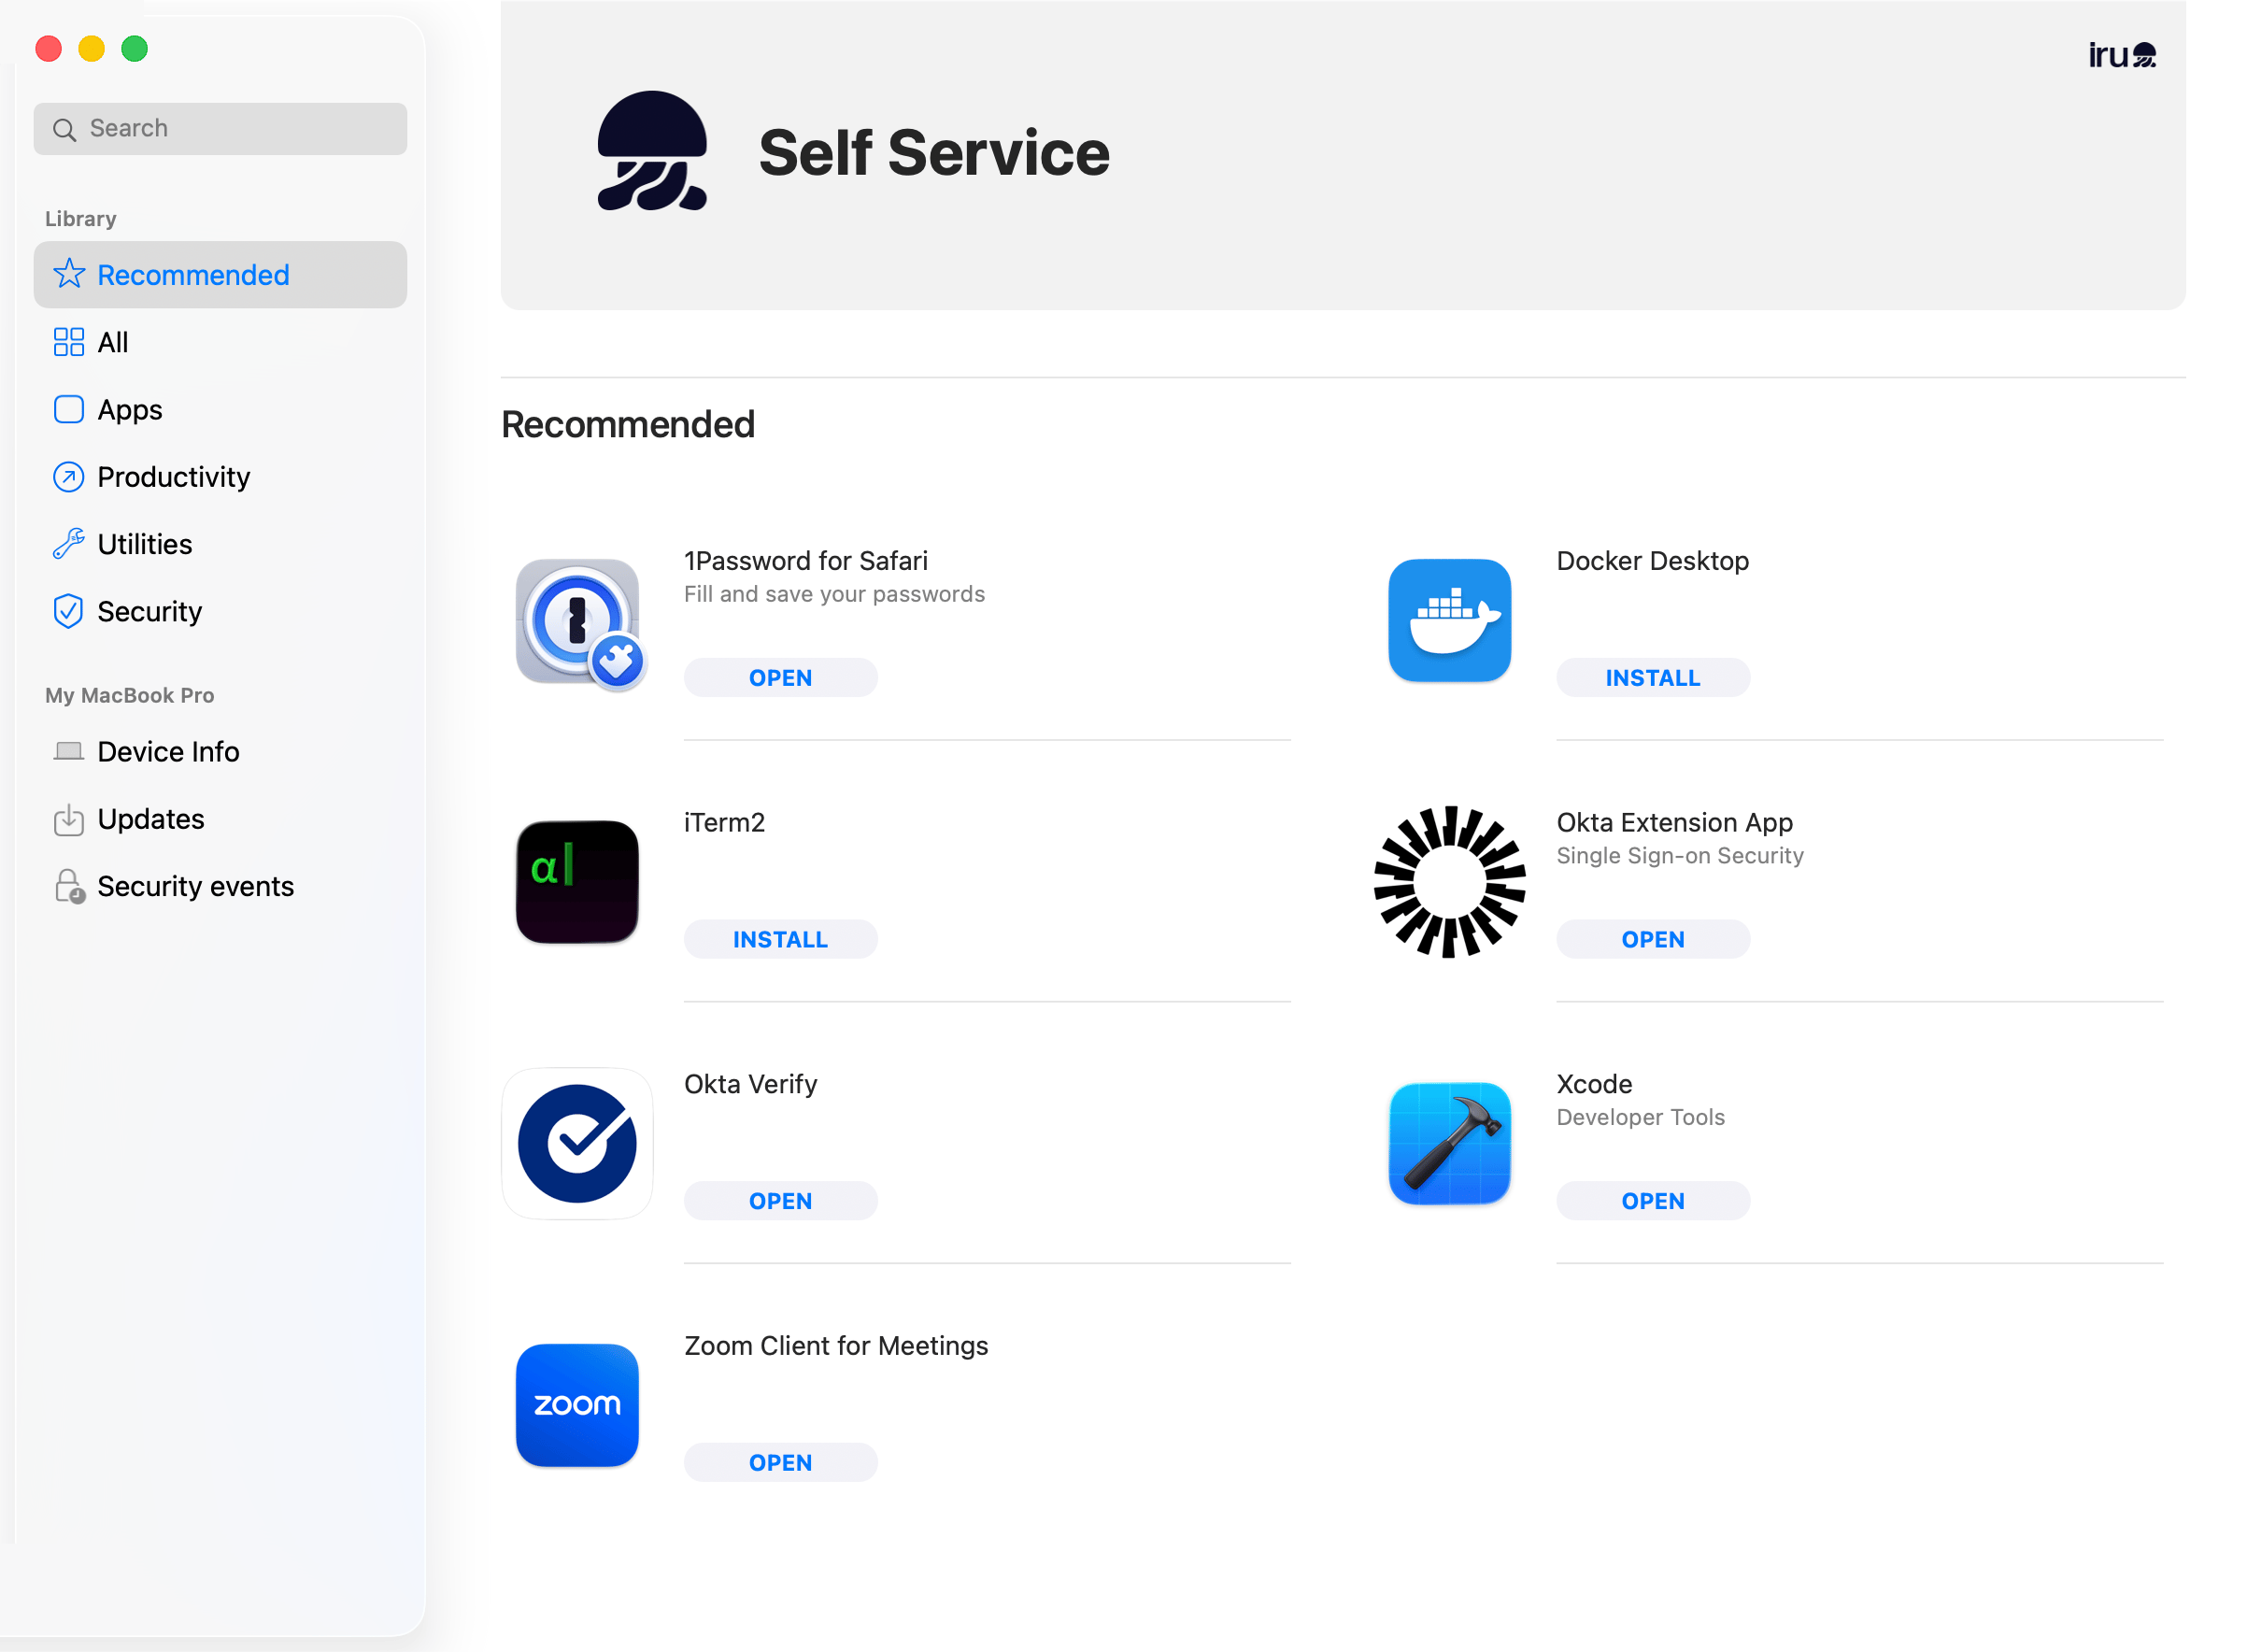 Clicking the **Install** button downloads and installs the app. After installing an app, the button changes to **Open**. After an app has been successfully installed, more options will become available.
#### Post-Installation Options
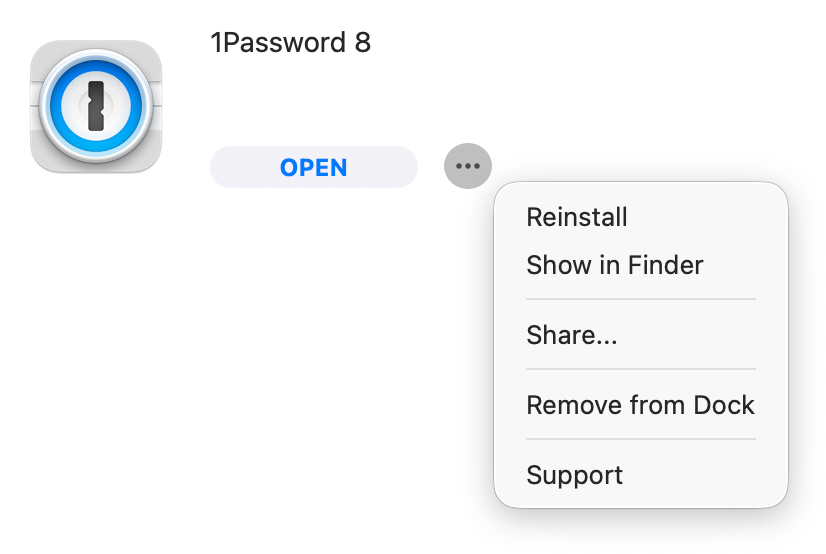
To access the options available after installation, click the **ellipsis** next to the Open button. From there, you will see:
* **Reinstall**: Reinstall the app
* **Show in Finder**: Open a Finder window with the app's location
* **Add to Dock**: Add the app icon to the currently logged-in user's Dock
* **Support**: Opens the app's support webpage
* **Show in App Store**: For Apps and Books apps only, launch the app's page in the Mac App Store
Clicking the **Install** button downloads and installs the app. After installing an app, the button changes to **Open**. After an app has been successfully installed, more options will become available.
#### Post-Installation Options
To access the options available after installation, click the **ellipsis** next to the Open button. From there, you will see:
* **Reinstall**: Reinstall the app
* **Show in Finder**: Open a Finder window with the app's location
* **Add to Dock**: Add the app icon to the currently logged-in user's Dock
* **Support**: Opens the app's support webpage
* **Show in App Store**: For Apps and Books apps only, launch the app's page in the Mac App Store
 #### App Details
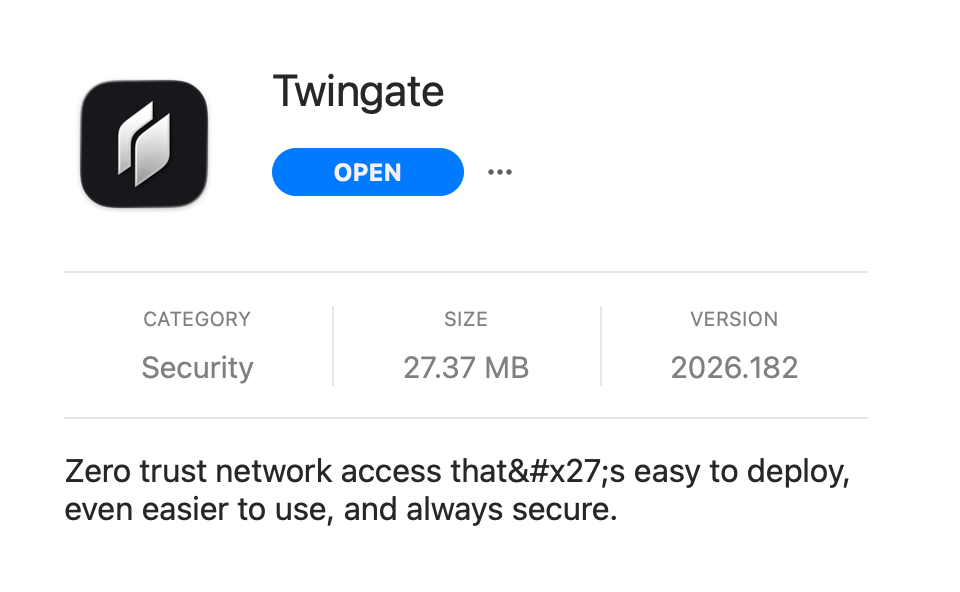
Clicking an app **icon** or app **name** will bring up details about the app itself, including:
* App icon
* App name
* Short description
* Long description
* Install button or Open button (after an app has been installed the Install button changes to the Open button)
#### App Details
Clicking an app **icon** or app **name** will bring up details about the app itself, including:
* App icon
* App name
* Short description
* Long description
* Install button or Open button (after an app has been installed the Install button changes to the Open button)
 ### Deep-Linking Self Service Items
You can directly link to and share items in Self Service using deep links through the Share menu. To link to an item, use a URL with the `iru-self-service://` scheme:
```
iru-self-service://library/items/
```
You can still use `kandji-self-service://` in existing links; they open in the current Self Service app with the same path.
If needed, you can share links to Categories by secondary-clicking on them and selecting **Share**.
### Device Localization Support
When a user configures their macOS device to use one of the supported languages as its primary language, the Self Service app displays localized text for non-customizable strings. No admin configuration is required to enable this capability.
The following languages are supported:
* Chinese (Simplified)
* French / French (Canada)
* German
* Italian
* Japanese
* Portuguese
* Portuguese (Brazil)
* Spanish
### Deep-Linking Self Service Items
You can directly link to and share items in Self Service using deep links through the Share menu. To link to an item, use a URL with the `iru-self-service://` scheme:
```
iru-self-service://library/items/
```
You can still use `kandji-self-service://` in existing links; they open in the current Self Service app with the same path.
If needed, you can share links to Categories by secondary-clicking on them and selecting **Share**.
### Device Localization Support
When a user configures their macOS device to use one of the supported languages as its primary language, the Self Service app displays localized text for non-customizable strings. No admin configuration is required to enable this capability.
The following languages are supported:
* Chinese (Simplified)
* French / French (Canada)
* German
* Italian
* Japanese
* Portuguese
* Portuguese (Brazil)
* Spanish
 ### Show or Hide the Iru Endpoint Menu
With **Iru Self Service**, users can choose to show or hide the Iru Endpoint Menu.
#### To Show the Iru Endpoint Menu
Open Self Service.
In the menu bar, select the **Help** menu.
Click **Show Iru Endpoint Menu...**
#### To Hide the Iru Endpoint Menu
In the menu bar, click the **Iru Endpoint** jellyfish.
Click the settings **gear**.
Select **Hide Iru Endpoint**.
### Considerations
* **Multiple Launch Methods**: Self Service can be accessed through various methods including menu bar, Application search, Finder, and direct URL
* **Automatic Installation**: Self Service is automatically installed when Mac computers enroll in Iru Endpoint
* **User Control**: Users have control over their device software while maintaining IT oversight and security
* **Navigation Features**: The app provides search functionality, categorized libraries, device information, and update management
* **Post-Installation Options**: Users can reinstall apps, add them to Dock, access support, and view in App Store
* **Deep Linking**: Items can be shared with `iru-self-service://` URLs; existing `kandji-self-service://` links keep working
* **Localization Support**: The app supports multiple languages automatically based on system settings
* **Menu Management**: Users can show or hide the Iru Endpoint menu based on their preferences
* **Device Information**: Users can view comprehensive device details including OS version, power, storage, and connected displays
* **Sync Functionality**: Users can manually initiate device check-ins when requested by administrators
* **Update Management**: Users can view and manage app updates through the dedicated Updates tab
* **Bookmark Access**: Quick access to essential work resources and links provided by IT administrators
* **Recommended Items**: You can mark important items for easy user discovery
### Show or Hide the Iru Endpoint Menu
With **Iru Self Service**, users can choose to show or hide the Iru Endpoint Menu.
#### To Show the Iru Endpoint Menu
Open Self Service.
In the menu bar, select the **Help** menu.
Click **Show Iru Endpoint Menu...**
#### To Hide the Iru Endpoint Menu
In the menu bar, click the **Iru Endpoint** jellyfish.
Click the settings **gear**.
Select **Hide Iru Endpoint**.
### Considerations
* **Multiple Launch Methods**: Self Service can be accessed through various methods including menu bar, Application search, Finder, and direct URL
* **Automatic Installation**: Self Service is automatically installed when Mac computers enroll in Iru Endpoint
* **User Control**: Users have control over their device software while maintaining IT oversight and security
* **Navigation Features**: The app provides search functionality, categorized libraries, device information, and update management
* **Post-Installation Options**: Users can reinstall apps, add them to Dock, access support, and view in App Store
* **Deep Linking**: Items can be shared with `iru-self-service://` URLs; existing `kandji-self-service://` links keep working
* **Localization Support**: The app supports multiple languages automatically based on system settings
* **Menu Management**: Users can show or hide the Iru Endpoint menu based on their preferences
* **Device Information**: Users can view comprehensive device details including OS version, power, storage, and connected displays
* **Sync Functionality**: Users can manually initiate device check-ins when requested by administrators
* **Update Management**: Users can view and manage app updates through the dedicated Updates tab
* **Bookmark Access**: Quick access to essential work resources and links provided by IT administrators
* **Recommended Items**: You can mark important items for easy user discovery