> ## Documentation Index
> Fetch the complete documentation index at: https://docs.iru.com/llms.txt
> Use this file to discover all available pages before exploring further.
# Passport Configuration with OneLogin
> Configure Passport with OneLogin in Iru Endpoint for macOS login and password synchronization. Set up the OneLogin app integration and authentication.
This guide applies to Mac computers
## About Passport with OneLogin
Passport with OneLogin enables users to log into Mac computers using their OneLogin credentials. This integration provides secure authentication using your organization's OneLogin identity system with support for both standard and multi-factor authentication.
## How It Works
Passport integrates with your OneLogin instance using OpenID Connect (OIDC) to authenticate users at the macOS login screen. Whether you need MFA for Passport sign-in determines how many OIDC applications you create in OneLogin and whether you set Authentication mode to Web Login or Mac Login in the Passport Library Item.
## Prerequisites
* To add apps in OneLogin, use an account that is a Super User or Account Owner.
## Configure an OIDC App
If you do not need MFA for Passport sign-in, set **Authentication mode** to **Mac Login** in the Passport Library Item and follow only the [Mac Login](#onelogin-oidc-mac-login) section (skip [Web Login](#onelogin-oidc-web-login)).
If you need MFA at sign-in, set **Authentication mode** to **Web Login**. You must create **two** OIDC apps in OneLogin: **Mac Login** first (sign-in and password sync to the Mac), then **Web Login** (MFA in the embedded web view). Follow the **Mac Login** section, then the **Web Login** section, in that order.
### Mac Login
Create the Mac Login OIDC application in OneLogin. This article uses the display name *Iru Passport Mac Login*.
Every deployment uses this app. With **Mac Login** as the authentication mode, it is the only OneLogin OIDC app you add in this guide. With **Web Login** (MFA), add this app first, then continue to [Web Login](#onelogin-oidc-web-login).
Log in to OneLogin as an Account owner or Super user.
In your OneLogin admin console, navigate to the **Applications** page.
In the upper-right corner, click **Add App**.
In the search field in the upper-left corner, enter *OIDC*.
Select **OpenID Connect (OIDC)**.
In the **Display Name** field, enter a descriptive name such as *Iru Passport Mac Login*.
Click the **Visible in portal** switch to the **Off** position; this app does not need to be visible in order for Passport to work, and it might be confusing for a user to see this app in their OneLogin portal.
Click **Save**.
In the left sidebar, click **Configuration**.
In the **Redirect URIs** field, enter the following:
```
https://localhost.redirect
```
Passport doesn't require this value, but you cannot save the app configuration without some value in the Redirect URIs field.
In the left sidebar, click **SSO**.
Click the **Application Type** menu and select **Native**.
Click the **Token Endpoint** menu and select **None (PKCE)**.
Click **Save**.
#### Collecting configuration details for Mac Login
This OIDC app keeps the Mac password in sync with OneLogin. Open a secure text document that you can use to store values for this OIDC app. You will need the Client ID and Issuer URL details when you configure the Passport Library Item (you don't need the client secret).
To the right of the **Client ID** field, click the **Copy to Clipboard** button (looks like a clipboard).
Paste the Client ID into the secure text document.
Right-click (or Control-click) the **Well-known Configuration** link and copy its value. The Issuer URL is your OIDC well-known configuration endpoint and follows this pattern:
```bash theme={null}
https://{subdomain}.onelogin.com/oidc/2/.well-known/openid-configuration
```
Paste the Issuer URL into the secure text document.
Save the secure text document.
In OneLogin, assign the app to the users or groups who will be using Passport to log in to their Mac computers.
If you are not using Web Login (no MFA), skip the [Web Login](#onelogin-oidc-web-login) section below, then continue with [Configuring a User Account Type by Identity Provider Group in OneLogin](#configuring-a-user-account-type-by-identity-provider-group-in-onelogin) if you need role-based account types, then open the [Iru Endpoint tab](#iru-endpoint).
### Web Login
Use this section only when **Authentication mode** is **Web Login** (MFA). After you finish [Mac Login](#onelogin-oidc-mac-login), create the second OIDC app here. This article uses the display name *Iru Passport Web Login*.
In your OneLogin admin console, navigate to the **Applications** page.
In the upper-right corner, click **Add App**.
If the **Add App** button does not appear, it's possible that you previously clicked **See the new apps list**. To make OneLogin display the **Add App** button, remove the string */admin2* from the URL. For example, instead of *[https://accuhive.onelogin.com/admin2/apps](https://accuhive.onelogin.com/admin2/apps)*, use *[https://accuhive.onelogin.com/apps](https://accuhive.onelogin.com/apps)*.
In the search field in the upper-left corner, enter OIDC.
Select **OpenID Connect (OIDC)**.
In the Display Name field, enter a descriptive name such as **Iru Passport Web Login**.
Click the **Visible in portal** switch to the **Off** position; this app does not need to be visible in order for Passport to work, and it might be confusing for a user to see this app in their OneLogin portal.
Click **Save**.
In the left sidebar, click **Configuration**.
In the **Redirect URIs** field, enter the following:
```
https://localhost.redirect
```
In the left sidebar, click **SSO**.
Click the **Application Type** menu and select **Native**.
In the **Token Endpoint** section, click the **Authentication Method** menu and select **POST**. POST is required so users can complete MFA in the web view at Mac sign-in.
Click **Save**.
#### Collecting configuration details for Web Login
This OIDC app supplies the Web Login fields for the Passport Library Item. Open a secure text document that you can use to store values for this OIDC app. You will need the Client ID and Client Secret for this POST app when you configure the Passport Library Item. If you already have a secure document from the Mac Login OIDC app, add a note that the new values are for the Web Login OIDC app.
Copy the contents of the **Client ID** field.
Paste the Client ID into the secure text document.
Click **Show client secret**.
Copy the client secret.
Paste the client secret into the secure text document.
Save the secure document.
In OneLogin, assign the app to the users or groups who will sign in with Web Login (MFA).
## Configuring a User Account Type by Identity Provider Group in OneLogin
Use this section when you map OneLogin roles to standard or administrator Mac accounts in Passport. It applies for both Mac Login (no MFA) and Web Login (MFA).
When configuring whether a user will be a standard user or an admin user, follow the steps below.
Log in to your OneLogin Console. Select Users > Roles.
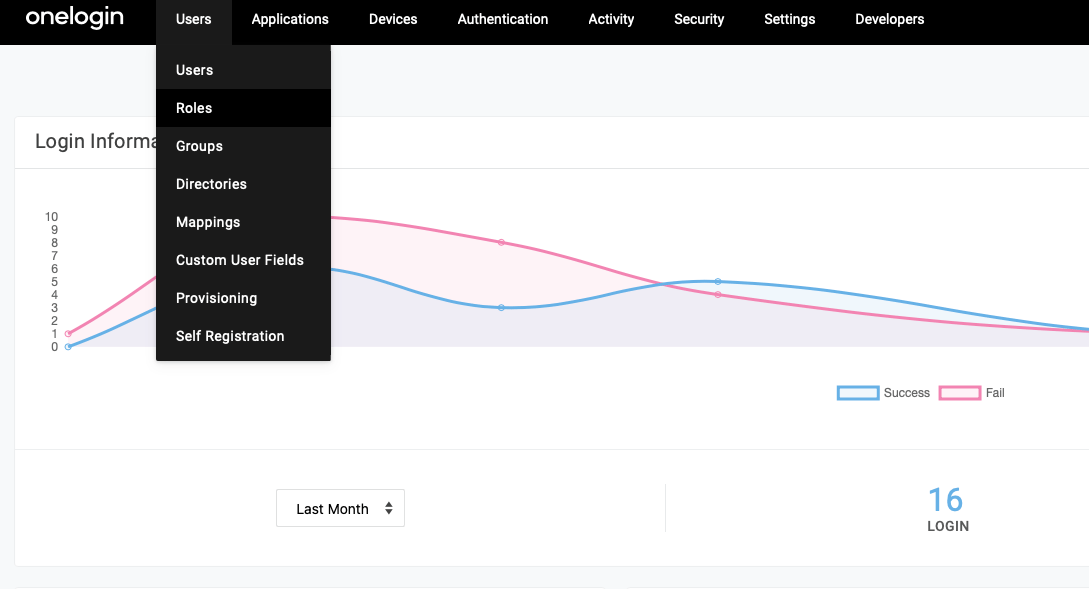 Select **New Role** on the top right of the screen, and name your role. (*You will want to make sure your role name matches the IDP group name that you are using in your Iru Passport configuration).* In this example, the role is named Passport Admin Users. Finally, select your Iru Passport app that you created in OneLogin and click **Save** on the top right of the screen.
Next, navigate to the Iru Passport app that you created in OneLogin. Select the **parameters** link and click the **Groups** field.
In the "Default if no value selected" section, select User Roles from the drop-down list and make sure Semicolon Delimited Input is selected. Click **Save**.
Select **New Role** on the top right of the screen, and name your role. (*You will want to make sure your role name matches the IDP group name that you are using in your Iru Passport configuration).* In this example, the role is named Passport Admin Users. Finally, select your Iru Passport app that you created in OneLogin and click **Save** on the top right of the screen.
Next, navigate to the Iru Passport app that you created in OneLogin. Select the **parameters** link and click the **Groups** field.
In the "Default if no value selected" section, select User Roles from the drop-down list and make sure Semicolon Delimited Input is selected. Click **Save**.
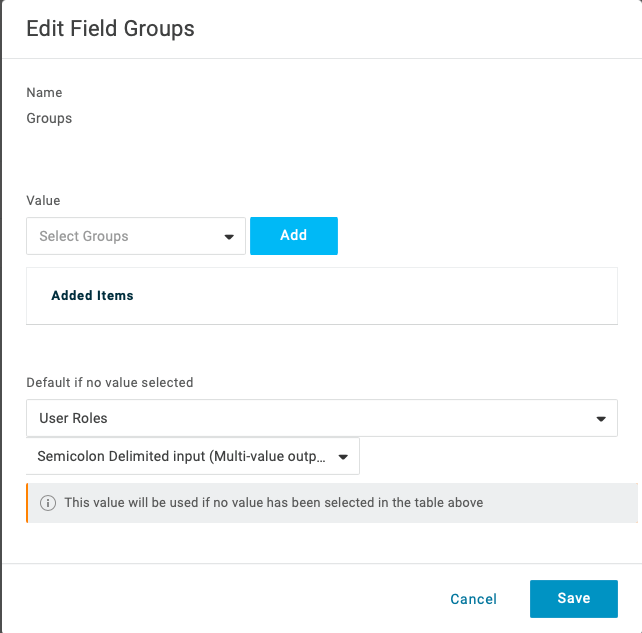 Finally, make sure your users are part of the role that you are creating, as well as a member of the Iru Passport application in OneLogin. To add a user to a role, select Users > Roles > *your role name (for example, Passport Admin Users)*, select the **Users** link, search for the user, click the blue **check box**, click the **Add to Role** link, and then click **Save** at the top right of the page.
When OIDC apps and roles in OneLogin match what you need, open the [Iru Endpoint tab](#iru-endpoint) to enter values in the Passport Library Item. On that tab, User provisioning includes an example when a OneLogin role supplies the administrator group name.
If you have not already, use [Configure the Passport Library Item](/en/endpoint/library/passport/configure-the-passport-library-item) to add the Passport Library Item and basic settings. The steps below are the Iru Endpoint steps specific to OneLogin Passport; use the values you collected on the [OneLogin tab](#onelogin).
### Authentication Mode
Set **Authentication mode** in the Passport Library Item to match how users sign in with OneLogin. Use **Web Login** when MFA applies, and **Mac Login** when it does not.
In OneLogin you always configure the Mac Login OIDC app; add the Web Login OIDC app as the second app when you use MFA, as on the [OneLogin tab](#onelogin).
#### Web Login
If you use multi-factor authentication with Passport, you must use **Web Login** as the authentication mode so users can complete MFA during sign-in. You should already have created two OIDC apps in OneLogin (Mac Login, then Web Login).
When **Identity provider** in the Passport Library Item is **OneLogin** and **Authentication mode** is **Web Login**, the **second** OneLogin OIDC application must use the **POST** authentication method on the token endpoint (see the [Web Login](#onelogin-oidc-web-login) OIDC app steps on the [OneLogin tab](#onelogin)). Enter that second application's client ID in **Client ID (Web Authentication)**, the redirect URI in **Redirect URI**, and the client secret in **Client secret** on the Library Item (steps below).
In the Passport Library Item, set **Identity provider** to **OneLogin**.
In the **Identity provider URL** field, enter the OIDC well-known configuration URL (Issuer URL) from the **Mac Login** OIDC app you collected on the [OneLogin tab](#onelogin). It follows this pattern:
```bash theme={null}
https://{subdomain}.onelogin.com/oidc/2/.well-known/openid-configuration
```
In the **Client ID (Password Sync)** field, enter the Client ID from the **Mac Login** OIDC application on the [OneLogin tab](#onelogin).
Under **Authentication mode**, select **Web Login**.
In the **Client ID (Web Authentication)** field, enter the client ID from the Web Login OIDC application you collected on the [OneLogin tab](#onelogin).
In the **Redirect URI** field, enter the following:
```
https://localhost.redirect
```
In the **Client secret** field, enter the client secret from the Web Login OIDC application in OneLogin.
Click **Save**.
#### Mac Login
If you are not using MFA with Passport, use **Mac Login** as the authentication mode. Users sign in with their OneLogin password at the Mac login window without the Web Login MFA flow. You should already have created one OIDC app in OneLogin (Mac Login only).
In the Passport Library Item, set **Identity provider** to **OneLogin**.
In the **Identity provider URL** field, enter the OIDC well-known configuration URL from the **Mac Login** OIDC app you collected on the [OneLogin tab](#onelogin). It follows this pattern:
```bash theme={null}
https://{subdomain}.onelogin.com/oidc/2/.well-known/openid-configuration
```
In the **Client ID (Password Sync)** field, enter the Client ID from the **Mac Login** OIDC application on the [OneLogin tab](#onelogin).
Under **Authentication mode**, select **Mac Login**.
Click **Save**.
### User Provisioning
If you want Passport to set each user's Mac account type from OneLogin roles, complete [Configuring a User Account Type by Identity Provider Group in OneLogin](#configuring-a-user-account-type-by-identity-provider-group-in-onelogin) first. Use the **User provisioning** steps below on the Passport Library Item [**Iru Endpoint** tab](#iru-endpoint).
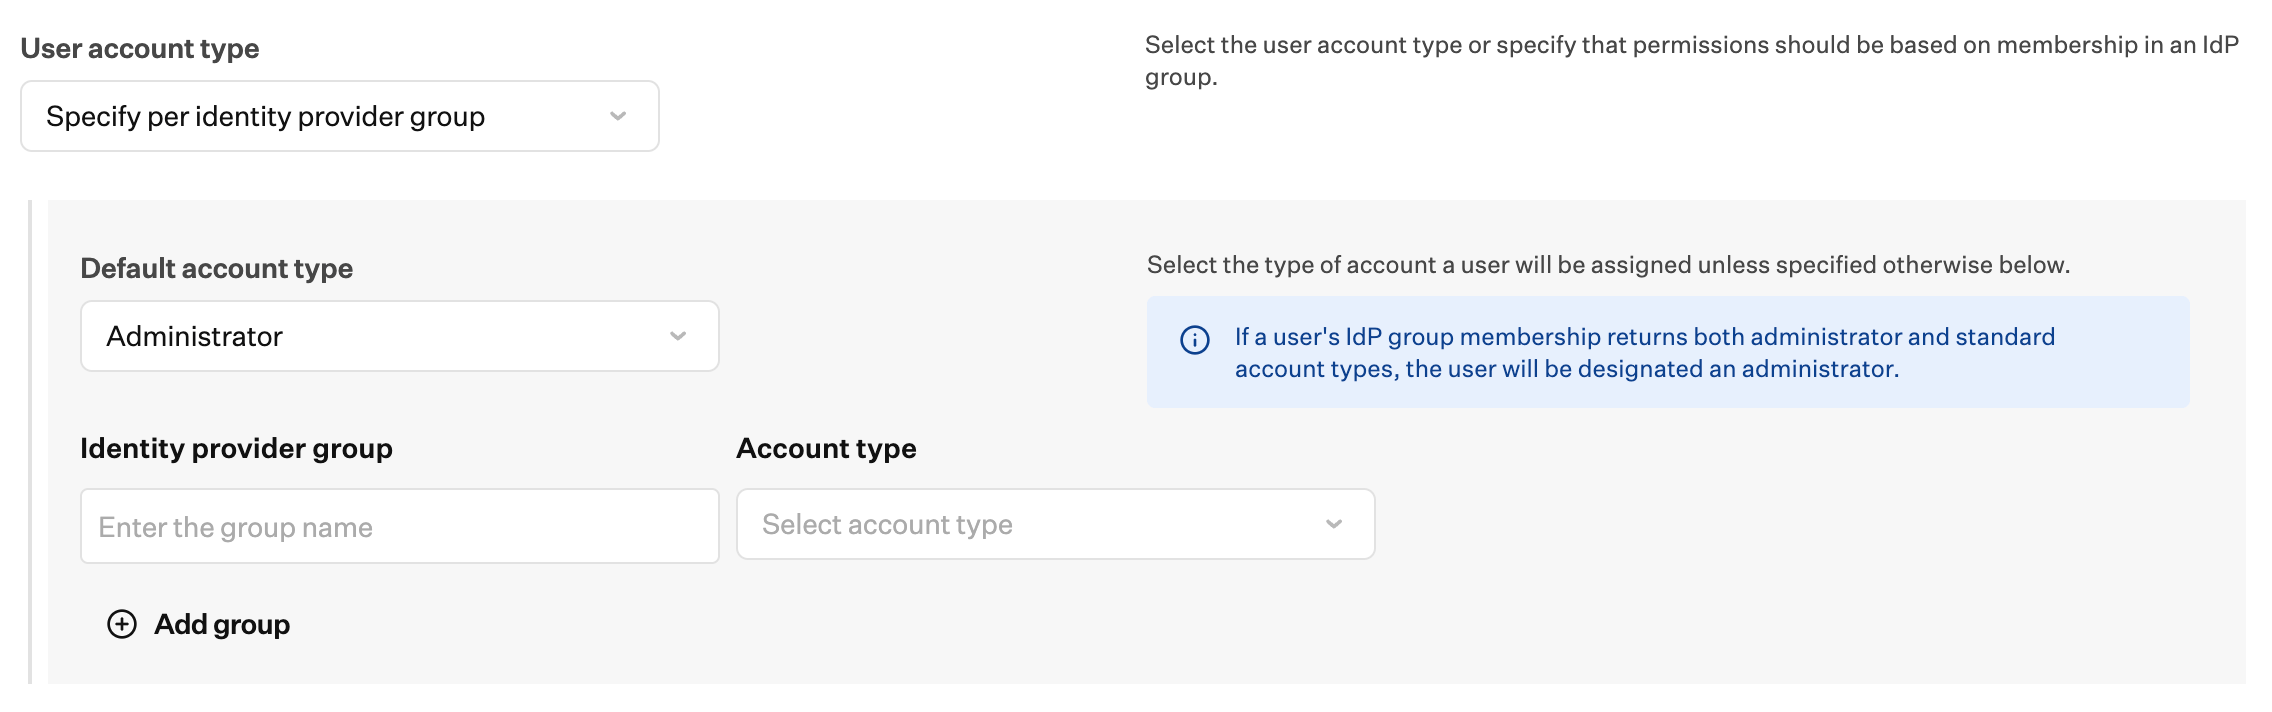
In the Passport Library Item, open the User account type menu in the User provisioning section and select **Specify per identity provider group**.
With **User account type** set to **Specify per identity provider group**, open the account type drop-down below it and select Administrator or Standard user. If a user's IdP group membership returns both Administrator and Standard account types, the user is designated an Administrator.
In each **Identity provider group** field, enter a role name that matches your OneLogin configuration.
For each **Identity provider group** row, set the **Account type** as appropriate.
Finally, make sure your users are part of the role that you are creating, as well as a member of the Iru Passport application in OneLogin. To add a user to a role, select Users > Roles > *your role name (for example, Passport Admin Users)*, select the **Users** link, search for the user, click the blue **check box**, click the **Add to Role** link, and then click **Save** at the top right of the page.
When OIDC apps and roles in OneLogin match what you need, open the [Iru Endpoint tab](#iru-endpoint) to enter values in the Passport Library Item. On that tab, User provisioning includes an example when a OneLogin role supplies the administrator group name.
If you have not already, use [Configure the Passport Library Item](/en/endpoint/library/passport/configure-the-passport-library-item) to add the Passport Library Item and basic settings. The steps below are the Iru Endpoint steps specific to OneLogin Passport; use the values you collected on the [OneLogin tab](#onelogin).
### Authentication Mode
Set **Authentication mode** in the Passport Library Item to match how users sign in with OneLogin. Use **Web Login** when MFA applies, and **Mac Login** when it does not.
In OneLogin you always configure the Mac Login OIDC app; add the Web Login OIDC app as the second app when you use MFA, as on the [OneLogin tab](#onelogin).
#### Web Login
If you use multi-factor authentication with Passport, you must use **Web Login** as the authentication mode so users can complete MFA during sign-in. You should already have created two OIDC apps in OneLogin (Mac Login, then Web Login).
When **Identity provider** in the Passport Library Item is **OneLogin** and **Authentication mode** is **Web Login**, the **second** OneLogin OIDC application must use the **POST** authentication method on the token endpoint (see the [Web Login](#onelogin-oidc-web-login) OIDC app steps on the [OneLogin tab](#onelogin)). Enter that second application's client ID in **Client ID (Web Authentication)**, the redirect URI in **Redirect URI**, and the client secret in **Client secret** on the Library Item (steps below).
In the Passport Library Item, set **Identity provider** to **OneLogin**.
In the **Identity provider URL** field, enter the OIDC well-known configuration URL (Issuer URL) from the **Mac Login** OIDC app you collected on the [OneLogin tab](#onelogin). It follows this pattern:
```bash theme={null}
https://{subdomain}.onelogin.com/oidc/2/.well-known/openid-configuration
```
In the **Client ID (Password Sync)** field, enter the Client ID from the **Mac Login** OIDC application on the [OneLogin tab](#onelogin).
Under **Authentication mode**, select **Web Login**.
In the **Client ID (Web Authentication)** field, enter the client ID from the Web Login OIDC application you collected on the [OneLogin tab](#onelogin).
In the **Redirect URI** field, enter the following:
```
https://localhost.redirect
```
In the **Client secret** field, enter the client secret from the Web Login OIDC application in OneLogin.
Click **Save**.
#### Mac Login
If you are not using MFA with Passport, use **Mac Login** as the authentication mode. Users sign in with their OneLogin password at the Mac login window without the Web Login MFA flow. You should already have created one OIDC app in OneLogin (Mac Login only).
In the Passport Library Item, set **Identity provider** to **OneLogin**.
In the **Identity provider URL** field, enter the OIDC well-known configuration URL from the **Mac Login** OIDC app you collected on the [OneLogin tab](#onelogin). It follows this pattern:
```bash theme={null}
https://{subdomain}.onelogin.com/oidc/2/.well-known/openid-configuration
```
In the **Client ID (Password Sync)** field, enter the Client ID from the **Mac Login** OIDC application on the [OneLogin tab](#onelogin).
Under **Authentication mode**, select **Mac Login**.
Click **Save**.
### User Provisioning
If you want Passport to set each user's Mac account type from OneLogin roles, complete [Configuring a User Account Type by Identity Provider Group in OneLogin](#configuring-a-user-account-type-by-identity-provider-group-in-onelogin) first. Use the **User provisioning** steps below on the Passport Library Item [**Iru Endpoint** tab](#iru-endpoint).
In the Passport Library Item, open the User account type menu in the User provisioning section and select **Specify per identity provider group**.
With **User account type** set to **Specify per identity provider group**, open the account type drop-down below it and select Administrator or Standard user. If a user's IdP group membership returns both Administrator and Standard account types, the user is designated an Administrator.
In each **Identity provider group** field, enter a role name that matches your OneLogin configuration.
For each **Identity provider group** row, set the **Account type** as appropriate.
 When the Passport Library Item is saved, return to the [OneLogin tab](#onelogin) if you need to change OIDC apps or role mappings.
If you experience any issues with Passport and OneLogin, read [Passport Troubleshooting with OneLogin](/en/endpoint/library/passport/onelogin/passport-troubleshooting-with-onelogin).
When the Passport Library Item is saved, return to the [OneLogin tab](#onelogin) if you need to change OIDC apps or role mappings.
If you experience any issues with Passport and OneLogin, read [Passport Troubleshooting with OneLogin](/en/endpoint/library/passport/onelogin/passport-troubleshooting-with-onelogin).