> ## Documentation Index
> Fetch the complete documentation index at: https://docs.iru.com/llms.txt
> Use this file to discover all available pages before exploring further.
# Passport Configuration with Okta
> Configure Passport with Okta in Iru Endpoint for macOS login and password synchronization. Set up the Okta app integration and authentication settings.
This guide applies to Mac computers
### About Passport with Okta
Passport with Okta enables users to log into Mac computers using their Okta credentials instead of separate local passwords. This integration streamlines authentication by connecting your Okta identity provider directly to macOS login.
### How It Works
Passport integrates with your Okta organization to authenticate users at the macOS login screen. When users enter their Okta credentials, Passport verifies them against your Okta tenant and creates or updates the local Mac user account accordingly.
### Okta Application Configuration
When configuring the Passport Library Item, you need the **Client ID** and **Identity provider URL**. In Okta, the client identifier may be labeled **Application ID**. Use these steps to configure the OIDC app and collect the required information.
In your Okta Administrator Console, in the left menu pane, expand the Applications section and select **Applications**.
Click **Create App Integration**.
For **Sign-in method**, select **OIDC - OpenID Connect**.
For Application Type, select **Native Application**.
Click **Next**.
In the **App integration name** field, enter a name such as *Iru Passport*.
In the **Grant type** section, confirm that the checkbox for **Refresh Token** is deselected. This option must be turned off to ensure that Passport prompts users to update their Mac password while logged in if their Okta password changes.
The **Store user password** setting in the Passport Library Item needs to be set to **Securely store password** for users to receive the password update prompt.
If you're using Okta Identity Engine, click **Advanced** to show additional options.
In the **Other grants** section, select the checkbox for **Resource Owner Password**.
If your Okta instance hasn't yet been updated from Classic to Okta Identity Engine, also referred to as OIE, the **Interaction Code** grant type and other options will not be displayed.
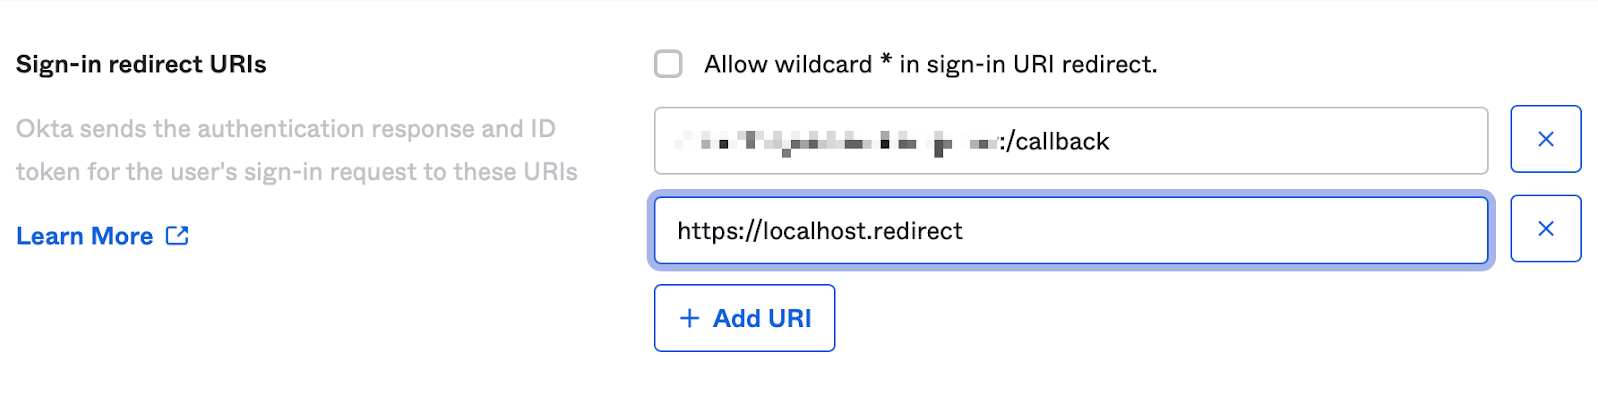
In the **Sign-in redirect URIs** section, click **Add URI**.
In the new field that appears, enter the following:
```
https://localhost.redirect
```
The same Sign-in redirect URI must be used in the Passport Library Item in the Redirect URI field in the Authentication mode section.
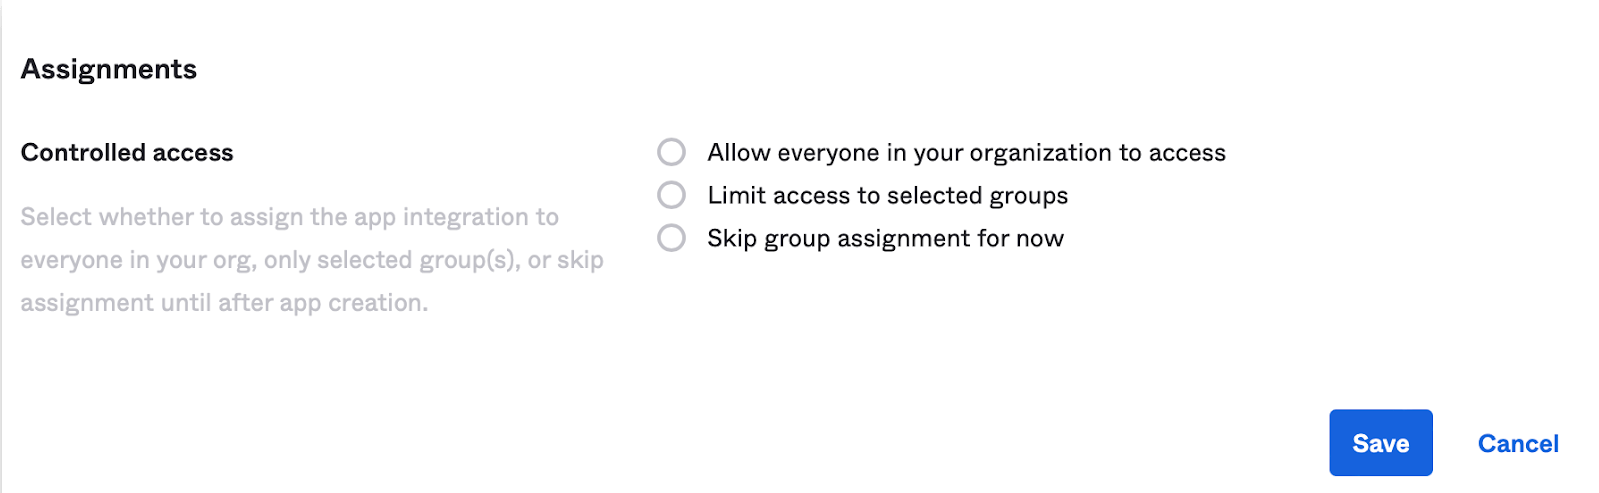
 In the Assignments section, select whether to assign the app integration to everyone in your org, only to selected groups, or skip assignment until after app creation.
Click **Save**.
In the Assignments section, select whether to assign the app integration to everyone in your org, only to selected groups, or skip assignment until after app creation.
Click **Save**.
 ### Collecting Configuration Details
Open a secure text document that you can use to store values for this OIDC app. You will need these details when you configure the Passport Library Item.
In the General tab of the OIDC application you just created, on the right side of the **Client ID** field, click the **copy icon** that looks like a clipboard.
### Collecting Configuration Details
Open a secure text document that you can use to store values for this OIDC app. You will need these details when you configure the Passport Library Item.
In the General tab of the OIDC application you just created, on the right side of the **Client ID** field, click the **copy icon** that looks like a clipboard.
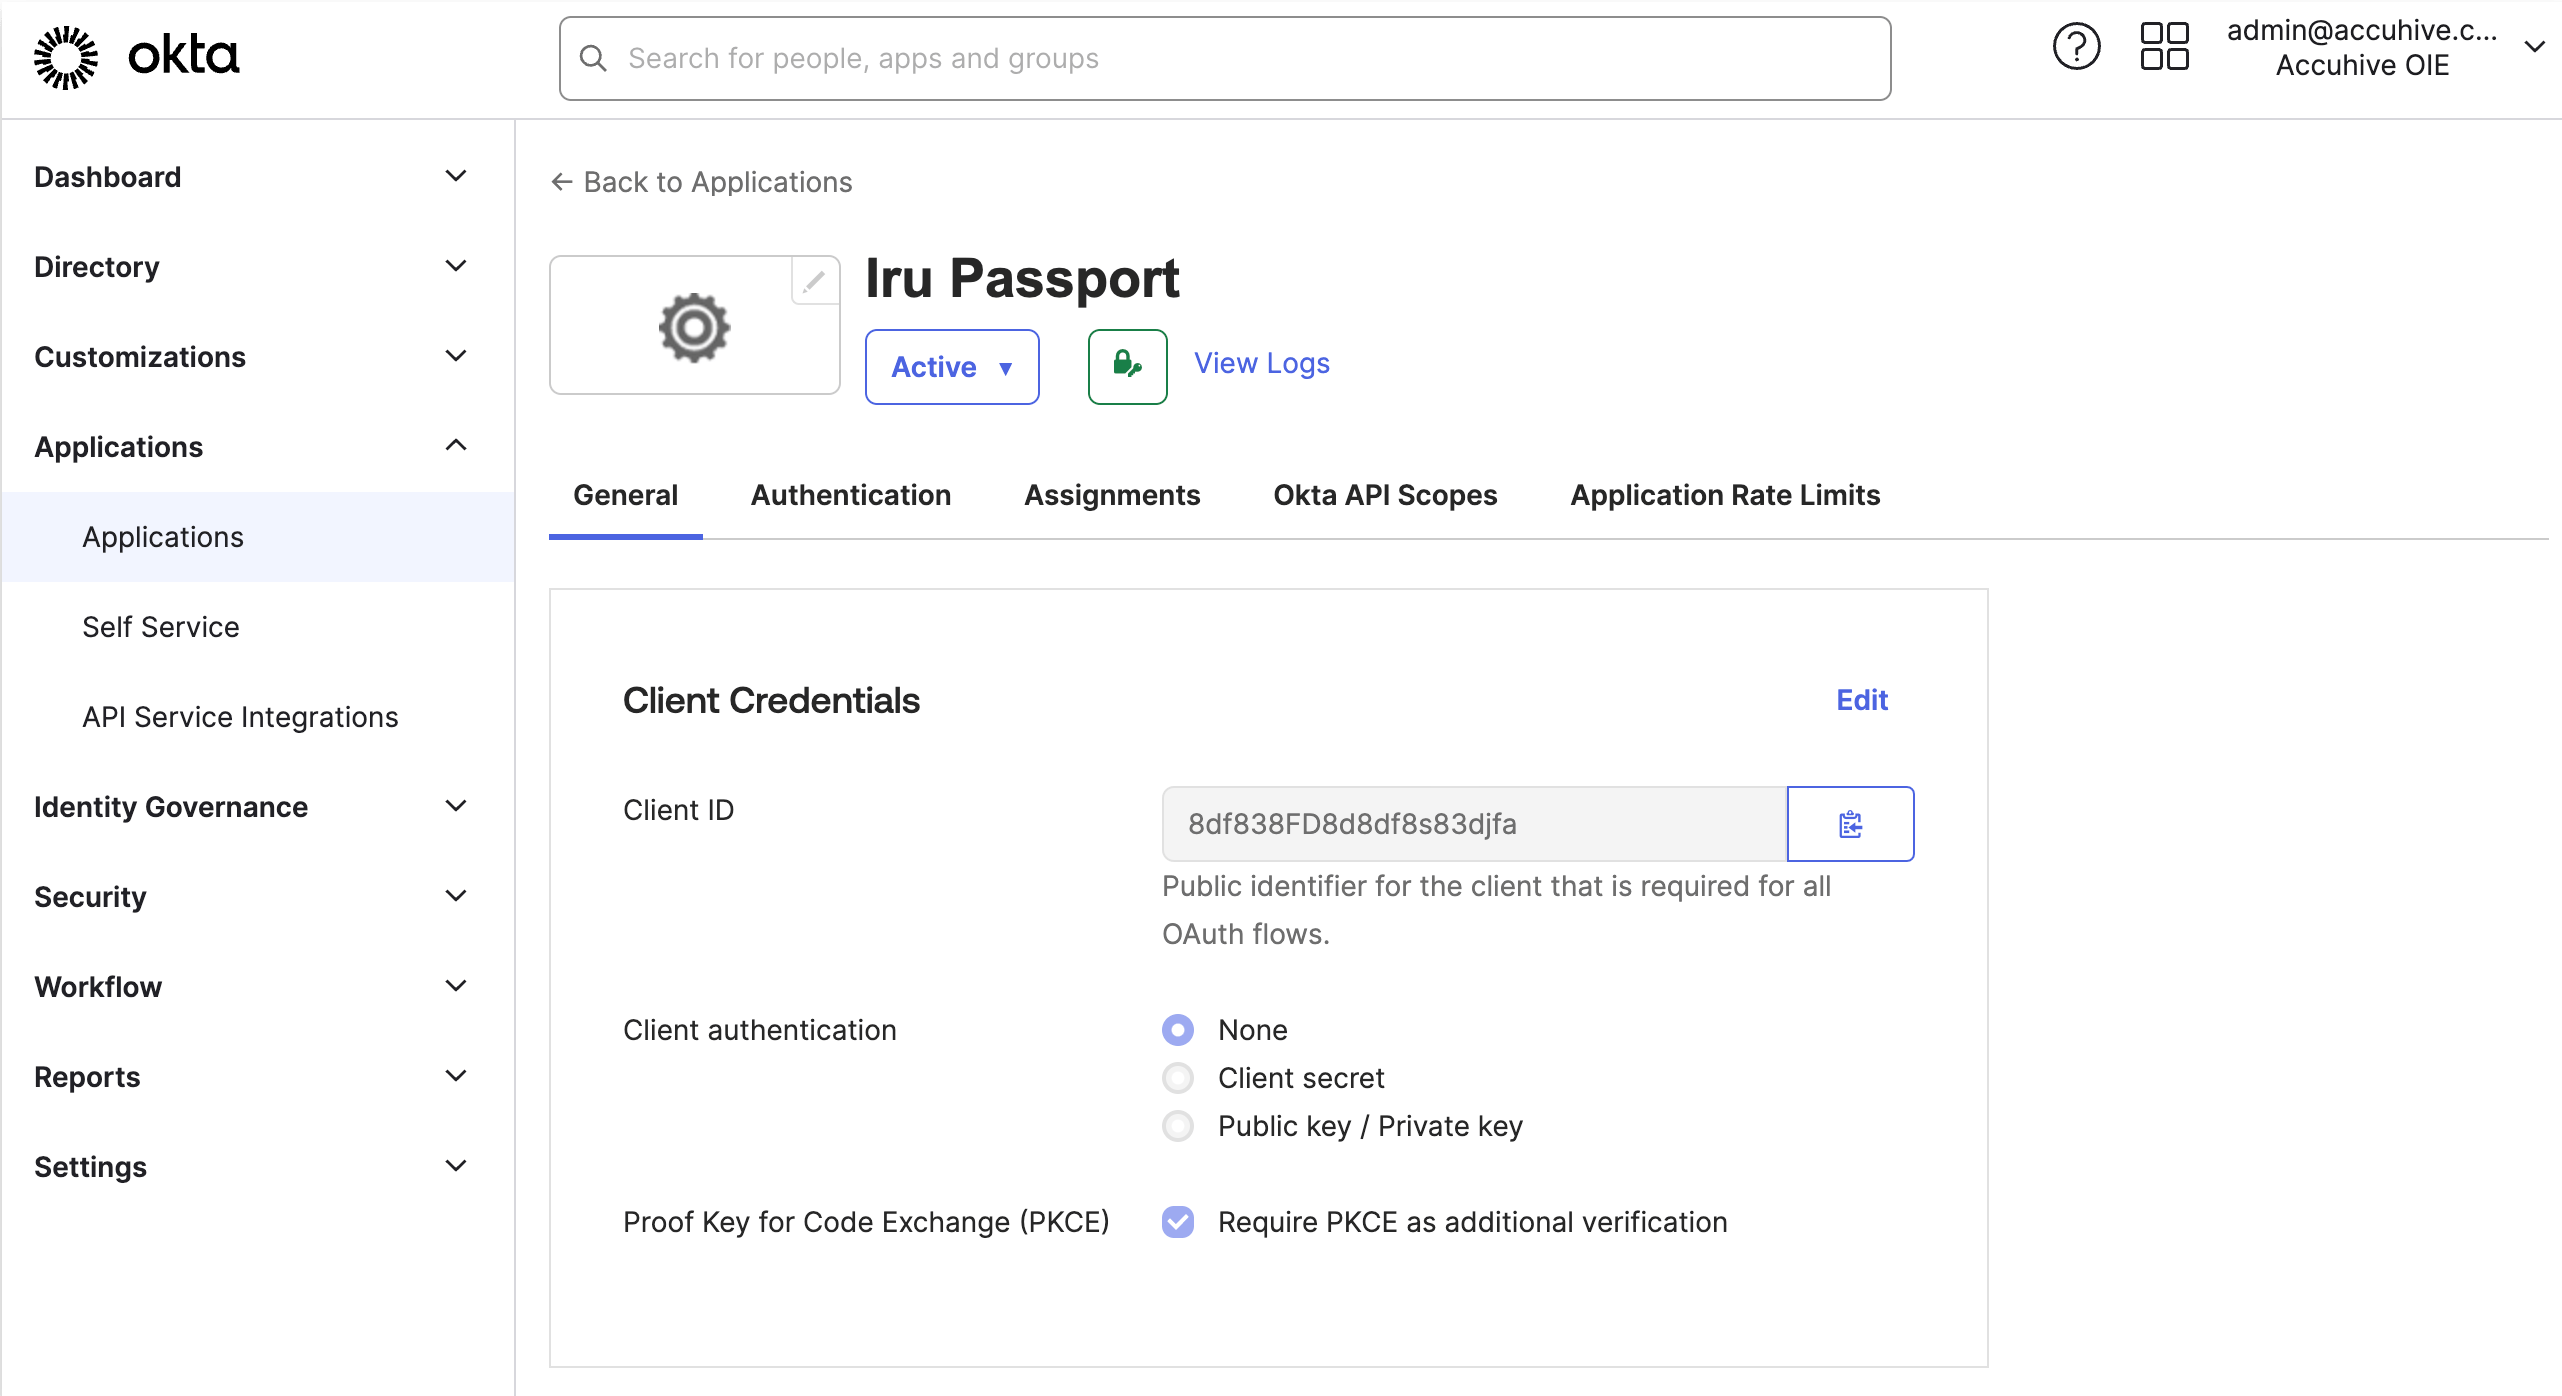 Paste the value into your secure text document.
Copy the formula for your **Identity provider URL** from the following text:
```
https://yourOktaDomain/.well-known/openid-configuration
```
Paste the text into your secure text document.
In your secure text document, replace yourOktaDomain with your Okta domain.
You do not need a custom Sign-On Policy Rule, but if you add one, ensure MFA is disabled.
If you do not need to configure MFA, open the [**Iru Endpoint** tab](#iru-endpoint). Follow [the next section](#enable-multi-factor-authentication) if you do need to configure MFA.
### Enable Multi-Factor Authentication
The MFA policy in Okta should be applied to Users or Groups, not to the Passport Application in Okta.
When you use MFA with Passport, update Okta and the Passport Library Item. For more on how they can differ, see Okta's [Differences Between Okta Classic and OIE](https://support.okta.com/help/s/article/Setting-Up-Okta-Verify-Differences-Between-Classic-and-Okta-Identity-Engine-OIE?language=en_US) article. Expand the section for your Okta engine, or use the [Okta Identity Engine](#okta-identity-engine) or [Classic Engine](#classic-engine) links.
**Okta Authenticators**
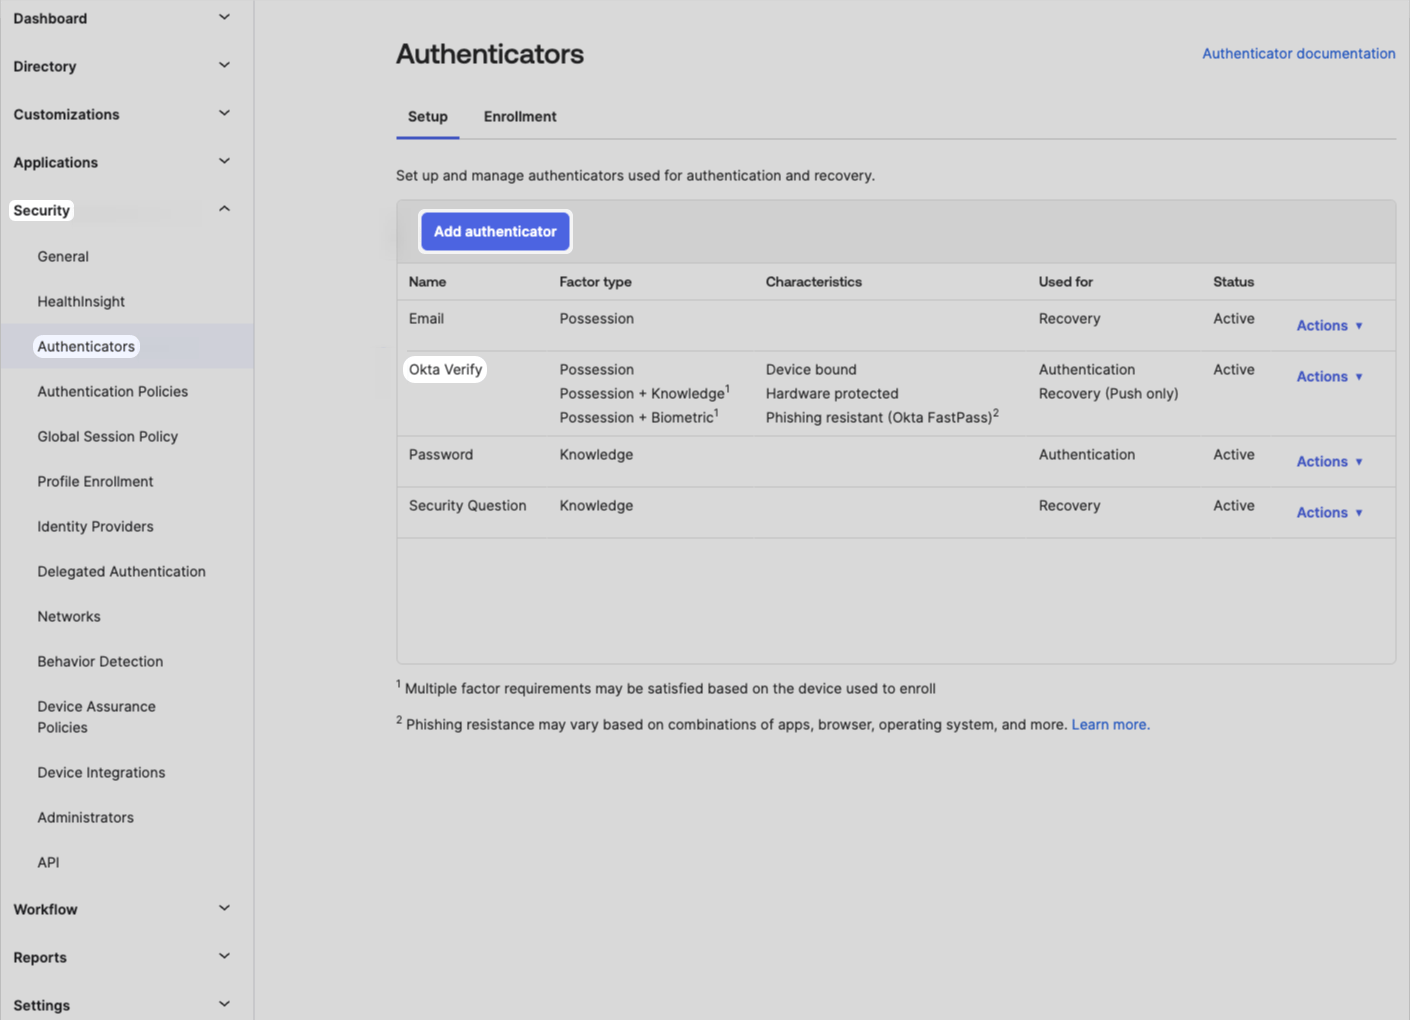
Expand the **Security** section from the left-hand navigation.
Click **Authenticators**.
Ensure that at least one multifactor authentication method, such as Okta Verify, is listed.
If no multifactor method is listed, click the **Add authenticator** button.
Paste the value into your secure text document.
Copy the formula for your **Identity provider URL** from the following text:
```
https://yourOktaDomain/.well-known/openid-configuration
```
Paste the text into your secure text document.
In your secure text document, replace yourOktaDomain with your Okta domain.
You do not need a custom Sign-On Policy Rule, but if you add one, ensure MFA is disabled.
If you do not need to configure MFA, open the [**Iru Endpoint** tab](#iru-endpoint). Follow [the next section](#enable-multi-factor-authentication) if you do need to configure MFA.
### Enable Multi-Factor Authentication
The MFA policy in Okta should be applied to Users or Groups, not to the Passport Application in Okta.
When you use MFA with Passport, update Okta and the Passport Library Item. For more on how they can differ, see Okta's [Differences Between Okta Classic and OIE](https://support.okta.com/help/s/article/Setting-Up-Okta-Verify-Differences-Between-Classic-and-Okta-Identity-Engine-OIE?language=en_US) article. Expand the section for your Okta engine, or use the [Okta Identity Engine](#okta-identity-engine) or [Classic Engine](#classic-engine) links.
**Okta Authenticators**
Expand the **Security** section from the left-hand navigation.
Click **Authenticators**.
Ensure that at least one multifactor authentication method, such as Okta Verify, is listed.
If no multifactor method is listed, click the **Add authenticator** button.
 Click the **Add** button below each authenticator you need.
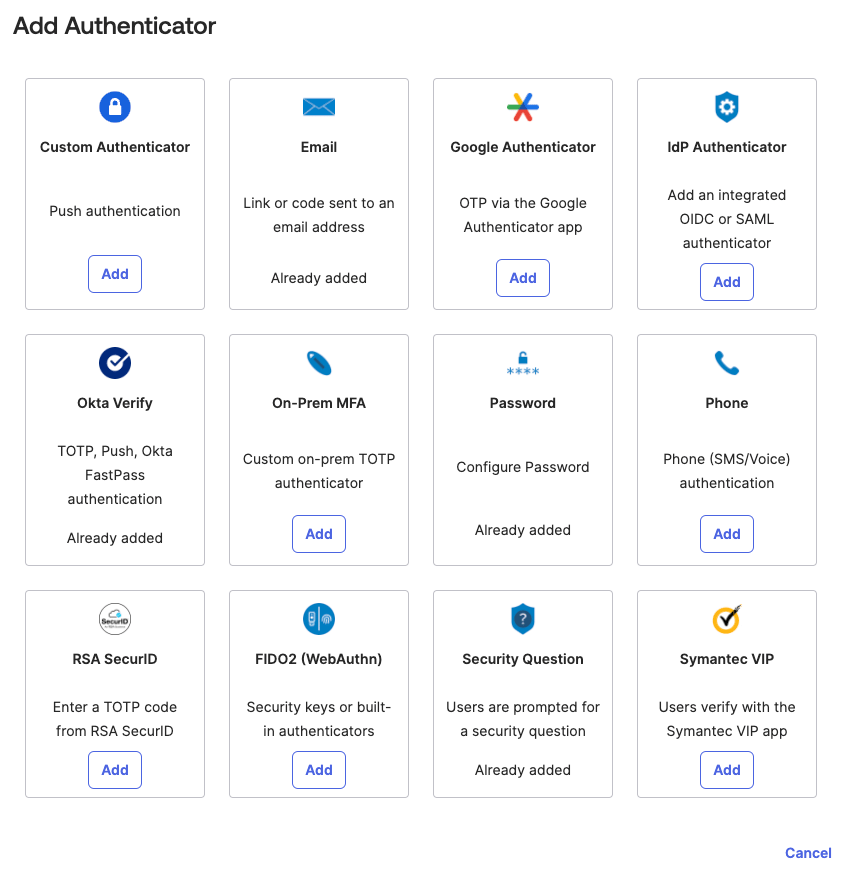 Complete any additional steps for the authenticator.
Click **Add**.
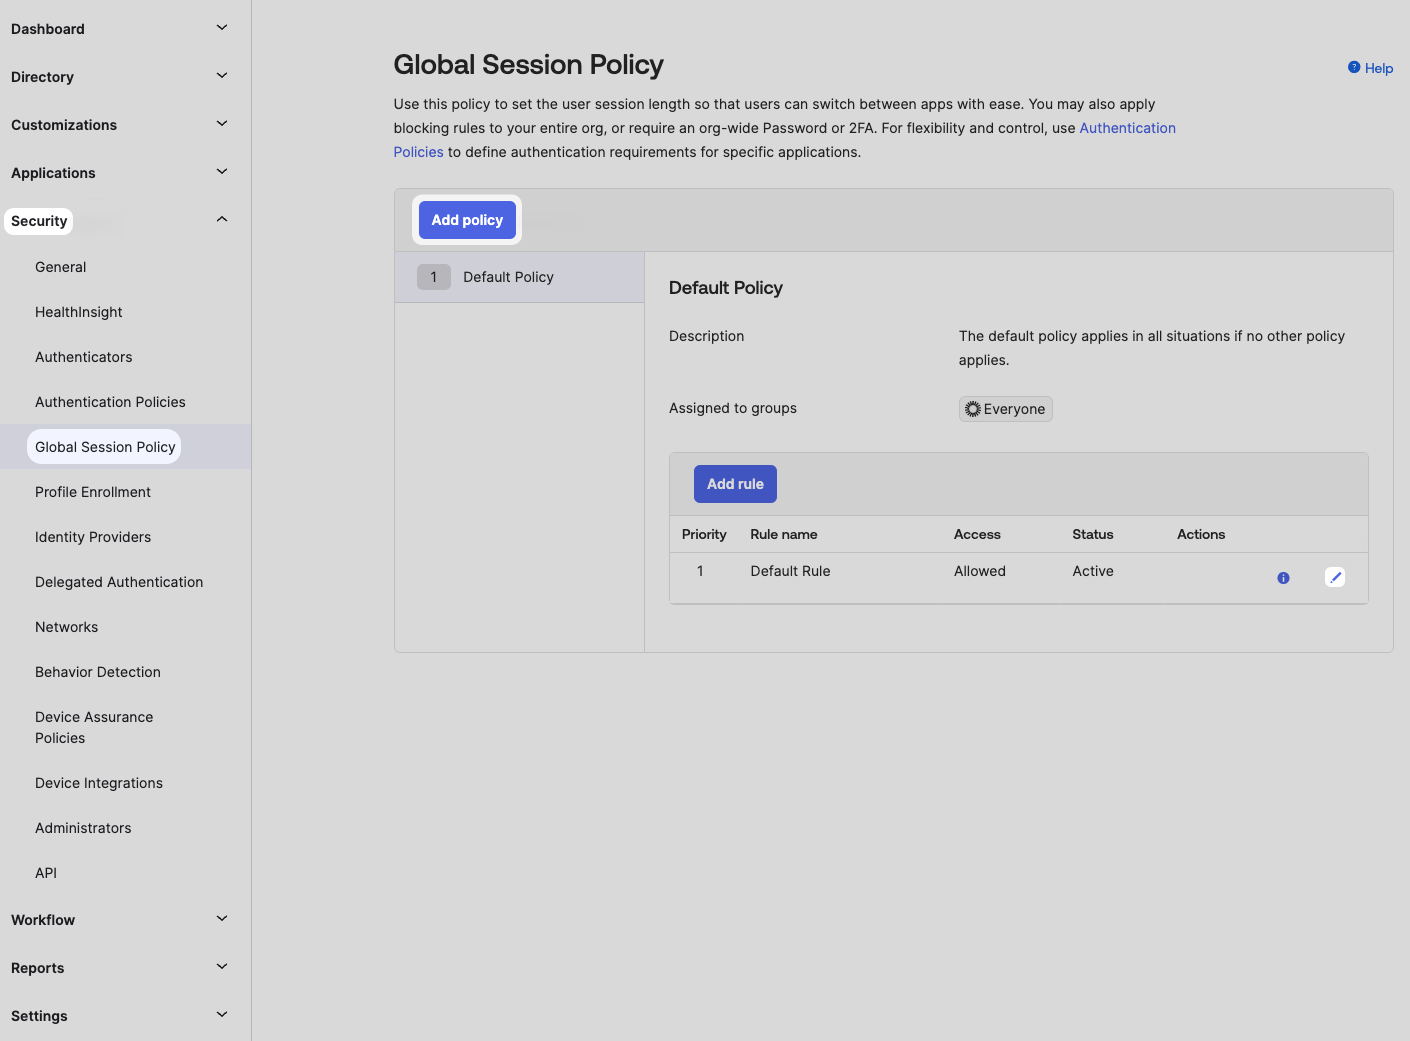
**Okta Global Session Policy**
Expand the **Security** section from the left-hand navigation.
Click **Global Session Policy**.
Click **Add policy** to create a new policy, or to edit the existing **Default Policy**, continue to the next step.
To edit the existing **Default Policy**, click the pencil icon in the **Actions** column for the Default Rule.
Complete any additional steps for the authenticator.
Click **Add**.
**Okta Global Session Policy**
Expand the **Security** section from the left-hand navigation.
Click **Global Session Policy**.
Click **Add policy** to create a new policy, or to edit the existing **Default Policy**, continue to the next step.
To edit the existing **Default Policy**, click the pencil icon in the **Actions** column for the Default Rule.
 Set multifactor authentication to **Required**.
Set **Users will be prompted for MFA** to **At every sign in**.
Set multifactor authentication to **Required**.
Set **Users will be prompted for MFA** to **At every sign in**.
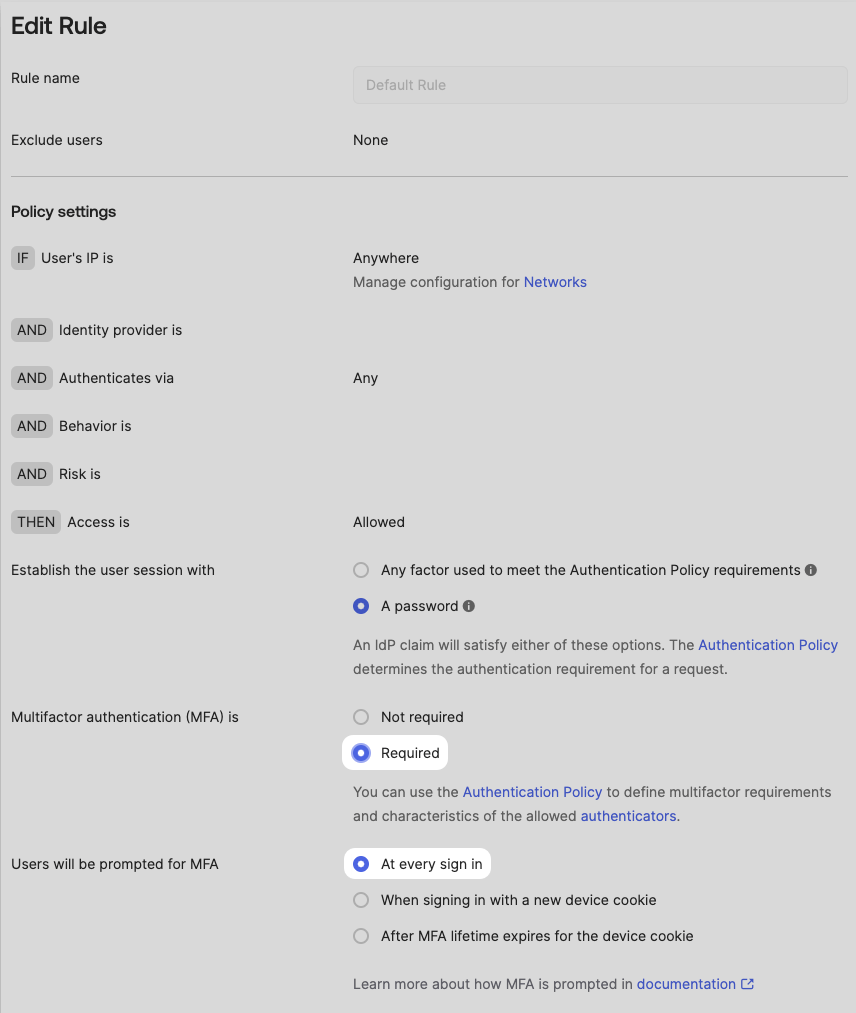 Scroll down and click **Update rule** or **Create rule**.
**Authentication Policies**
Expand the **Security** section from the left-hand navigation.
Click **Authentication Policies**.
Click **Applications**.
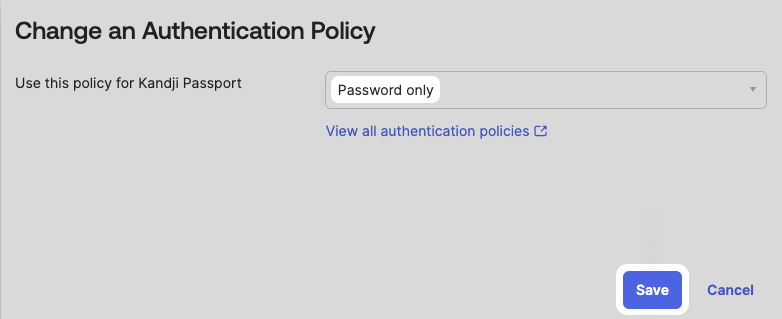
Click **Switch policy** next to your Iru Passport application.
Select **Password only** for the **Use this policy for Iru Passport** policy.
Click **Save**.
Scroll down and click **Update rule** or **Create rule**.
**Authentication Policies**
Expand the **Security** section from the left-hand navigation.
Click **Authentication Policies**.
Click **Applications**.
Click **Switch policy** next to your Iru Passport application.
Select **Password only** for the **Use this policy for Iru Passport** policy.
Click **Save**.
 **Okta MFA Settings**
Expand the **Security** section from the left-hand navigation.
Click **Authentication**.
Click **Sign On**.
Click **Add New Okta Sign-on Policy**.
**Okta MFA Settings**
Expand the **Security** section from the left-hand navigation.
Click **Authentication**.
Click **Sign On**.
Click **Add New Okta Sign-on Policy**.
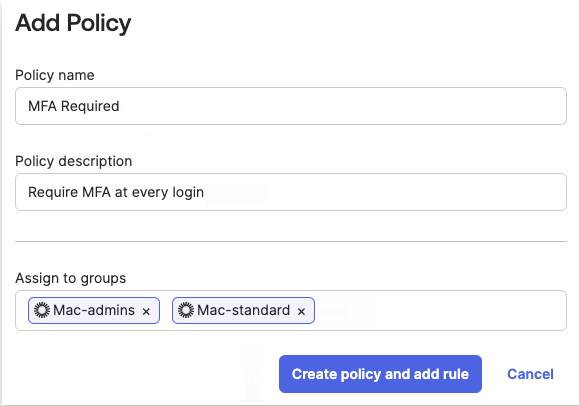
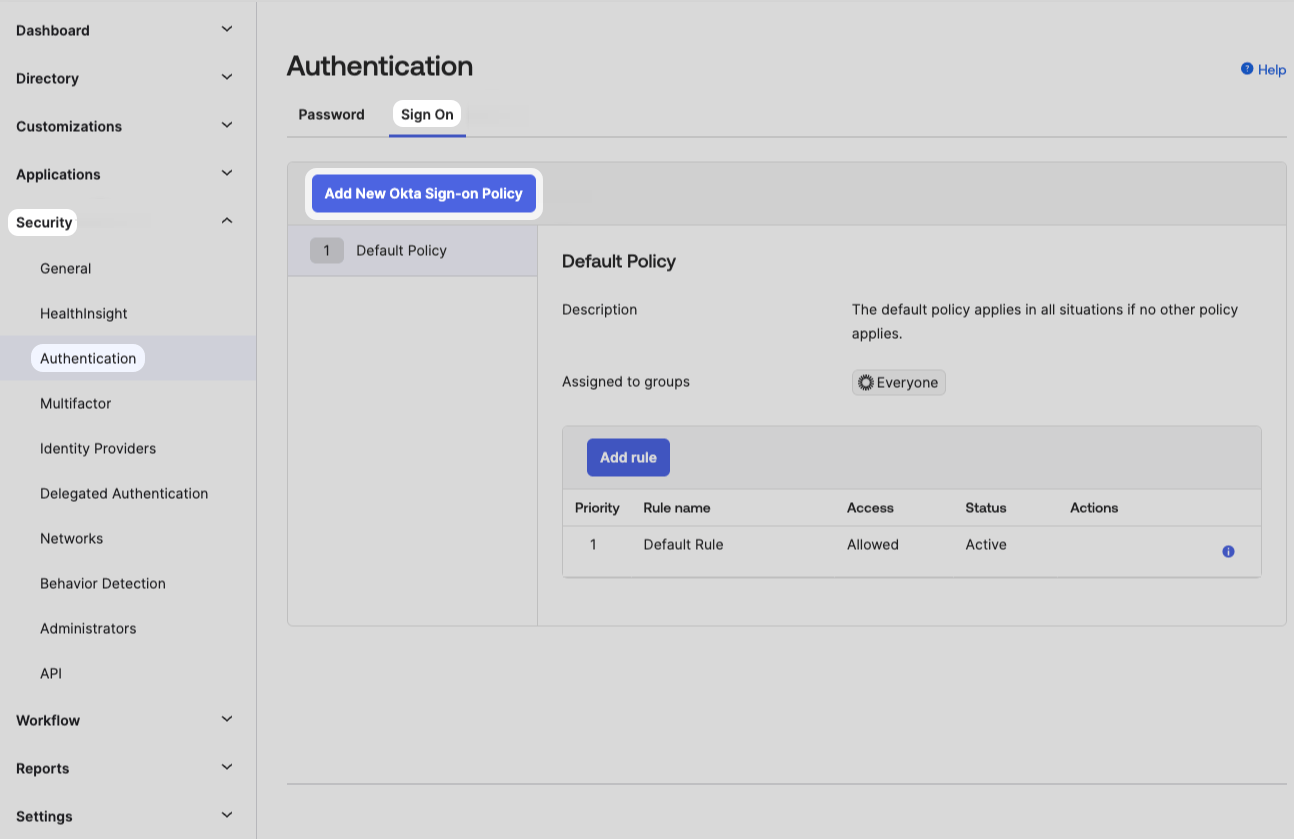 Enter a **Policy name** similar to MFA Required.
Enter a **Policy Description**.
Select the groups that will be assigned to this MFA requirement.
Click **Create policy and add rule**.
Enter a **Policy name** similar to MFA Required.
Enter a **Policy Description**.
Select the groups that will be assigned to this MFA requirement.
Click **Create policy and add rule**.
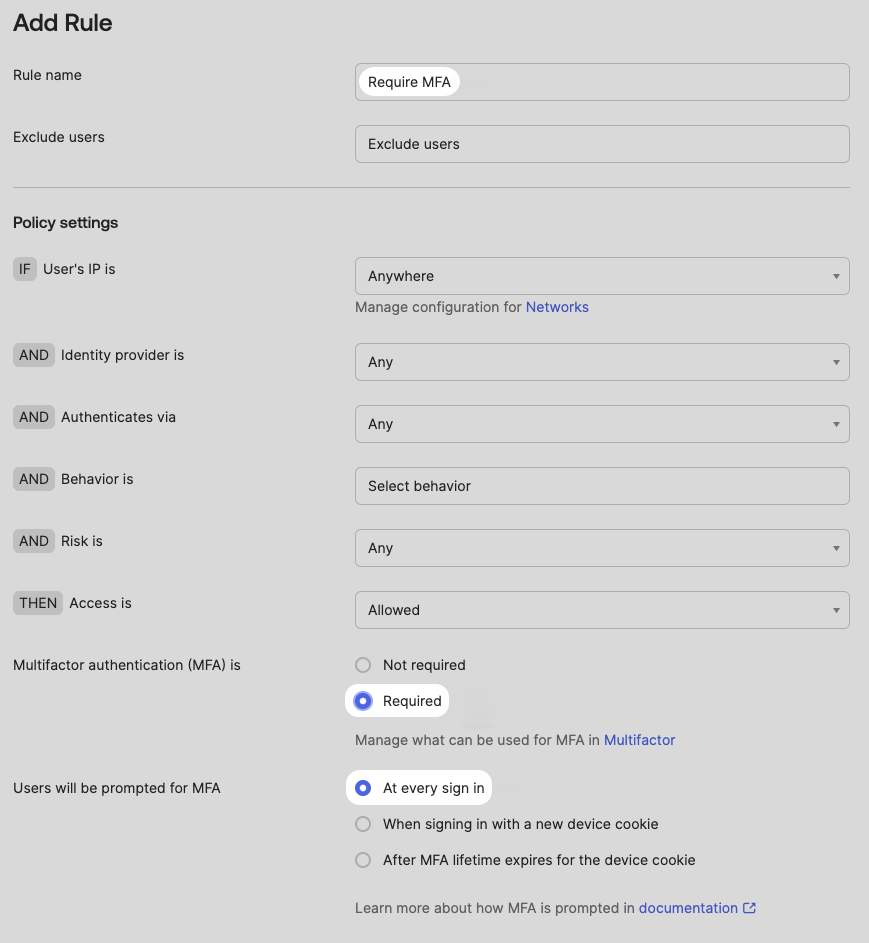
 Enter the **Rule name**.
Select **Required** for multifactor authentication.
Select **At every sign in** for the **Users will be prompted for MFA** setting.
Enter the **Rule name**.
Select **Required** for multifactor authentication.
Select **At every sign in** for the **Users will be prompted for MFA** setting.
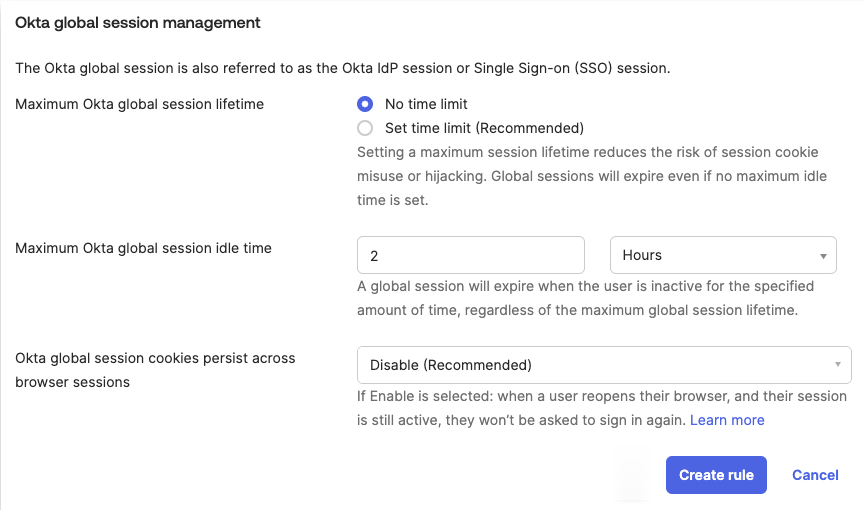
 Click **Create rule** at the bottom of the window.
 Switch to the [**Iru Endpoint** tab](#iru-endpoint) and work through the Passport Library Item steps there. Start at the top of that tab. When you are done, return to this tab and continue with **Configure the Group Claim Filter in Okta** below.
### Configure the Group Claim Filter in Okta
In your Passport OIDC application, configure the **Groups claim filter** so Okta sends the group claims Passport expects. This article uses names starting with *Mac-* as an example.
In your Okta Administrator Console, in the left menu pane, expand the Applications section if necessary, then select **Applications**.
Select the **Iru Passport** application that you previously created.
Click the **Sign On** tab.
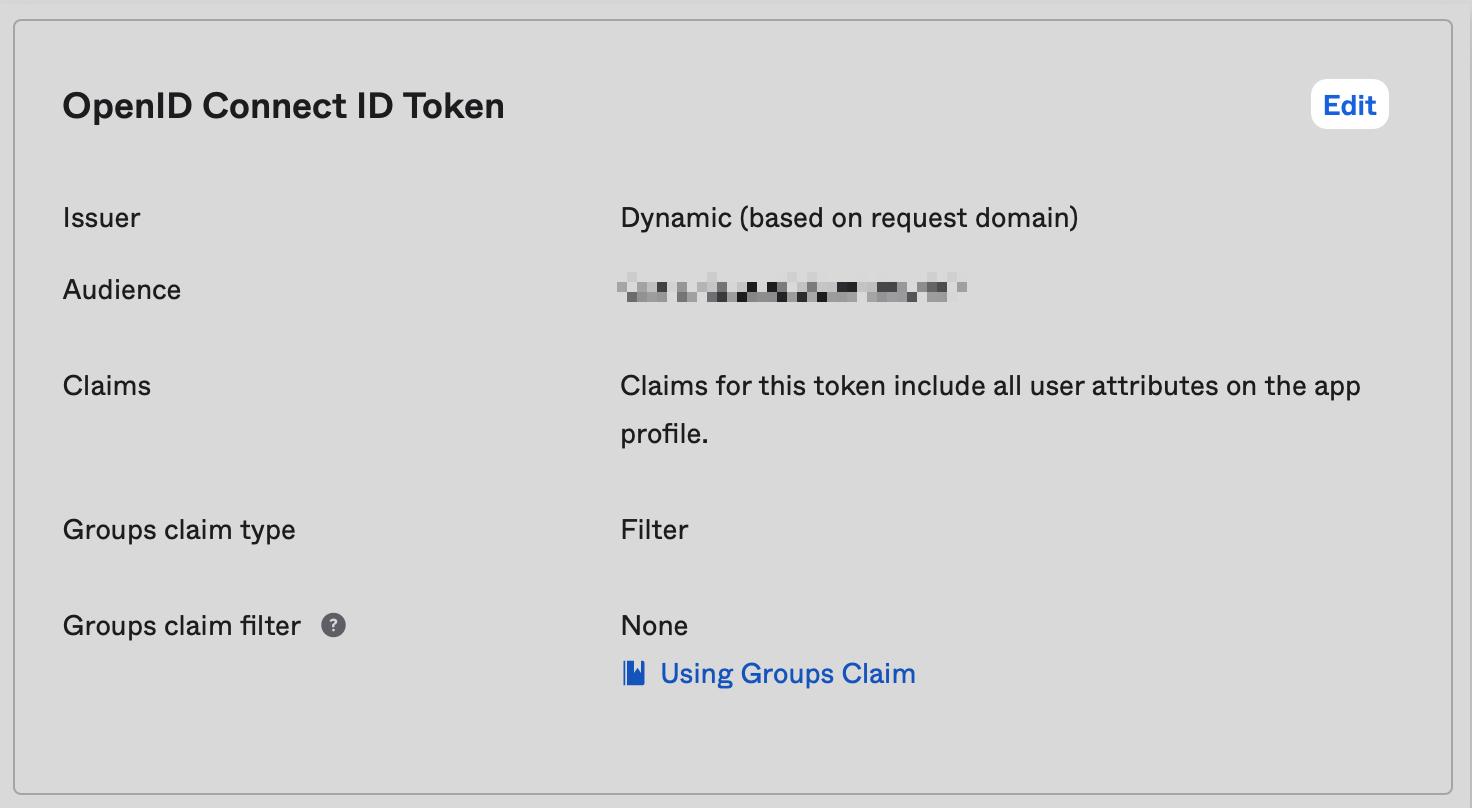
In the **OpenID Connect ID Token** section, click Edit.
Switch to the [**Iru Endpoint** tab](#iru-endpoint) and work through the Passport Library Item steps there. Start at the top of that tab. When you are done, return to this tab and continue with **Configure the Group Claim Filter in Okta** below.
### Configure the Group Claim Filter in Okta
In your Passport OIDC application, configure the **Groups claim filter** so Okta sends the group claims Passport expects. This article uses names starting with *Mac-* as an example.
In your Okta Administrator Console, in the left menu pane, expand the Applications section if necessary, then select **Applications**.
Select the **Iru Passport** application that you previously created.
Click the **Sign On** tab.
In the **OpenID Connect ID Token** section, click Edit.
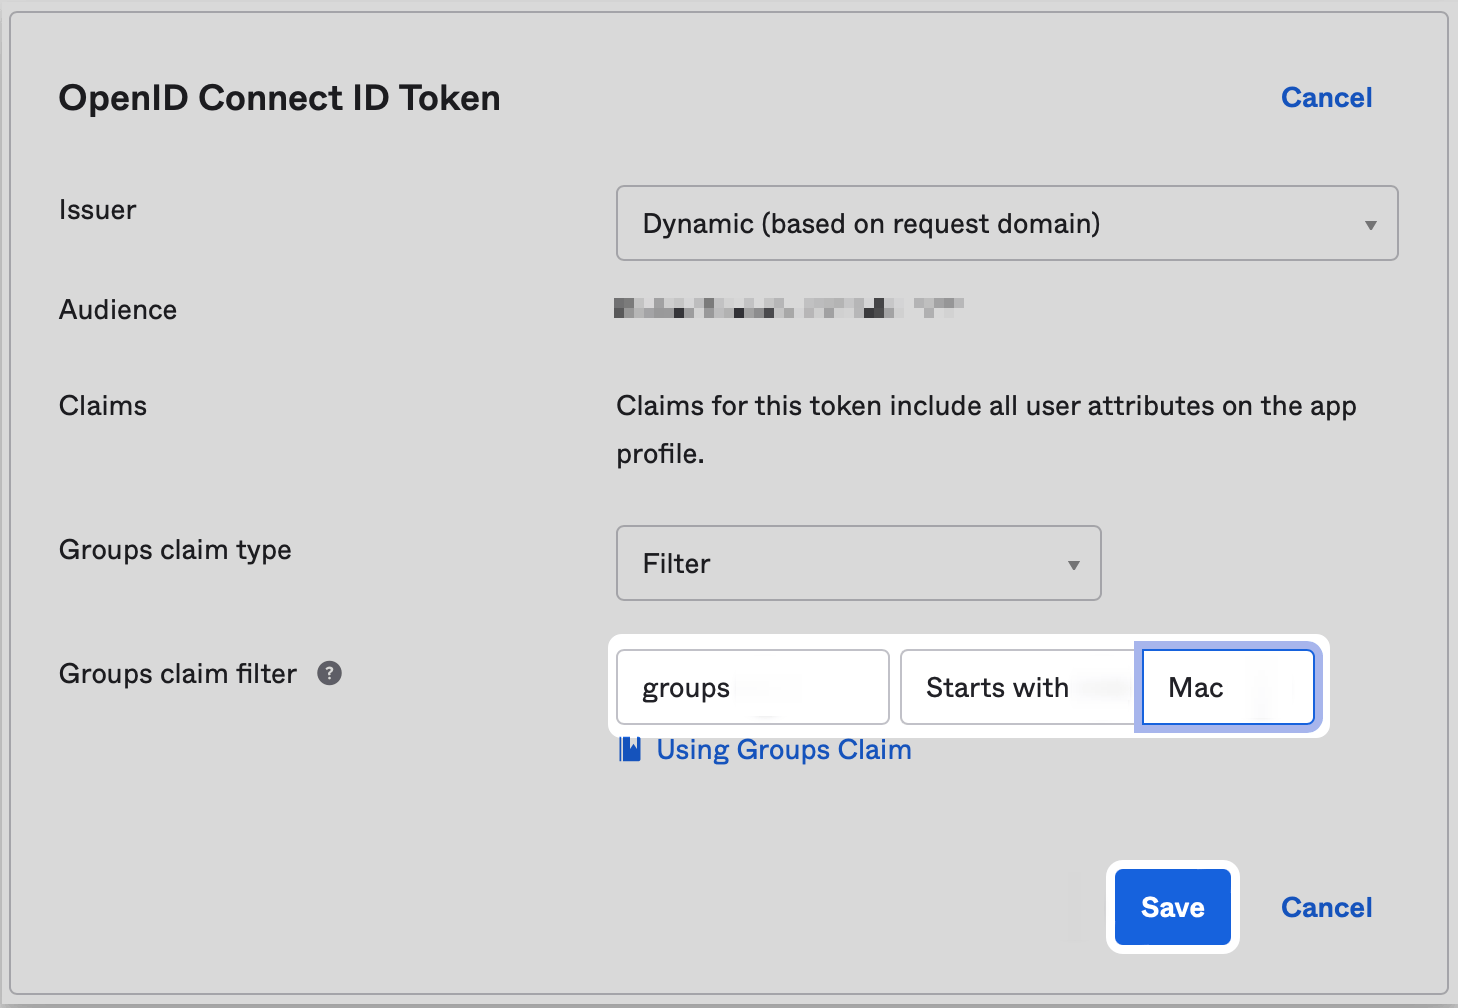
 In the **Groups claim filter** section, leave the default value: **groups**.
Leave the middle field at the default: **Starts with**.
In the right-most field, enter **Mac** if the Okta groups you use or will use start with **Mac**.
Click **Save**.
In the **Groups claim filter** section, leave the default value: **groups**.
Leave the middle field at the default: **Starts with**.
In the right-most field, enter **Mac** if the Okta groups you use or will use start with **Mac**.
Click **Save**.
 If you have not already, use [Configure the Passport Library Item](/en/endpoint/library/passport/configure-the-passport-library-item) to add the Passport Library Item and basic settings. The steps below are the **Iru Endpoint** configuration specific to Okta Passport.
### Authentication Mode
Set **Authentication mode** in the Passport Library Item to match how users sign in with Okta. Use **Web Login** when MFA applies, and **Mac Login** when it does not.
Complete the steps below first, using the values you collected on the **Okta** tab. Then follow **Web Login** or **Mac Login**.
In the Passport Library Item, set **Identity provider** to **Okta**.
In the **Identity provider URL** field, enter your Okta OIDC well-known configuration URL from the **Okta** tab. It follows this pattern:
```bash theme={null}
https://{yourOktaDomain}/.well-known/openid-configuration
```
In the **Client ID (Password Sync)** field, enter the **Application ID** (client ID) from the OIDC app on the **Okta** tab.
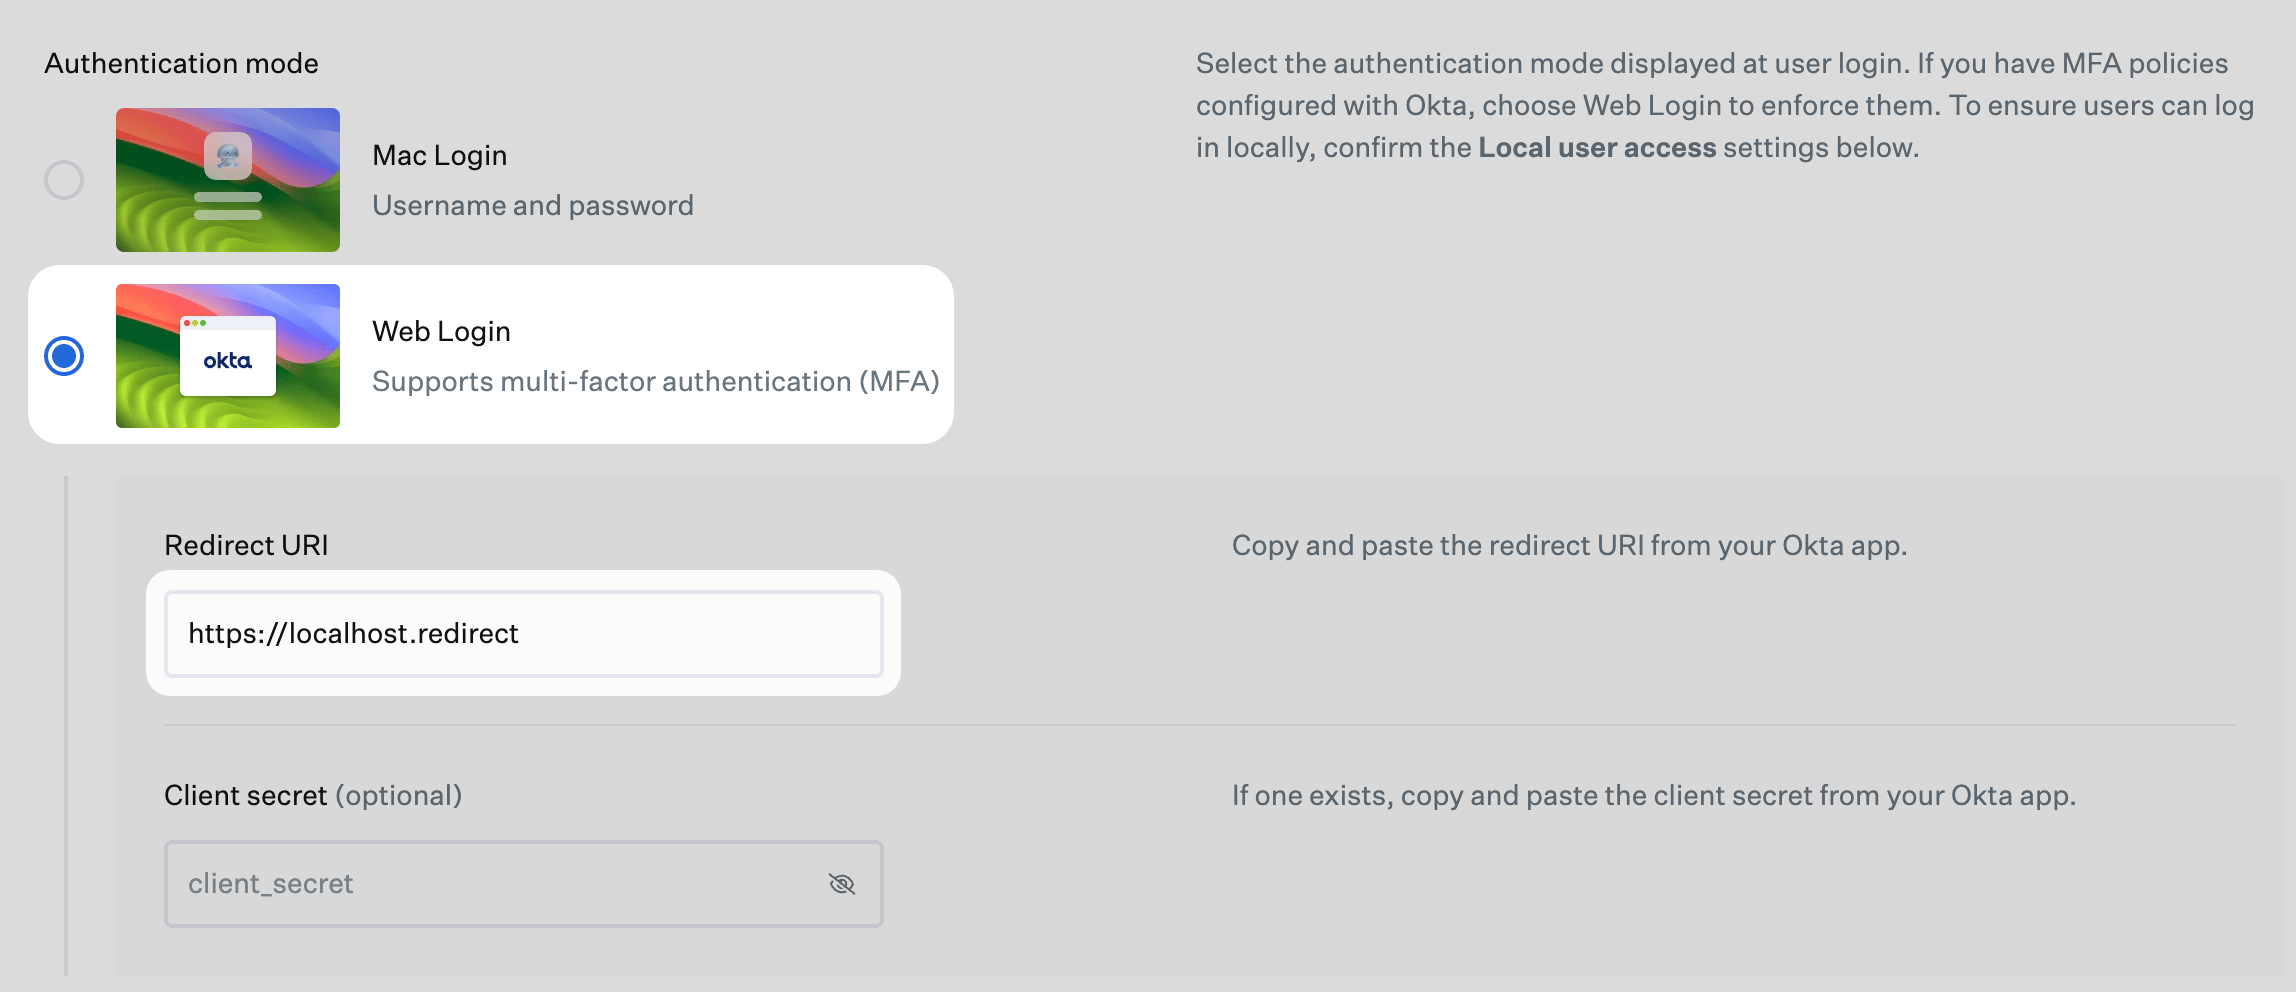
#### Web Login
If you use multi-factor authentication with Passport, you must use **Web Login** as the authentication mode so users can complete MFA during sign-in.
Under **Authentication mode**, select **Web Login**.
In the **Redirect URI** field, enter the following:
```
https://localhost.redirect
```
If you have not already, use [Configure the Passport Library Item](/en/endpoint/library/passport/configure-the-passport-library-item) to add the Passport Library Item and basic settings. The steps below are the **Iru Endpoint** configuration specific to Okta Passport.
### Authentication Mode
Set **Authentication mode** in the Passport Library Item to match how users sign in with Okta. Use **Web Login** when MFA applies, and **Mac Login** when it does not.
Complete the steps below first, using the values you collected on the **Okta** tab. Then follow **Web Login** or **Mac Login**.
In the Passport Library Item, set **Identity provider** to **Okta**.
In the **Identity provider URL** field, enter your Okta OIDC well-known configuration URL from the **Okta** tab. It follows this pattern:
```bash theme={null}
https://{yourOktaDomain}/.well-known/openid-configuration
```
In the **Client ID (Password Sync)** field, enter the **Application ID** (client ID) from the OIDC app on the **Okta** tab.
#### Web Login
If you use multi-factor authentication with Passport, you must use **Web Login** as the authentication mode so users can complete MFA during sign-in.
Under **Authentication mode**, select **Web Login**.
In the **Redirect URI** field, enter the following:
```
https://localhost.redirect
```
 Click **Save**.
#### Mac Login
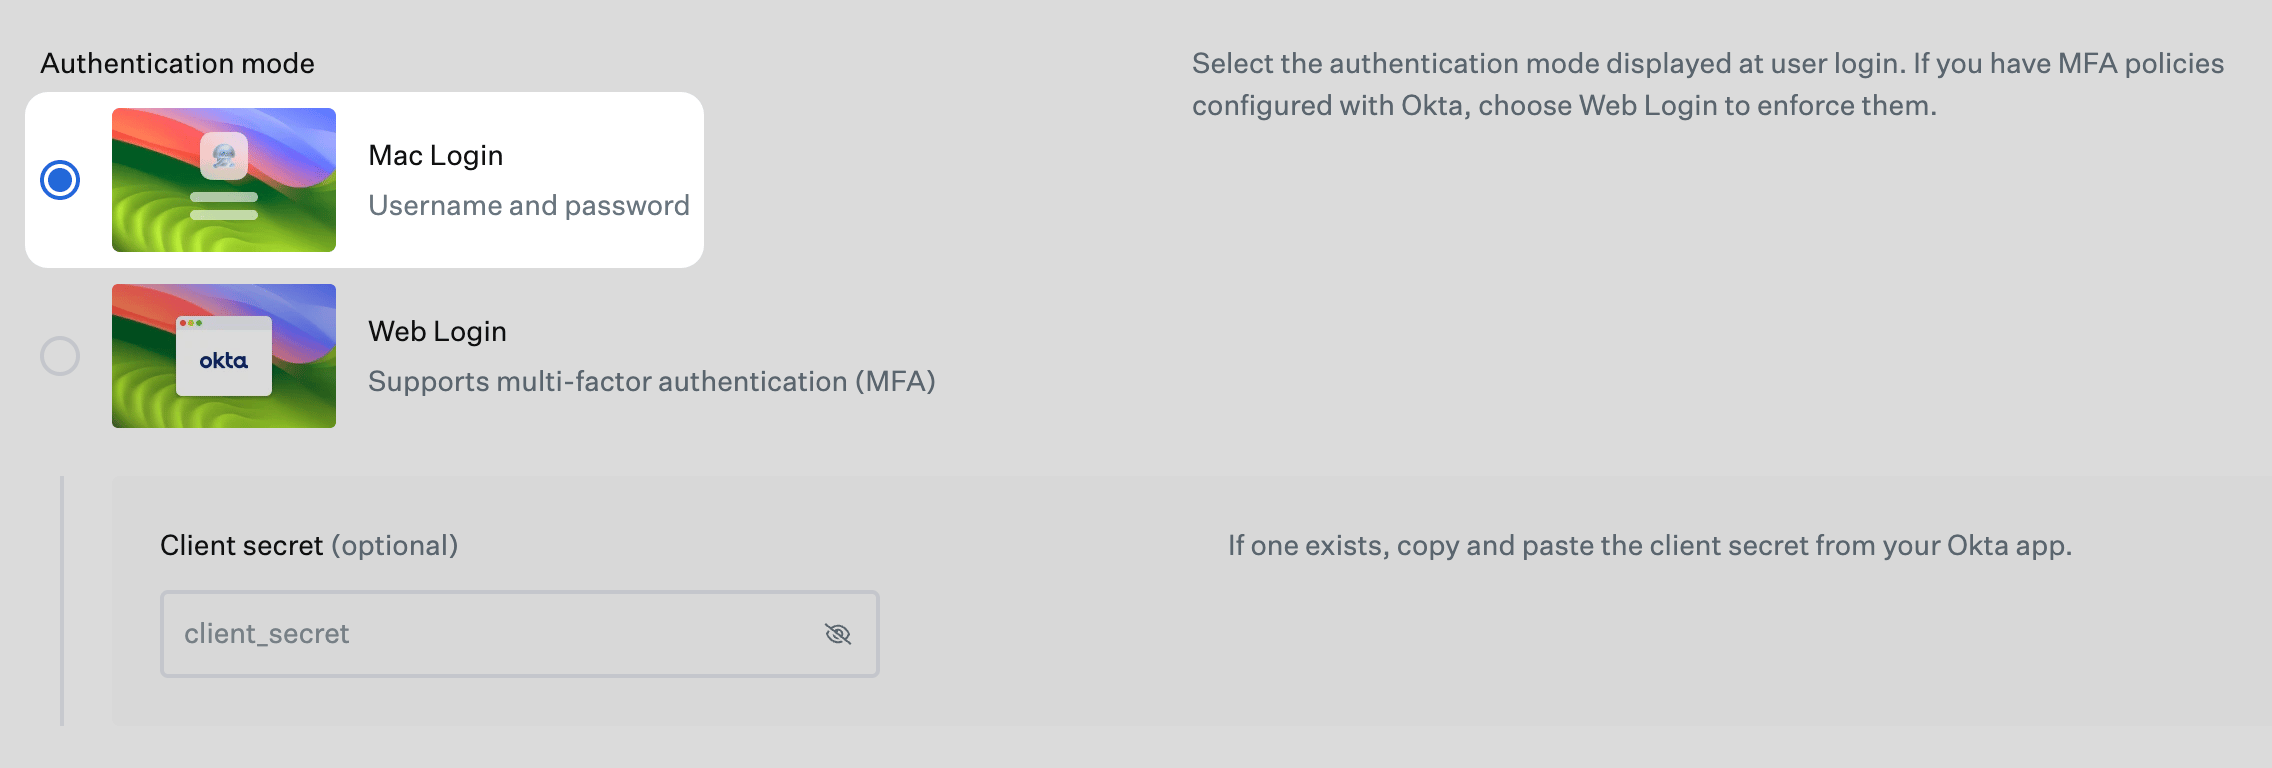
If you are not using MFA with Passport, use **Mac Login** as the authentication mode. Users sign in with their Okta password at the Mac login window without the Web Login MFA flow.
Under **Authentication mode**, select **Mac Login**.
Click **Save**.
#### Mac Login
If you are not using MFA with Passport, use **Mac Login** as the authentication mode. Users sign in with their Okta password at the Mac login window without the Web Login MFA flow.
Under **Authentication mode**, select **Mac Login**.
 Click **Save**.
### User Provisioning
If you want Passport to set each user's Mac account type from Okta group membership, use the **User provisioning** steps below on the Passport Library Item [**Iru Endpoint** tab](#iru-endpoint). The groups you use in Okta do not have to start with *Mac-*, but the example groups in this article use that prefix.
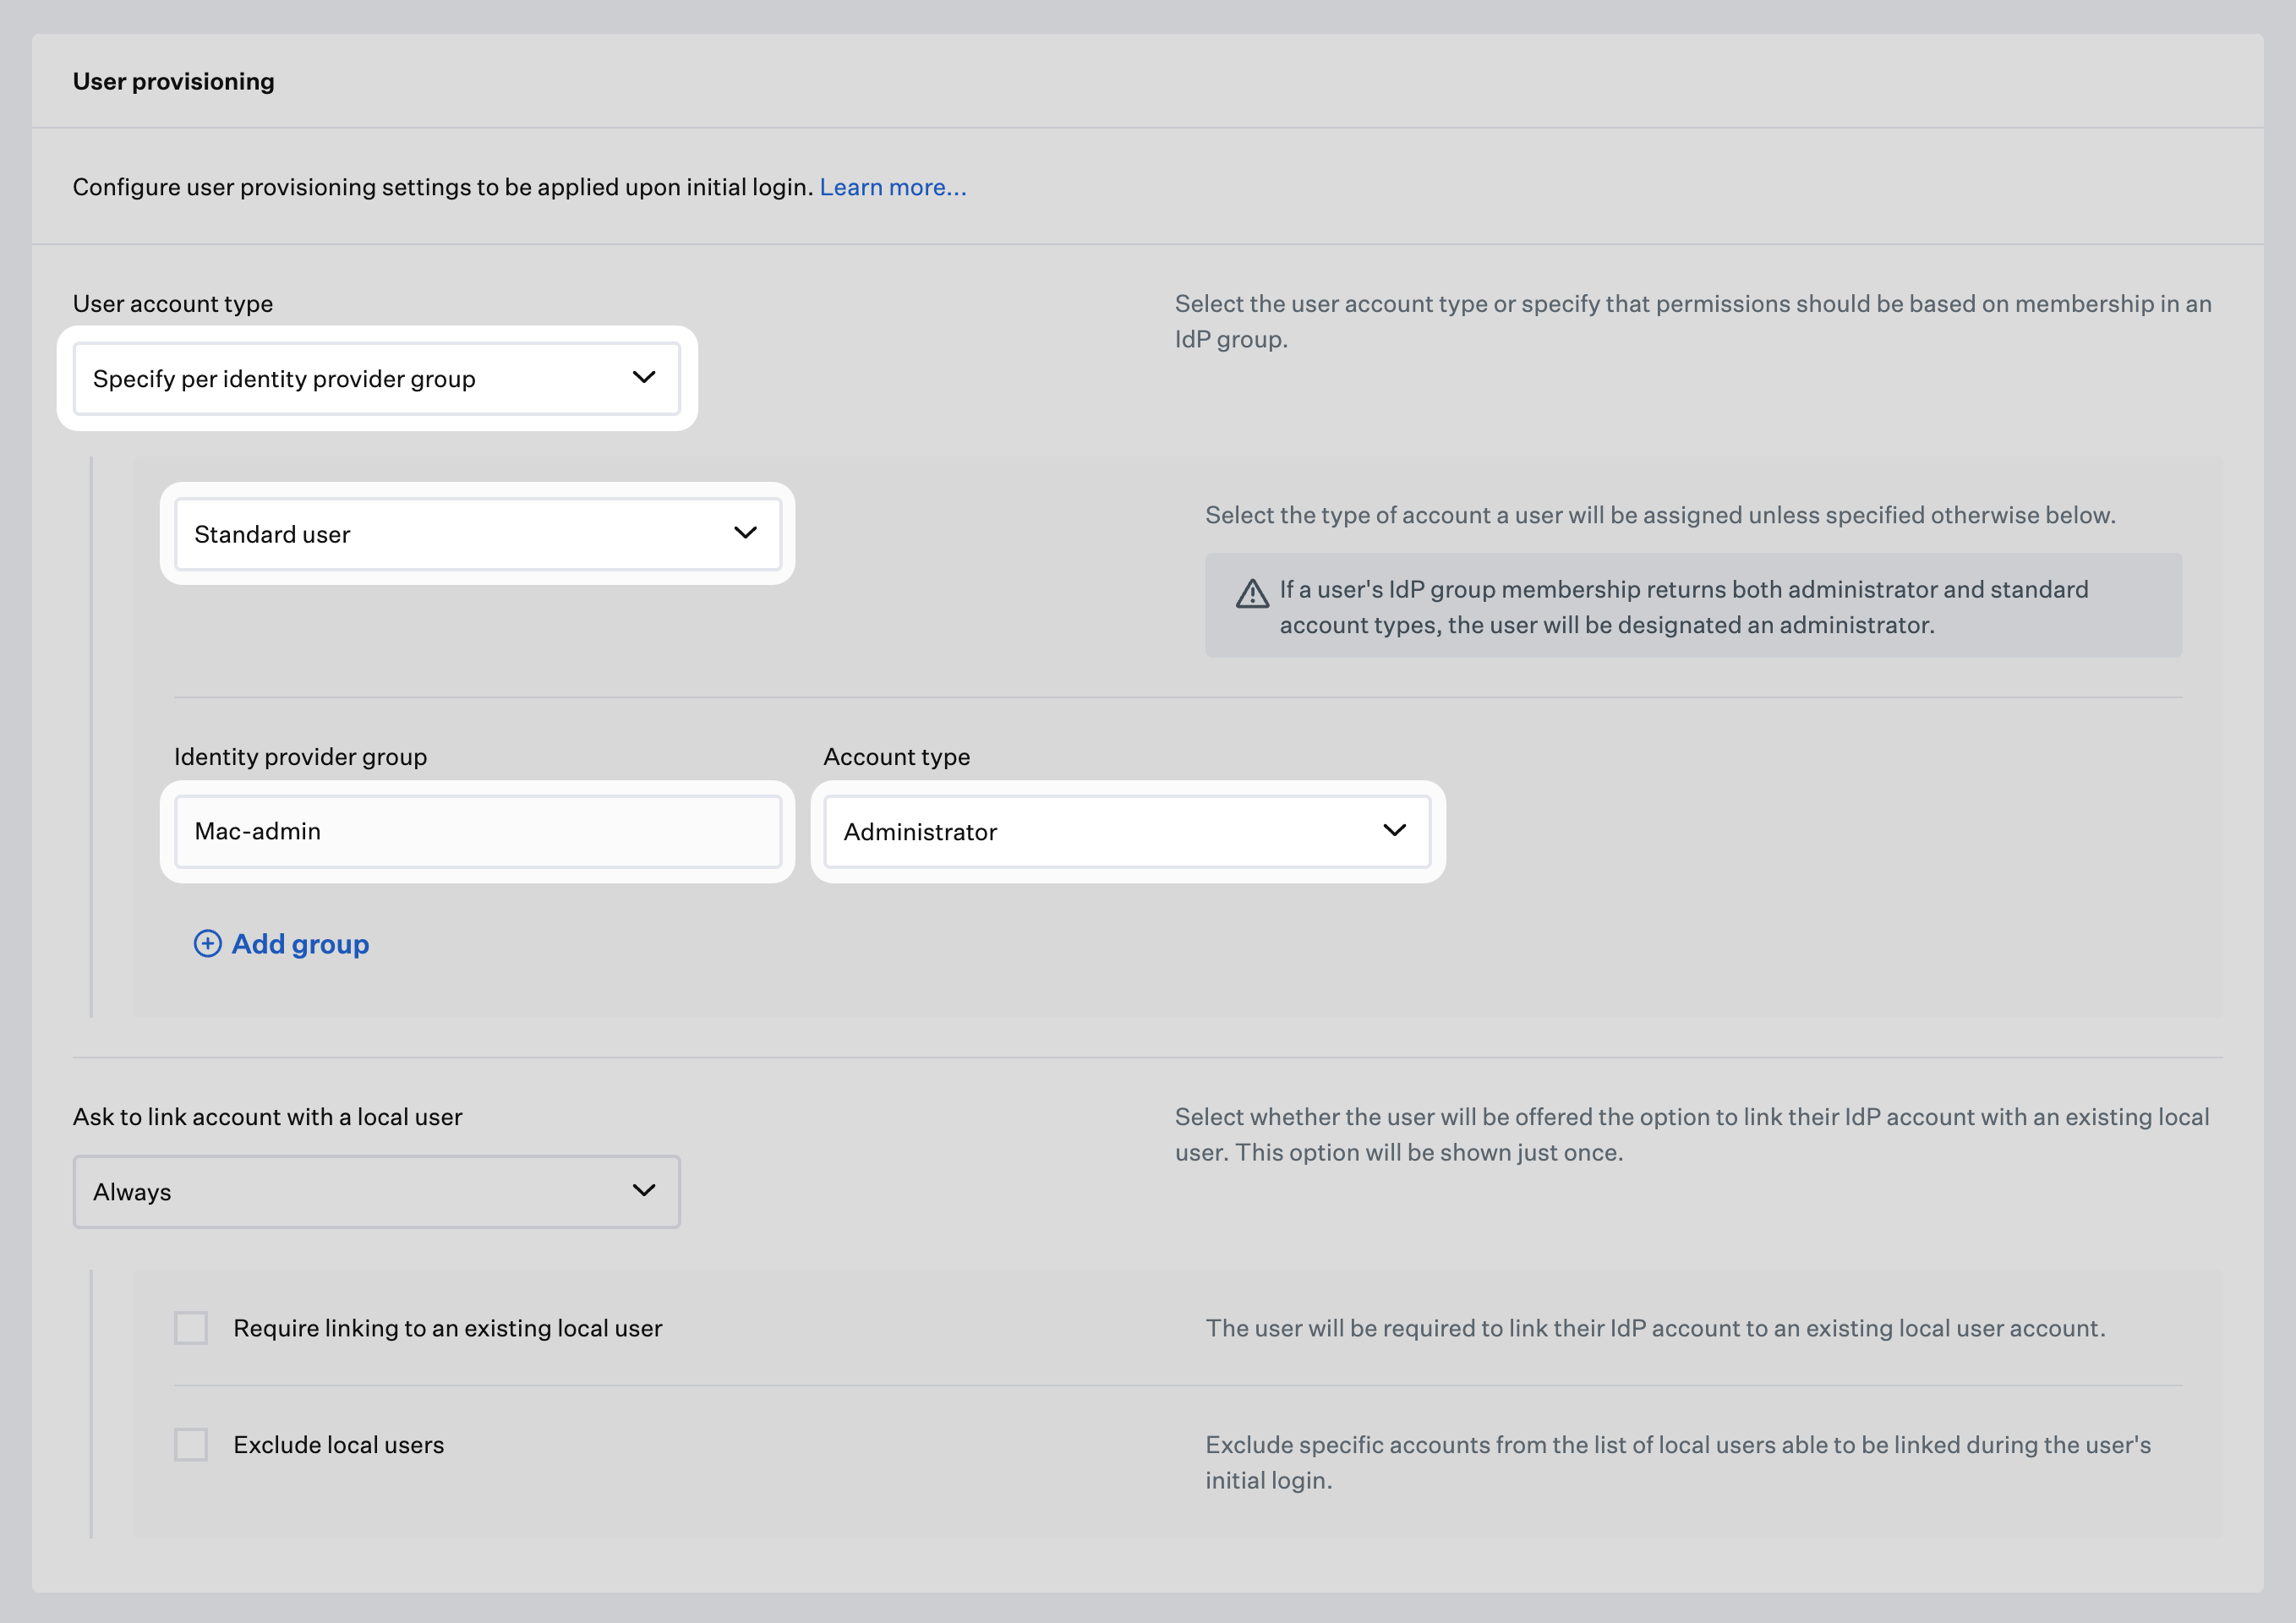
In the Passport Library Item, click the User account type menu in the User provisioning section and select **Specify per identity provider group**.
With **User account type** set to **Specify per identity provider group**, open the account type drop-down below it and select Administrator or Standard user. If a user's IdP group membership returns both Administrator and Standard account types, the user is designated an Administrator.
In the **Identity provider group** fields, enter your Okta group names. This article uses groups that start with *Mac-* as an example.
For each **Identity provider group** row, set the **Account type** as appropriate.
Click **Save**.
### User Provisioning
If you want Passport to set each user's Mac account type from Okta group membership, use the **User provisioning** steps below on the Passport Library Item [**Iru Endpoint** tab](#iru-endpoint). The groups you use in Okta do not have to start with *Mac-*, but the example groups in this article use that prefix.
In the Passport Library Item, click the User account type menu in the User provisioning section and select **Specify per identity provider group**.
With **User account type** set to **Specify per identity provider group**, open the account type drop-down below it and select Administrator or Standard user. If a user's IdP group membership returns both Administrator and Standard account types, the user is designated an Administrator.
In the **Identity provider group** fields, enter your Okta group names. This article uses groups that start with *Mac-* as an example.
For each **Identity provider group** row, set the **Account type** as appropriate.
 When **User provisioning** and related saves are complete in the Passport Library Item, switch back to the **Okta** tab and complete [Configure the Group Claim Filter in Okta](#configure-the-group-claim-filter-in-okta) if you have not already. Start at the top of that tab if you need the full flow.
### Troubleshooting Issues with Passport & Okta
If you experience any issues with Passport & Okta, read our [Passport Troubleshooting with Okta](/en/endpoint/library/passport/okta/passport-troubleshooting-with-okta) article for additional information.
When **User provisioning** and related saves are complete in the Passport Library Item, switch back to the **Okta** tab and complete [Configure the Group Claim Filter in Okta](#configure-the-group-claim-filter-in-okta) if you have not already. Start at the top of that tab if you need the full flow.
### Troubleshooting Issues with Passport & Okta
If you experience any issues with Passport & Okta, read our [Passport Troubleshooting with Okta](/en/endpoint/library/passport/okta/passport-troubleshooting-with-okta) article for additional information.