> ## Documentation Index
> Fetch the complete documentation index at: https://docs.iru.com/llms.txt
> Use this file to discover all available pages before exploring further.
# Configure Passport Web Login with Microsoft Entra ID
> Configure Passport with Microsoft Entra ID Web Login in Iru Endpoint. Set up browser-based Entra authentication for macOS password synchronization.
This guide applies to Mac computers
### About Passport with Microsoft Entra ID Web Login
Passport with Microsoft Entra ID Web Login signs users in through a web view of your organization’s Microsoft Entra ID sign-in page, so Conditional Access and MFA can run at login. For Mac Login (username and password at the Mac login window without that web view), use [Configure Passport with Microsoft Entra ID - Mac Login](/en/endpoint/library/passport/microsoft-entra-id/configure-passport-with-microsoft-entra-id-mac-login).
Starting **June 15, 2026**, Microsoft Entra ID handles Conditional Access for Passport sign-in differently. Existing Passport **Web Login** deployments need updates only in some cases. See [Required changes before June 15, 2026](#june-2026-conditional-access-change). Microsoft explains the change in [this documentation](https://learn.microsoft.com/en-us/entra/identity/conditional-access/concept-enforcement-resource-exclusions).
If you are setting up Passport for the first time, continue from the beginning of this article. The setup instructions already include these updates where they apply.
### How It Works
Passport integrates with your Microsoft Entra ID tenant at the macOS login screen. In Web Login mode, users complete Entra ID sign-in (including MFA when required) in that web view before the local Mac session is created or updated.
### Prerequisites
* Access to a Microsoft Entra ID admin account that can grant the Passport app the correct permissions.
* For MFA settings in Microsoft Entra ID, see [Microsoft's MFA configuration guide](https://learn.microsoft.com/en-us/entra/identity/authentication/howto-mfa-mfasettings).
### Create the App Registration
Sign in to the [Microsoft Entra admin center](https://entra.microsoft.com) using a Global Administrator account.
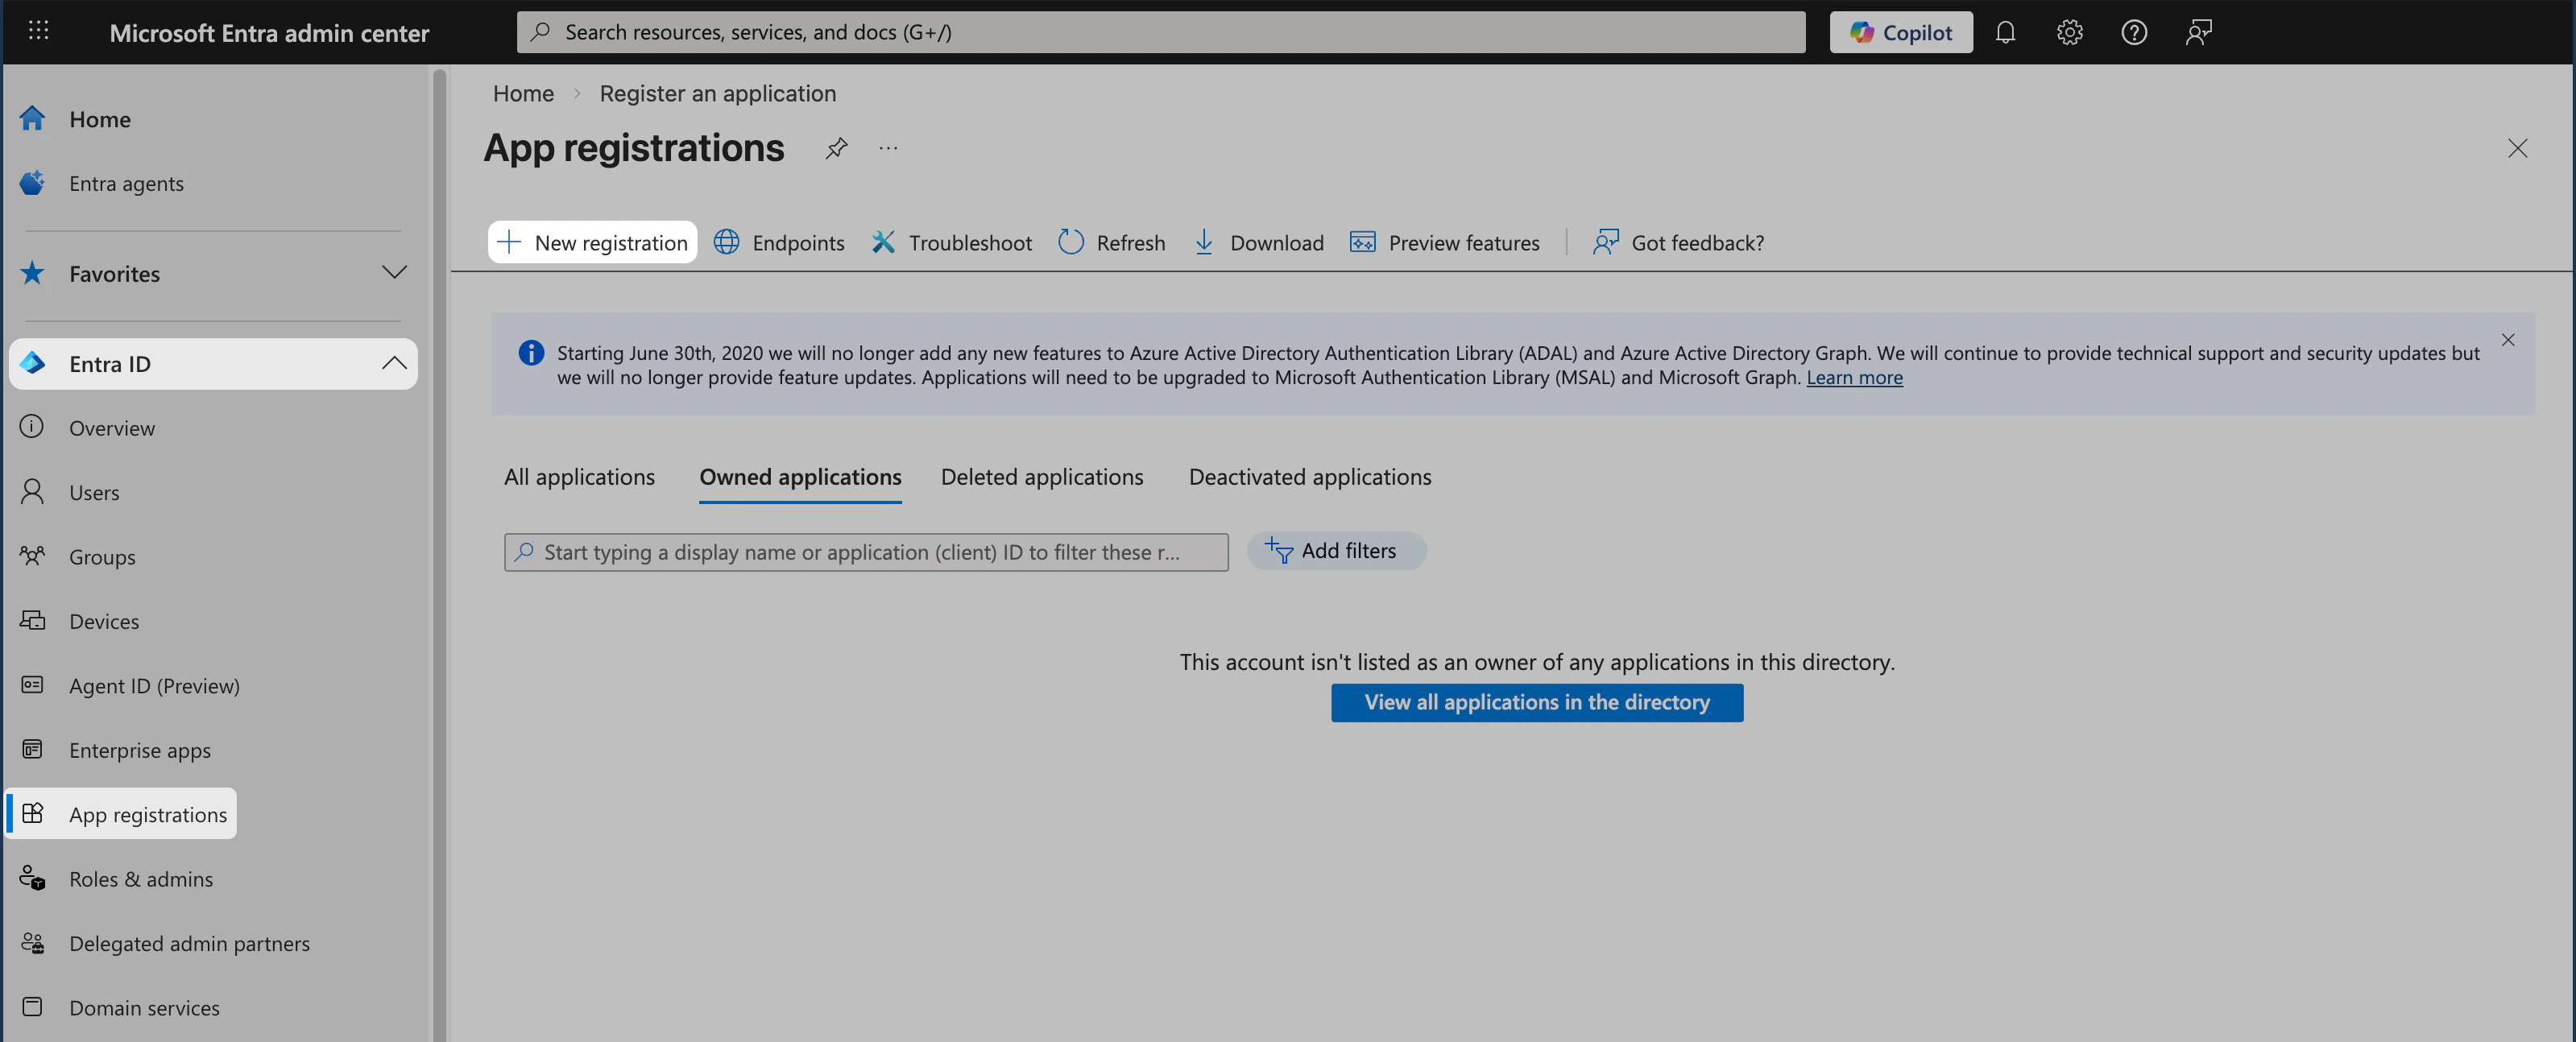
In the sidebar, under the Entra ID category, select **App registrations**.
On App registrations, select **+ New registration** on the menu.
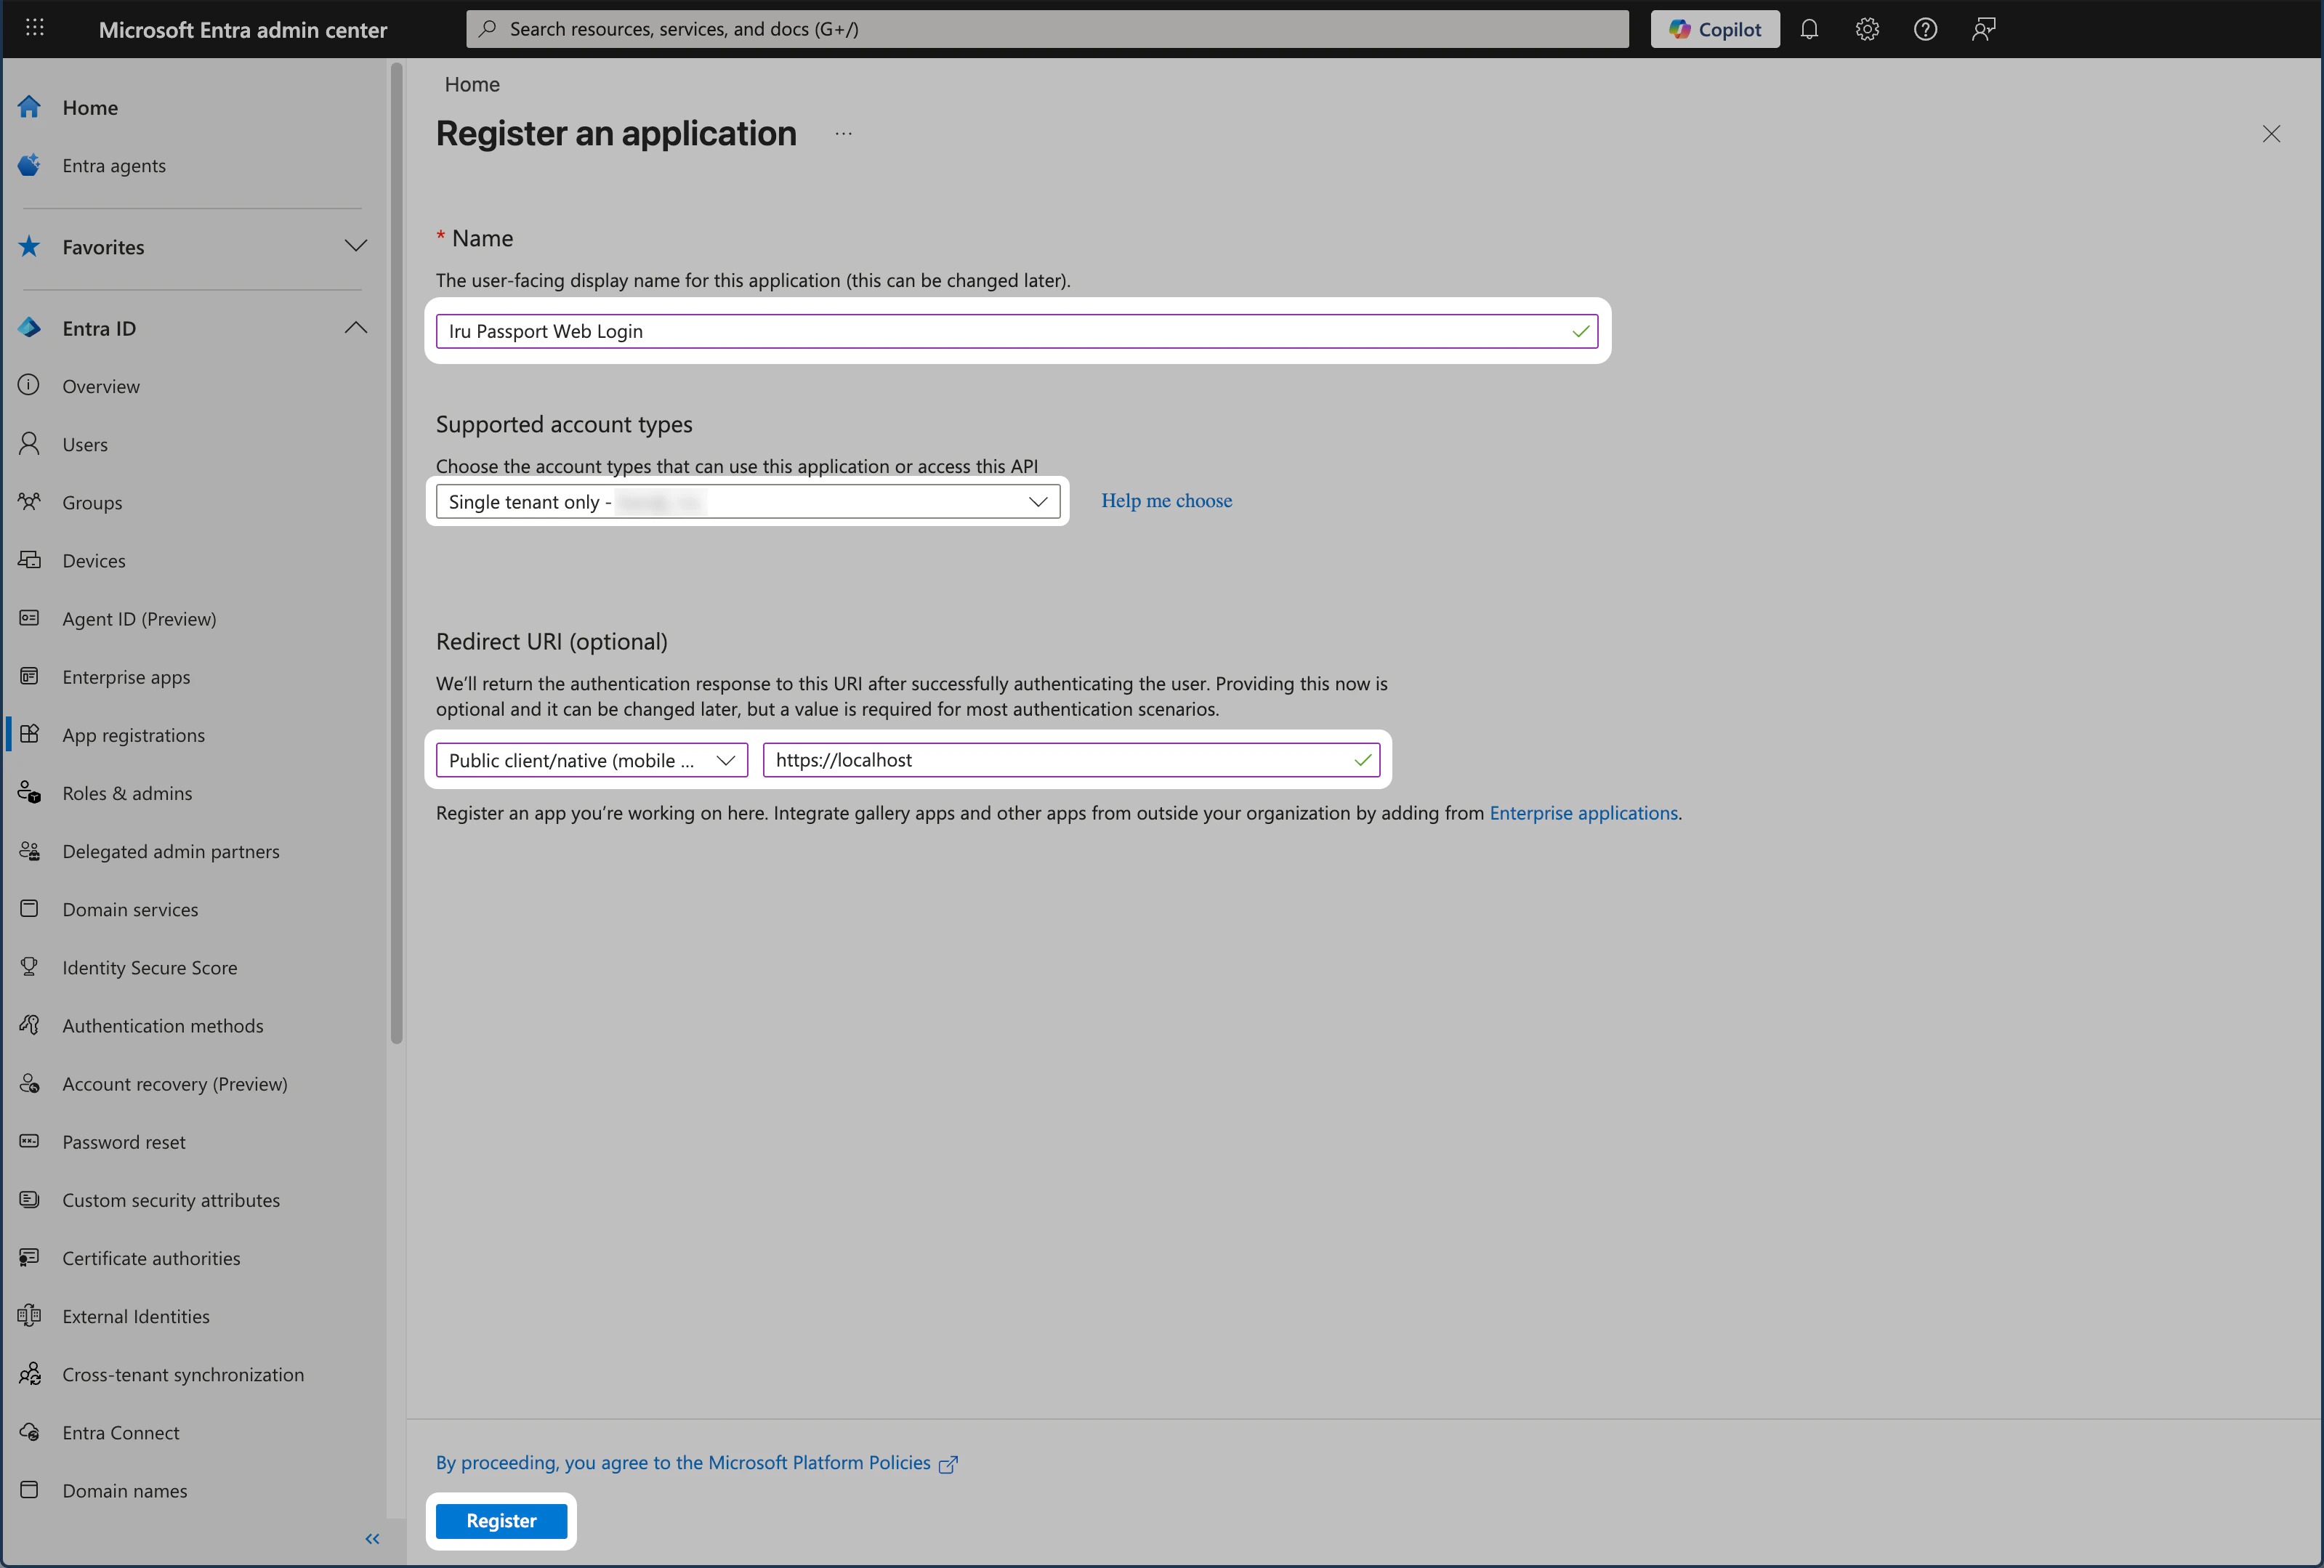
 Enter a name for the new application (such as *Iru Passport Web Login*).
Under **Supported account types**, open the drop-down and select **Single tenant only** (the option also shows your tenant name, for example **Single tenant only - *Accuhive***). Passport should be single-tenant in your organization only. See [Register an application in Microsoft Entra ID](https://learn.microsoft.com/en-us/entra/identity-platform/quickstart-register-app).
In the Redirect URI section, open the **Select a platform** drop-down and choose **Public client/native (mobile & desktop)**.
In the URI field, enter `https://localhost`. You will use this redirect URI when you [configure the Passport Library Item](/en/endpoint/library/passport/configure-the-passport-library-item).
```
https://localhost
```
For more information about redirect URI restrictions, platform types, and best practices, see [Microsoft's redirect URI documentation](https://learn.microsoft.com/en-us/entra/identity-platform/reply-url).
Click **Register**.
Enter a name for the new application (such as *Iru Passport Web Login*).
Under **Supported account types**, open the drop-down and select **Single tenant only** (the option also shows your tenant name, for example **Single tenant only - *Accuhive***). Passport should be single-tenant in your organization only. See [Register an application in Microsoft Entra ID](https://learn.microsoft.com/en-us/entra/identity-platform/quickstart-register-app).
In the Redirect URI section, open the **Select a platform** drop-down and choose **Public client/native (mobile & desktop)**.
In the URI field, enter `https://localhost`. You will use this redirect URI when you [configure the Passport Library Item](/en/endpoint/library/passport/configure-the-passport-library-item).
```
https://localhost
```
For more information about redirect URI restrictions, platform types, and best practices, see [Microsoft's redirect URI documentation](https://learn.microsoft.com/en-us/entra/identity-platform/reply-url).
Click **Register**.
 ### Collecting Configuration Details
Open a secure text document where the values for this OIDC app can be temporarily stored. You will need these details when you [configure the Passport Library Item](/en/endpoint/library/passport/configure-the-passport-library-item).
#### Overview Pane
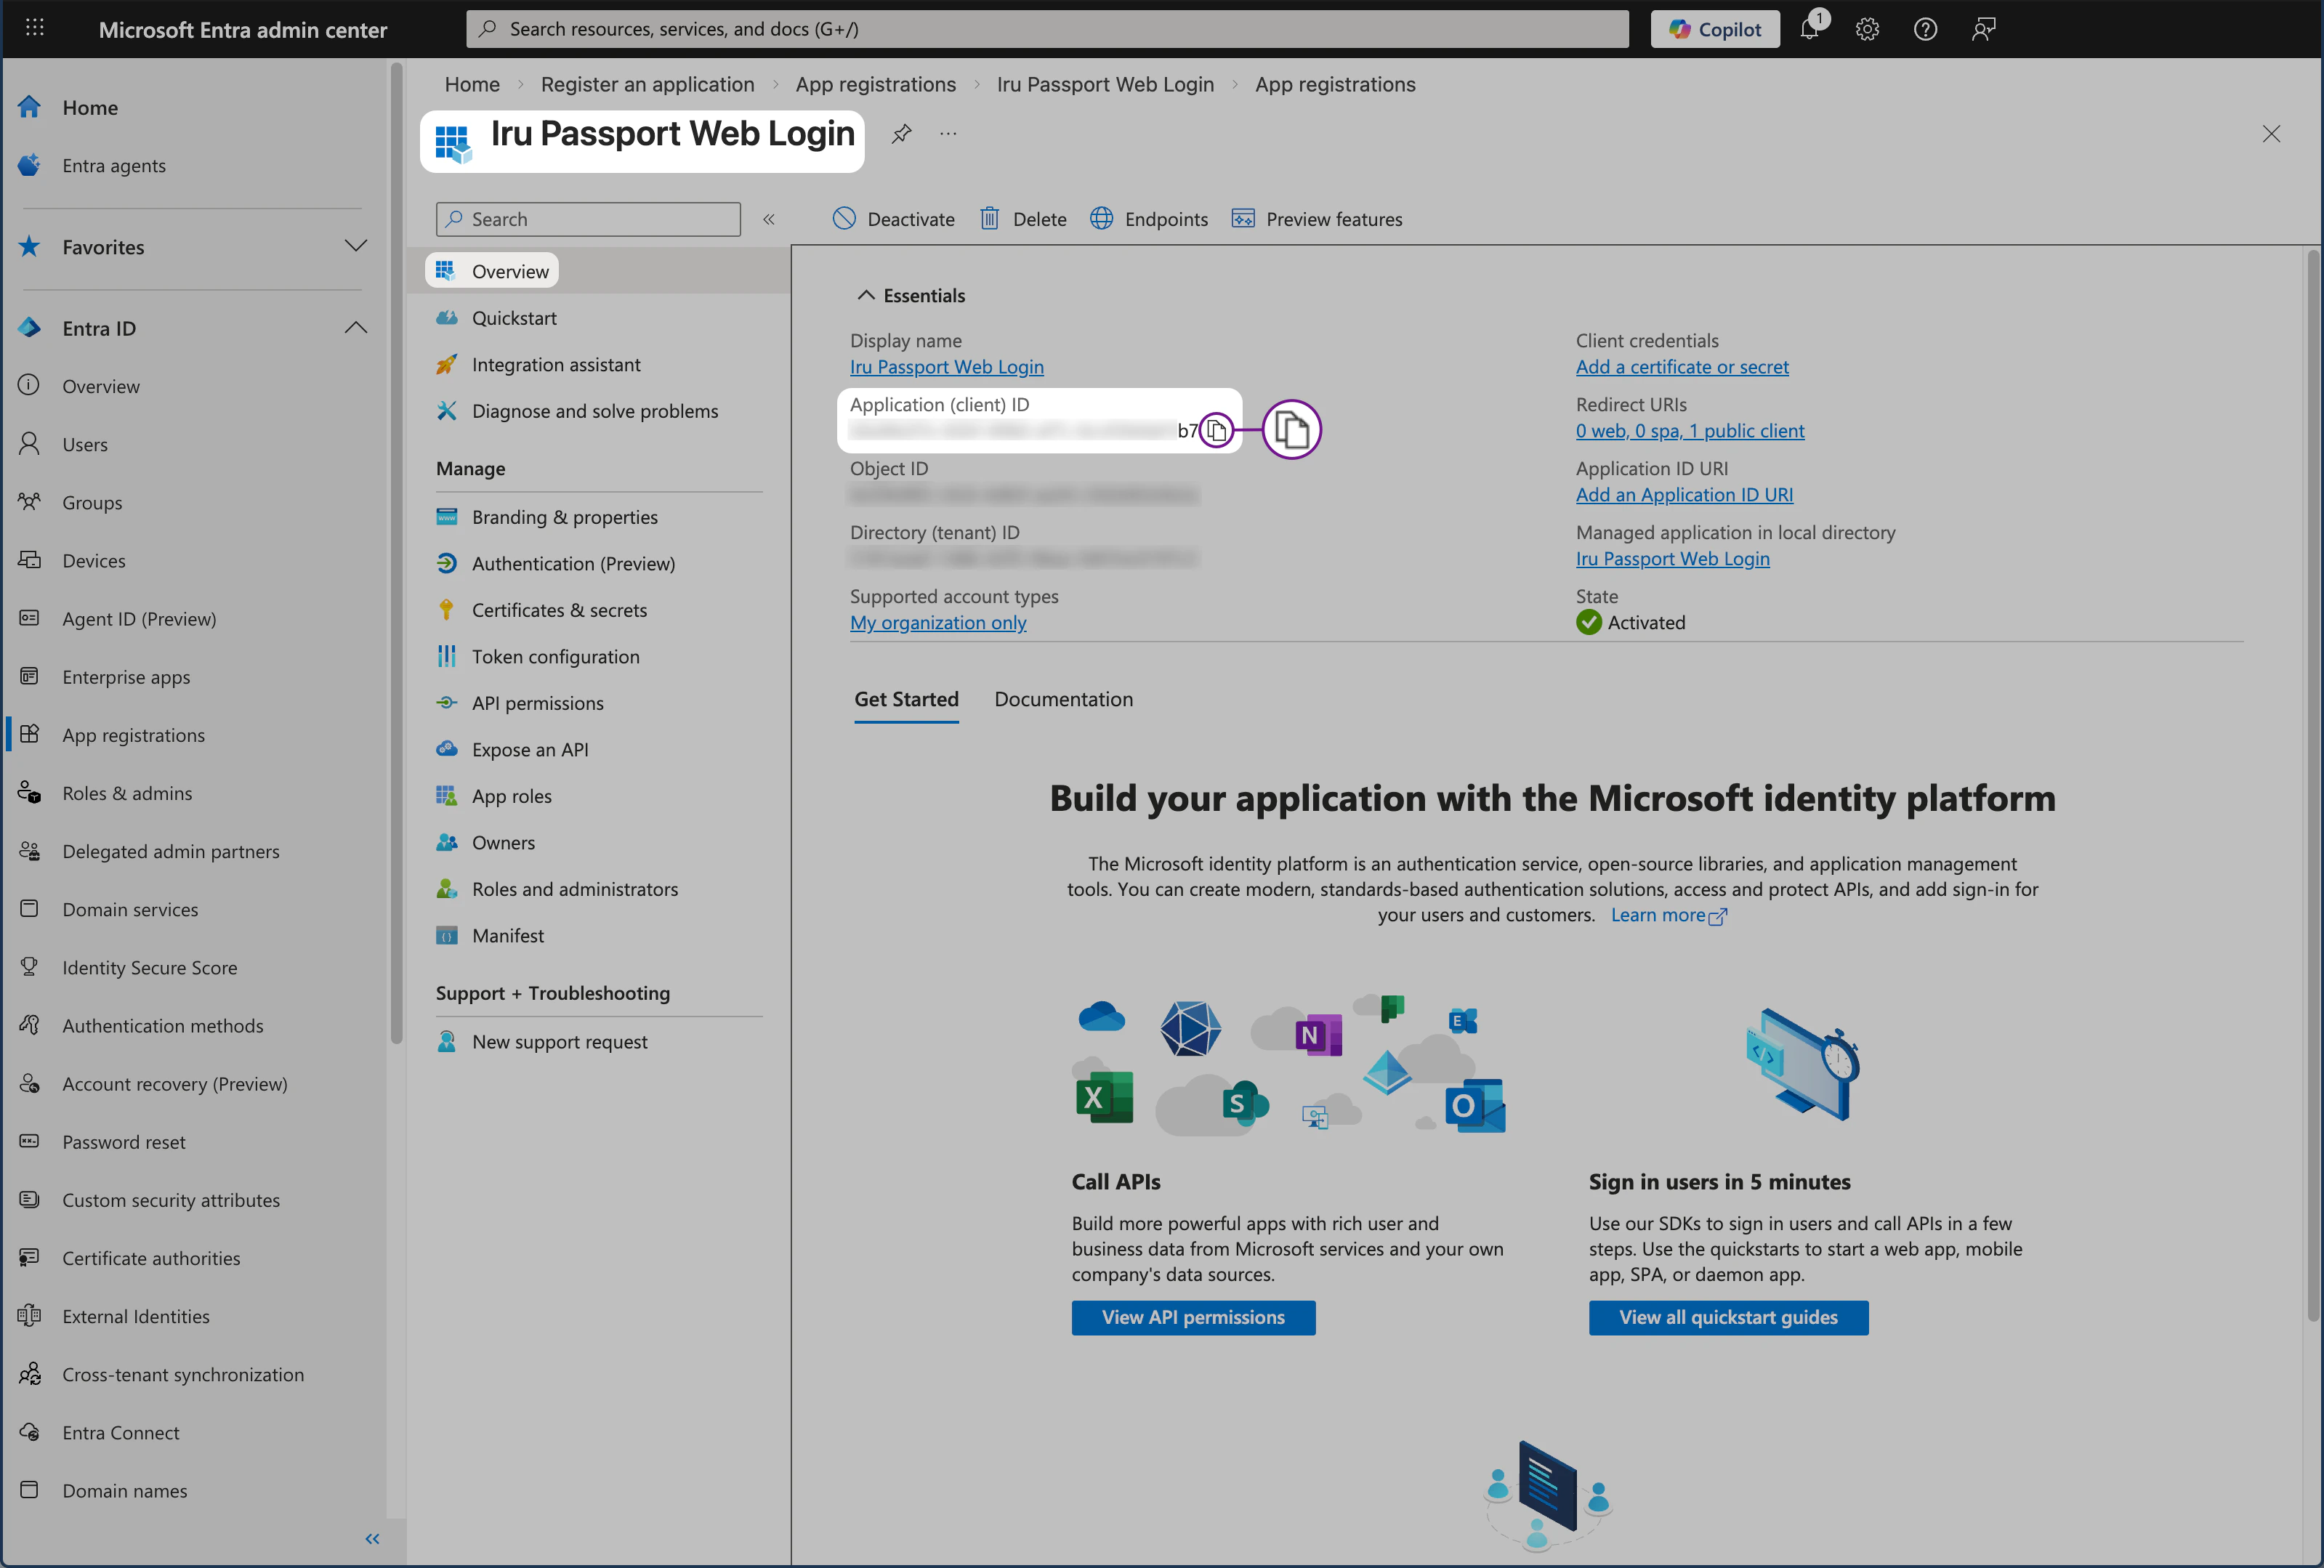
Copy the application (client) ID from the app’s overview. You will need it for the Passport Library Item.
In the left menu, select **Overview** to open that pane.
Copy the **Application (client) ID** to your secure document.
### Collecting Configuration Details
Open a secure text document where the values for this OIDC app can be temporarily stored. You will need these details when you [configure the Passport Library Item](/en/endpoint/library/passport/configure-the-passport-library-item).
#### Overview Pane
Copy the application (client) ID from the app’s overview. You will need it for the Passport Library Item.
In the left menu, select **Overview** to open that pane.
Copy the **Application (client) ID** to your secure document.
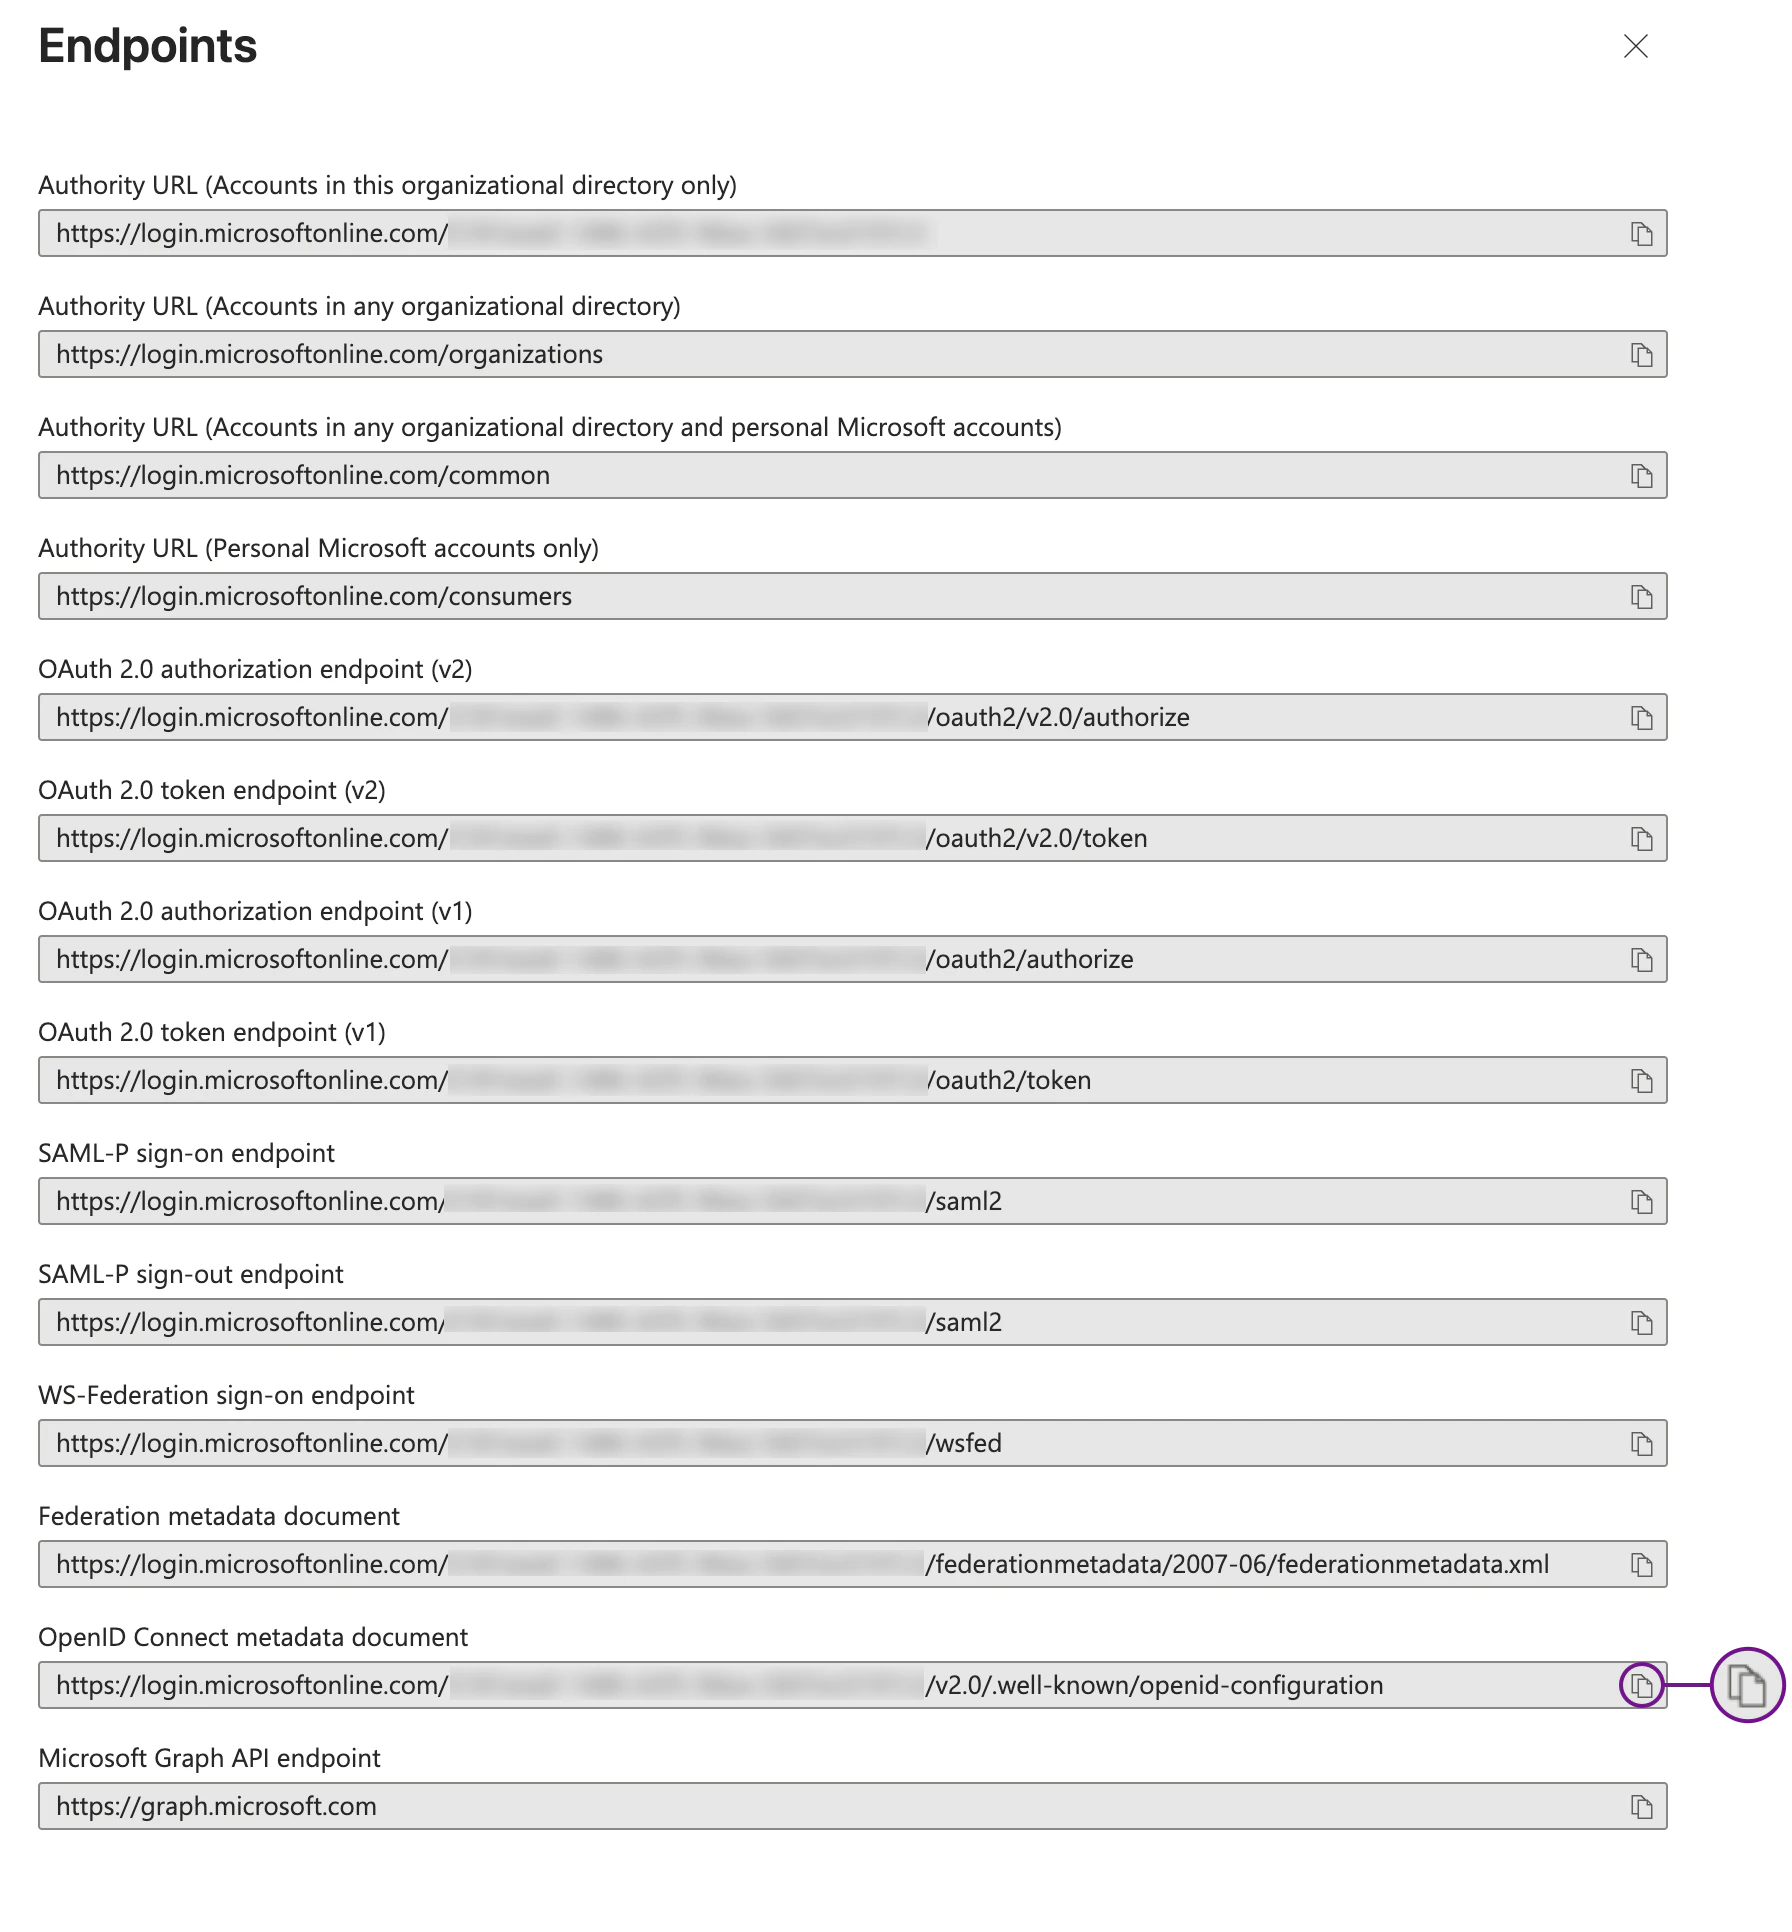
 #### Endpoints Pane
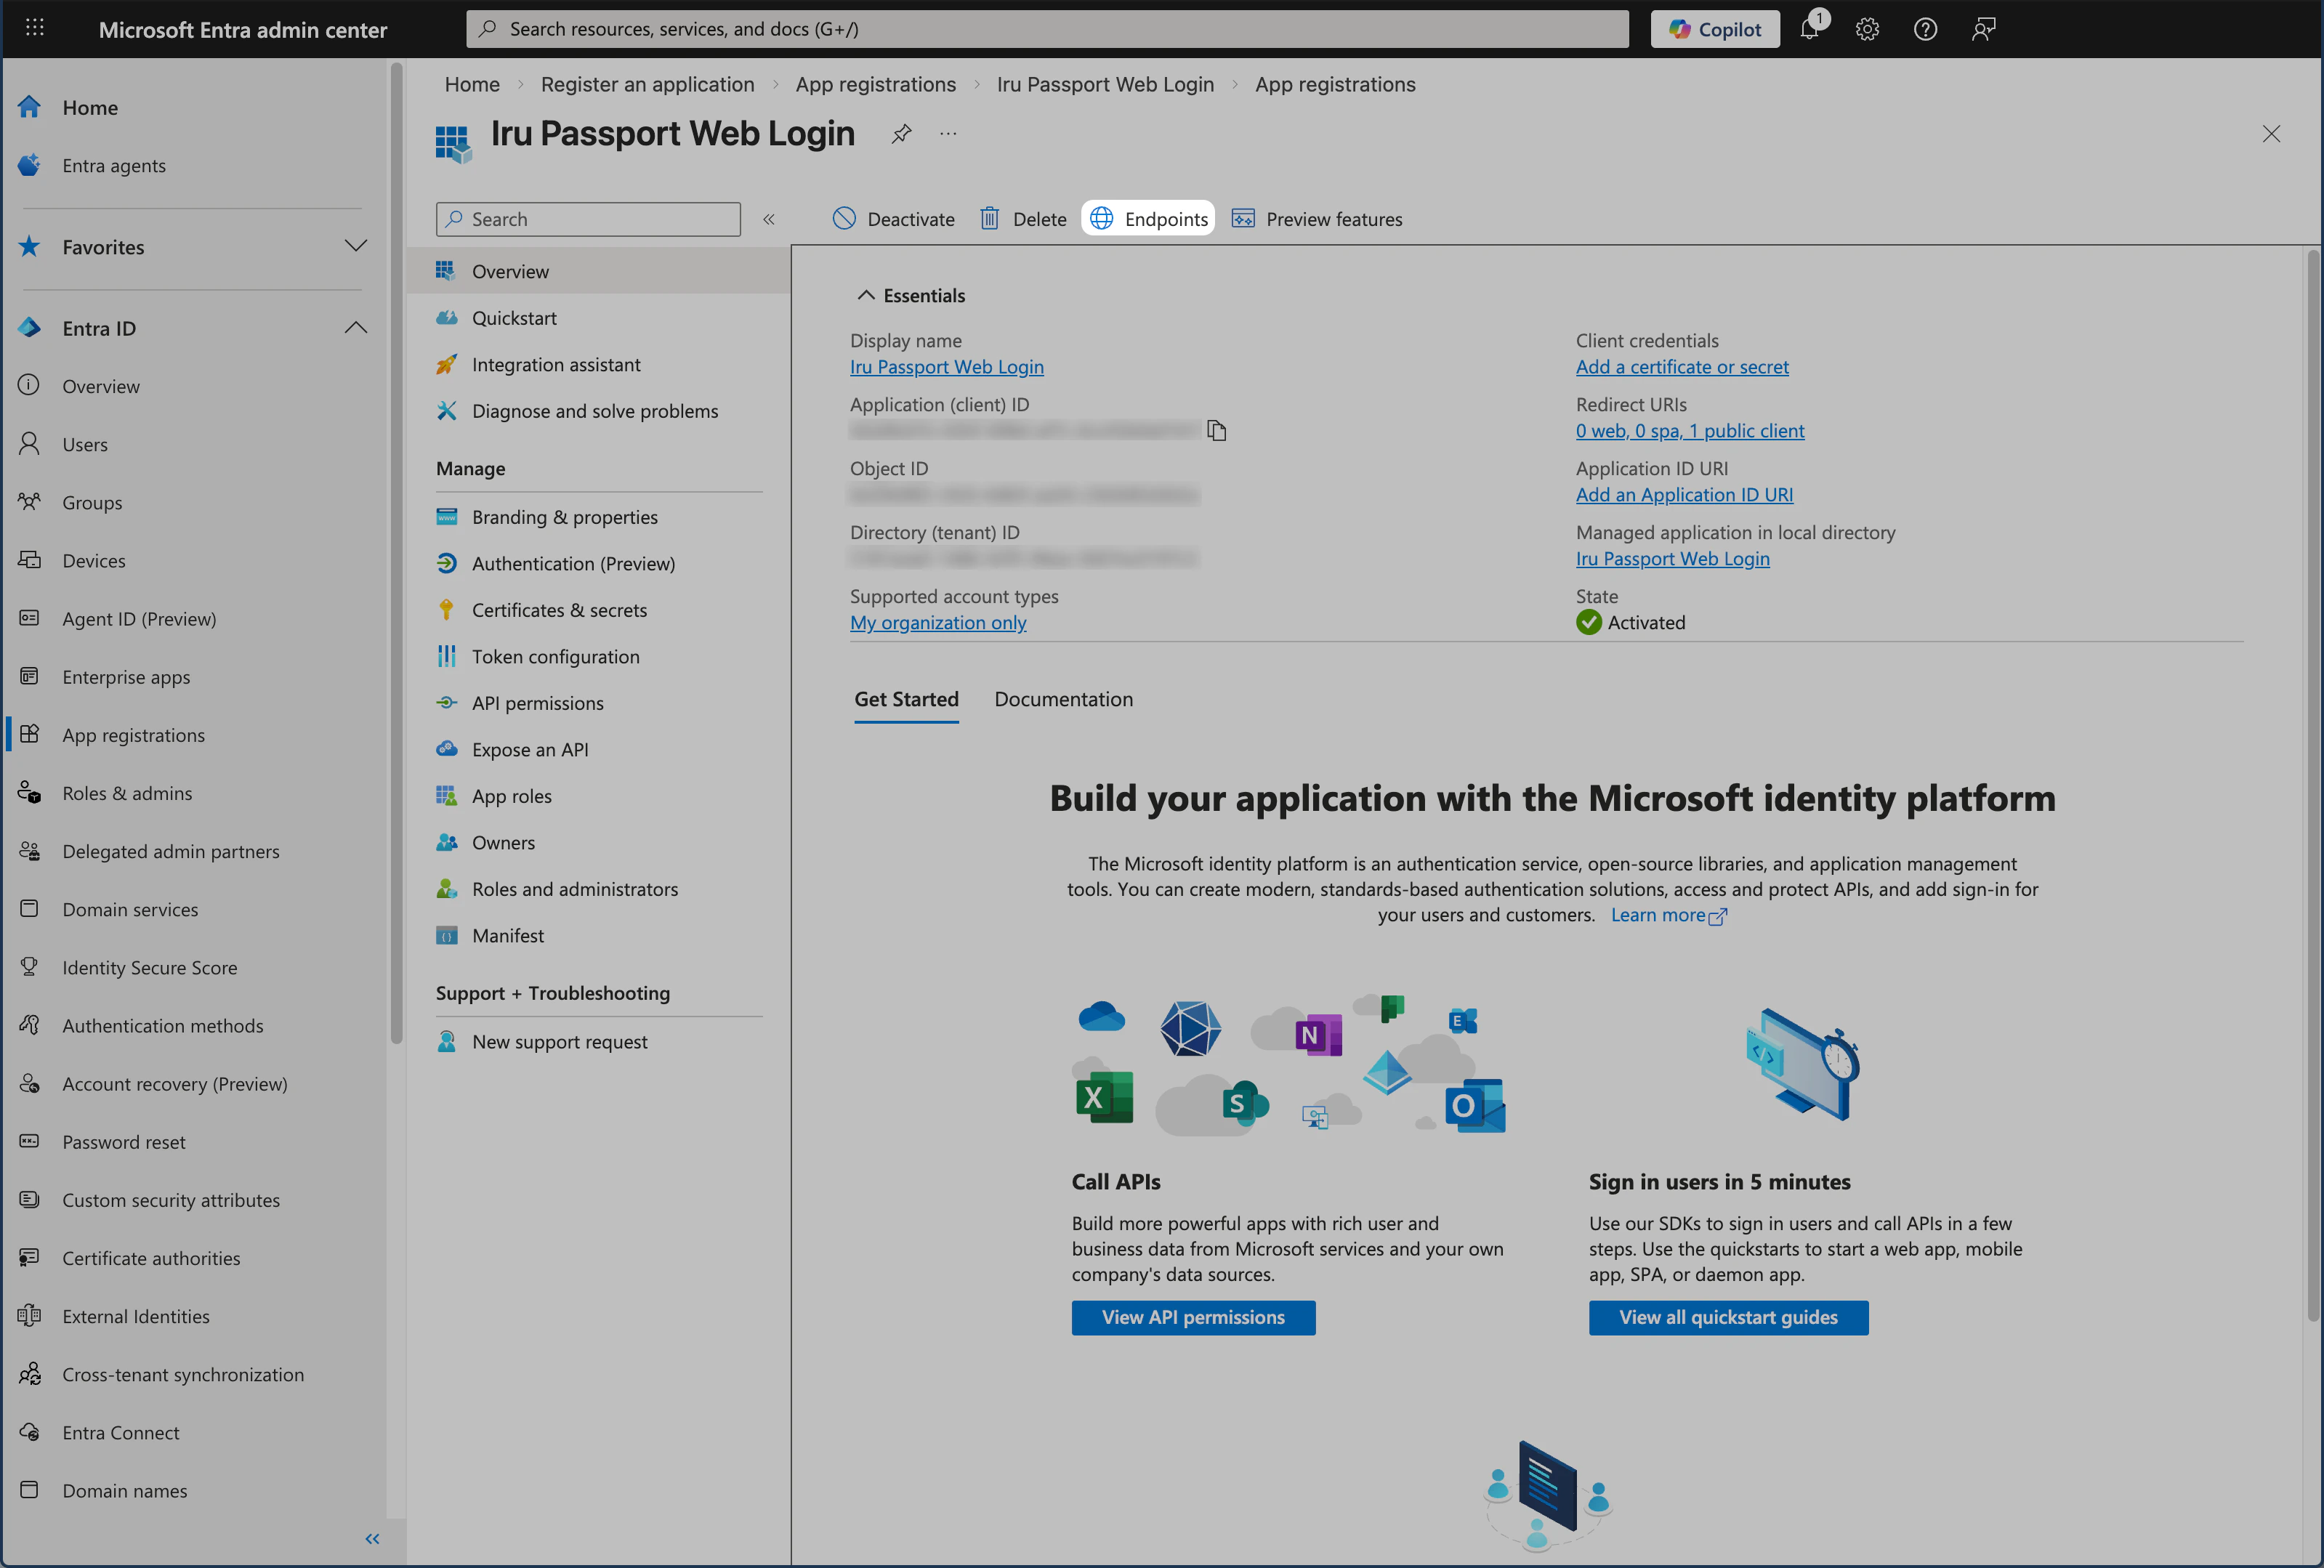
Copy the OpenID Connect metadata URL from Endpoints; this is the identity provider URL Passport uses to discover sign-in and token endpoints.
In the top menu, select **Endpoints** to open that pane.
#### Endpoints Pane
Copy the OpenID Connect metadata URL from Endpoints; this is the identity provider URL Passport uses to discover sign-in and token endpoints.
In the top menu, select **Endpoints** to open that pane.
 Copy the **OpenID Connect metadata document** (identity provider URL) to your secure document.
Click the **X** at the top right to close the Endpoints pane.
Copy the **OpenID Connect metadata document** (identity provider URL) to your secure document.
Click the **X** at the top right to close the Endpoints pane.
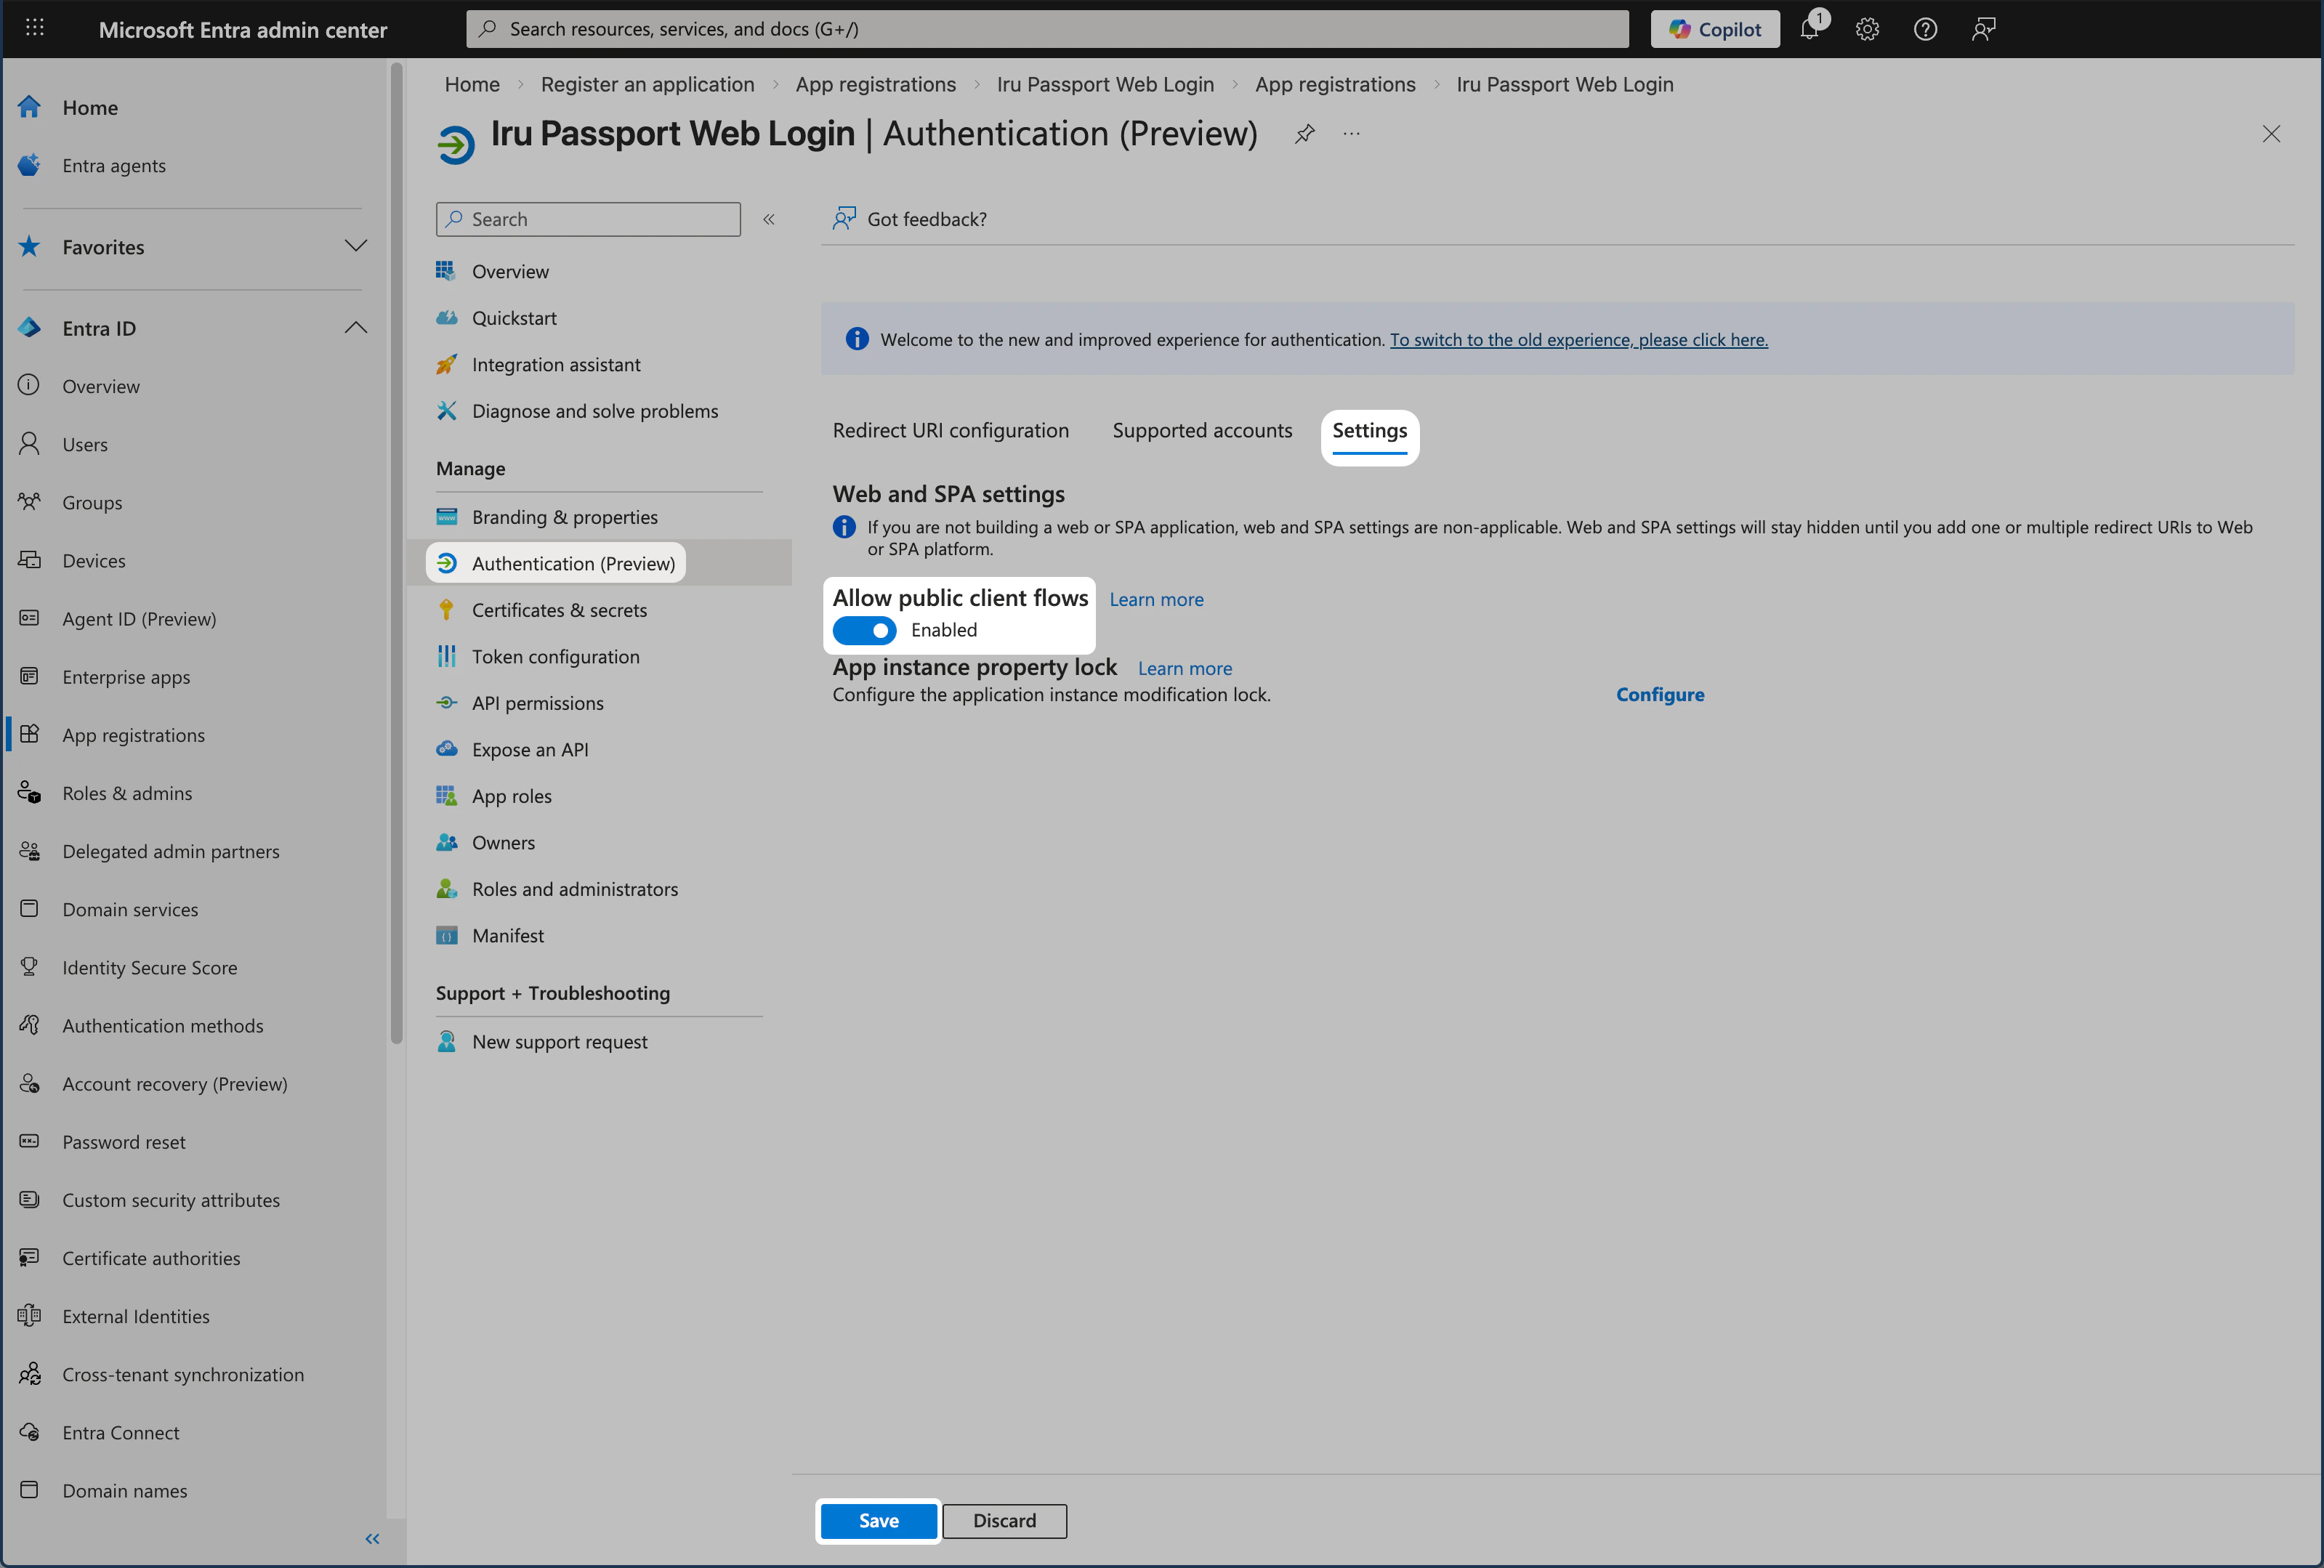
 #### Authentication (Preview) pane
Enable public client flows so the Mac app can complete the sign-in flow without a client secret.
In the left menu, select **Authentication (Preview)** to open that pane.
Select the **Settings** tab.
Set **Allow public client flows** to **Enabled**.
Click **Save**.
#### Authentication (Preview) pane
Enable public client flows so the Mac app can complete the sign-in flow without a client secret.
In the left menu, select **Authentication (Preview)** to open that pane.
Select the **Settings** tab.
Set **Allow public client flows** to **Enabled**.
Click **Save**.
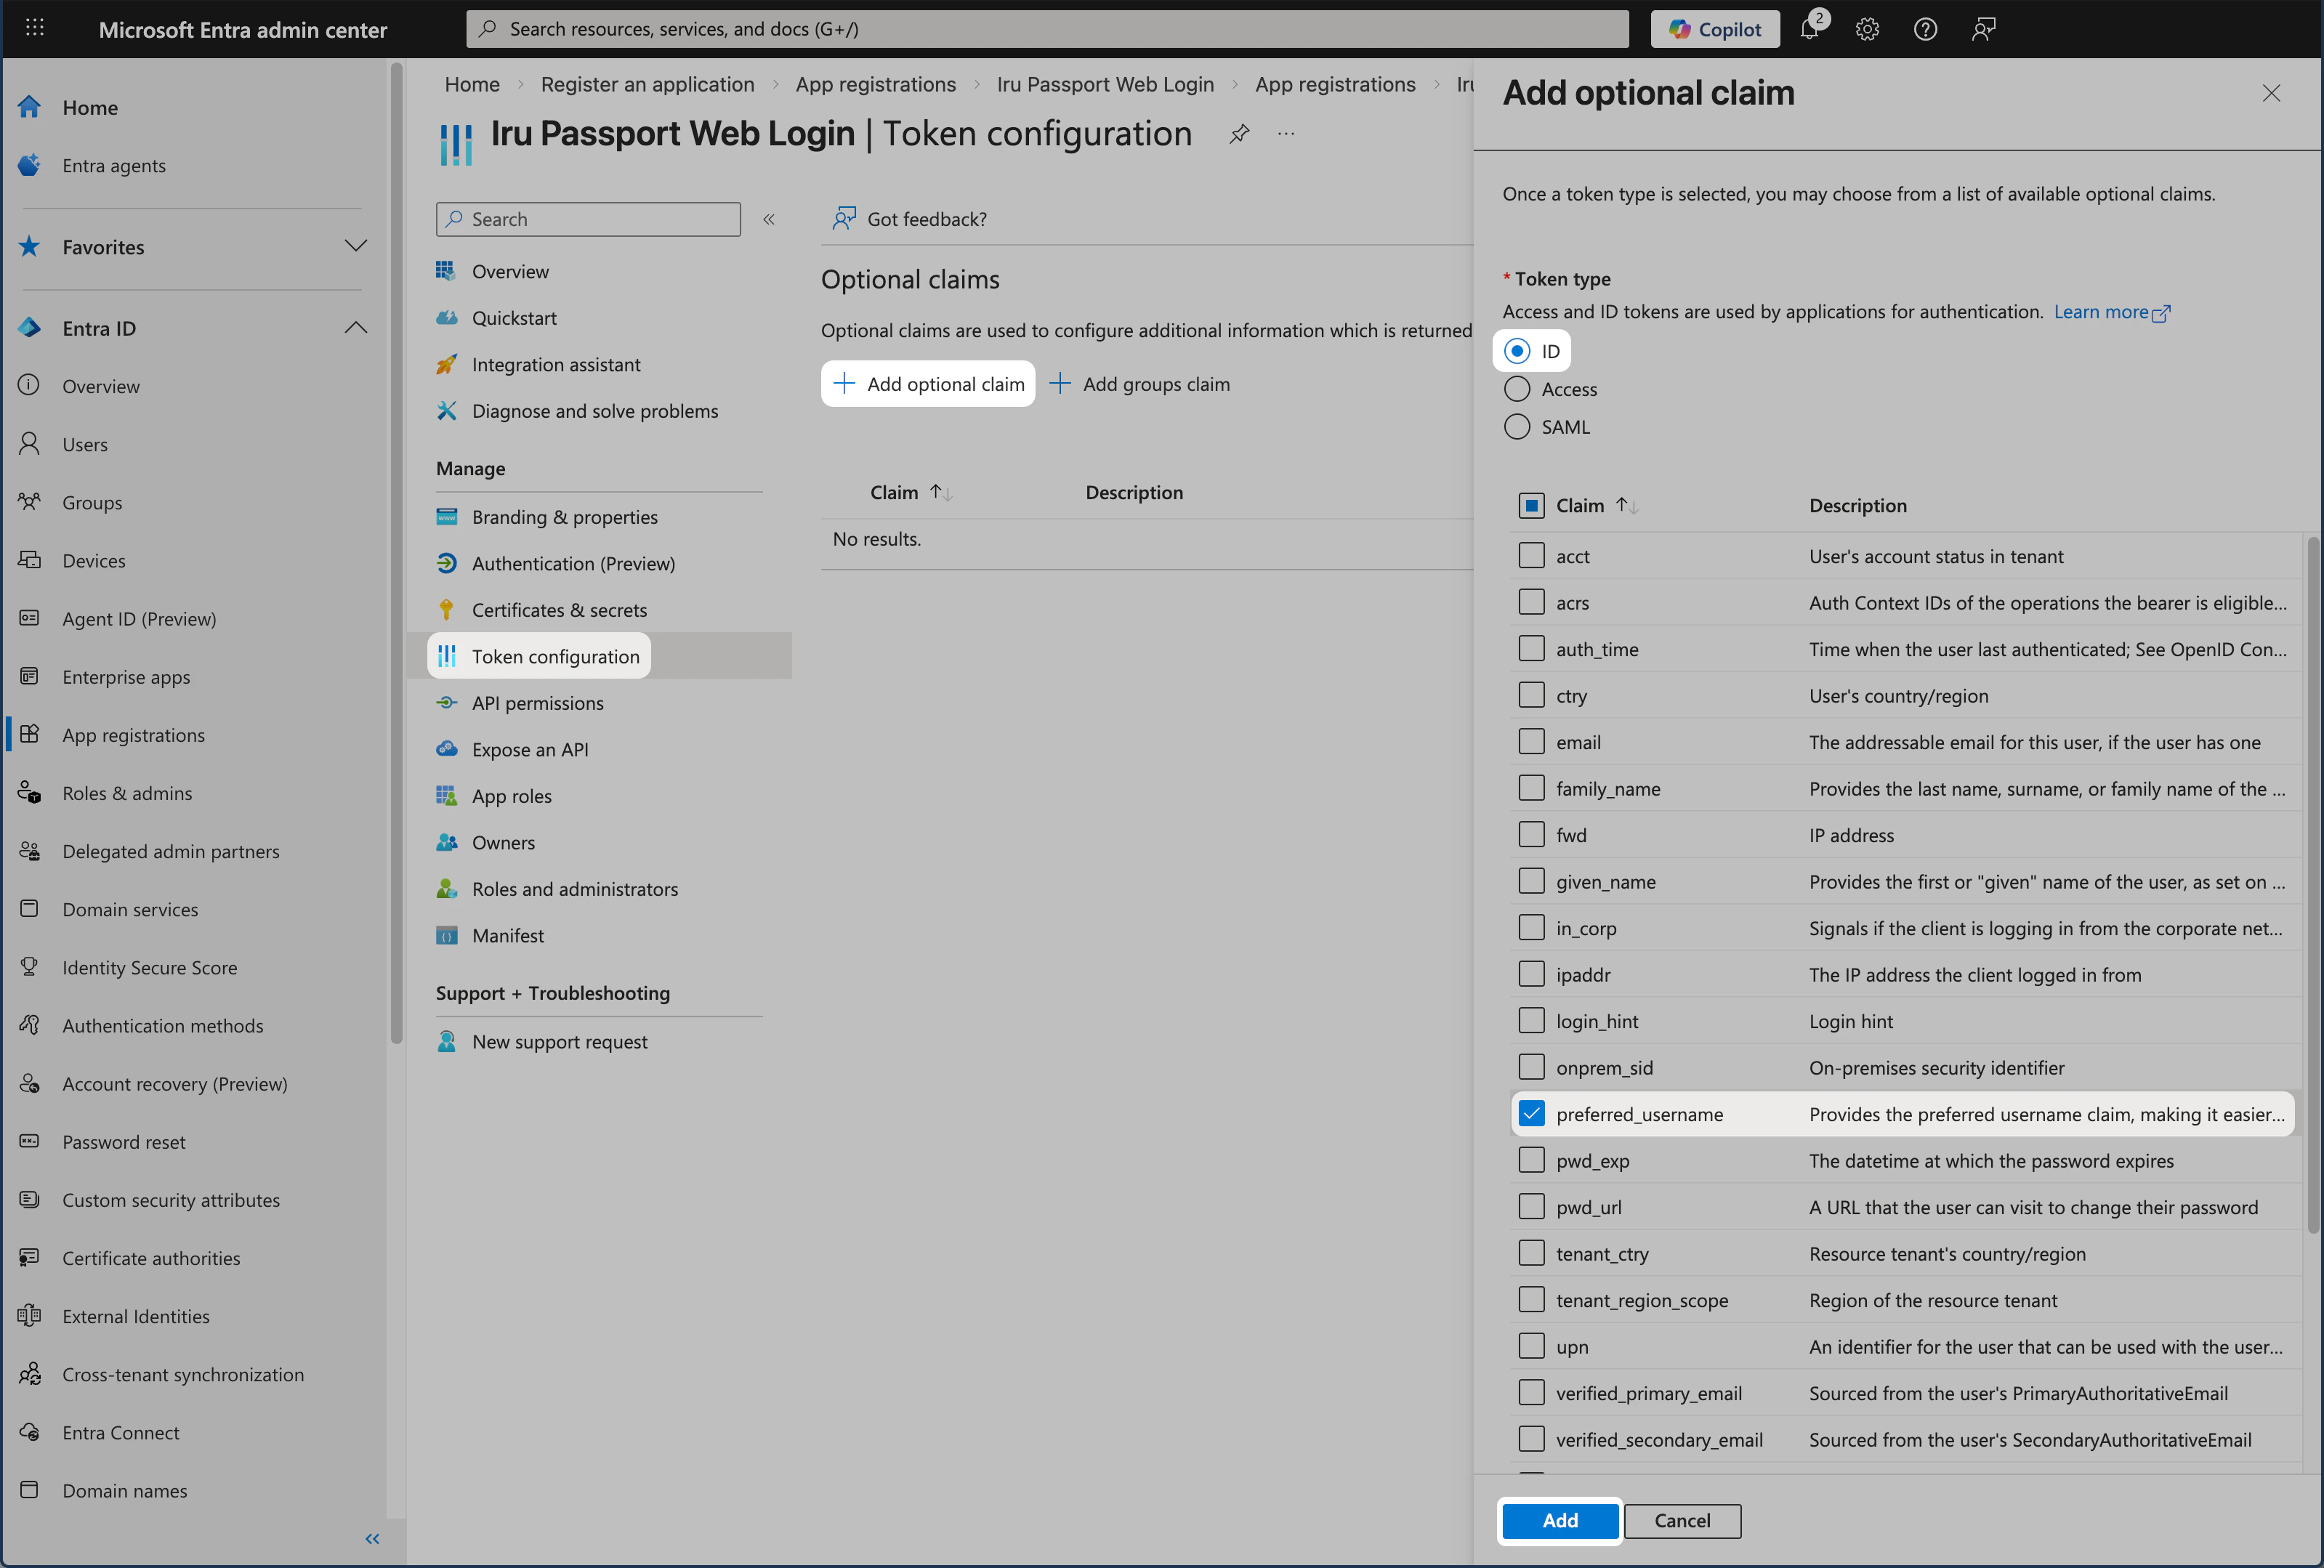
 #### Token Configuration Pane
Add the required claims so the token includes the username and group membership Passport needs.
In the left menu, select **Token configuration** to open that pane.
Click **Add optional claim**.
For the Token type, select **ID**.
For the Claim, select **preferred\_username**.
Click **Add**.
#### Token Configuration Pane
Add the required claims so the token includes the username and group membership Passport needs.
In the left menu, select **Token configuration** to open that pane.
Click **Add optional claim**.
For the Token type, select **ID**.
For the Claim, select **preferred\_username**.
Click **Add**.
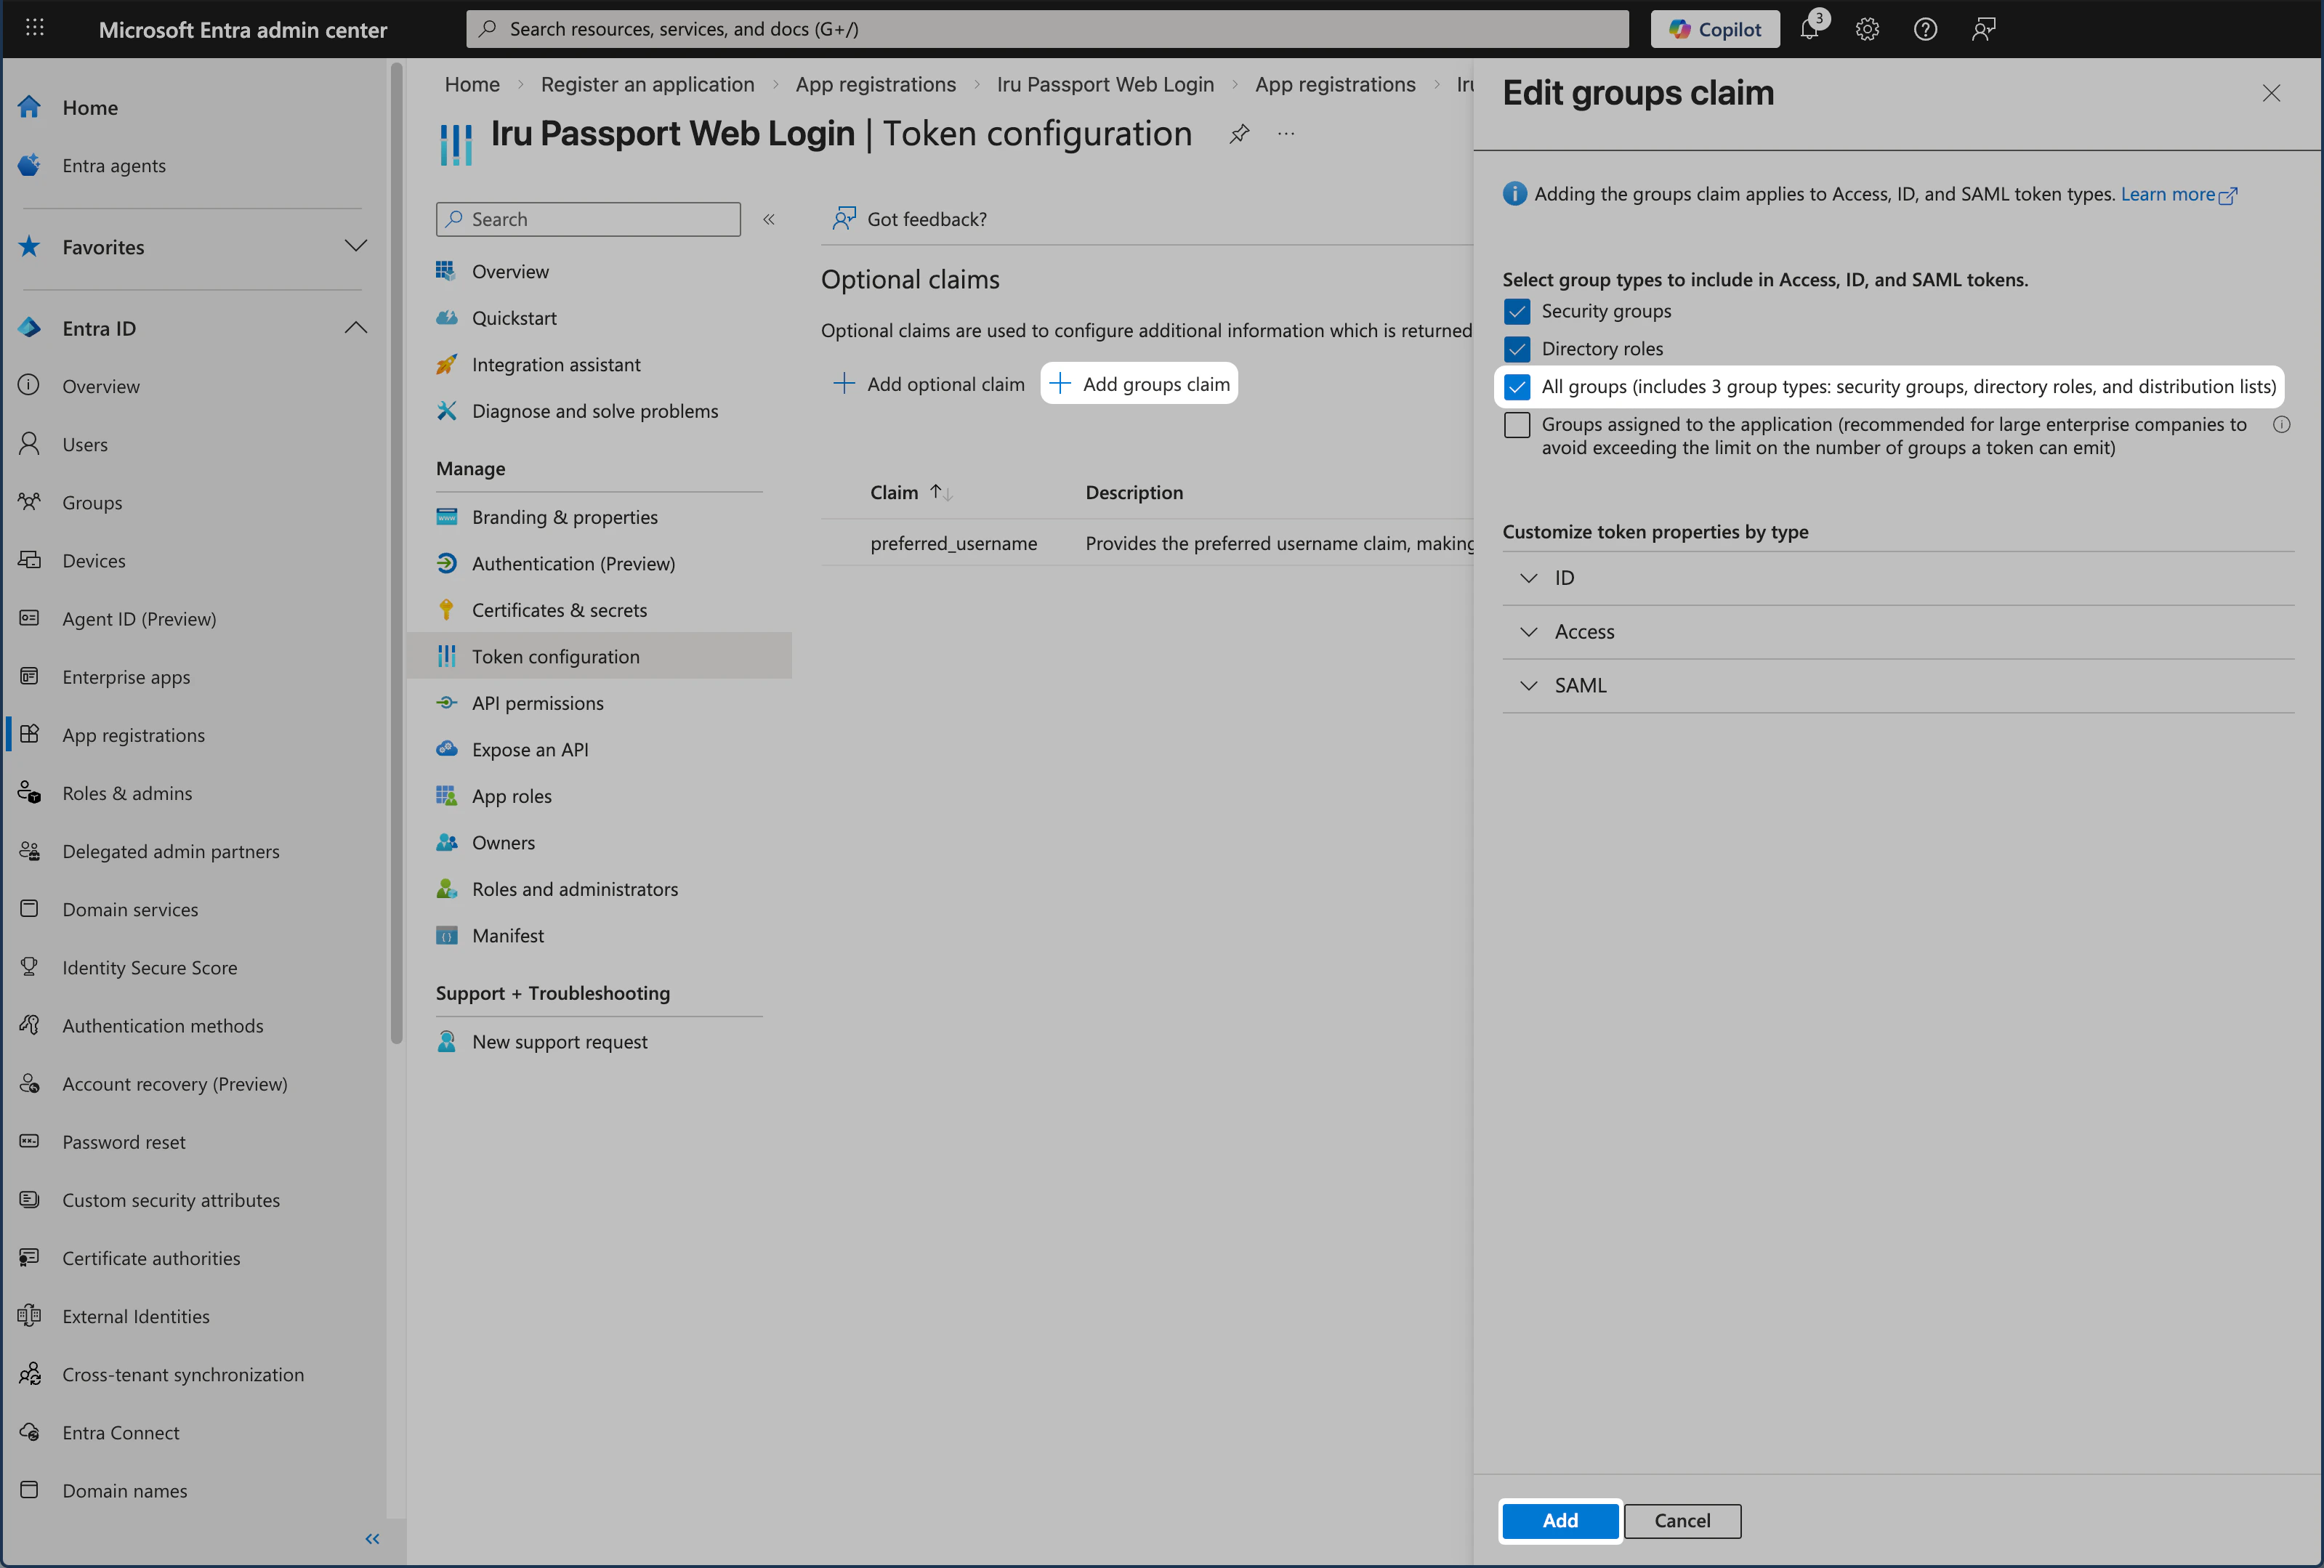
 Click **Add groups claim**.
Select **All groups**.
Entra ID SAML only supports up to 150 security groups. If you have more than 150 security groups, you should not use **All groups**, but rather select specific groups. You can read more in Microsoft's [Configure group claims for applications by using Microsoft Entra ID](https://learn.microsoft.com/en-us/entra/identity/hybrid/connect/how-to-connect-fed-group-claims) article.
Click **Add**.
Click **Add groups claim**.
Select **All groups**.
Entra ID SAML only supports up to 150 security groups. If you have more than 150 security groups, you should not use **All groups**, but rather select specific groups. You can read more in Microsoft's [Configure group claims for applications by using Microsoft Entra ID](https://learn.microsoft.com/en-us/entra/identity/hybrid/connect/how-to-connect-fed-group-claims) article.
Click **Add**.
 Once you complete the token configurations, you will see both optional claims.
### API Permissions
Add the Microsoft Graph permissions Passport needs (email, profile, User.Read) and grant admin consent so users can sign in.
In the left menu, select **API permissions** to open that pane.
Click **Add a permission**.
Once you complete the token configurations, you will see both optional claims.
### API Permissions
Add the Microsoft Graph permissions Passport needs (email, profile, User.Read) and grant admin consent so users can sign in.
In the left menu, select **API permissions** to open that pane.
Click **Add a permission**.
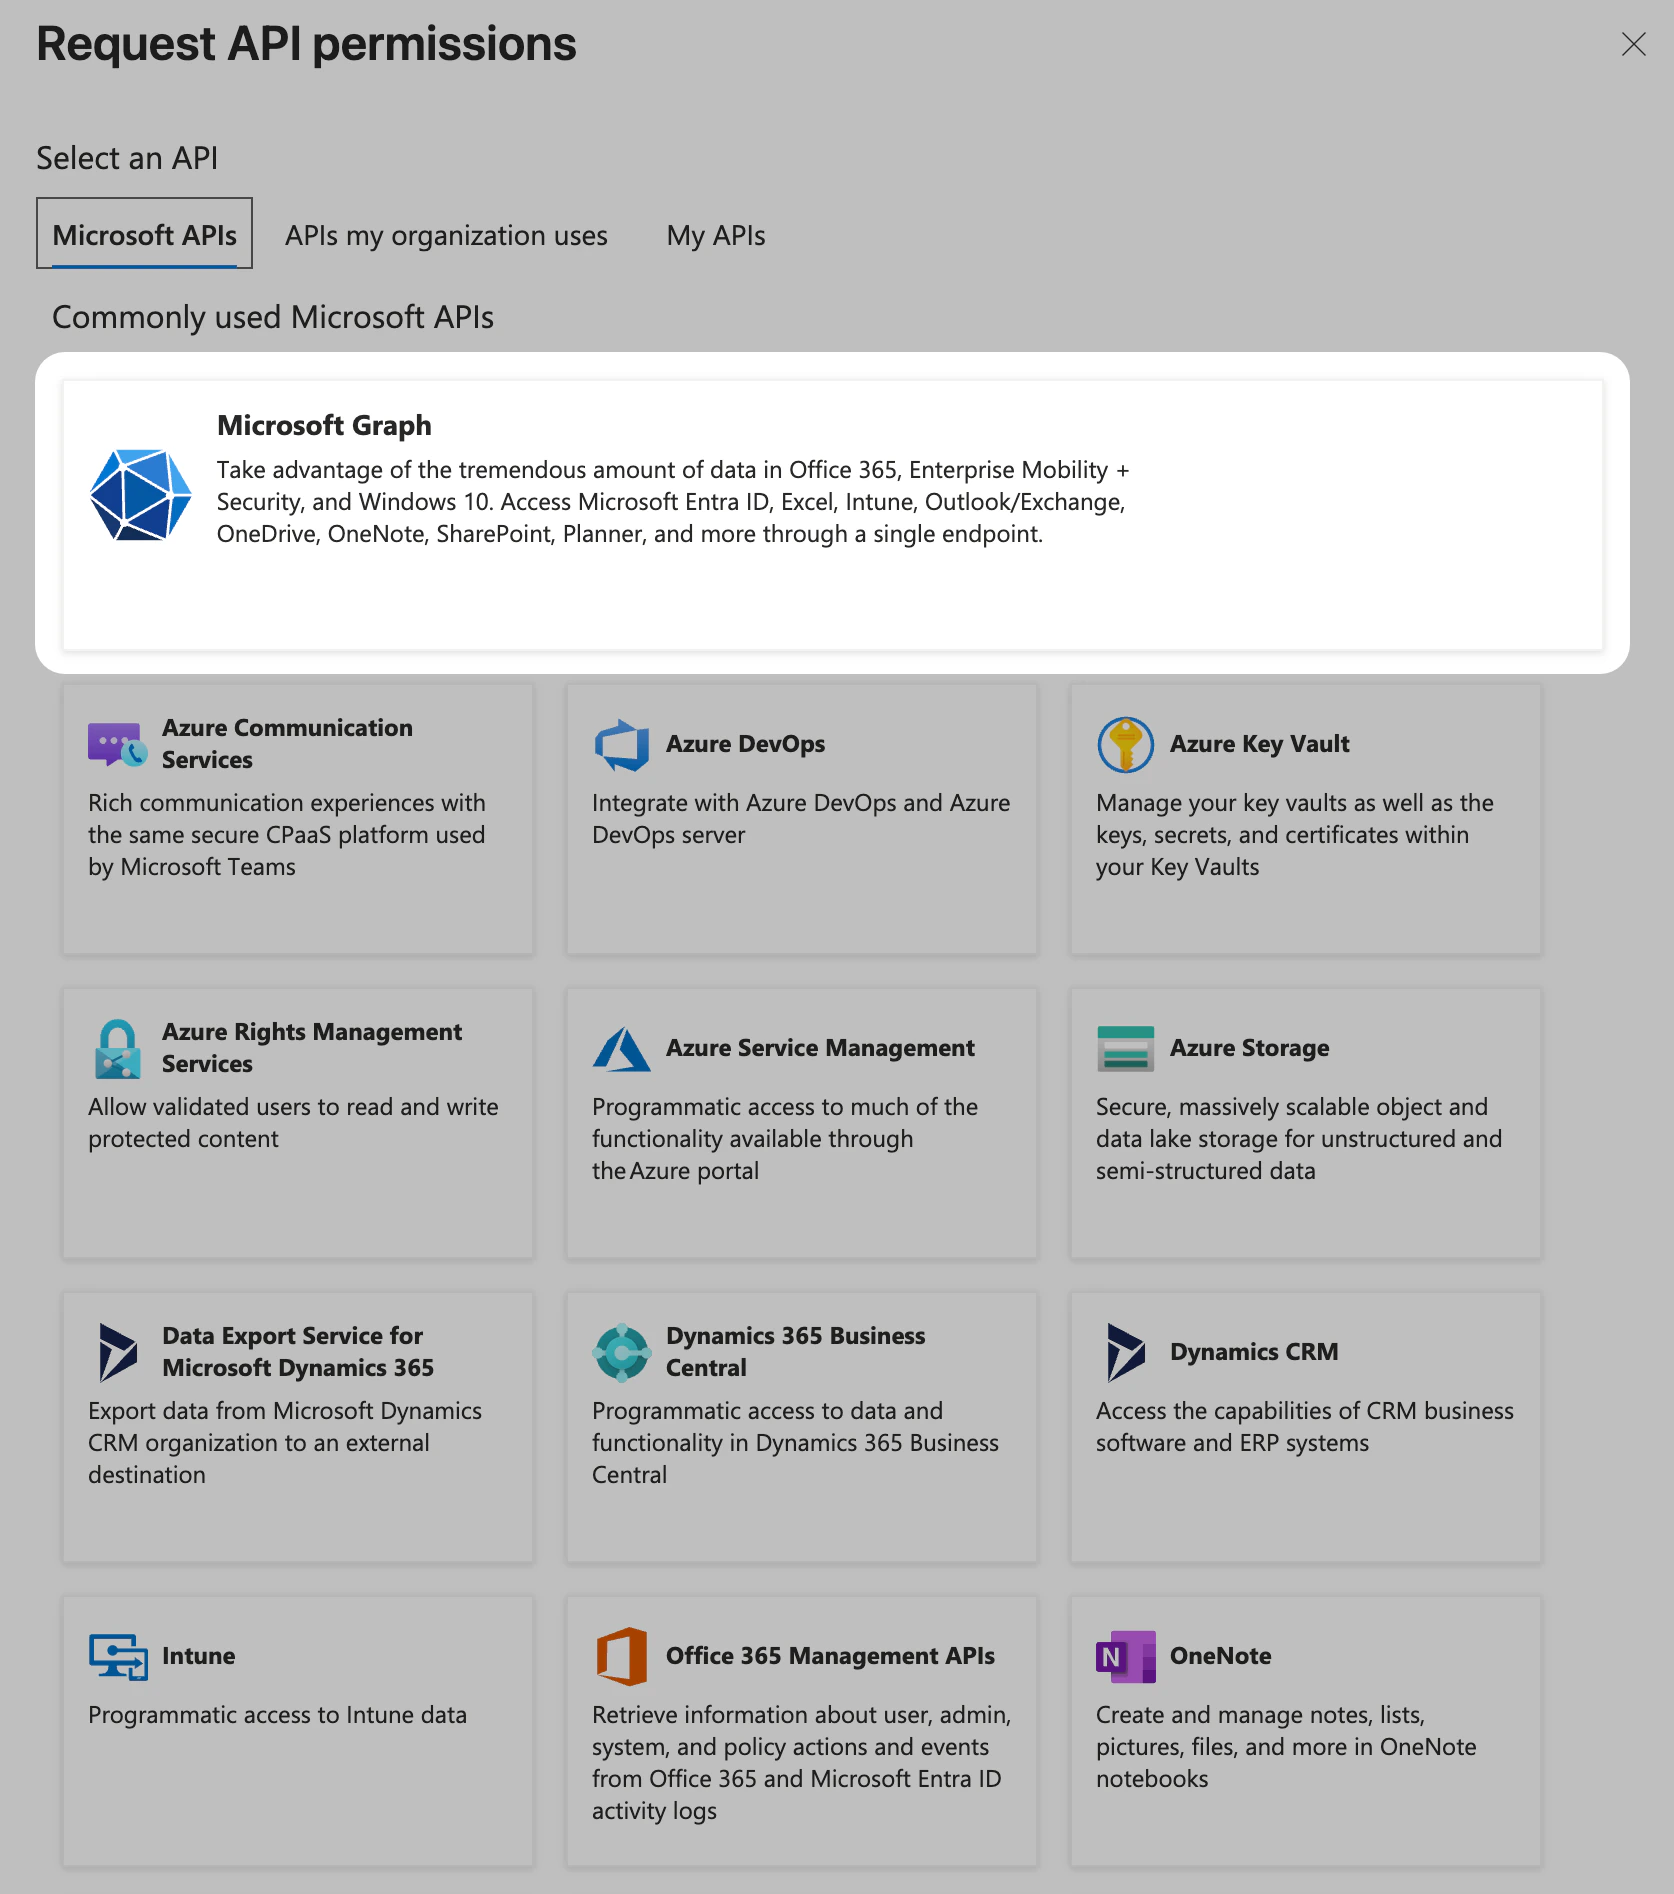
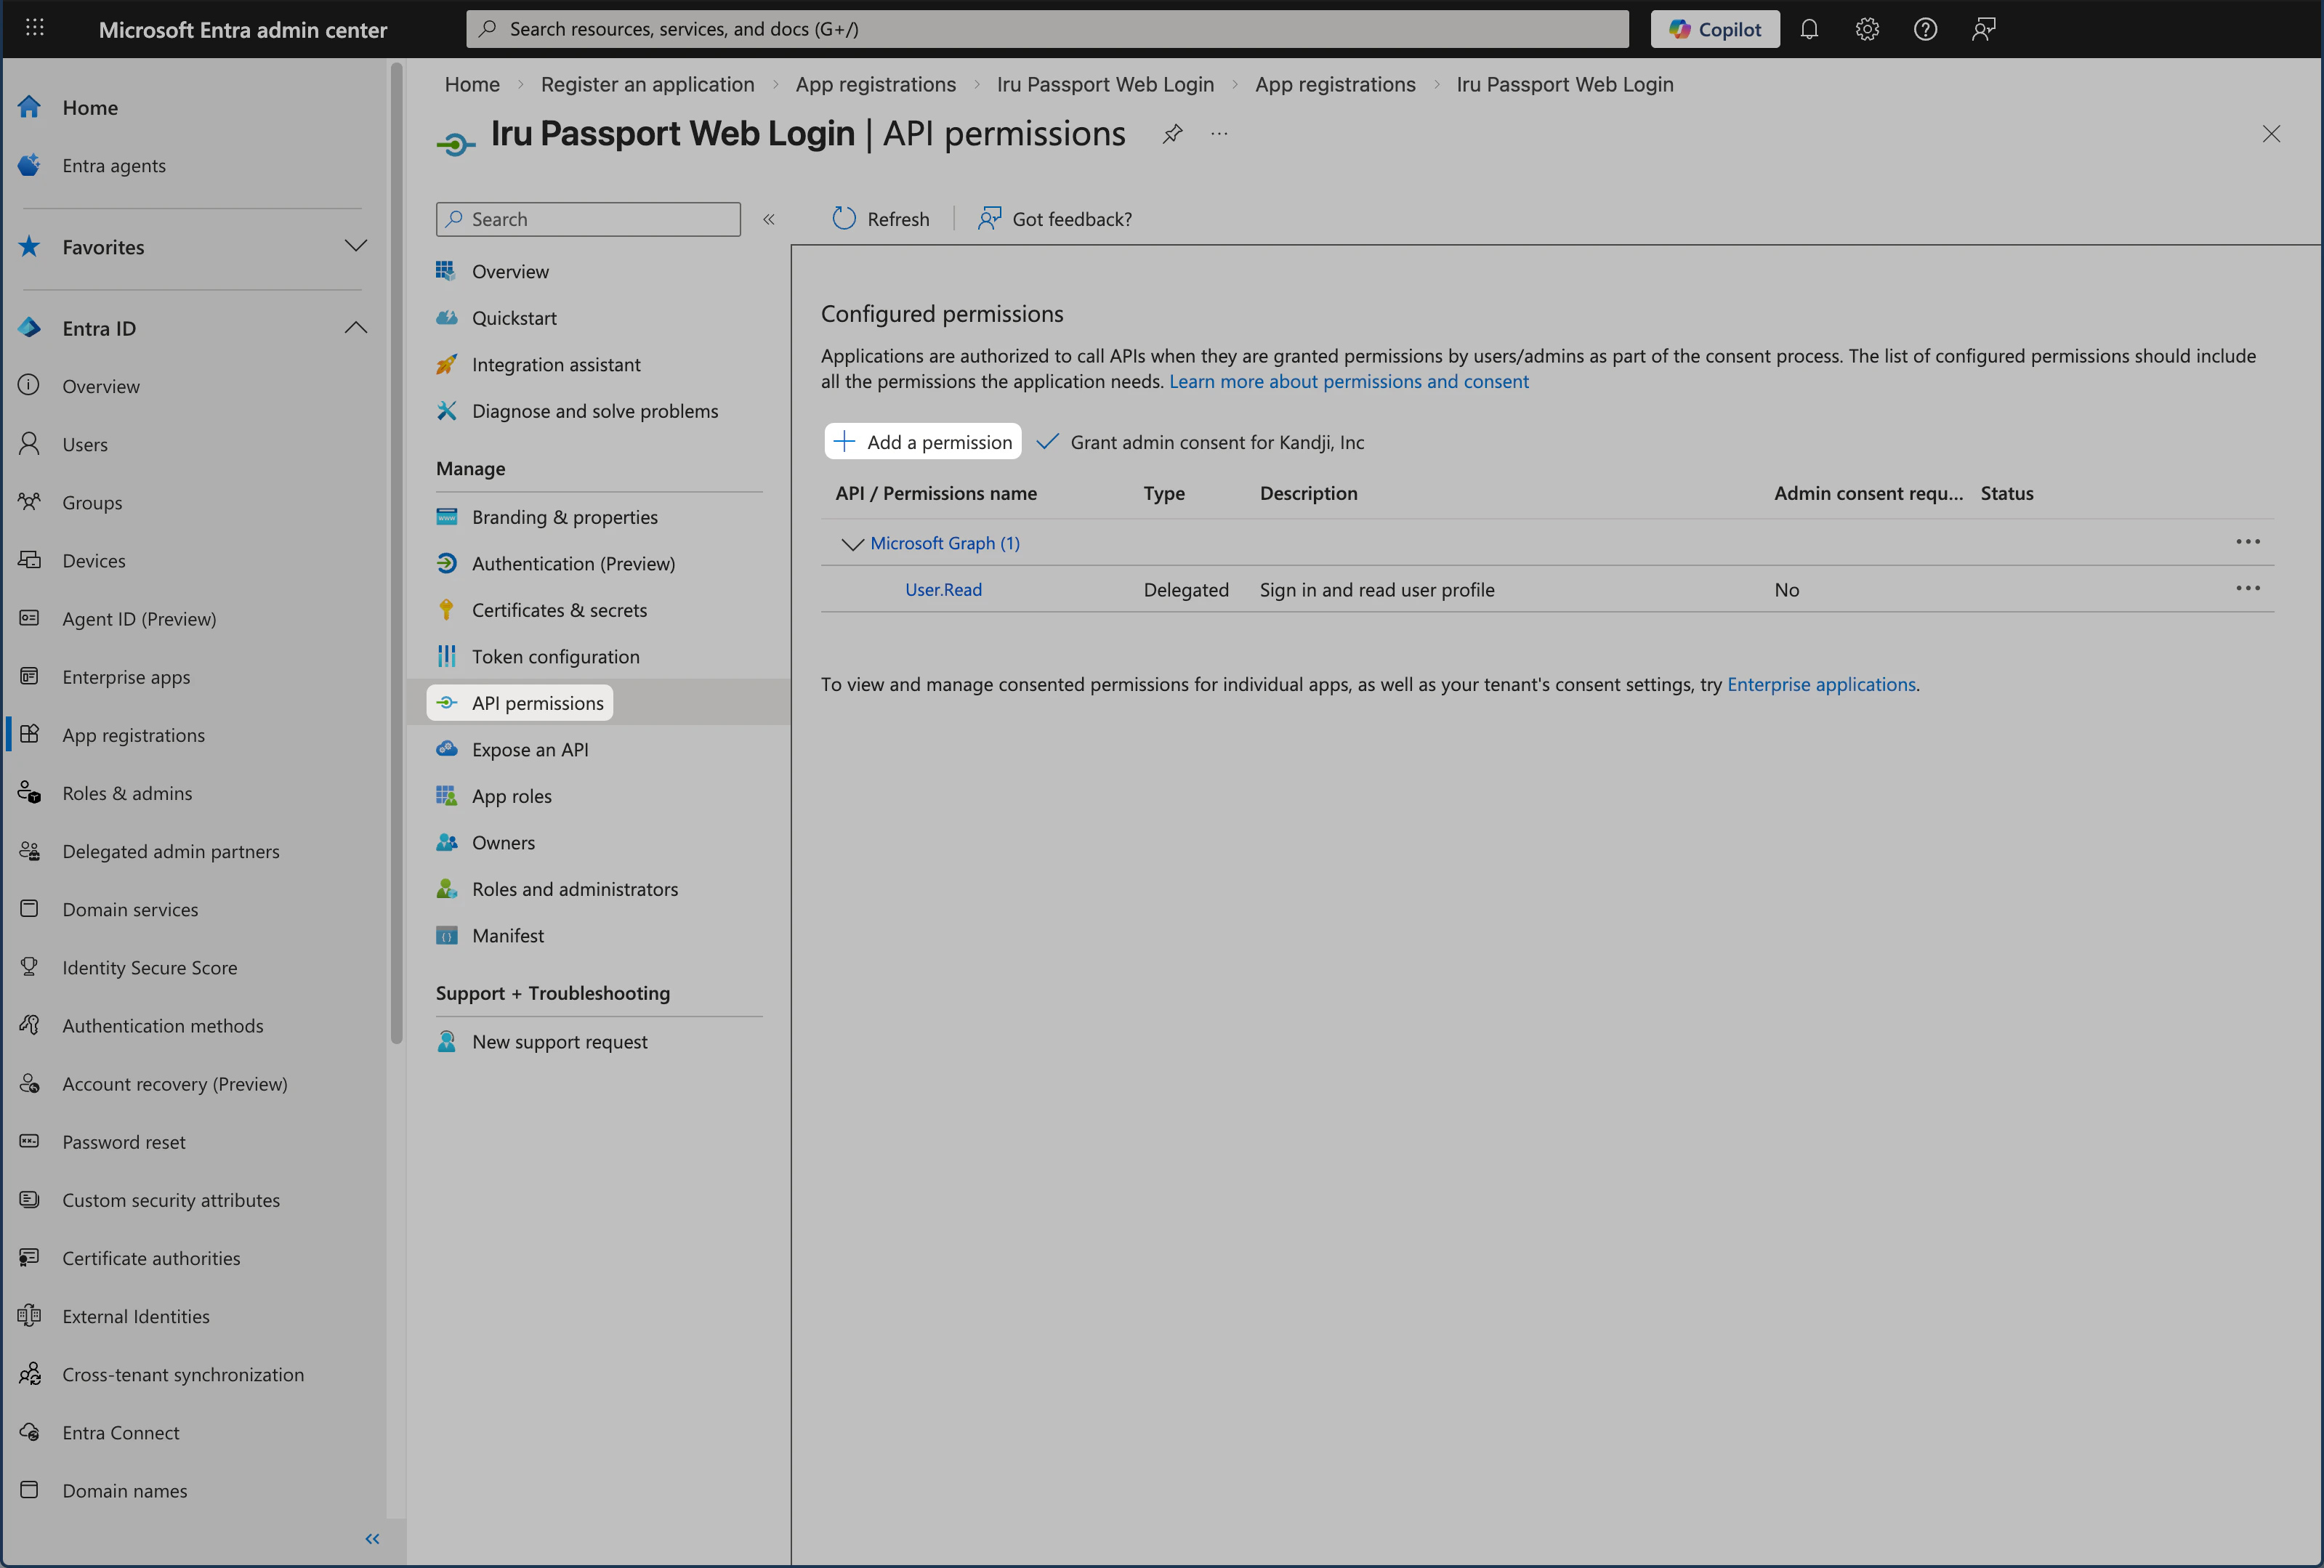 Click **Microsoft Graph**.
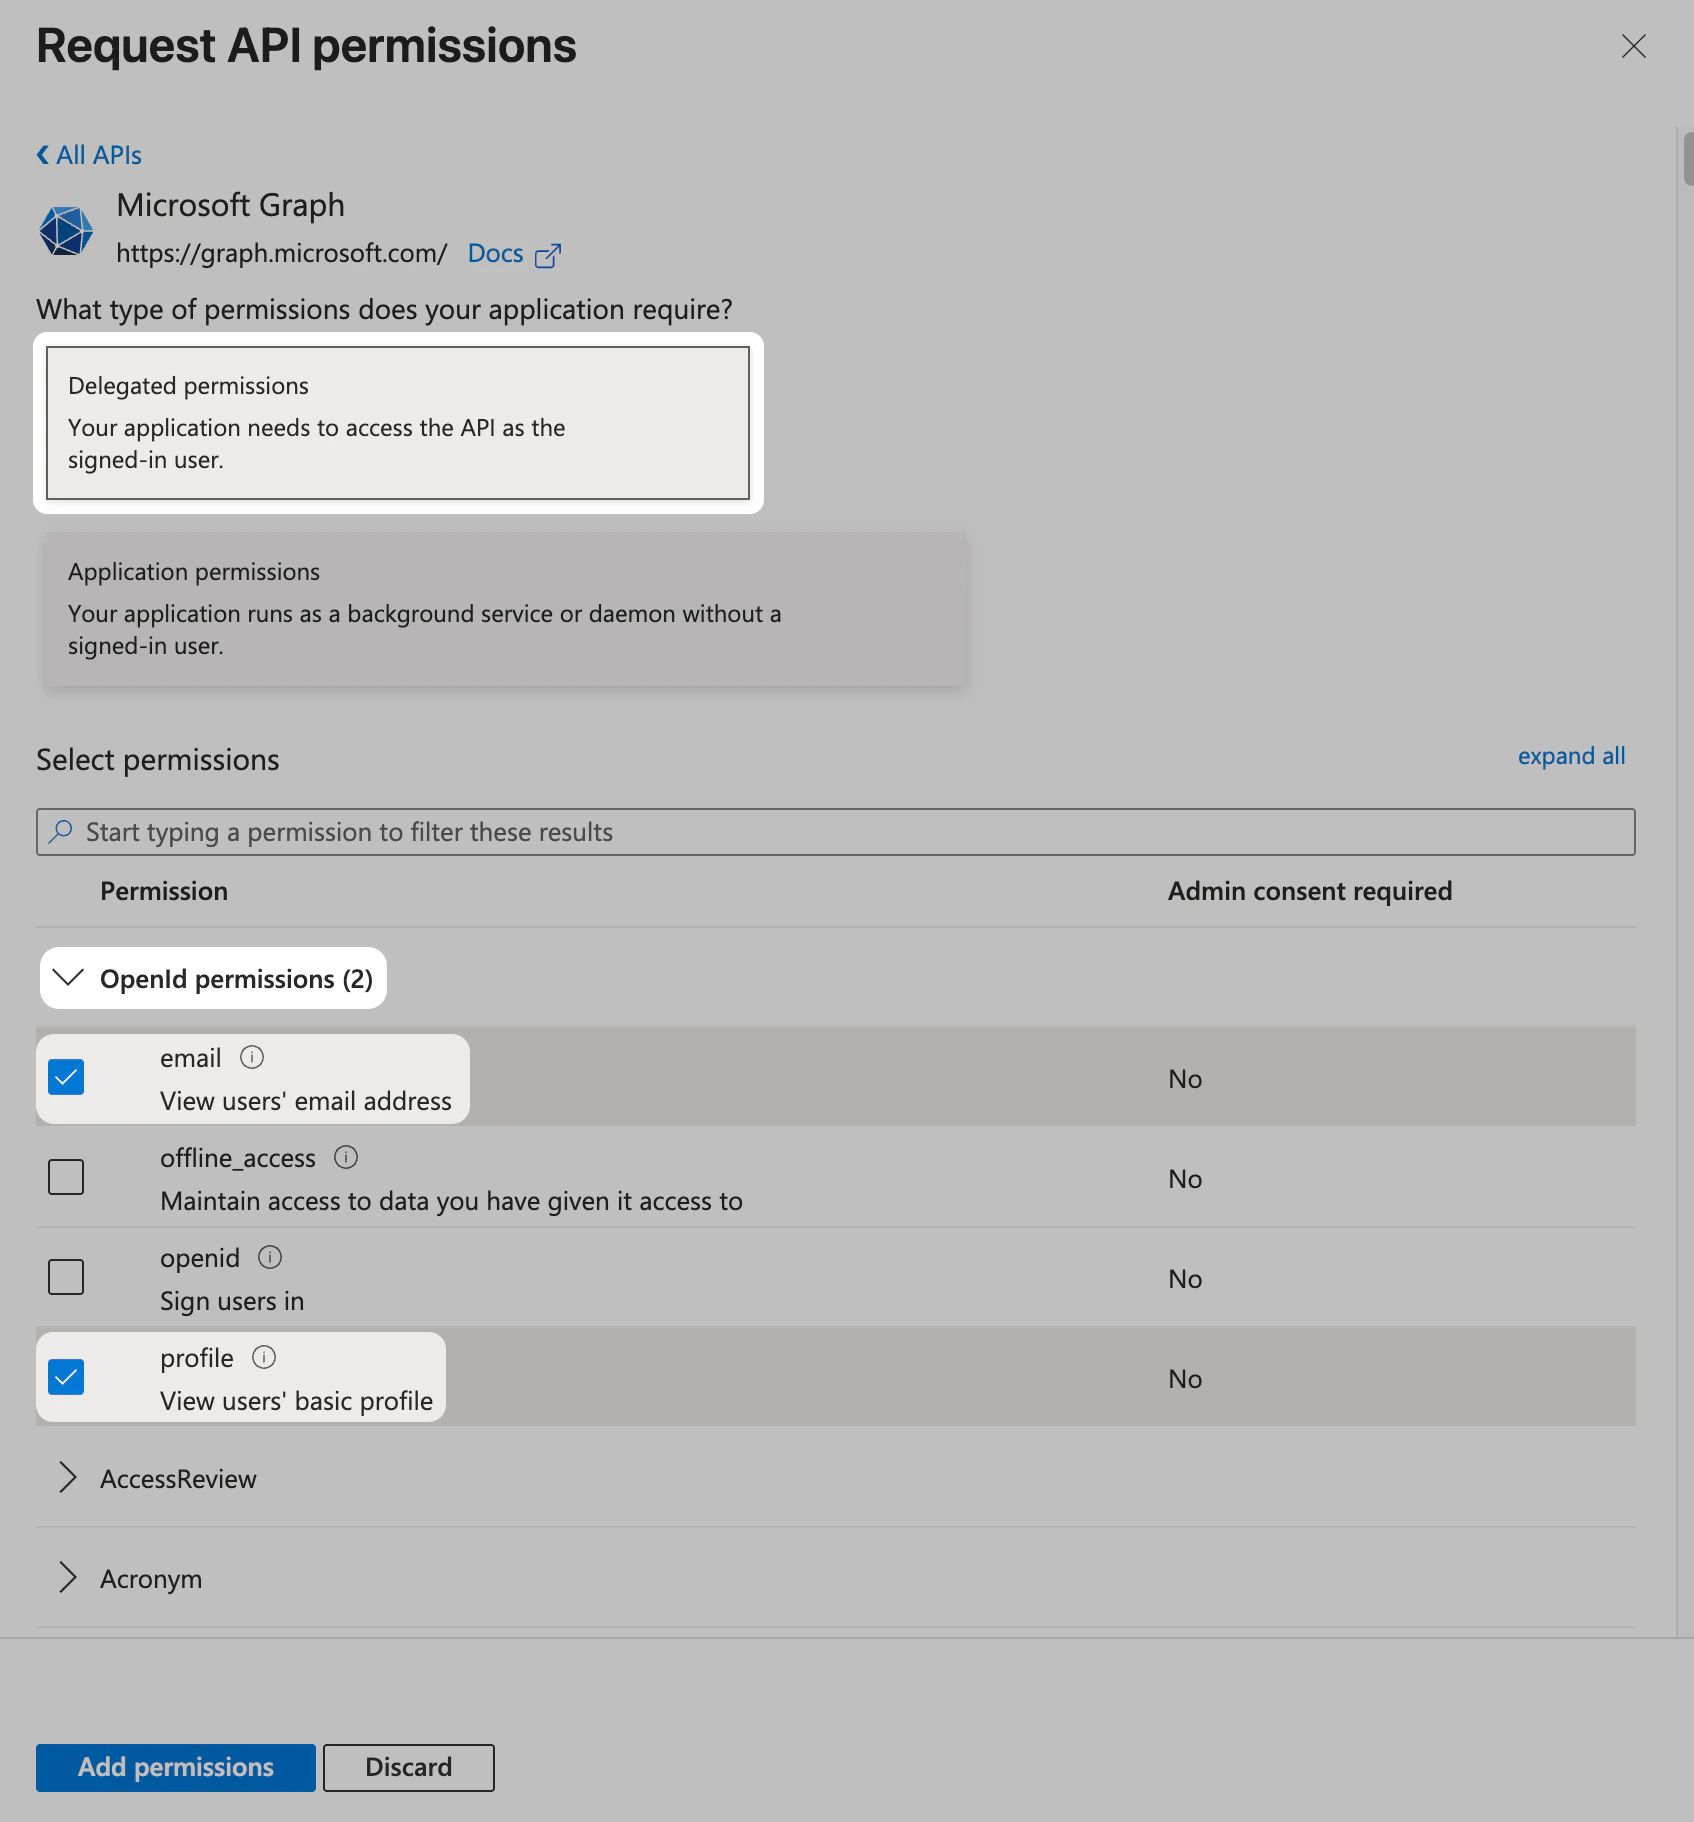
 Select **Delegated permissions**.
Confirm that the **OpenID permissions** section is expanded. If it isn't, click the icon next to it to expand it.
Select **email** and **profile**.
Select **Delegated permissions**.
Confirm that the **OpenID permissions** section is expanded. If it isn't, click the icon next to it to expand it.
Select **email** and **profile**.
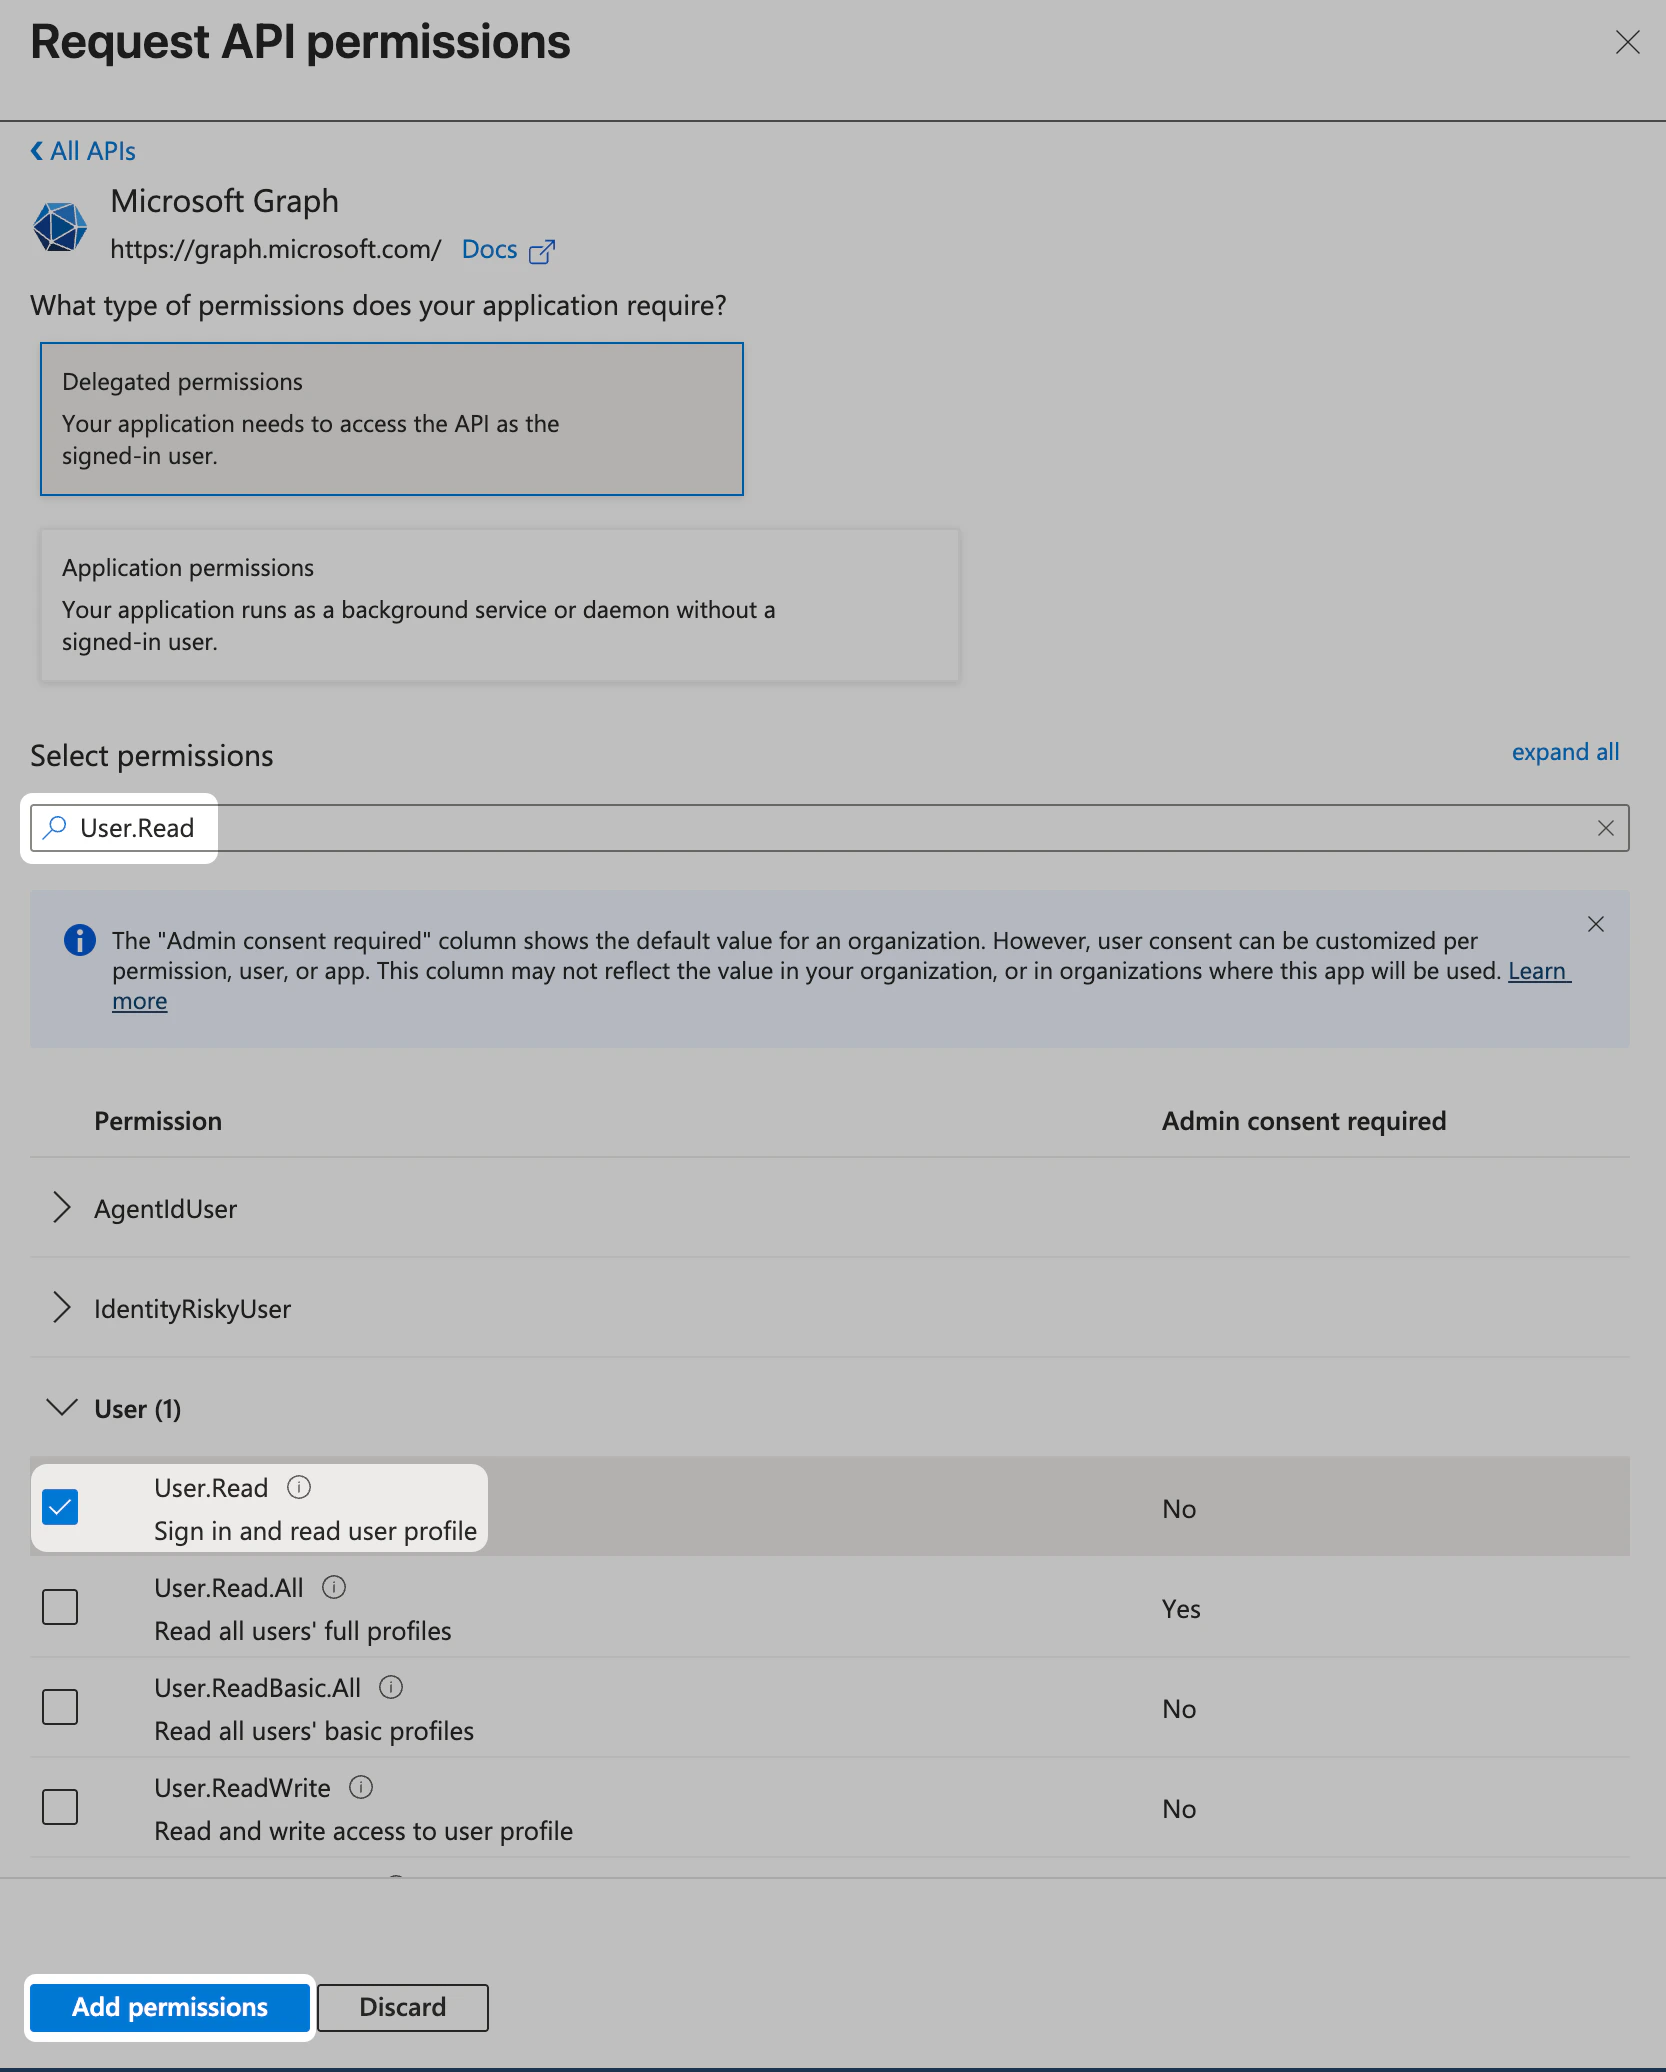
 In the **Select permissions** search field, enter **User.Read**.
In the User section, confirm that **User.Read** is already selected. If it isn't, select it.
Click **Add permissions**.
In the **Select permissions** search field, enter **User.Read**.
In the User section, confirm that **User.Read** is already selected. If it isn't, select it.
Click **Add permissions**.
 Select **Grant admin consent for \[your tenant]**.
Select **Yes**.
Select **Grant admin consent for \[your tenant]**.
Select **Yes**.
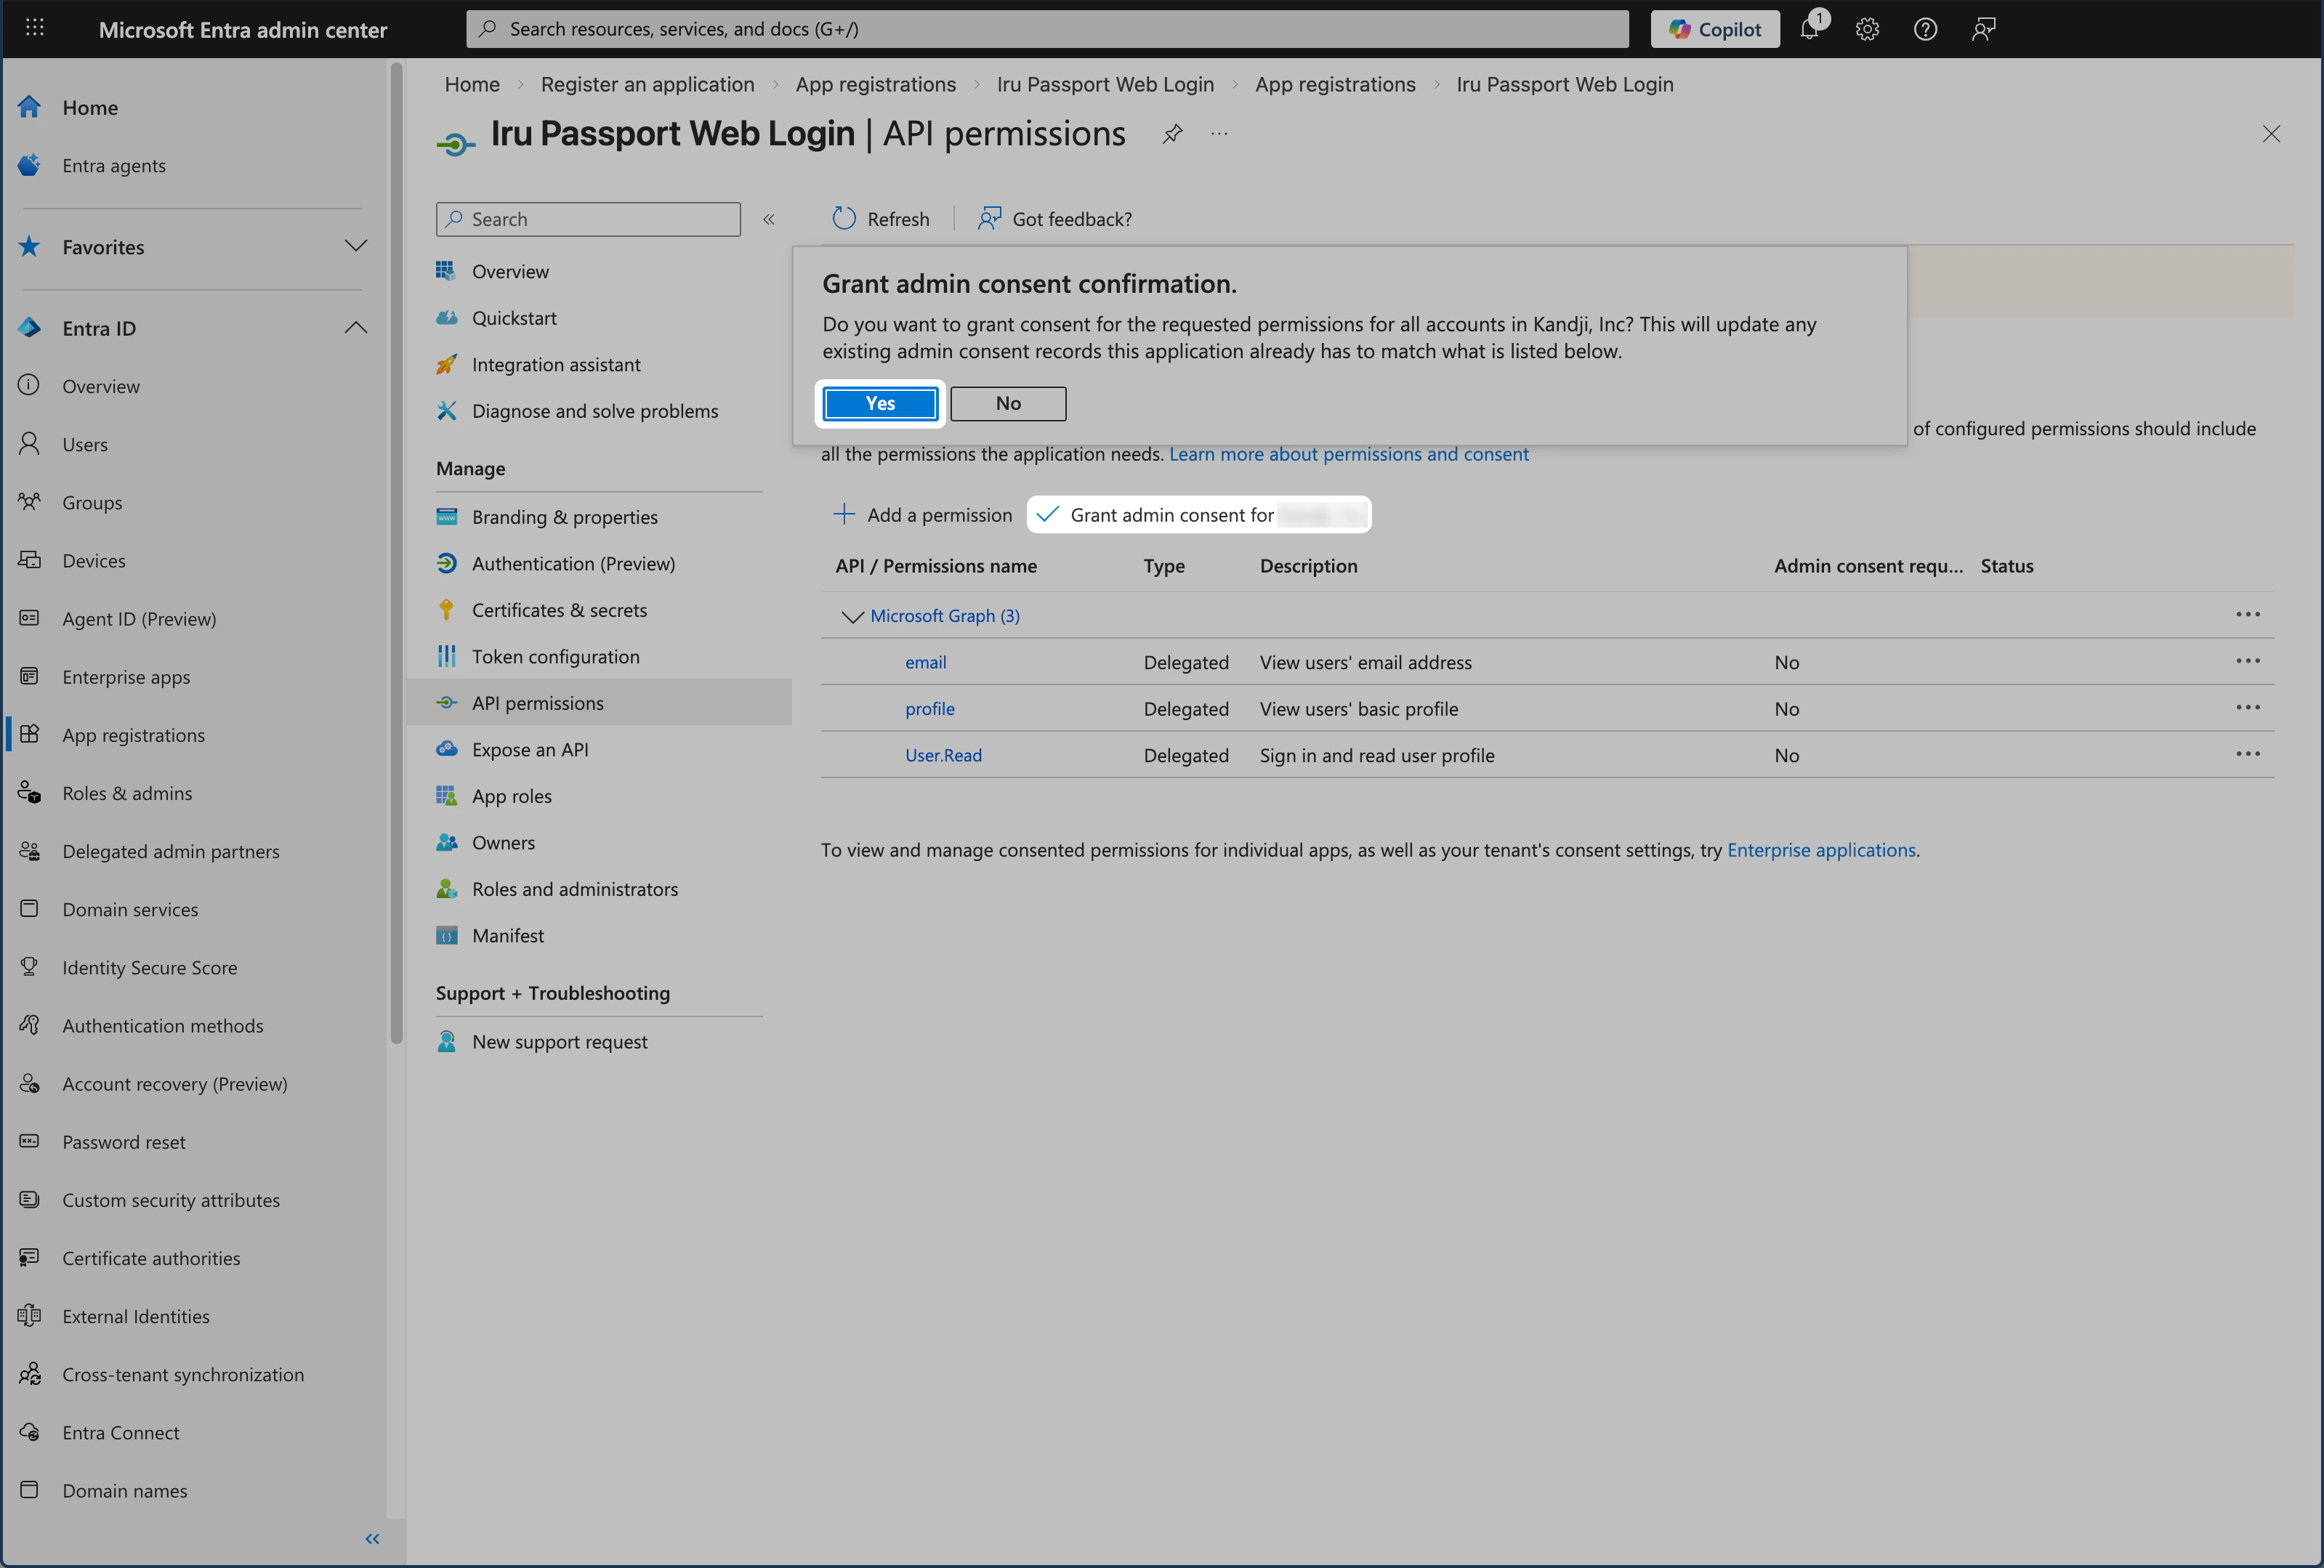 Confirm that there is a ** Granted for \[your tenant]** message in the **Status** column for each permission.
 ### Assign Users and Groups
Configure who can use the Passport app and whether it appears in the user portal. By default, all users in Entra ID can use the app; the steps below cover the Properties settings and assigning users or users and groups when required.
In the Entra ID navigation menu on the left, select **Enterprise Apps**.
In the All applications list, select **Iru Passport Web Login** or whatever name you gave the App registration in the previous section.
### Assign Users and Groups
Configure who can use the Passport app and whether it appears in the user portal. By default, all users in Entra ID can use the app; the steps below cover the Properties settings and assigning users or users and groups when required.
In the Entra ID navigation menu on the left, select **Enterprise Apps**.
In the All applications list, select **Iru Passport Web Login** or whatever name you gave the App registration in the previous section.
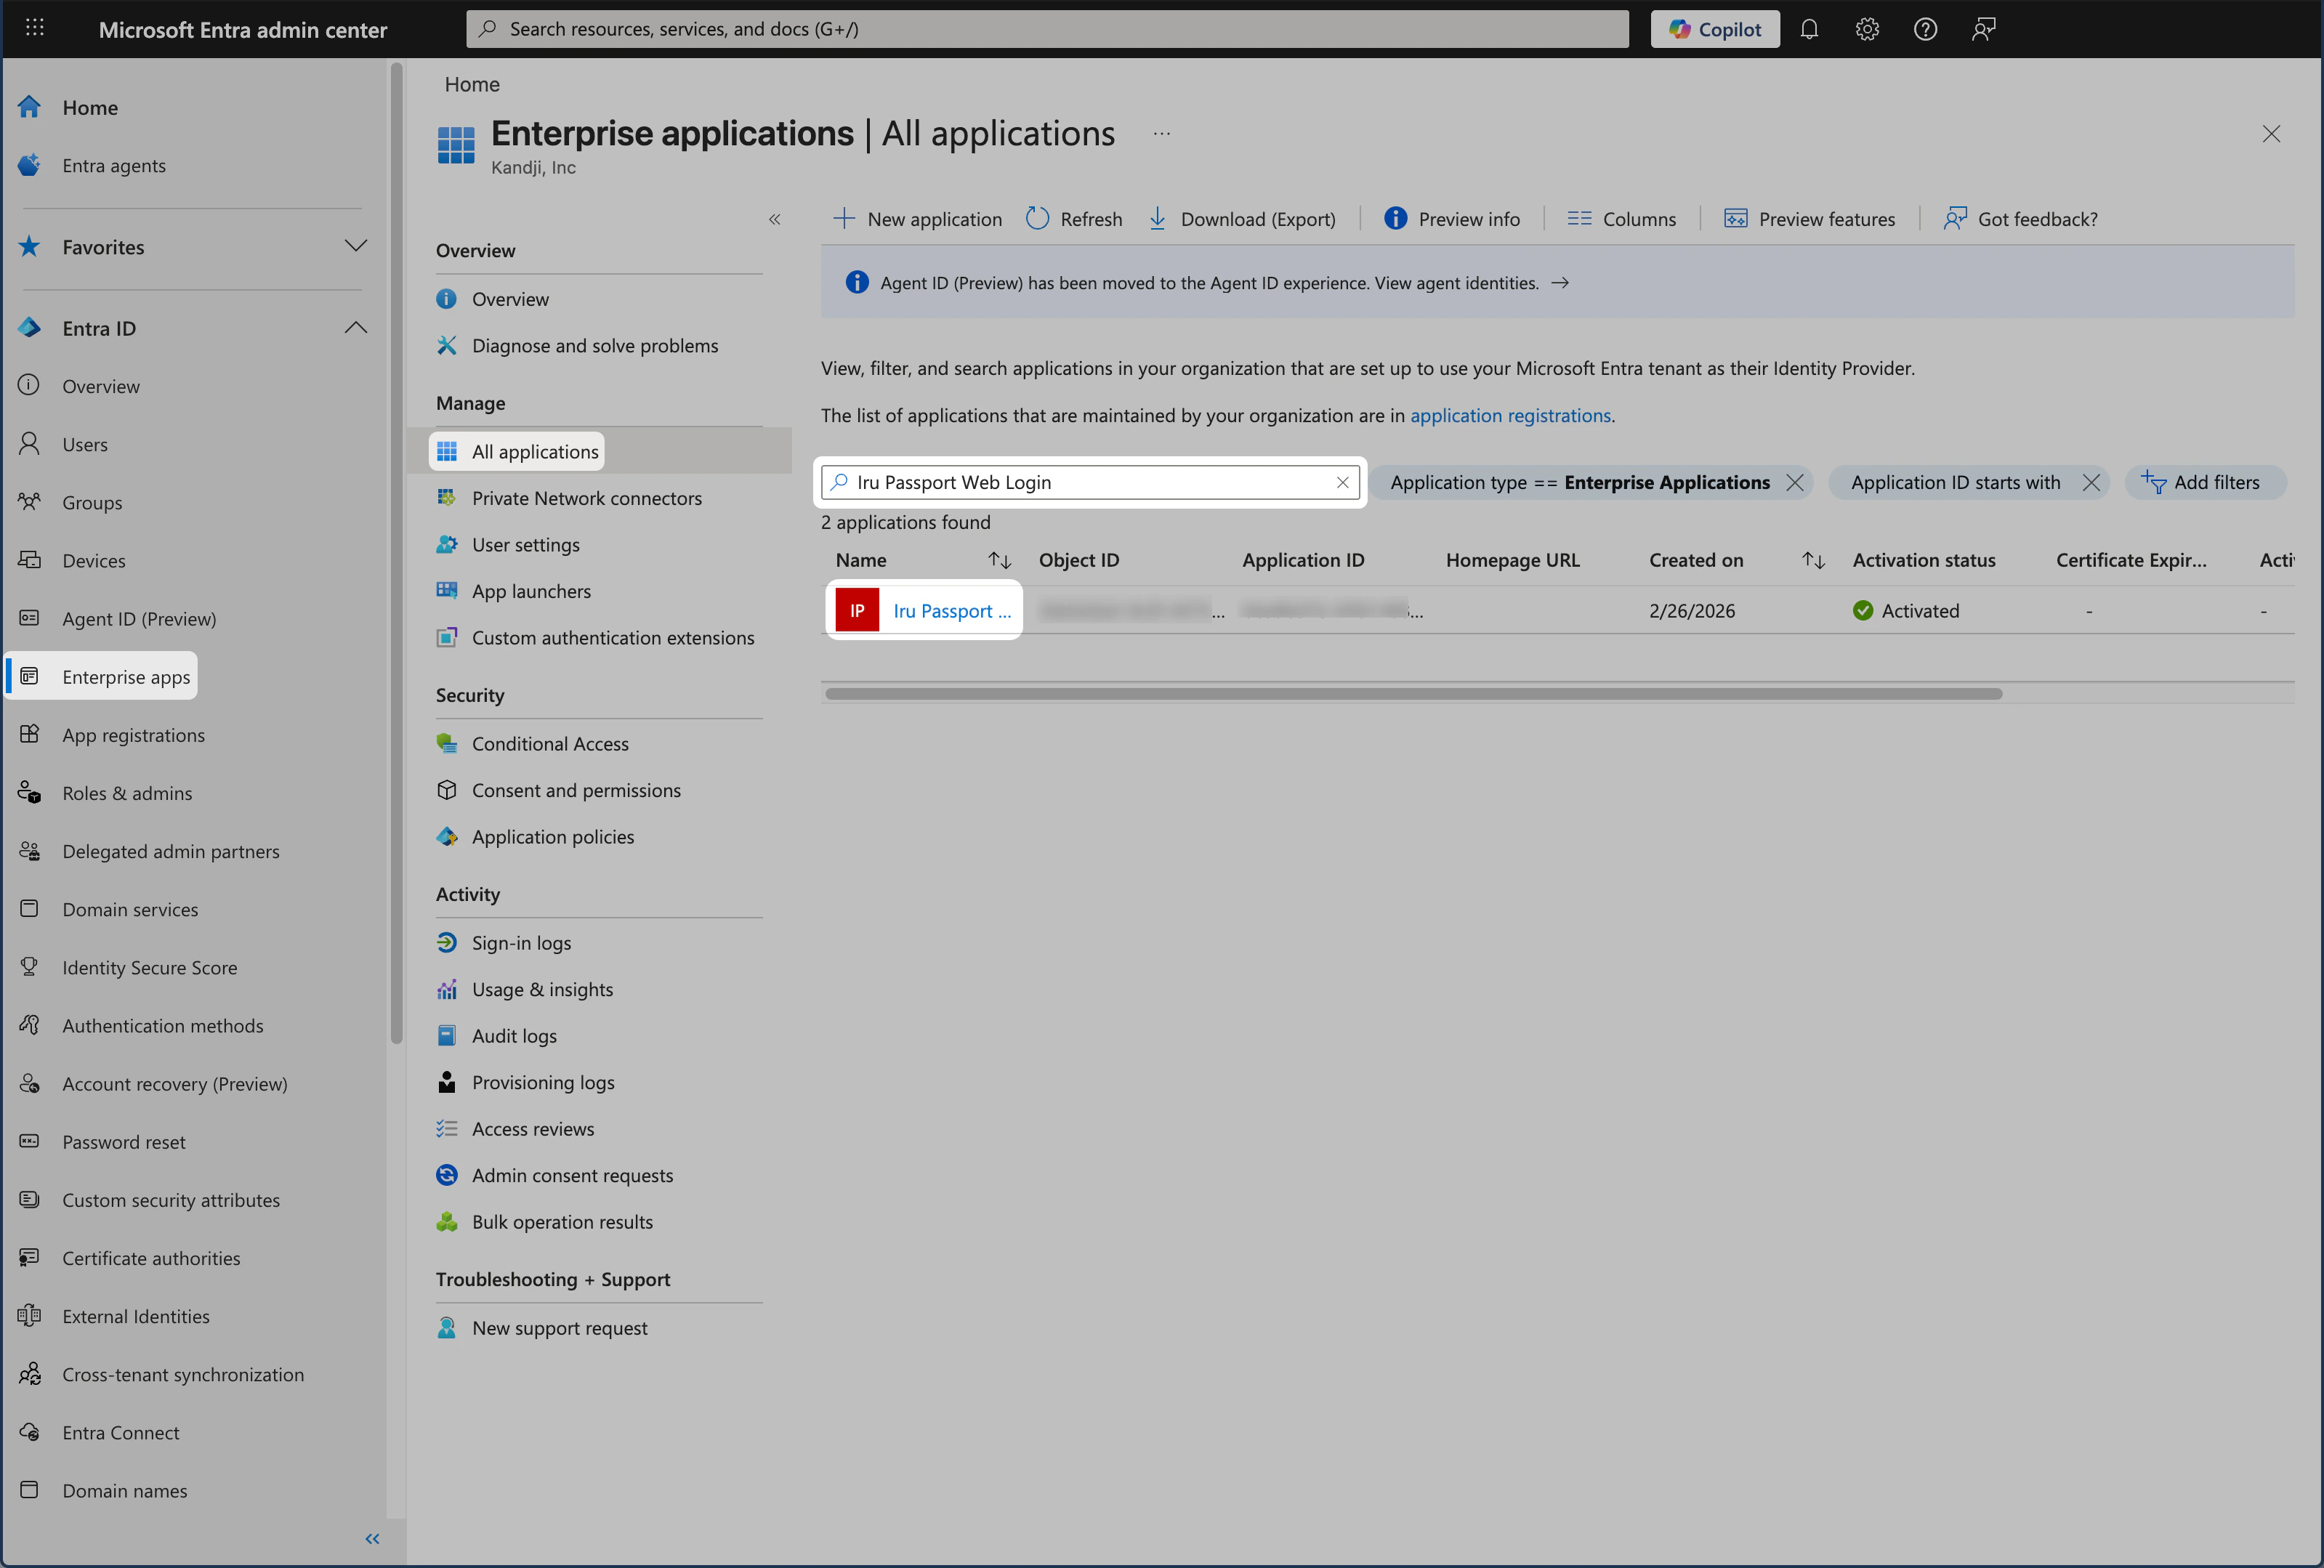 In the left menu, under the **Manage** category, select **Properties** to open that pane.
Optionally, add a logo to your Enterprise App.
Inspect the **Assignment required?** setting:
* **No**: You will not need to assign users or users and groups.
* **Yes**: You will need to assign users or users and groups.
Set **Visible to users?** to **No**.
If it is **Yes**, users will see the app in their portal. The Passport app is only useful as a replacement for the macOS login window.
Click **Save**.
In the left menu, under the **Manage** category, select **Properties** to open that pane.
Optionally, add a logo to your Enterprise App.
Inspect the **Assignment required?** setting:
* **No**: You will not need to assign users or users and groups.
* **Yes**: You will need to assign users or users and groups.
Set **Visible to users?** to **No**.
If it is **Yes**, users will see the app in their portal. The Passport app is only useful as a replacement for the macOS login window.
Click **Save**.
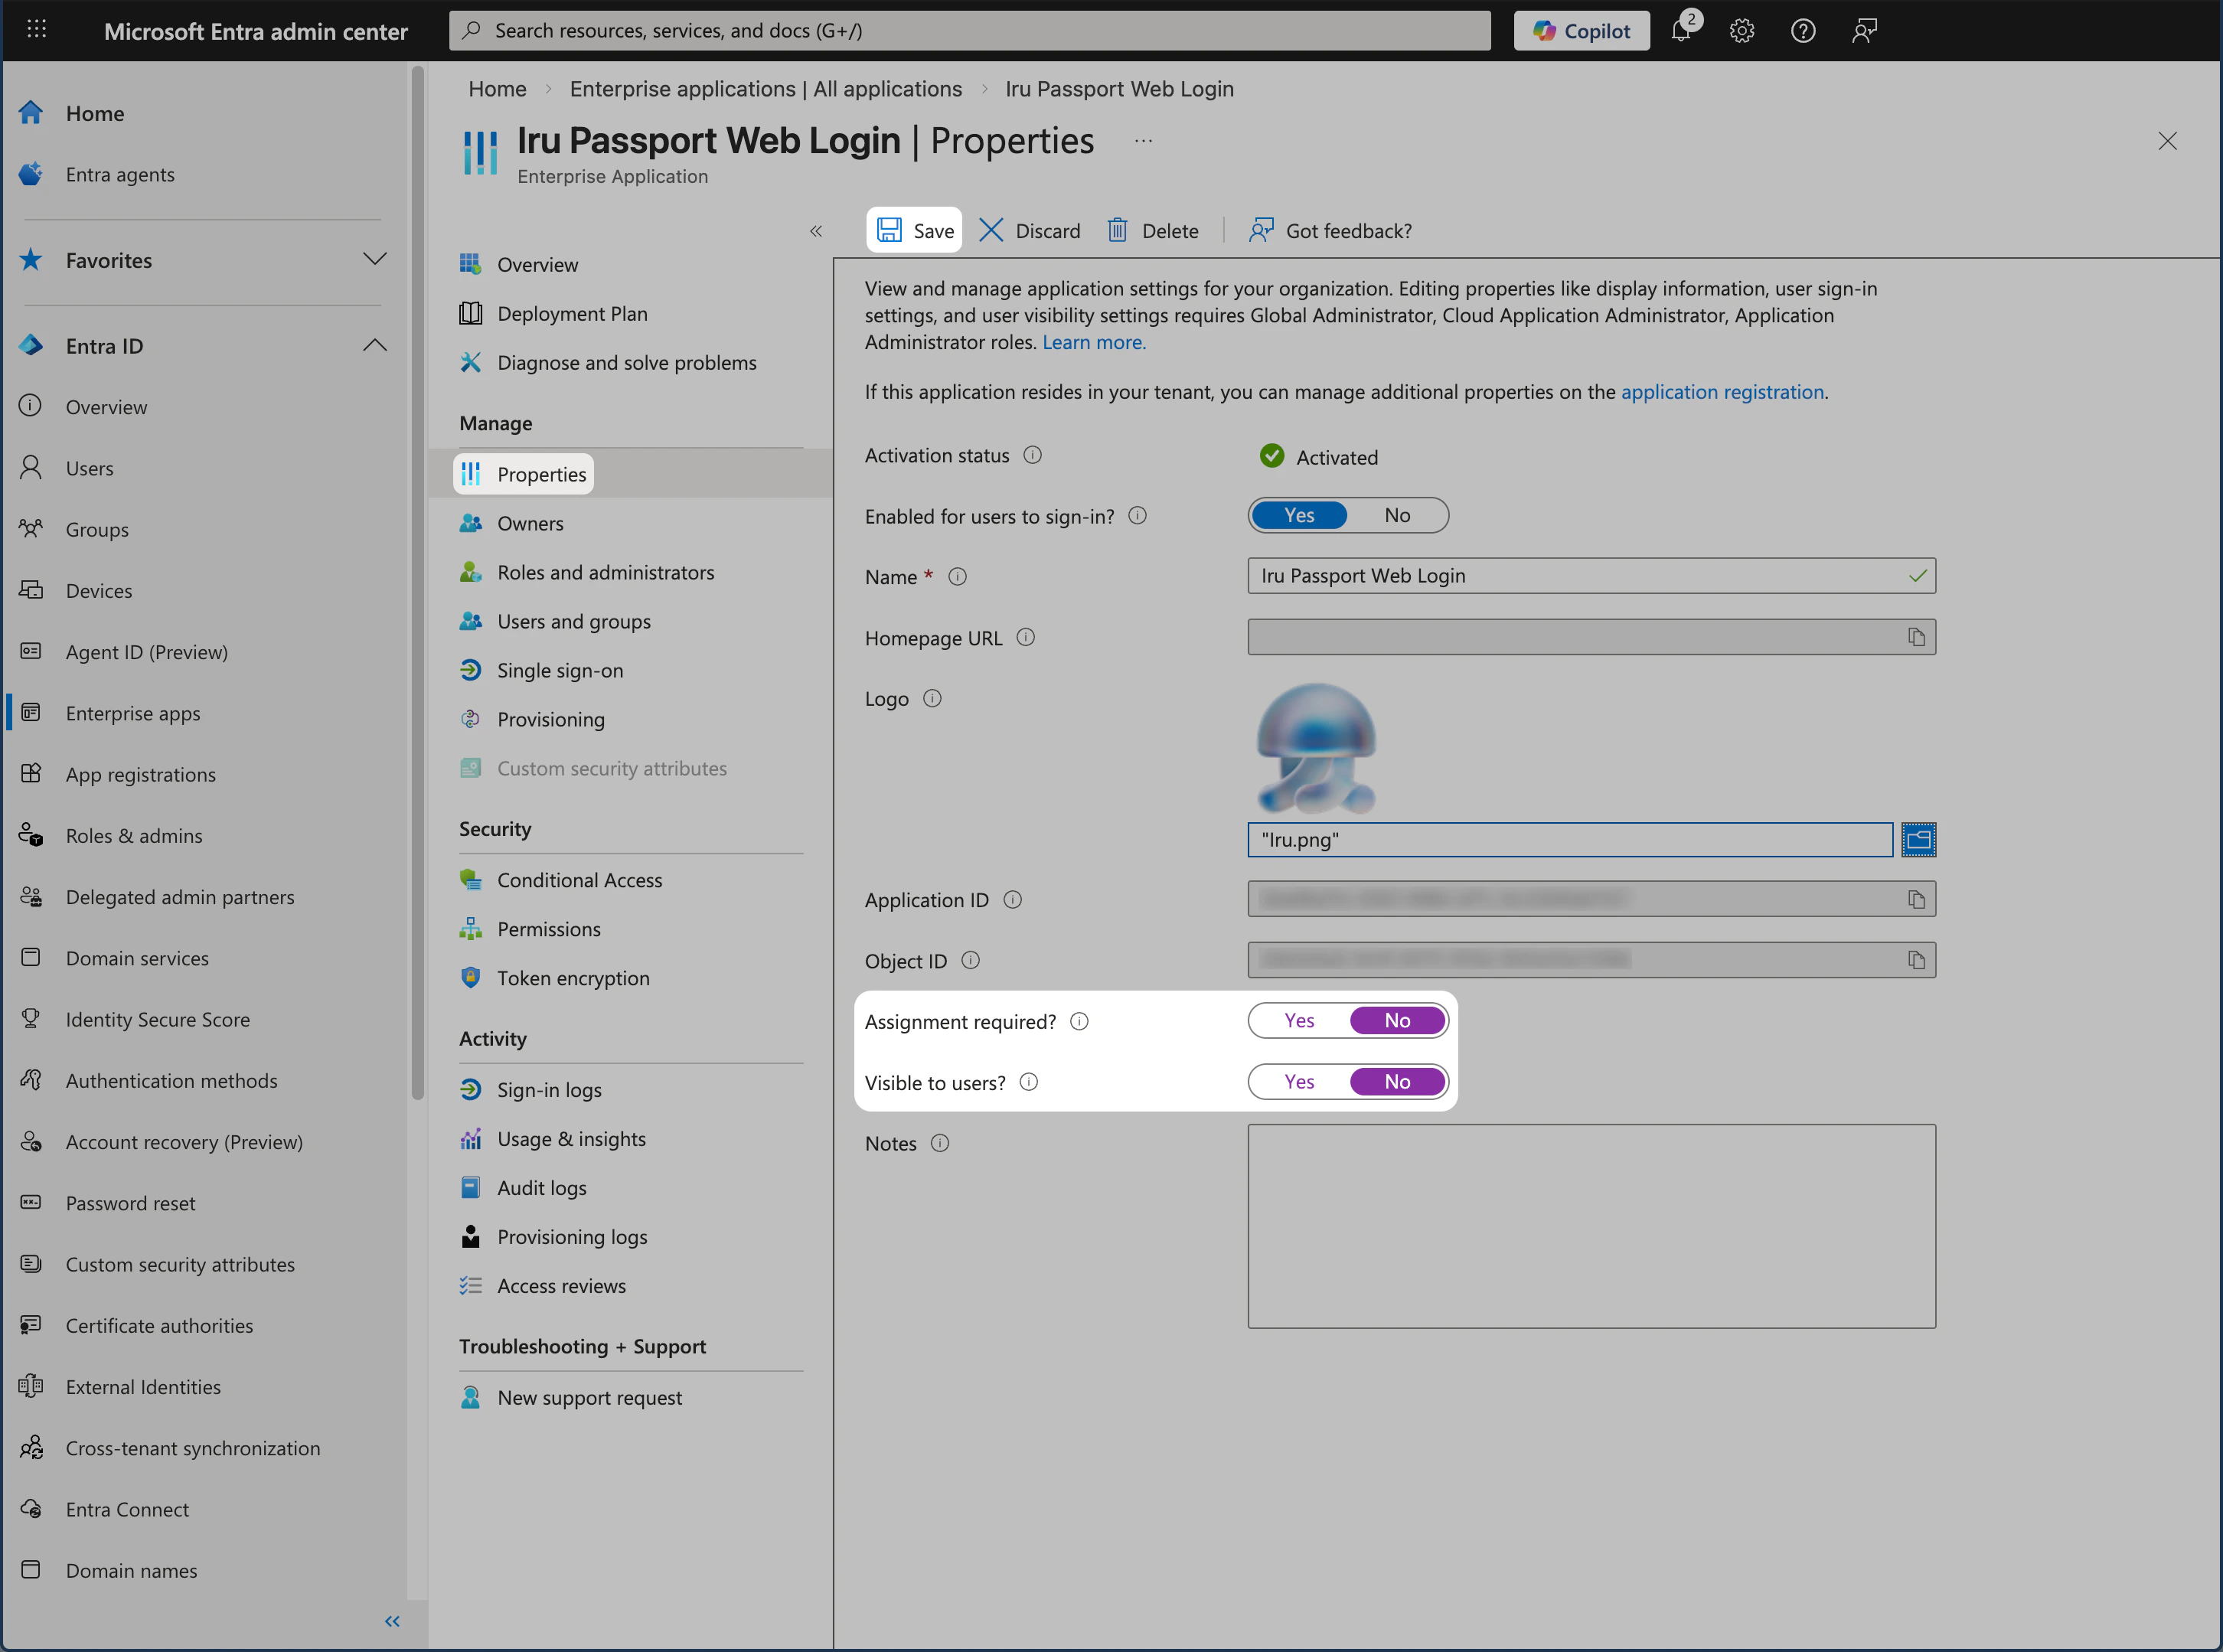 If **Assignment required?** is set to **No**, you can go directly to [User Account Provisioning via Passport](#user-account-provisioning-via-passport). If it is set to **Yes**, continue with the steps below.
#### Assignment Required
If your Passport Enterprise application has **Assignment required?** set to **Yes**, follow the steps below to assign users or users and groups.
In the left menu, under the **Manage** category, select **Users and groups** to open that pane.
On the menu, select **+ Add user/group**.
If **Assignment required?** is set to **No**, you can go directly to [User Account Provisioning via Passport](#user-account-provisioning-via-passport). If it is set to **Yes**, continue with the steps below.
#### Assignment Required
If your Passport Enterprise application has **Assignment required?** set to **Yes**, follow the steps below to assign users or users and groups.
In the left menu, under the **Manage** category, select **Users and groups** to open that pane.
On the menu, select **+ Add user/group**.
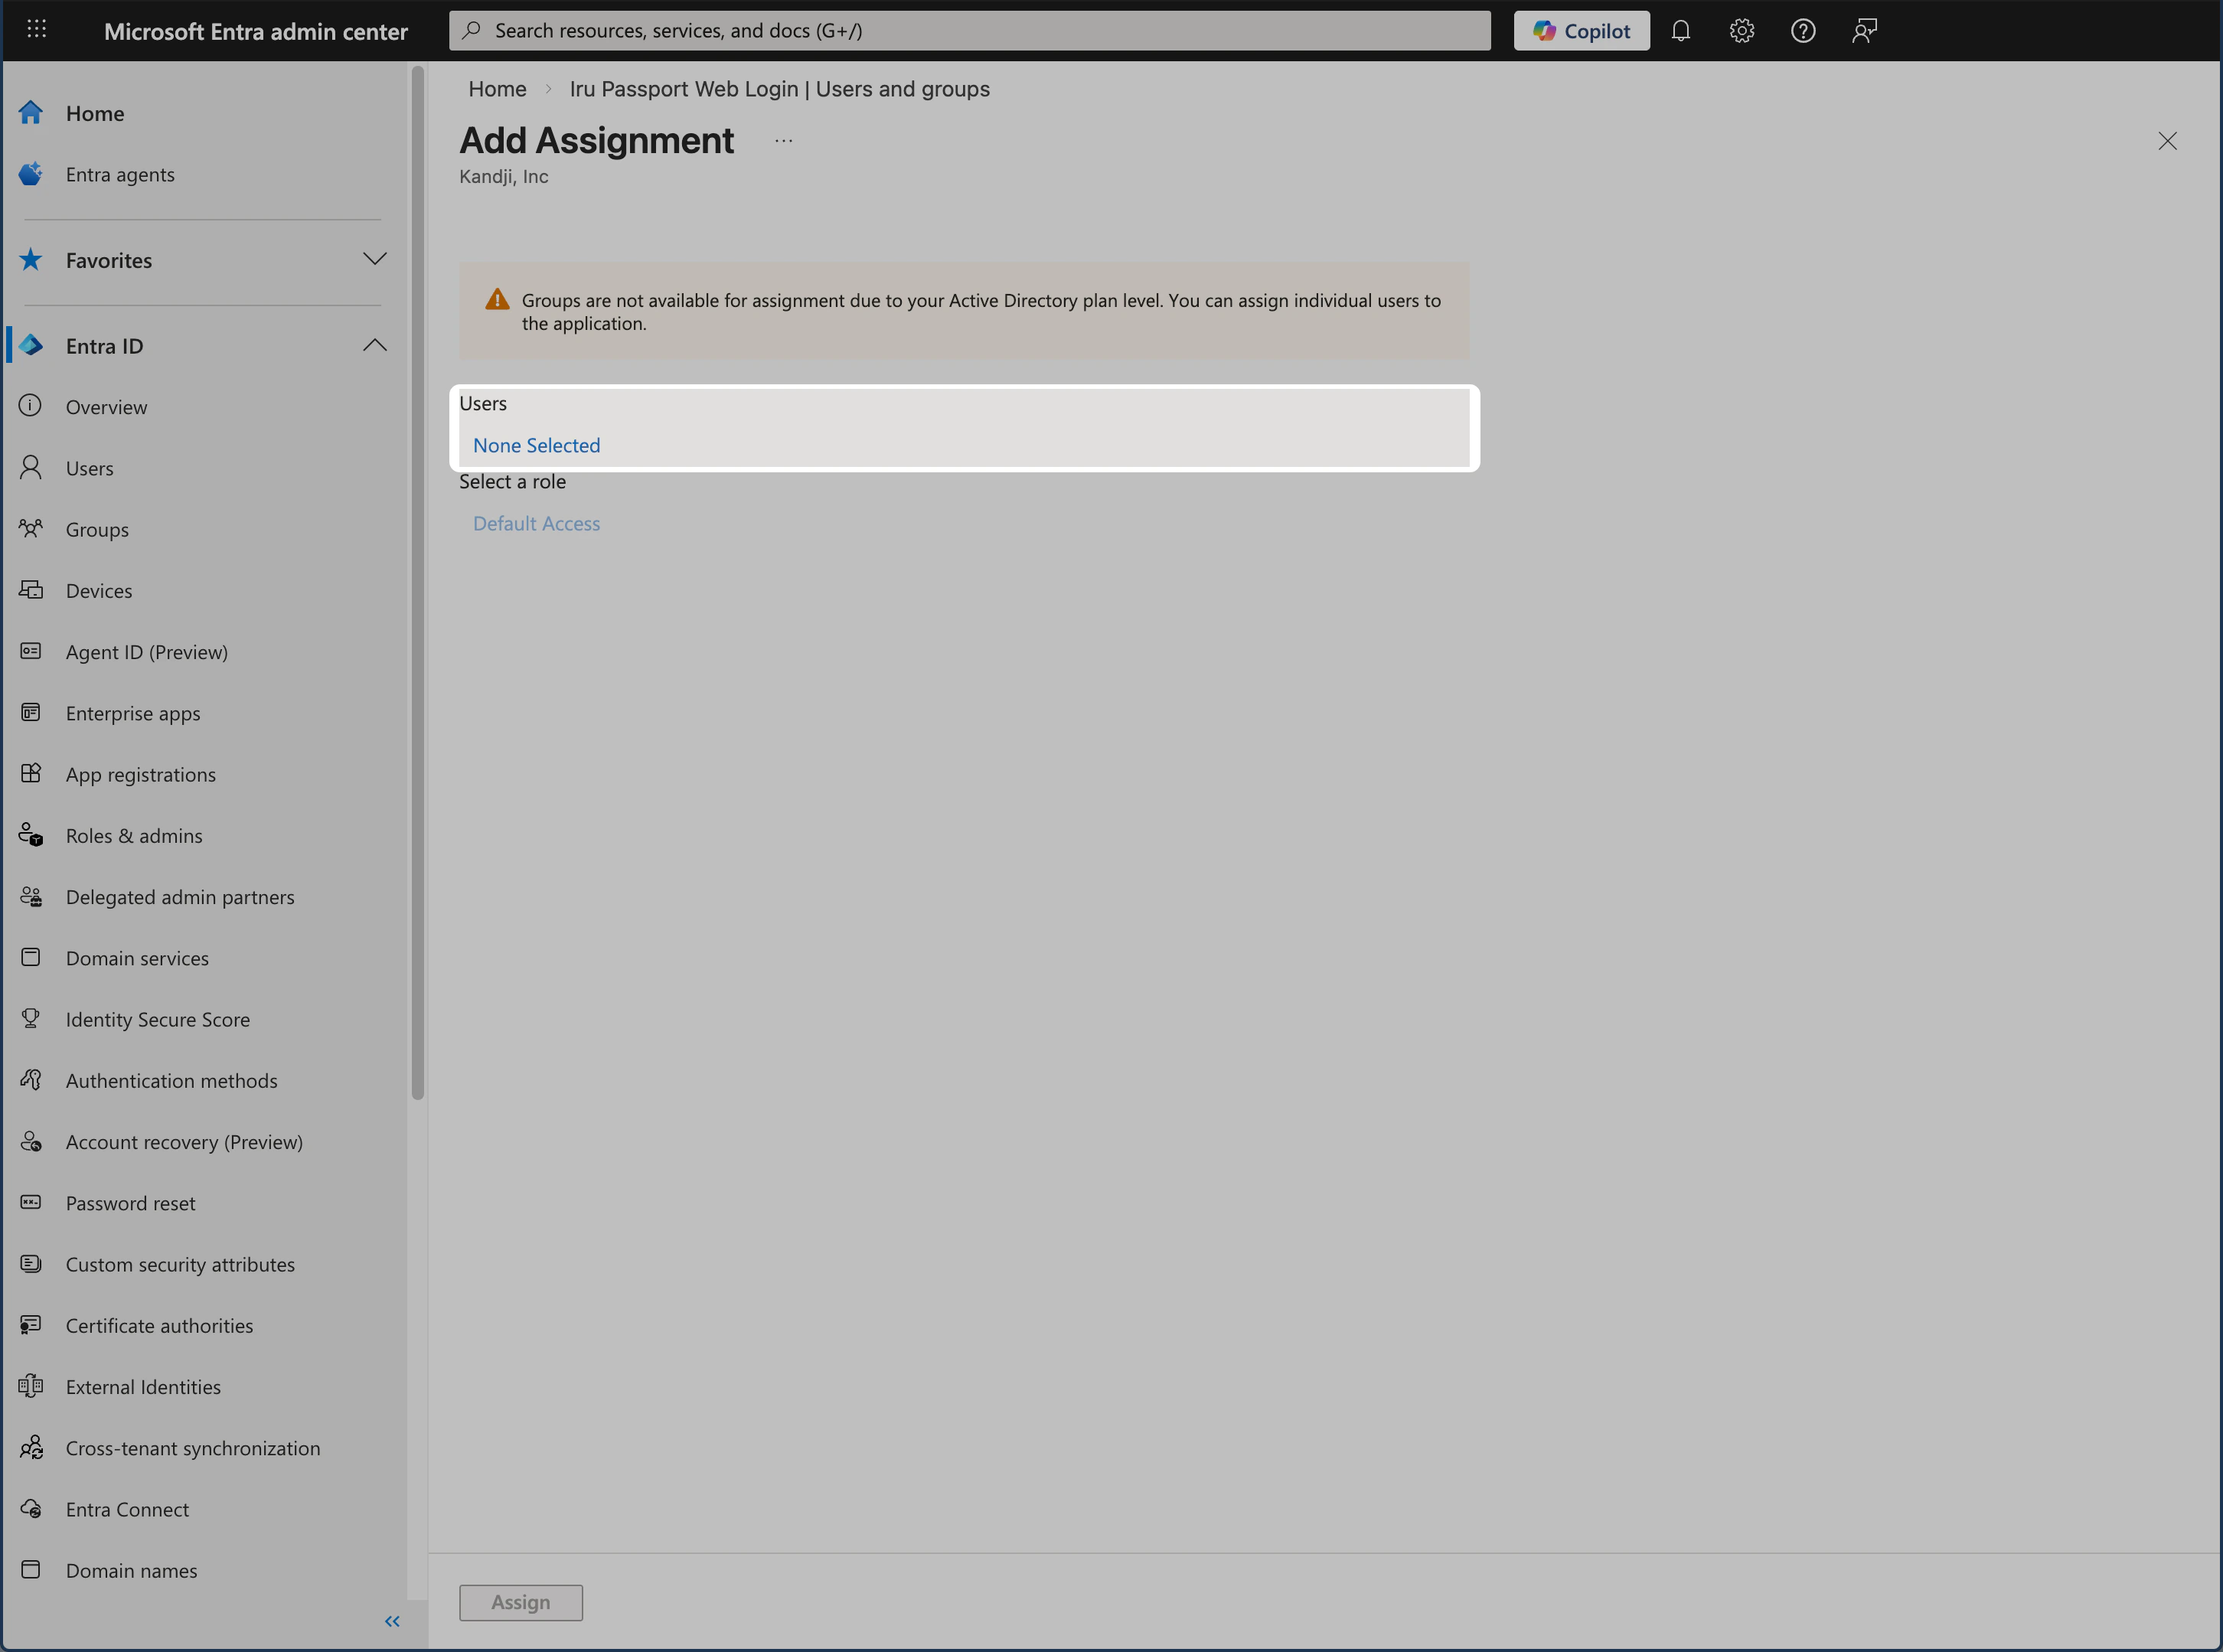
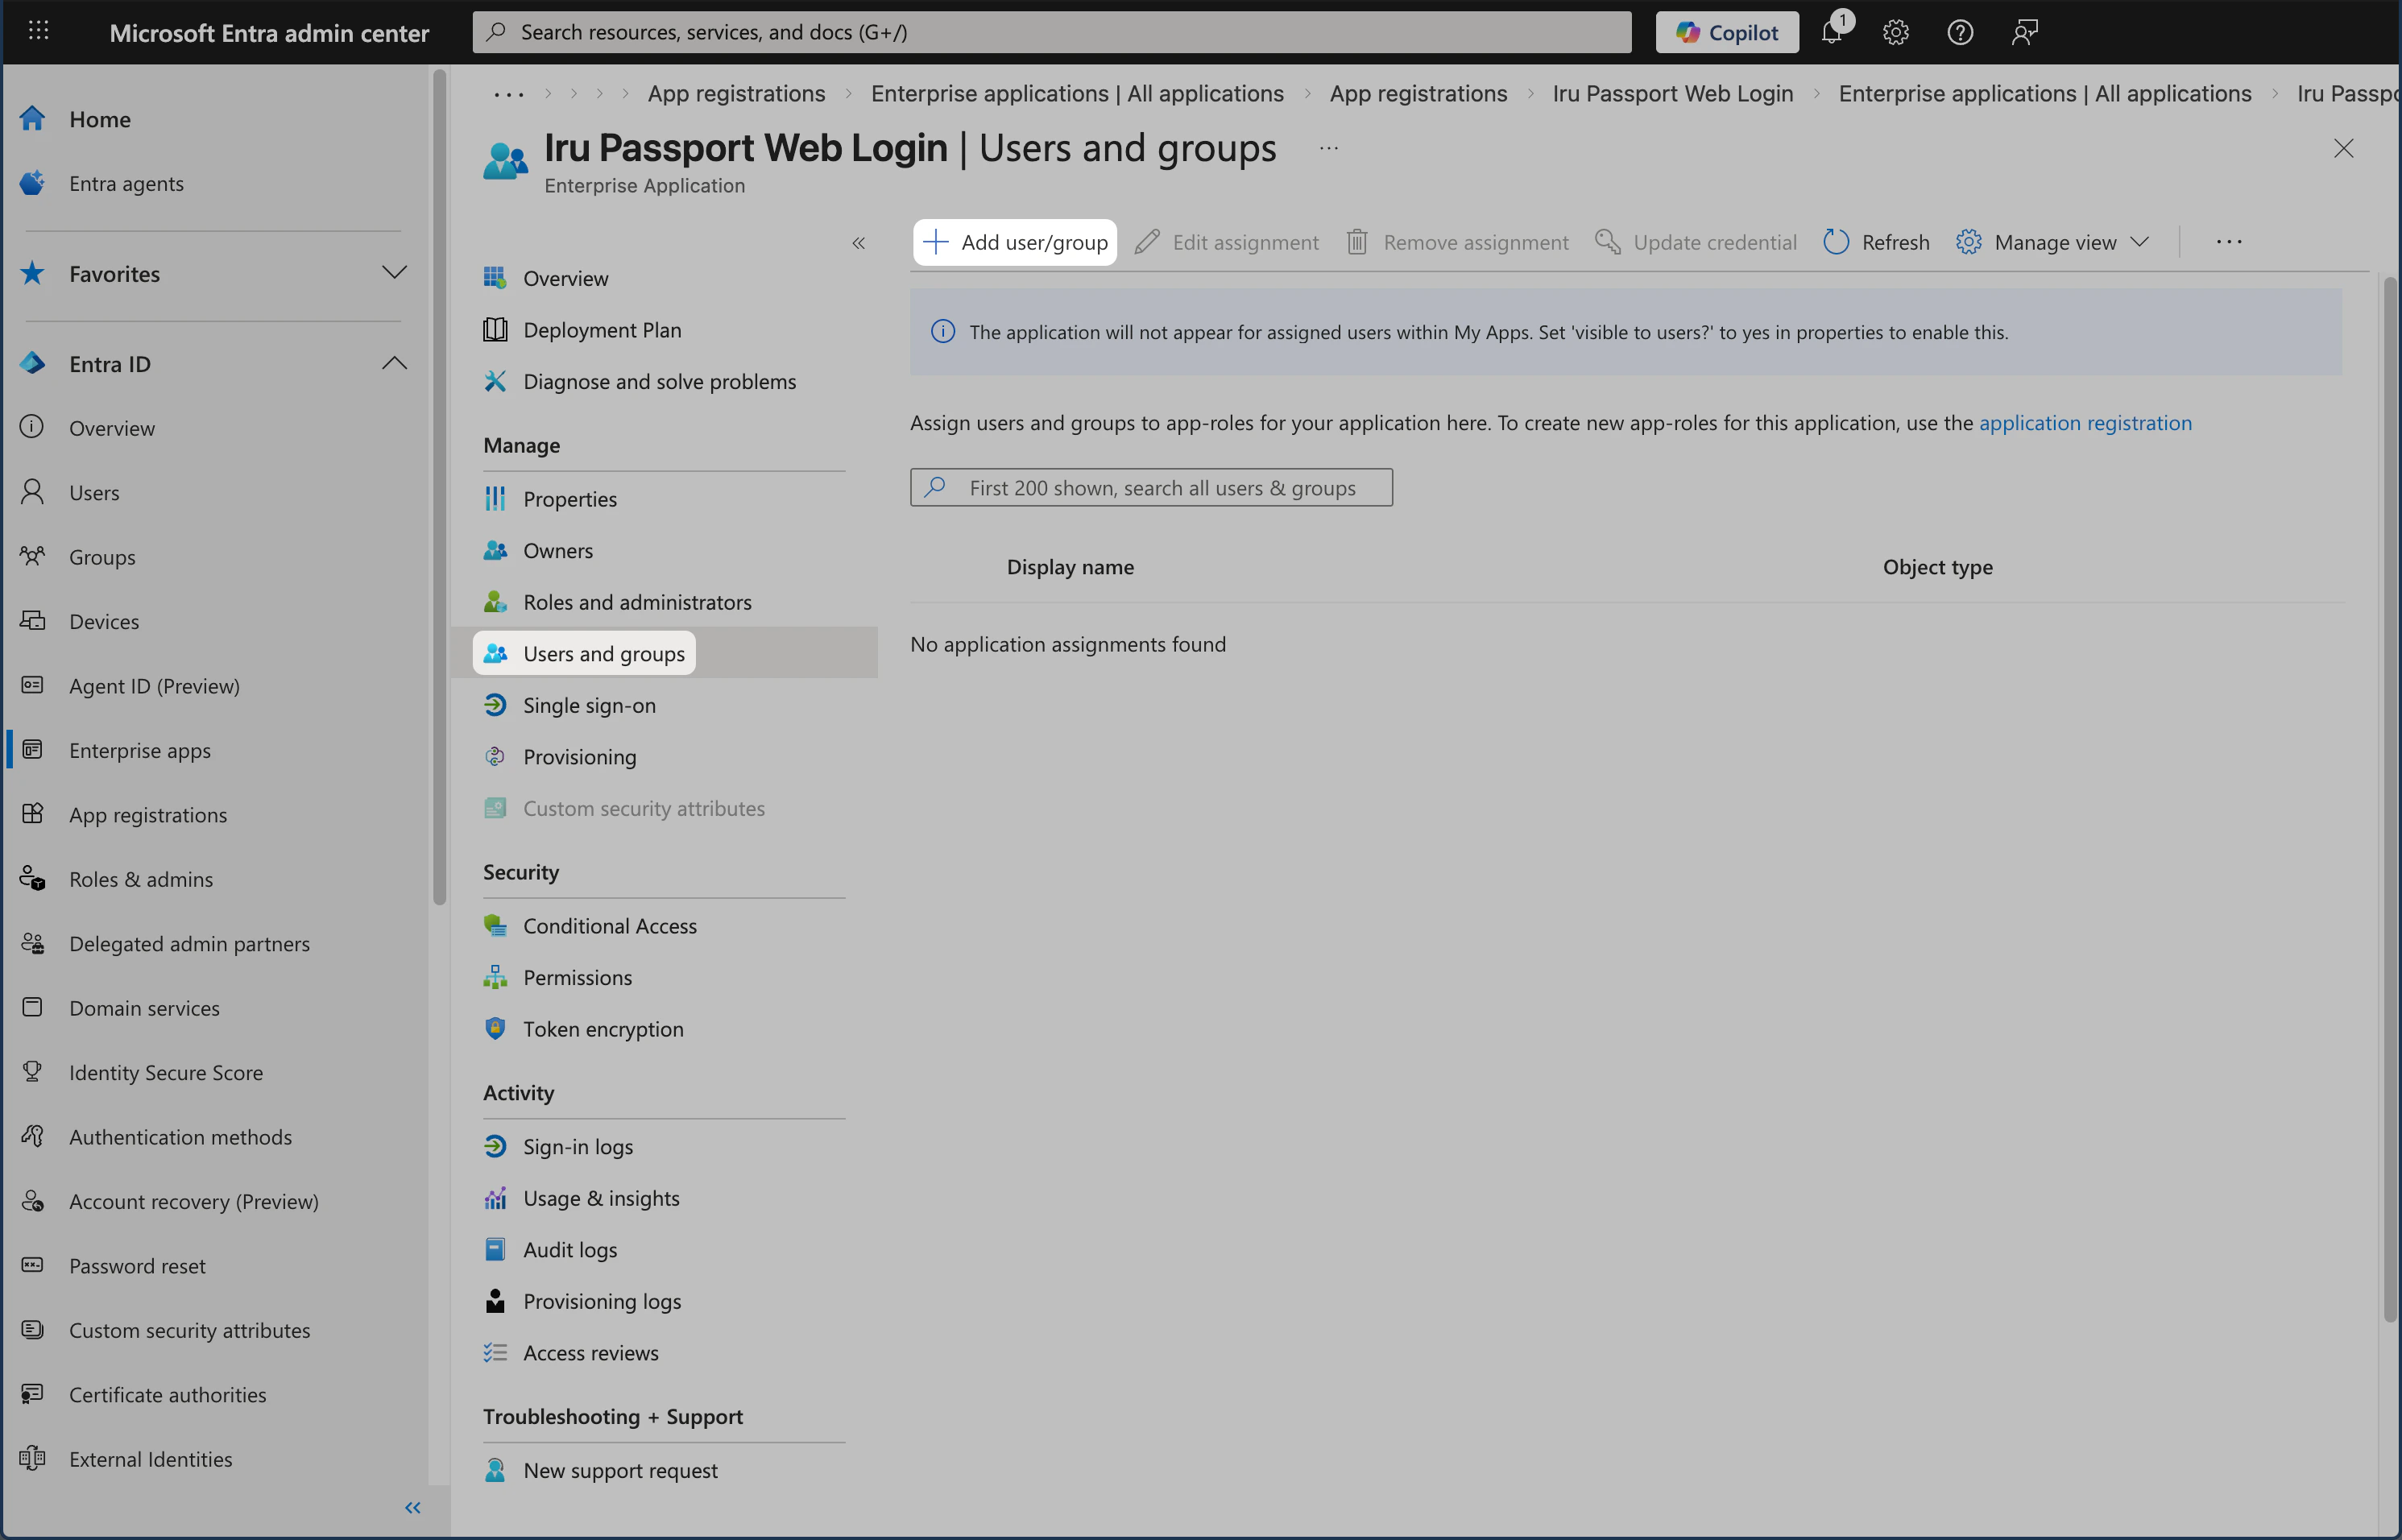 On the **Add Assignment** page, under the **Users** or **Users and groups** heading, select the **None selected** link to choose who can use the app.
Depending on your Microsoft Entra ID plan, you may only be able to assign users, not groups. In that case, the heading shows **Users** and group assignment is not available.
On the **Add Assignment** page, under the **Users** or **Users and groups** heading, select the **None selected** link to choose who can use the app.
Depending on your Microsoft Entra ID plan, you may only be able to assign users, not groups. In that case, the heading shows **Users** and group assignment is not available.
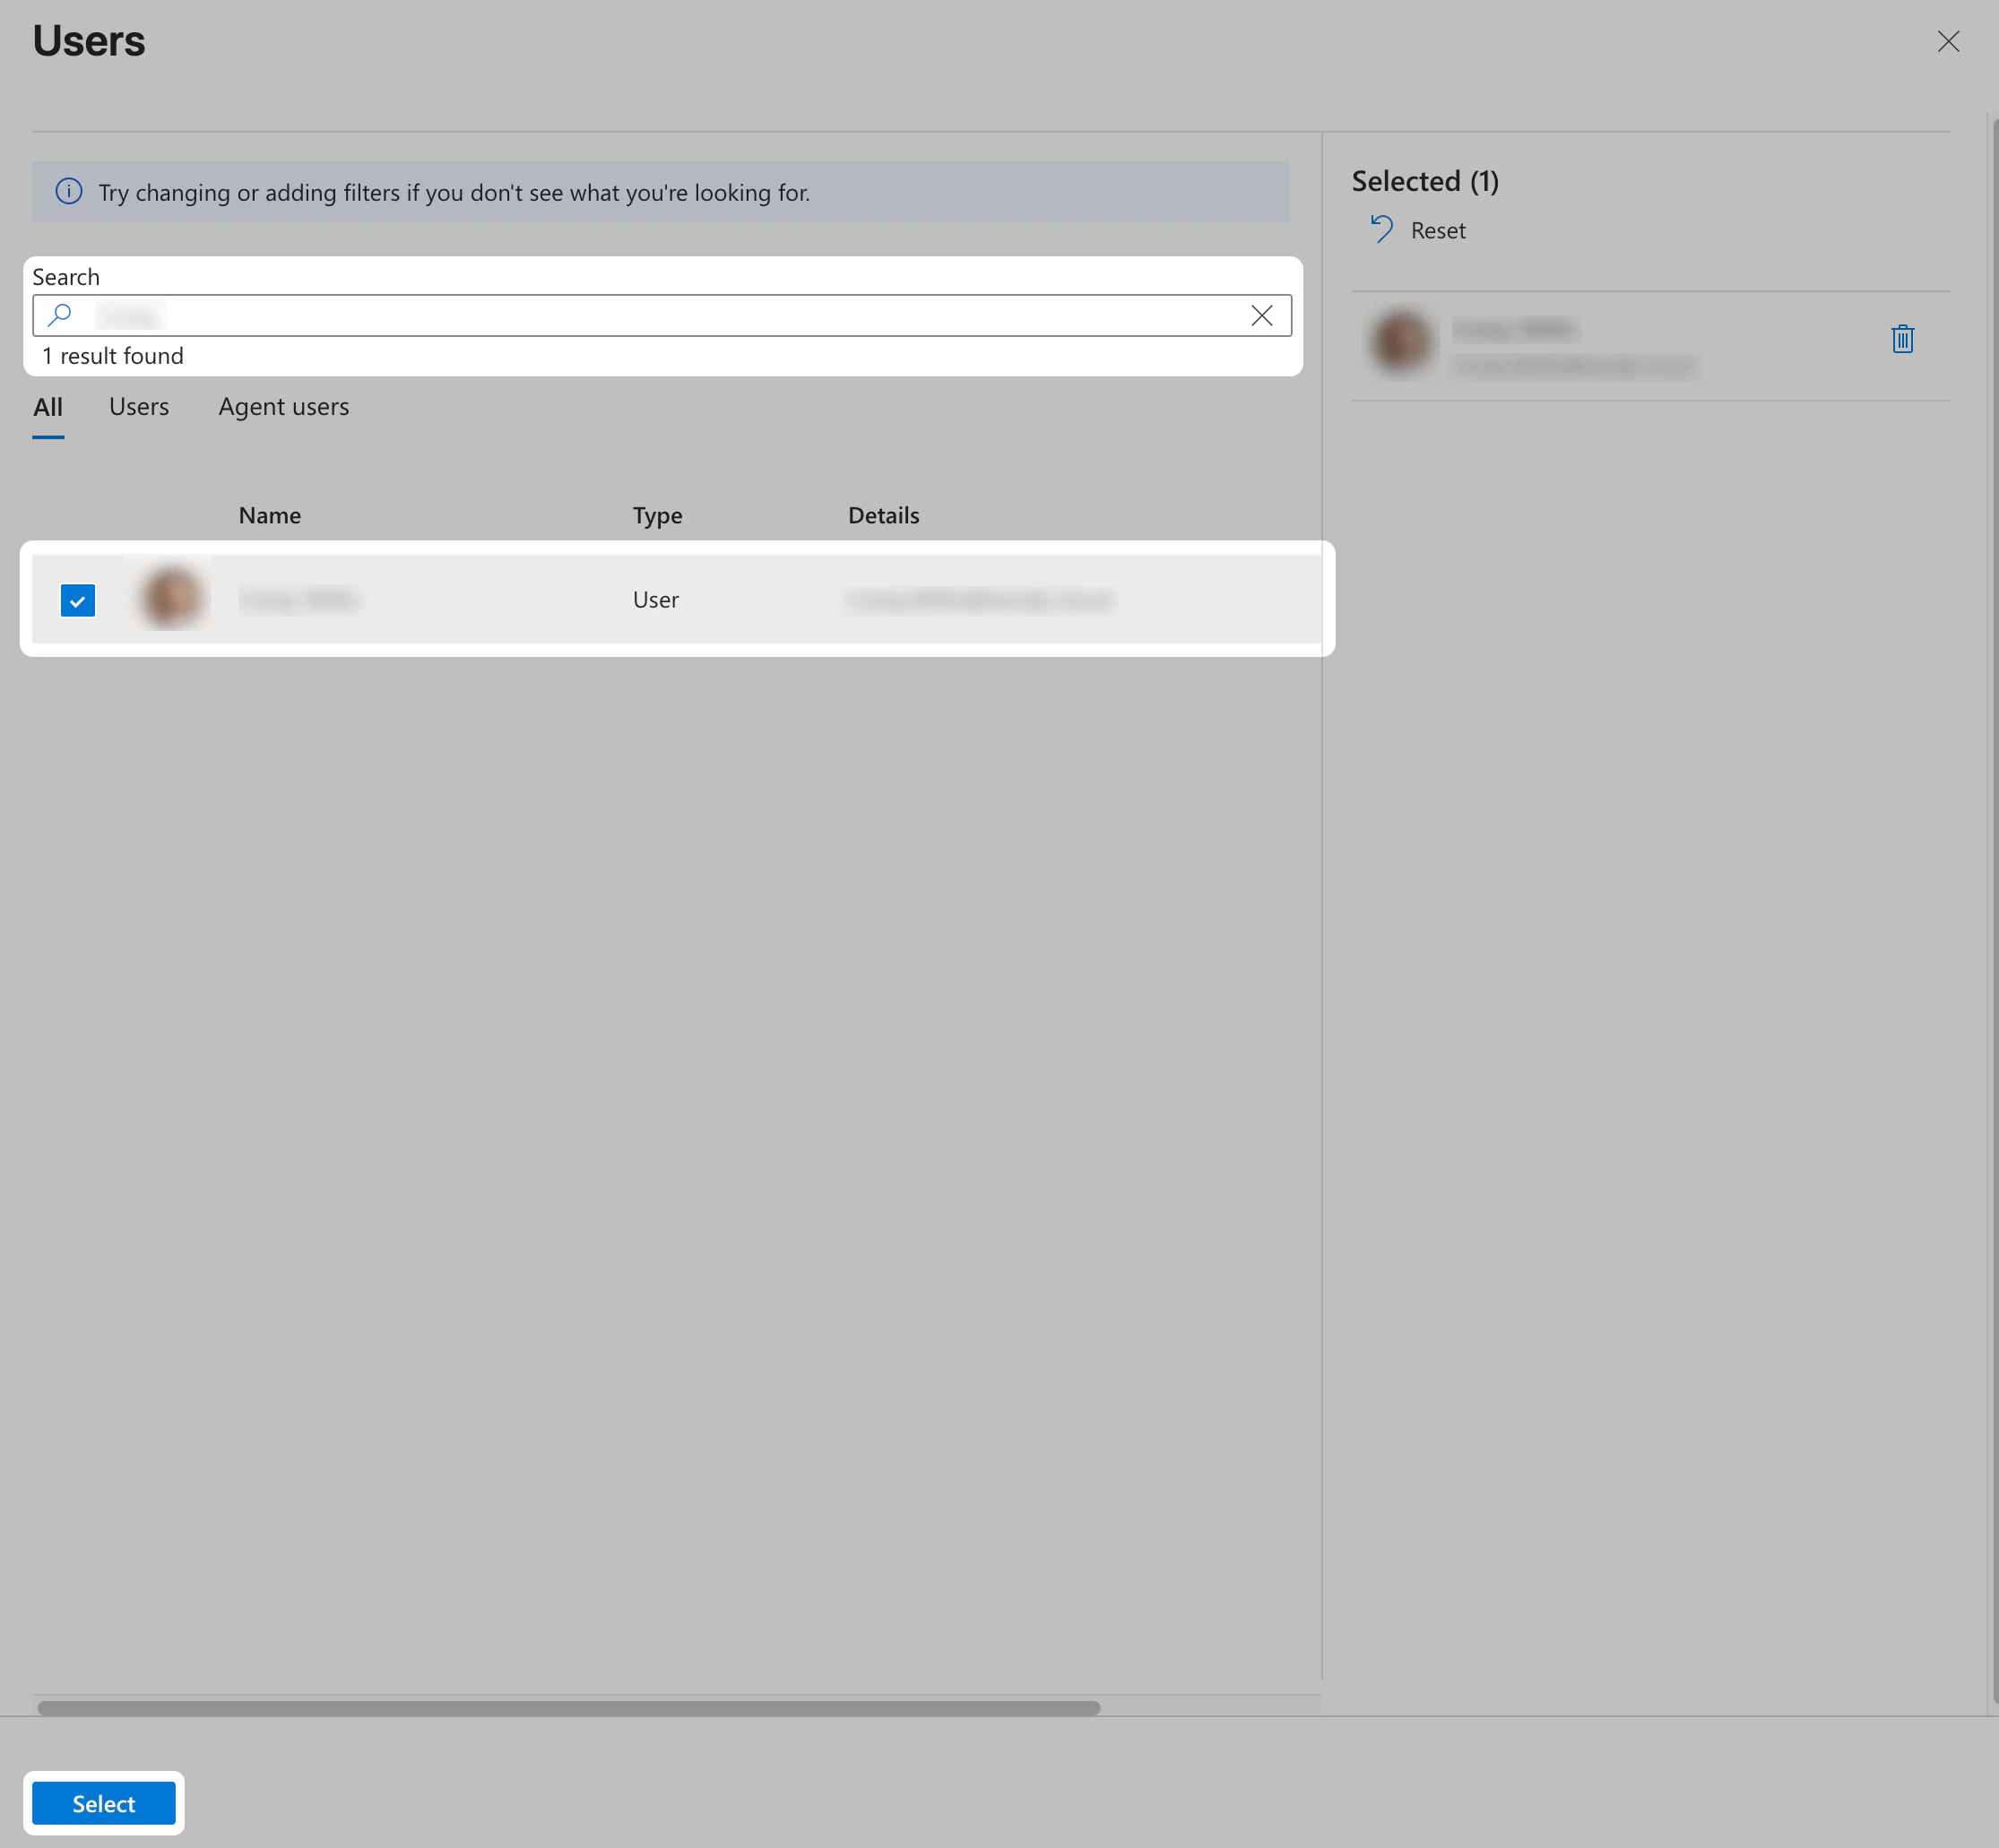
 A list of users or users and security groups is displayed. You can search for a specific user or group, or select multiple users or users and groups that appear in the list.
After you have selected your users or users and groups, select **Select**.
A list of users or users and security groups is displayed. You can search for a specific user or group, or select multiple users or users and groups that appear in the list.
After you have selected your users or users and groups, select **Select**.
 Select **Assign** to finish the assignment of users or users and groups to the app.
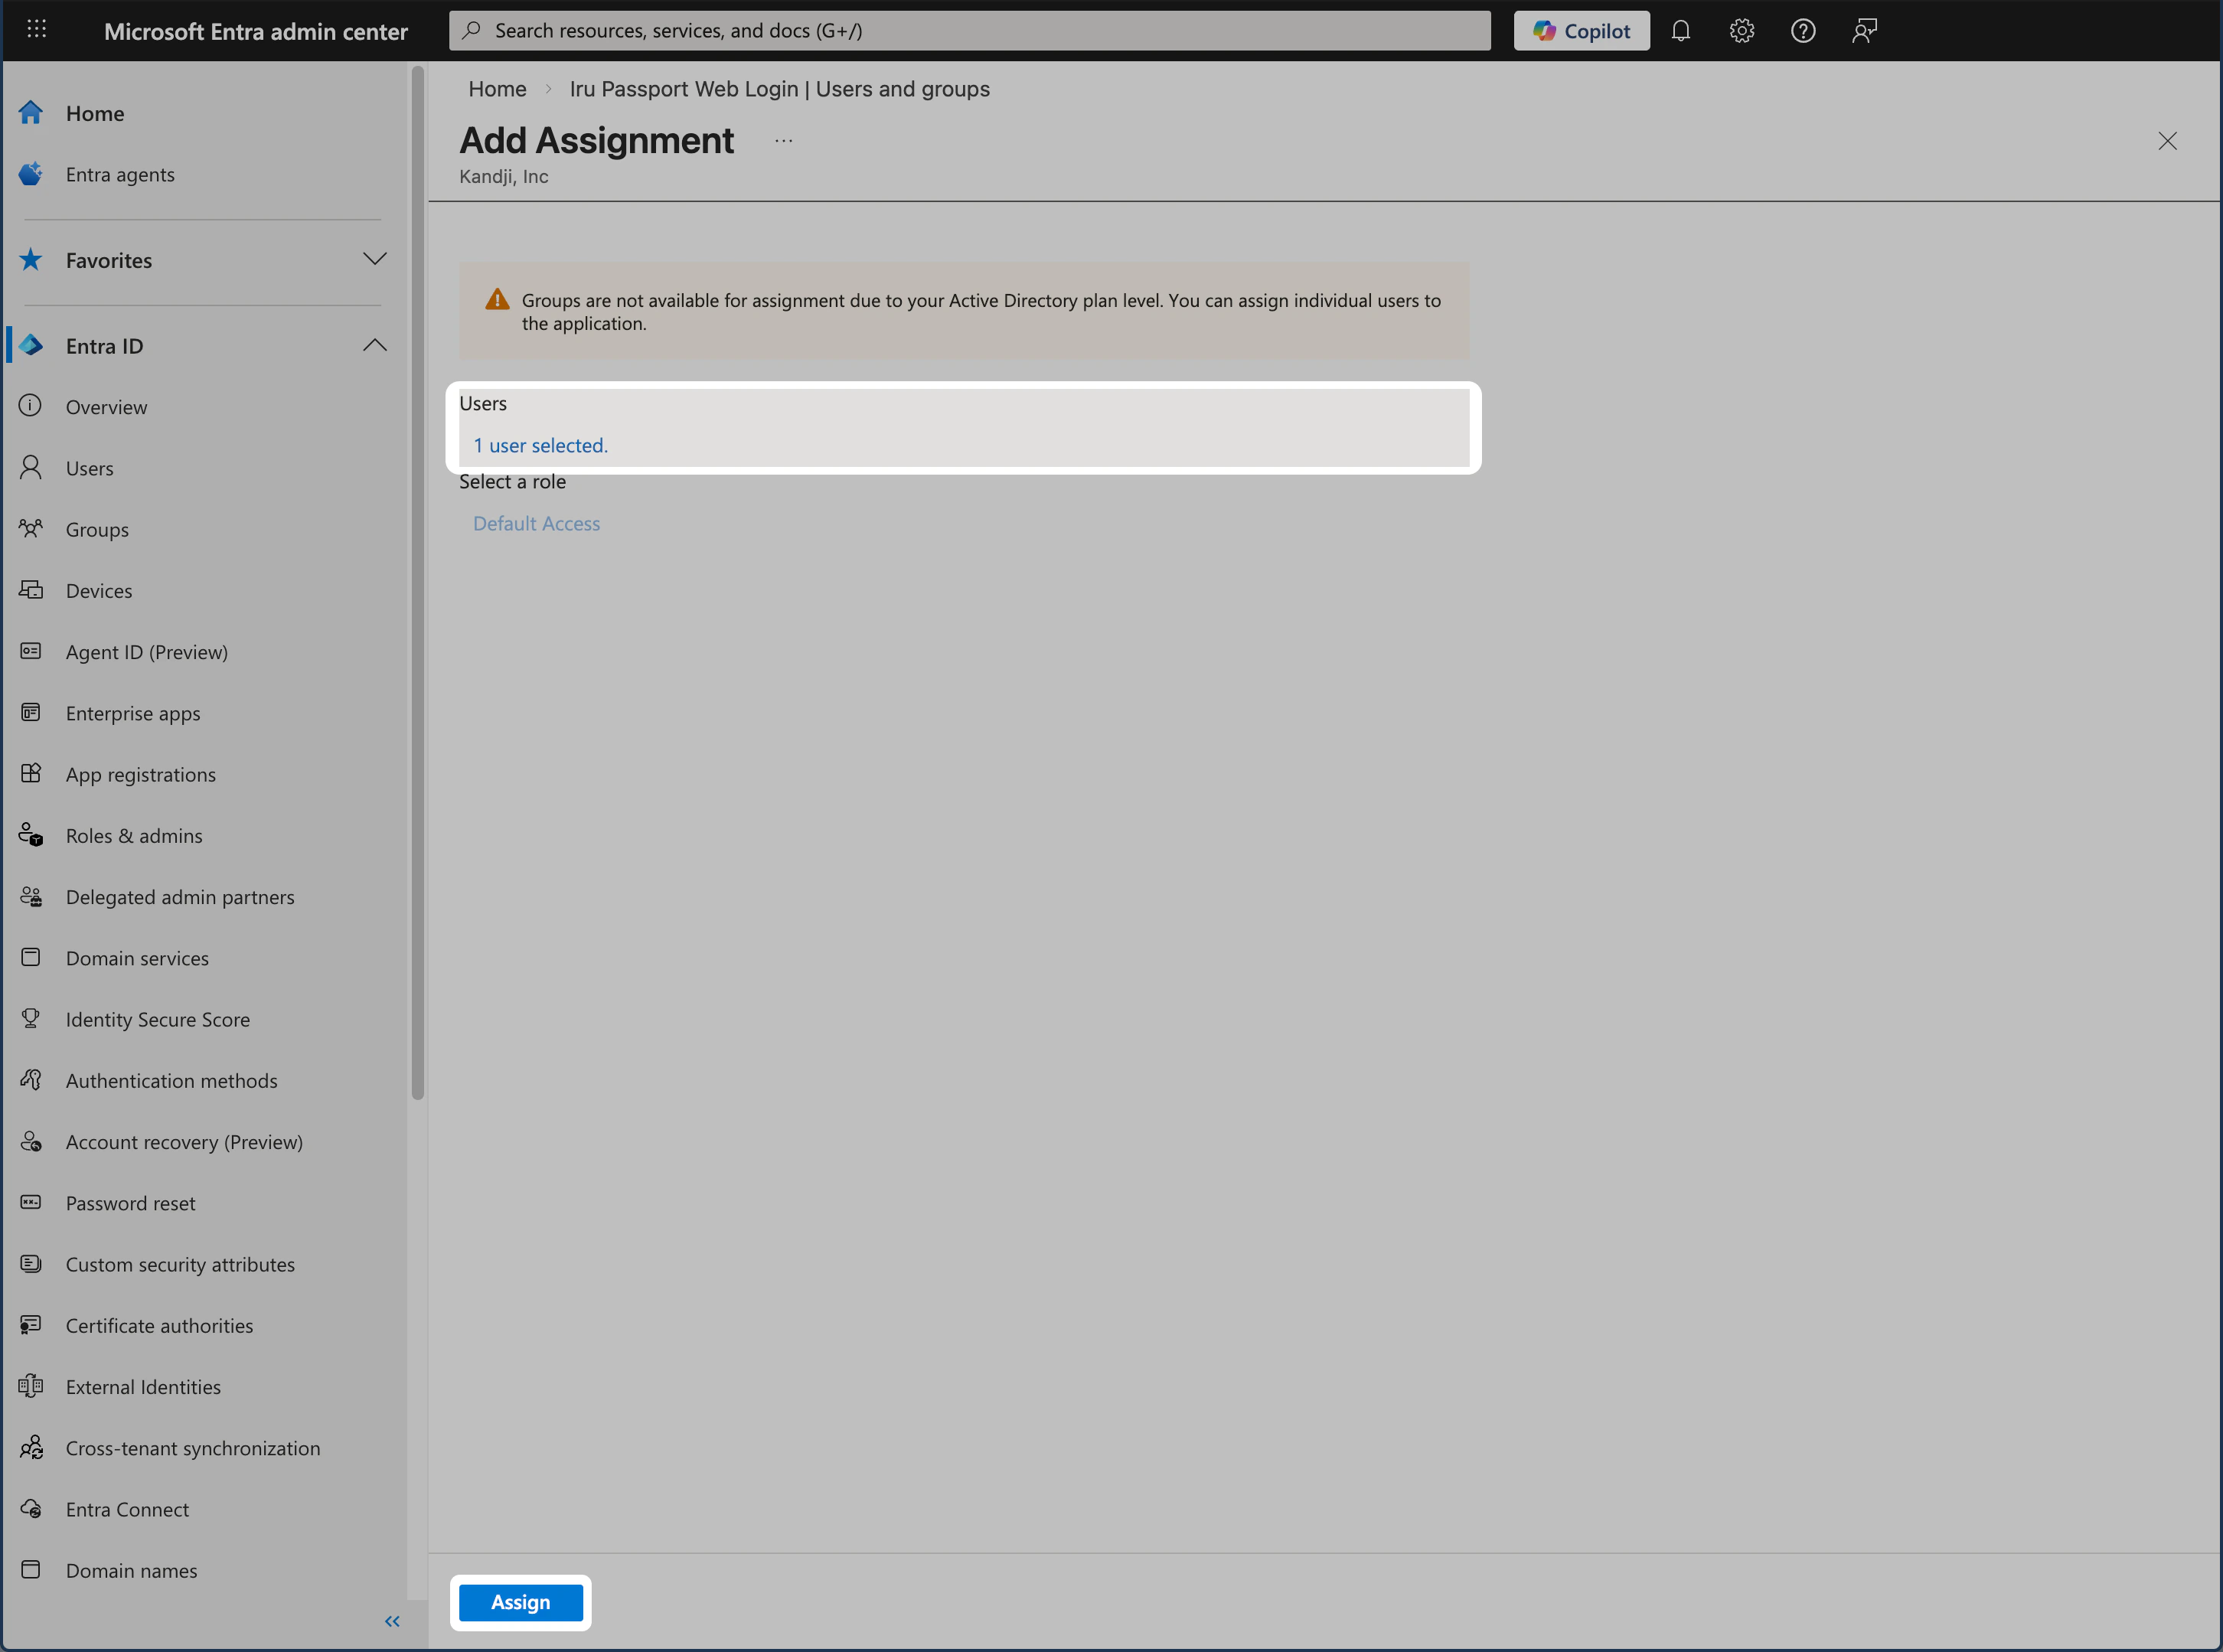 Confirm that the users or users and groups you added appear in the **Users and groups** list.
 With this portion of the Entra ID configuration complete, review the remaining sections of this article for your Microsoft Entra ID environment.
### Microsoft Entra ID Conditional Access Considerations
[Microsoft Entra ID Conditional Access](https://learn.microsoft.com/en-us/entra/identity/conditional-access/) is included with Microsoft Entra ID Premium or better. Be sure to turn off both per-user MFA and Security defaults before you turn on Microsoft Entra ID Conditional Access policies.
Complete the steps below to register **Passport - CA Policy API**, add its scope to your Passport app, and exclude that app from applicable policies. Skip this section if you do not use Conditional Access. When you finish, add the scope under **Additional scopes (optional)** in [Authentication Mode](#authentication-mode) on the [Iru Endpoint](#iru-endpoint) tab.
Passport **Web Login** completes Conditional Access challenges such as MFA in the Passport web view at login.
#### Create the Passport - CA Policy API application
Create this application registration so Passport can request a scope beyond baseline scopes.
Sign in to the [Microsoft Entra admin center](https://entra.microsoft.com) and open **Entra ID** > **App registrations**.
Select **+ New registration**. Enter **Passport - CA Policy API** as the name, under **Supported account types** select **Single tenant only**, and leave **Redirect URI** empty. Select **Register**.
Open **API permissions**. If admin consent is not already granted, select **Grant admin consent for \[your tenant]**.
Open **Expose an API** in the left navigation.
Select **+ Add a scope**.
Review the **Application ID URI**. Entra ID suggests a default value (for example, `api://cca588ed-dfe6-4fb4-b695-abfa23b6475a`). The default is fine. Select **Save and continue**. You do not need to copy this URI; copy the scope URI in **Copy the scope URI** below.
For **Scope name**, enter `Passport` without spaces or special characters. Leave **Who can consent** at the default. Enter a display name and description in the **Admin consent** fields, then select **Add scope**.
With this portion of the Entra ID configuration complete, review the remaining sections of this article for your Microsoft Entra ID environment.
### Microsoft Entra ID Conditional Access Considerations
[Microsoft Entra ID Conditional Access](https://learn.microsoft.com/en-us/entra/identity/conditional-access/) is included with Microsoft Entra ID Premium or better. Be sure to turn off both per-user MFA and Security defaults before you turn on Microsoft Entra ID Conditional Access policies.
Complete the steps below to register **Passport - CA Policy API**, add its scope to your Passport app, and exclude that app from applicable policies. Skip this section if you do not use Conditional Access. When you finish, add the scope under **Additional scopes (optional)** in [Authentication Mode](#authentication-mode) on the [Iru Endpoint](#iru-endpoint) tab.
Passport **Web Login** completes Conditional Access challenges such as MFA in the Passport web view at login.
#### Create the Passport - CA Policy API application
Create this application registration so Passport can request a scope beyond baseline scopes.
Sign in to the [Microsoft Entra admin center](https://entra.microsoft.com) and open **Entra ID** > **App registrations**.
Select **+ New registration**. Enter **Passport - CA Policy API** as the name, under **Supported account types** select **Single tenant only**, and leave **Redirect URI** empty. Select **Register**.
Open **API permissions**. If admin consent is not already granted, select **Grant admin consent for \[your tenant]**.
Open **Expose an API** in the left navigation.
Select **+ Add a scope**.
Review the **Application ID URI**. Entra ID suggests a default value (for example, `api://cca588ed-dfe6-4fb4-b695-abfa23b6475a`). The default is fine. Select **Save and continue**. You do not need to copy this URI; copy the scope URI in **Copy the scope URI** below.
For **Scope name**, enter `Passport` without spaces or special characters. Leave **Who can consent** at the default. Enter a display name and description in the **Admin consent** fields, then select **Add scope**.
 Next to the scope URI in the **Scopes** list (for example, `api://cca588ed-dfe6-4fb4-b695-abfa23b6475a/Passport`), select **Copy**. Save it for **Add Additional scopes** in [Authentication Mode](#authentication-mode) on the [Iru Endpoint](#iru-endpoint) tab.
#### Add the custom scope to your Passport app registration
If you aren't already signed in, sign in to the [Microsoft Entra admin center](https://entra.microsoft.com) and open **Entra ID** > **App registrations**. Open the application you use for Passport **Web Login**.
Open **API permissions** and select **+ Add a permission**.
Open the **APIs my organization uses** tab and select **Passport - CA Policy API**.
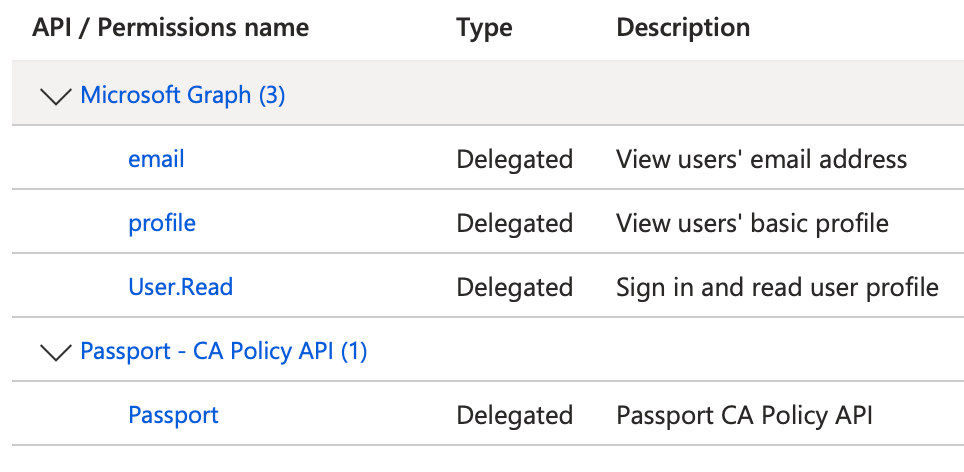
Select **Delegated permissions**, select the **Passport** permission, then select **Add permissions**.
Select **Grant admin consent for \[your tenant]**.
Next to the scope URI in the **Scopes** list (for example, `api://cca588ed-dfe6-4fb4-b695-abfa23b6475a/Passport`), select **Copy**. Save it for **Add Additional scopes** in [Authentication Mode](#authentication-mode) on the [Iru Endpoint](#iru-endpoint) tab.
#### Add the custom scope to your Passport app registration
If you aren't already signed in, sign in to the [Microsoft Entra admin center](https://entra.microsoft.com) and open **Entra ID** > **App registrations**. Open the application you use for Passport **Web Login**.
Open **API permissions** and select **+ Add a permission**.
Open the **APIs my organization uses** tab and select **Passport - CA Policy API**.
Select **Delegated permissions**, select the **Passport** permission, then select **Add permissions**.
Select **Grant admin consent for \[your tenant]**.
 #### Exclude Passport - CA Policy API from All resources policies
Exclude **Passport - CA Policy API** from each policy scoped to **All resources** so password verification and synchronization continue to work.
In the [Microsoft Entra admin center](https://entra.microsoft.com), open **Protection** > **Conditional Access** > **Policies**.
Select each policy scoped to **All resources**, then open **Target resources**.
Open the **Exclude** tab, select **Select resources**, then select **Passport - CA Policy API**. Select **Select**, then **Save**.
#### Exclude Passport - CA Policy API from All resources policies
Exclude **Passport - CA Policy API** from each policy scoped to **All resources** so password verification and synchronization continue to work.
In the [Microsoft Entra admin center](https://entra.microsoft.com), open **Protection** > **Conditional Access** > **Policies**.
Select each policy scoped to **All resources**, then open **Target resources**.
Open the **Exclude** tab, select **Select resources**, then select **Passport - CA Policy API**. Select **Select**, then **Save**.
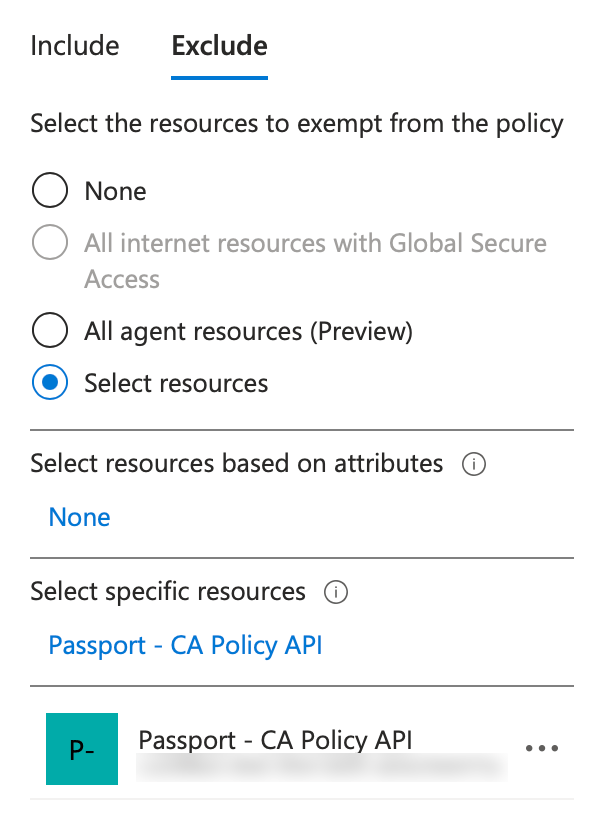 Repeat these steps for every Conditional Access policy scoped to **All resources**.
If **Save** fails, confirm that **Passport - CA Policy API** does not allow public client flows. If the app has a redirect URI configured, remove it and try again.
### User Account Provisioning via Passport
If you want Passport to set each user's Mac account type from Entra ID security group membership, collect each group's **Object ID** in the Microsoft Entra admin center using the steps in this section. You will use those values under **User provisioning** on the Passport Library Item [**Iru Endpoint** tab](#iru-endpoint). For more detail on this mode, see [User provisioning](/en/endpoint/library/passport/configure-the-passport-library-item#user-provisioning) in **Configure the Passport Library Item**.
Sign in to the [Microsoft Entra admin center](https://entra.microsoft.com). In the Identity navigation menu on the left, open **Groups** and select **All groups**.
Select the group that you want to use.
Repeat these steps for every Conditional Access policy scoped to **All resources**.
If **Save** fails, confirm that **Passport - CA Policy API** does not allow public client flows. If the app has a redirect URI configured, remove it and try again.
### User Account Provisioning via Passport
If you want Passport to set each user's Mac account type from Entra ID security group membership, collect each group's **Object ID** in the Microsoft Entra admin center using the steps in this section. You will use those values under **User provisioning** on the Passport Library Item [**Iru Endpoint** tab](#iru-endpoint). For more detail on this mode, see [User provisioning](/en/endpoint/library/passport/configure-the-passport-library-item#user-provisioning) in **Configure the Passport Library Item**.
Sign in to the [Microsoft Entra admin center](https://entra.microsoft.com). In the Identity navigation menu on the left, open **Groups** and select **All groups**.
Select the group that you want to use.
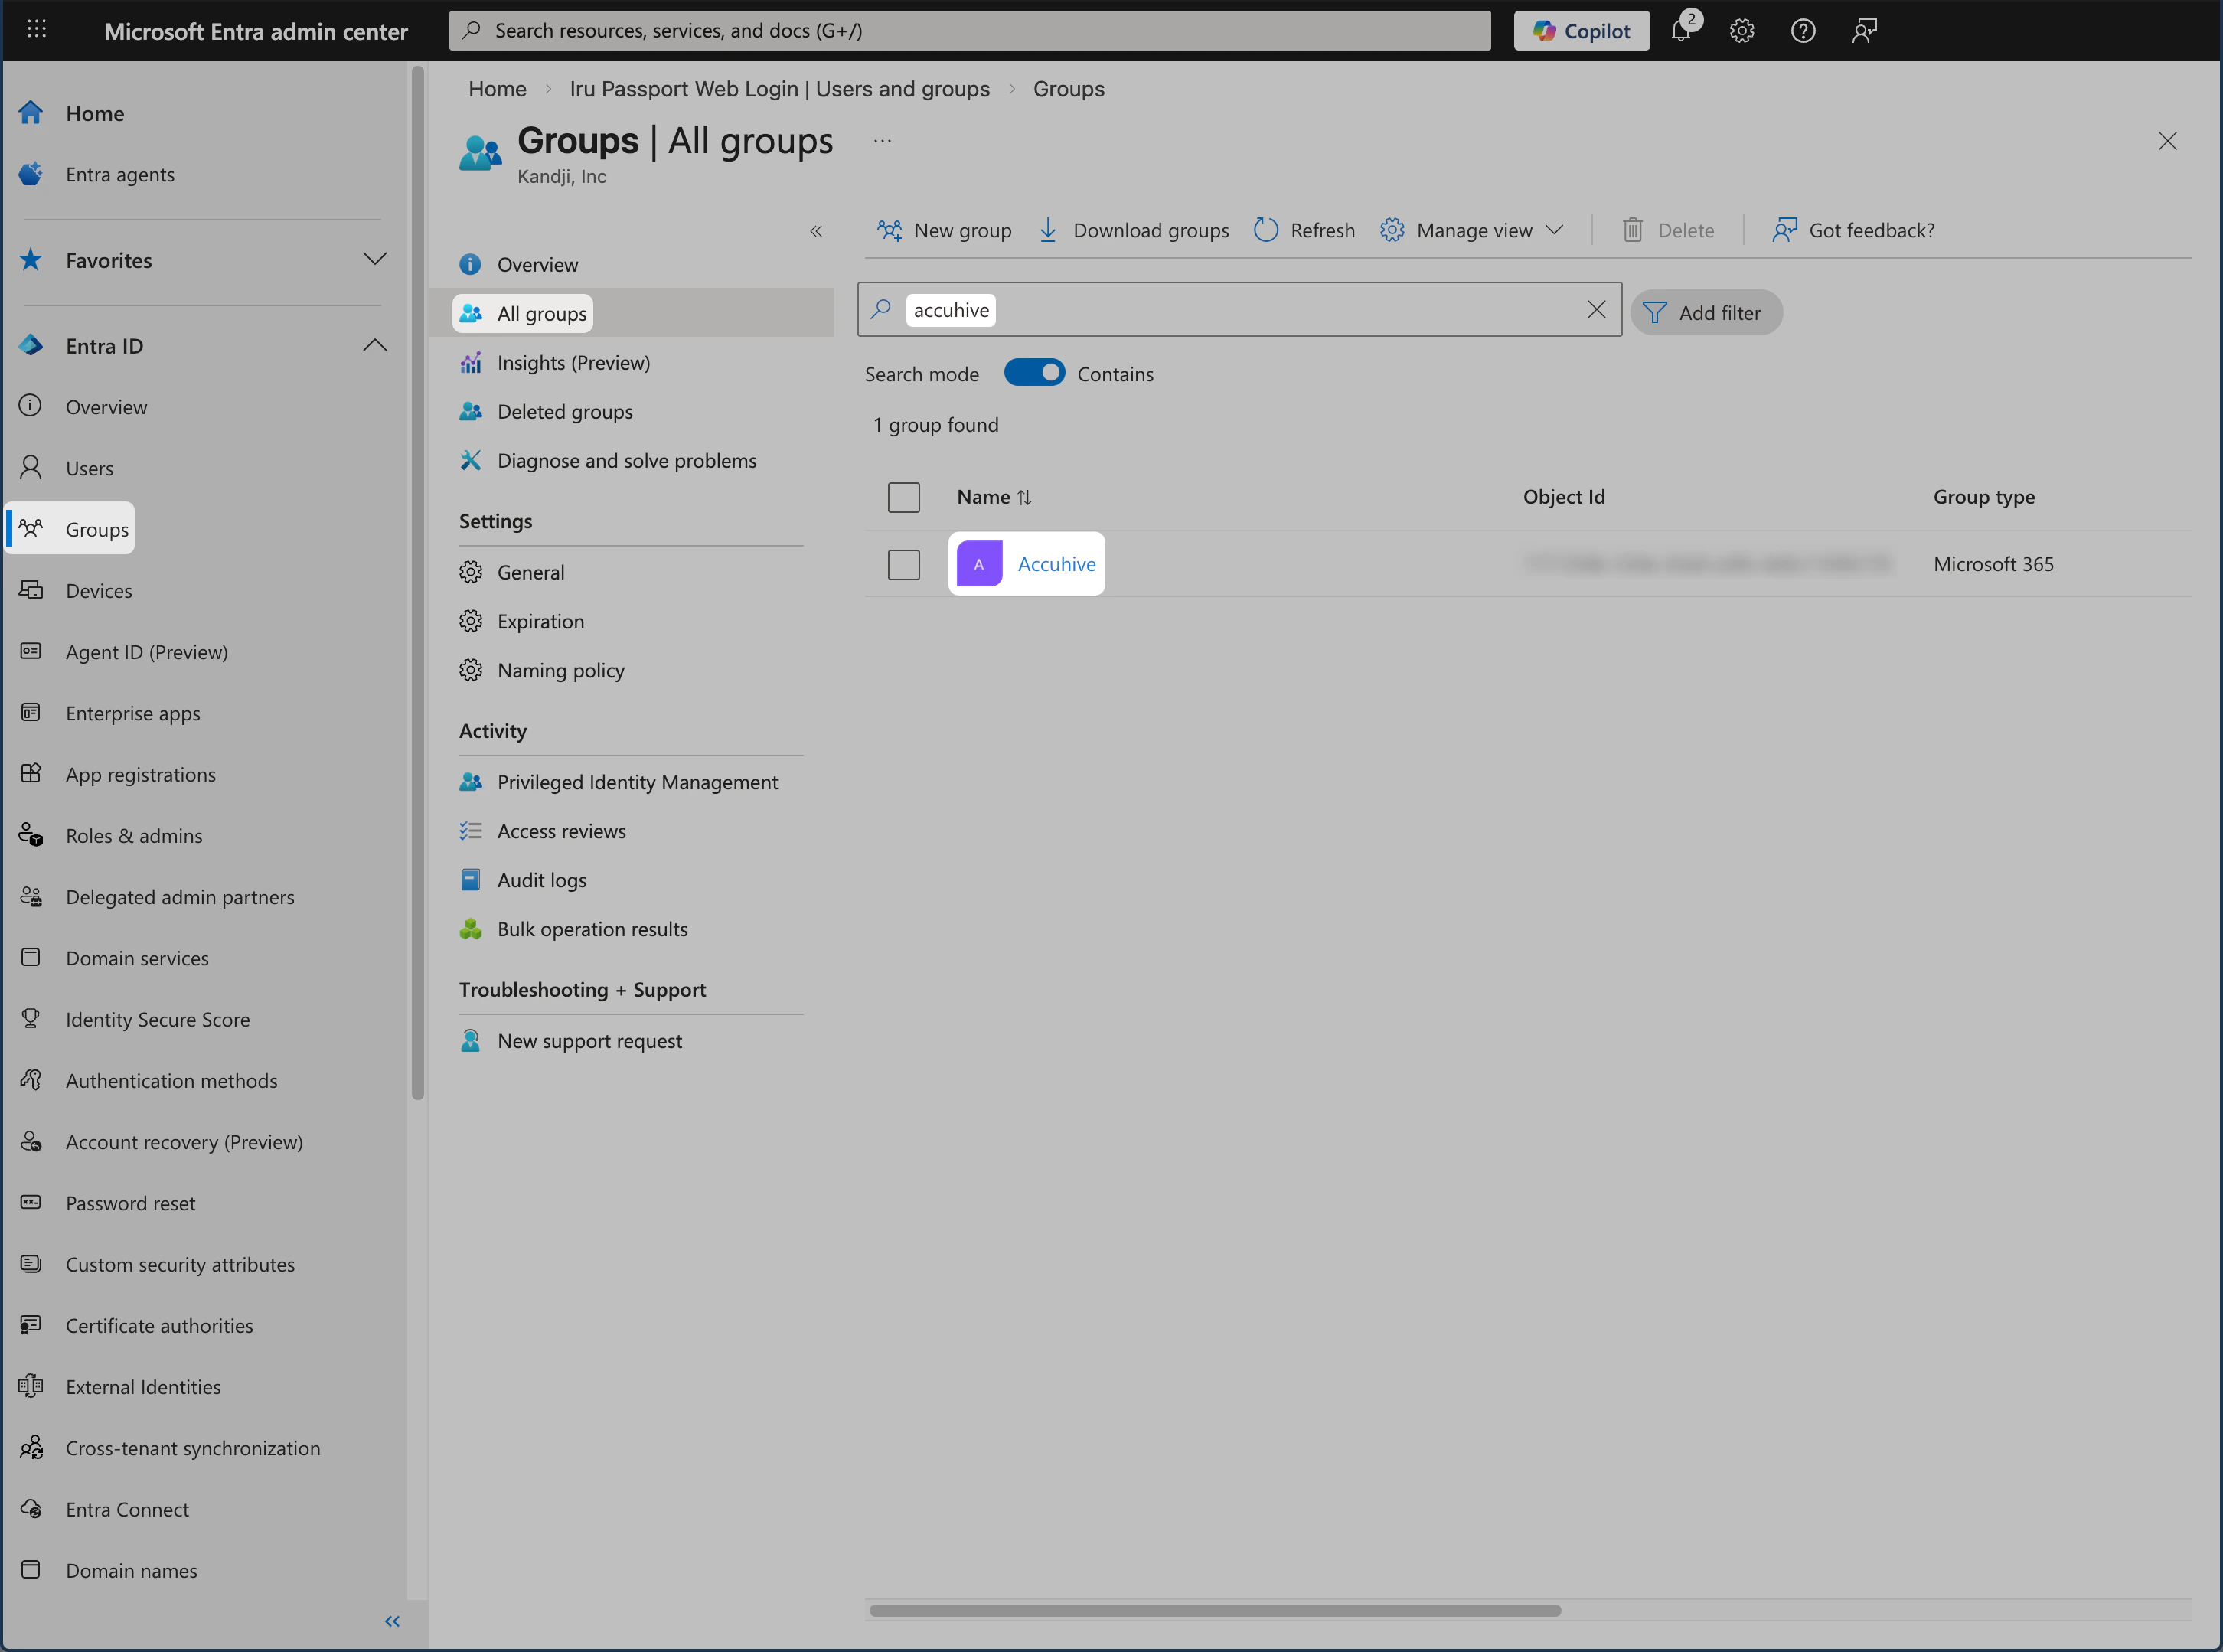 Copy the **Object ID** for that group.
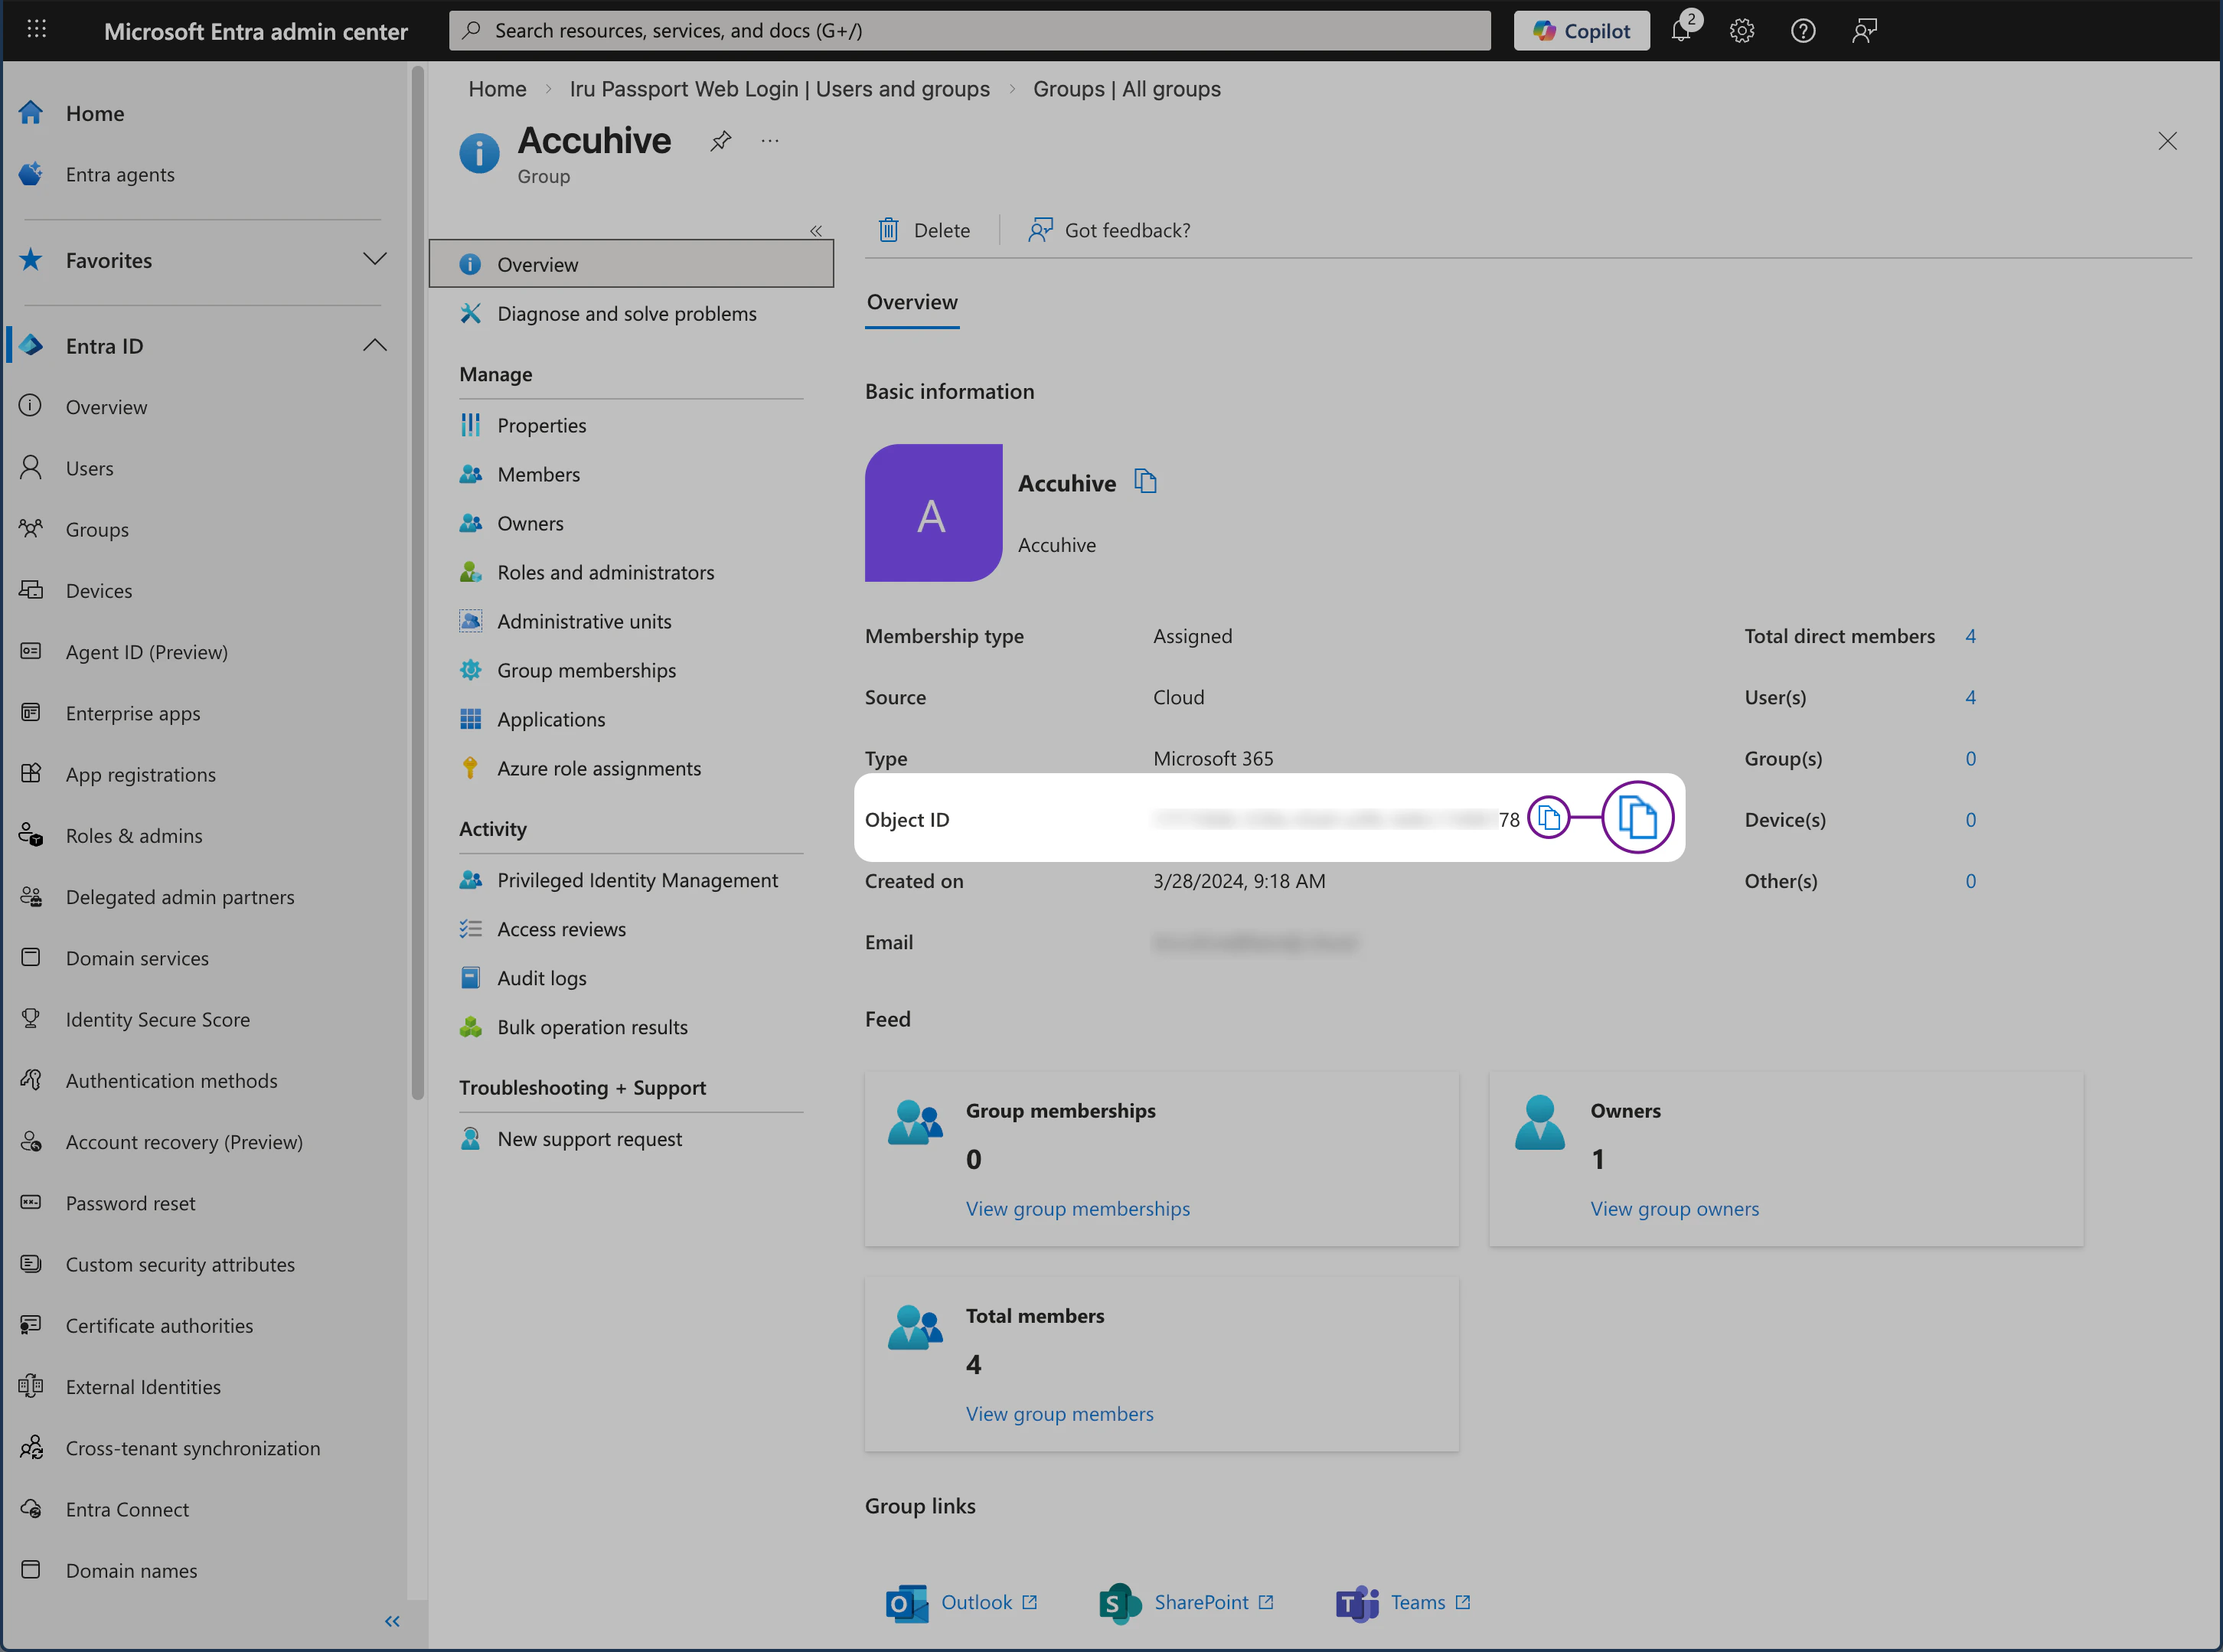 For each additional Entra ID group you want to use, repeat **Select group** and **Copy Object ID**. Keep the **Object ID** values in a secure document until you enter them on the [**Iru Endpoint** tab](#iru-endpoint).
Configure **Authentication mode** and **User provisioning** in the Passport Library Item on the [**Iru Endpoint** tab](#iru-endpoint).
If you have not already, use [Configure the Passport Library Item](/en/endpoint/library/passport/configure-the-passport-library-item) to add the Passport Library Item and basic settings. The steps below are Microsoft Entra ID **Web Login** fields in the Passport Library Item; use the **Application (client) ID** and OpenID Connect metadata URL from the [Microsoft Entra ID](#microsoft-entra-id) tab.
### Authentication Mode
Set **Authentication mode** to **Web Login** when users must complete Microsoft Entra ID sign-in (including MFA) in the Passport web view.
In the Passport Library Item, set **Identity provider** to **Microsoft Entra ID**.
In the **Identity provider URL** field, paste the **OpenID Connect metadata document** URL from the app registration on the [Microsoft Entra ID](#microsoft-entra-id) tab.
In the **Client ID (Password Sync)** field, paste the **Application (client) ID** from the app registration on the [Microsoft Entra ID](#microsoft-entra-id) tab.
Complete this step only if you completed [Microsoft Entra ID Conditional Access Considerations](#microsoft-entra-id-conditional-access-considerations). If you skipped that section, continue to **Select Web Login**.
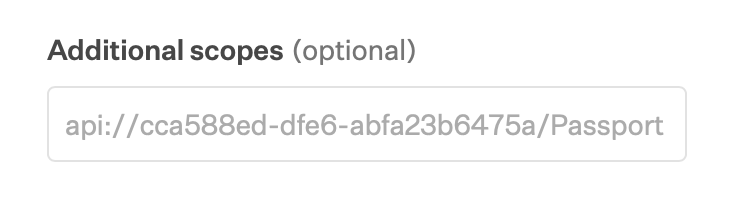
Paste the scope URI you copied from **Create the Passport - CA Policy API application** into **Additional scopes (optional)**. This field appears below **Client ID (Password Sync)**.
For each additional Entra ID group you want to use, repeat **Select group** and **Copy Object ID**. Keep the **Object ID** values in a secure document until you enter them on the [**Iru Endpoint** tab](#iru-endpoint).
Configure **Authentication mode** and **User provisioning** in the Passport Library Item on the [**Iru Endpoint** tab](#iru-endpoint).
If you have not already, use [Configure the Passport Library Item](/en/endpoint/library/passport/configure-the-passport-library-item) to add the Passport Library Item and basic settings. The steps below are Microsoft Entra ID **Web Login** fields in the Passport Library Item; use the **Application (client) ID** and OpenID Connect metadata URL from the [Microsoft Entra ID](#microsoft-entra-id) tab.
### Authentication Mode
Set **Authentication mode** to **Web Login** when users must complete Microsoft Entra ID sign-in (including MFA) in the Passport web view.
In the Passport Library Item, set **Identity provider** to **Microsoft Entra ID**.
In the **Identity provider URL** field, paste the **OpenID Connect metadata document** URL from the app registration on the [Microsoft Entra ID](#microsoft-entra-id) tab.
In the **Client ID (Password Sync)** field, paste the **Application (client) ID** from the app registration on the [Microsoft Entra ID](#microsoft-entra-id) tab.
Complete this step only if you completed [Microsoft Entra ID Conditional Access Considerations](#microsoft-entra-id-conditional-access-considerations). If you skipped that section, continue to **Select Web Login**.
Paste the scope URI you copied from **Create the Passport - CA Policy API application** into **Additional scopes (optional)**. This field appears below **Client ID (Password Sync)**.
 Under **Authentication mode**, select **Web Login**.
In the **Redirect URI** field, enter the following. It must match the redirect URI on the app registration from the [Microsoft Entra ID](#microsoft-entra-id) tab:
```
https://localhost
```
Click **Save** on the Passport Library Item.
### User Provisioning
If you want Passport to set each user's Mac account type from Entra ID security group membership, use the steps below under **User provisioning** on the Passport Library Item [**Iru Endpoint** tab](#iru-endpoint). Collect each group's **Object ID** in Entra ID first. See [User Account Provisioning via Passport](#user-account-provisioning-via-passport) on the [Microsoft Entra ID](#microsoft-entra-id) tab.
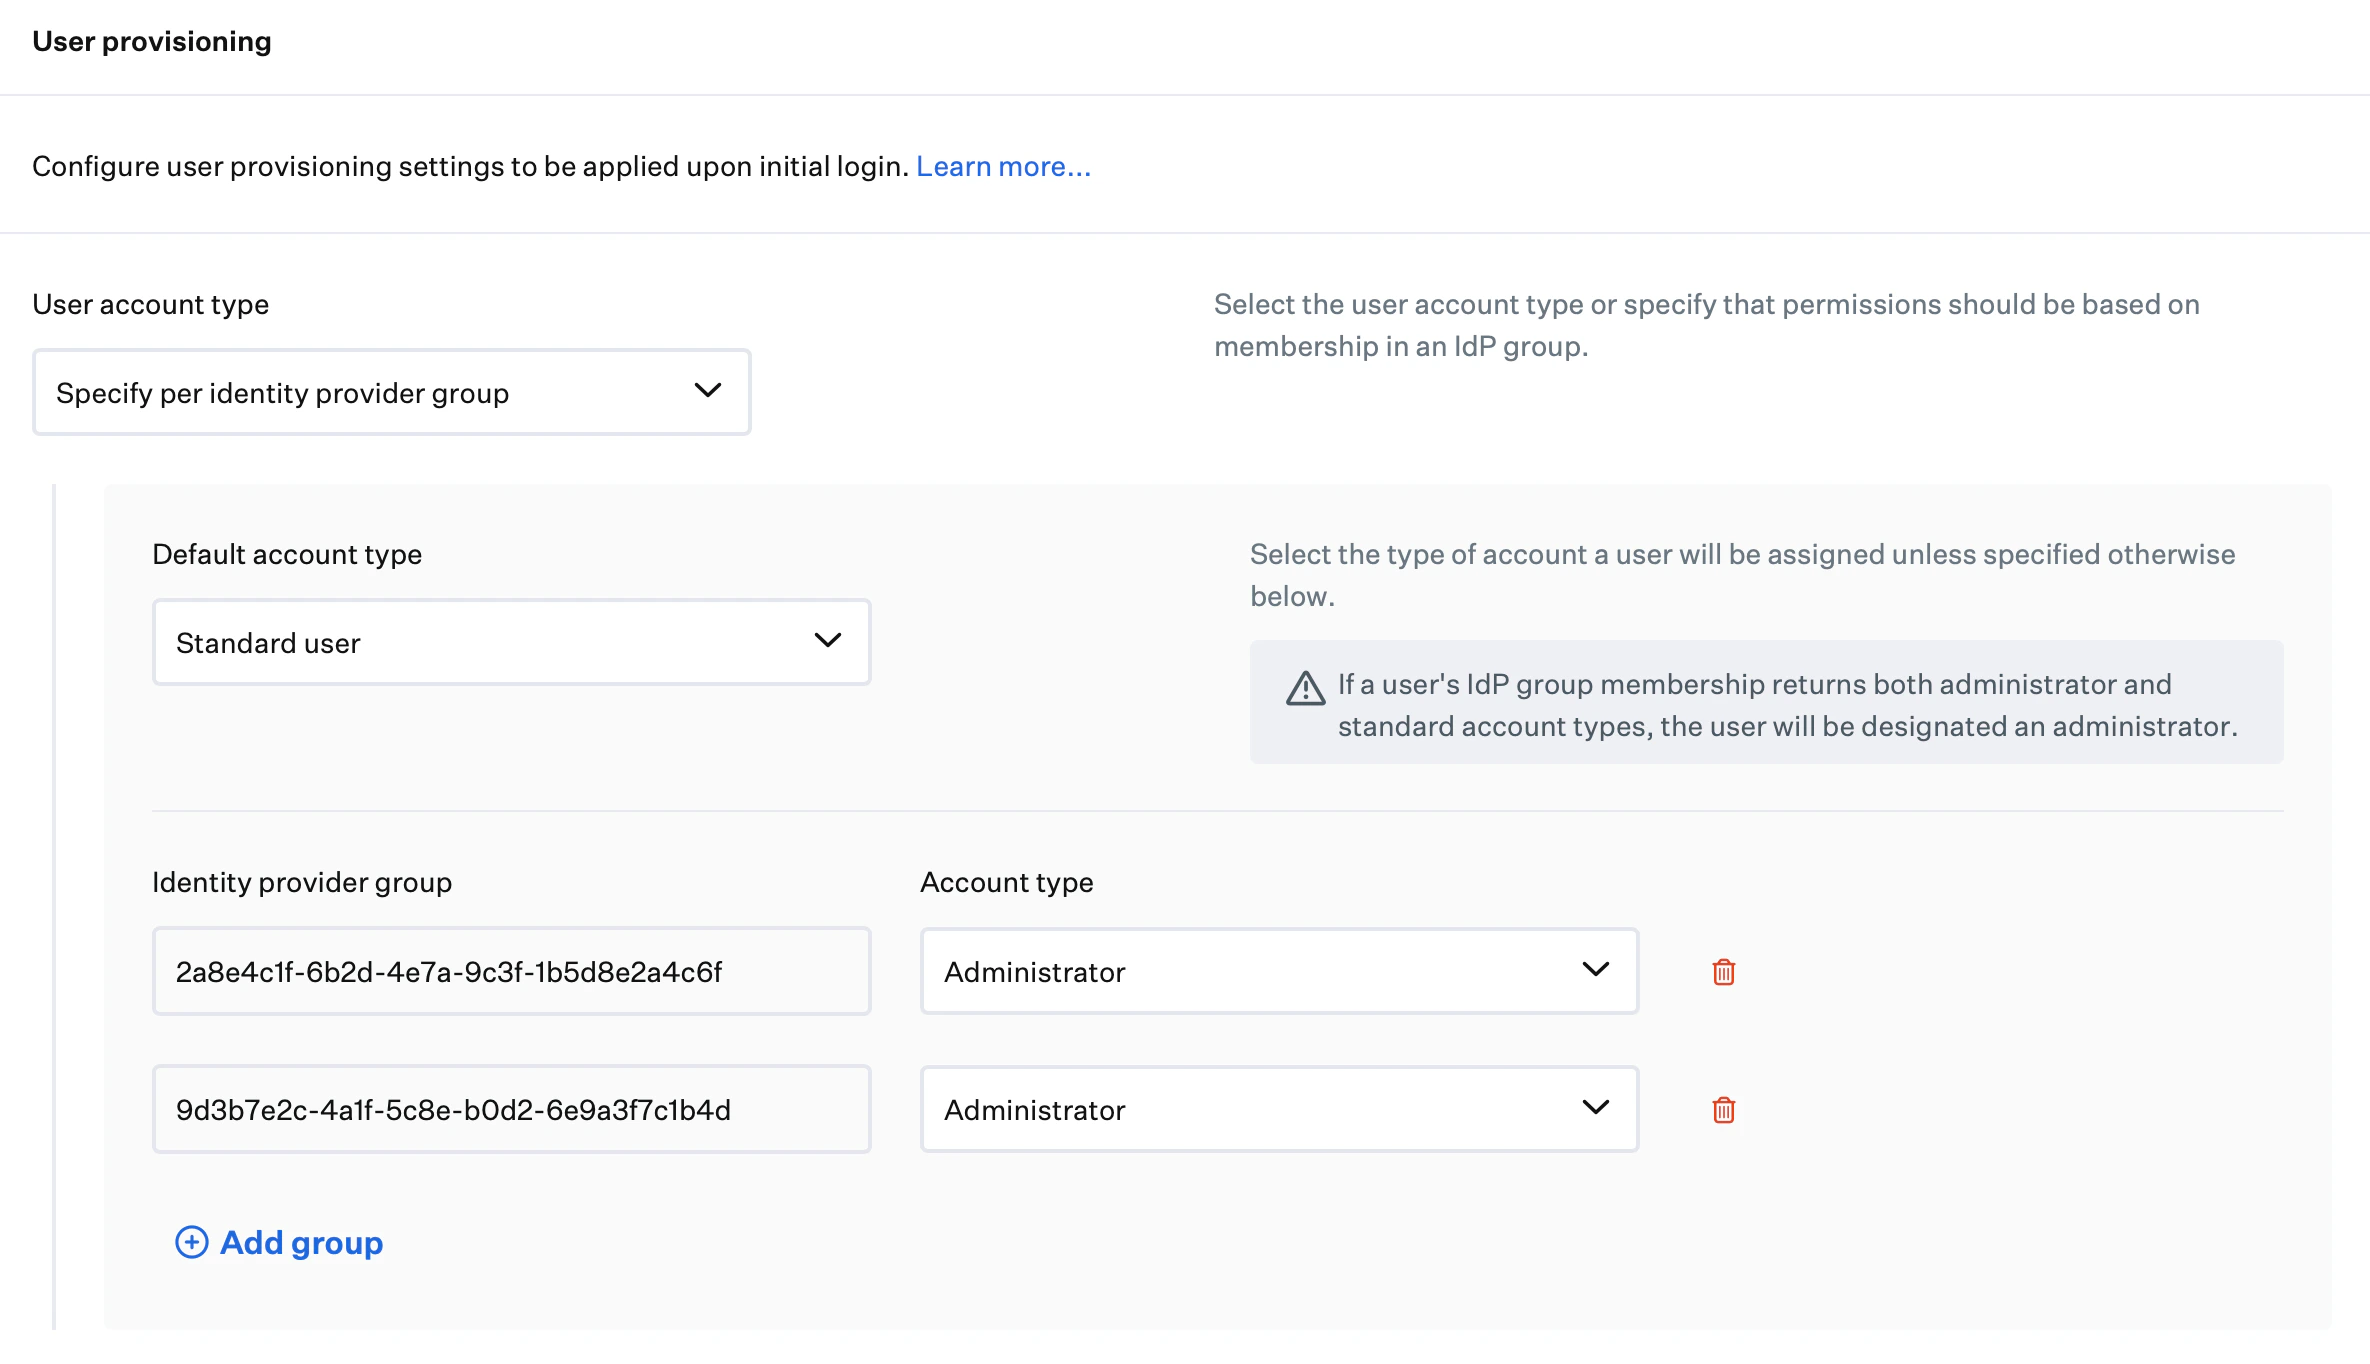
In the **User provisioning** section, open **User account type** and select **Specify per identity provider group**.
With **User account type** set to **Specify per identity provider group**, open the account type drop-down below it and select Administrator or Standard user. If a user's IdP group membership returns both Administrator and Standard account types, the user is designated an Administrator.
In each **Identity provider group** field, enter the Entra ID group **Object ID** as a GUID, not the group display name.
For each **Identity provider group** row, set the **Account type** as appropriate.
Under **Authentication mode**, select **Web Login**.
In the **Redirect URI** field, enter the following. It must match the redirect URI on the app registration from the [Microsoft Entra ID](#microsoft-entra-id) tab:
```
https://localhost
```
Click **Save** on the Passport Library Item.
### User Provisioning
If you want Passport to set each user's Mac account type from Entra ID security group membership, use the steps below under **User provisioning** on the Passport Library Item [**Iru Endpoint** tab](#iru-endpoint). Collect each group's **Object ID** in Entra ID first. See [User Account Provisioning via Passport](#user-account-provisioning-via-passport) on the [Microsoft Entra ID](#microsoft-entra-id) tab.
In the **User provisioning** section, open **User account type** and select **Specify per identity provider group**.
With **User account type** set to **Specify per identity provider group**, open the account type drop-down below it and select Administrator or Standard user. If a user's IdP group membership returns both Administrator and Standard account types, the user is designated an Administrator.
In each **Identity provider group** field, enter the Entra ID group **Object ID** as a GUID, not the group display name.
For each **Identity provider group** row, set the **Account type** as appropriate.
 Click **Save**.
When the Passport Library Item is saved, return to the [Microsoft Entra ID](#microsoft-entra-id) tab if you need to change the app registration, **Passport - CA Policy API** exclusions, or group **Object IDs**.
## Required Changes Before June 15, 2026
On **June 15, 2026**, Microsoft Entra ID starts enforcing Conditional Access more broadly for policies that target **All resources** (formerly **All cloud apps**) and include **resource exclusions**. Sign-ins that request only **baseline scopes**, including `openid`, `profile`, `email`, and `User.Read`, will be subject to those policies.
Passport **Web Login** requests those scopes as a public client. If you already use Passport **Web Login**, you need the steps below only when you want password verification and synchronization to work without MFA being enforced through Conditional Access on policies scoped to **All resources** (you exempt Passport from MFA instead of having users complete MFA during web sign-in). If users complete MFA in the Entra ID web view, you generally do not need the custom scope, **Step 3**, or the **Additional scopes** Library Item update; your tenant may still need the path under **If you do not use Conditional Access policies**. If you skip required updates, sign-in and password sync can break once the change reaches your tenant.
If you are configuring Passport **Web Login** for the first time using this article, the **Microsoft Entra ID** and **Iru Endpoint** tabs above already include these updates where they apply.
Read [Enforcement for baseline scopes in Conditional Access](https://learn.microsoft.com/en-us/entra/identity/conditional-access/concept-enforcement-resource-exclusions) for more detail.
### If you skip these updates
If you do not prepare before **June 15, 2026**:
* New users might not be able to sign in with Passport.
* Existing users might need to switch to local login after a reboot or logout.
* Password sync and state management can stop working.
* Microsoft Entra ID might record extra failed sign-in events.
### If you do not use Conditional Access policies
If you do not use Conditional Access, or you want the old behavior across your tenant while you test:
Register a single-tenant application in Microsoft Entra ID to serve as the custom target resource for baseline scopes. No additional configuration is required during registration. See **Create an application** in [Customize behavior](https://learn.microsoft.com/en-us/entra/identity/conditional-access/concept-enforcement-resource-exclusions#customize-behavior).
In each Conditional Access policy where you need to retain legacy behavior, exclude the placeholder application from **Target resources**. See **Exclude the application from the relevant policy** in [Microsoft's documentation](https://learn.microsoft.com/en-us/entra/identity/conditional-access/concept-enforcement-resource-exclusions#customize-behavior).
Open [Baseline scopes settings](https://aka.ms/BaselineScopesSettingsUX), select **Customize behavior**, select the placeholder application, then select **Save**. See **Select the application in the Baseline scopes settings UX** in [Microsoft's documentation](https://learn.microsoft.com/en-us/entra/identity/conditional-access/concept-enforcement-resource-exclusions#customize-behavior).
You do not need to change your Passport Library Item in Iru Endpoint.
This Entra ID setting affects every application that requests baseline scopes, not just Passport.
### If you use Conditional Access policies
If you use Conditional Access with Passport **Web Login** and want to exempt Passport from MFA as described above, complete the steps below before **June 15, 2026**.
#### Step 1 — Create the Passport - CA Policy API application
Sign in to the [Microsoft Entra admin center](https://entra.microsoft.com) and open **Entra ID** > **App registrations**.
Select **+ New registration**. Enter **Passport - CA Policy API** as the name, under **Supported account types** select **Single tenant only**, and leave **Redirect URI** empty. Select **Register**.
Open **API permissions**. If admin consent is not already granted, select **Grant admin consent for \[your tenant]**.
Open **Expose an API** in the left navigation.
Select **+ Add a scope**.
Review the **Application ID URI**. Entra ID suggests a default value (for example, `api://cca588ed-dfe6-4fb4-b695-abfa23b6475a`). The default is fine. Select **Save and continue**. You do not need to copy this URI; copy the scope URI in **Copy the scope URI** below.
For **Scope name**, enter `Passport` without spaces or special characters. Leave **Who can consent** at the default. Enter a display name and description in the **Admin consent** fields, then select **Add scope**.
Next to the scope URI in the **Scopes** list (for example, `api://cca588ed-dfe6-4fb4-b695-abfa23b6475a/Passport`), select **Copy**. Save it for step 4 below.
#### Step 2 — Add the custom scope to your Passport app registration
If you aren't already signed in, sign in to the [Microsoft Entra admin center](https://entra.microsoft.com) and open **Entra ID** > **App registrations**. Open the application you use for Passport **Web Login**.
Open **API permissions** and select **+ Add a permission**.
Open the **APIs my organization uses** tab and select **Passport - CA Policy API**.
Select **Delegated permissions**, select the **Passport** permission, then select **Add permissions**.
Select **Grant admin consent for \[your tenant]**.
#### Step 3 — Exclude Passport - CA Policy API from All resources policies
Complete this step only when you use **Web Login** and want to exempt Passport from MFA through Conditional Access. Skip it if users complete MFA in the Entra ID web view at login.
Policies scoped to **All resources** include sign-ins that use baseline scopes Passport requests at sign-in. Exclude **Passport - CA Policy API** so password verification and synchronization continue to work without an MFA requirement on those policies.
In the [Microsoft Entra admin center](https://entra.microsoft.com), open **Protection** > **Conditional Access** > **Policies**.
Select each policy scoped to **All resources**, then open **Target resources**.
Open the **Exclude** tab, select **Select resources**, then select **Passport - CA Policy API**. Select **Select**, then **Save**.
Repeat these steps for every Conditional Access policy scoped to **All resources**.
If **Save** fails, confirm that **Passport - CA Policy API** does not allow public client flows. If the app has a redirect URI configured, remove it and try again.
#### Step 4 — Update your Passport Library Item
Complete this step when you follow **If you use Conditional Access policies** because you exempt **Web Login** from MFA as described above.
In Iru Endpoint, open **Library** and edit your Passport Library Item configured for Microsoft Entra ID **Web Login**.
On the [**Iru Endpoint** tab](#iru-endpoint), paste the scope URI from step 1 above into **Additional scopes (optional)**, then select **Save**.
Repeat **Add the scope URI** for every Passport Library Item configured for Microsoft Entra ID **Web Login**.
After you finish these updates, test Passport sign-in on an enrolled Mac. If sign-in fails, see [Passport Troubleshooting with Microsoft Entra ID (formerly Azure AD)](/en/endpoint/library/passport/microsoft-entra-id/passport-troubleshooting-with-microsoft-entra-id-formerly-azure-ad).
## Microsoft Entra ID Troubleshooting
If Passport sign-in fails with Entra ID, see [Passport Troubleshooting with Microsoft Entra ID (formerly Azure AD)](/en/endpoint/library/passport/microsoft-entra-id/passport-troubleshooting-with-microsoft-entra-id-formerly-azure-ad).
Click **Save**.
When the Passport Library Item is saved, return to the [Microsoft Entra ID](#microsoft-entra-id) tab if you need to change the app registration, **Passport - CA Policy API** exclusions, or group **Object IDs**.
## Required Changes Before June 15, 2026
On **June 15, 2026**, Microsoft Entra ID starts enforcing Conditional Access more broadly for policies that target **All resources** (formerly **All cloud apps**) and include **resource exclusions**. Sign-ins that request only **baseline scopes**, including `openid`, `profile`, `email`, and `User.Read`, will be subject to those policies.
Passport **Web Login** requests those scopes as a public client. If you already use Passport **Web Login**, you need the steps below only when you want password verification and synchronization to work without MFA being enforced through Conditional Access on policies scoped to **All resources** (you exempt Passport from MFA instead of having users complete MFA during web sign-in). If users complete MFA in the Entra ID web view, you generally do not need the custom scope, **Step 3**, or the **Additional scopes** Library Item update; your tenant may still need the path under **If you do not use Conditional Access policies**. If you skip required updates, sign-in and password sync can break once the change reaches your tenant.
If you are configuring Passport **Web Login** for the first time using this article, the **Microsoft Entra ID** and **Iru Endpoint** tabs above already include these updates where they apply.
Read [Enforcement for baseline scopes in Conditional Access](https://learn.microsoft.com/en-us/entra/identity/conditional-access/concept-enforcement-resource-exclusions) for more detail.
### If you skip these updates
If you do not prepare before **June 15, 2026**:
* New users might not be able to sign in with Passport.
* Existing users might need to switch to local login after a reboot or logout.
* Password sync and state management can stop working.
* Microsoft Entra ID might record extra failed sign-in events.
### If you do not use Conditional Access policies
If you do not use Conditional Access, or you want the old behavior across your tenant while you test:
Register a single-tenant application in Microsoft Entra ID to serve as the custom target resource for baseline scopes. No additional configuration is required during registration. See **Create an application** in [Customize behavior](https://learn.microsoft.com/en-us/entra/identity/conditional-access/concept-enforcement-resource-exclusions#customize-behavior).
In each Conditional Access policy where you need to retain legacy behavior, exclude the placeholder application from **Target resources**. See **Exclude the application from the relevant policy** in [Microsoft's documentation](https://learn.microsoft.com/en-us/entra/identity/conditional-access/concept-enforcement-resource-exclusions#customize-behavior).
Open [Baseline scopes settings](https://aka.ms/BaselineScopesSettingsUX), select **Customize behavior**, select the placeholder application, then select **Save**. See **Select the application in the Baseline scopes settings UX** in [Microsoft's documentation](https://learn.microsoft.com/en-us/entra/identity/conditional-access/concept-enforcement-resource-exclusions#customize-behavior).
You do not need to change your Passport Library Item in Iru Endpoint.
This Entra ID setting affects every application that requests baseline scopes, not just Passport.
### If you use Conditional Access policies
If you use Conditional Access with Passport **Web Login** and want to exempt Passport from MFA as described above, complete the steps below before **June 15, 2026**.
#### Step 1 — Create the Passport - CA Policy API application
Sign in to the [Microsoft Entra admin center](https://entra.microsoft.com) and open **Entra ID** > **App registrations**.
Select **+ New registration**. Enter **Passport - CA Policy API** as the name, under **Supported account types** select **Single tenant only**, and leave **Redirect URI** empty. Select **Register**.
Open **API permissions**. If admin consent is not already granted, select **Grant admin consent for \[your tenant]**.
Open **Expose an API** in the left navigation.
Select **+ Add a scope**.
Review the **Application ID URI**. Entra ID suggests a default value (for example, `api://cca588ed-dfe6-4fb4-b695-abfa23b6475a`). The default is fine. Select **Save and continue**. You do not need to copy this URI; copy the scope URI in **Copy the scope URI** below.
For **Scope name**, enter `Passport` without spaces or special characters. Leave **Who can consent** at the default. Enter a display name and description in the **Admin consent** fields, then select **Add scope**.
Next to the scope URI in the **Scopes** list (for example, `api://cca588ed-dfe6-4fb4-b695-abfa23b6475a/Passport`), select **Copy**. Save it for step 4 below.
#### Step 2 — Add the custom scope to your Passport app registration
If you aren't already signed in, sign in to the [Microsoft Entra admin center](https://entra.microsoft.com) and open **Entra ID** > **App registrations**. Open the application you use for Passport **Web Login**.
Open **API permissions** and select **+ Add a permission**.
Open the **APIs my organization uses** tab and select **Passport - CA Policy API**.
Select **Delegated permissions**, select the **Passport** permission, then select **Add permissions**.
Select **Grant admin consent for \[your tenant]**.
#### Step 3 — Exclude Passport - CA Policy API from All resources policies
Complete this step only when you use **Web Login** and want to exempt Passport from MFA through Conditional Access. Skip it if users complete MFA in the Entra ID web view at login.
Policies scoped to **All resources** include sign-ins that use baseline scopes Passport requests at sign-in. Exclude **Passport - CA Policy API** so password verification and synchronization continue to work without an MFA requirement on those policies.
In the [Microsoft Entra admin center](https://entra.microsoft.com), open **Protection** > **Conditional Access** > **Policies**.
Select each policy scoped to **All resources**, then open **Target resources**.
Open the **Exclude** tab, select **Select resources**, then select **Passport - CA Policy API**. Select **Select**, then **Save**.
Repeat these steps for every Conditional Access policy scoped to **All resources**.
If **Save** fails, confirm that **Passport - CA Policy API** does not allow public client flows. If the app has a redirect URI configured, remove it and try again.
#### Step 4 — Update your Passport Library Item
Complete this step when you follow **If you use Conditional Access policies** because you exempt **Web Login** from MFA as described above.
In Iru Endpoint, open **Library** and edit your Passport Library Item configured for Microsoft Entra ID **Web Login**.
On the [**Iru Endpoint** tab](#iru-endpoint), paste the scope URI from step 1 above into **Additional scopes (optional)**, then select **Save**.
Repeat **Add the scope URI** for every Passport Library Item configured for Microsoft Entra ID **Web Login**.
After you finish these updates, test Passport sign-in on an enrolled Mac. If sign-in fails, see [Passport Troubleshooting with Microsoft Entra ID (formerly Azure AD)](/en/endpoint/library/passport/microsoft-entra-id/passport-troubleshooting-with-microsoft-entra-id-formerly-azure-ad).
## Microsoft Entra ID Troubleshooting
If Passport sign-in fails with Entra ID, see [Passport Troubleshooting with Microsoft Entra ID (formerly Azure AD)](/en/endpoint/library/passport/microsoft-entra-id/passport-troubleshooting-with-microsoft-entra-id-formerly-azure-ad).