> ## Documentation Index
> Fetch the complete documentation index at: https://docs.iru.com/llms.txt
> Use this file to discover all available pages before exploring further.
# Passport Configuration with Google Workspace
> Set up Passport with Google Workspace in Iru Endpoint. Configure OAuth credentials, enable user authentication, and sync macOS passwords with Google.
This guide applies to Mac computers
### About Passport with Google Workspace
Passport with Google Workspace enables users to log into Mac computers using their Google Workspace credentials. This integration provides seamless authentication using your organization's Google identity system.
### How It Works
Passport integrates with your Google Workspace instance using Secure LDAP to authenticate users at the macOS login screen. When users enter their Google Workspace credentials, Passport verifies them against your Google directory and creates or updates the local Mac user account.
### Prerequisites
* Your organization's Google Workspace instance needs to support Secure Lightweight Directory Access Protocol (LDAP). Google has a list of supported licenses for the LDAP service [here](https://support.google.com/a/answer/9100761).
* Every Google Workspace user who will sign in with Passport must have a Cloud Identity Premium license assigned in Google Workspace.
* You need access to your organization's super administrator account.
* If your web browser automatically uncompresses .zip files, temporarily change that setting and download the file again, or compress the uncompressed folder before you upload it to your Passport Library Item.
### Create a Secure LDAP Client and Download the Certificate
Passport uses Secure LDAP to communicate with Google to confirm login credentials and gather basic user and group information. When you create a new Secure LDAP client in Google Workspace, you'll download a certificate to secure communications and turn the service on.
In a web browser, use your organization's super administrator account to sign in to your organization's Google Admin console at [admin.google.com](https://admin.google.com).
In the left sidebar, click **Apps**.
In the Apps section, click **LDAP**.
If **LDAP** does not appear, your edition may not include Secure LDAP. Business Starter and Business Standard do not offer the Secure LDAP service.
If your organization already has one or more Secure LDAP clients, they appear in the list on the **LDAP** page you opened in the previous step. In the upper-right corner, select **ADD CLIENT** to create another client for Passport.
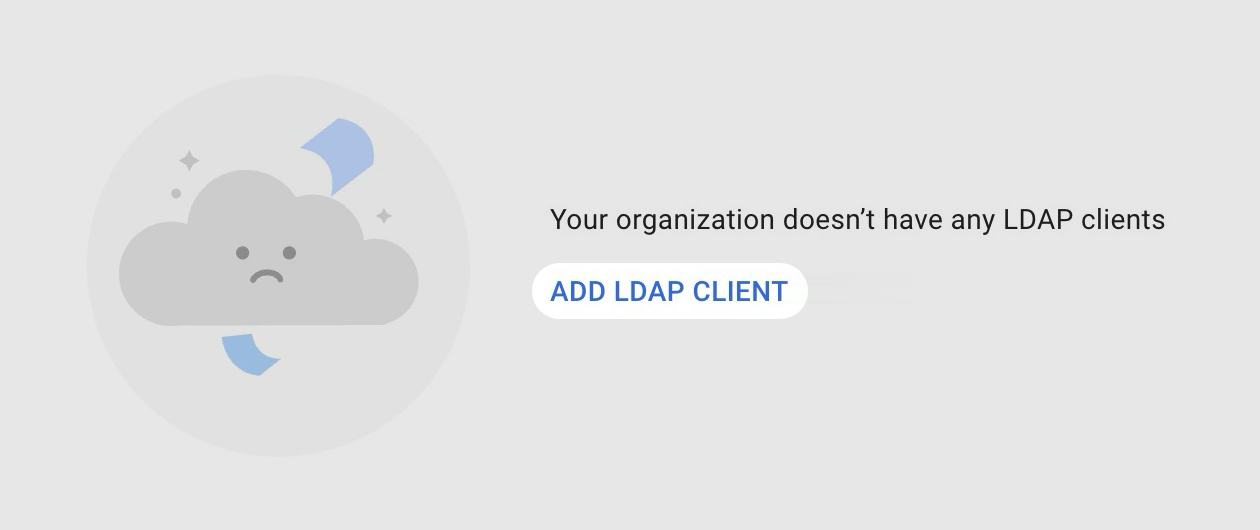
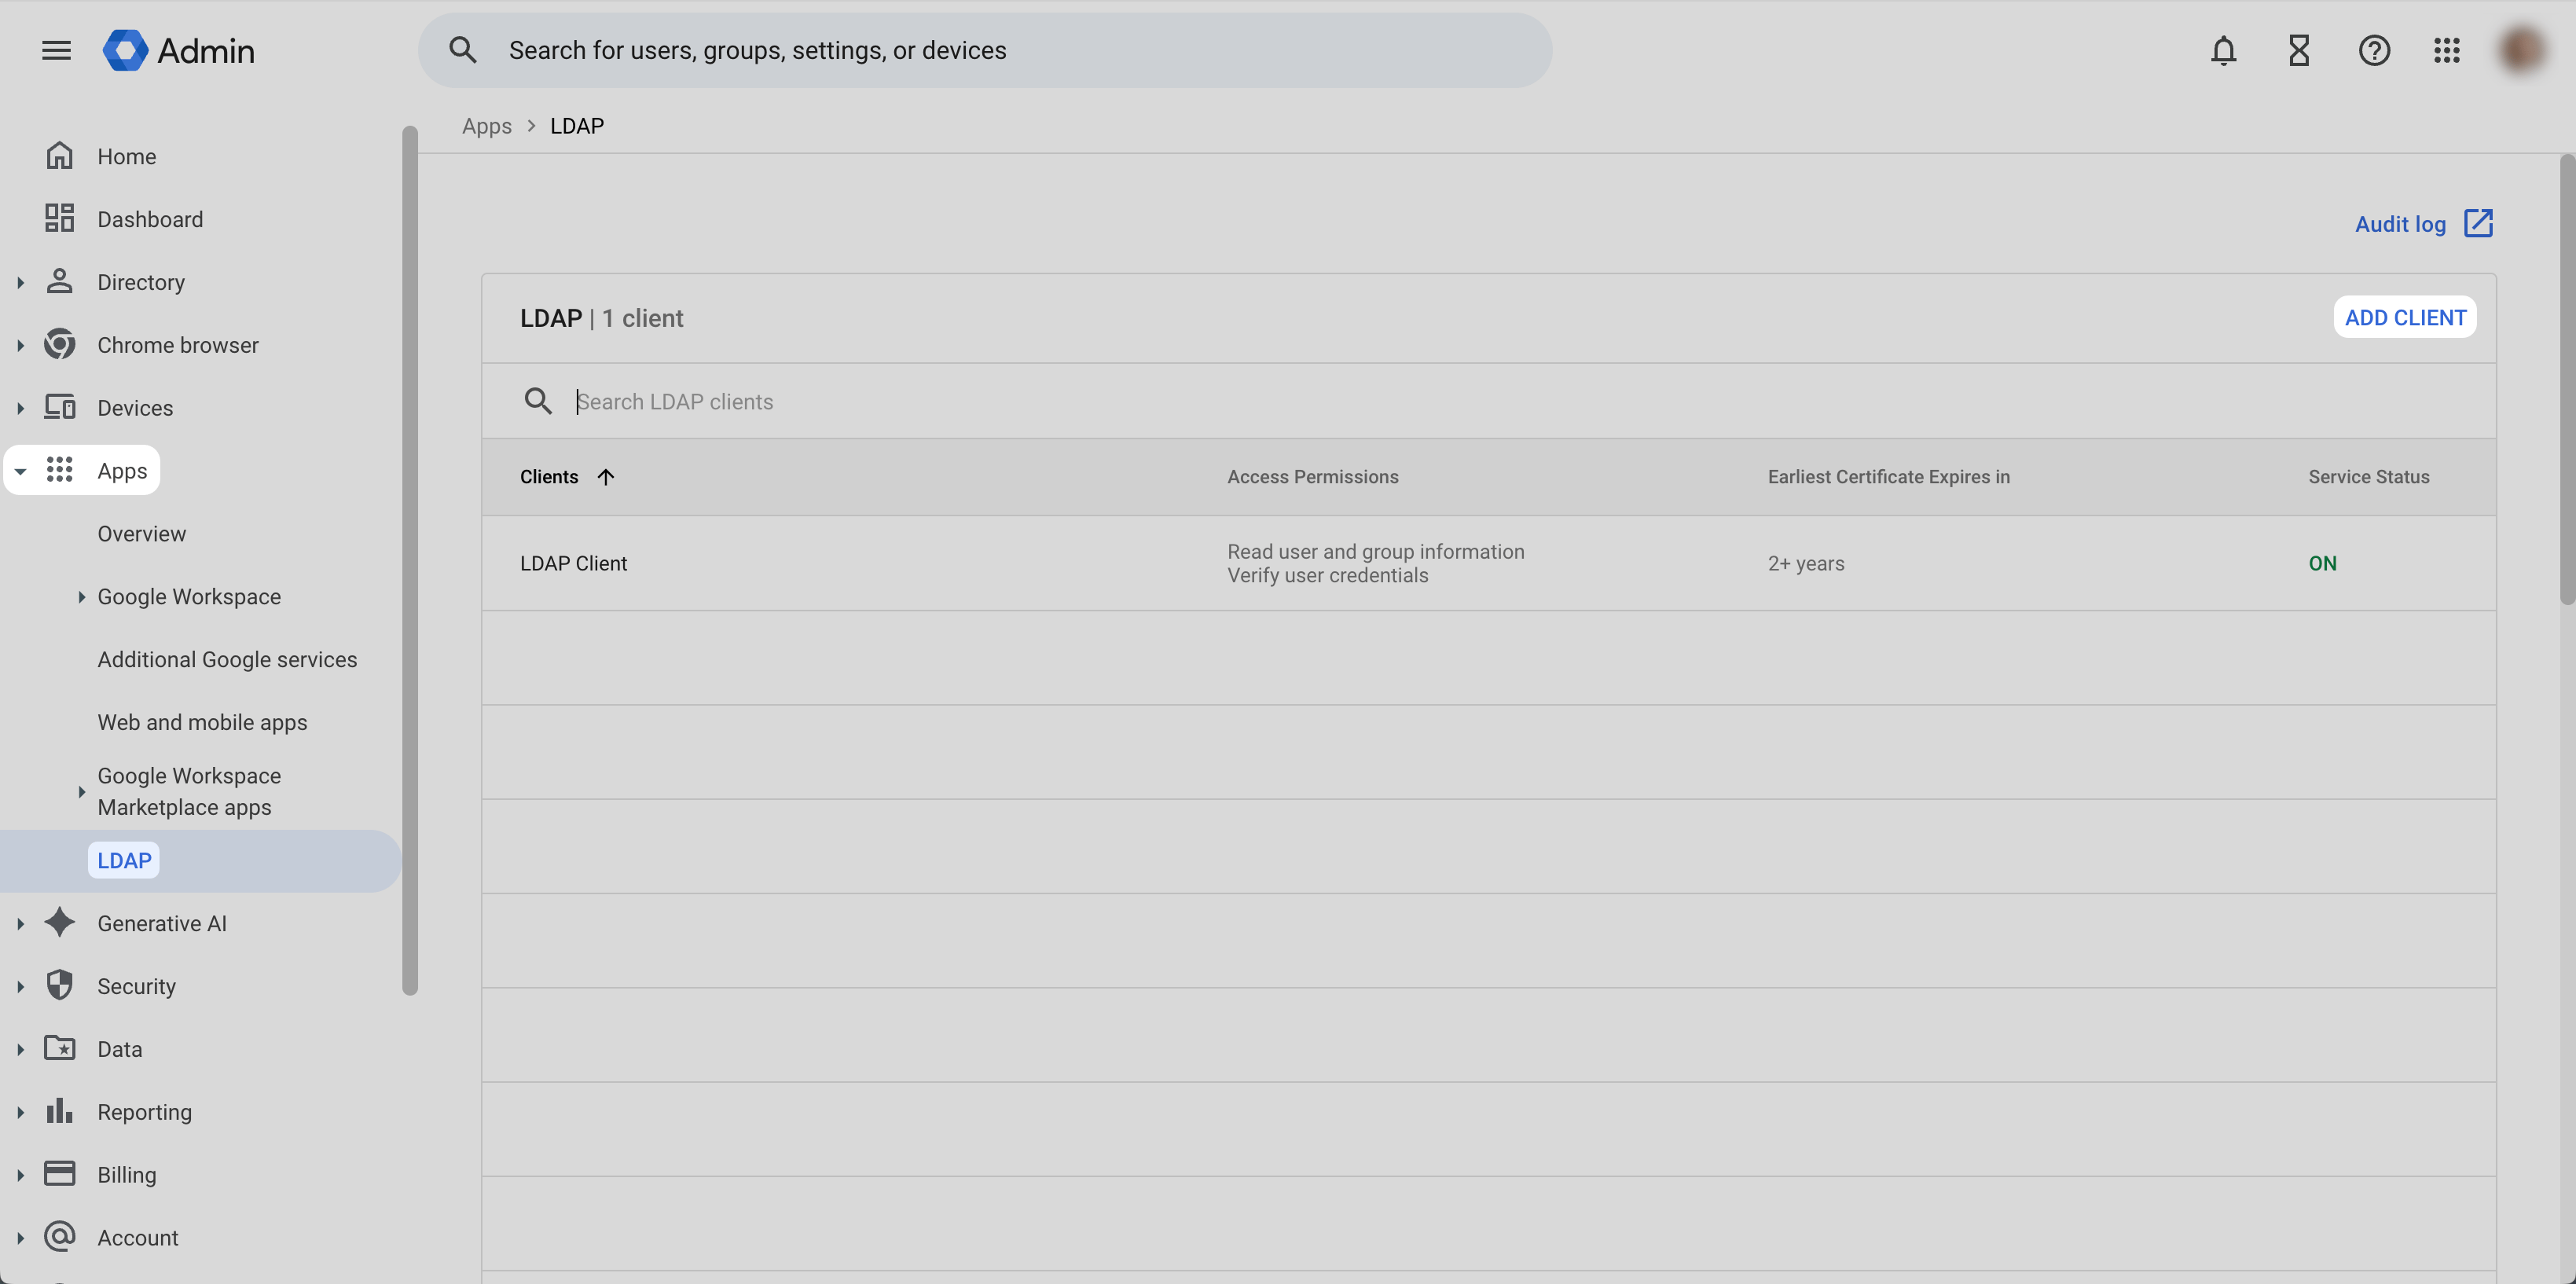 If your organization does not have any Secure LDAP clients yet, the LDAP apps page shows **ADD LDAP CLIENT**. Select **ADD LDAP CLIENT** to start creating the client for Passport.
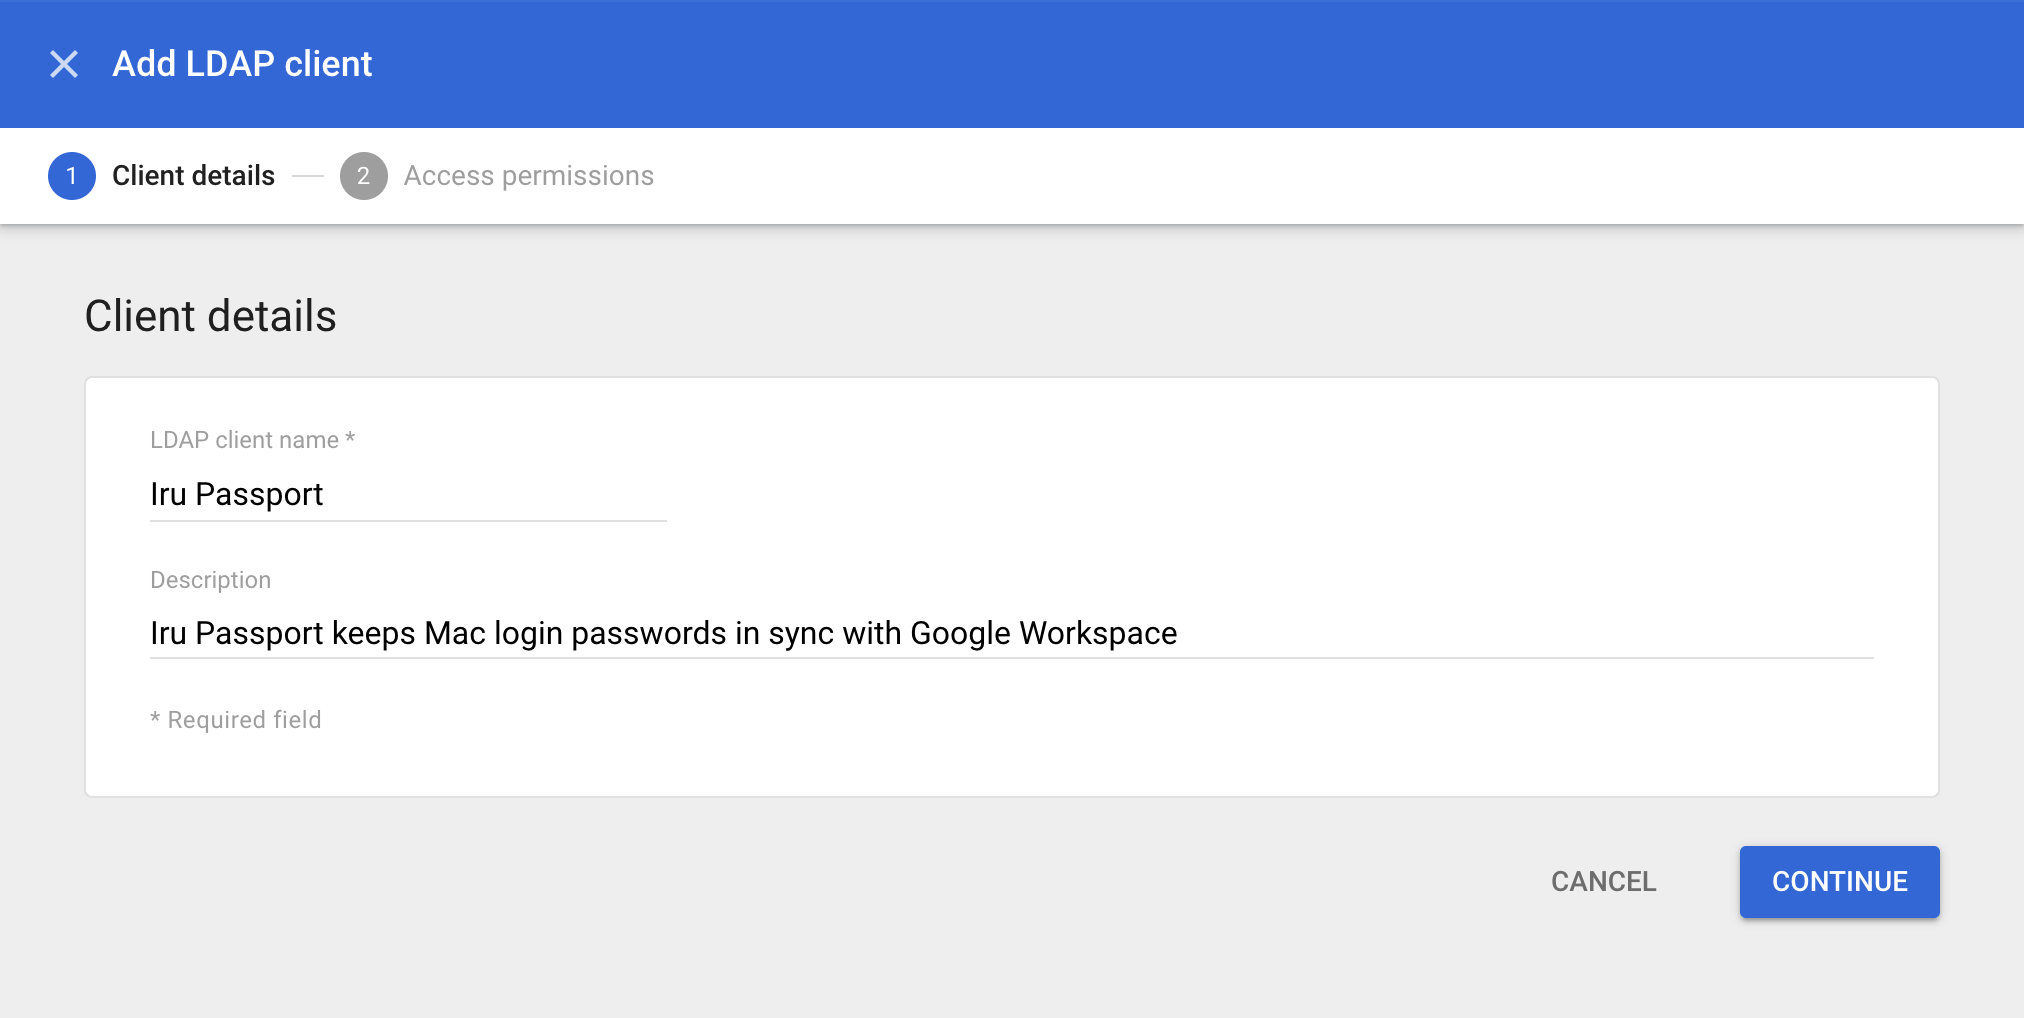
 In the **LDAP client name** field, enter a name like **Iru Passport**.
In the **Description** field, enter a description like **Passport: keep Mac login passwords in sync with Google Workspace**.
Select **CONTINUE**.
In the **LDAP client name** field, enter a name like **Iru Passport**.
In the **Description** field, enter a description like **Passport: keep Mac login passwords in sync with Google Workspace**.
Select **CONTINUE**.
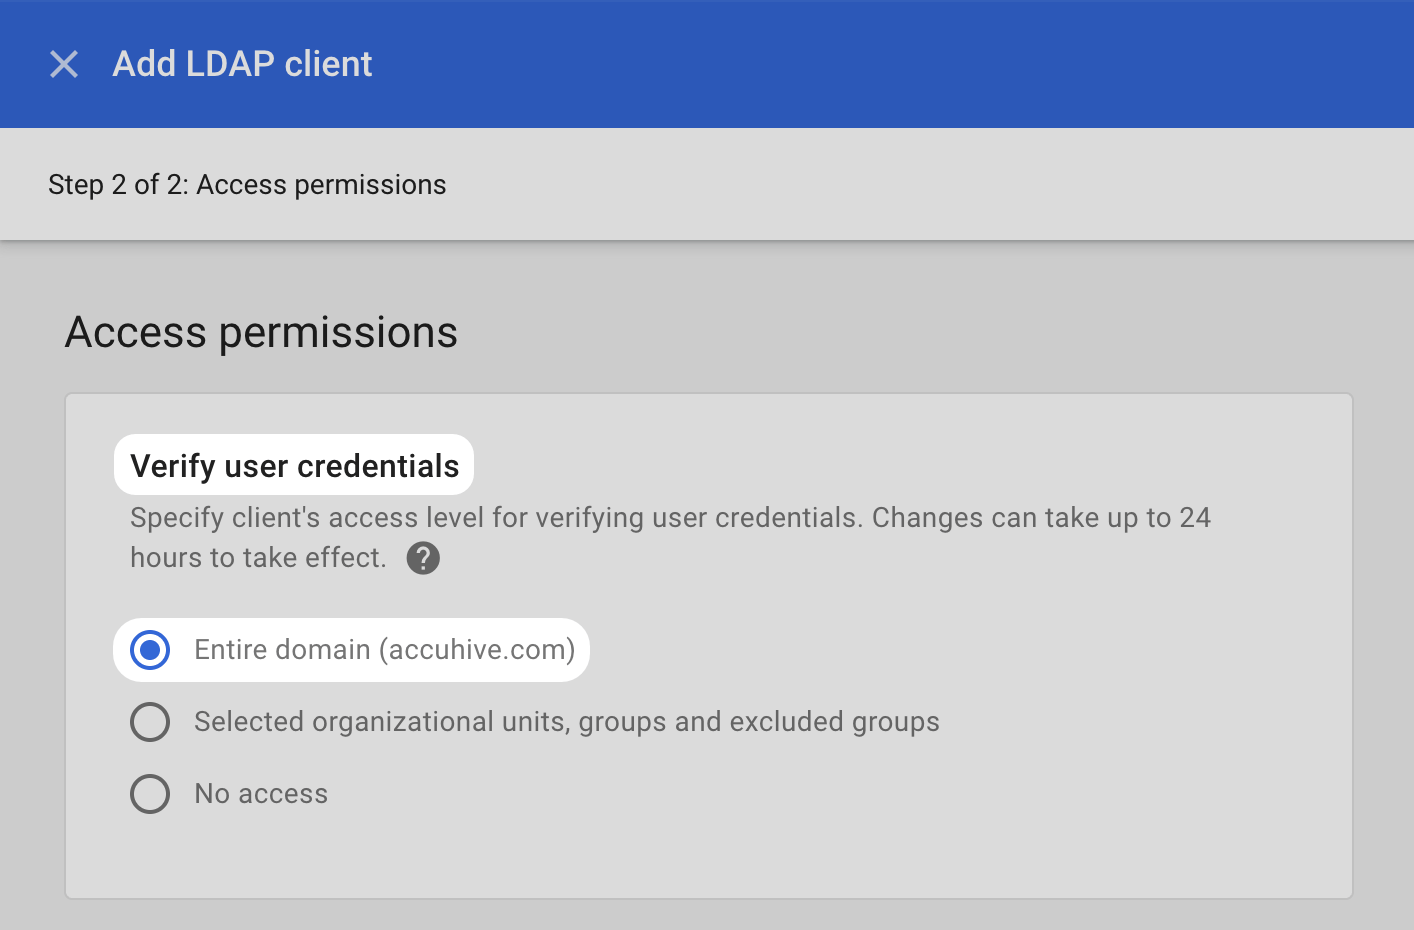
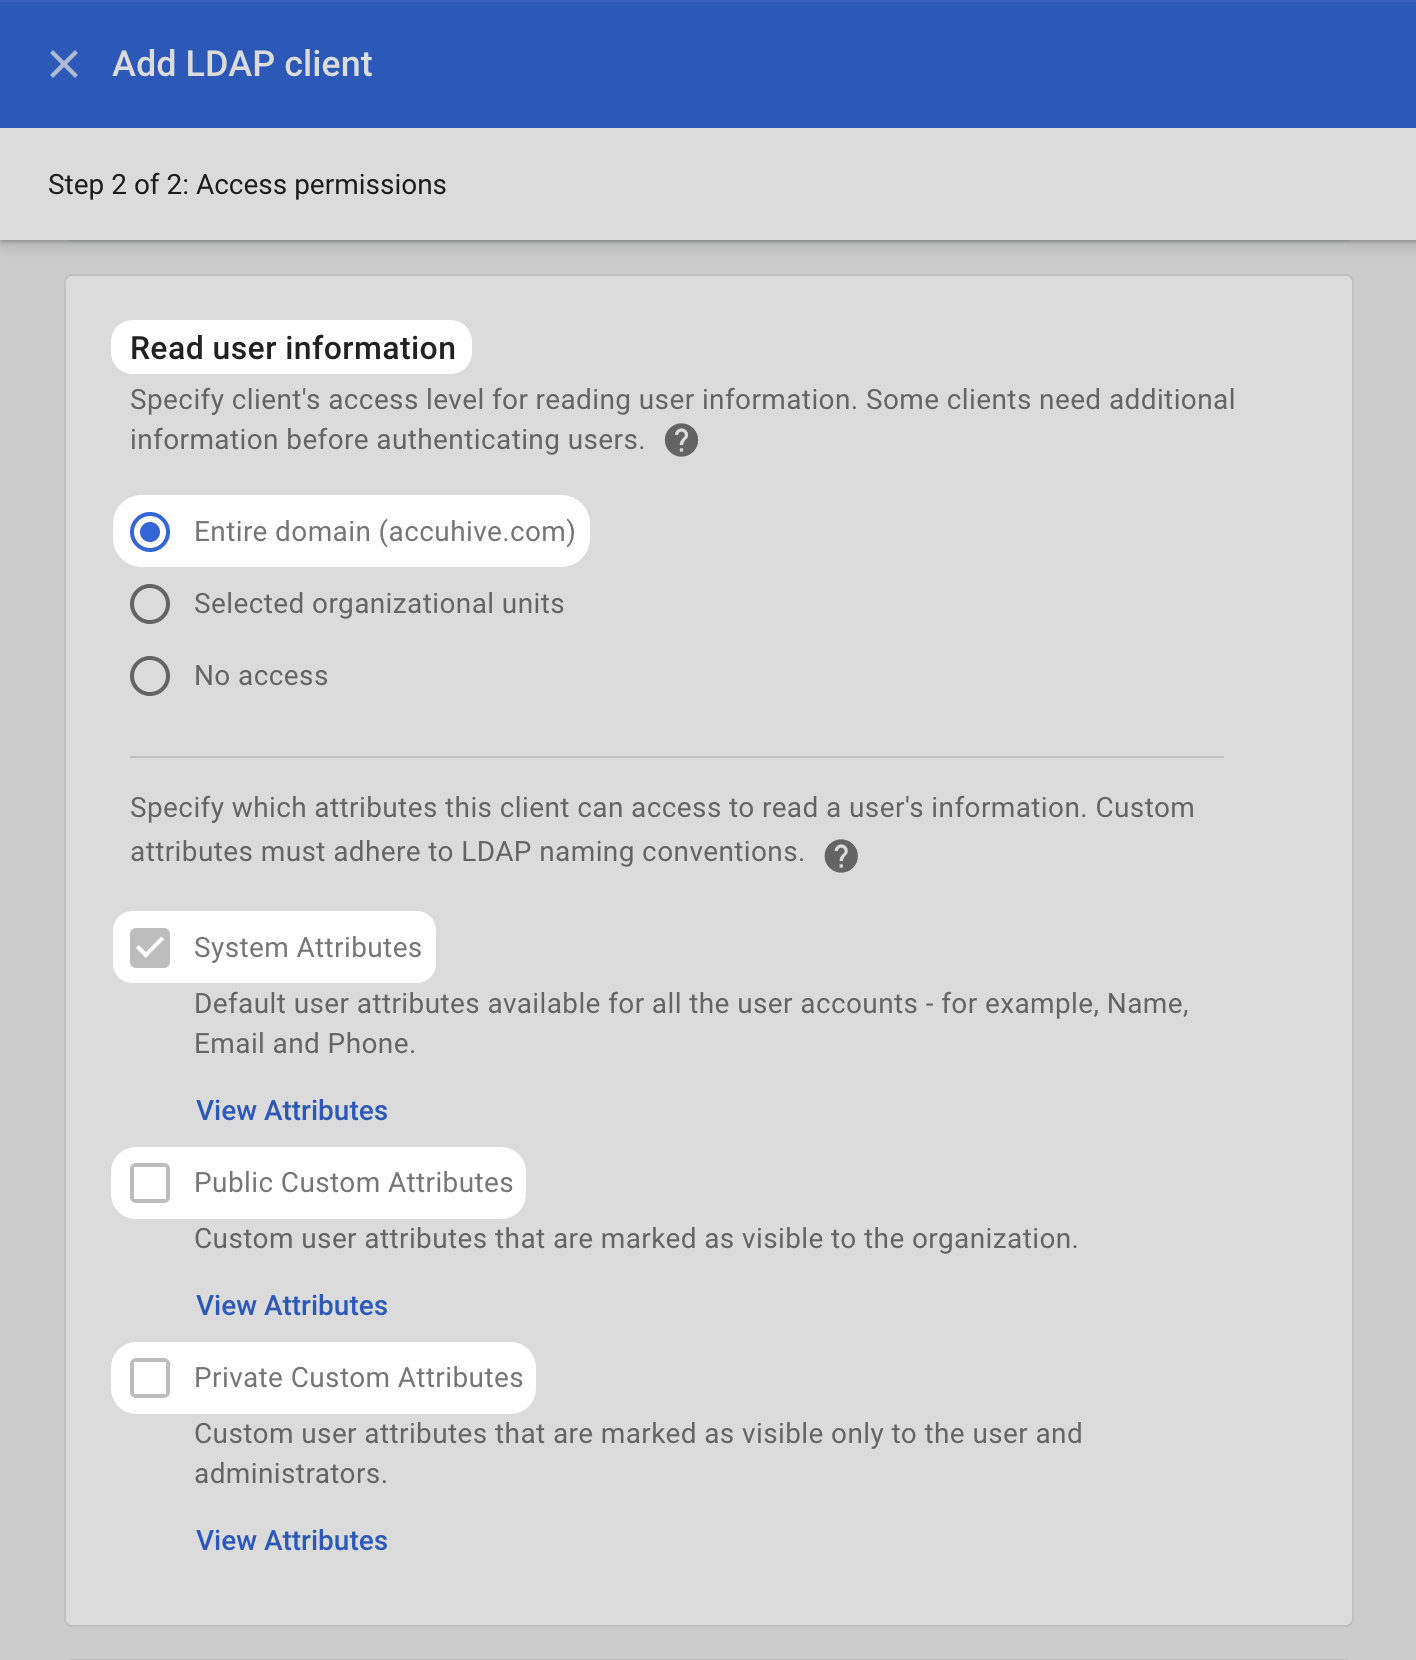
 In the **Verify user credentials** section, select either **Entire domain** (your domain appears in parentheses), or if you want to limit Passport to certain accounts, select **Selected organizational units, groups and excluded groups**.
 In the **Read user information** section, configure the same settings as you did in **Verify user credentials** (for example **Entire domain** or **Selected organizational units** when those options appear).
Confirm that the checkbox for **System Attributes** is selected so that Passport can read the default user attributes.
Leave **Public Custom Attributes** and **Private Custom Attributes** deselected; Passport will not use custom user attributes.
In the **Read user information** section, configure the same settings as you did in **Verify user credentials** (for example **Entire domain** or **Selected organizational units** when those options appear).
Confirm that the checkbox for **System Attributes** is selected so that Passport can read the default user attributes.
Leave **Public Custom Attributes** and **Private Custom Attributes** deselected; Passport will not use custom user attributes.
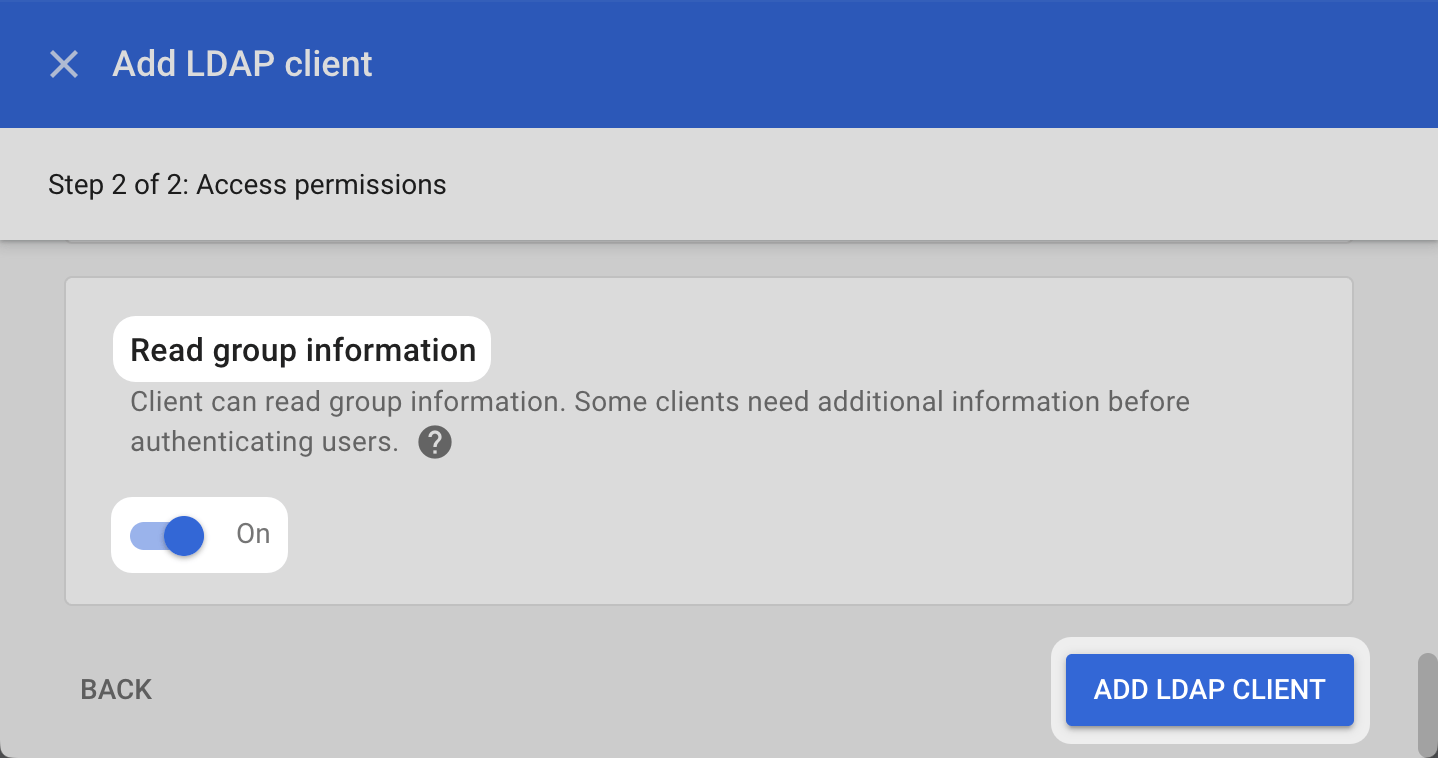
 In the **Read group information** section, set the switch to **On** so you can configure Passport to use a user's Google Workspace group information to dynamically convert their local Mac account between standard and administrator privileges when they log in. You can turn this option on later if you don't turn it on now.
Review your configuration, then select **ADD LDAP CLIENT**.
In the **Read group information** section, set the switch to **On** so you can configure Passport to use a user's Google Workspace group information to dynamically convert their local Mac account between standard and administrator privileges when they log in. You can turn this option on later if you don't turn it on now.
Review your configuration, then select **ADD LDAP CLIENT**.
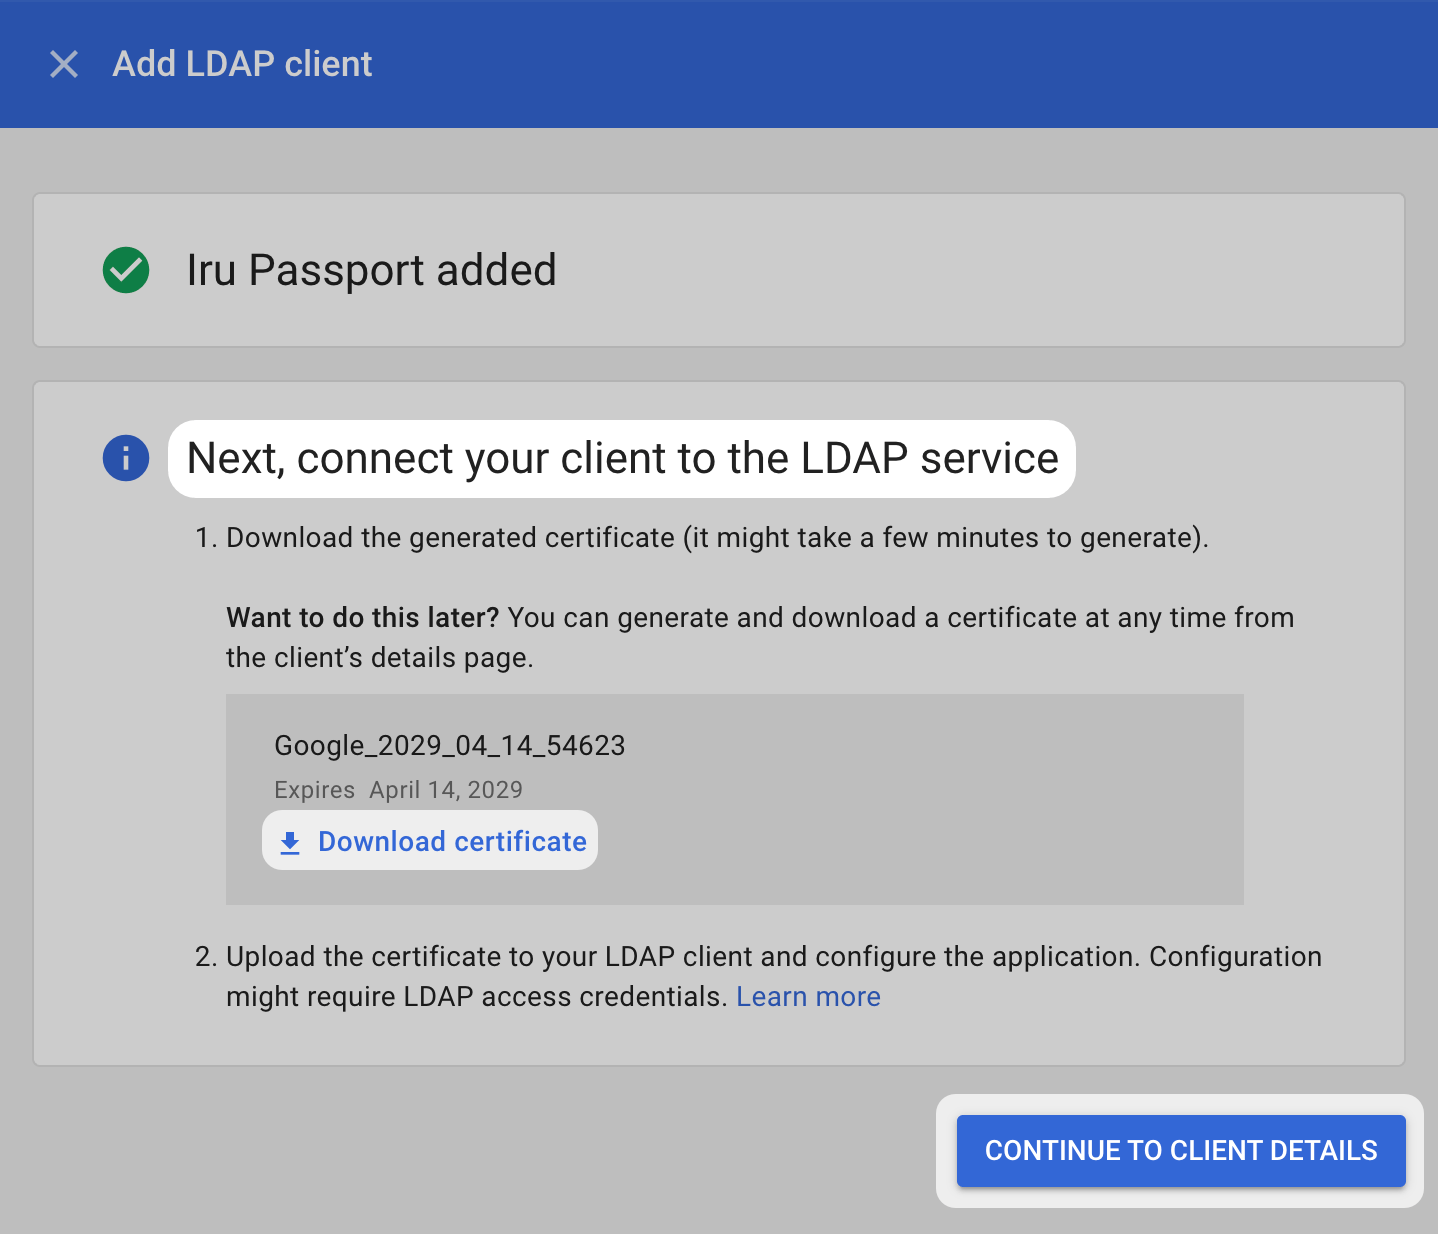
 Select **Download certificate**.
Select **CONTINUE TO CLIENT DETAILS**.
Select **Download certificate**.
Select **CONTINUE TO CLIENT DETAILS**.
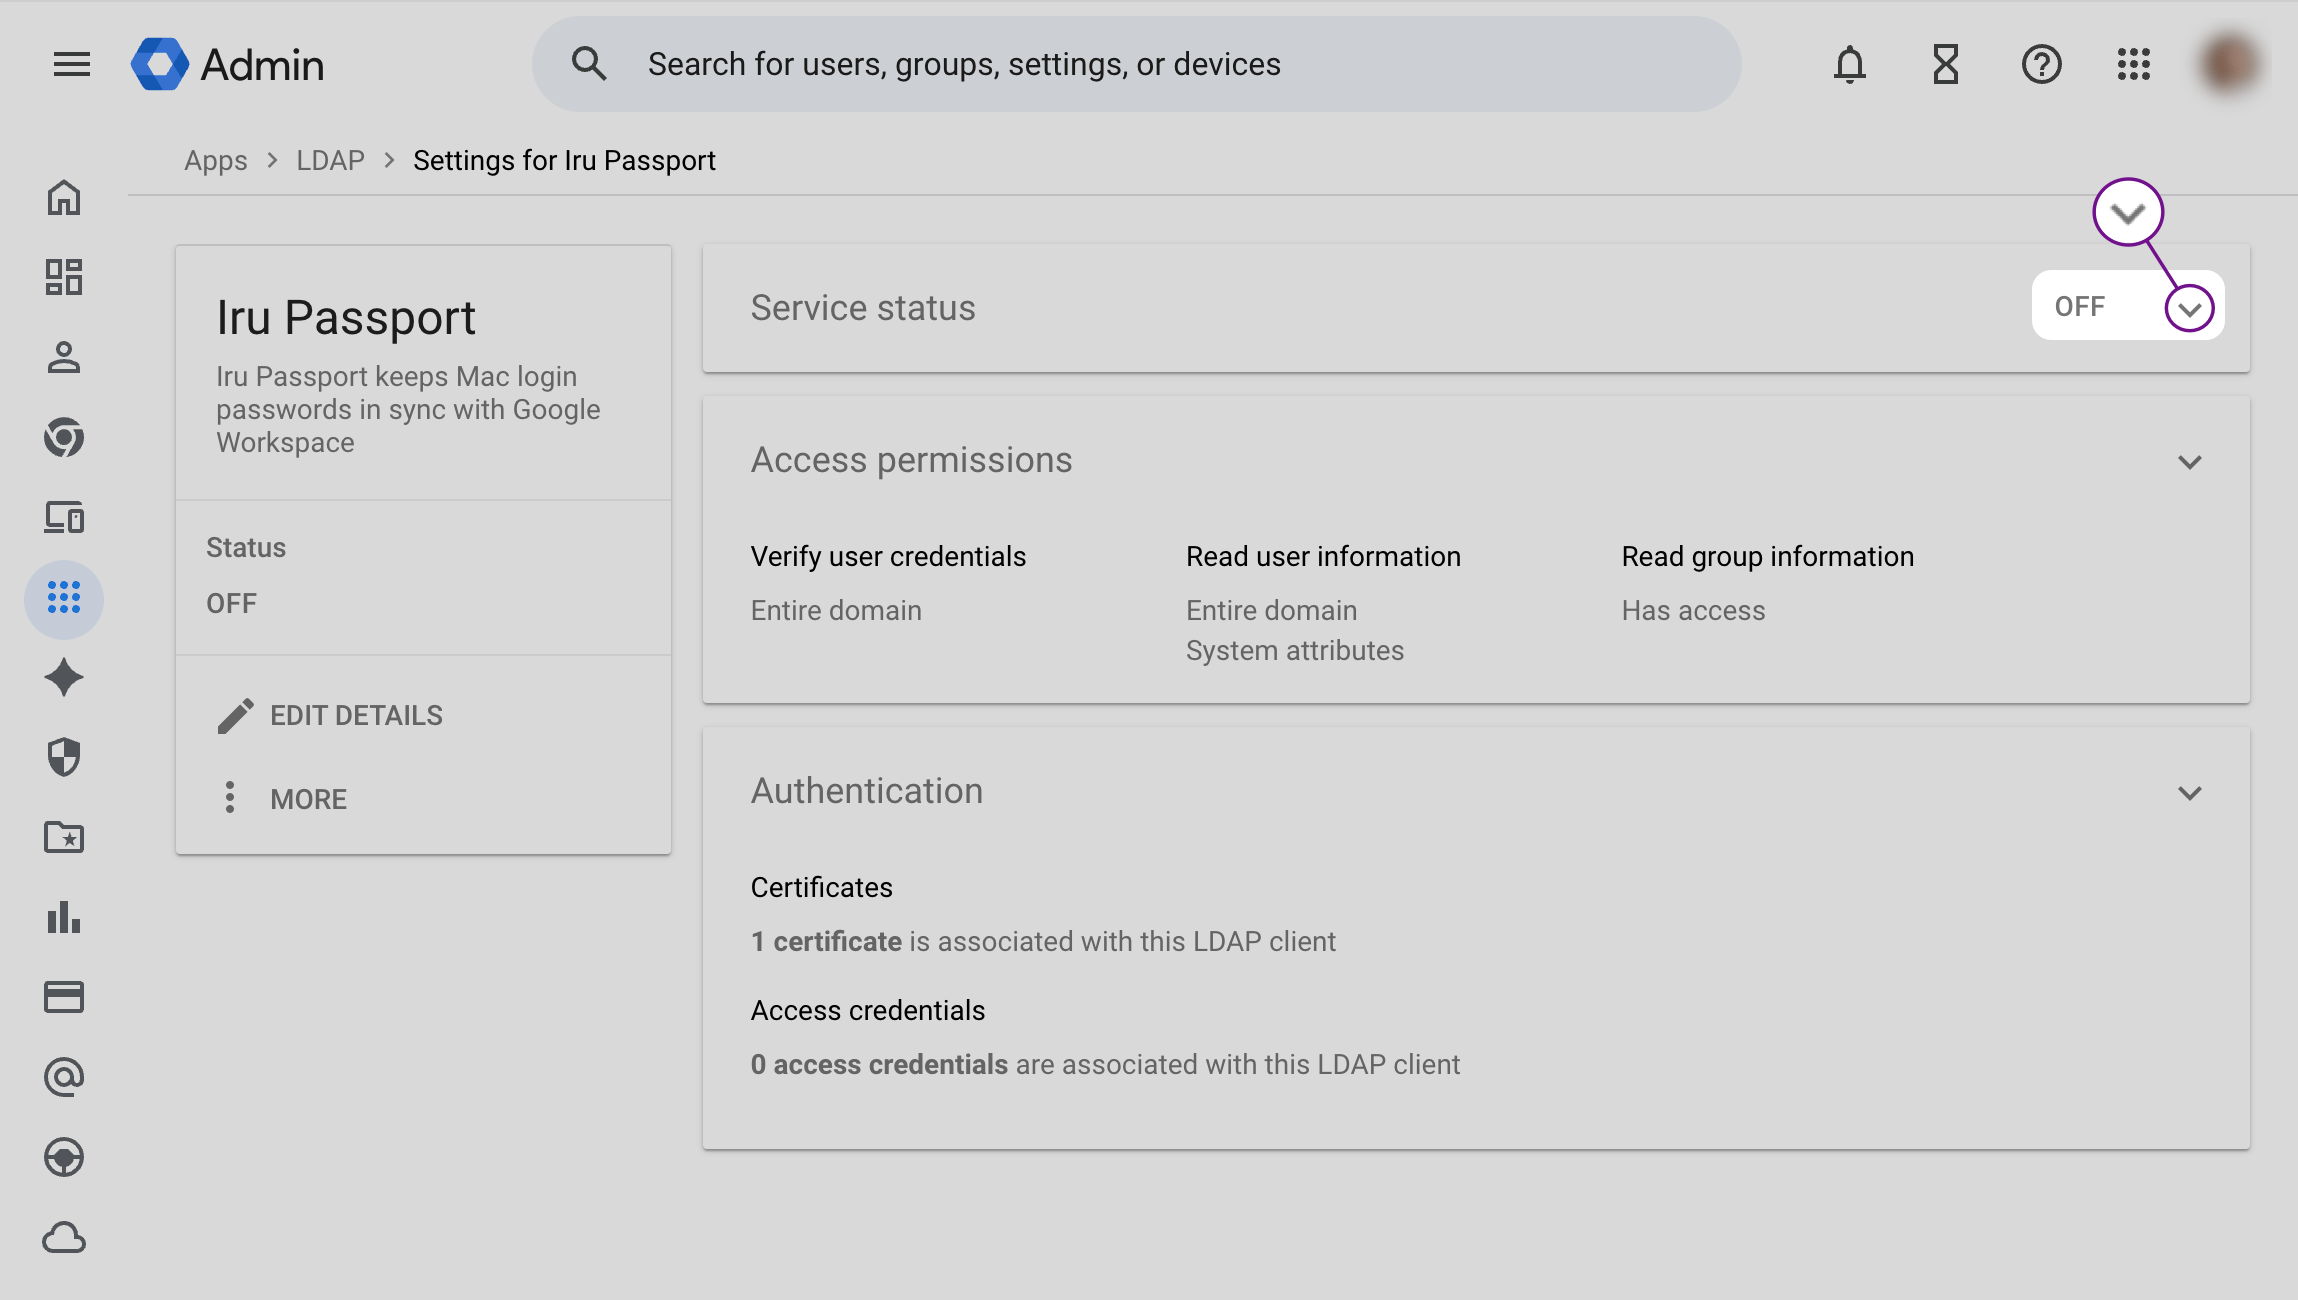
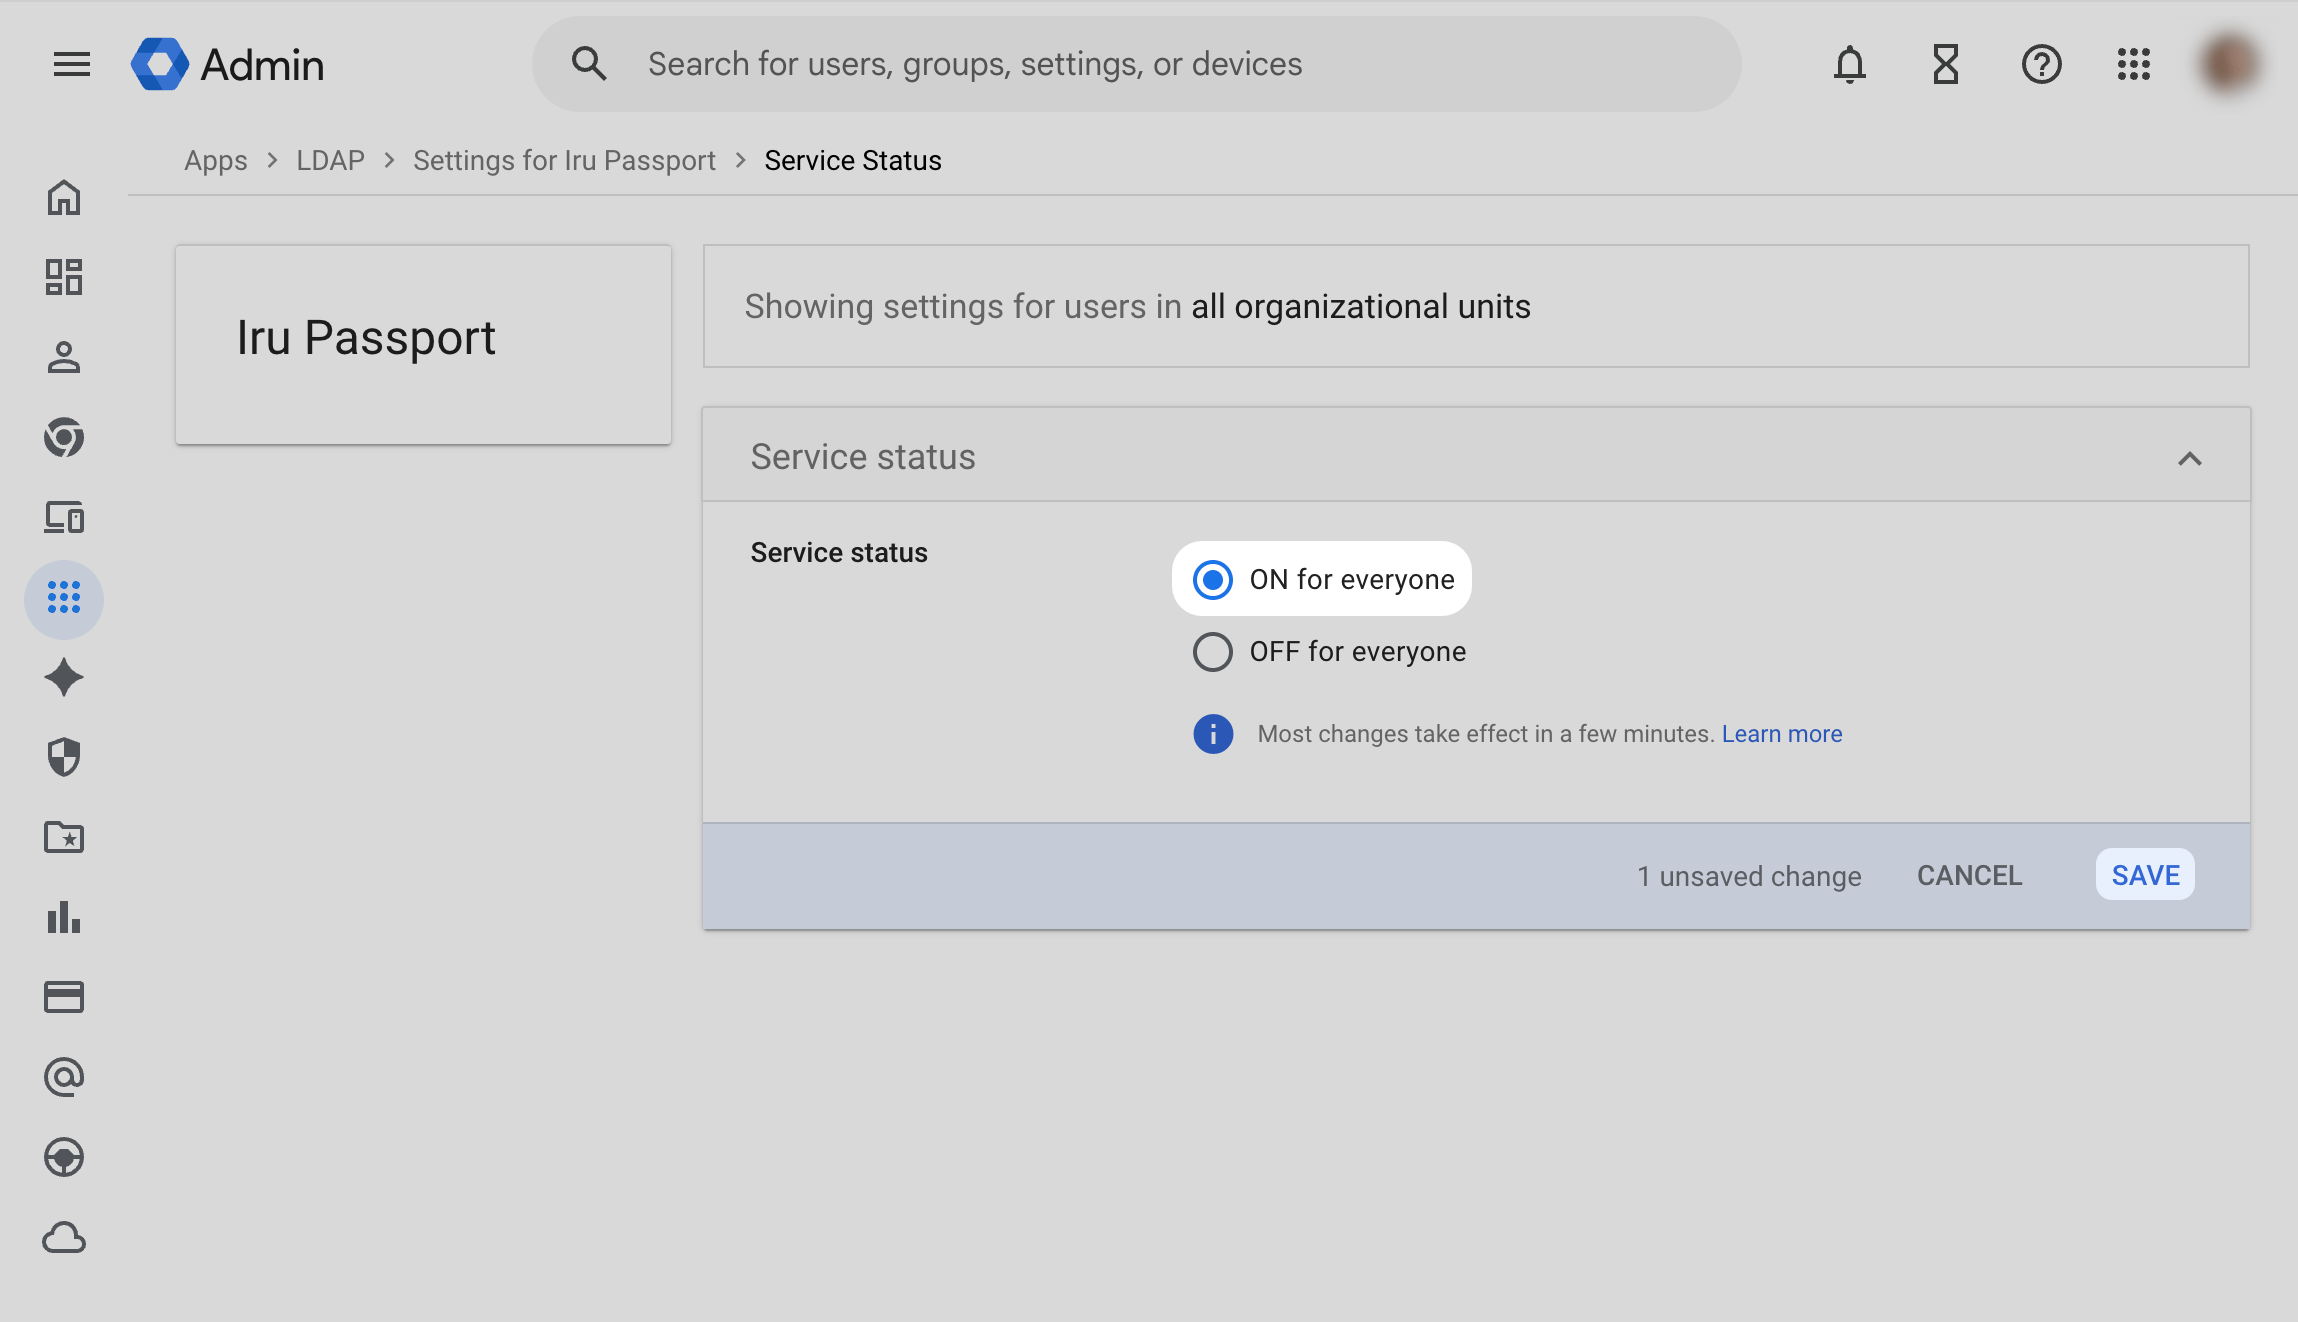
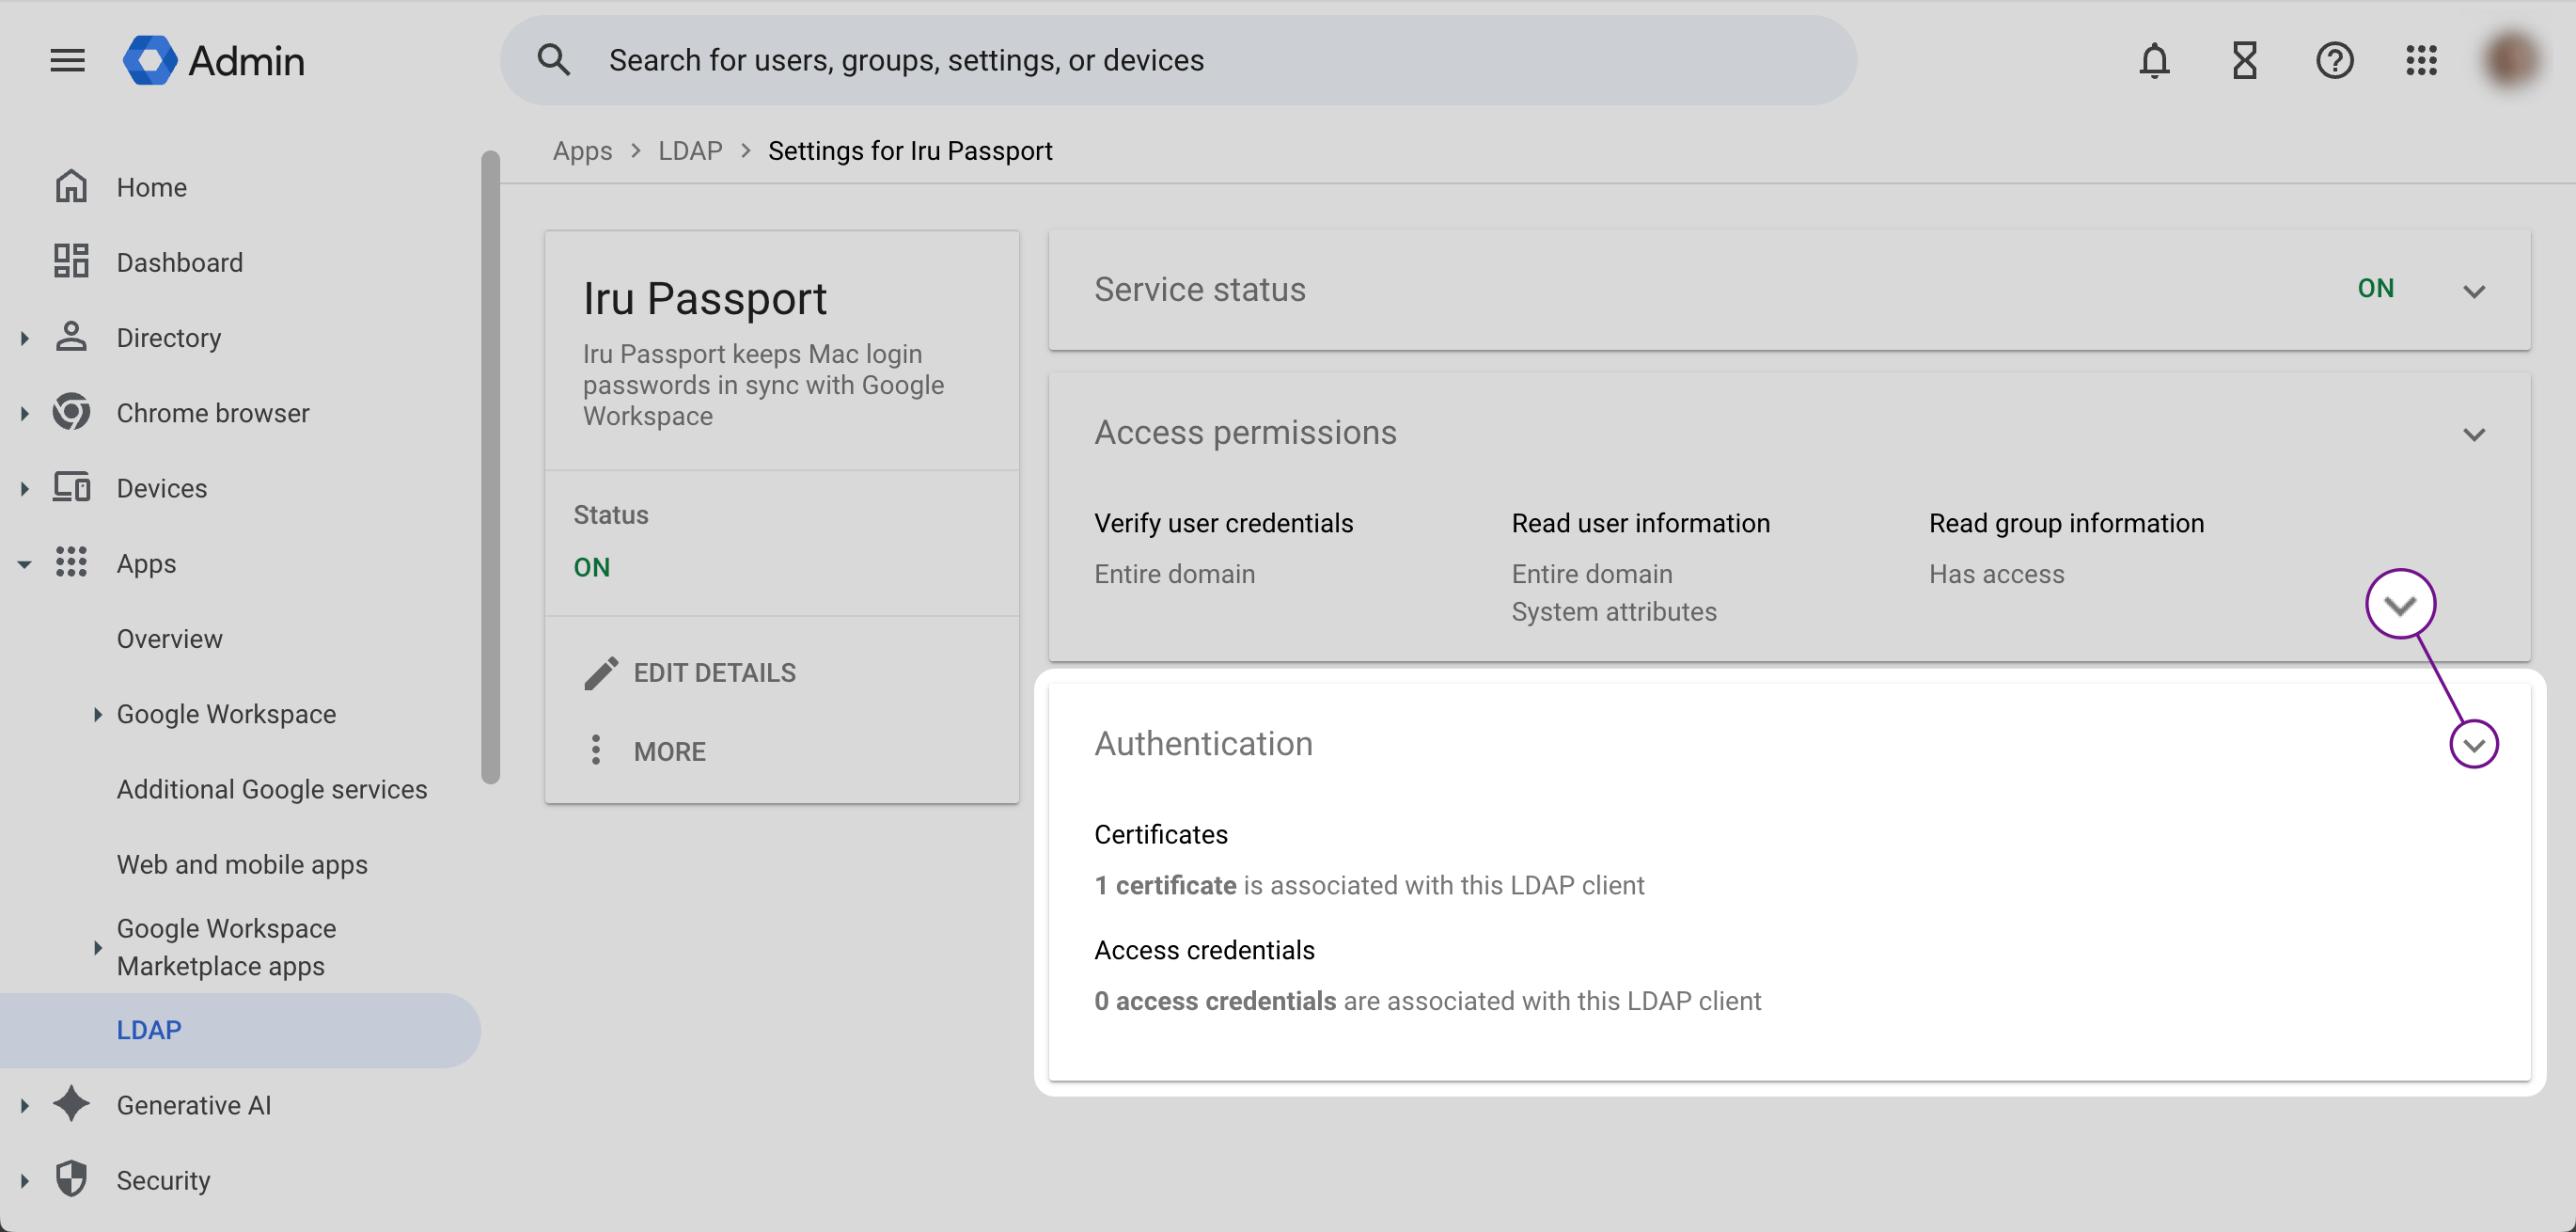
 In the **Service status** section, select **OFF** or the disclosure control (chevron) to open the flow where you can turn the LDAP service on.
 On the **Service status** page, select **ON for everyone**.
Select **SAVE**.
On the **Service status** page, select **ON for everyone**.
Select **SAVE**.
 ### Re-Download Your Secure LDAP Certificate (Optional)
After you configure the LDAP client in the previous section, you can always download the certificate that's used to secure the LDAP communication between Passport and Google. There are many other options, including renaming a certificate, generating additional certificates, and deleting a certificate.
In a web browser, use your organization's super administrator account to sign in to your organization's Google Admin console at [admin.google.com](https://admin.google.com).
In the left sidebar, click **Apps**.
In the Apps section, click **LDAP**.
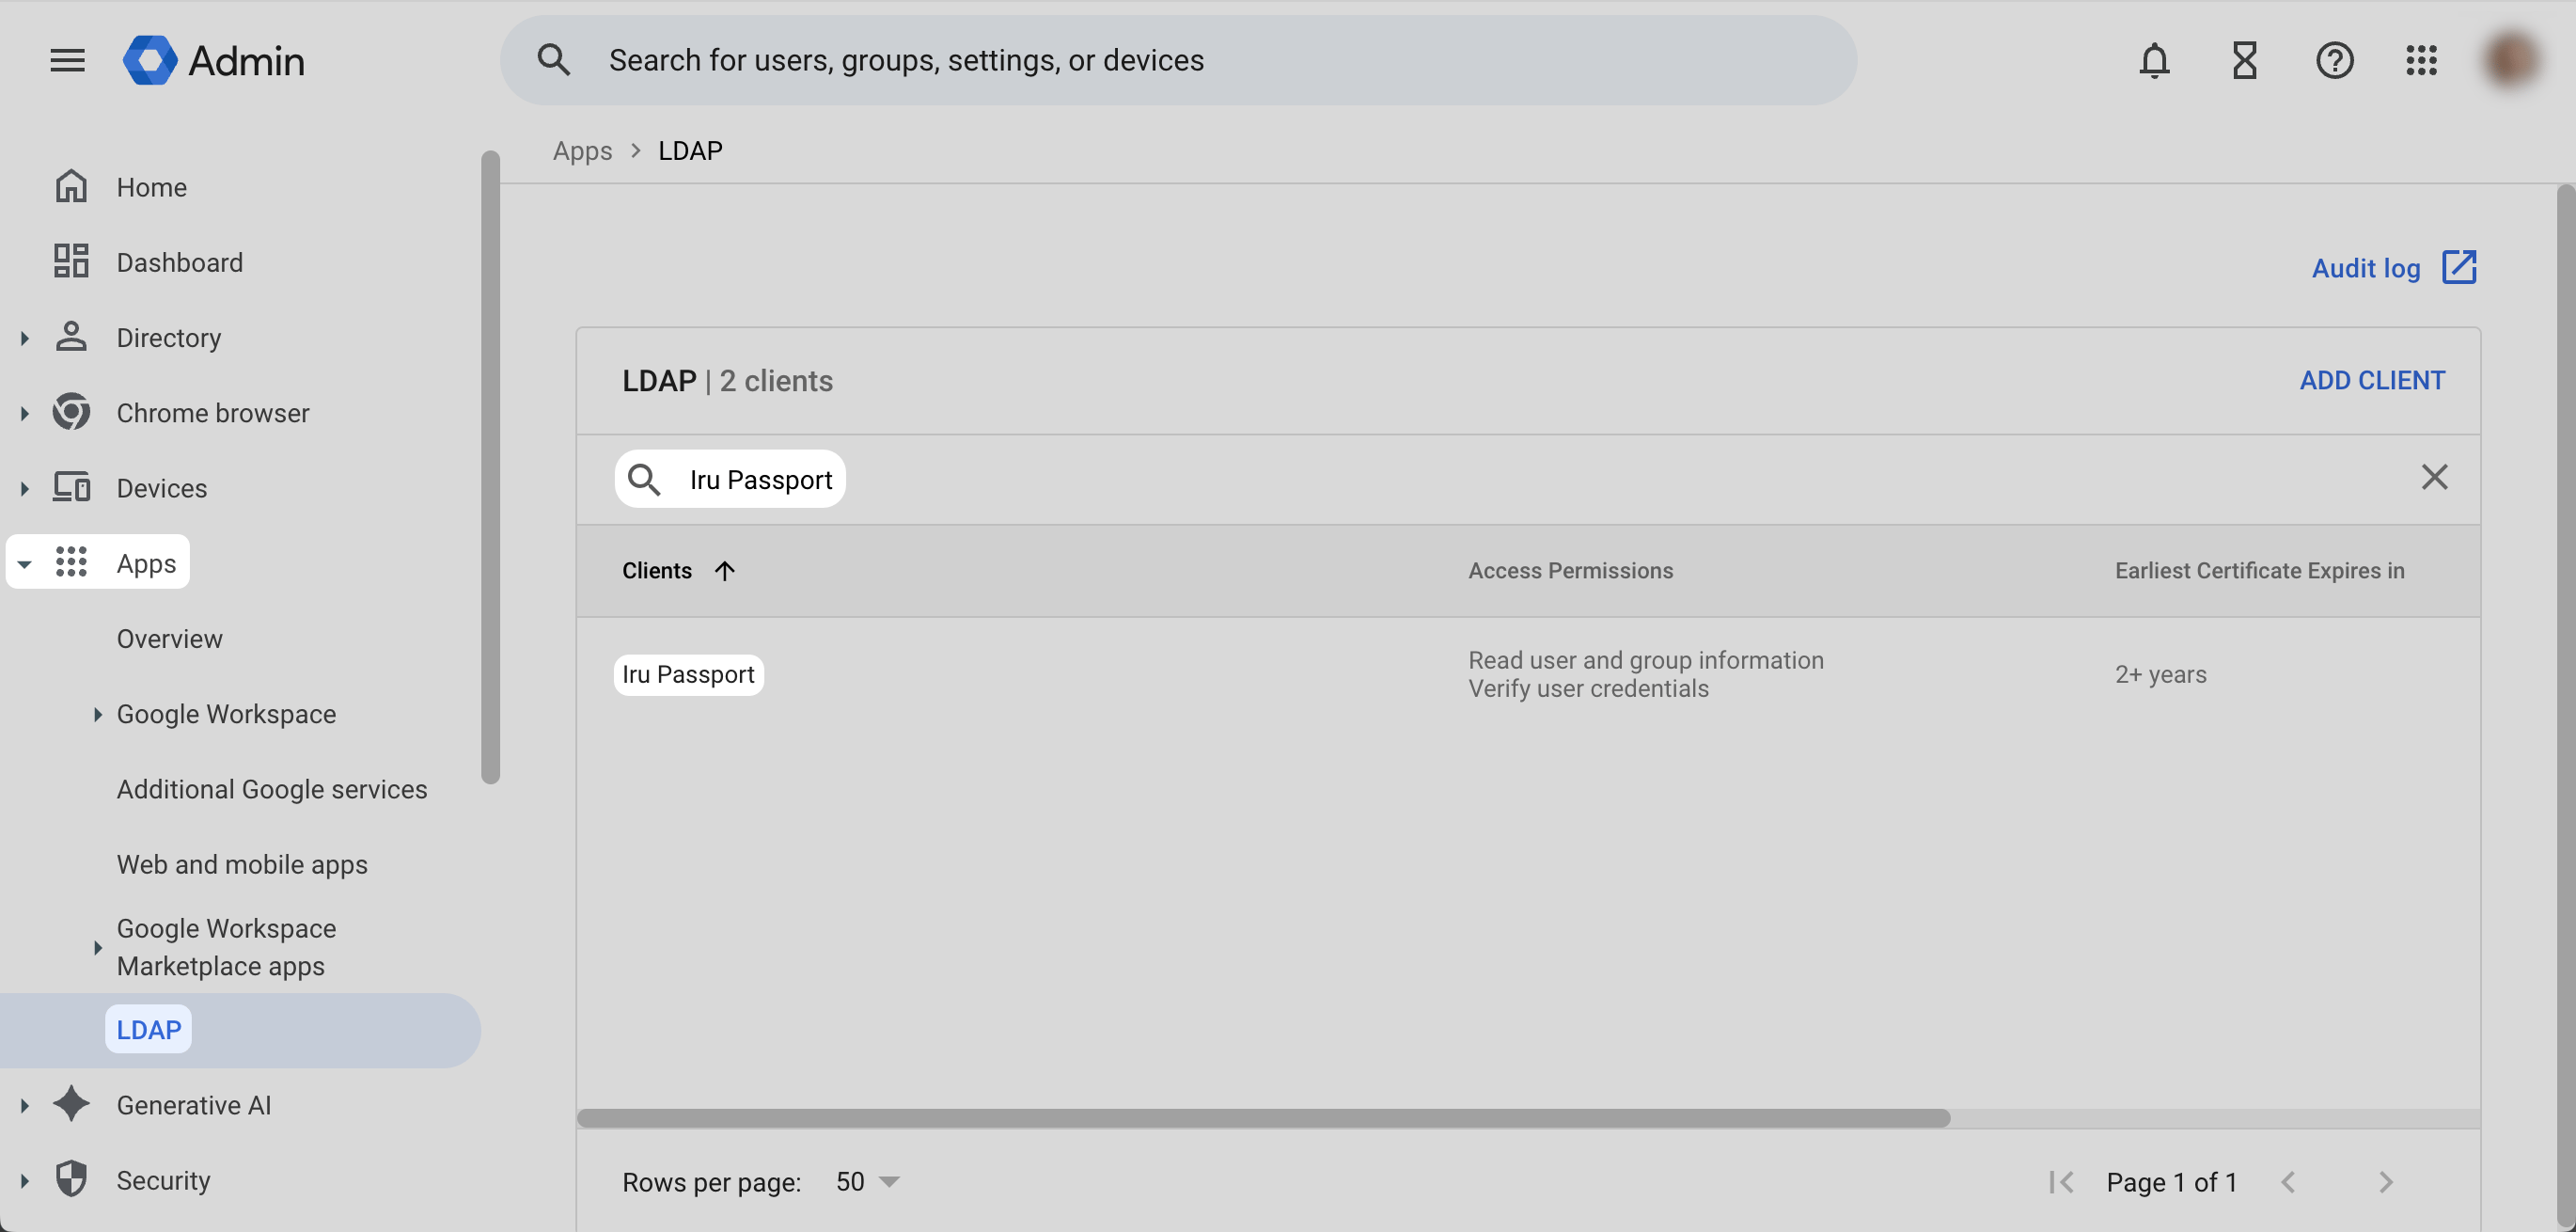
In the list of LDAP clients, select the LDAP client you created for use with Passport.
### Re-Download Your Secure LDAP Certificate (Optional)
After you configure the LDAP client in the previous section, you can always download the certificate that's used to secure the LDAP communication between Passport and Google. There are many other options, including renaming a certificate, generating additional certificates, and deleting a certificate.
In a web browser, use your organization's super administrator account to sign in to your organization's Google Admin console at [admin.google.com](https://admin.google.com).
In the left sidebar, click **Apps**.
In the Apps section, click **LDAP**.
In the list of LDAP clients, select the LDAP client you created for use with Passport.
 Open the **Authentication** section for the client.
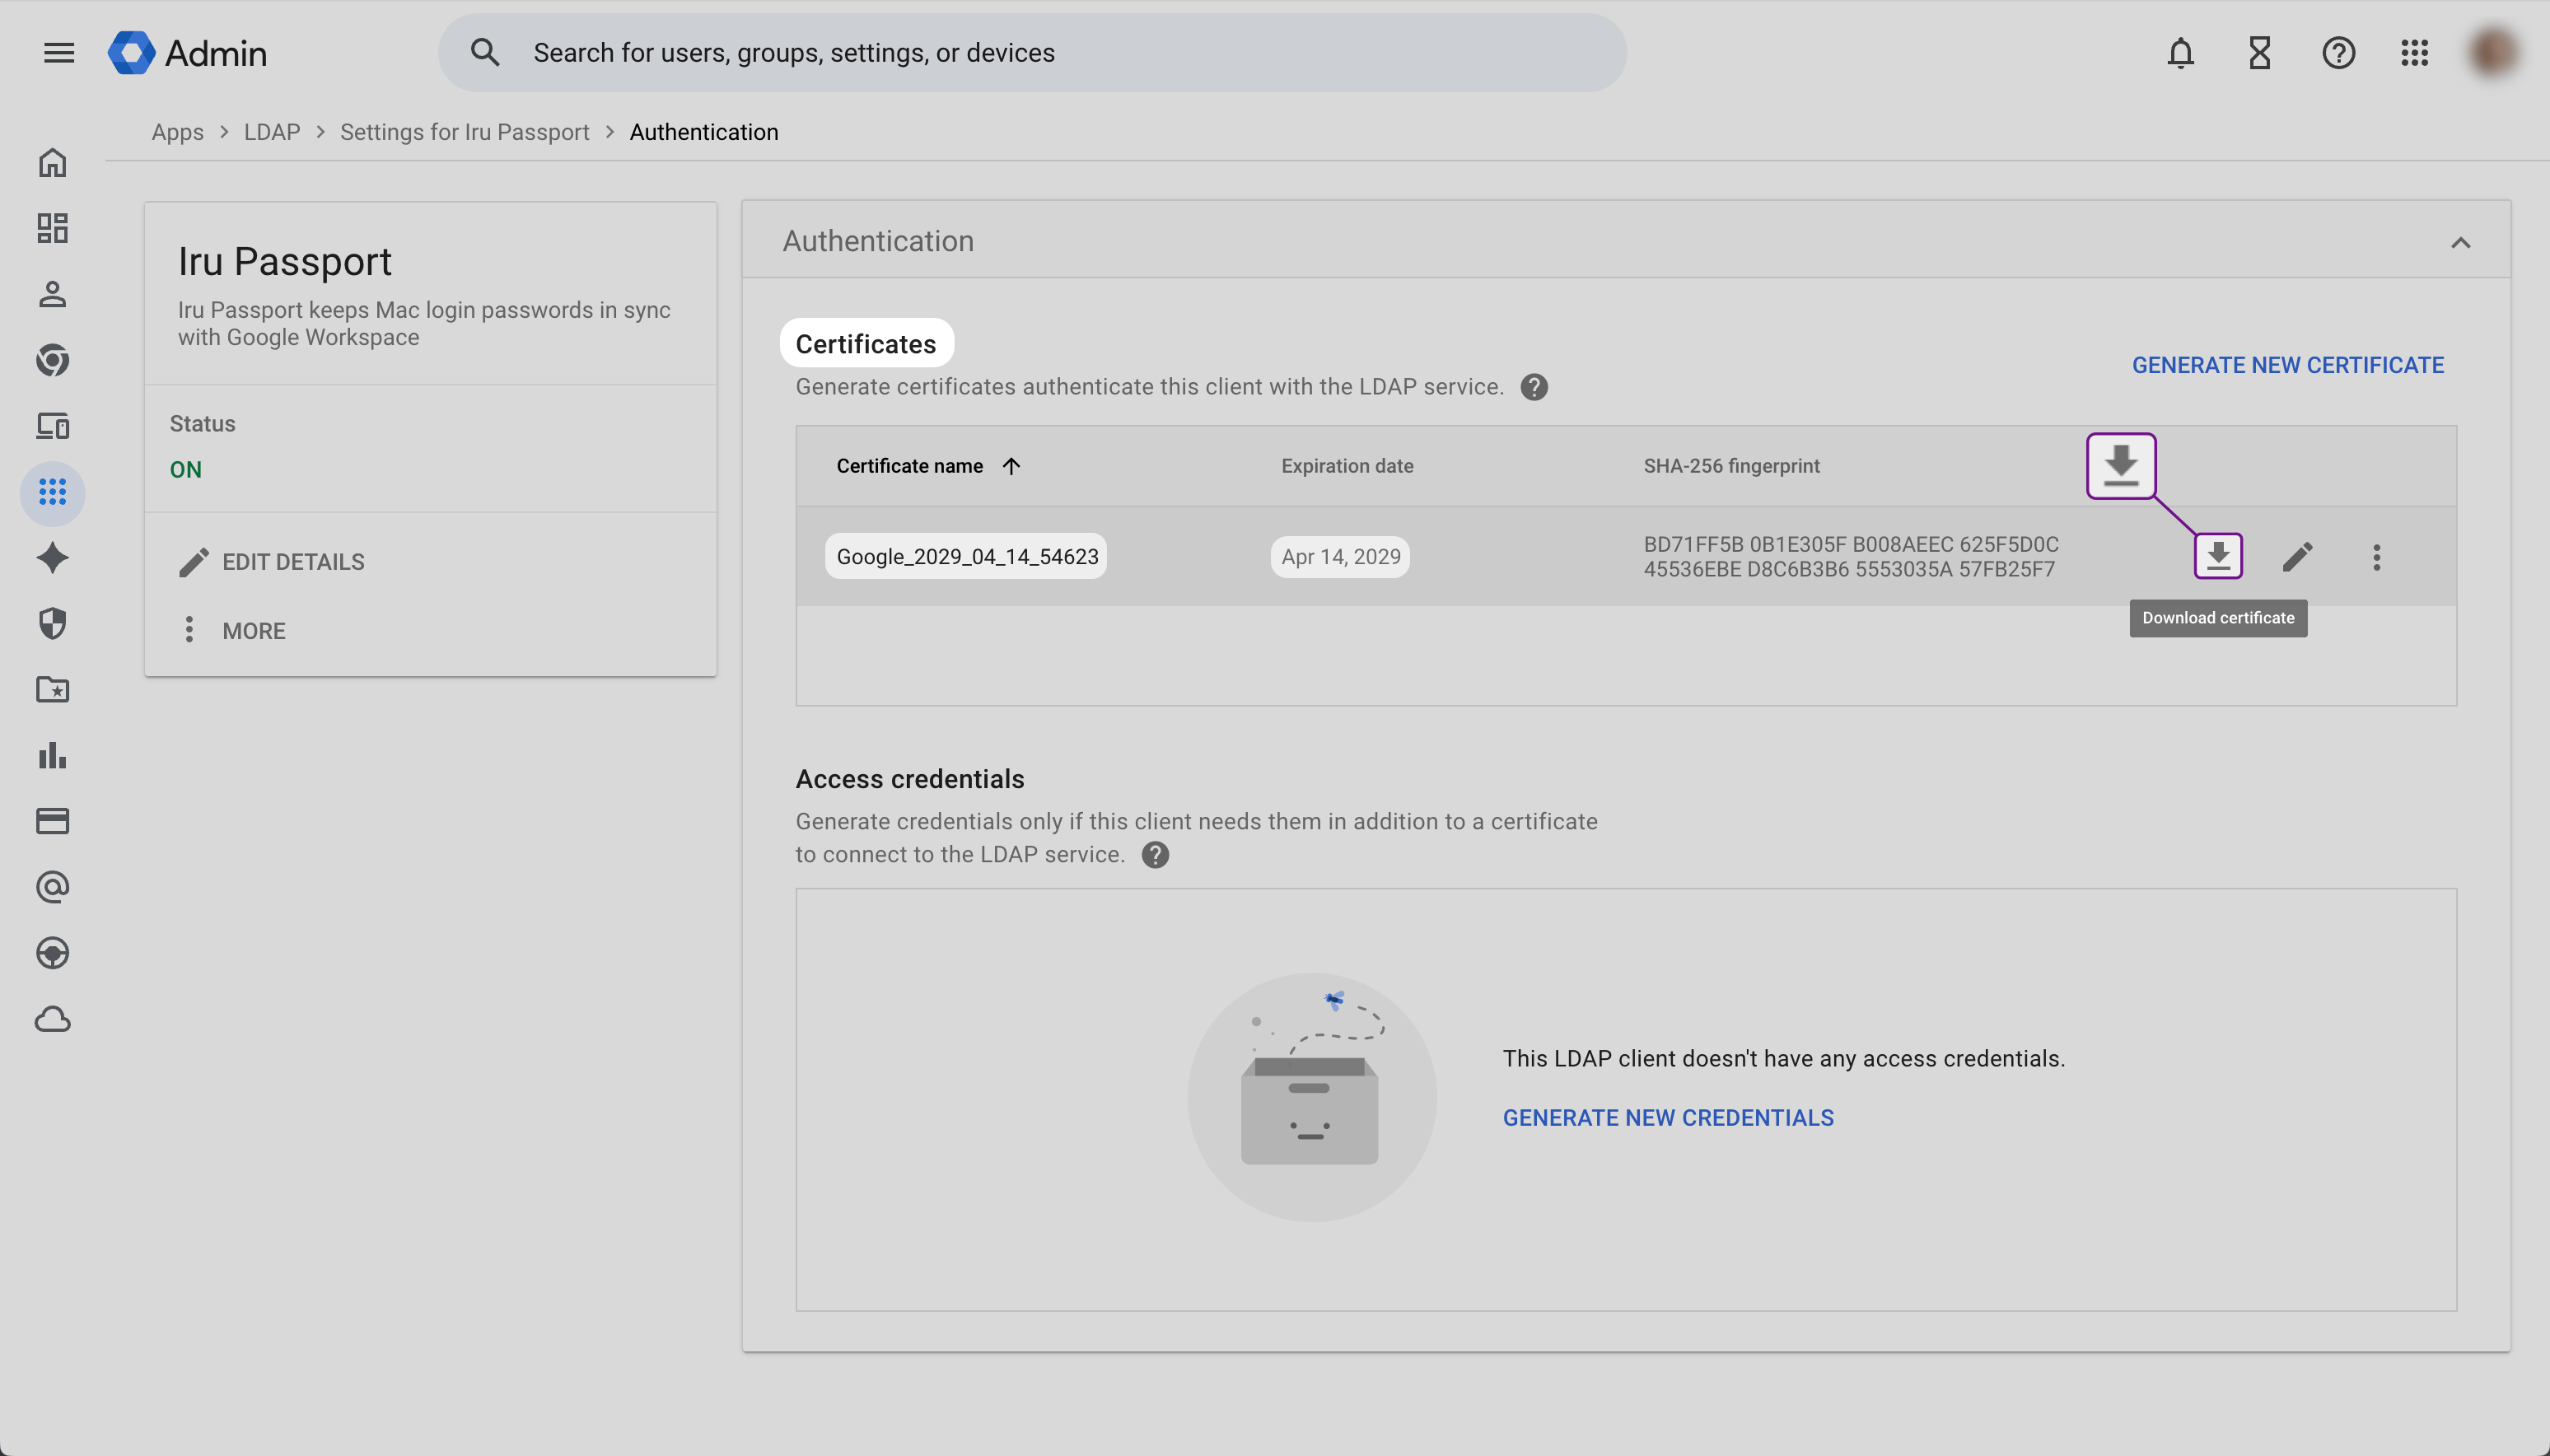
 In **Certificates**, select the download icon for the certificate row. The control’s tooltip reads **Download certificate**.
 ### Collect Group Email Prefixes for User Provisioning
If you want Passport to set each user's Mac account type from Google group membership, collect the **Group email** prefix for each group you plan to map. You will use those values under **User provisioning** on the Passport Library Item [**Iru Endpoint** tab](#iru-endpoint).
In Google Admin, open a group you want to use for Passport user provisioning.
From **Group email**, copy everything before the **@** symbol. Passport expects that prefix in the Library Item, not the group's display name.
Paste the prefix into a secure text document or internal runbook. If you use several groups, note which prefix belongs to which group.
Repeat the previous steps for every Google group you plan to reference in Passport.
When the Secure LDAP client and certificate are ready, open the [**Iru Endpoint** tab](#iru-endpoint) to upload the certificate and complete the Library Item steps there.
### After Initial Setup
#### Certificate Expiration and Renewal
Google Workspace Secure LDAP certificates expire. Generate, download, and upload a replacement before the current certificate expires so Passport can keep authenticating users without interruption.
Sign in to the Google Admin console, open **Apps** → **LDAP**, then select the LDAP client you use for Passport.
Open the **Authentication** section for that client.
Note the **Expiration date** in the certificate table (and **Earliest Certificate Expires in** on the **Apps** → **LDAP** client list if you use that column) so you can plan renewal ahead of time.
In **Certificates**, select **GENERATE NEW CERTIFICATE**. Do not wait until the current certificate has already expired if you can avoid it.
### Collect Group Email Prefixes for User Provisioning
If you want Passport to set each user's Mac account type from Google group membership, collect the **Group email** prefix for each group you plan to map. You will use those values under **User provisioning** on the Passport Library Item [**Iru Endpoint** tab](#iru-endpoint).
In Google Admin, open a group you want to use for Passport user provisioning.
From **Group email**, copy everything before the **@** symbol. Passport expects that prefix in the Library Item, not the group's display name.
Paste the prefix into a secure text document or internal runbook. If you use several groups, note which prefix belongs to which group.
Repeat the previous steps for every Google group you plan to reference in Passport.
When the Secure LDAP client and certificate are ready, open the [**Iru Endpoint** tab](#iru-endpoint) to upload the certificate and complete the Library Item steps there.
### After Initial Setup
#### Certificate Expiration and Renewal
Google Workspace Secure LDAP certificates expire. Generate, download, and upload a replacement before the current certificate expires so Passport can keep authenticating users without interruption.
Sign in to the Google Admin console, open **Apps** → **LDAP**, then select the LDAP client you use for Passport.
Open the **Authentication** section for that client.
Note the **Expiration date** in the certificate table (and **Earliest Certificate Expires in** on the **Apps** → **LDAP** client list if you use that column) so you can plan renewal ahead of time.
In **Certificates**, select **GENERATE NEW CERTIFICATE**. Do not wait until the current certificate has already expired if you can avoid it.
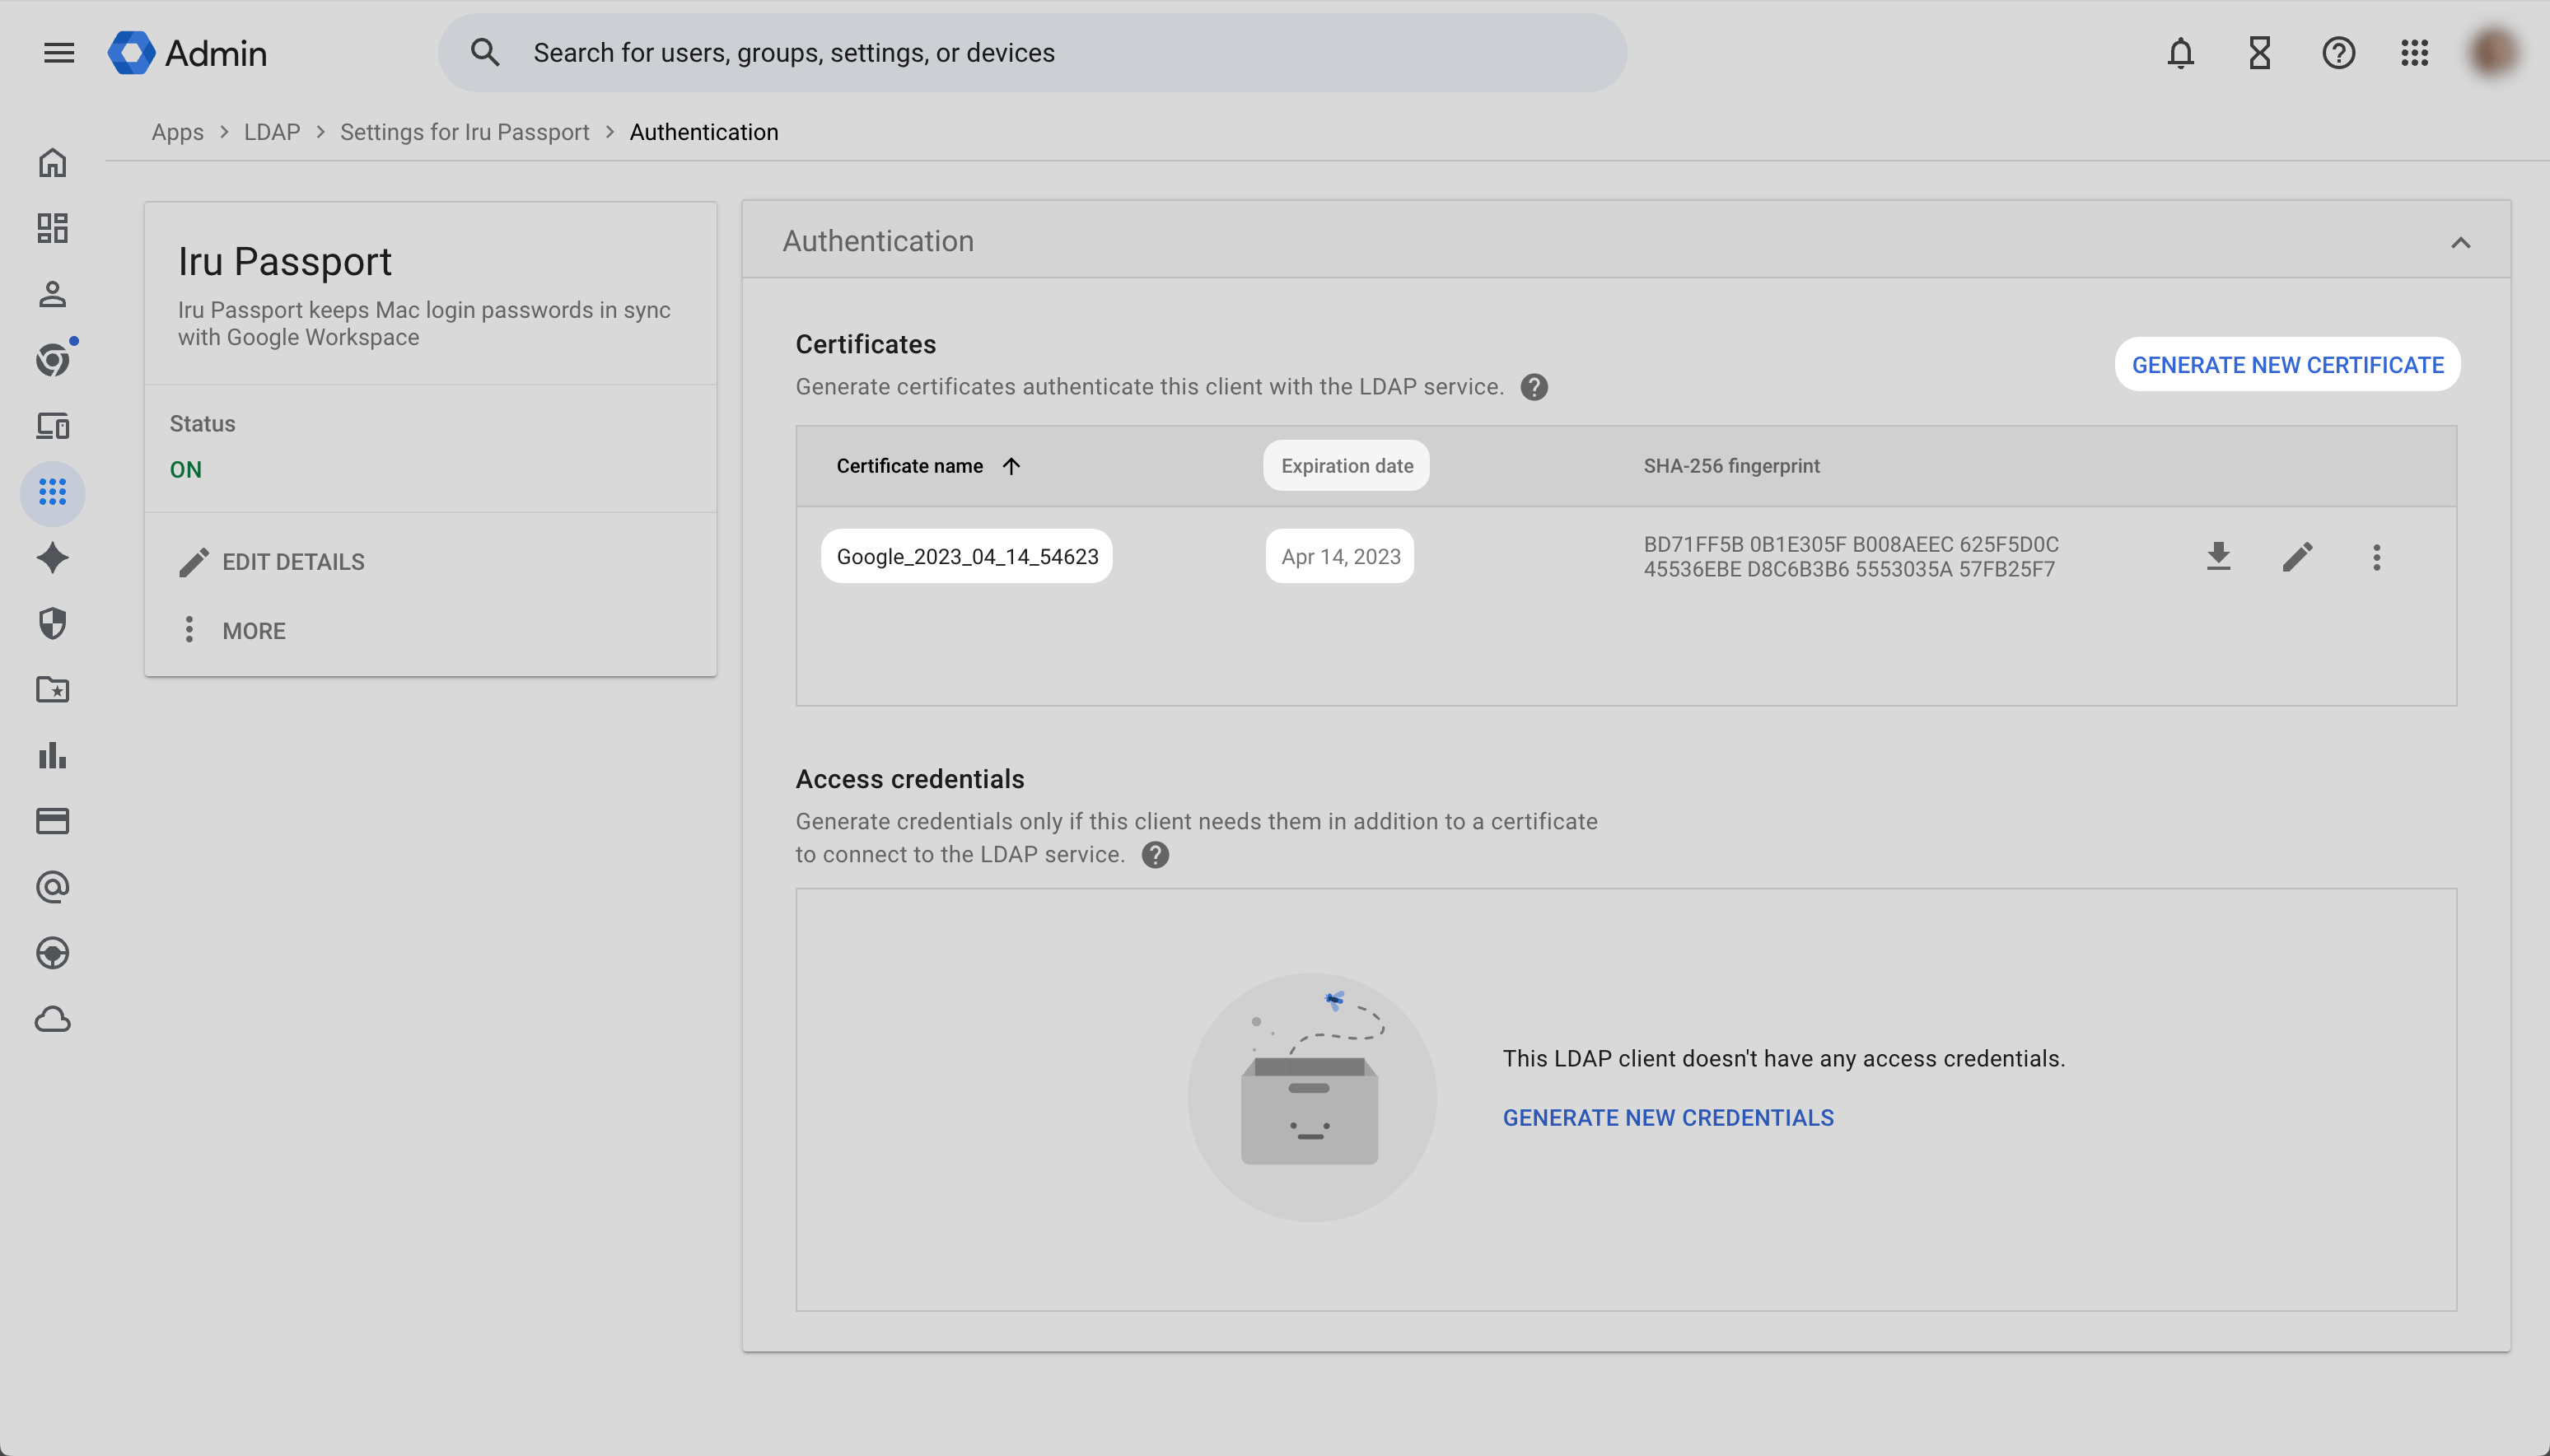 Download the new certificate bundle using the same download icon as in [Re-download Your Secure LDAP certificate](#re-download-your-secure-ldap-certificate-optional) (tooltip **Download certificate**).
In Iru Endpoint, open the [**Iru Endpoint** tab](#iru-endpoint) and use [**Certificate expiration and renewal**](#replace-google-workspace-certificate-in-passport) to remove the old compressed certificate, upload the new bundle, and save.
Return to the **Authentication** section for your Passport LDAP client in Google Admin. For the **previous** certificate row, open the row **More** menu (vertical ellipsis) and select **DELETE CERTIFICATE**.
Download the new certificate bundle using the same download icon as in [Re-download Your Secure LDAP certificate](#re-download-your-secure-ldap-certificate-optional) (tooltip **Download certificate**).
In Iru Endpoint, open the [**Iru Endpoint** tab](#iru-endpoint) and use [**Certificate expiration and renewal**](#replace-google-workspace-certificate-in-passport) to remove the old compressed certificate, upload the new bundle, and save.
Return to the **Authentication** section for your Passport LDAP client in Google Admin. For the **previous** certificate row, open the row **More** menu (vertical ellipsis) and select **DELETE CERTIFICATE**.
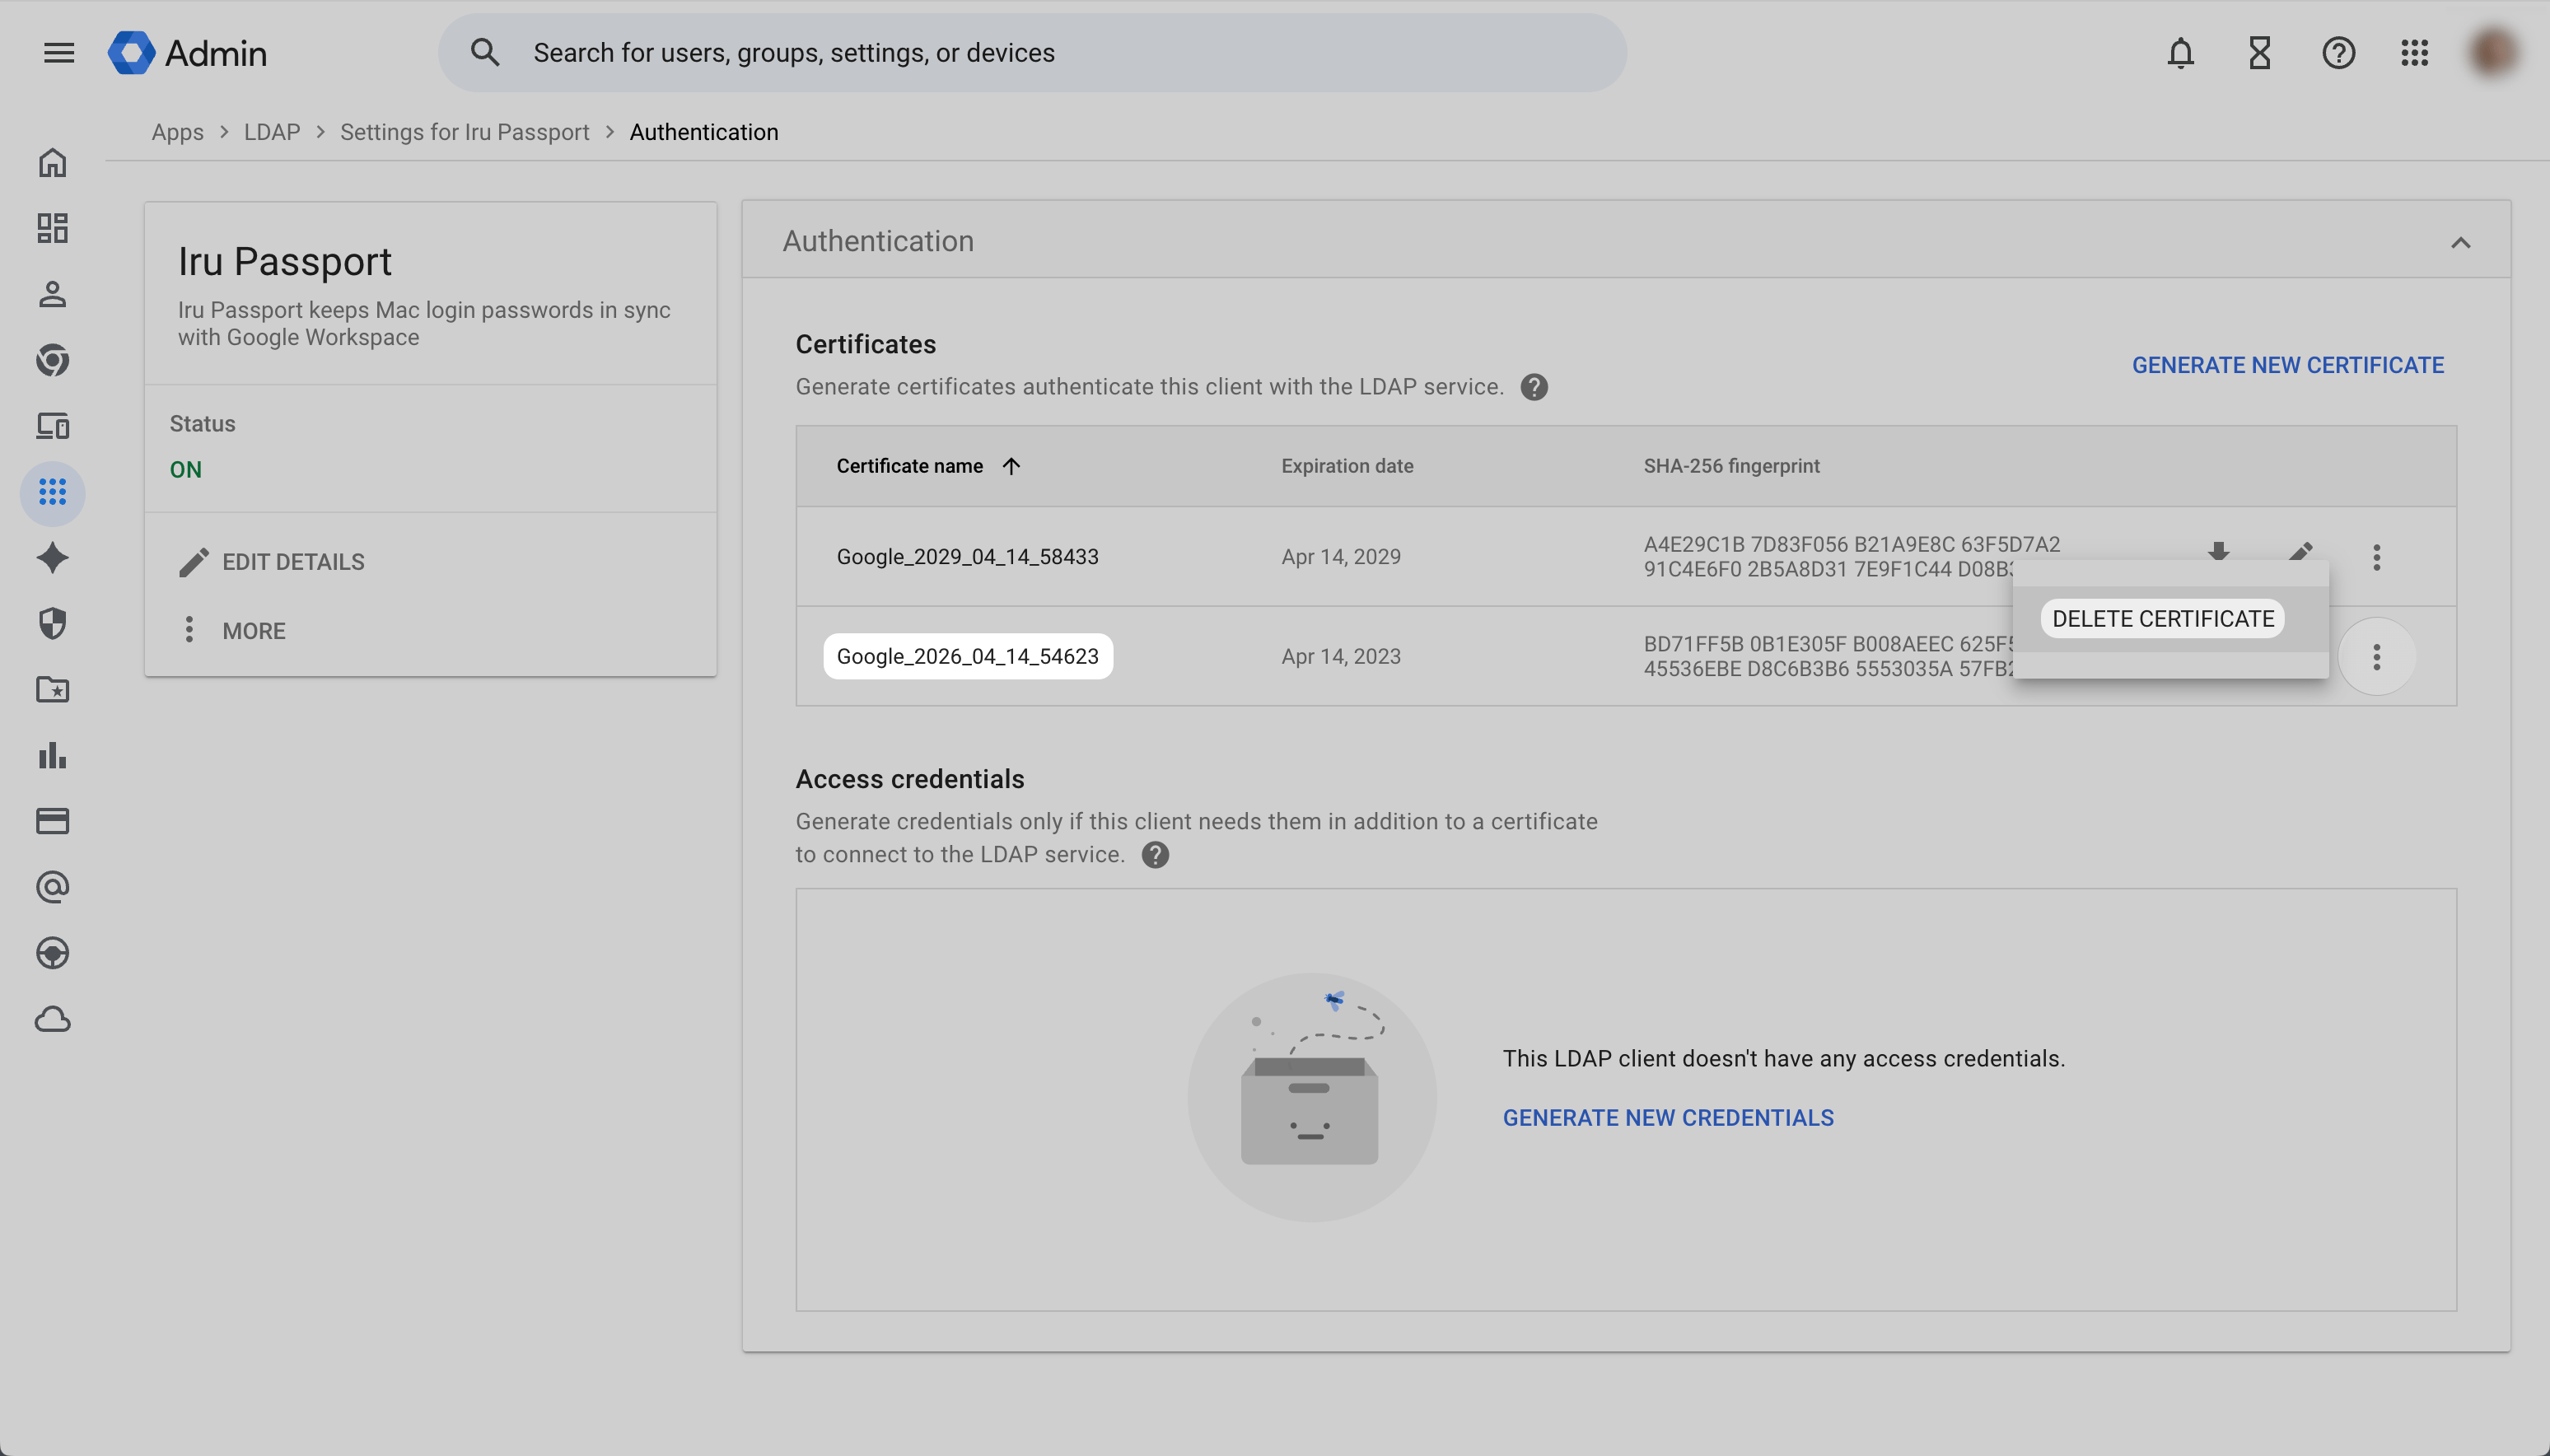 In the **Delete certificate** dialog, read the warning, then select **DELETE** to confirm (or **CANCEL** to go back).
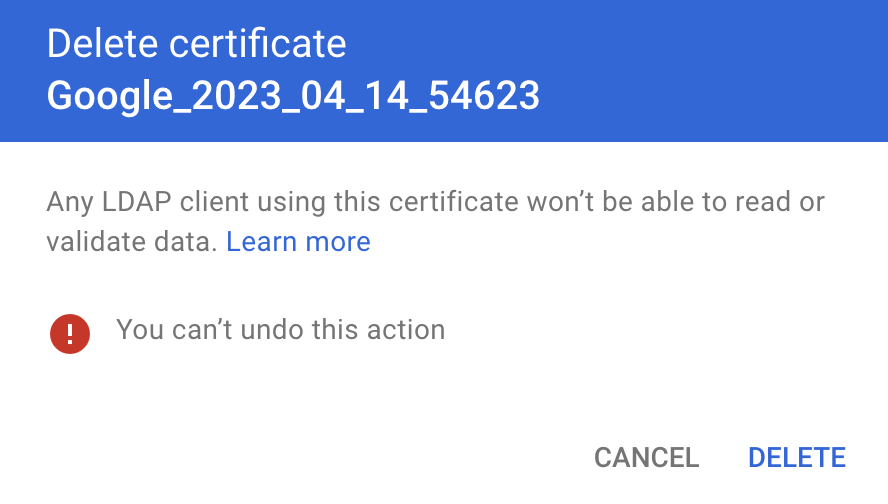 For the next steps in this workflow, open the [**Iru Endpoint** tab](#iru-endpoint) and follow [**Certificate expiration and renewal**](#replace-google-workspace-certificate-in-passport).
If you have not already, use [Configure the Passport Library Item](/en/endpoint/library/passport/configure-the-passport-library-item) to add the Passport Library Item and set **Name** and **Blueprints**. The steps below are the **Iru Endpoint** configuration specific to Google Workspace Passport.
### Library Item Configuration
Provide the certificate that you downloaded from Google Workspace.
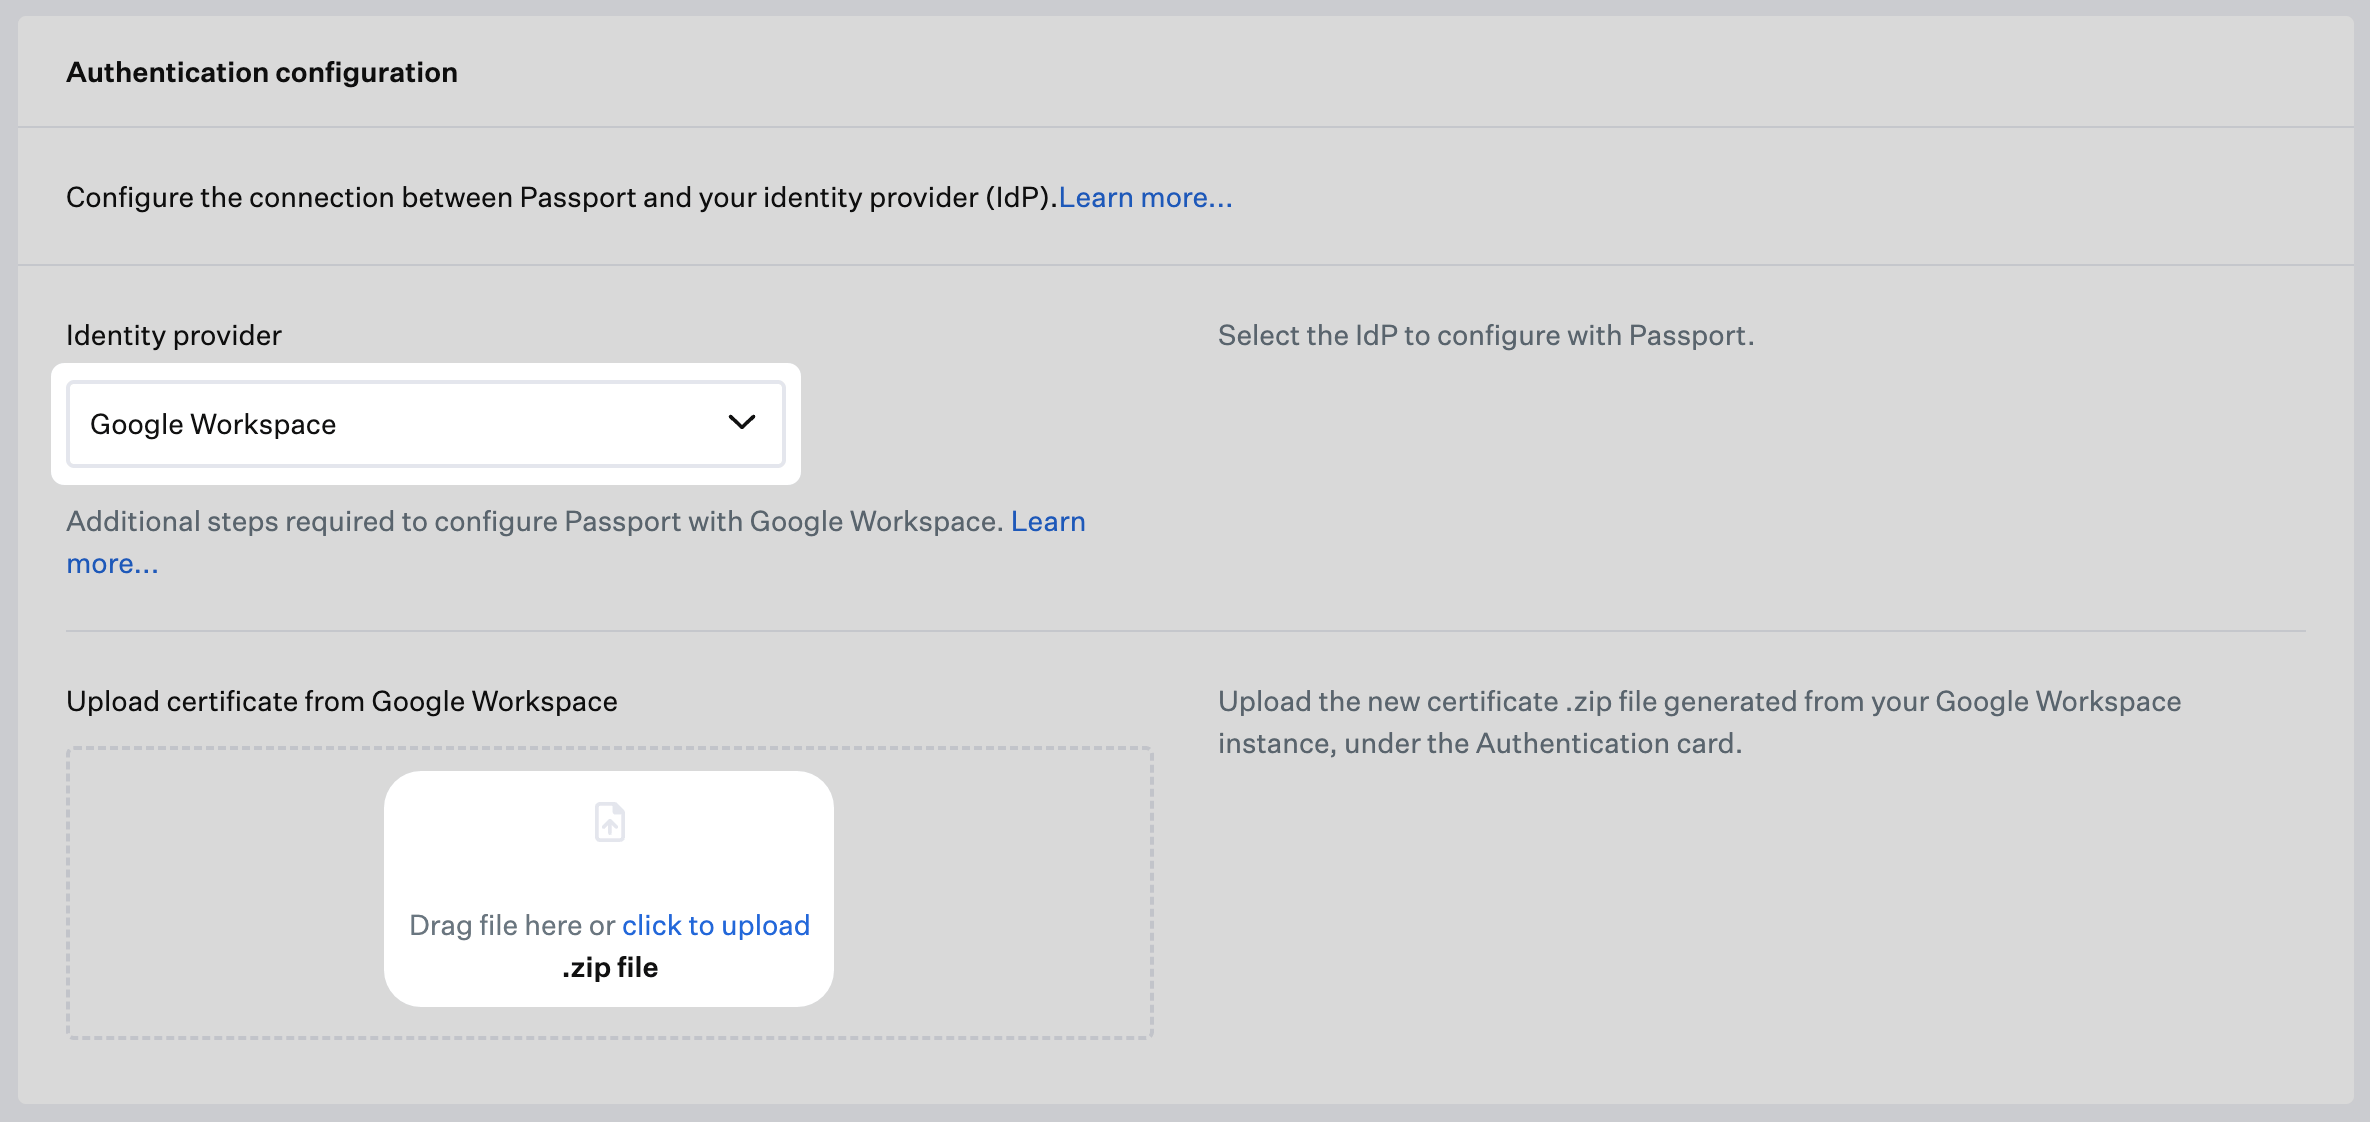
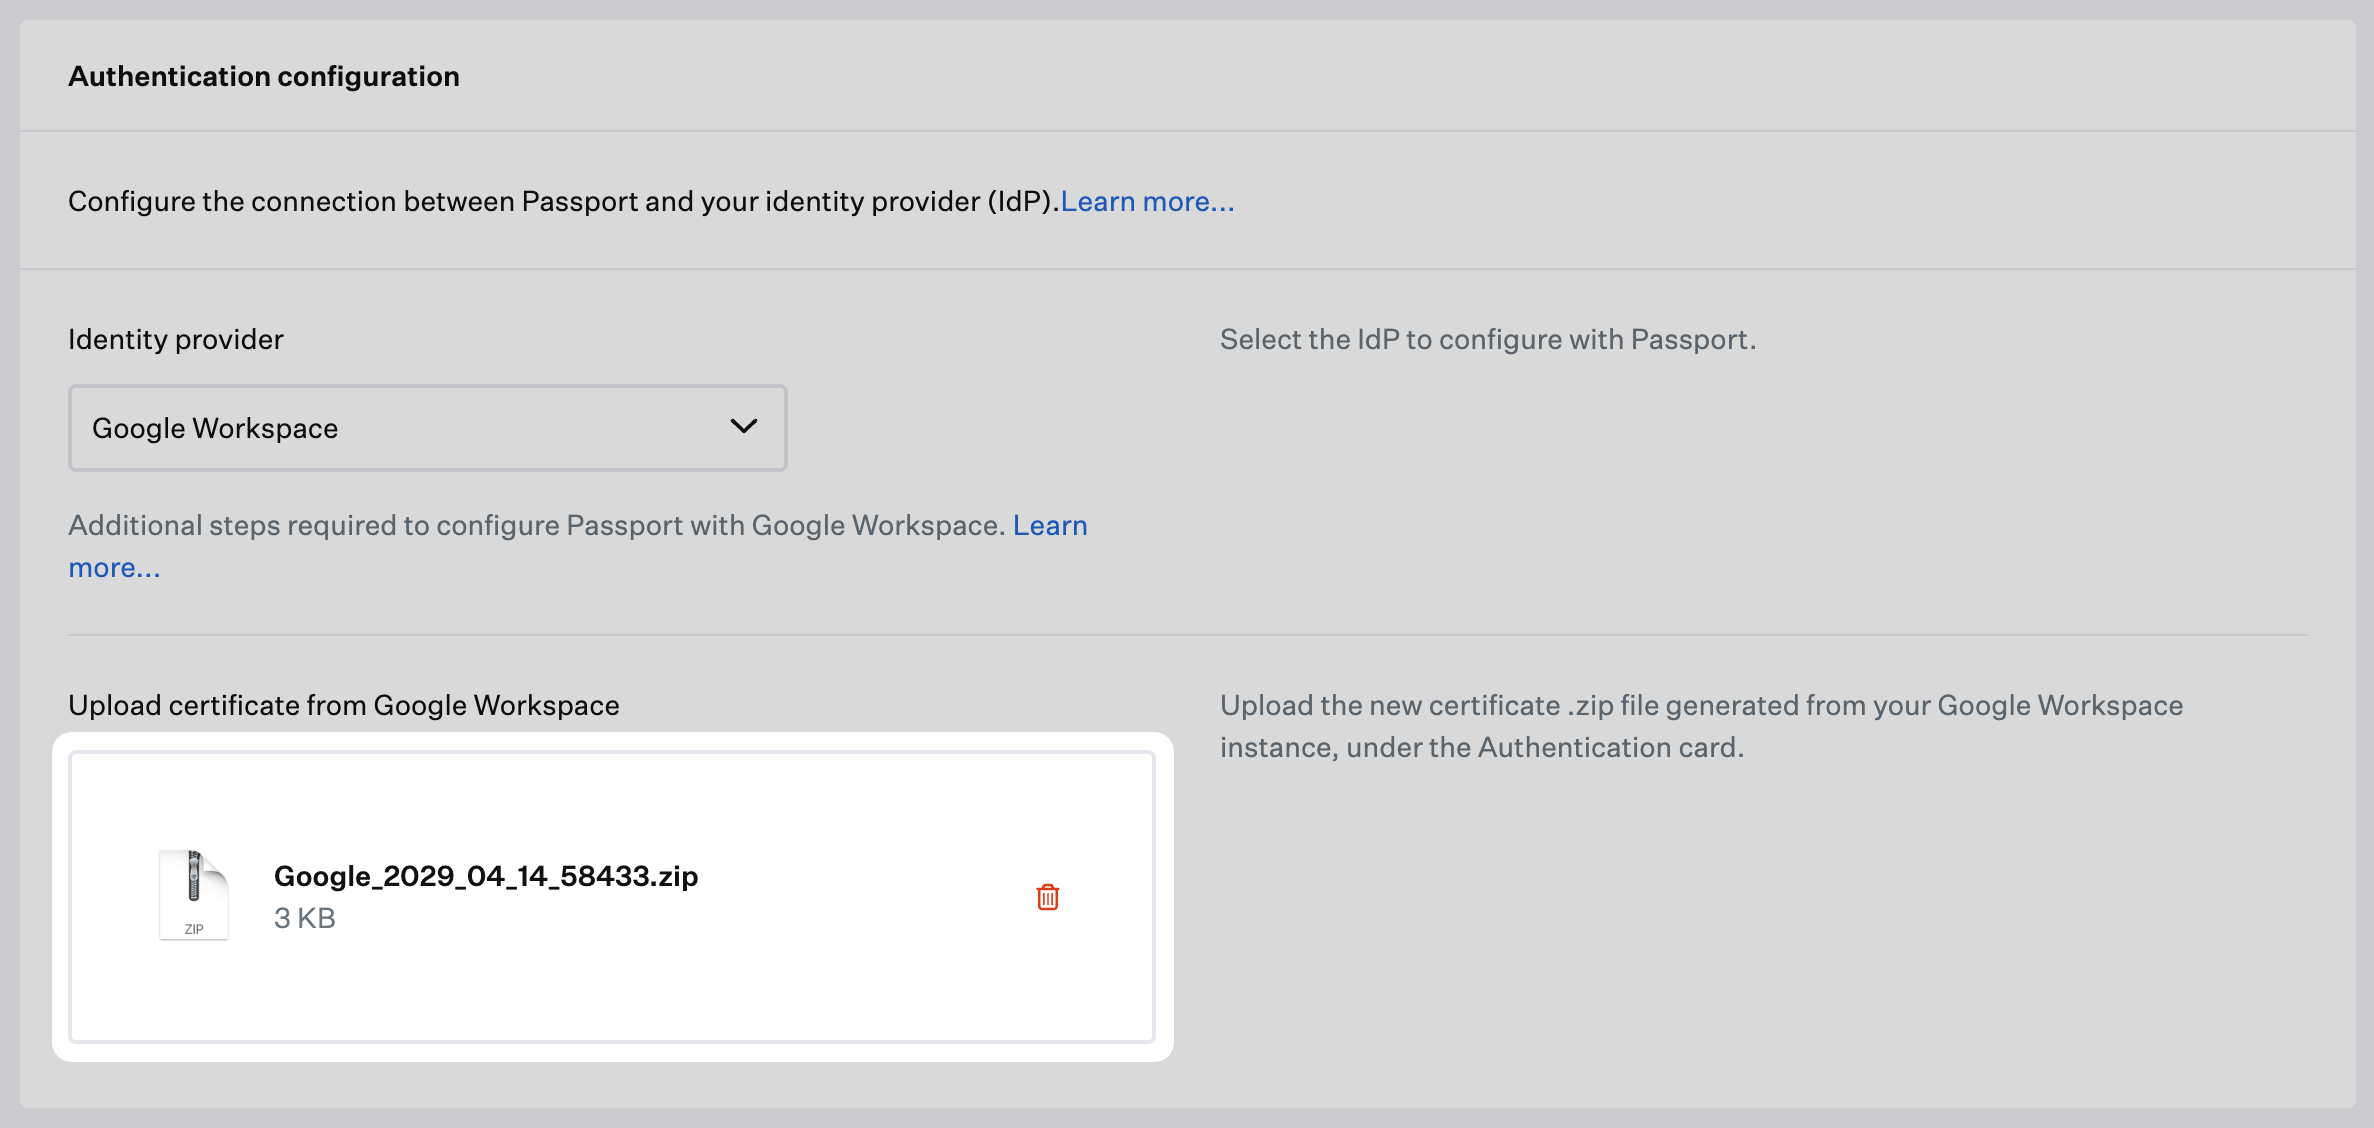
In the **Settings** section, in the **Authentication configuration** section, click **Identity provider** and select **Google Workspace**.
In **Upload certificate from Google Workspace**, drag your **.zip** file into the dashed area, or select **click to upload** to pick the same **.zip** from Google Workspace.
For the next steps in this workflow, open the [**Iru Endpoint** tab](#iru-endpoint) and follow [**Certificate expiration and renewal**](#replace-google-workspace-certificate-in-passport).
If you have not already, use [Configure the Passport Library Item](/en/endpoint/library/passport/configure-the-passport-library-item) to add the Passport Library Item and set **Name** and **Blueprints**. The steps below are the **Iru Endpoint** configuration specific to Google Workspace Passport.
### Library Item Configuration
Provide the certificate that you downloaded from Google Workspace.
In the **Settings** section, in the **Authentication configuration** section, click **Identity provider** and select **Google Workspace**.
In **Upload certificate from Google Workspace**, drag your **.zip** file into the dashed area, or select **click to upload** to pick the same **.zip** from Google Workspace.
 In the **Choose Files to Upload** window, navigate to the folder that contains your compressed certificate file and select the compressed certificate file.
Click **Upload**.
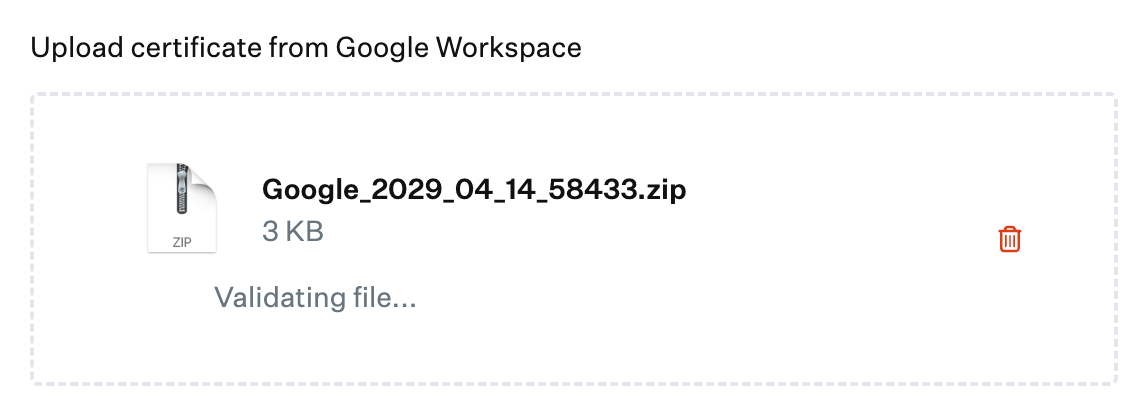
If you see the **Validating file** message, wait a few moments for the validation to complete.
In the **Choose Files to Upload** window, navigate to the folder that contains your compressed certificate file and select the compressed certificate file.
Click **Upload**.
If you see the **Validating file** message, wait a few moments for the validation to complete.
 Confirm that the compressed certificate file is displayed.
 ### User Provisioning
If you want Passport to set each user's Mac account type from Google group membership, use the **User provisioning** steps below on the Passport Library Item [**Iru Endpoint** tab](#iru-endpoint). Use the **Group email** prefixes from **Collect group email prefixes for user provisioning** on the [**Google Workspace** tab](#google-workspace).
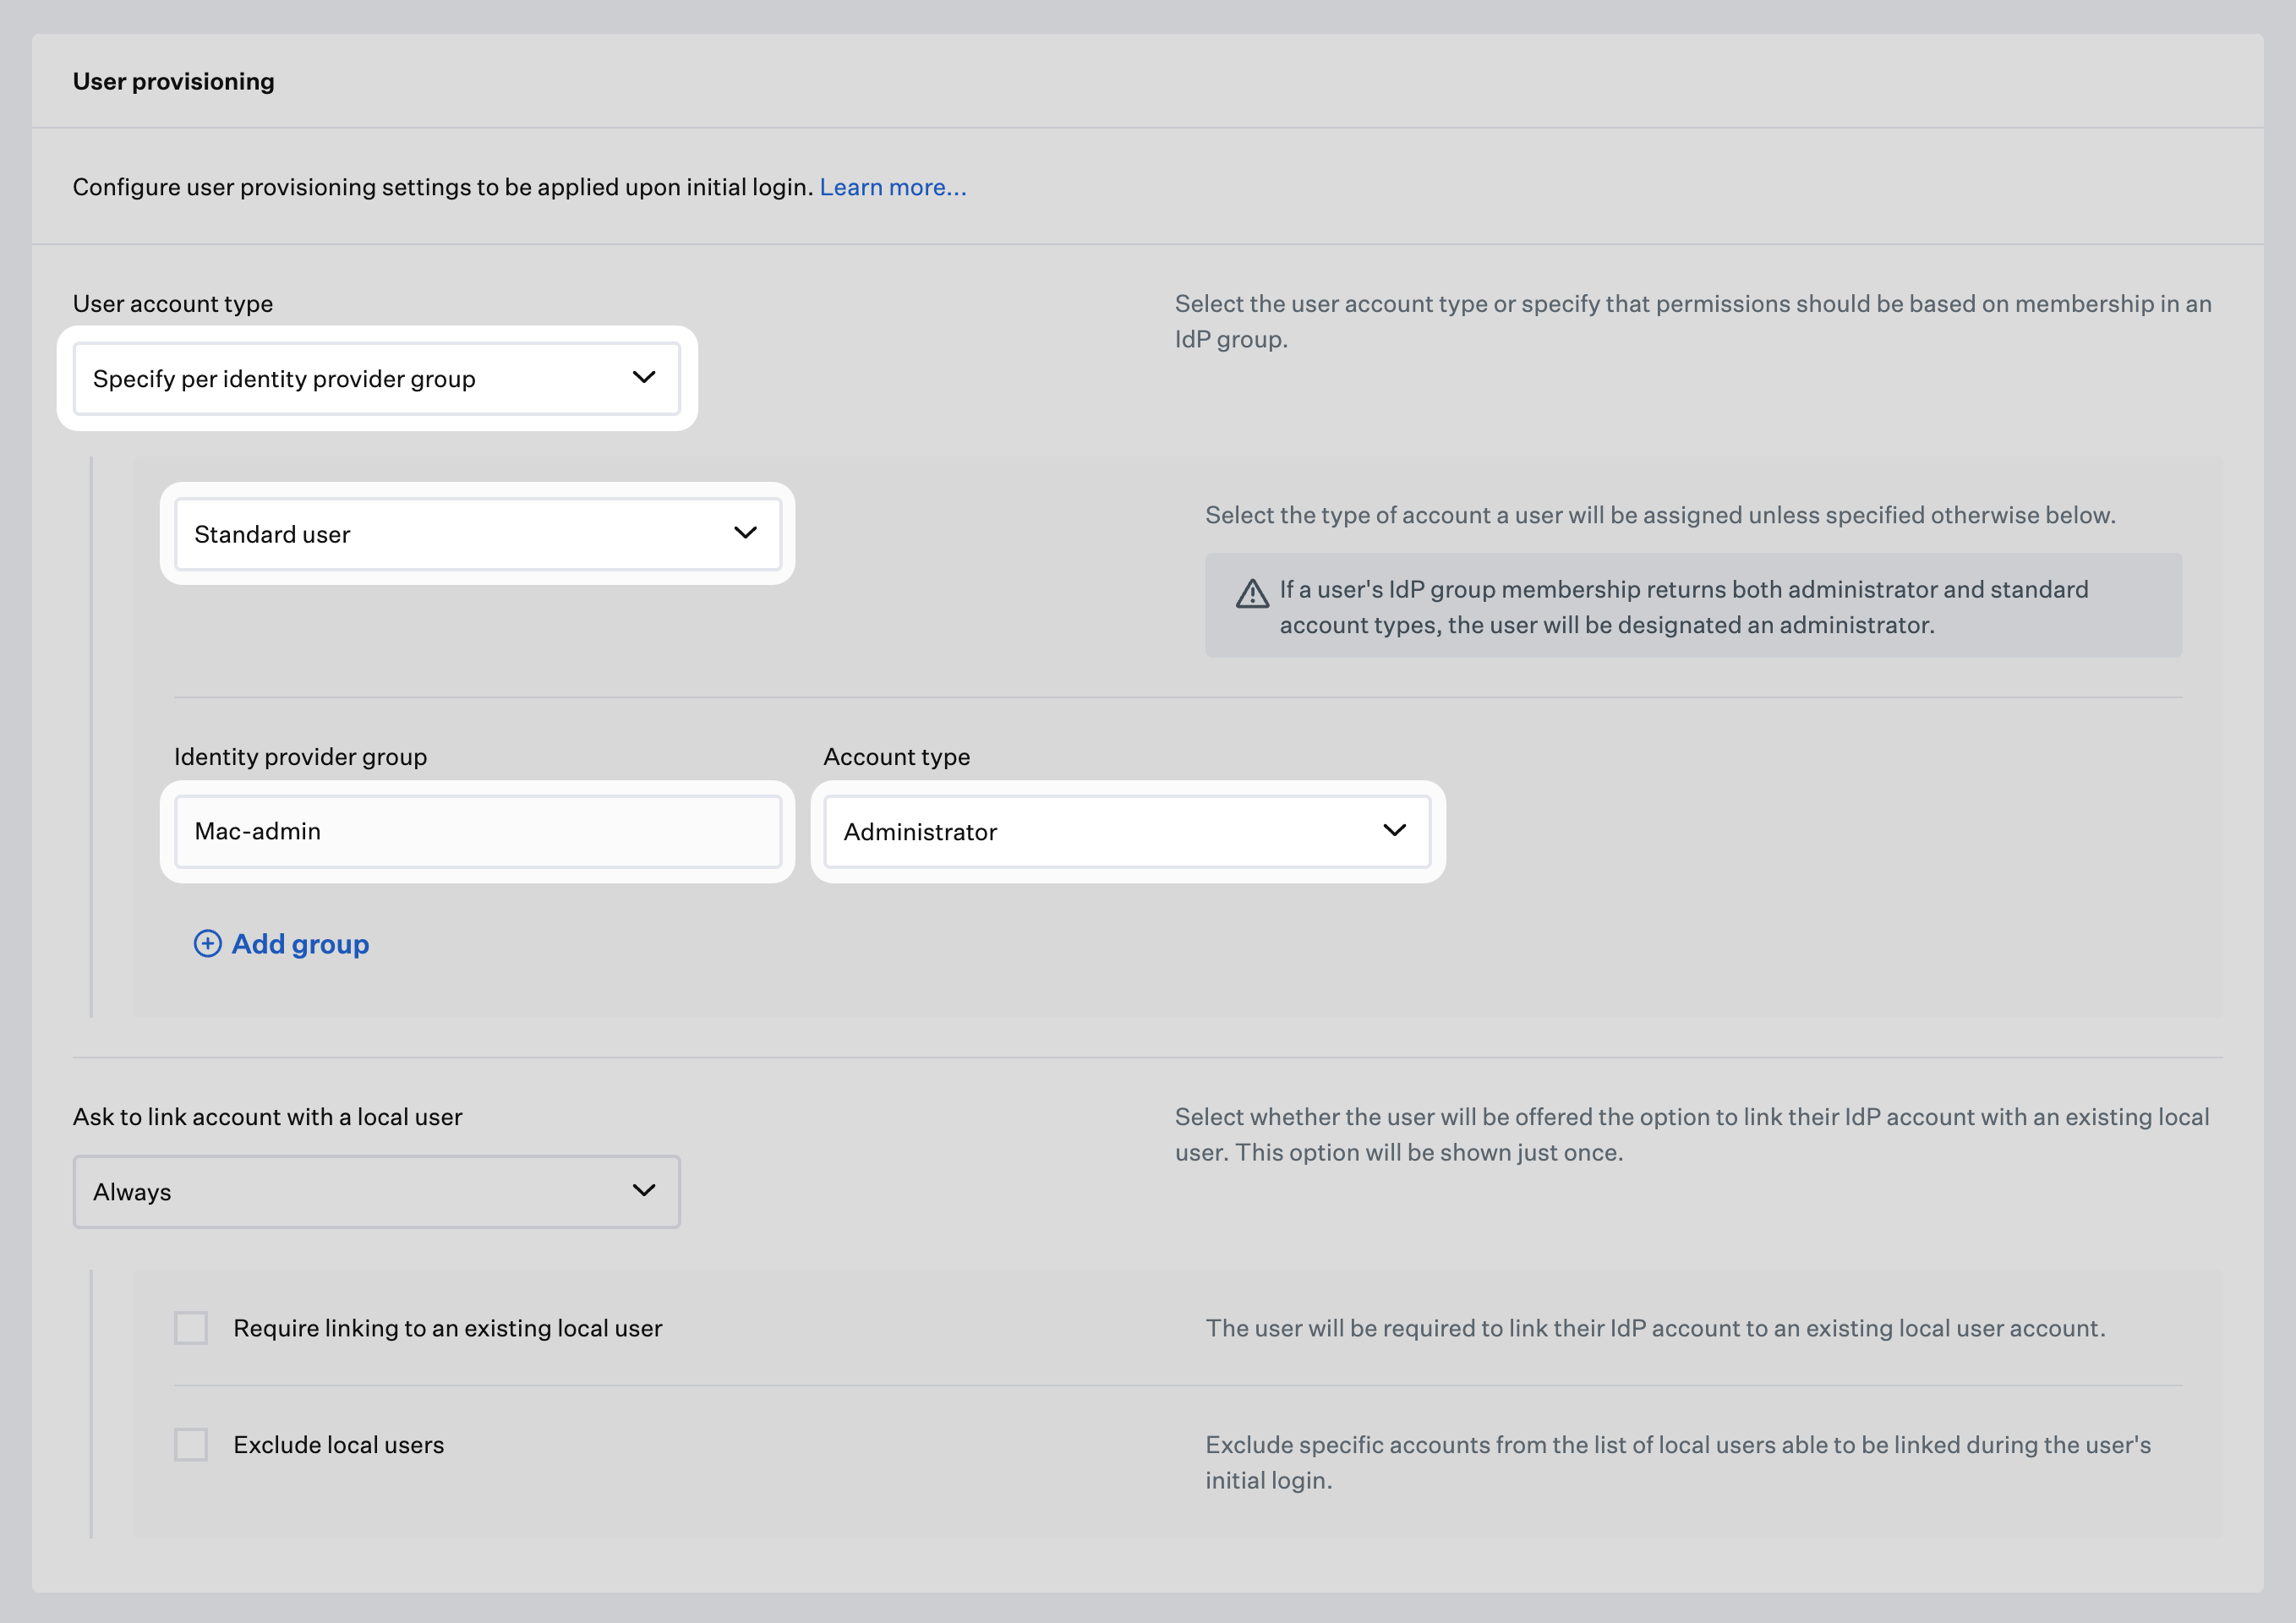
In the Passport Library Item, click the User account type menu in the User provisioning section and select **Specify per identity provider group**.
With **User account type** set to **Specify per identity provider group**, open the account type drop-down below it and select Administrator or Standard user. If a user's IdP group membership returns both Administrator and Standard account types, the user is designated an Administrator.
In each **Identity provider group** field, enter the part of **Group email** before the **@** symbol, not the group's display name. Add a row for each additional group as the Library Item shows, matching the prefixes from your document.
For each **Identity provider group** row, set the **Account type** as appropriate.
### User Provisioning
If you want Passport to set each user's Mac account type from Google group membership, use the **User provisioning** steps below on the Passport Library Item [**Iru Endpoint** tab](#iru-endpoint). Use the **Group email** prefixes from **Collect group email prefixes for user provisioning** on the [**Google Workspace** tab](#google-workspace).
In the Passport Library Item, click the User account type menu in the User provisioning section and select **Specify per identity provider group**.
With **User account type** set to **Specify per identity provider group**, open the account type drop-down below it and select Administrator or Standard user. If a user's IdP group membership returns both Administrator and Standard account types, the user is designated an Administrator.
In each **Identity provider group** field, enter the part of **Group email** before the **@** symbol, not the group's display name. Add a row for each additional group as the Library Item shows, matching the prefixes from your document.
For each **Identity provider group** row, set the **Account type** as appropriate.
 In the Passport Library Item, click **Save**.
When **User provisioning** and related saves are complete in the Passport Library Item, switch back to the [**Google Workspace** tab](#google-workspace) if you need to confirm the Secure LDAP client or download the certificate again.
### After Initial Setup
#### Certificate Expiration and Renewal
Use these steps after you finish [**Certificate expiration and renewal**](#renew-secure-ldap-certificate-google-workspace) on the [**Google Workspace** tab](#google-workspace), when you need Iru Endpoint to trust the new certificate bundle instead of the old one.
In Iru Endpoint, open the **Library**, then open your Passport Library Item. Confirm **Identity provider** is set to **Google Workspace** under **Authentication configuration**.
In **Upload certificate from Google Workspace**, select the **trash** icon on the existing certificate file row to remove it.
In the Passport Library Item, click **Save**.
When **User provisioning** and related saves are complete in the Passport Library Item, switch back to the [**Google Workspace** tab](#google-workspace) if you need to confirm the Secure LDAP client or download the certificate again.
### After Initial Setup
#### Certificate Expiration and Renewal
Use these steps after you finish [**Certificate expiration and renewal**](#renew-secure-ldap-certificate-google-workspace) on the [**Google Workspace** tab](#google-workspace), when you need Iru Endpoint to trust the new certificate bundle instead of the old one.
In Iru Endpoint, open the **Library**, then open your Passport Library Item. Confirm **Identity provider** is set to **Google Workspace** under **Authentication configuration**.
In **Upload certificate from Google Workspace**, select the **trash** icon on the existing certificate file row to remove it.
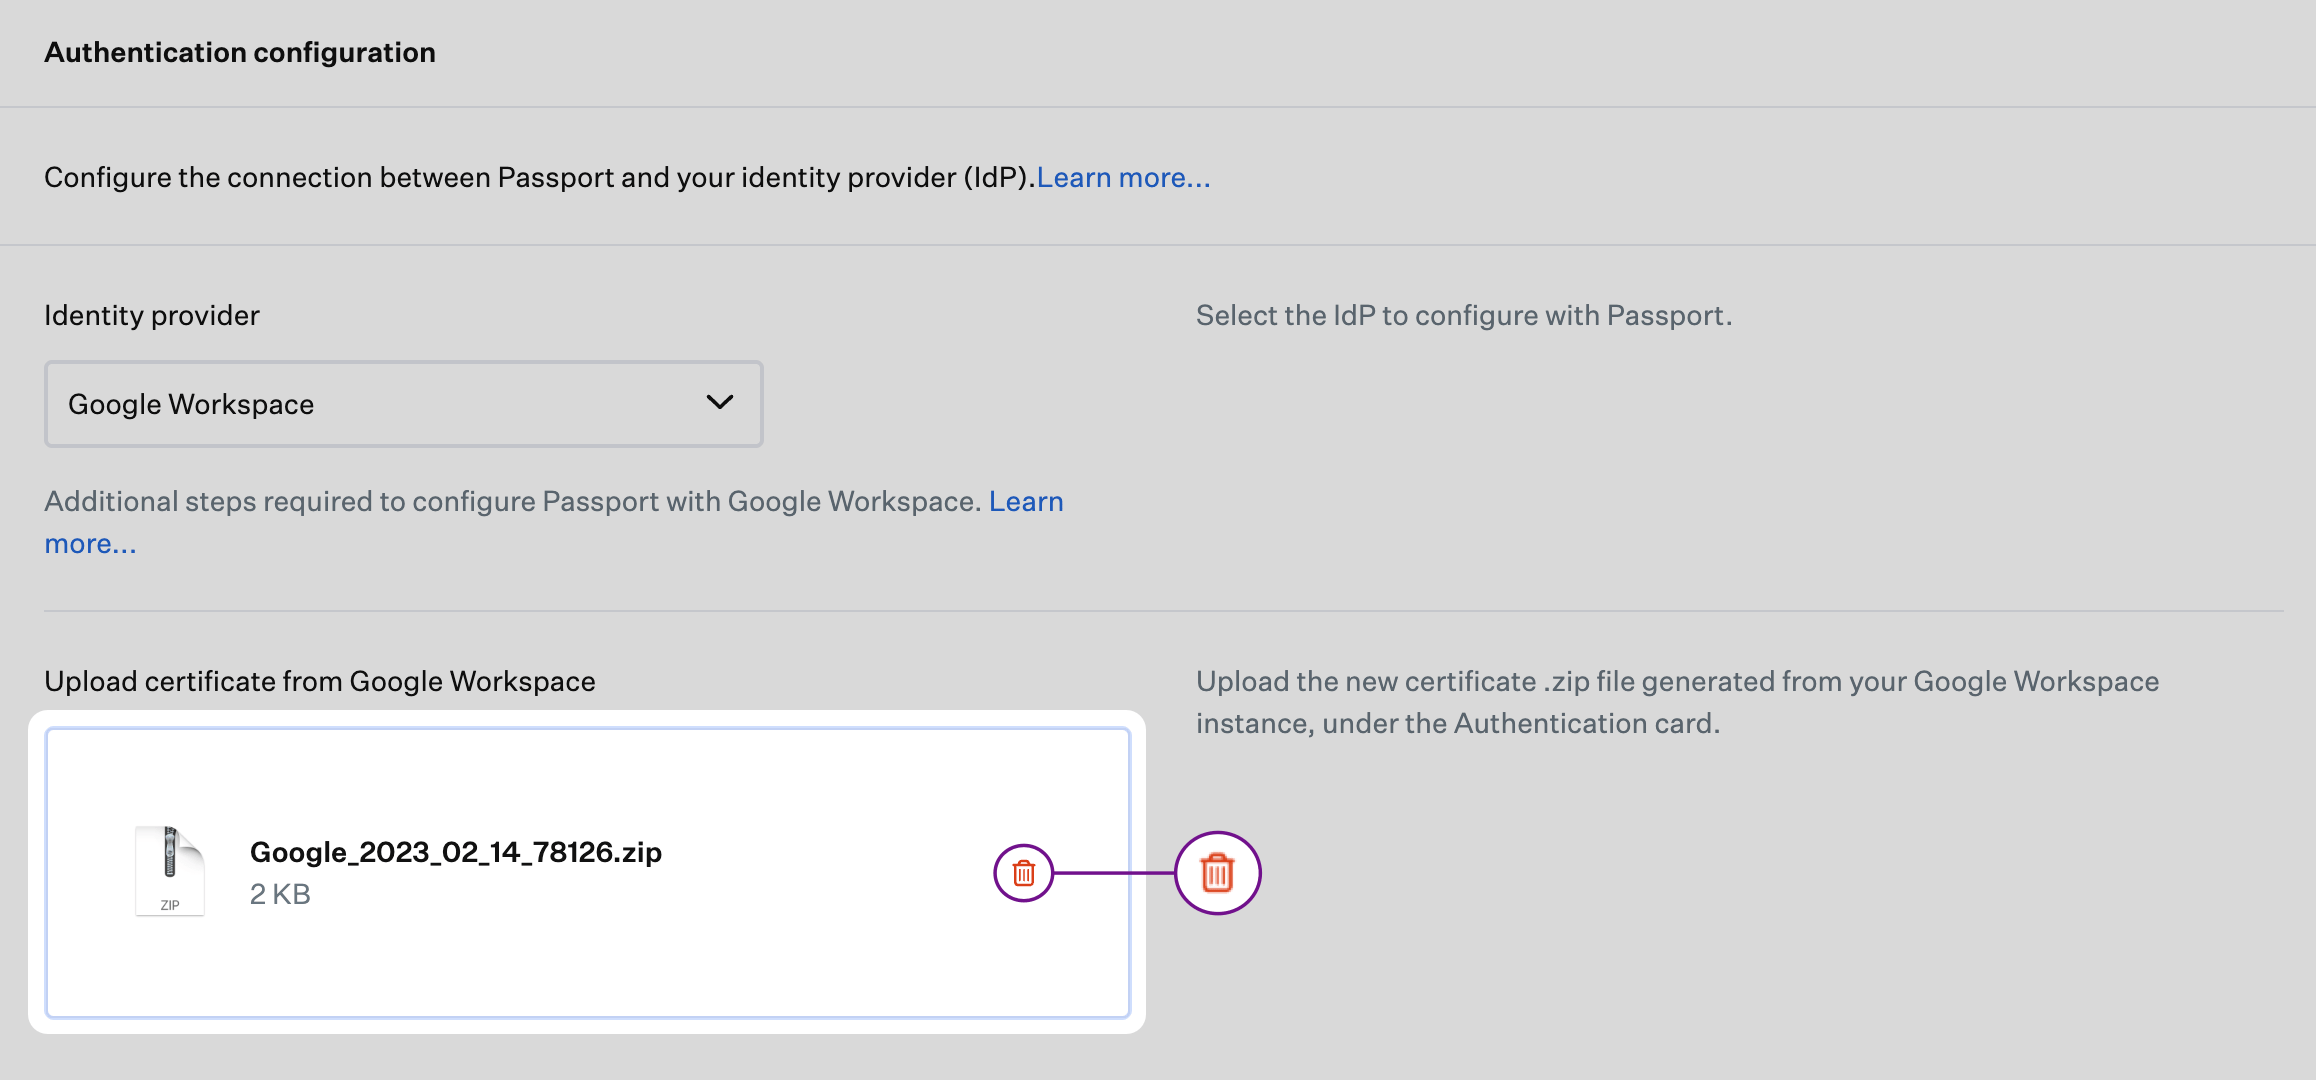 Upload the **new** compressed certificate file you downloaded from Google Admin (the same file type and flow as in [Library Item configuration](#library-item-configuration) above).
Select **Save** on the Passport Library Item.
### Troubleshooting
If a user enters the correct Google Workspace email address and password but still cannot sign in with Passport, verify that they meet the [Cloud Identity Premium license requirement](#cloud-identity-premium-license) for Passport.
In Google Admin, open **Users**, select the user, then open **Licenses**. Confirm that **Cloud Identity Premium** is assigned to that user and enabled. If it is missing, assign the license, then have the user try again.
Passport cannot authenticate users if the Secure LDAP certificate in Google Workspace has expired or is rejected. On the [**Google Workspace** tab](#google-workspace), [Certificate expiration and renewal](#renew-secure-ldap-certificate-google-workspace) walks through generating and downloading a new certificate in Google Admin and removing the old certificate there. On the [**Iru Endpoint** tab](#iru-endpoint), [Certificate expiration and renewal](#replace-google-workspace-certificate-in-passport) covers updating the Passport Library Item. Plan renewal before the expiration date so users do not lose sign-in access.
Upload the **new** compressed certificate file you downloaded from Google Admin (the same file type and flow as in [Library Item configuration](#library-item-configuration) above).
Select **Save** on the Passport Library Item.
### Troubleshooting
If a user enters the correct Google Workspace email address and password but still cannot sign in with Passport, verify that they meet the [Cloud Identity Premium license requirement](#cloud-identity-premium-license) for Passport.
In Google Admin, open **Users**, select the user, then open **Licenses**. Confirm that **Cloud Identity Premium** is assigned to that user and enabled. If it is missing, assign the license, then have the user try again.
Passport cannot authenticate users if the Secure LDAP certificate in Google Workspace has expired or is rejected. On the [**Google Workspace** tab](#google-workspace), [Certificate expiration and renewal](#renew-secure-ldap-certificate-google-workspace) walks through generating and downloading a new certificate in Google Admin and removing the old certificate there. On the [**Iru Endpoint** tab](#iru-endpoint), [Certificate expiration and renewal](#replace-google-workspace-certificate-in-passport) covers updating the Passport Library Item. Plan renewal before the expiration date so users do not lose sign-in access.