> ## Documentation Index
> Fetch the complete documentation index at: https://docs.iru.com/llms.txt
> Use this file to discover all available pages before exploring further.
# Configure the Passport Library Item
> Configure the Passport Library Item in Iru Endpoint to sync macOS login with your identity provider. Set up IdP authentication, password sync, and SSO.
This guide applies to Mac computers
### About Passport
Passport is a feature in Iru Endpoint that allows users to log into Mac computers using their organization's Identity Provider (IdP) credentials instead of separate local passwords. This streamlines authentication by connecting your IdP directly to macOS login.
Starting **June 15, 2026**, Microsoft Entra ID handles Conditional Access for Passport sign-in differently.
* **Mac Login:** See [Entra ID Passport Mac Login](/en/endpoint/library/passport/microsoft-entra-id/configure-passport-with-microsoft-entra-id-mac-login#june-2026-conditional-access-change) to confirm whether your tenant is affected and what to update before that date.
* **Web Login:** Updates are required only if you use Web Login and want to exempt Passport from MFA in Conditional Access. See [Entra ID Passport Web Login](/en/endpoint/library/passport/microsoft-entra-id/configure-passport-with-microsoft-entra-id-web-login#june-2026-conditional-access-change).
Microsoft explains the change in [this documentation](https://learn.microsoft.com/en-us/entra/identity/conditional-access/concept-enforcement-resource-exclusions).
### How It Works
Passport integrates with your Identity Provider (IdP) to authenticate users at the macOS login screen. When users enter their IdP credentials, Passport verifies them against your organization's identity system and creates or updates the local Mac user account accordingly.
For more information about how Passport interacts with other Iru Endpoint and macOS features, see [Passport Compatibility with macOS & Iru Endpoint Features](/en/endpoint/library/passport/passport-compatibility-with-macos-and-iru-endpoint-features#login-window).
### Set Up Your IdP for Passport
Set up your identity provider with Passport before you configure the Library Item in Iru Endpoint. Depending on your IdP and authentication mode, you will need the right values to enter in Iru Endpoint, such as the OIDC well-known configuration URL (issuer metadata URL), the application client ID, and, when your setup requires them, client secrets and redirect URIs.
Use the guide that matches your IdP:
Secure LDAP and certificate setup for Google Workspace.
OIDC application and Passport Library Item setup for Okta.
Use this guide when you need MFA with Passport.
Use this guide when you do not need MFA with Passport.
OIDC applications and Passport Library Item setup for OneLogin.
If you use **Other** as the **Identity provider** in Iru Endpoint, use your vendor's documentation to obtain the issuer `.well-known/openid-configuration` URL and the client settings that match **Web Login** or **Mac Login** in your Passport Library Item.
### Create a Passport Library Item
To add this Library Item to your Iru Endpoint Library, follow the steps outlined in the [Library Overview](/en/endpoint/library/library-items-profiles/library-overview) article.
Give the new Passport Library Item a descriptive **Name** and assign it to your desired [Blueprints](/en/endpoint/getting-started/blueprints-and-library/configuring-blueprints).
Continue with **Authentication configuration**, **User provisioning**, **Access**, **Login window**, and **Help window** as described later in this article. When you are finished, select **Save** on the Library Item.
### Authentication Configuration
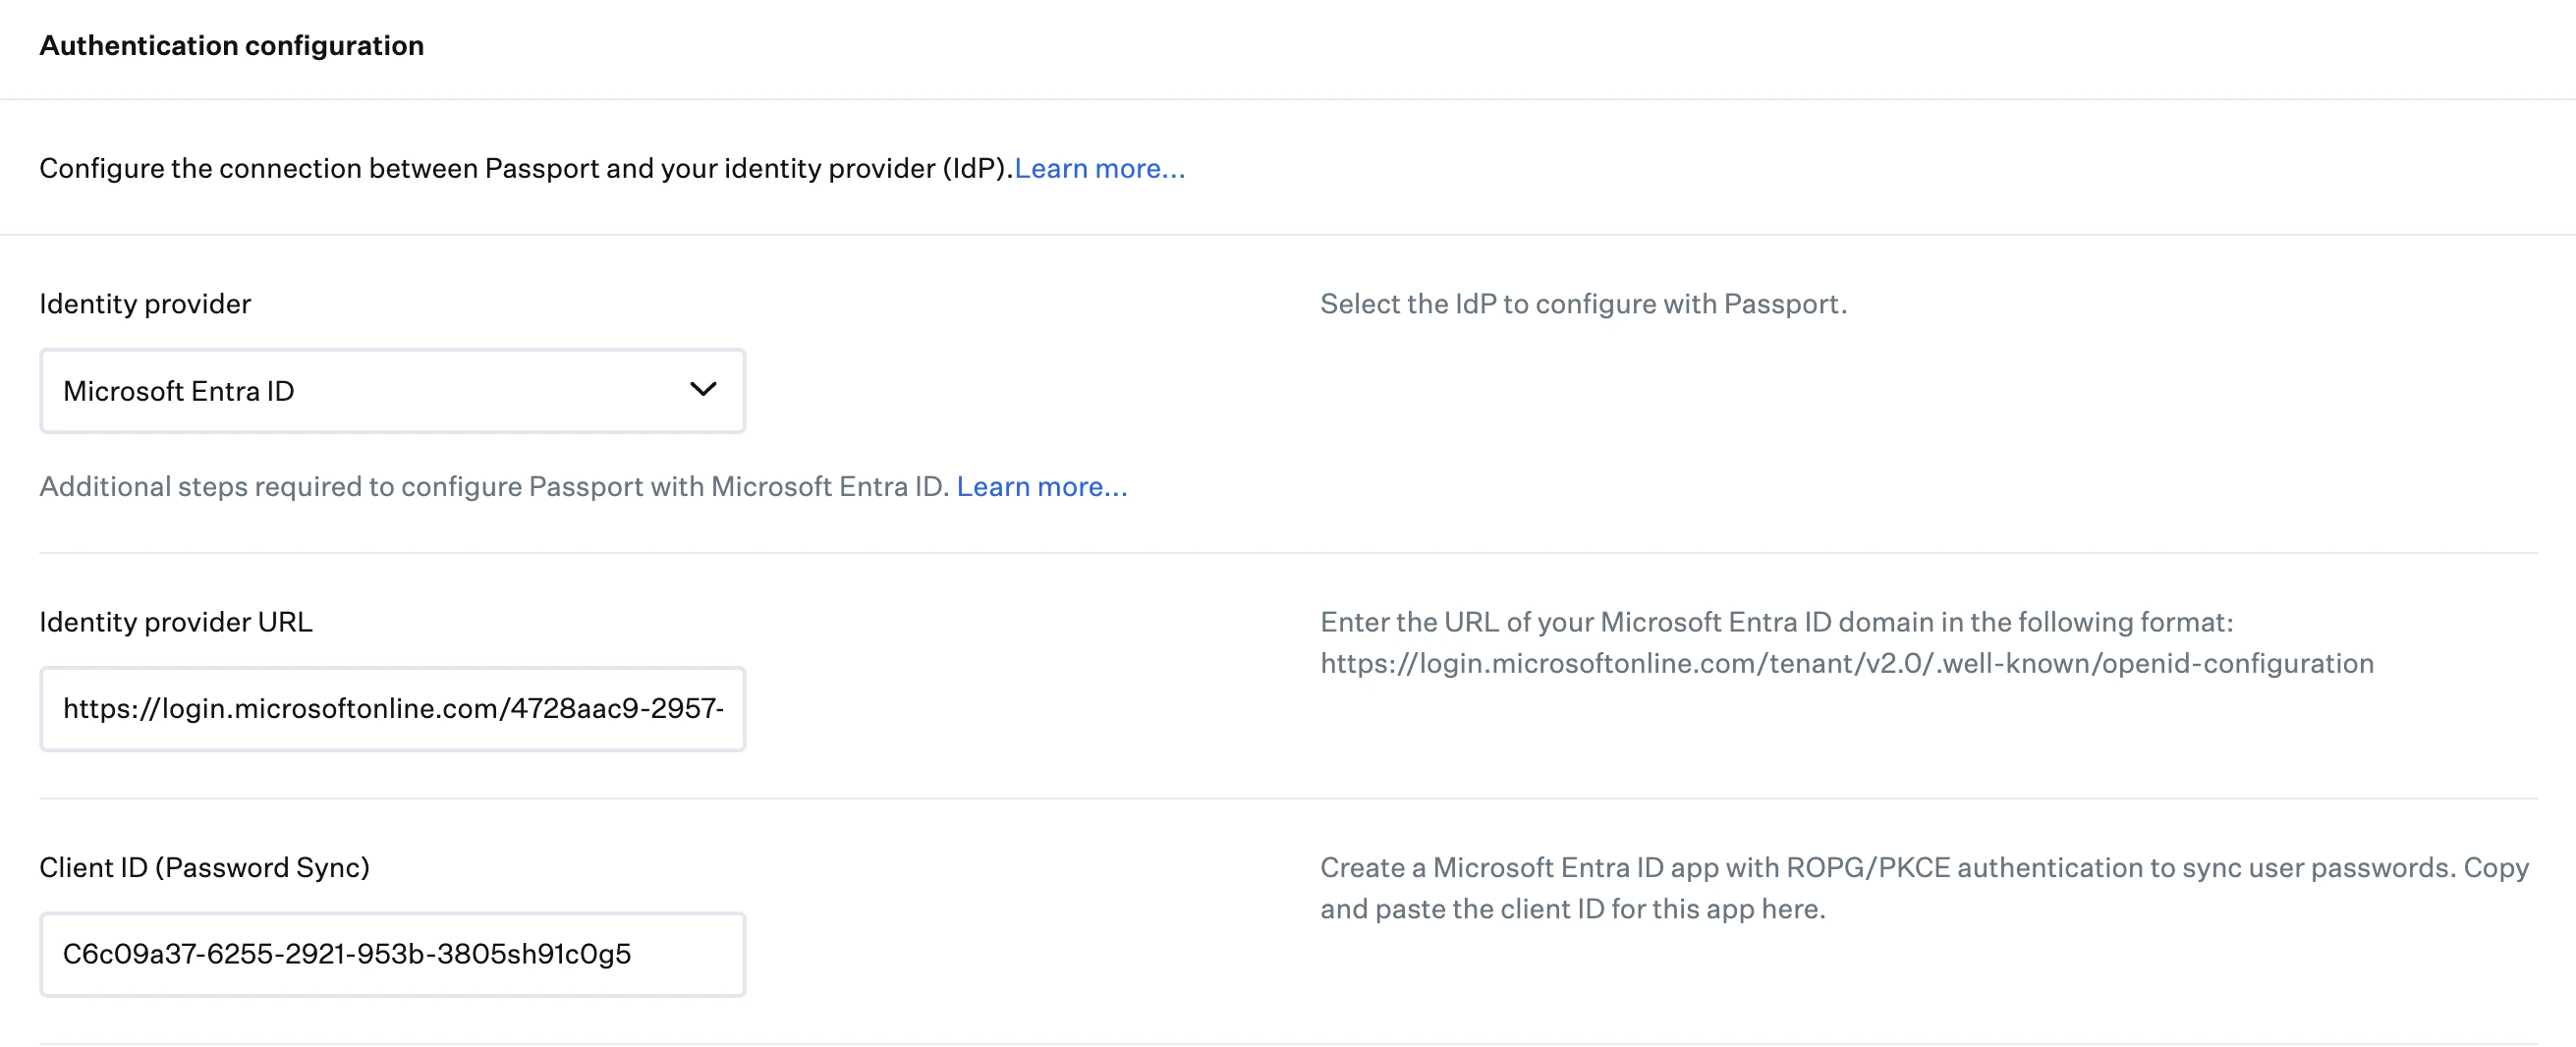
In **Settings**, under **Authentication configuration**, select **Identity provider** and choose your IdP.
If you use any **Identity provider** other than **Google Workspace**, skip this step and continue with **Enter Identity provider URL** below.
Upload the compressed certificate from your Secure LDAP client in **Authentication configuration**. Skip ahead to [User provisioning](#user-provisioning).
In the **Identity provider URL** field, enter the IdP's OIDC well-known configuration endpoint. The expected URL pattern depends on your IdP; use the tab that matches your **Identity provider** selection.
If you are unsure of your tenant ID, follow the instructions located [here](https://learn.microsoft.com/en-us/entra/fundamentals/how-to-find-tenant) to find it.
```bash theme={null}
https://login.microsoftonline.com/{tenant}/v2.0/.well-known/openid-configuration
```
```bash theme={null}
https://{yourOktaDomain}/.well-known/openid-configuration
```
```bash theme={null}
https://{subdomain}.onelogin.com/oidc/2/.well-known/openid-configuration
```
```bash theme={null}
https://{OIDCDomainURL}/.well-known/openid-configuration
```
In the **Client ID (Password Sync)** field, enter the client ID of the OIDC application configured in the identity provider's platform.
 The two modes work differently at the Mac login window:
* **Web Login:** Passport shows a web view of your IdP's sign-in page. Users complete IdP sign-in (including multifactor authentication when your IdP requires it) inside that view. When your organization allows it, they can [sign in locally](/en/endpoint/library/passport/user-experience-with-passport#signing-in-with-only-your-mac-account-local-login).
* **Mac Login:** Passport shows the Mac username and password fields only. Users enter their IdP credentials there; Passport checks them against the IdP without running the IdP's full web sign-in flow at the login window.
Use **Web Login** if you need Passport to **support MFA** with your IdP at Mac sign-in. Use **Mac Login** if you **do not** need Passport to support MFA that way for your deployment.
If FileVault is set to **Disallow automatic FileVault Login** and **Web Login** is selected, users need to authenticate three times in total after the device is powered on or restarted.
If you selected **Web Login**, enter the redirect URI in the **Redirect URI** field as described in your IdP configuration article.
If your IdP OIDC app uses a client secret, enter it in the **Client secret (optional)** field. That applies to **Mac Login** or **Web Login** when your app is configured with a secret in the IdP (for example, some Web Login apps use a confidential client). If you are unsure, follow your IdP configuration article.
If you are using Microsoft Entra ID, the "Client Secret" is the Client Secret Value, not the Client Secret ID. Using the Client Secret ID will result in login errors.
### User Provisioning
Configure the user provisioning settings you want to be applied when a user first logs in to the Mac. You can control how account types are assigned and what to do when an account already exists.
Passport uses two attributes of a local Mac user account (which you can view using the `dscl` command or the Directory Utility app):
* `dsAttrTypeNative:io.kandji.KandjiLogin.LinkedAccount`: contains a unique value specific to the IdP account; this varies and could be a number, email address, or unique identifier
* `dsAttrTypeNative:io.kandji.KandjiLogin.LinkedAccountName`: contains a value from the RecordName attribute of the linked user account, for example, an email address
Passport also adds an additional value to the RecordName attribute, the email address of the IdP account.
When Passport creates a new local user account, Passport creates the local Mac account with the appropriate attributes and values.
When Passport links with an existing local user account, Passport adds a value to the existing RecordName attribute, adding the two additional attributes and values to the existing local user account.
In **User provisioning**, the **User account type** drop-down offers **Administrator** (default), **Standard**, and **Specify per identity provider group**. When Passport creates new local user accounts, their type follows this setting.
* If you select **Administrator** or **Standard**, Passport checks a local account's permissions at the initial Passport login.
* If you select **Specify per identity provider group** to configure the new account type based on IdP group membership:
* With **User account type** set to **Specify per identity provider group**, open the account type drop-down below it and select Administrator or Standard user. If a user matches an **Identity provider group** row farther down, Passport uses that row's account type instead.
* Ensure the group in the **Identity provider group** field in Iru Endpoint matches the group in your IdP
* For Microsoft Entra ID, based on Microsoft's recommendations, use the Entra ID group Object ID instead of the group name.
* For Google Workspace, the name entered should be the email prefix of the group in Google as opposed to the name of the group.
* If a user is designated as an administrator in one group and a standard user in another, that user's account type will be **Administrator**.
* When **Specify per identity provider group** is selected, Passport checks the user's group membership every time the user logs in. Passport updates the user's account type if you make a group membership change or a configuration change that would cause a user to:
* change from a standard account to an administrator account
* change from an administrator account to a standard account (this change forces the user to restart their Mac to demote the user account and ensure that the change is in effect)
Select whether the user will be offered the option to link their IdP account with an existing local user. This option will be shown just once.
* **Always.** This is the default setting. When a user logs in to the Mac using their IdP credentials, Passport will prompt the user to select an existing local Mac account they want to link to. It is a good option if you are unsure whether or not your users' IdP account names match their Mac account names. When **Always** is selected, you will see two additional options:
* **Require linking to an existing local user:** The user will be required to link their IdP account to an existing local user account.
* **Exclude local users:** Exclude specific accounts from the list of local users able to be linked during the user's initial login. Enter a short name in **Local user short name** and select **Add user** when you need more than one row. A common use case is preventing the user from being prompted to link an IT admin or service account.
* **If a local username matches.** When a user logs in to the Mac using their IdP credentials, Passport will automatically find the Mac account with a matching username and prompt the user to link it. The user will not have the option to link to another account.
* **Never.** When a user logs in using their IdP credentials, Passport will create a new user account on the Mac, regardless of existing accounts.
### Access
Configure which users can log into the Mac and FileVault's automatic login behavior. Our [Managing Passwords with Passport](/en/endpoint/library/passport/managing-passwords-with-passport) article provides in-depth information regarding password management using Passport.
These settings apply only to new or existing Passport users who authenticated against the IdP. Use **Local user access** below to control sign-in for other local users.
* **Allow all users to log in** allows all IdP users to log into the Mac at the Passport login window.
* **Specify which IdP users can log in** allows only users you specify to log into the Mac at the Passport login window.
* **Automatically include user assigned to device record:** Automatically allows the user assigned to the device record in Iru Endpoint to log in.
* **Specify additional IdP users:** Allows certain IdP users to log in, even if they aren't assigned to the device record in Iru Endpoint.
Choose whether existing local users can sign in, or whether access is limited to local administrators or specific local users.
* **Allow all local users to log in** allows all local users to log in to the Mac at the Passport login window. If the Mac is connected to a network and can reach the IdP, Passport will check the user's credentials against the IdP. If the Mac is not connected to a network, the user can log in with their local Mac account credentials. This is the default setting.
* **Allow local administrators to log in** allows only local administrator users to log in to the Mac at the Passport login window.
* **Specify which local users can log in** allows only users you specify to log into the Mac at the Passport login window.
These options control FileVault pass-through authentication (also called automatic FileVault login): whether users can unlock FileVault and reach the desktop without a separate sign-in at the Passport window.
* **Allow automatic FileVault login:** Users sign in only at the FileVault login window. They do not see the Passport login window unless they log out. The FileVault login window does not check credentials against an IdP.
* **Disallow automatic FileVault login:** This is the default. Users see the Passport login window when they turn on their Mac. They sign in at the FileVault login window and again at the Passport login window.
When **Disallow automatic FileVault login** is selected, users authenticate at the FileVault window and again at the Passport login window after each system reboot.
Optionally store the user's current password in a dedicated keychain so Passport can handle password changes at the login window without extra prompts where possible.
* **Securely store password:** Stores the user's IdP credentials in a dedicated keychain on their Mac to aid in password changes. When the user changes their password with their IdP and then logs in to the Mac, they only need to enter their new credentials; Passport will silently update the Mac password. If a user is already logged in and changes their password with the IdP, Passport will prompt them within 5 minutes to update their local password, and the user will not have to provide their local password; they will only have to enter their IdP password for Passport to change their local password to match their IdP password. The location of this keychain is `/Library/Keychains/iru.keychain`. If you remove that keychain, Passport will automatically create a new keychain in that location and use it without generating an error or notification to the user.
* **Web Login Passthrough:** When this option is selected with **Web Login**, users will see an additional password verification screen only the first time they log in. The login process will be completed after a single authentication at the Web Login window on subsequent logins.
* **Do not store password:** With this option set, Passport only checks and enforces password synchronization at login. If a user changes their password in between login sessions, their local password will remain out of sync until their next login.
### Customize Login Window
You can customize the Passport login window for your users. Click **Customize** to reveal the **Customize login window** drawer with the following options:
* **Display logo:** Include your organization's logo on the login window. If the Passport Library Item uses **Web Login**, Passport shows the web view instead of the logo until the user selects **Local Login**, which brings back the logo with the username and password fields.
* **Logo:** Use a 128 x 128 pixel PNG with a transparent background. Drag the file into the upload area or select **upload**. JPEG and PNG are accepted.
* **Customize Desktop picture:** Turn this on to upload a picture for the login window background.
* **Desktop picture:** A 3840 x 2160 pixel JPEG or PNG is recommended. Drag the file into the upload area or select **upload**.
* **Network manager:** Include the Wi-Fi network manager in the menu bar so users can connect at the Passport login window when they are not already on a network.
* **Allow connecting to unsecured Wi-Fi networks:** When **Network manager** is on, users can use it to join networks that do not require encryption.
Captive Portal networks are not supported.
**Lock message:** Choose to display or hide a lock message. Options are **Don't display a lock message**, **Display a custom lock message**, and **Inherit system settings**. For a custom message, enter up to 220 characters in the text field.
**Policy banner:** Choose to display or hide a policy banner. Options are **Don't display a policy banner**, **Display a plain-text policy banner**, **Display an RTF policy banner**, and **Inherit system settings**. Plain text accepts up to 900 characters. For RTF, use the drop zone or select **upload** to attach a file.
Specify which power controls are available from the login window. By default, all three are enabled.
* **Shut Down button**
* **Restart button**
* **Sleep button**
* **Customize username label:** Add a custom label that appears in the username field. Up to 83 characters.
* **Include password reset URL:** Allow users to reset their passwords from the login window. Enter the full URL, for example a value starting with `https://`.
### Customize Help Window
Users select the Help **?** control in the bottom left of the Passport login window. The Help window that opens has three tabs across the top: **Support**, **Device info**, and **About**, matching what you configure here. In the Passport Library Item, click **Customize** to open the **Customize Help window** drawer.
* **Header:** Required. Up to 30 characters. This text appears as the main heading on the Support tab, for example **Contact us**.
* **Body text (optional):** Up to 250 characters. This text appears under the heading, for example instructions to contact the organization's IT department if login fails.
Turn each toggle on or off to control whether that row appears on the Device info tab. By default, all of these options are enabled.
* **Serial number**
* **IP address**
* **Hostname**
* **macOS version**
* **Model information**
Shows the **Passport** name, a **Version** line with the build number, and the Iru copyright notice, similar to a standard macOS About window.
### Testing Passport
When testing Passport:
* You can use the command `sudo iru library` to force the new Passport Library Item configuration to be applied after making changes.
* You can delete a user account associated with Passport using the Users & Groups settings (or Users & Groups preferences).
* After you've performed these steps, you can safely log out and then attempt to log in again with new Passport settings using the credentials of a test IdP user account.
### Related Articles
How to manage passwords with Passport.
Passport compatibility with macOS and Iru features
The two modes work differently at the Mac login window:
* **Web Login:** Passport shows a web view of your IdP's sign-in page. Users complete IdP sign-in (including multifactor authentication when your IdP requires it) inside that view. When your organization allows it, they can [sign in locally](/en/endpoint/library/passport/user-experience-with-passport#signing-in-with-only-your-mac-account-local-login).
* **Mac Login:** Passport shows the Mac username and password fields only. Users enter their IdP credentials there; Passport checks them against the IdP without running the IdP's full web sign-in flow at the login window.
Use **Web Login** if you need Passport to **support MFA** with your IdP at Mac sign-in. Use **Mac Login** if you **do not** need Passport to support MFA that way for your deployment.
If FileVault is set to **Disallow automatic FileVault Login** and **Web Login** is selected, users need to authenticate three times in total after the device is powered on or restarted.
If you selected **Web Login**, enter the redirect URI in the **Redirect URI** field as described in your IdP configuration article.
If your IdP OIDC app uses a client secret, enter it in the **Client secret (optional)** field. That applies to **Mac Login** or **Web Login** when your app is configured with a secret in the IdP (for example, some Web Login apps use a confidential client). If you are unsure, follow your IdP configuration article.
If you are using Microsoft Entra ID, the "Client Secret" is the Client Secret Value, not the Client Secret ID. Using the Client Secret ID will result in login errors.
### User Provisioning
Configure the user provisioning settings you want to be applied when a user first logs in to the Mac. You can control how account types are assigned and what to do when an account already exists.
Passport uses two attributes of a local Mac user account (which you can view using the `dscl` command or the Directory Utility app):
* `dsAttrTypeNative:io.kandji.KandjiLogin.LinkedAccount`: contains a unique value specific to the IdP account; this varies and could be a number, email address, or unique identifier
* `dsAttrTypeNative:io.kandji.KandjiLogin.LinkedAccountName`: contains a value from the RecordName attribute of the linked user account, for example, an email address
Passport also adds an additional value to the RecordName attribute, the email address of the IdP account.
When Passport creates a new local user account, Passport creates the local Mac account with the appropriate attributes and values.
When Passport links with an existing local user account, Passport adds a value to the existing RecordName attribute, adding the two additional attributes and values to the existing local user account.
In **User provisioning**, the **User account type** drop-down offers **Administrator** (default), **Standard**, and **Specify per identity provider group**. When Passport creates new local user accounts, their type follows this setting.
* If you select **Administrator** or **Standard**, Passport checks a local account's permissions at the initial Passport login.
* If you select **Specify per identity provider group** to configure the new account type based on IdP group membership:
* With **User account type** set to **Specify per identity provider group**, open the account type drop-down below it and select Administrator or Standard user. If a user matches an **Identity provider group** row farther down, Passport uses that row's account type instead.
* Ensure the group in the **Identity provider group** field in Iru Endpoint matches the group in your IdP
* For Microsoft Entra ID, based on Microsoft's recommendations, use the Entra ID group Object ID instead of the group name.
* For Google Workspace, the name entered should be the email prefix of the group in Google as opposed to the name of the group.
* If a user is designated as an administrator in one group and a standard user in another, that user's account type will be **Administrator**.
* When **Specify per identity provider group** is selected, Passport checks the user's group membership every time the user logs in. Passport updates the user's account type if you make a group membership change or a configuration change that would cause a user to:
* change from a standard account to an administrator account
* change from an administrator account to a standard account (this change forces the user to restart their Mac to demote the user account and ensure that the change is in effect)
Select whether the user will be offered the option to link their IdP account with an existing local user. This option will be shown just once.
* **Always.** This is the default setting. When a user logs in to the Mac using their IdP credentials, Passport will prompt the user to select an existing local Mac account they want to link to. It is a good option if you are unsure whether or not your users' IdP account names match their Mac account names. When **Always** is selected, you will see two additional options:
* **Require linking to an existing local user:** The user will be required to link their IdP account to an existing local user account.
* **Exclude local users:** Exclude specific accounts from the list of local users able to be linked during the user's initial login. Enter a short name in **Local user short name** and select **Add user** when you need more than one row. A common use case is preventing the user from being prompted to link an IT admin or service account.
* **If a local username matches.** When a user logs in to the Mac using their IdP credentials, Passport will automatically find the Mac account with a matching username and prompt the user to link it. The user will not have the option to link to another account.
* **Never.** When a user logs in using their IdP credentials, Passport will create a new user account on the Mac, regardless of existing accounts.
### Access
Configure which users can log into the Mac and FileVault's automatic login behavior. Our [Managing Passwords with Passport](/en/endpoint/library/passport/managing-passwords-with-passport) article provides in-depth information regarding password management using Passport.
These settings apply only to new or existing Passport users who authenticated against the IdP. Use **Local user access** below to control sign-in for other local users.
* **Allow all users to log in** allows all IdP users to log into the Mac at the Passport login window.
* **Specify which IdP users can log in** allows only users you specify to log into the Mac at the Passport login window.
* **Automatically include user assigned to device record:** Automatically allows the user assigned to the device record in Iru Endpoint to log in.
* **Specify additional IdP users:** Allows certain IdP users to log in, even if they aren't assigned to the device record in Iru Endpoint.
Choose whether existing local users can sign in, or whether access is limited to local administrators or specific local users.
* **Allow all local users to log in** allows all local users to log in to the Mac at the Passport login window. If the Mac is connected to a network and can reach the IdP, Passport will check the user's credentials against the IdP. If the Mac is not connected to a network, the user can log in with their local Mac account credentials. This is the default setting.
* **Allow local administrators to log in** allows only local administrator users to log in to the Mac at the Passport login window.
* **Specify which local users can log in** allows only users you specify to log into the Mac at the Passport login window.
These options control FileVault pass-through authentication (also called automatic FileVault login): whether users can unlock FileVault and reach the desktop without a separate sign-in at the Passport window.
* **Allow automatic FileVault login:** Users sign in only at the FileVault login window. They do not see the Passport login window unless they log out. The FileVault login window does not check credentials against an IdP.
* **Disallow automatic FileVault login:** This is the default. Users see the Passport login window when they turn on their Mac. They sign in at the FileVault login window and again at the Passport login window.
When **Disallow automatic FileVault login** is selected, users authenticate at the FileVault window and again at the Passport login window after each system reboot.
Optionally store the user's current password in a dedicated keychain so Passport can handle password changes at the login window without extra prompts where possible.
* **Securely store password:** Stores the user's IdP credentials in a dedicated keychain on their Mac to aid in password changes. When the user changes their password with their IdP and then logs in to the Mac, they only need to enter their new credentials; Passport will silently update the Mac password. If a user is already logged in and changes their password with the IdP, Passport will prompt them within 5 minutes to update their local password, and the user will not have to provide their local password; they will only have to enter their IdP password for Passport to change their local password to match their IdP password. The location of this keychain is `/Library/Keychains/iru.keychain`. If you remove that keychain, Passport will automatically create a new keychain in that location and use it without generating an error or notification to the user.
* **Web Login Passthrough:** When this option is selected with **Web Login**, users will see an additional password verification screen only the first time they log in. The login process will be completed after a single authentication at the Web Login window on subsequent logins.
* **Do not store password:** With this option set, Passport only checks and enforces password synchronization at login. If a user changes their password in between login sessions, their local password will remain out of sync until their next login.
### Customize Login Window
You can customize the Passport login window for your users. Click **Customize** to reveal the **Customize login window** drawer with the following options:
* **Display logo:** Include your organization's logo on the login window. If the Passport Library Item uses **Web Login**, Passport shows the web view instead of the logo until the user selects **Local Login**, which brings back the logo with the username and password fields.
* **Logo:** Use a 128 x 128 pixel PNG with a transparent background. Drag the file into the upload area or select **upload**. JPEG and PNG are accepted.
* **Customize Desktop picture:** Turn this on to upload a picture for the login window background.
* **Desktop picture:** A 3840 x 2160 pixel JPEG or PNG is recommended. Drag the file into the upload area or select **upload**.
* **Network manager:** Include the Wi-Fi network manager in the menu bar so users can connect at the Passport login window when they are not already on a network.
* **Allow connecting to unsecured Wi-Fi networks:** When **Network manager** is on, users can use it to join networks that do not require encryption.
Captive Portal networks are not supported.
**Lock message:** Choose to display or hide a lock message. Options are **Don't display a lock message**, **Display a custom lock message**, and **Inherit system settings**. For a custom message, enter up to 220 characters in the text field.
**Policy banner:** Choose to display or hide a policy banner. Options are **Don't display a policy banner**, **Display a plain-text policy banner**, **Display an RTF policy banner**, and **Inherit system settings**. Plain text accepts up to 900 characters. For RTF, use the drop zone or select **upload** to attach a file.
Specify which power controls are available from the login window. By default, all three are enabled.
* **Shut Down button**
* **Restart button**
* **Sleep button**
* **Customize username label:** Add a custom label that appears in the username field. Up to 83 characters.
* **Include password reset URL:** Allow users to reset their passwords from the login window. Enter the full URL, for example a value starting with `https://`.
### Customize Help Window
Users select the Help **?** control in the bottom left of the Passport login window. The Help window that opens has three tabs across the top: **Support**, **Device info**, and **About**, matching what you configure here. In the Passport Library Item, click **Customize** to open the **Customize Help window** drawer.
* **Header:** Required. Up to 30 characters. This text appears as the main heading on the Support tab, for example **Contact us**.
* **Body text (optional):** Up to 250 characters. This text appears under the heading, for example instructions to contact the organization's IT department if login fails.
Turn each toggle on or off to control whether that row appears on the Device info tab. By default, all of these options are enabled.
* **Serial number**
* **IP address**
* **Hostname**
* **macOS version**
* **Model information**
Shows the **Passport** name, a **Version** line with the build number, and the Iru copyright notice, similar to a standard macOS About window.
### Testing Passport
When testing Passport:
* You can use the command `sudo iru library` to force the new Passport Library Item configuration to be applied after making changes.
* You can delete a user account associated with Passport using the Users & Groups settings (or Users & Groups preferences).
* After you've performed these steps, you can safely log out and then attempt to log in again with new Passport settings using the credentials of a test IdP user account.
### Related Articles
How to manage passwords with Passport.
Passport compatibility with macOS and Iru features