> ## Documentation Index
> Fetch the complete documentation index at: https://docs.iru.com/llms.txt
> Use this file to discover all available pages before exploring further.
# Deploy Bitdefender as a custom app on Mac
> Deploy the Bitdefender Endpoint Security Tool to Mac computers as a custom app in Iru Endpoint. Package the installer, configure PPPC, and assign to devices.
This guide applies to Mac computers
Please note that depending on the specific application and version you have installed, the app path, privacy access, and system extension requirements may vary. As a best practice, we recommend thoroughly testing any Custom Apps before deploying them to a Mac in a production environment.
### Prerequisites
* Bitdefender installer package(s) from your [Bitdefender admin portal](https://gravityzone.bitdefender.com/). Ensure that an **uninstall password** is set in the package settings
* If you have a mixed environment of both Intel and Apple Silicon Mac computers, you will need to download both the macOS kit (Intel x86) and macOS kit (Apple Silicon) packages, but you will only need to include one of the install.xml files. The post-install script used in this guide will account for both installer types
* If you are only deploying to one architecture, you will still need that install package and the included install.xml file
* Bitdefender PFX Certificate Generator script ([GitHub Link](https://github.com/kandji-inc/support/blob/main/custom-apps/bitdefender/bitdefender_cert_generator.zsh))
* Bitdefender Settings Profile ([GitHub Link](https://github.com/kandji-inc/support/blob/main/custom-apps/bitdefender/bitdefender_settings.mobileconfig))
* This configuration profile enables full disk access for Notifications, [System Extensions](/en/endpoint/library/library-items-profiles/system-extensions-overview-and-guide), Bitdefender SSL CA certificate, Privacy Preferences (PPPC), and a Network content filter
* Bitdefender macOS 15+ Settings Profile ([GitHub Link](https://github.com/kandji-inc/support/blob/main/custom-apps/bitdefender/bitdefender_settings_macOS15.mobileconfig))
* This configuration profile includes the NonRemovableFromUISystemExtensions field for macOS 15+ devices
* Bitdefender Service Management Profile ([GitHub Link](https://github.com/kandji-inc/support/blob/main/custom-apps/bitdefender/bitdefender_service_management.mobileconfig))
* This configuration profile allows managed background items for Bitdefender
* Bitdefender Audit and Enforce Script ([GitHub Link](https://github.com/kandji-inc/support/blob/main/custom-apps/bitdefender/bitdefender_ae_script.zsh))
* Bitdefender Postinstall Script ([GitHub Link](https://github.com/kandji-inc/support/blob/main/custom-apps/bitdefender/post-install.sh))
### Creating a PFX Certificate
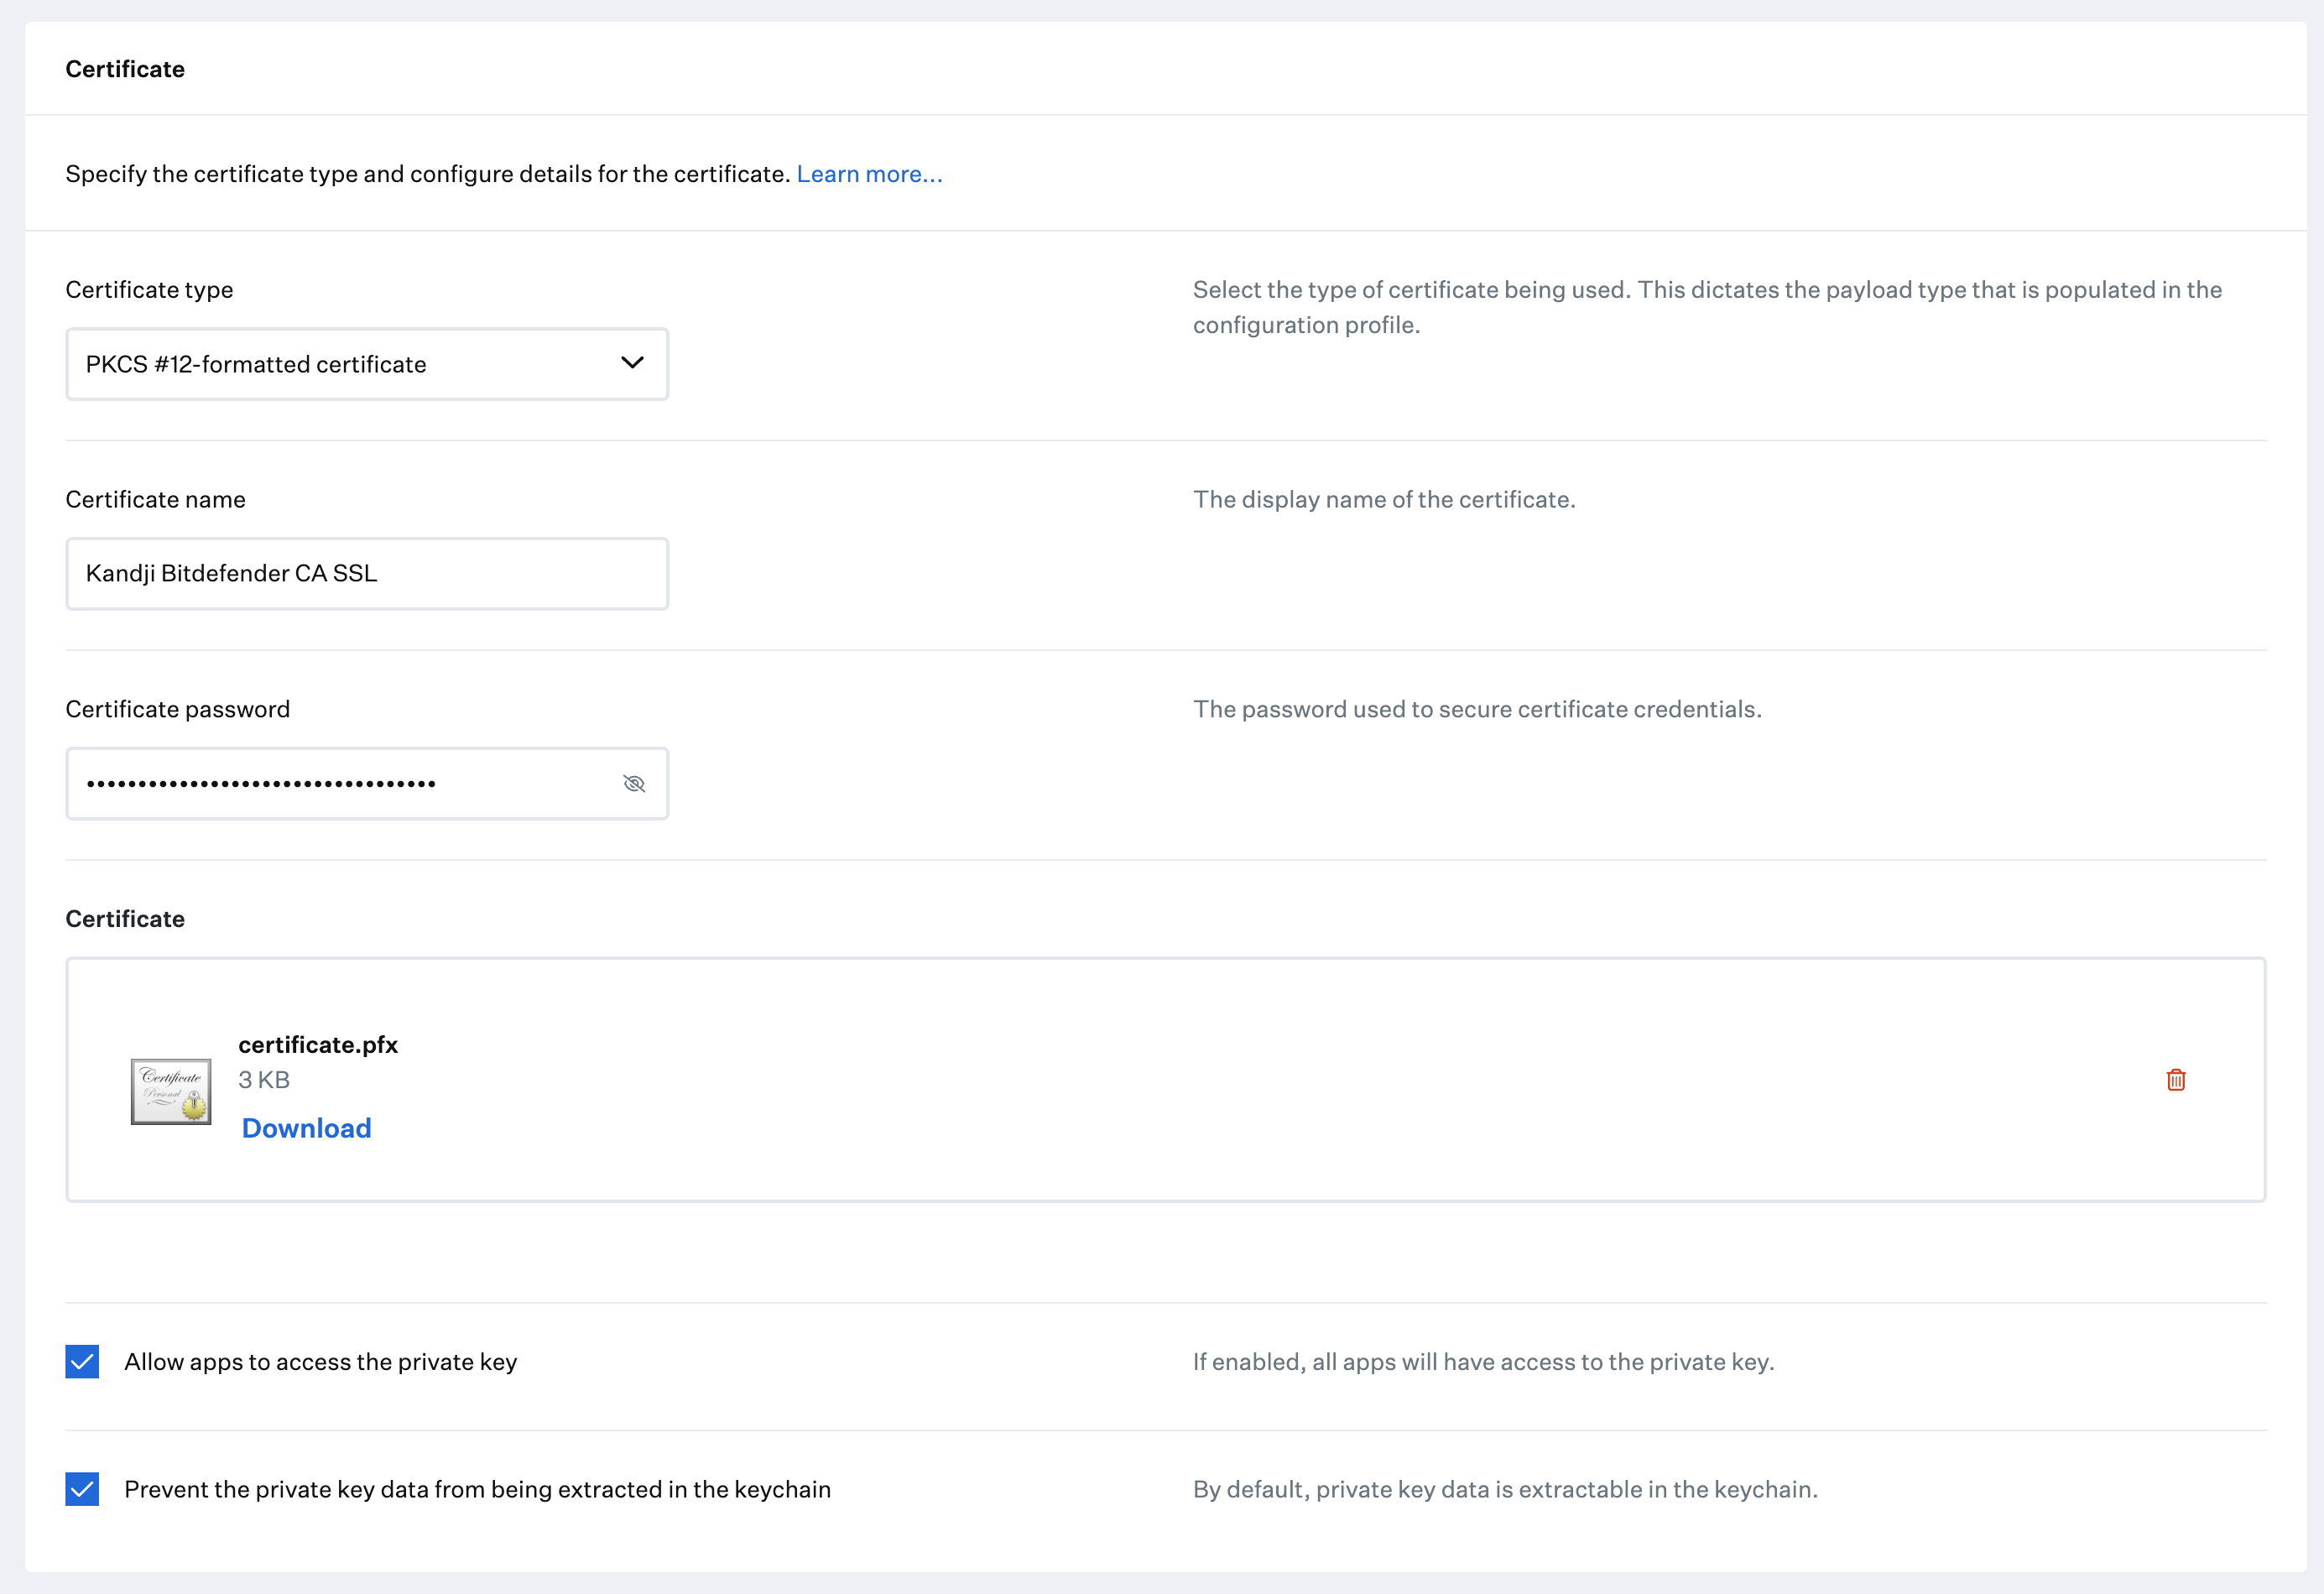
This section steps through the creation of a PFX certificate for Bitdefender that can be uploaded to Iru Endpoint in a Certificate Library Item.
Bitdefender requires that a PFX certificate be created and deployed to macOS. This section is based on [BitDefender's guide](https://www.bitdefender.com/business/support/en/77209-157498-install-security-agents---use-cases.html#UUID-00e93090-1040-8119-d7cf-c48320a8d6b7), which you can refer to for more information.
Open the **PFX Certificate Generator script** in a text editor or IDE such as VScode or BBEdit.
Fill in the certificate information section of the script:
```bash lines theme={null}
VARIABLES
# Cert info
COUNTRY="" # US - 2 letter country code
STATE="" # Georgia - state or province
LOCAL="" # Atlanta - locality name
ORG_NAME="Endpoint" # Leave as default
CERT_NAME=" BitDefender CA SSL" # Leave as default
```
Save the updated script to your Desktop.
Open **Terminal.app**.
Run the following command in Terminal:
```bash theme={null}
zsh '/Users//Desktop/bitdefender/bitdefender_cert_generator.zsh'
```
When prompted, enter and verify the password used in the Bitdefender installer settings you defined in your Bitdefender portal.
When the script is finished, you should see the password hash used to generate the certificate. Copy the generated hash and paste it in the password field when creating the Certificate Library Item in Iru Endpoint:
```bash theme={null}
Password hash: 626cacdec63355c2680dbd6747c8d755
```
A Finder.app window should open on your Desktop, showing the **certificate.pfx** file.
Upload this certificate to Iru Endpoint in a [Certificate Library Item](/en/endpoint/library/library-items-profiles/configure-the-certificate-library-item).
 ### Add a Custom Profile Library Item
To add this Library Item to your Iru Endpoint Library, follow the steps outlined in the [Library Overview](/en/endpoint/library/library-items-profiles/library-overview) article.
### Configure the Bitdefender Profiles
Give the profile a Name.
For **Install on**, select Mac.
Assign your Custom Profile to a Blueprint.
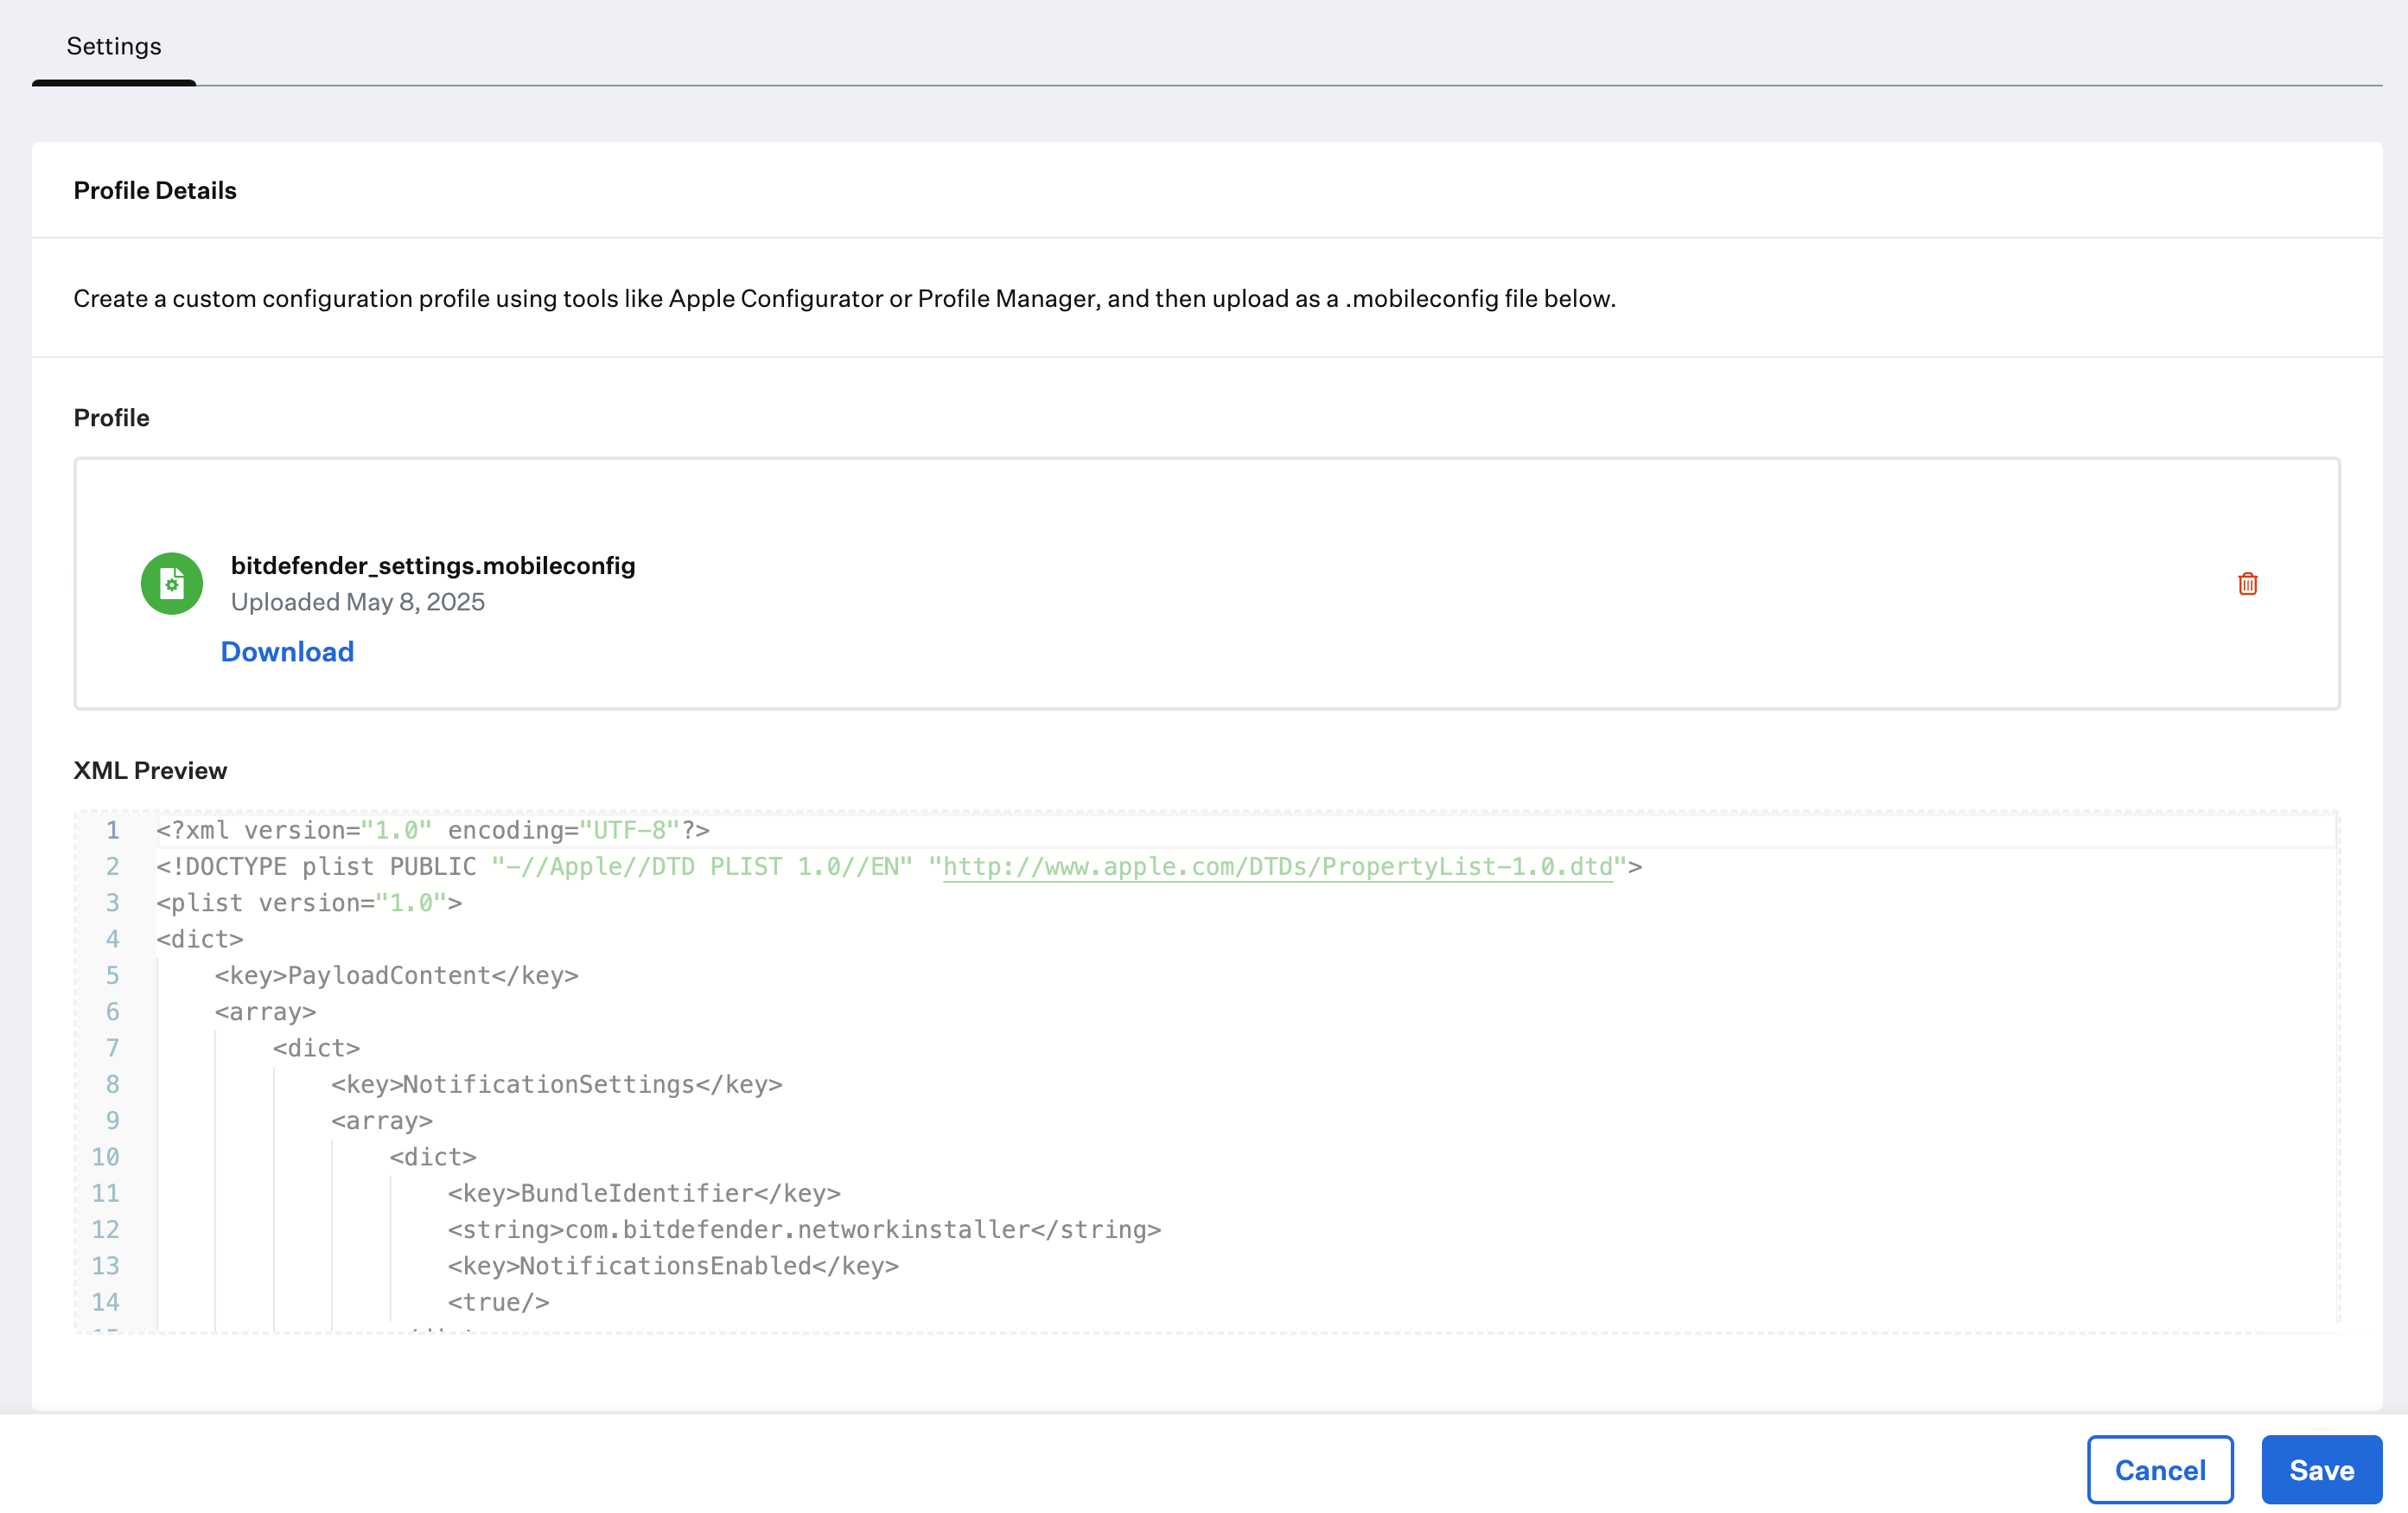
Upload the `bitdefender_settings.mobileconfig` file you downloaded previously.
Click **Save**.
Repeat the previous steps for the `bitdefender_settings_macOS15.mobileconfig` and the `bitdefender_service_management.mobileconfig` files you downloaded in the [prerequisites](/en/endpoint/library/deployment-guides/apple/deploy-bitdefender-endpoint-security-tool-as-a-custom-app#prerequisites) section.
### Add a Custom Profile Library Item
To add this Library Item to your Iru Endpoint Library, follow the steps outlined in the [Library Overview](/en/endpoint/library/library-items-profiles/library-overview) article.
### Configure the Bitdefender Profiles
Give the profile a Name.
For **Install on**, select Mac.
Assign your Custom Profile to a Blueprint.
Upload the `bitdefender_settings.mobileconfig` file you downloaded previously.
Click **Save**.
Repeat the previous steps for the `bitdefender_settings_macOS15.mobileconfig` and the `bitdefender_service_management.mobileconfig` files you downloaded in the [prerequisites](/en/endpoint/library/deployment-guides/apple/deploy-bitdefender-endpoint-security-tool-as-a-custom-app#prerequisites) section.
 ### Zipping the Installer Files
Before uploading the installer files to Iru Endpoint, you will need to zip them up together first.
Go to the Bitdefender installer files that you downloaded from the Bitdefender console earlier. If you downloaded the Intel and Apple ARM DMG files, you might need to mount them first and then pull the installer files out.
Put the installer package(s), **installer.xml** file, and **certificate.pfx** file in the same location, such as your Desktop. Only one **installer.xml** file is needed; either the one from the Intel download or the ARM download will work.
Select all of the files at one time.
Hold the Control(⌃) key and click on the selected files. Then, in the menu, click **Compress**. You should see a dialog showing the compression progress.
An **Archive.zip** file should be created in the same directory. Feel free to rename the file to something like **bitdefender\_install.zip**. This is the file that will be uploaded to Iru Endpoint in the next section.
### Custom App
To add this Library Item to your Iru Endpoint Library, follow the steps outlined in the [Library Overview](/en/endpoint/library/library-items-profiles/library-overview) article.
Give the Custom App a name. Optionally, add a custom icon.
Assign to your desired blueprint.
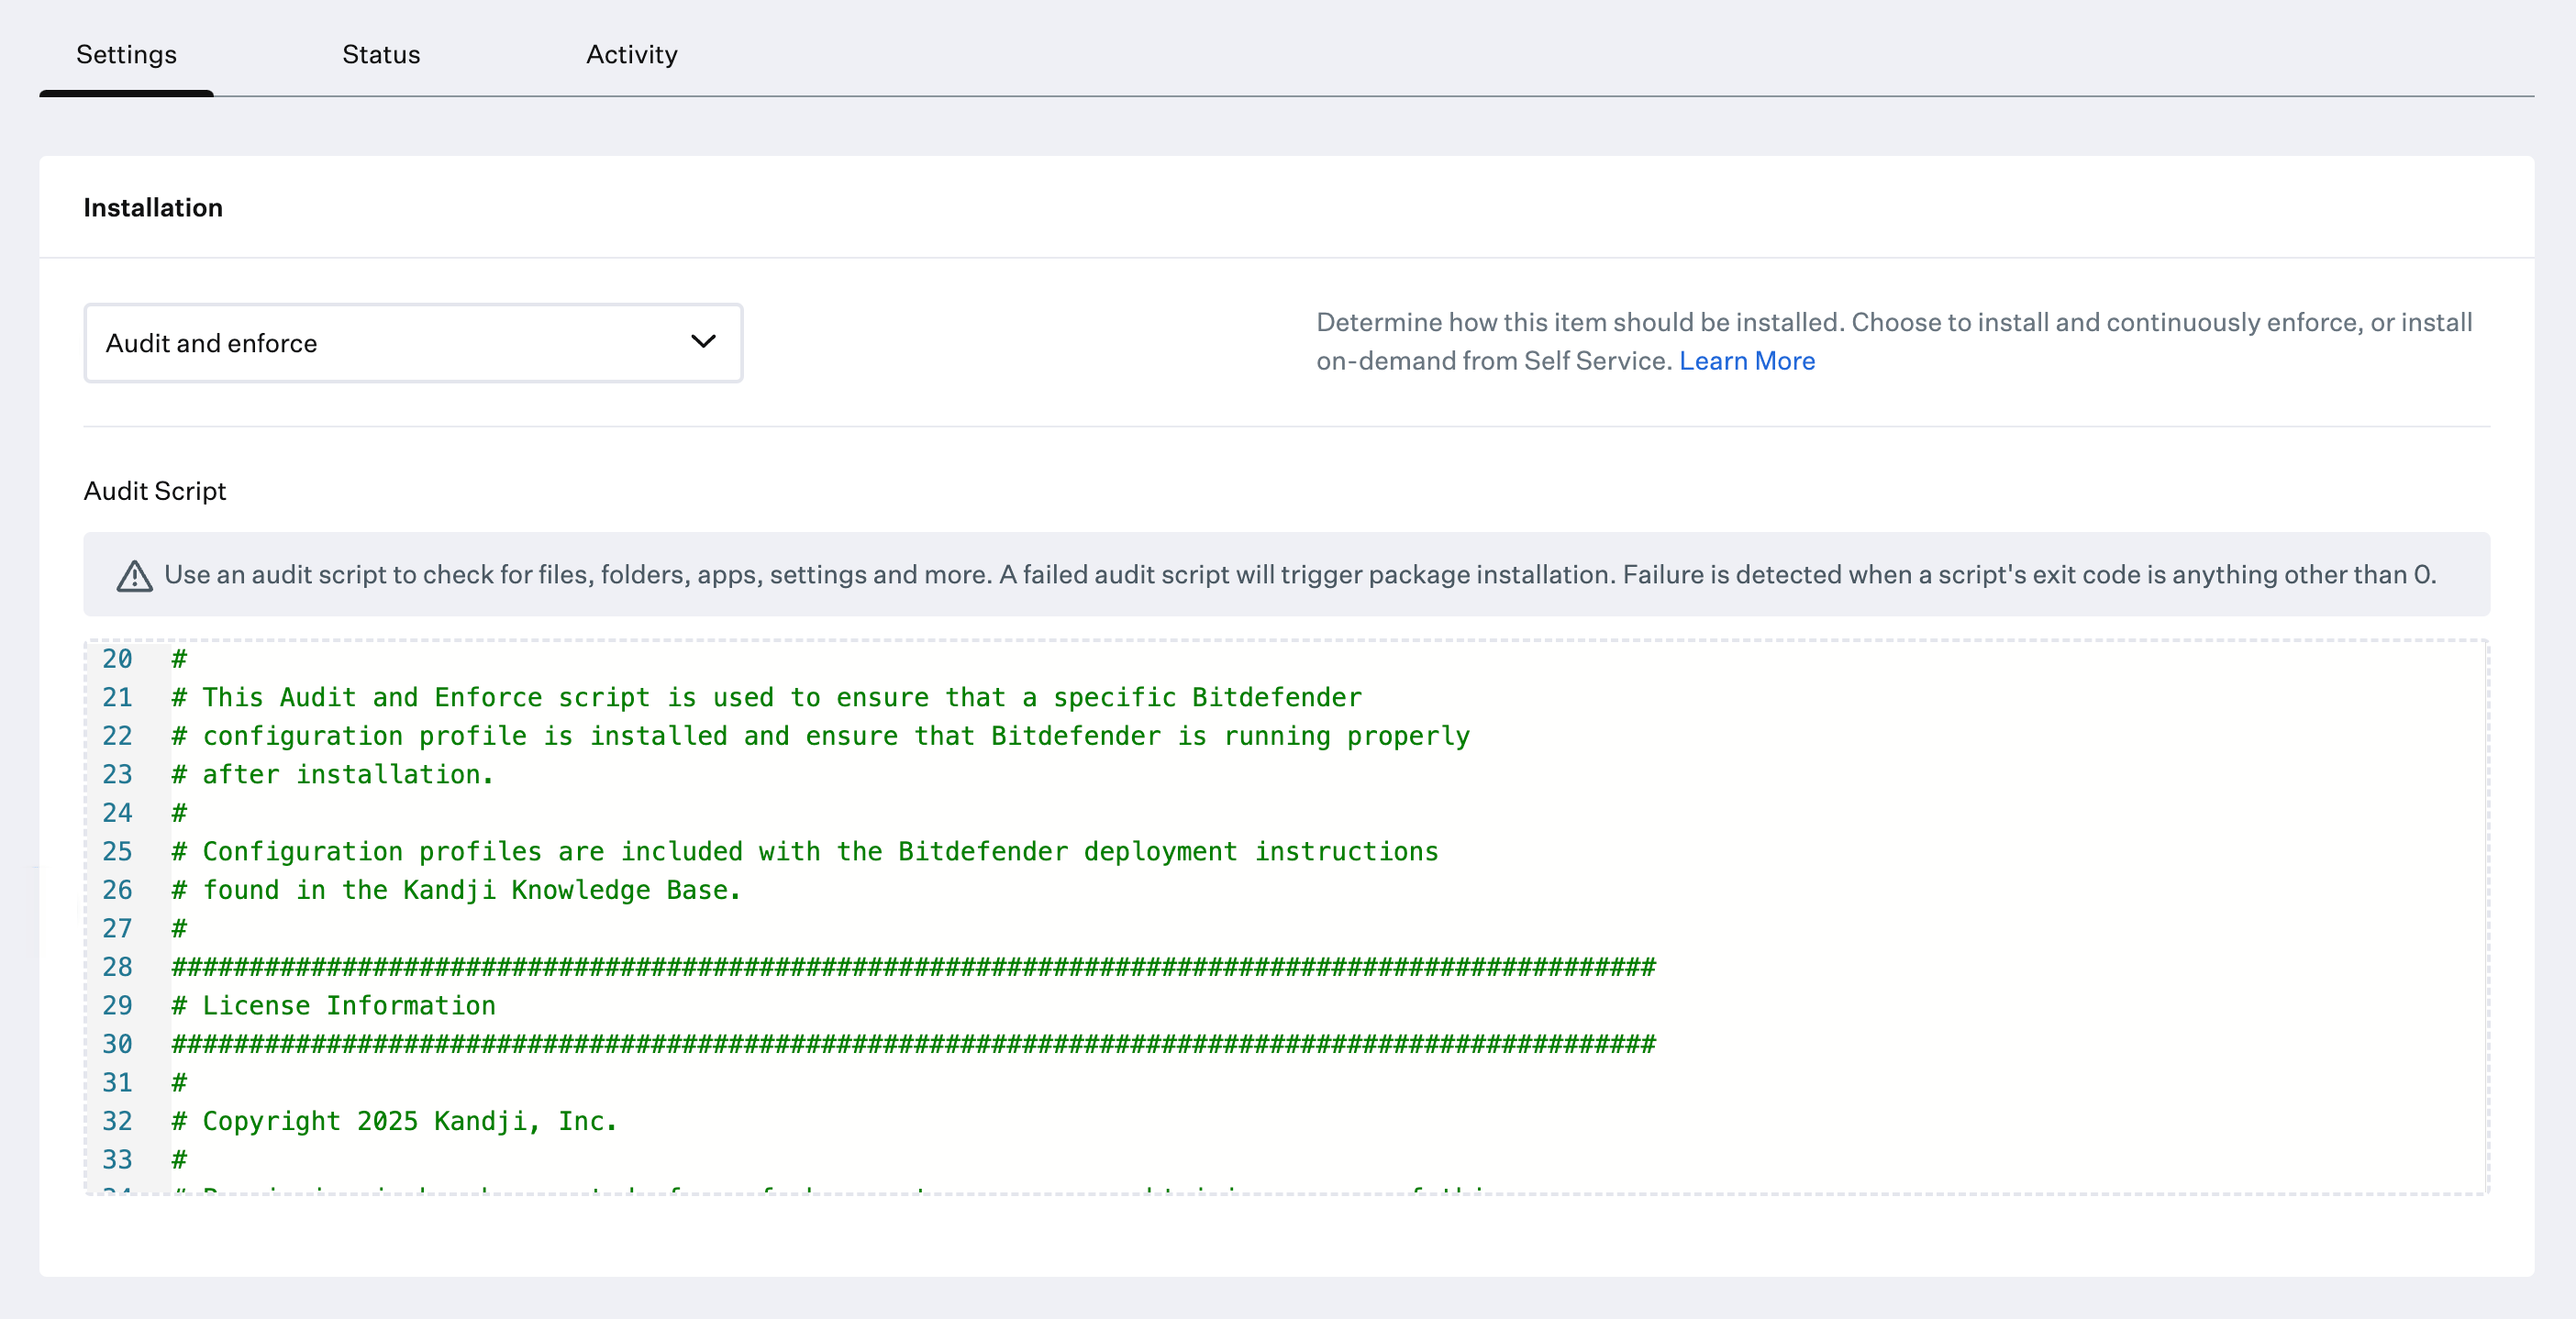
Change the installation type to **Audit and enforce**.
Copy the bitdefender\_ae\_script.zsh script you downloaded in the [prerequisites](/en/endpoint/library/deployment-guides/apple/deploy-bitdefender-endpoint-security-tool-as-a-custom-app#prerequisites) section and paste into the **Audit & Enforce** text box. No modification needed.
The script looks for two profile identifiers and the name of the installed Bitdefender app before attempting an install. Additionally, the script looks for two Launch Daemons on computers where the app is already installed to ensure that the app is running as expected. If you would like to use this script with another profile, update the profile identifier prefix information to match what is in your profile:
```bash lines theme={null}
Settings Profile prefix: io.kandji.bitdefender.D0DF2C14
Background Service Management Profile prefix: io.kandji.bitdefender.service-management
App name: "Endpoint Security for Mac.app"
Processes: "com.bitdefender.epsecurity.BDLDaemonApp", "com.epsecurity.bdldaemon"
```
### Zipping the Installer Files
Before uploading the installer files to Iru Endpoint, you will need to zip them up together first.
Go to the Bitdefender installer files that you downloaded from the Bitdefender console earlier. If you downloaded the Intel and Apple ARM DMG files, you might need to mount them first and then pull the installer files out.
Put the installer package(s), **installer.xml** file, and **certificate.pfx** file in the same location, such as your Desktop. Only one **installer.xml** file is needed; either the one from the Intel download or the ARM download will work.
Select all of the files at one time.
Hold the Control(⌃) key and click on the selected files. Then, in the menu, click **Compress**. You should see a dialog showing the compression progress.
An **Archive.zip** file should be created in the same directory. Feel free to rename the file to something like **bitdefender\_install.zip**. This is the file that will be uploaded to Iru Endpoint in the next section.
### Custom App
To add this Library Item to your Iru Endpoint Library, follow the steps outlined in the [Library Overview](/en/endpoint/library/library-items-profiles/library-overview) article.
Give the Custom App a name. Optionally, add a custom icon.
Assign to your desired blueprint.
Change the installation type to **Audit and enforce**.
Copy the bitdefender\_ae\_script.zsh script you downloaded in the [prerequisites](/en/endpoint/library/deployment-guides/apple/deploy-bitdefender-endpoint-security-tool-as-a-custom-app#prerequisites) section and paste into the **Audit & Enforce** text box. No modification needed.
The script looks for two profile identifiers and the name of the installed Bitdefender app before attempting an install. Additionally, the script looks for two Launch Daemons on computers where the app is already installed to ensure that the app is running as expected. If you would like to use this script with another profile, update the profile identifier prefix information to match what is in your profile:
```bash lines theme={null}
Settings Profile prefix: io.kandji.bitdefender.D0DF2C14
Background Service Management Profile prefix: io.kandji.bitdefender.service-management
App name: "Endpoint Security for Mac.app"
Processes: "com.bitdefender.epsecurity.BDLDaemonApp", "com.epsecurity.bdldaemon"
```
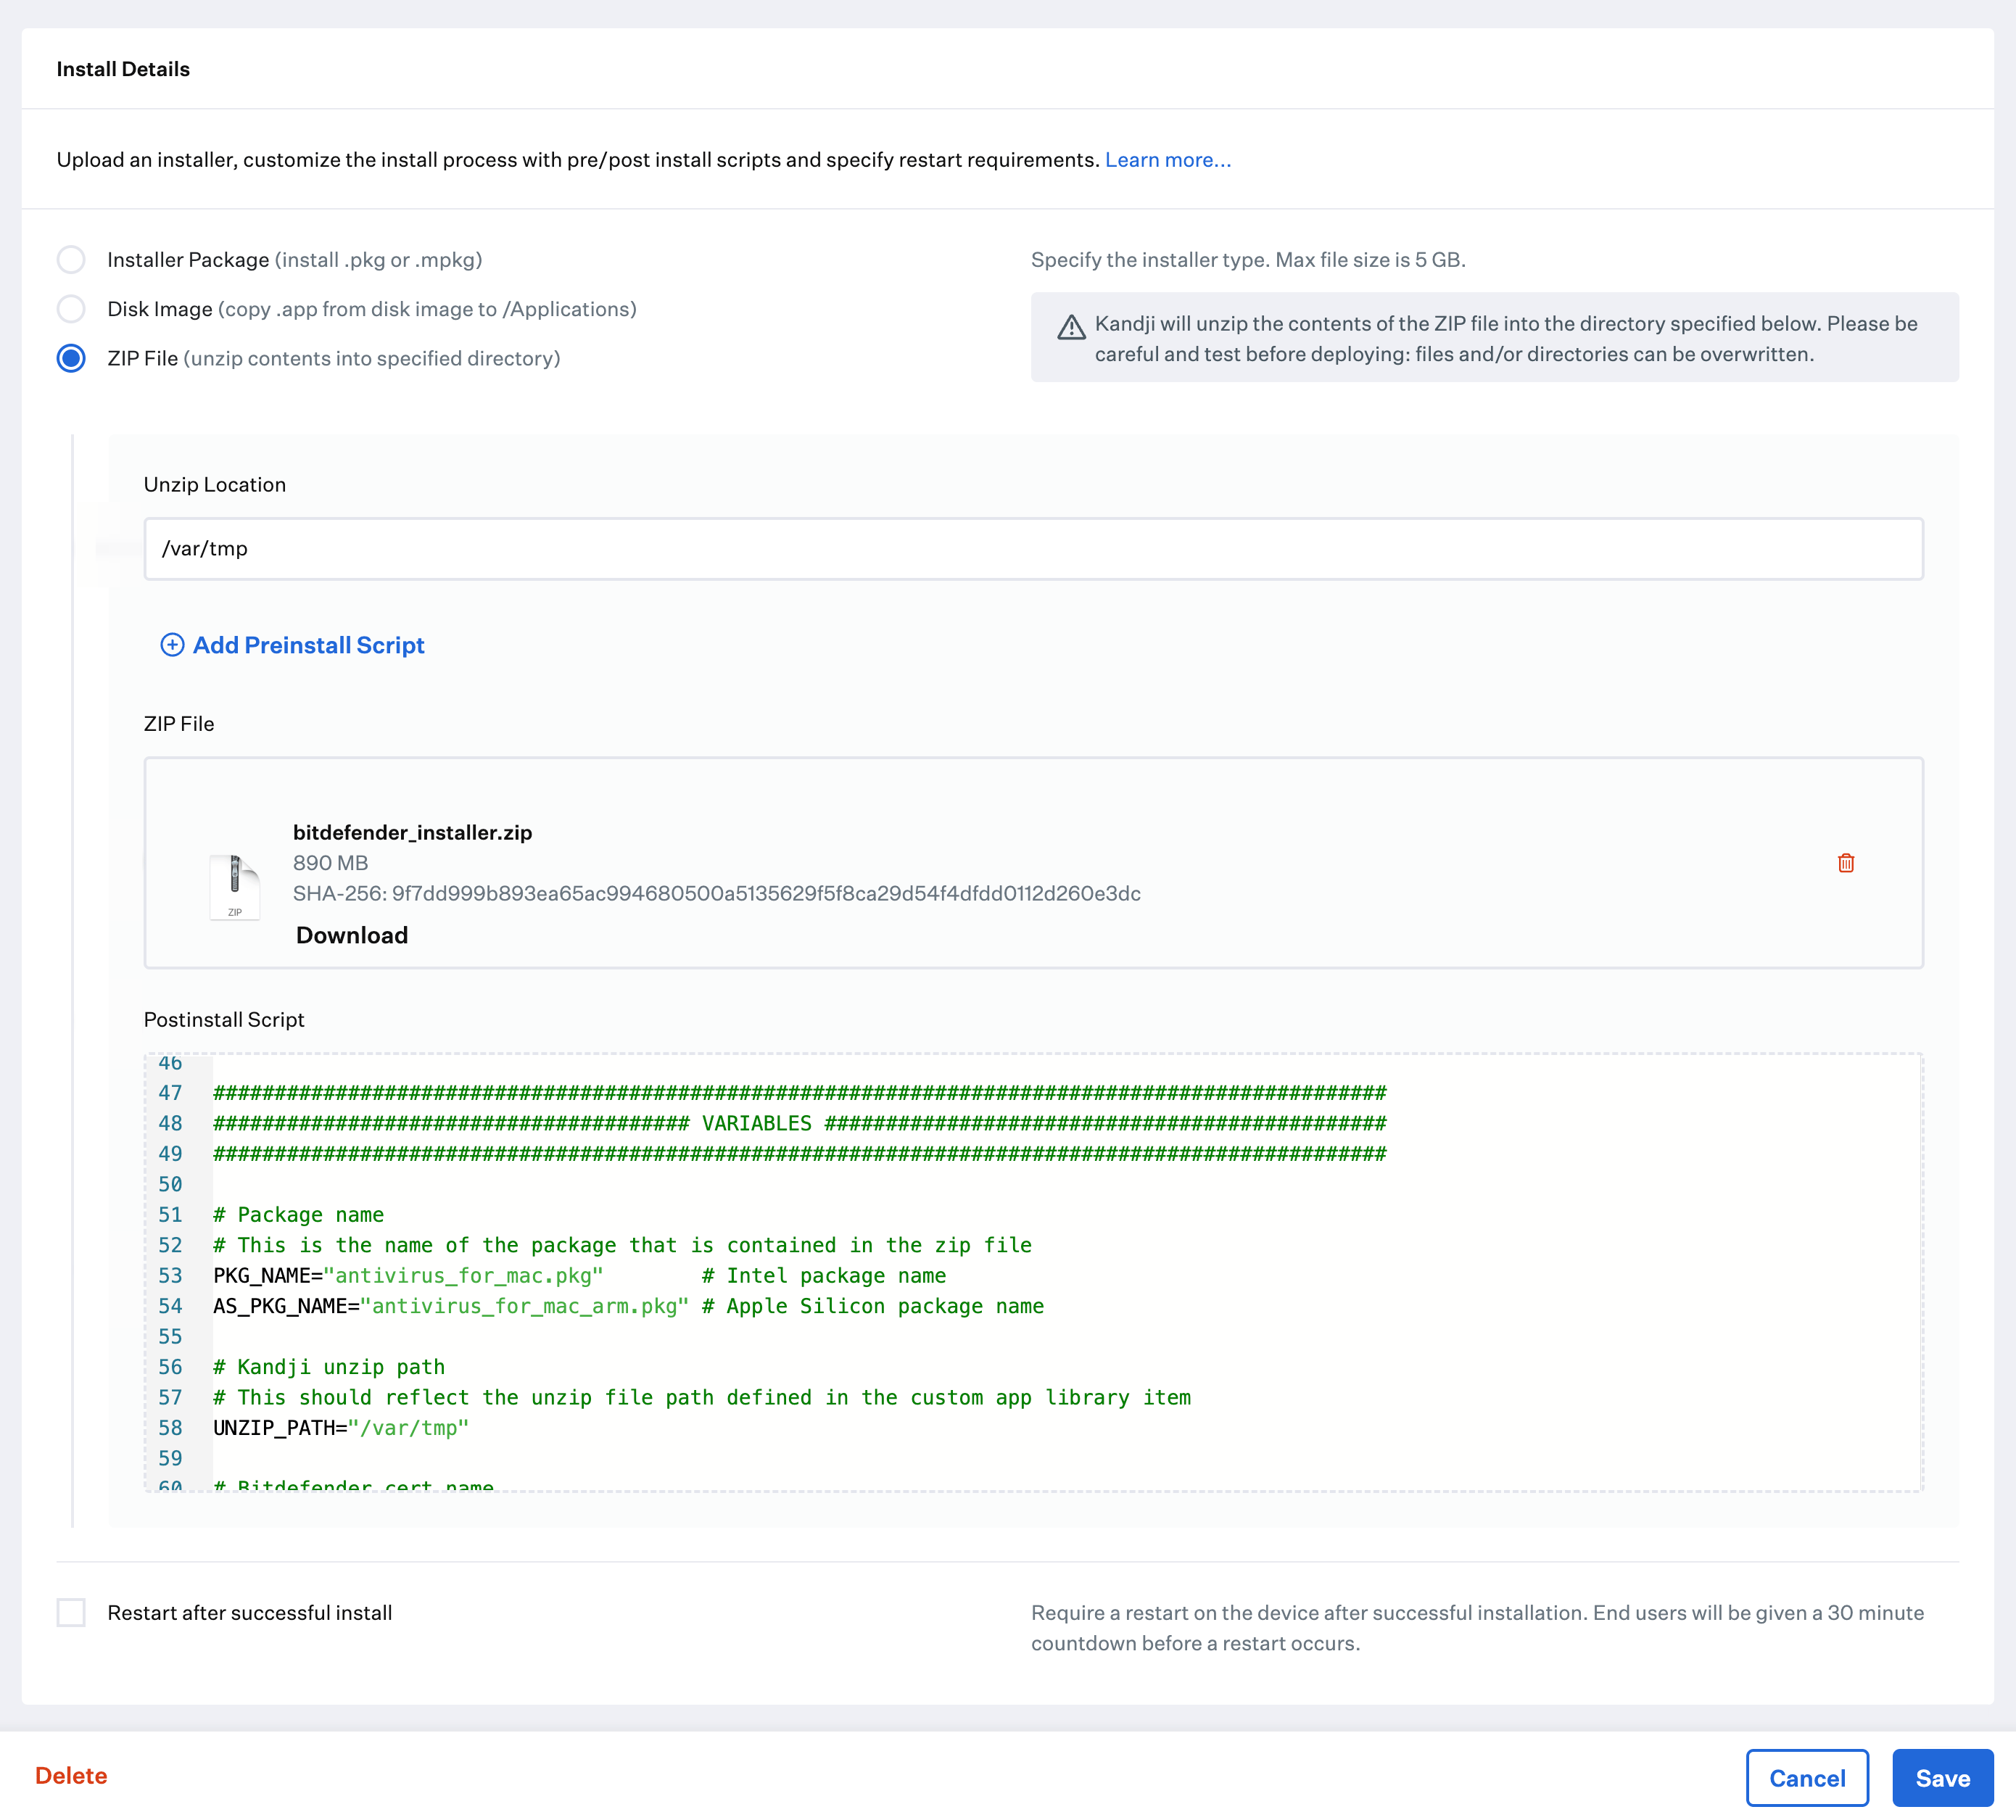
 Select **ZIP File (unzip contents into specified directory)** as the deployment type.
Set the **Unzip Location** to **/var/tmp**.
Upload the installer zip file downloaded earlier.
Click **Add Postinstall Script**.
Copy the post-install script you downloaded in the [prerequisites](/en/endpoint/library/deployment-guides/apple/deploy-bitdefender-endpoint-security-tool-as-a-custom-app#prerequisites) section and paste it into the post-installer text field. Be sure to copy all text, including the #!/bin/sh (shebang) line at the top.
* Ensure that the package names match the names downloaded from Bitdefender
* Ensure that the certificate file name matches the cert file you created using the Bitdefender KB
Click **Save**.
Select **ZIP File (unzip contents into specified directory)** as the deployment type.
Set the **Unzip Location** to **/var/tmp**.
Upload the installer zip file downloaded earlier.
Click **Add Postinstall Script**.
Copy the post-install script you downloaded in the [prerequisites](/en/endpoint/library/deployment-guides/apple/deploy-bitdefender-endpoint-security-tool-as-a-custom-app#prerequisites) section and paste it into the post-installer text field. Be sure to copy all text, including the #!/bin/sh (shebang) line at the top.
* Ensure that the package names match the names downloaded from Bitdefender
* Ensure that the certificate file name matches the cert file you created using the Bitdefender KB
Click **Save**.
 ### Deploying with Assignment Maps
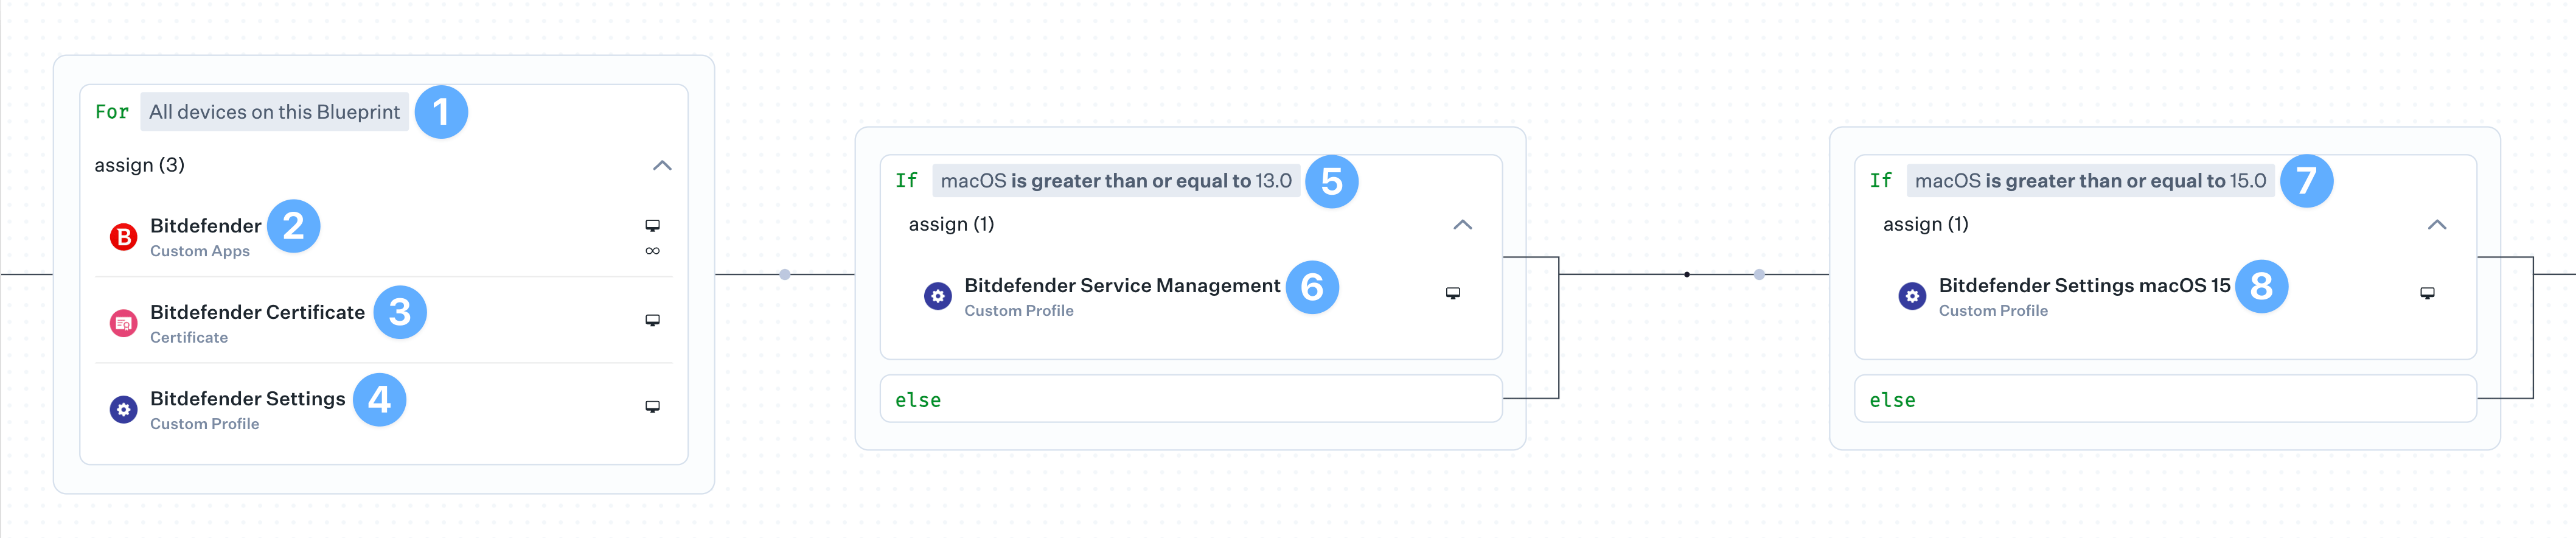
Two of the Bitdefender Custom Profiles need conditional logic to ensure they are deployed to the correct devices. An Assignment Map provides an easy solution for all of your devices in one convenient view.
Please review our [Creating a Blueprint](/en/endpoint/getting-started/blueprints-and-library/configuring-blueprints) and [Using Conditional Logic in Blueprints](/en/endpoint/blueprints/assignment-maps/using-conditional-logic-in-blueprints) articles.
Start with the **For All devices on this Blueprint** conditional block.
Assign the **Bitdefender** **Custom App** to the block.
If multiple Custom Apps are needed, create a conditional block with conditions for the different versions of the installer.
Assign the **Bitdefender Certificate Library Item** to the conditional block.
Assign the **bitdefender\_settings** Custom Profile to the conditional block.
Set the top of the conditional block to **If macOS is greater than or equal to 13.0**.
Assign the **bitdefender\_service\_management** Custom Profile to the conditional block.
Set the top of the conditional block to **If** **macOS is greater than or equal to 15.0**.
Assign the **bitdefender\_settings\_macOS15** Custom Profile to the conditional block.
### Deploying with Assignment Maps
Two of the Bitdefender Custom Profiles need conditional logic to ensure they are deployed to the correct devices. An Assignment Map provides an easy solution for all of your devices in one convenient view.
Please review our [Creating a Blueprint](/en/endpoint/getting-started/blueprints-and-library/configuring-blueprints) and [Using Conditional Logic in Blueprints](/en/endpoint/blueprints/assignment-maps/using-conditional-logic-in-blueprints) articles.
Start with the **For All devices on this Blueprint** conditional block.
Assign the **Bitdefender** **Custom App** to the block.
If multiple Custom Apps are needed, create a conditional block with conditions for the different versions of the installer.
Assign the **Bitdefender Certificate Library Item** to the conditional block.
Assign the **bitdefender\_settings** Custom Profile to the conditional block.
Set the top of the conditional block to **If macOS is greater than or equal to 13.0**.
Assign the **bitdefender\_service\_management** Custom Profile to the conditional block.
Set the top of the conditional block to **If** **macOS is greater than or equal to 15.0**.
Assign the **bitdefender\_settings\_macOS15** Custom Profile to the conditional block.