> ## Documentation Index
> Fetch the complete documentation index at: https://docs.iru.com/llms.txt
> Use this file to discover all available pages before exploring further.
# Single Sign-On with Microsoft Entra ID (SAML)
> Configure SAML-based SSO between Microsoft Entra ID and Iru Endpoint. Set up the enterprise application in Entra and map user attributes for login.
### About Microsoft Entra ID SAML Integration
Microsoft Entra ID SAML integration in Iru Endpoint lets you set up SAML-based SSO integration with Microsoft Entra ID for users accessing Iru Endpoint through their Microsoft Entra ID credentials.
#### How It Works
When users attempt to access Iru Endpoint, they're redirected to Microsoft Entra ID for authentication. After successful authentication, Microsoft Entra ID sends a SAML assertion back to Iru Endpoint, which validates the user's identity and grants access. SSO can be used for [Iru Endpoint Web App](/en/endpoint/getting-started/foundation/admins-and-access) sign-in and for [Require Authentication with Automated Device Enrollment](/en/endpoint/enrollment/configure-require-authentication-for-enrollment).
Note: Microsoft Entra ID [is the new name](https://learn.microsoft.com/en-us/azure/active-directory/fundamentals/new-name) for Azure AD (Azure Active Directory)
### Setting Up the SAML Connection
You'll need to complete the initial setup in Iru Endpoint first to get the configuration information required for Microsoft Entra ID. After copying the Entity ID and ACS URL, switch to the [**Microsoft Entra ID Configuration**](#microsoft-entra-id-configuration) tab and continue with [**Configuring Microsoft Entra ID Application**](#configuring-microsoft-entra-id-application).
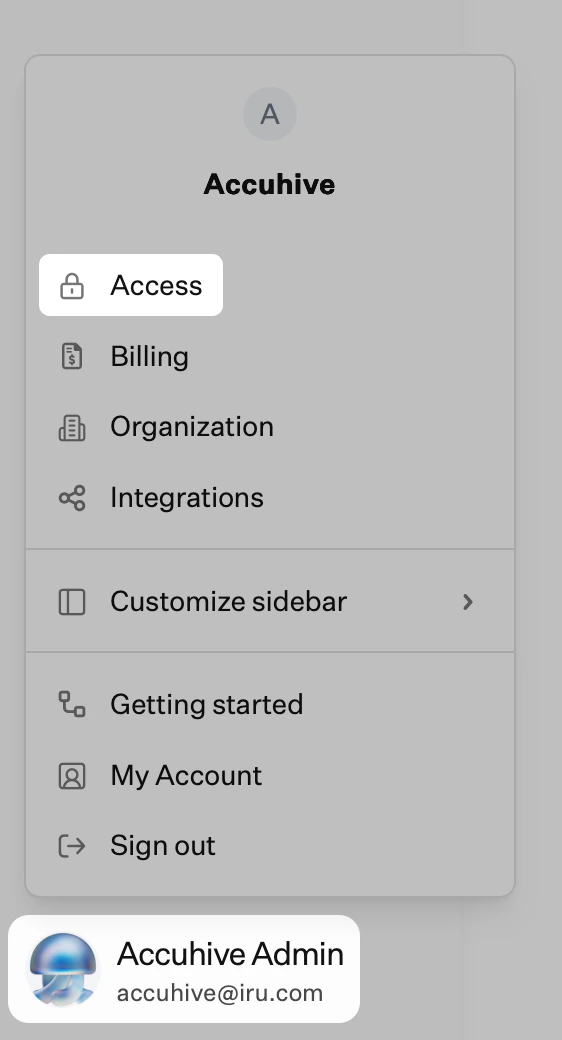
In Iru Endpoint, in the sidebar, click the [**Account Menu Button**](/en/iru/platform-overview/account-menu).
Click the **Access** option in the menu.
 Select the **Admin and authentication** tab (selected by default) and scroll down to **Authentication methods**.
Click **+ Authentication method**.
Enter a display name for the SSO Connection.
Select **SAML** for the Authentication method.
Click **Create**.
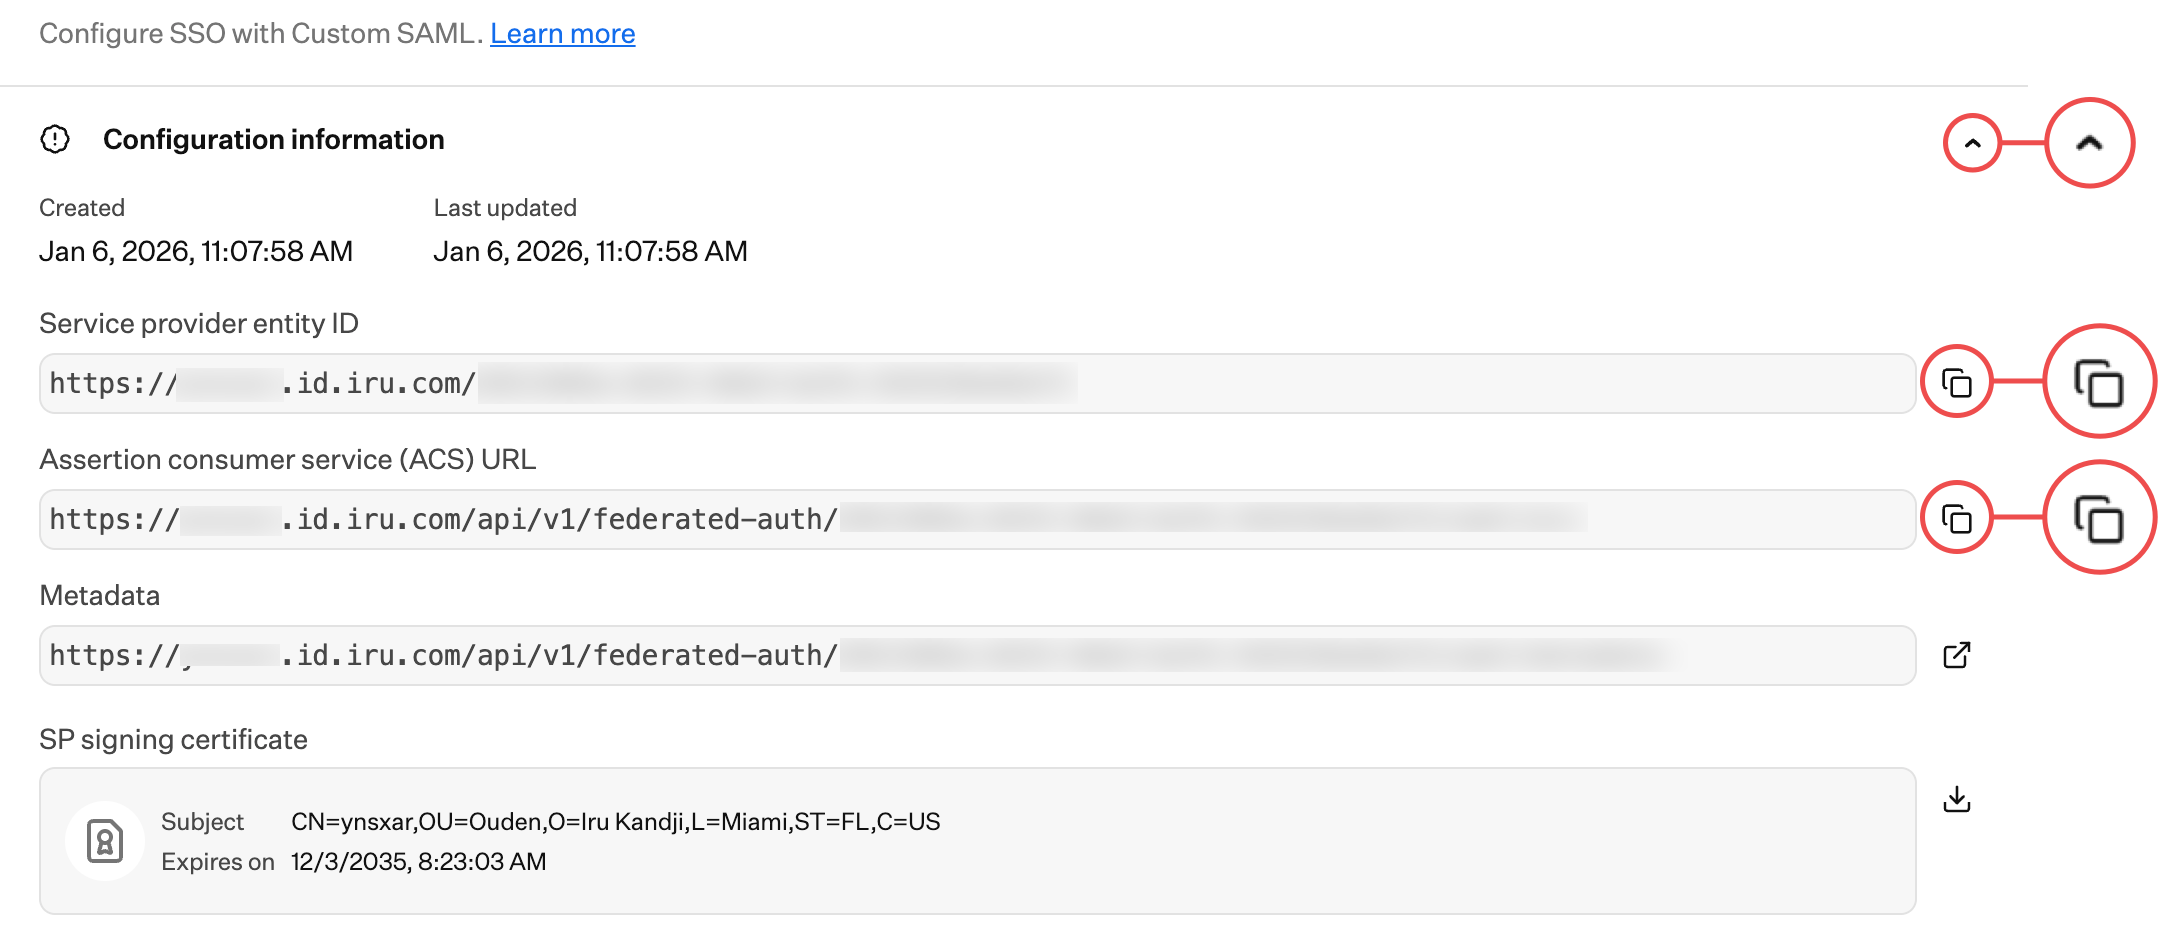
Click **Configuration information** if that section is not already expanded.
Copy the **Service provider entity ID** into a text document for later use. You'll need this for the Entra ID configuration.
Copy the **Assertion consumer service (ACS) URL** into a text document for later use. You'll need this for the Entra ID configuration.
Select the **Admin and authentication** tab (selected by default) and scroll down to **Authentication methods**.
Click **+ Authentication method**.
Enter a display name for the SSO Connection.
Select **SAML** for the Authentication method.
Click **Create**.
Click **Configuration information** if that section is not already expanded.
Copy the **Service provider entity ID** into a text document for later use. You'll need this for the Entra ID configuration.
Copy the **Assertion consumer service (ACS) URL** into a text document for later use. You'll need this for the Entra ID configuration.
 Keep the Iru Endpoint configuration modal open, then switch to the [**Microsoft Entra ID Configuration**](#microsoft-entra-id-configuration) tab to continue with [**Configuring Microsoft Entra ID Application**](#configuring-microsoft-entra-id-application).
### Configuring Iru Endpoint SAML Connection
After completing the Microsoft Entra ID configuration, return here to finish [**Configuring Iru Endpoint SAML Connection**](#configuring-iru-endpoint-saml-connection) in Iru Endpoint. You'll need the Single Sign-on URL, IdP Entity ID, and certificate from Microsoft Entra ID.
Go back to the Custom SAML modal in Iru Endpoint.
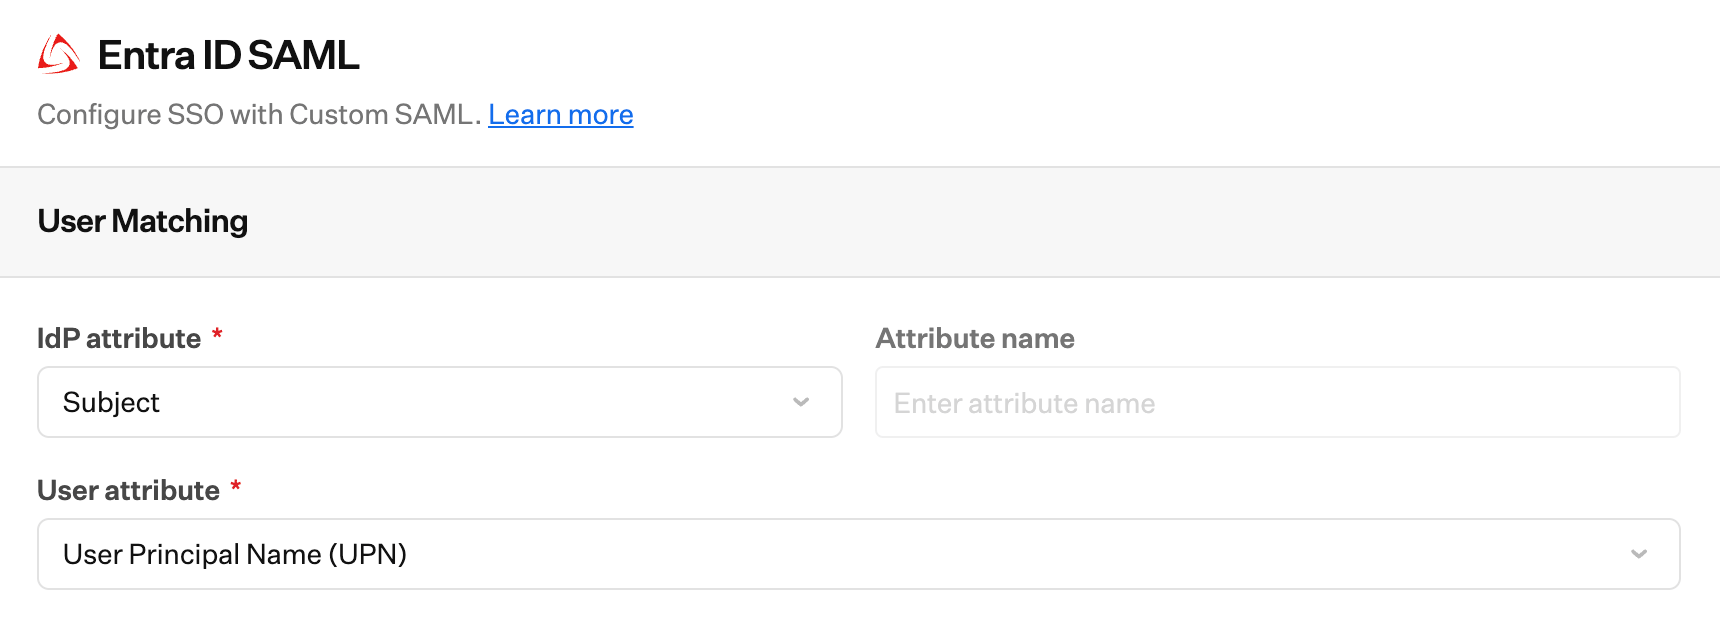
Set **IdP attribute** to **Subject**.
Leave **Attribute name** blank.
Set **User attribute** to **User Principal Name (UPN)**.
Paste the **Microsoft Entra Identifier** you copied earlier into the **IdP Entity ID** field.
Paste in the **Sign In URL** you copied from Entra ID.
Upload the **certificate** you downloaded from Entra ID.
Keep the Iru Endpoint configuration modal open, then switch to the [**Microsoft Entra ID Configuration**](#microsoft-entra-id-configuration) tab to continue with [**Configuring Microsoft Entra ID Application**](#configuring-microsoft-entra-id-application).
### Configuring Iru Endpoint SAML Connection
After completing the Microsoft Entra ID configuration, return here to finish [**Configuring Iru Endpoint SAML Connection**](#configuring-iru-endpoint-saml-connection) in Iru Endpoint. You'll need the Single Sign-on URL, IdP Entity ID, and certificate from Microsoft Entra ID.
Go back to the Custom SAML modal in Iru Endpoint.
Set **IdP attribute** to **Subject**.
Leave **Attribute name** blank.
Set **User attribute** to **User Principal Name (UPN)**.
Paste the **Microsoft Entra Identifier** you copied earlier into the **IdP Entity ID** field.
Paste in the **Sign In URL** you copied from Entra ID.
Upload the **certificate** you downloaded from Entra ID.
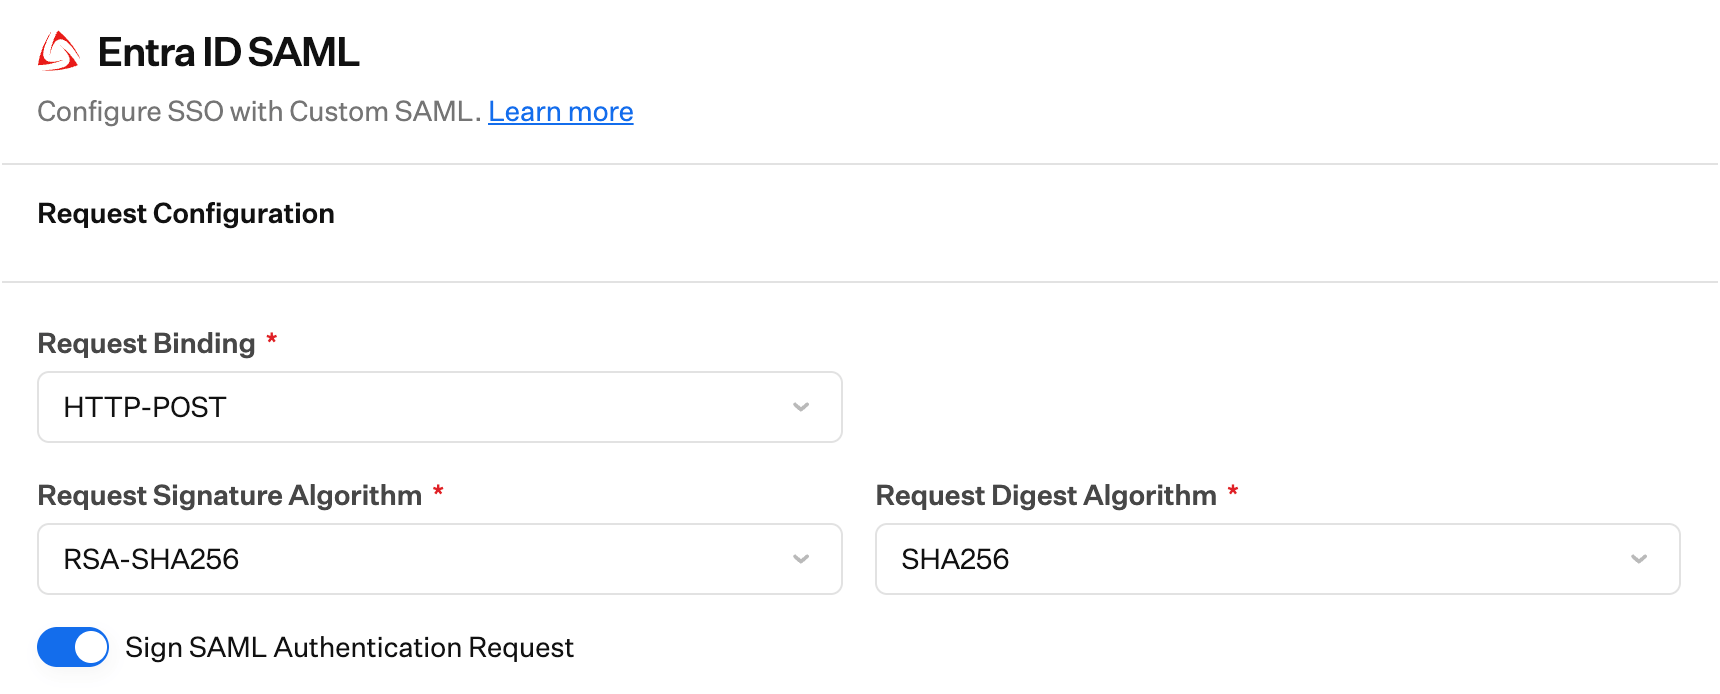
 Set the **Protocol Binding** to **HTTP-POST**.
Ensure that the **Request Algorithm** is set to **RSA-SHA256**.
Ensure that **Sign Request Algorithm Digest** is set to **SHA256**.
Ensure that **Sign Request** is enabled.
Set the **Response Signature Verification** to **Assertion**.
Leave the **Destination** field blank.
Set **Allowed Signature Algorithm** to **RSA-SHA256**.
Set **Allowed Digest Algorithm** to **SHA256**.
Click **Save**.
Set the **Protocol Binding** to **HTTP-POST**.
Ensure that the **Request Algorithm** is set to **RSA-SHA256**.
Ensure that **Sign Request Algorithm Digest** is set to **SHA256**.
Ensure that **Sign Request** is enabled.
Set the **Response Signature Verification** to **Assertion**.
Leave the **Destination** field blank.
Set **Allowed Signature Algorithm** to **RSA-SHA256**.
Set **Allowed Digest Algorithm** to **SHA256**.
Click **Save**.
 ### Allow for Tenant Authentication
Once you have configured the SAML connection in Iru Endpoint and your identity provider, you can allow its use for tenant authentication. For step-by-step instructions, please refer to the **Allowing Tenant Authentication and Managing Connections** section in our [Single Sign-on support article](/en/endpoint/integrations/single-sign-on-integrations/single-sign-on).
### Limit Authentication to Domain
When configuring the SAML connection, you can optionally limit authentication to one or more domains. This can be useful when the SSO connection could authenticate to multiple domains. You can limit the authentication to your Iru tenant to a subset of the available domains.
### Enforcing Single Sign-On
Once you have configured at least one Single Sign-on connection, you can disable Passkey, Google Social, and Microsoft Social connections. Disabling these connections will disable the ability for Iru Endpoint administrators in your tenant to authenticate via those methods. Please refer to our [Single Sign-on support article](/en/endpoint/integrations/single-sign-on-integrations/single-sign-on) for step-by-step instructions.
## Considerations
**Security**: Ensure that your Microsoft Entra ID tenant has appropriate security policies configured for SSO authentication.
**User Management**: Users must exist in both Microsoft Entra ID and Iru Endpoint to successfully authenticate via SSO.
**Testing**: Always test the SSO integration with a small group of users before rolling out to your entire organization.
### Testing the Integration
Add a user to the **Admin Team** in Iru Endpoint by clicking **New User**.
Fill in all of the corresponding user information. This user must exist in Microsoft Entra ID and must be assigned to the Iru Endpoint SSO app in your Microsoft Entra ID tenant.
Click **Submit**.
Once the invite is submitted, close the Invite User window.
Refresh the Access page in Iru Endpoint. You should see the user you just added.
Check the user's email to accept the invitation and log into Iru Endpoint with the new SAML SSO connection.
Before starting the Microsoft Entra ID configuration, complete [**Setting Up the SAML Connection**](#setting-up-the-saml-connection) in the [**Iru Web App Configuration**](#iru-web-app-configuration) tab to get the Service Provider Entity ID and ACS URL. You'll need these values to configure the Microsoft Entra ID application.
### Configuring Microsoft Entra ID Application
Sign in to the [Microsoft Entra admin center](https://entra.microsoft.com).
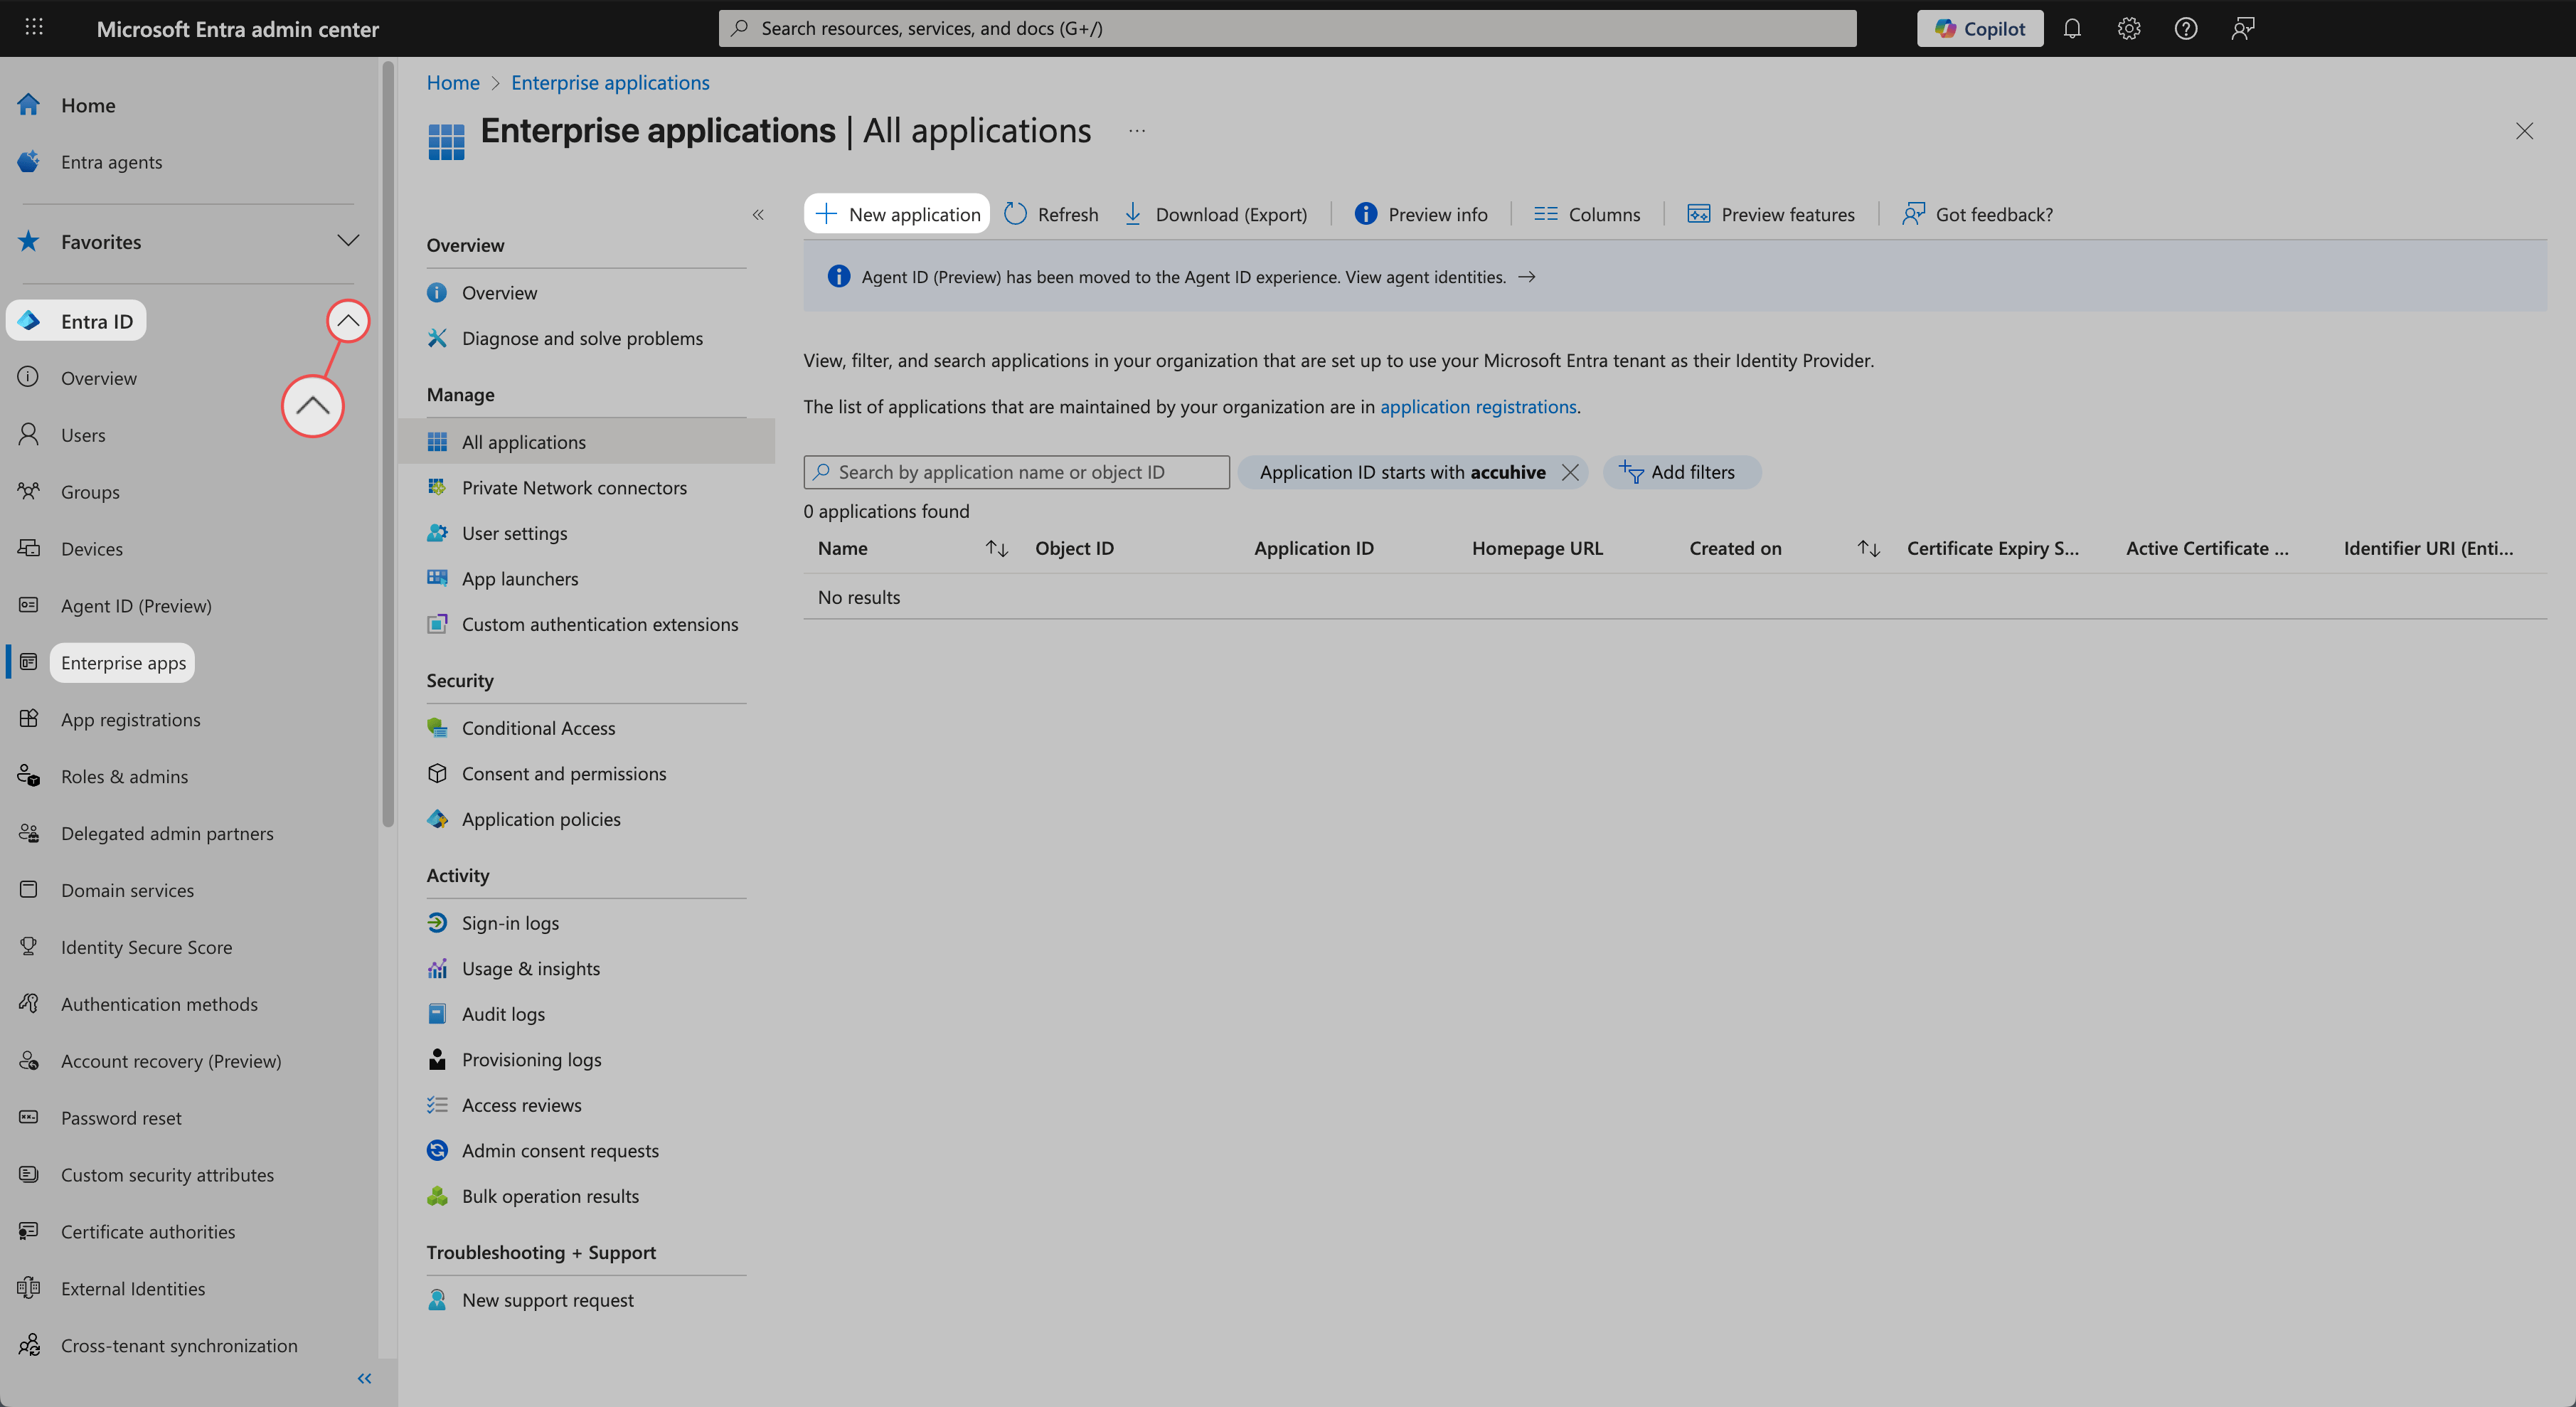
In the left navigation bar, ensure that the **Entra ID** section is expanded.
In the left navigation bar, click **Enterprise apps**.
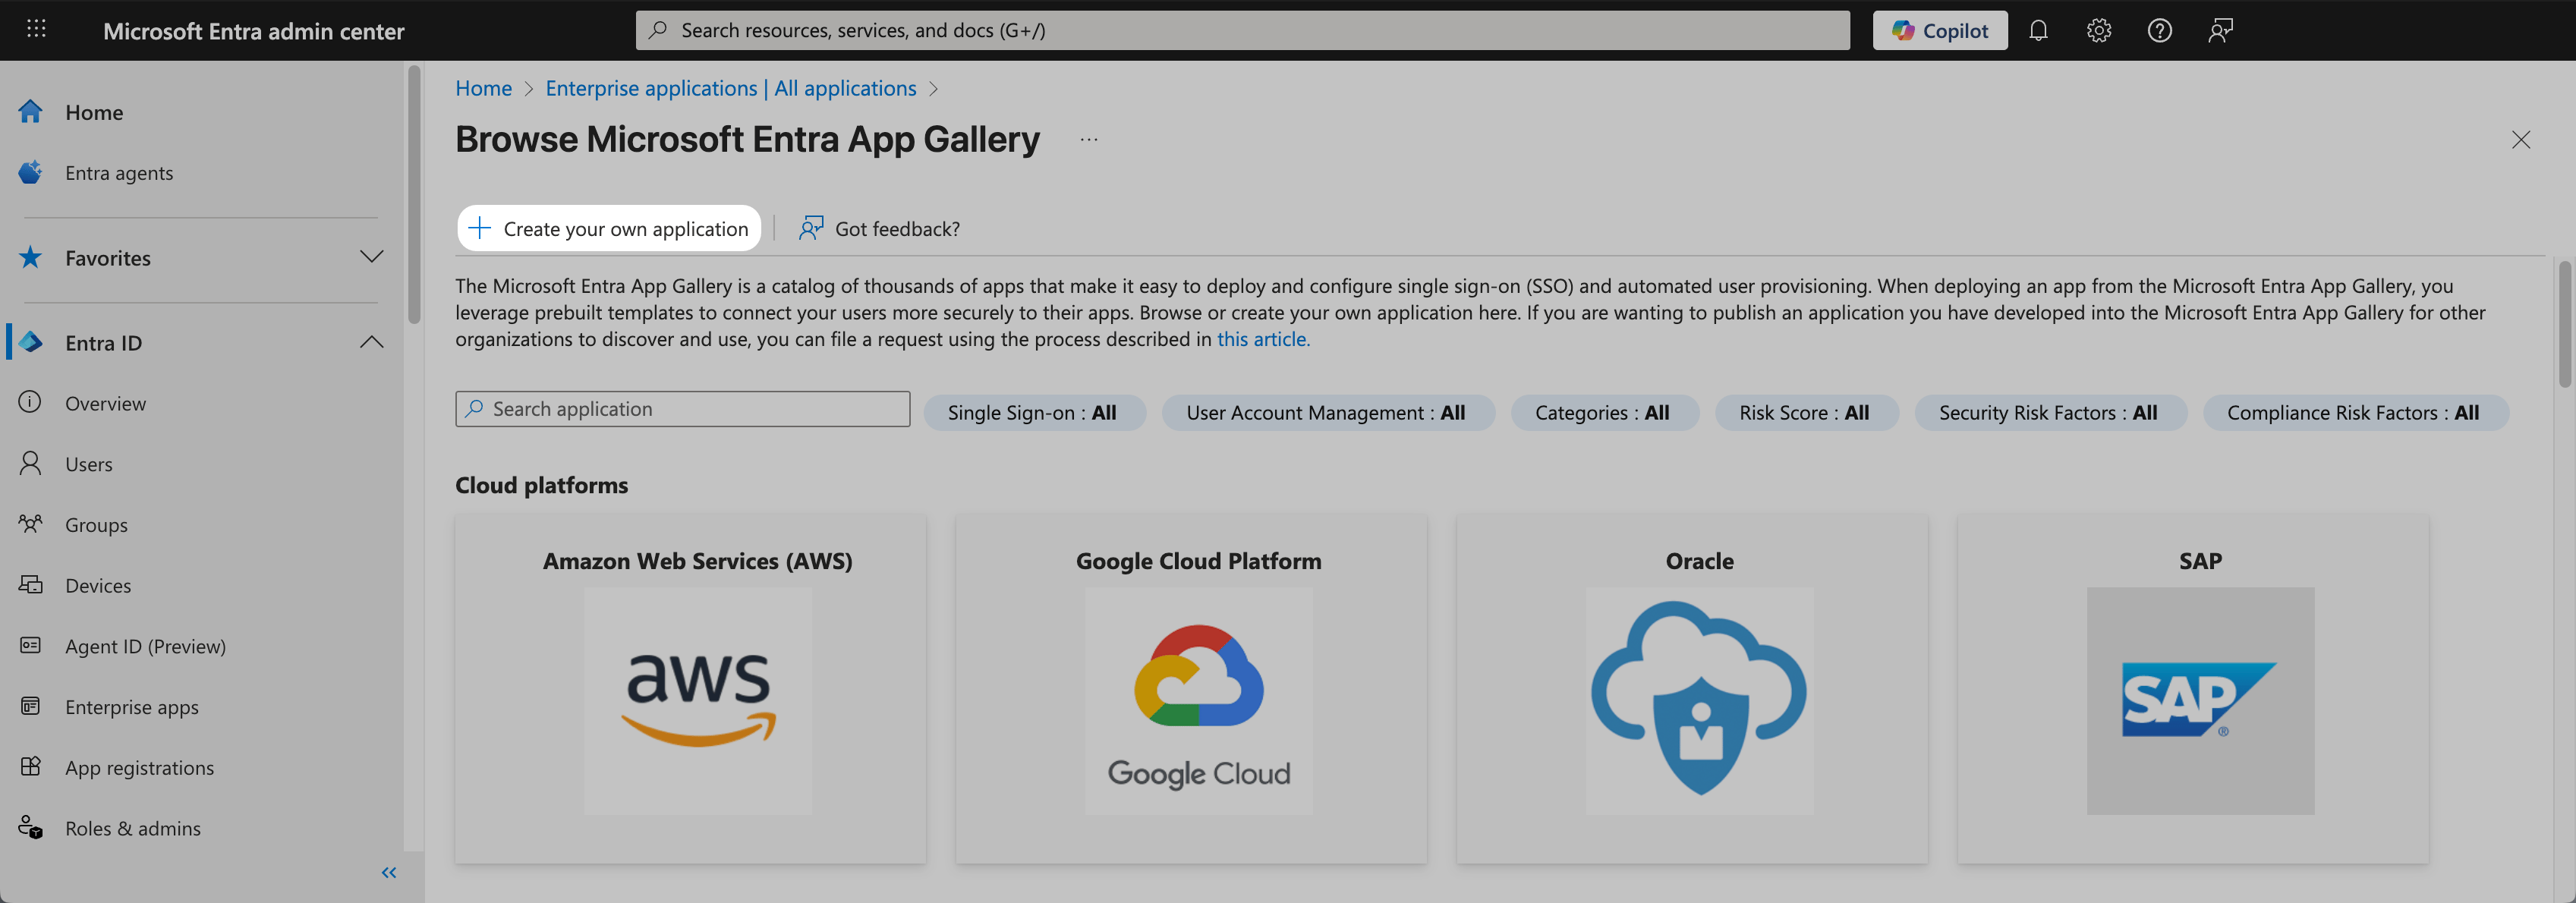
Select **+ New application**.
### Allow for Tenant Authentication
Once you have configured the SAML connection in Iru Endpoint and your identity provider, you can allow its use for tenant authentication. For step-by-step instructions, please refer to the **Allowing Tenant Authentication and Managing Connections** section in our [Single Sign-on support article](/en/endpoint/integrations/single-sign-on-integrations/single-sign-on).
### Limit Authentication to Domain
When configuring the SAML connection, you can optionally limit authentication to one or more domains. This can be useful when the SSO connection could authenticate to multiple domains. You can limit the authentication to your Iru tenant to a subset of the available domains.
### Enforcing Single Sign-On
Once you have configured at least one Single Sign-on connection, you can disable Passkey, Google Social, and Microsoft Social connections. Disabling these connections will disable the ability for Iru Endpoint administrators in your tenant to authenticate via those methods. Please refer to our [Single Sign-on support article](/en/endpoint/integrations/single-sign-on-integrations/single-sign-on) for step-by-step instructions.
## Considerations
**Security**: Ensure that your Microsoft Entra ID tenant has appropriate security policies configured for SSO authentication.
**User Management**: Users must exist in both Microsoft Entra ID and Iru Endpoint to successfully authenticate via SSO.
**Testing**: Always test the SSO integration with a small group of users before rolling out to your entire organization.
### Testing the Integration
Add a user to the **Admin Team** in Iru Endpoint by clicking **New User**.
Fill in all of the corresponding user information. This user must exist in Microsoft Entra ID and must be assigned to the Iru Endpoint SSO app in your Microsoft Entra ID tenant.
Click **Submit**.
Once the invite is submitted, close the Invite User window.
Refresh the Access page in Iru Endpoint. You should see the user you just added.
Check the user's email to accept the invitation and log into Iru Endpoint with the new SAML SSO connection.
Before starting the Microsoft Entra ID configuration, complete [**Setting Up the SAML Connection**](#setting-up-the-saml-connection) in the [**Iru Web App Configuration**](#iru-web-app-configuration) tab to get the Service Provider Entity ID and ACS URL. You'll need these values to configure the Microsoft Entra ID application.
### Configuring Microsoft Entra ID Application
Sign in to the [Microsoft Entra admin center](https://entra.microsoft.com).
In the left navigation bar, ensure that the **Entra ID** section is expanded.
In the left navigation bar, click **Enterprise apps**.
Select **+ New application**.
 Select **Create your own application**.
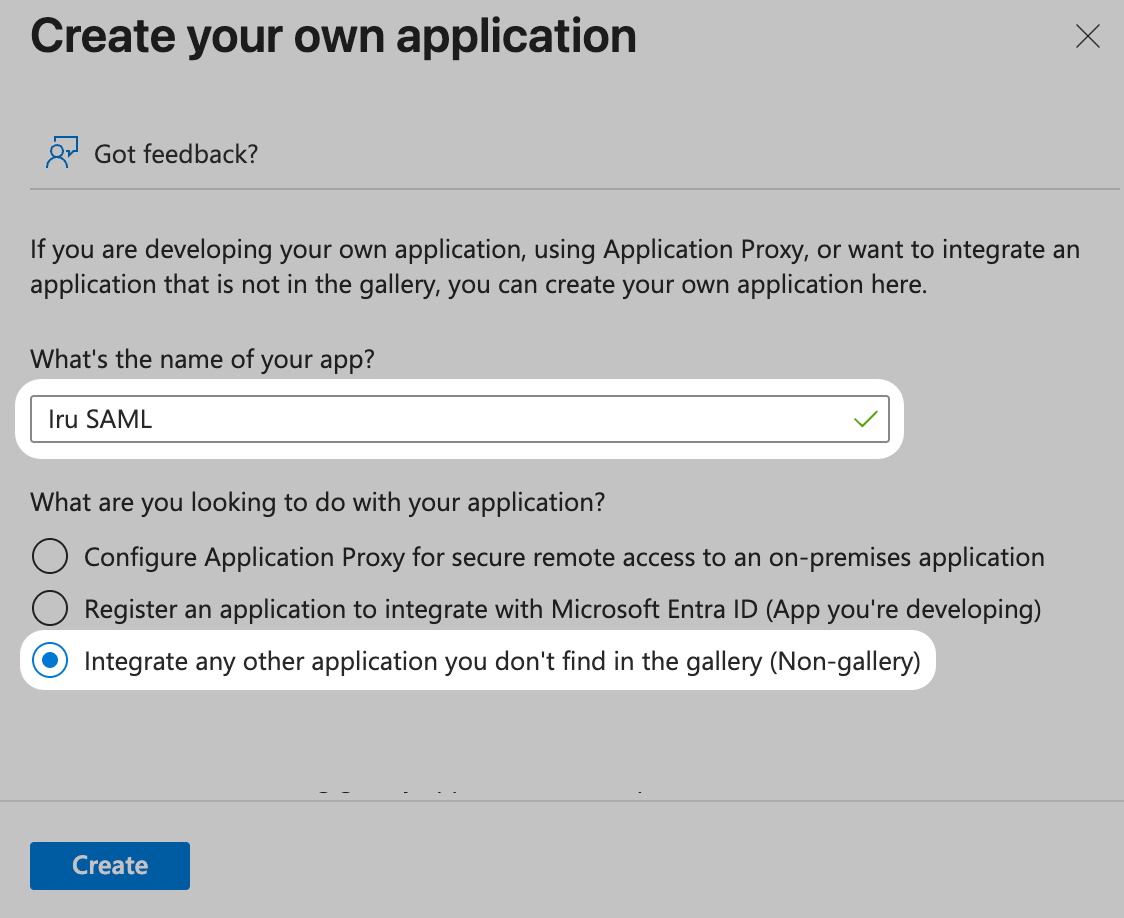
 Give the application a **name**.
Select **Integrate any other application you don't find in the gallery (Non-gallery)**.
Click **Create**.
Give the application a **name**.
Select **Integrate any other application you don't find in the gallery (Non-gallery)**.
Click **Create**.
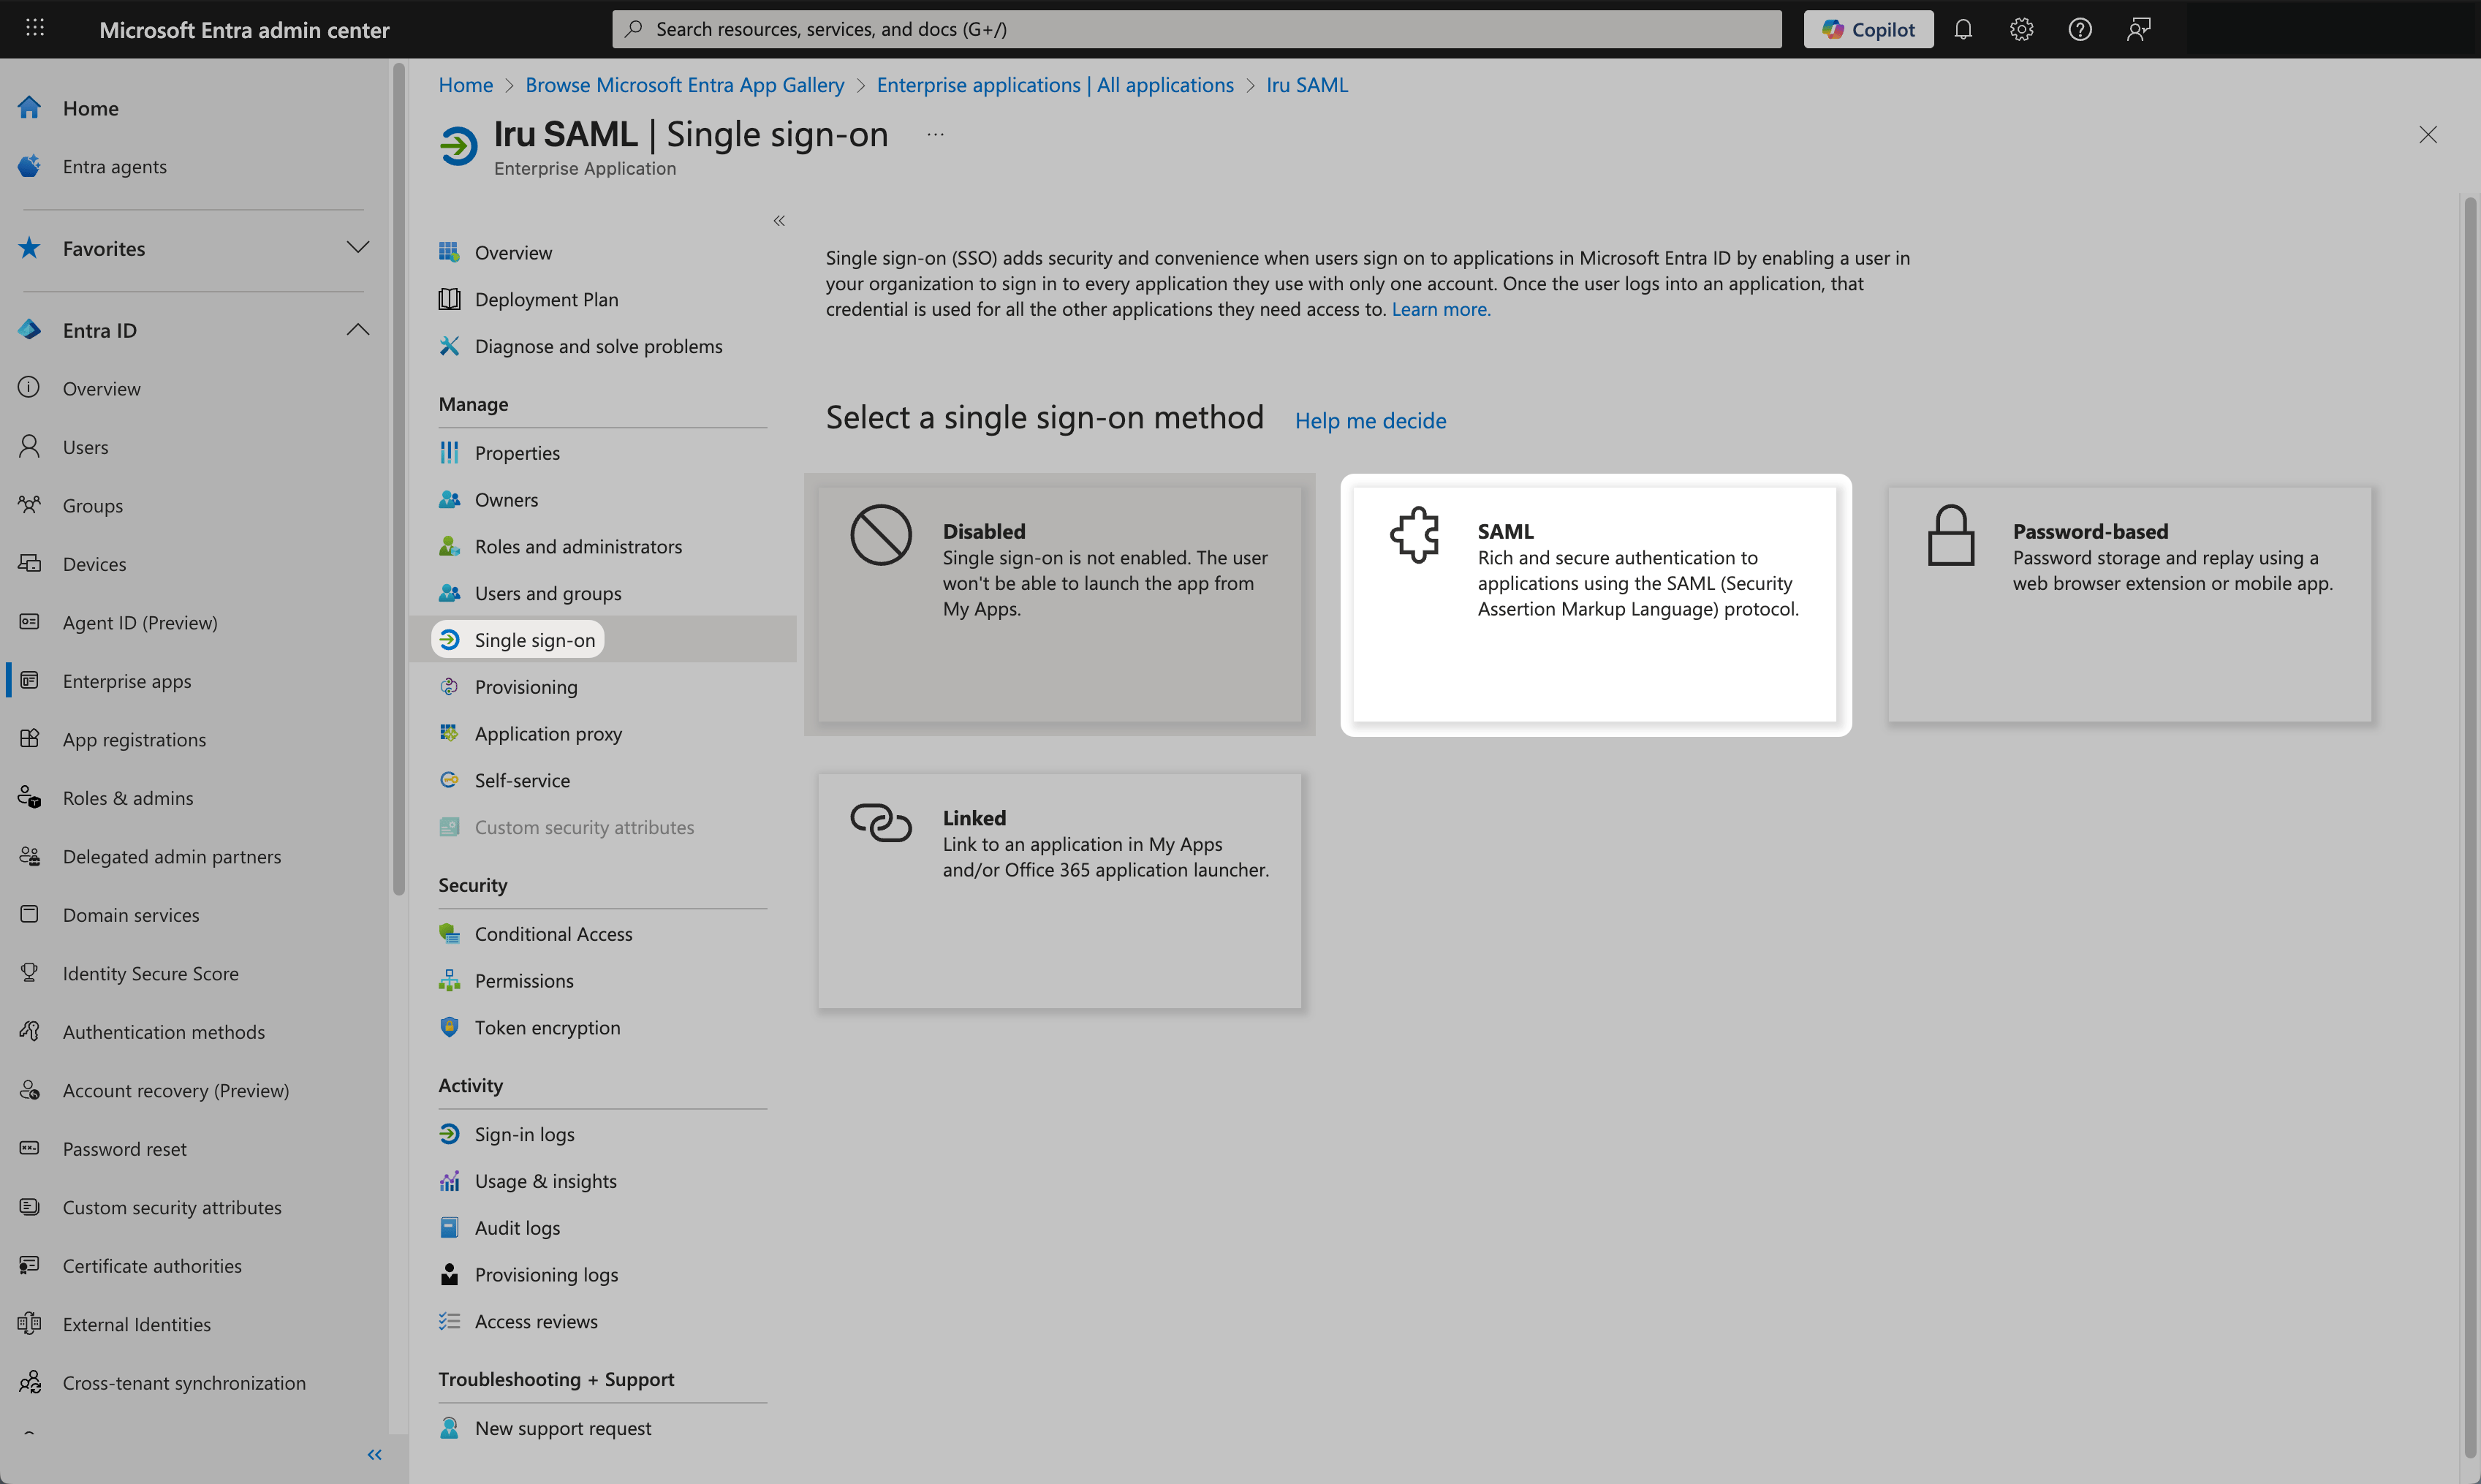
 Under **Manage**, select **Single sign-on**.
Select the **SAML** tile.
Under **Manage**, select **Single sign-on**.
Select the **SAML** tile.
 Click the **Edit** pencil in the Basic SAML configuration box
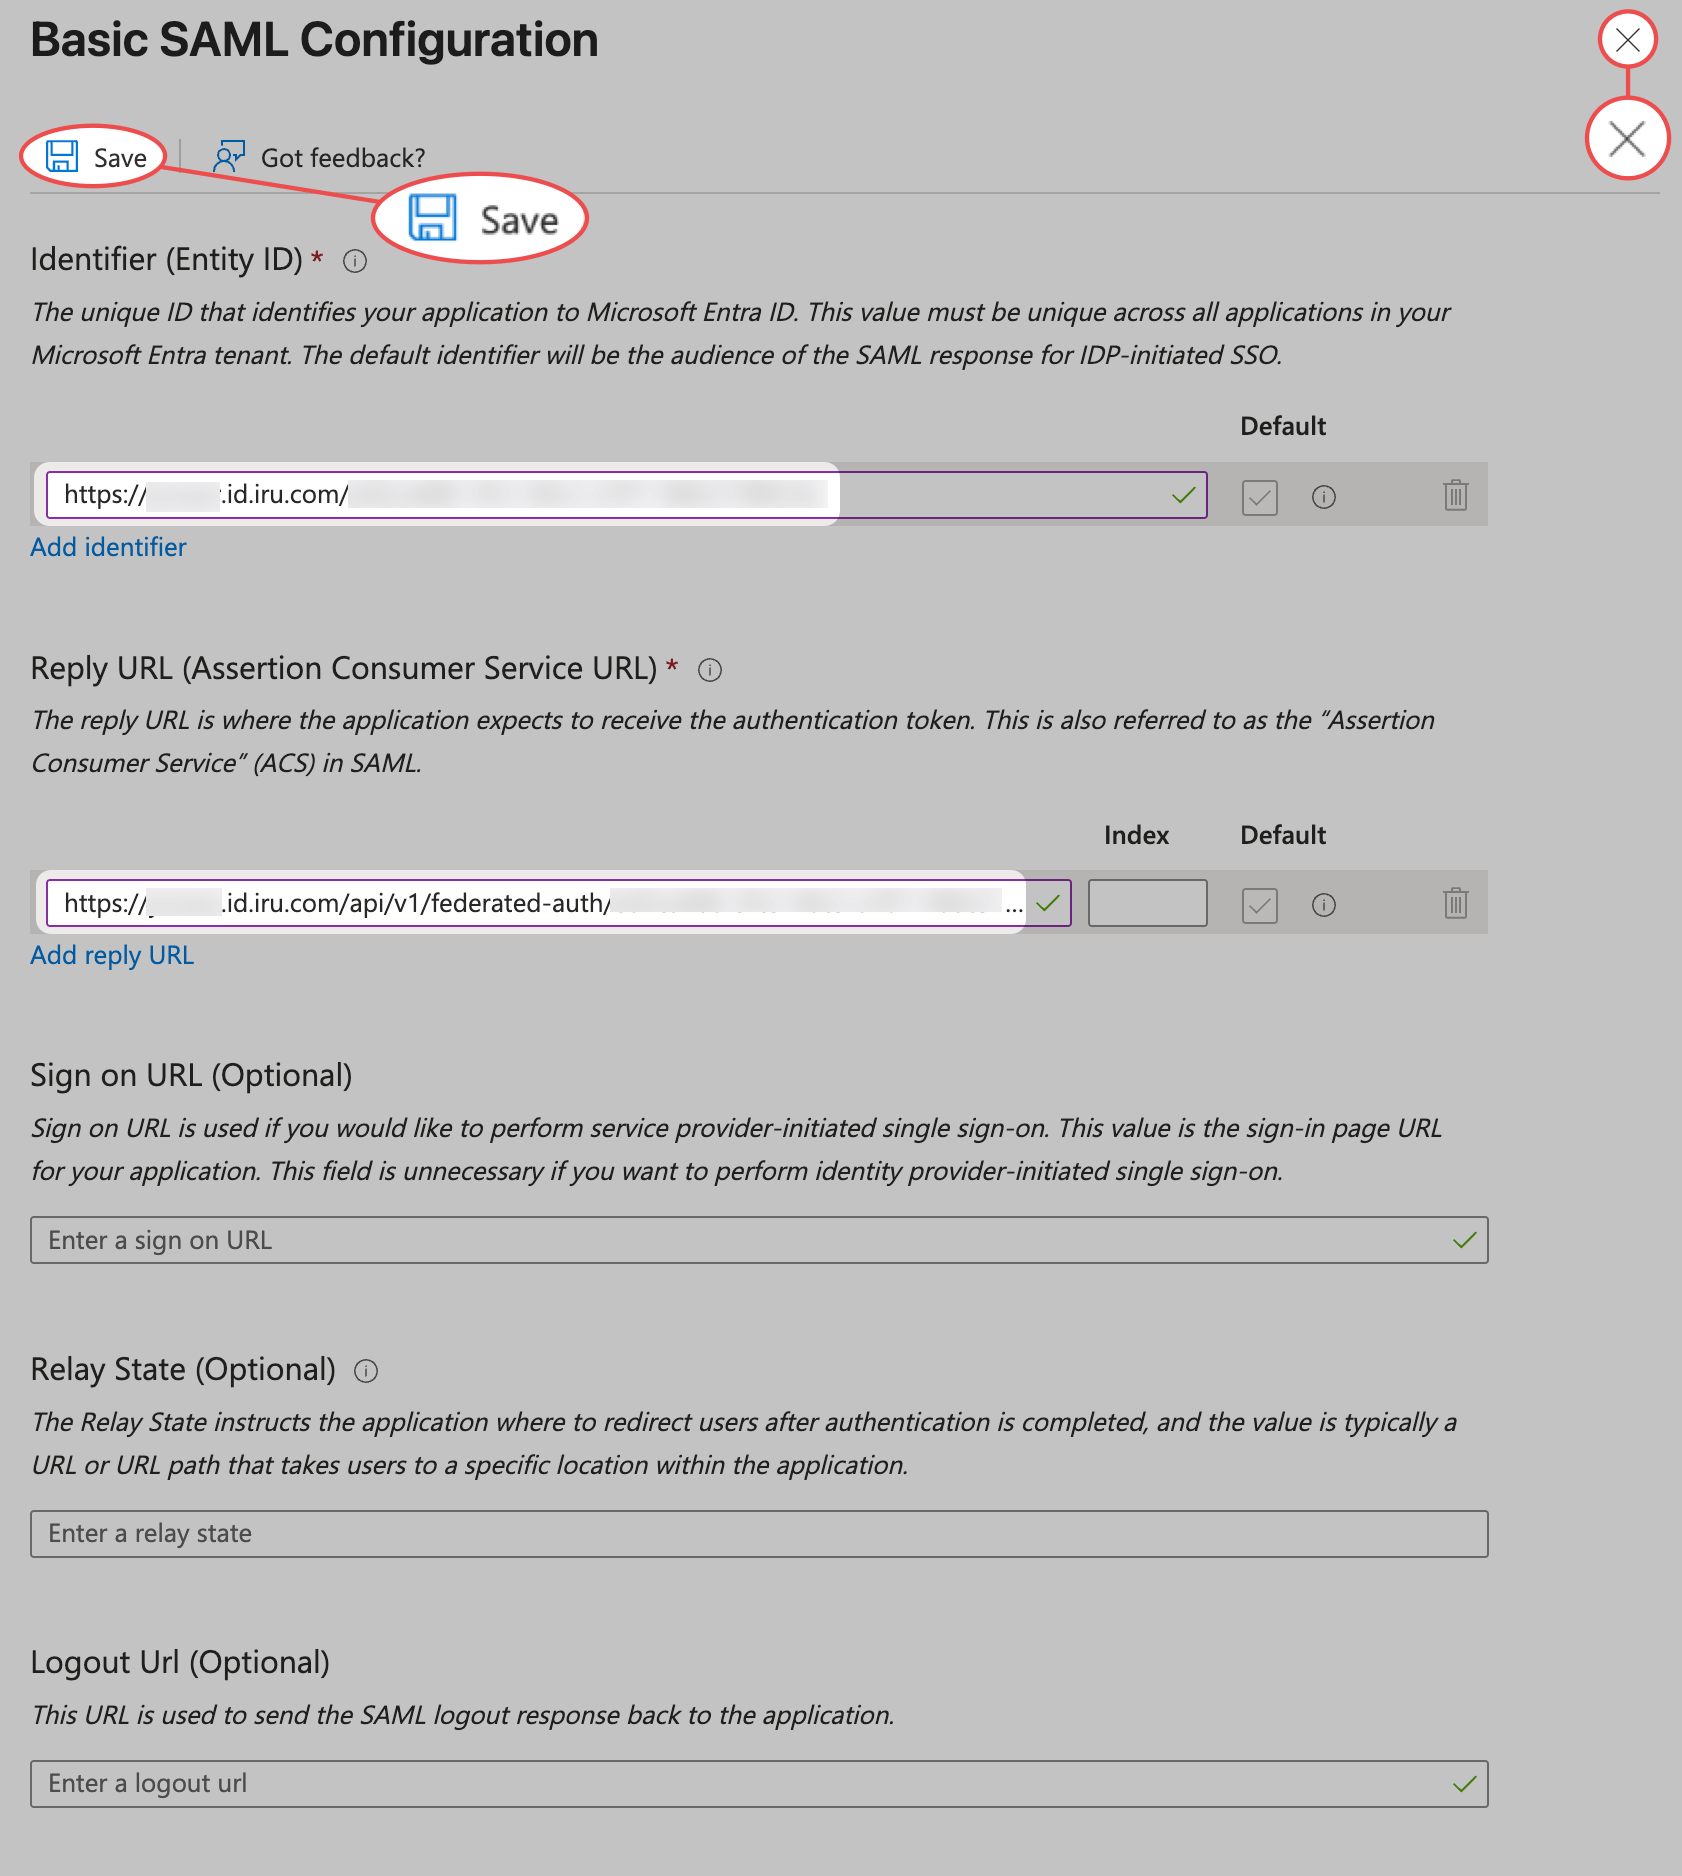
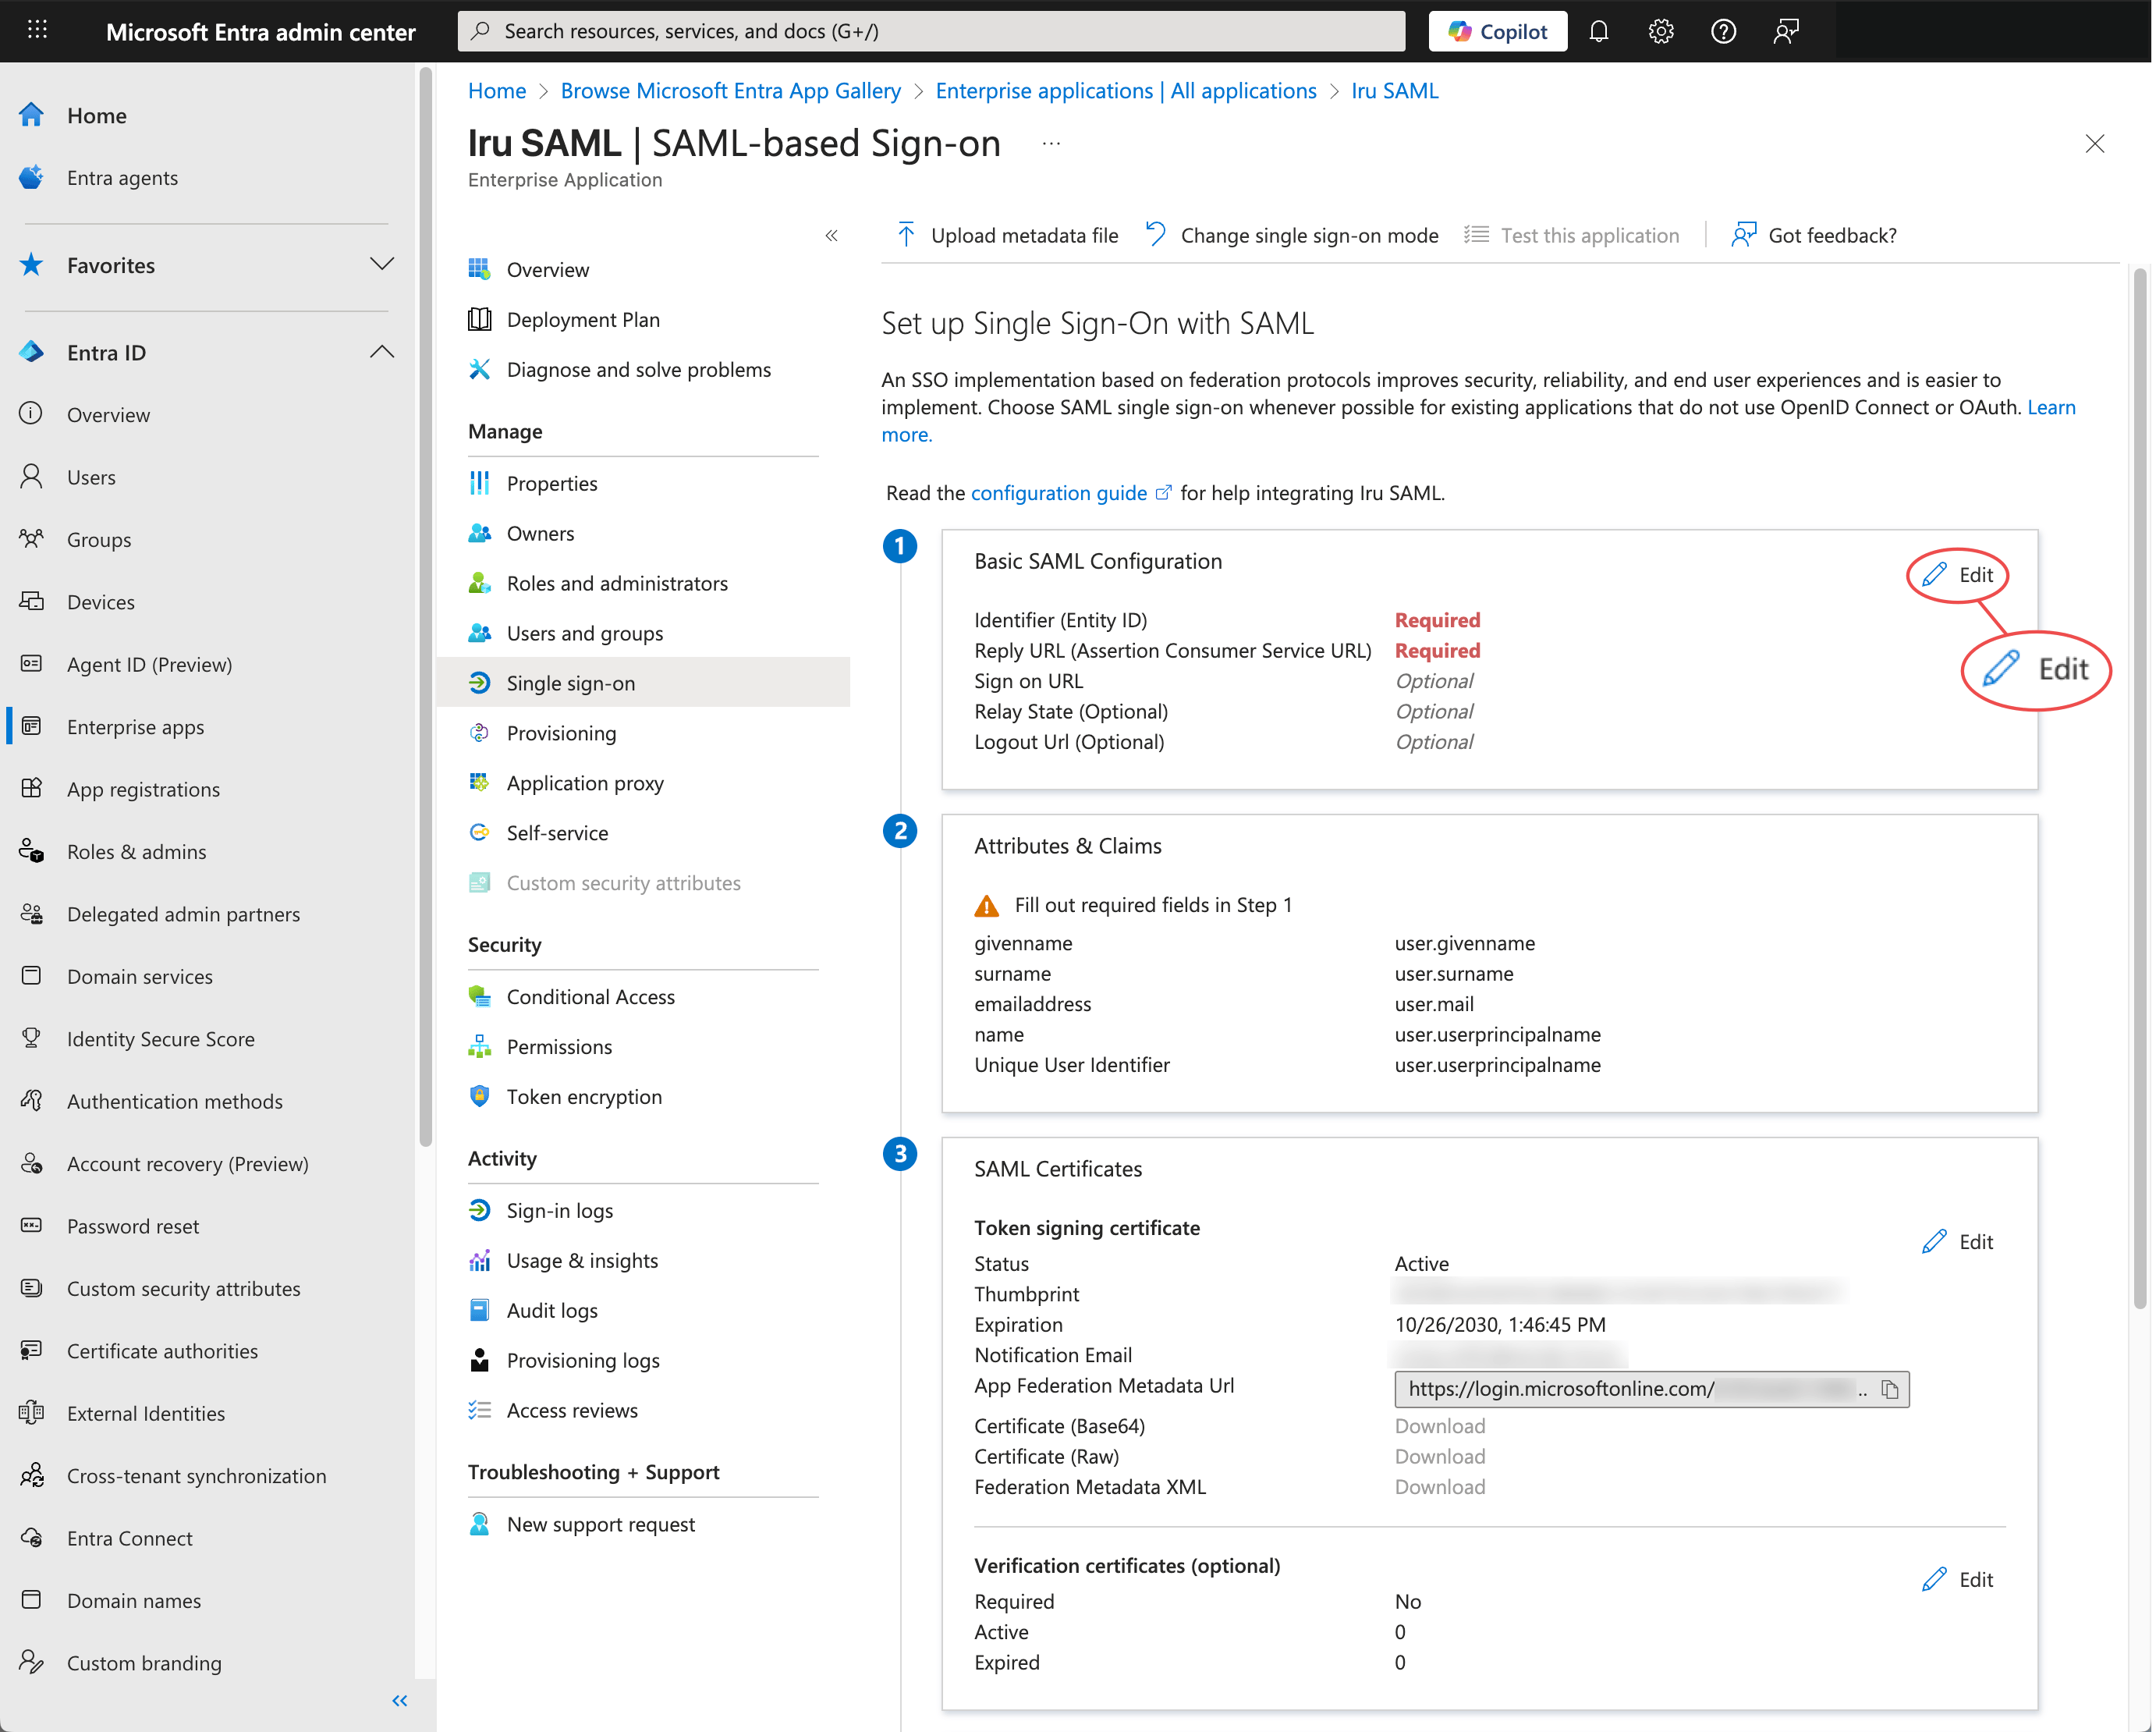 Click the Add Identifier link in the Identifier (Entity ID) section. Paste the Entity ID that you copied earlier into the Identifier (Entity ID) field.
In the Reply URL (Assertion Consumer Service URL) section, paste the Assertion Consumer Services URL that you copied earlier.
Click **Save**.
Click the **X** at the top right of the pane to close it.
Click the Add Identifier link in the Identifier (Entity ID) section. Paste the Entity ID that you copied earlier into the Identifier (Entity ID) field.
In the Reply URL (Assertion Consumer Service URL) section, paste the Assertion Consumer Services URL that you copied earlier.
Click **Save**.
Click the **X** at the top right of the pane to close it.
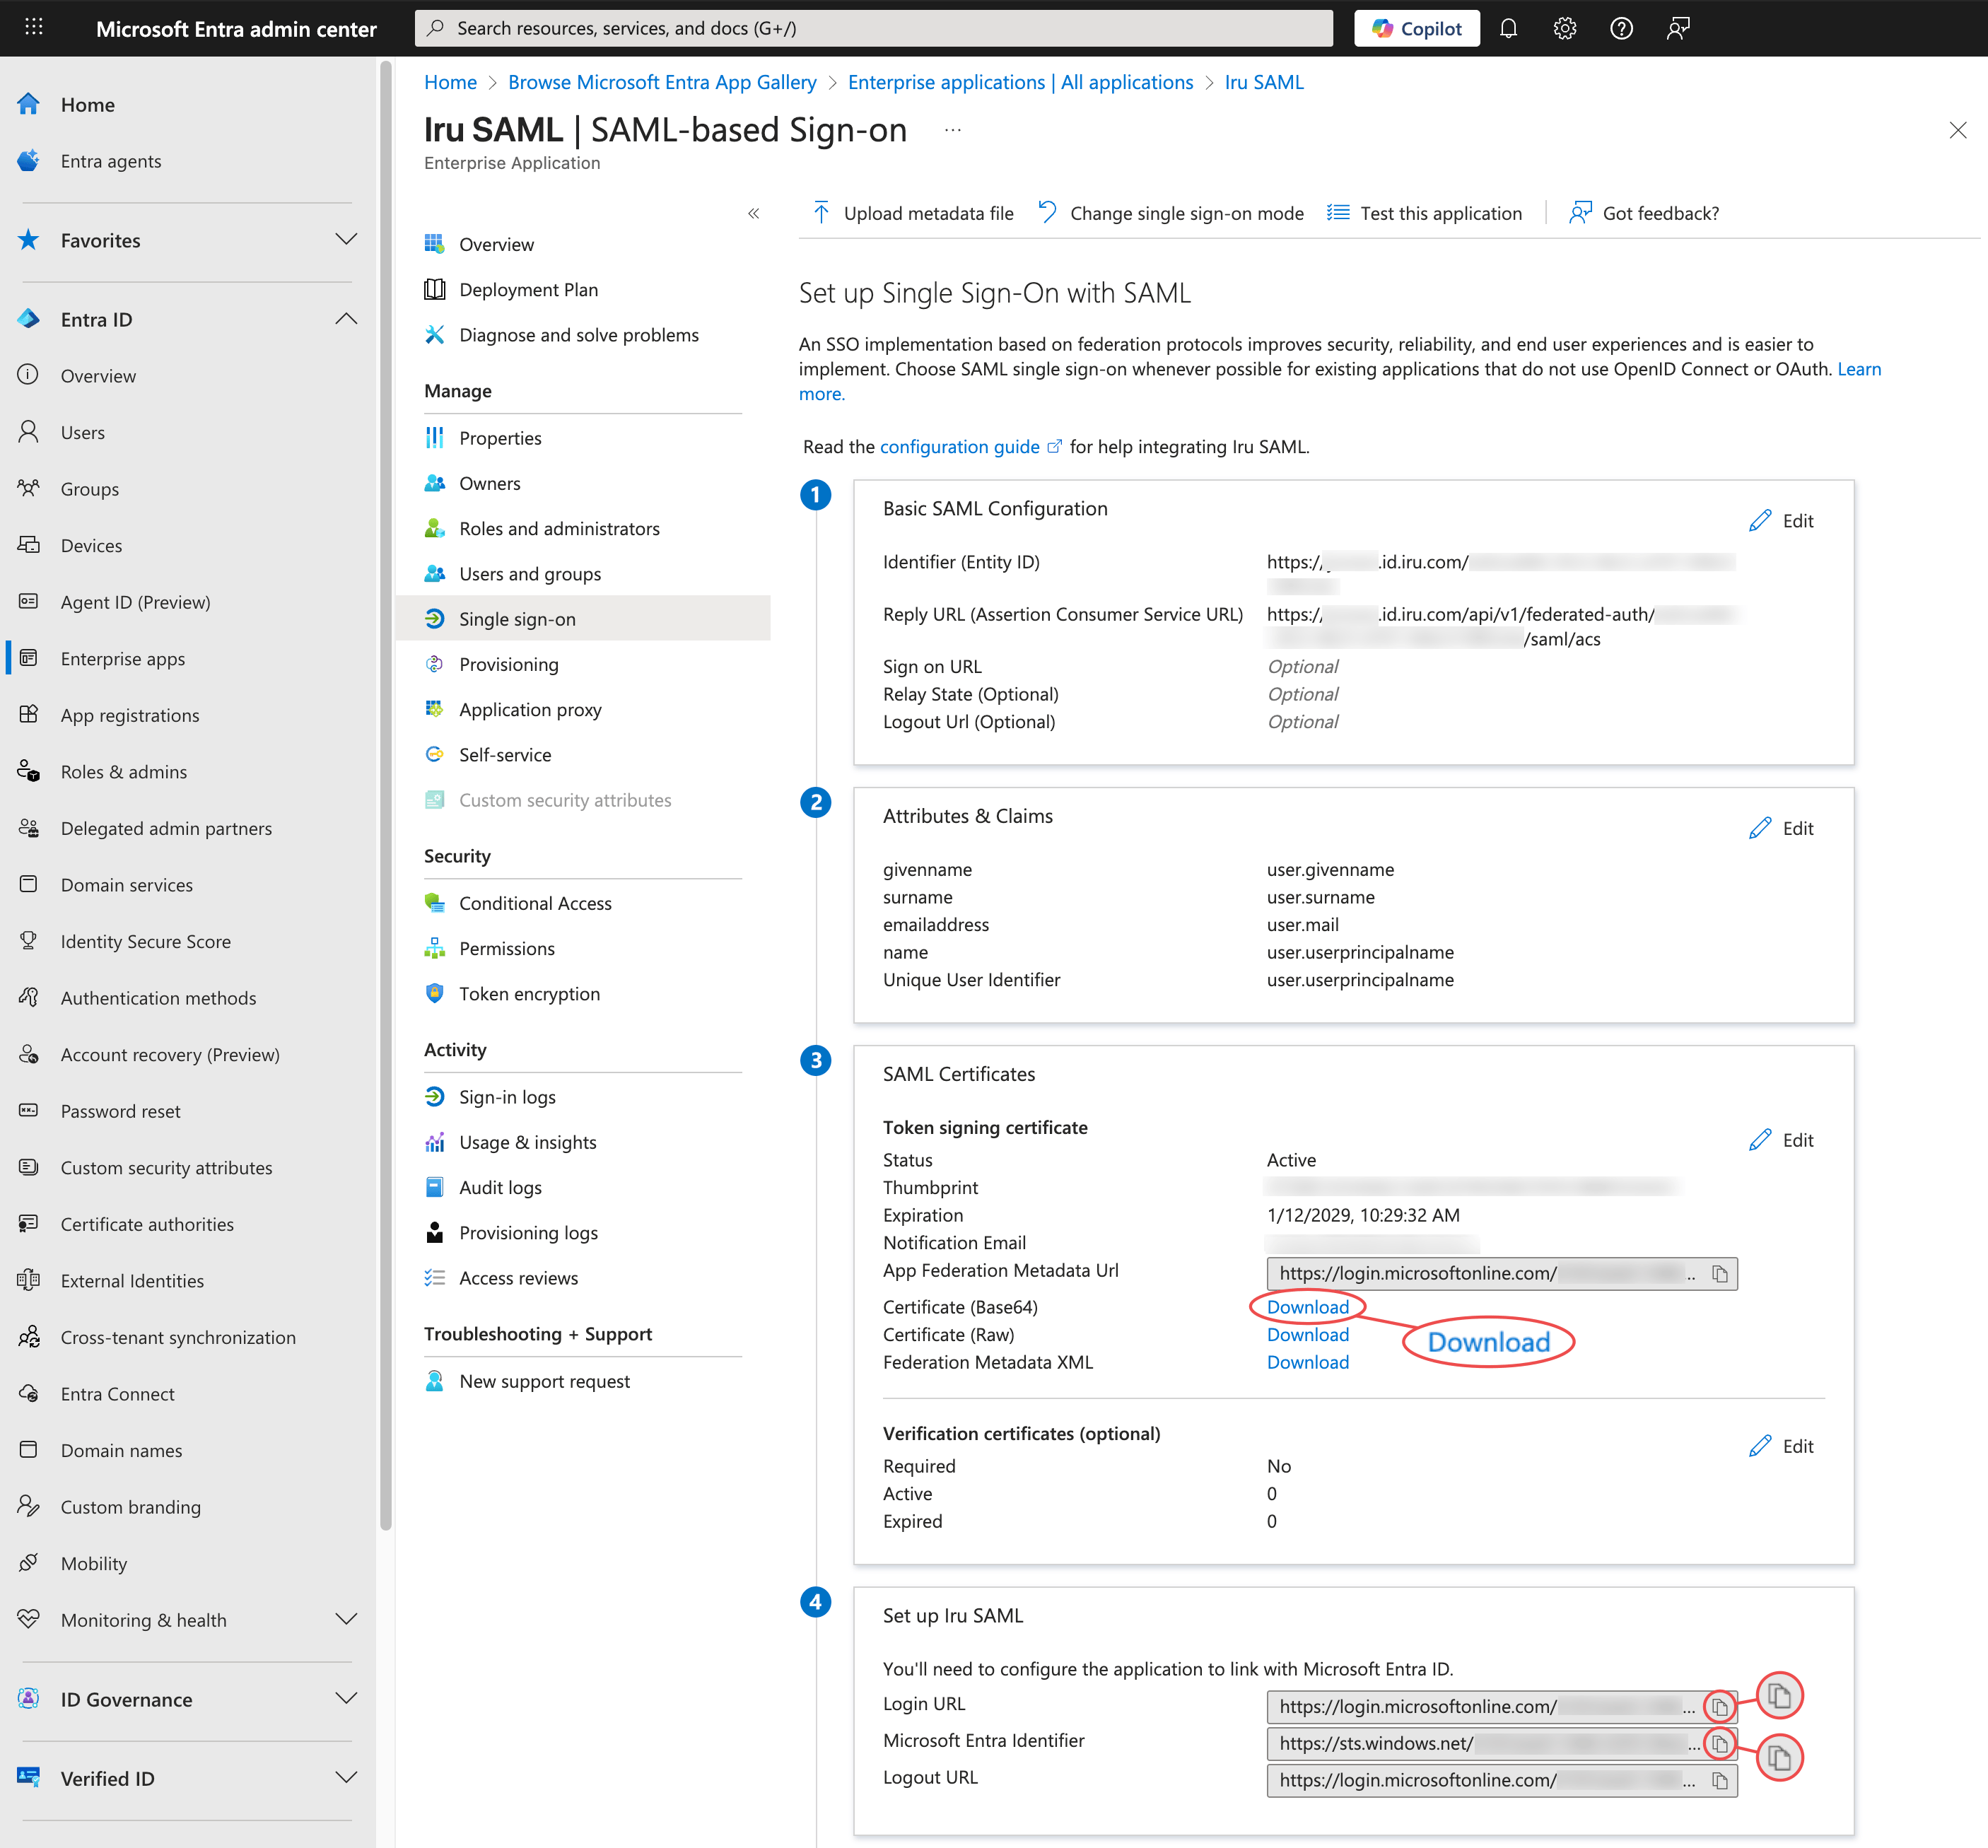
 Leave the settings in the **Attributes & Claims section** set to their default.
Click **Download** to download the Base 64 certificate in the SAML Certificates section. This certificate will be used in the Custom SAML configuration in Iru Endpoint.
In the **Set up \[App Name]** section, copy the Login URL and paste it into a secure text document for later use.
Copy the **Microsoft Entra Identifier** and save it in a text document. You will paste this into the **IdP Entity ID** field in Iru Endpoint. You can find this in the **Overview** section of your application.
Leave the settings in the **Attributes & Claims section** set to their default.
Click **Download** to download the Base 64 certificate in the SAML Certificates section. This certificate will be used in the Custom SAML configuration in Iru Endpoint.
In the **Set up \[App Name]** section, copy the Login URL and paste it into a secure text document for later use.
Copy the **Microsoft Entra Identifier** and save it in a text document. You will paste this into the **IdP Entity ID** field in Iru Endpoint. You can find this in the **Overview** section of your application.
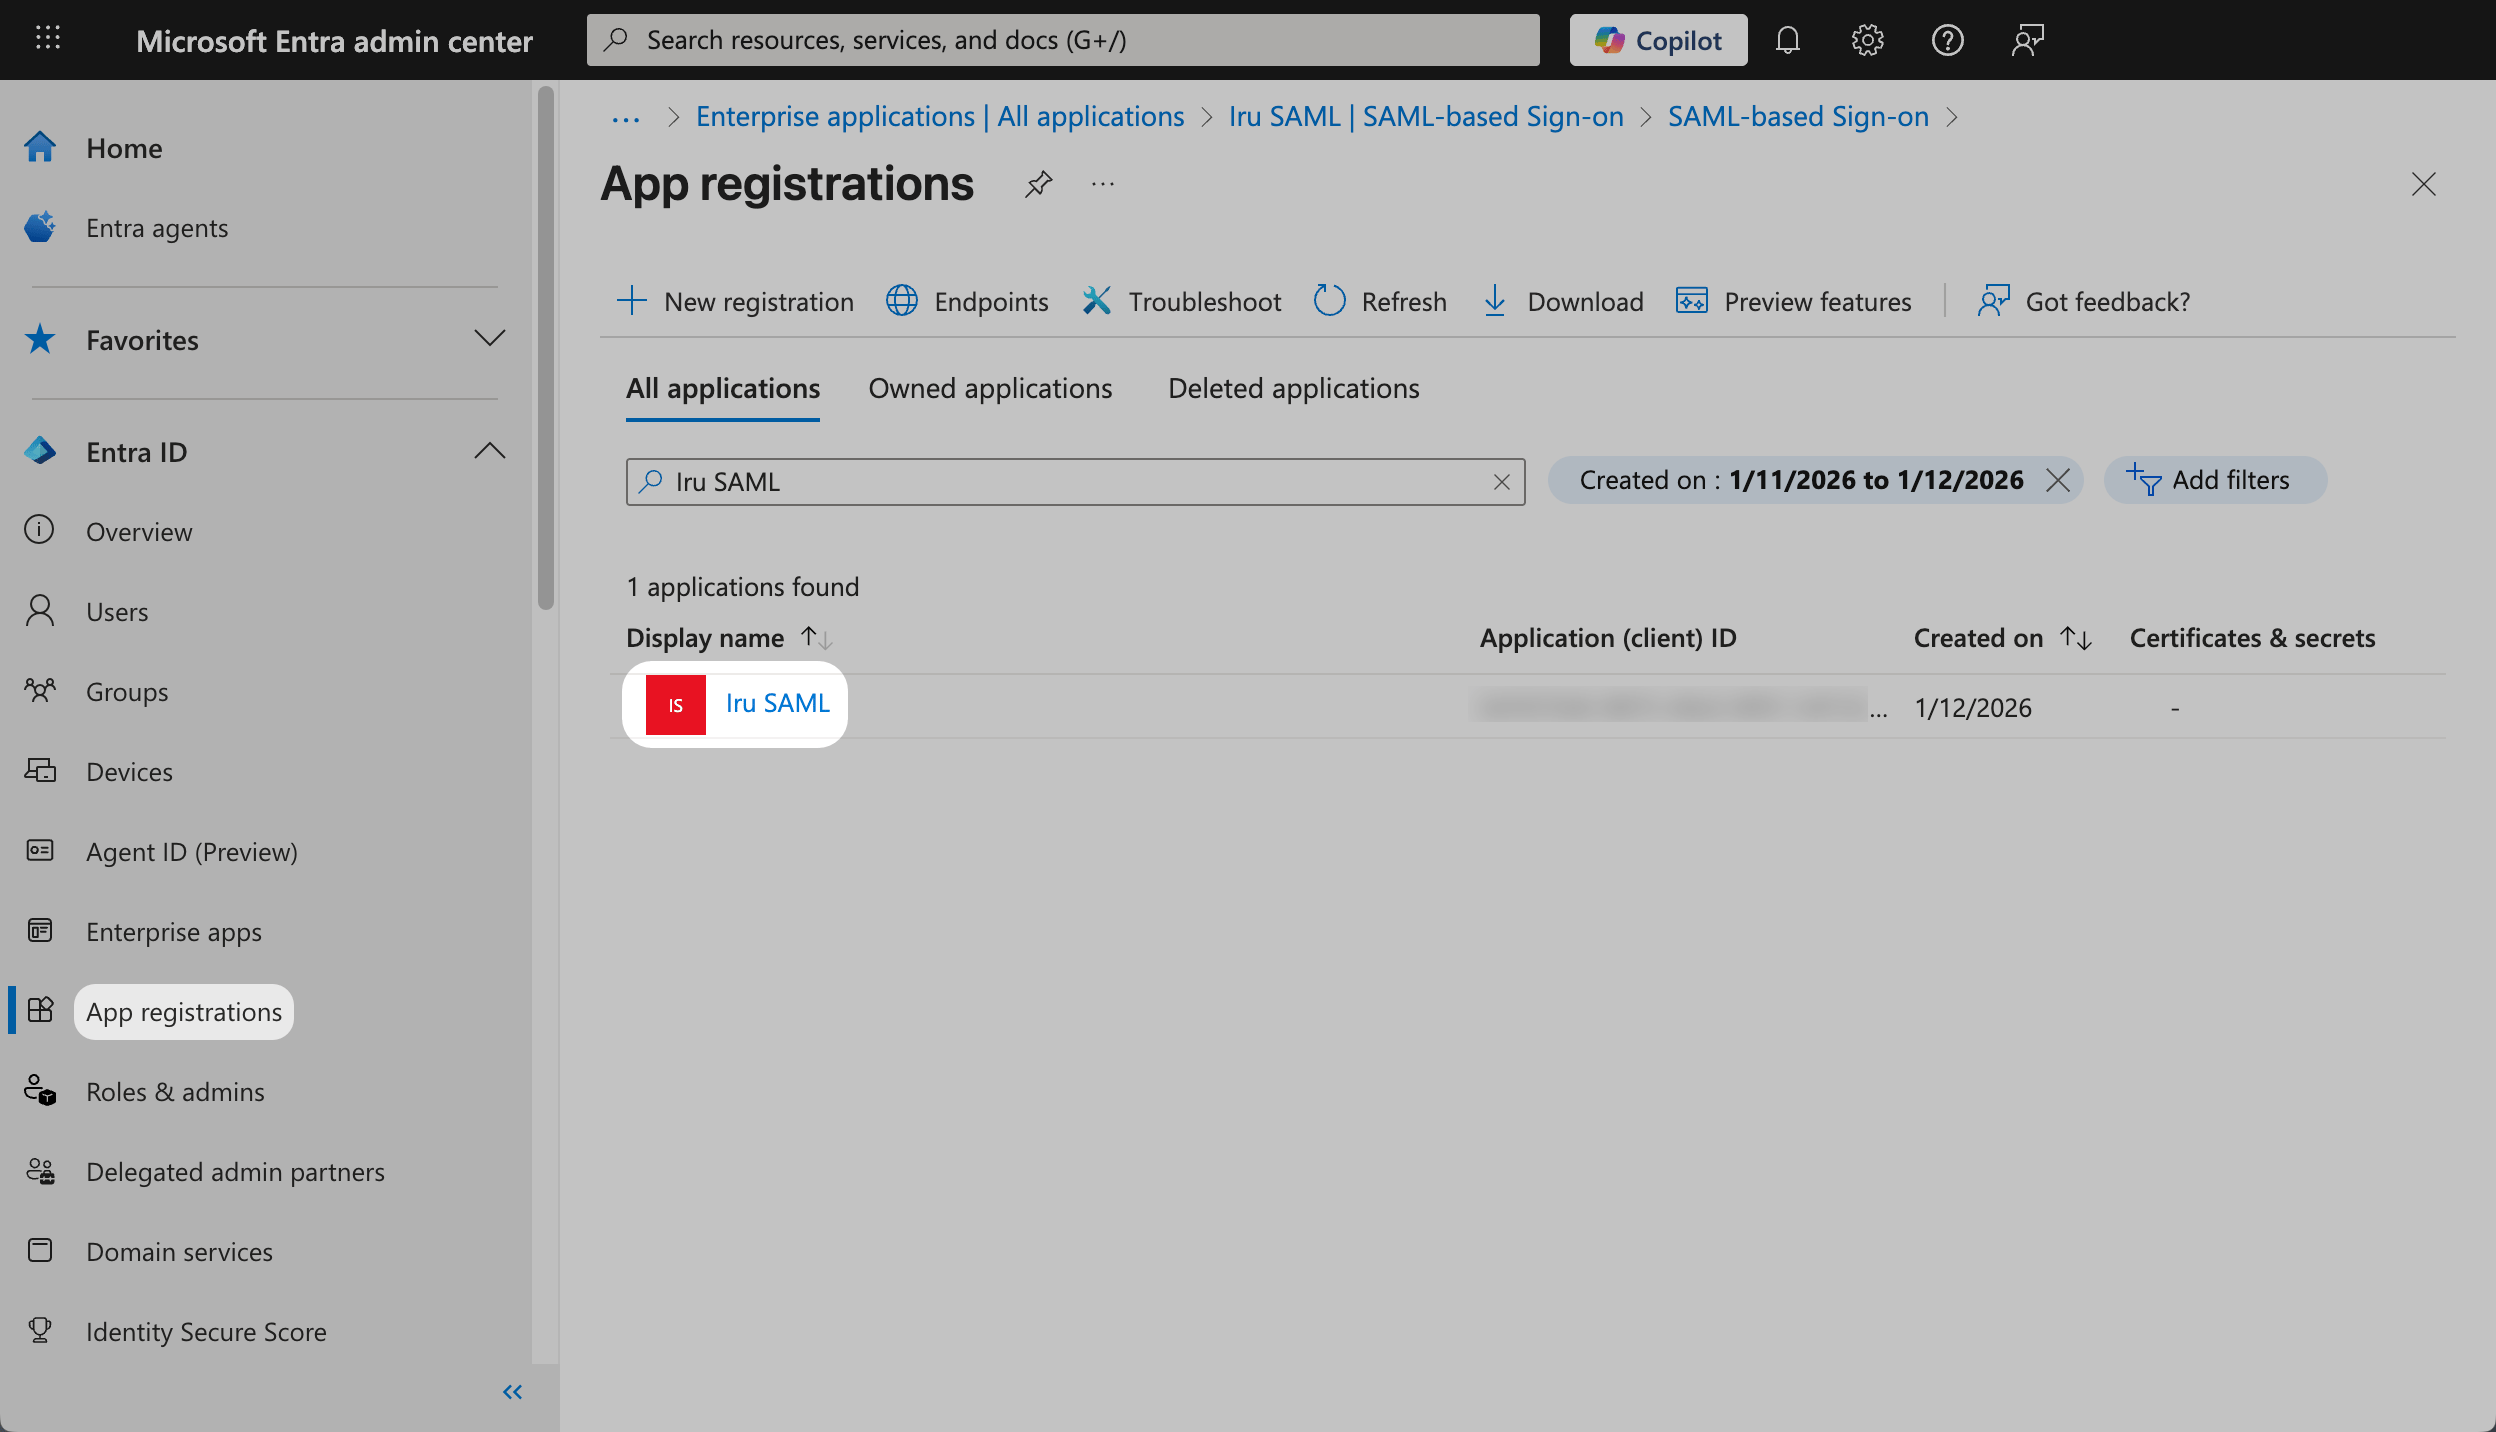
 Go to **App registrations**.
Select your newly created app.
Go to **App registrations**.
Select your newly created app.
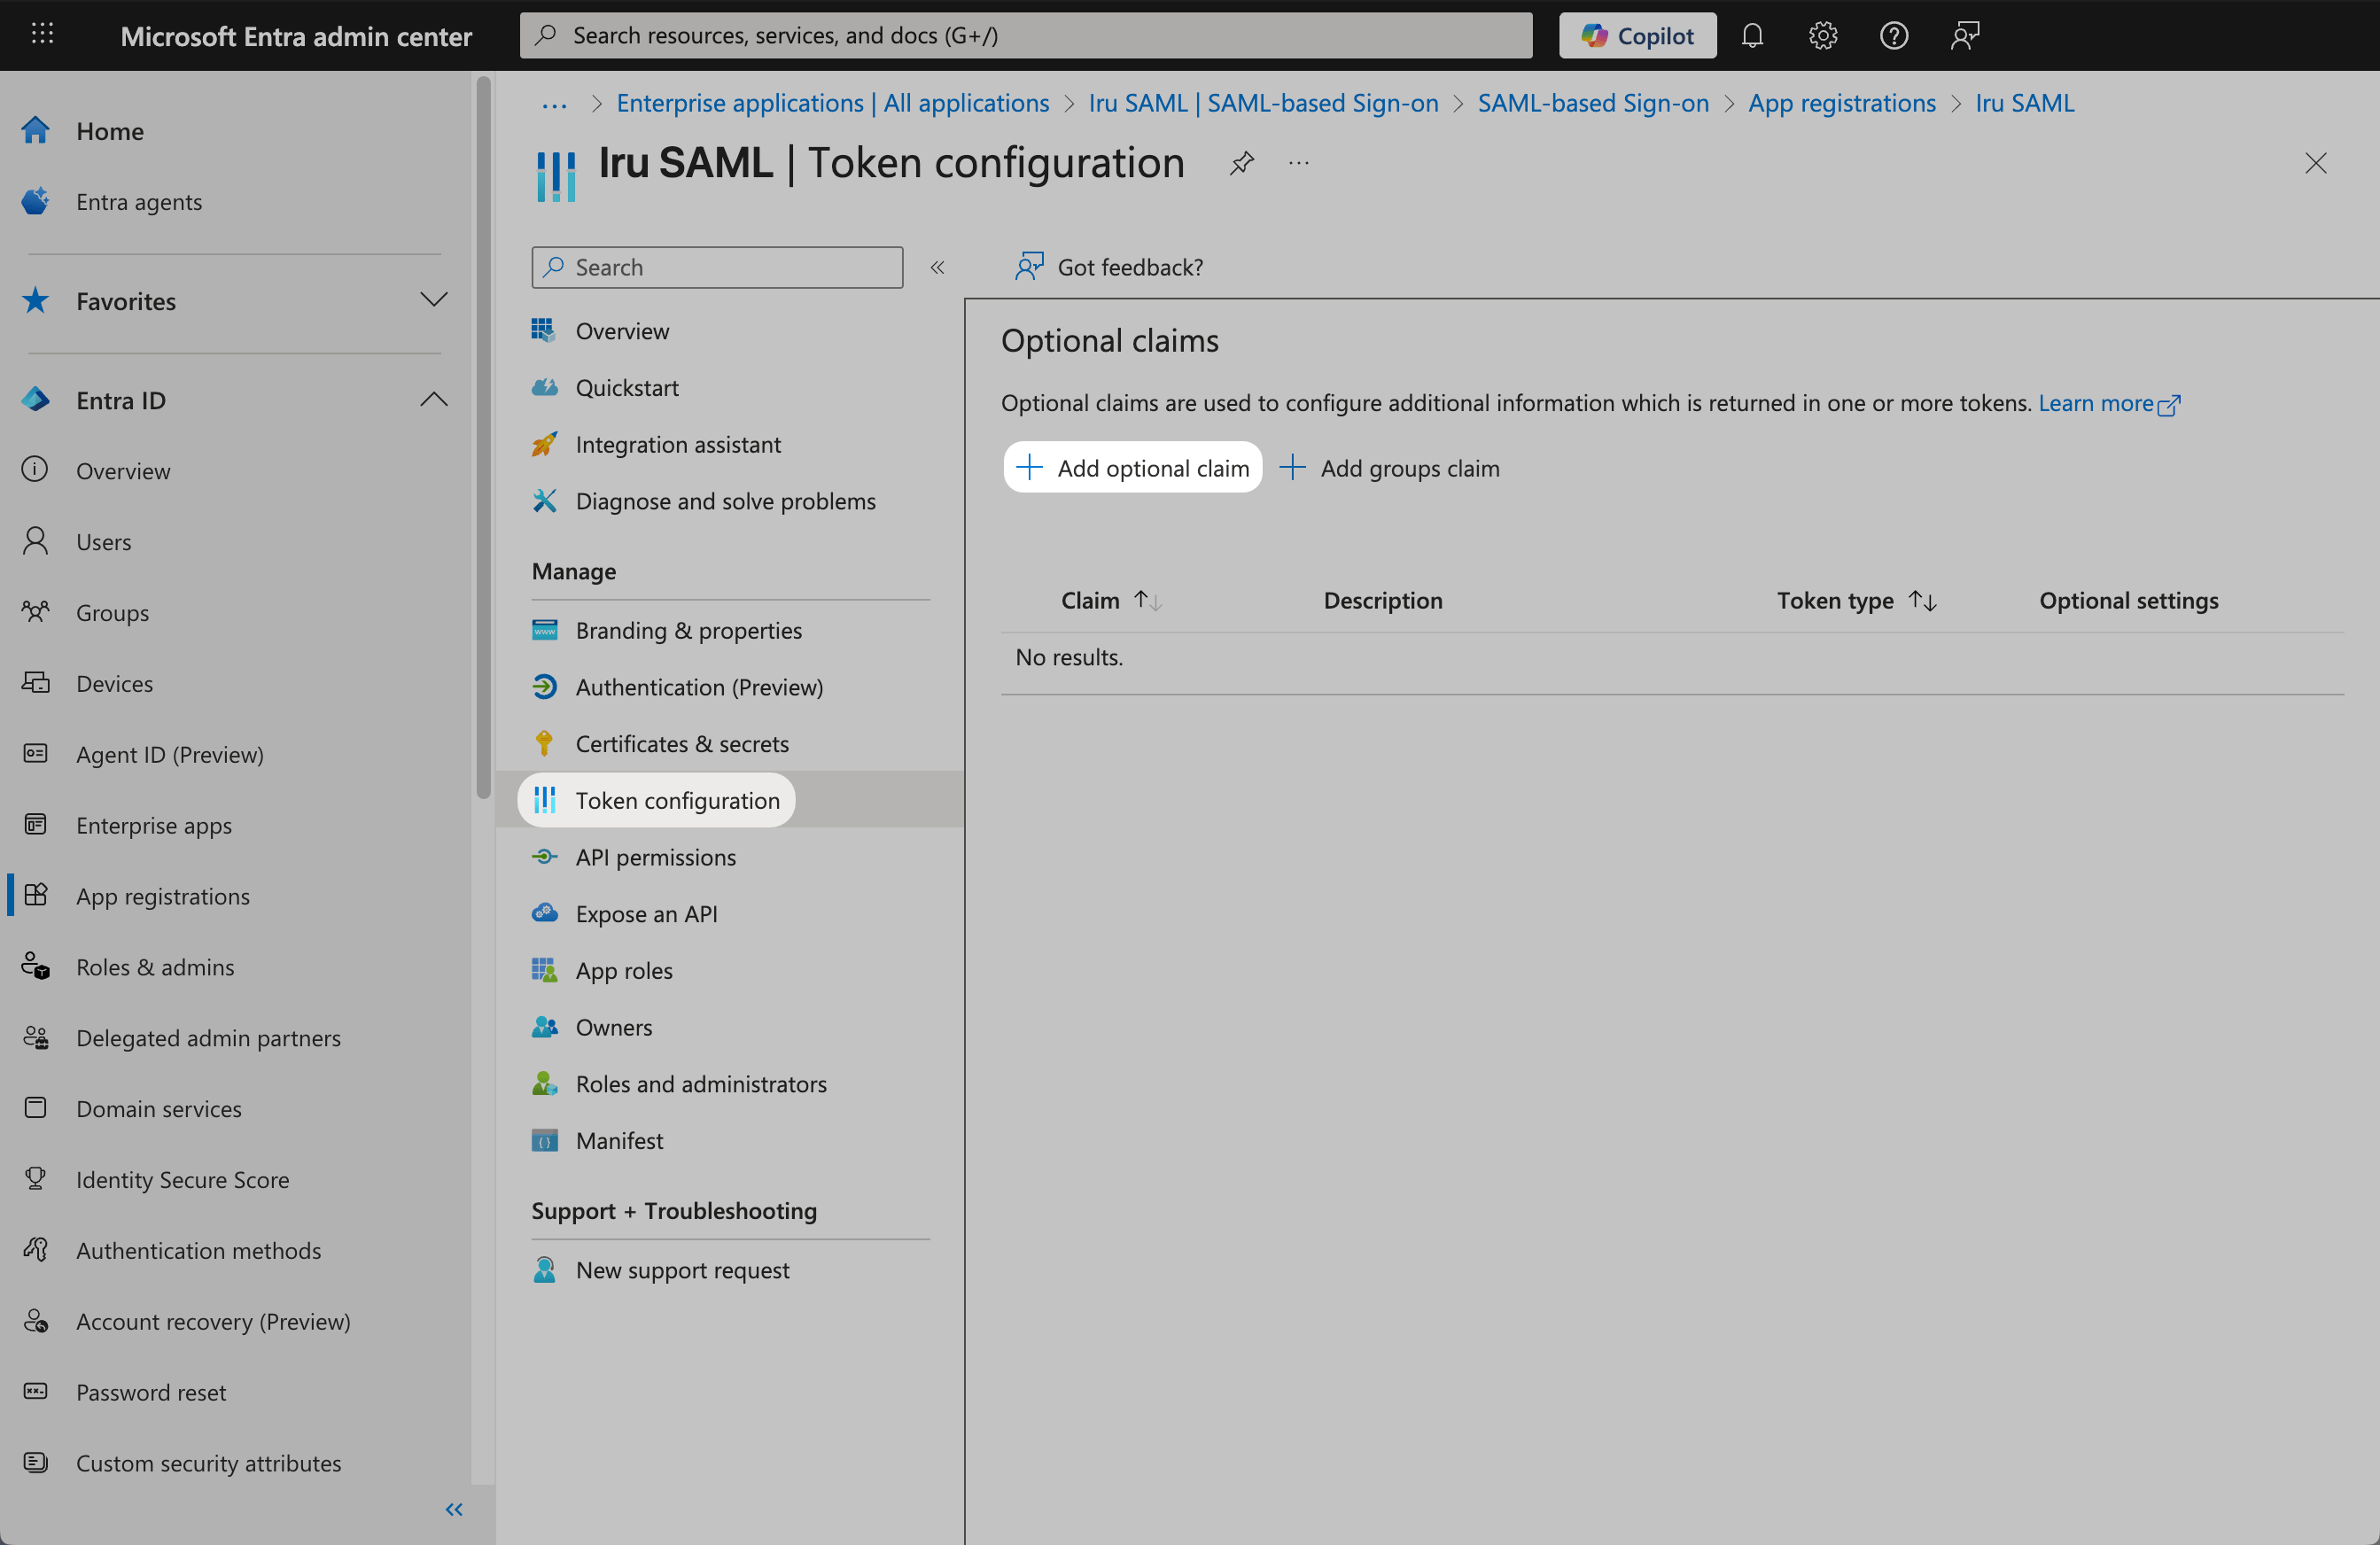
 Navigate to the **Token configuration** section under **Manage**.
Click **+ Add optional claims**.
Navigate to the **Token configuration** section under **Manage**.
Click **+ Add optional claims**.
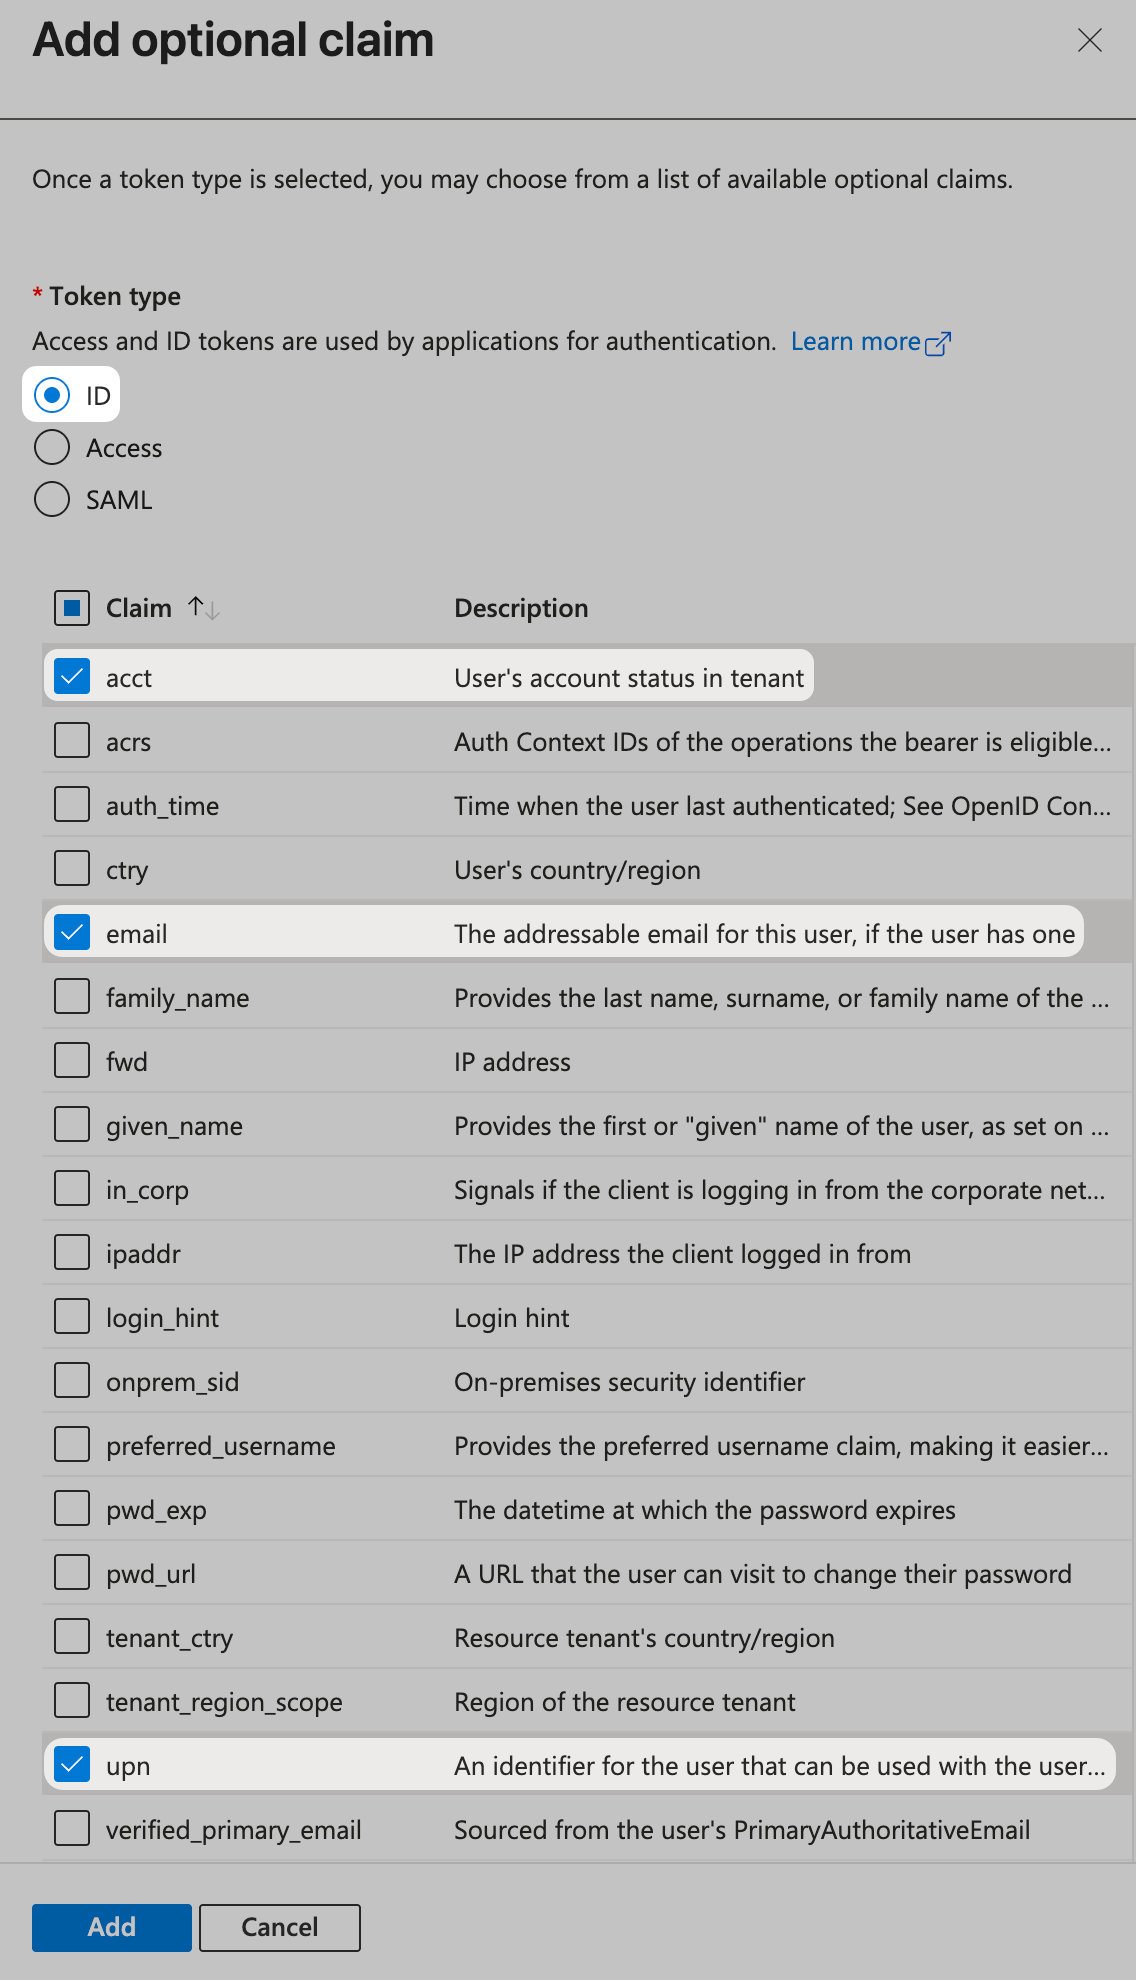
 Check the **ID** radio button.
Check the **acct** box.
Check the **email** box.
Check the **upn** box.
Click **Add**.
Check the **ID** radio button.
Check the **acct** box.
Check the **email** box.
Check the **upn** box.
Click **Add**.
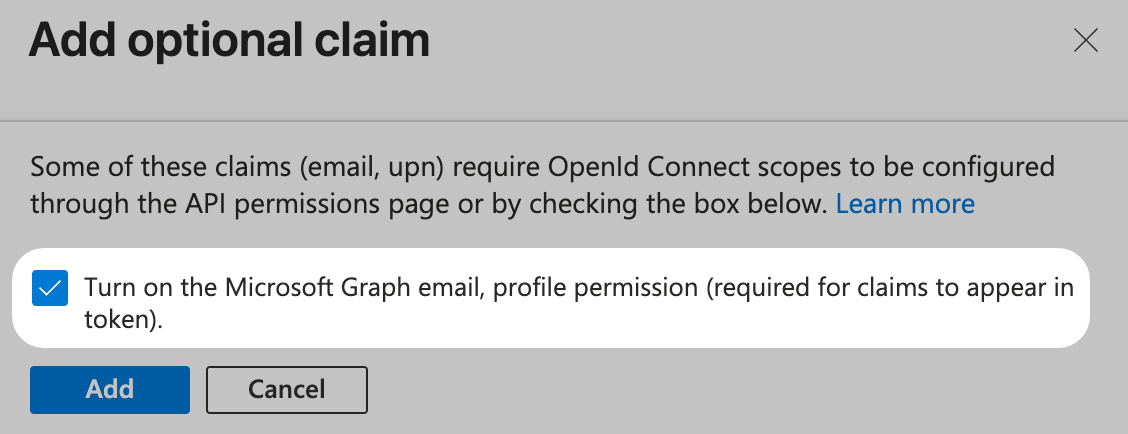
 Check the **Turn on the Microsoft Graph email, profile permission (required for claims to appear in token)** box.
Click **Add**.
Check the **Turn on the Microsoft Graph email, profile permission (required for claims to appear in token)** box.
Click **Add**.
 The Microsoft Entra Identifier is used in the Iru configuration as the IdP Entity ID.
### Assigning Users and Groups
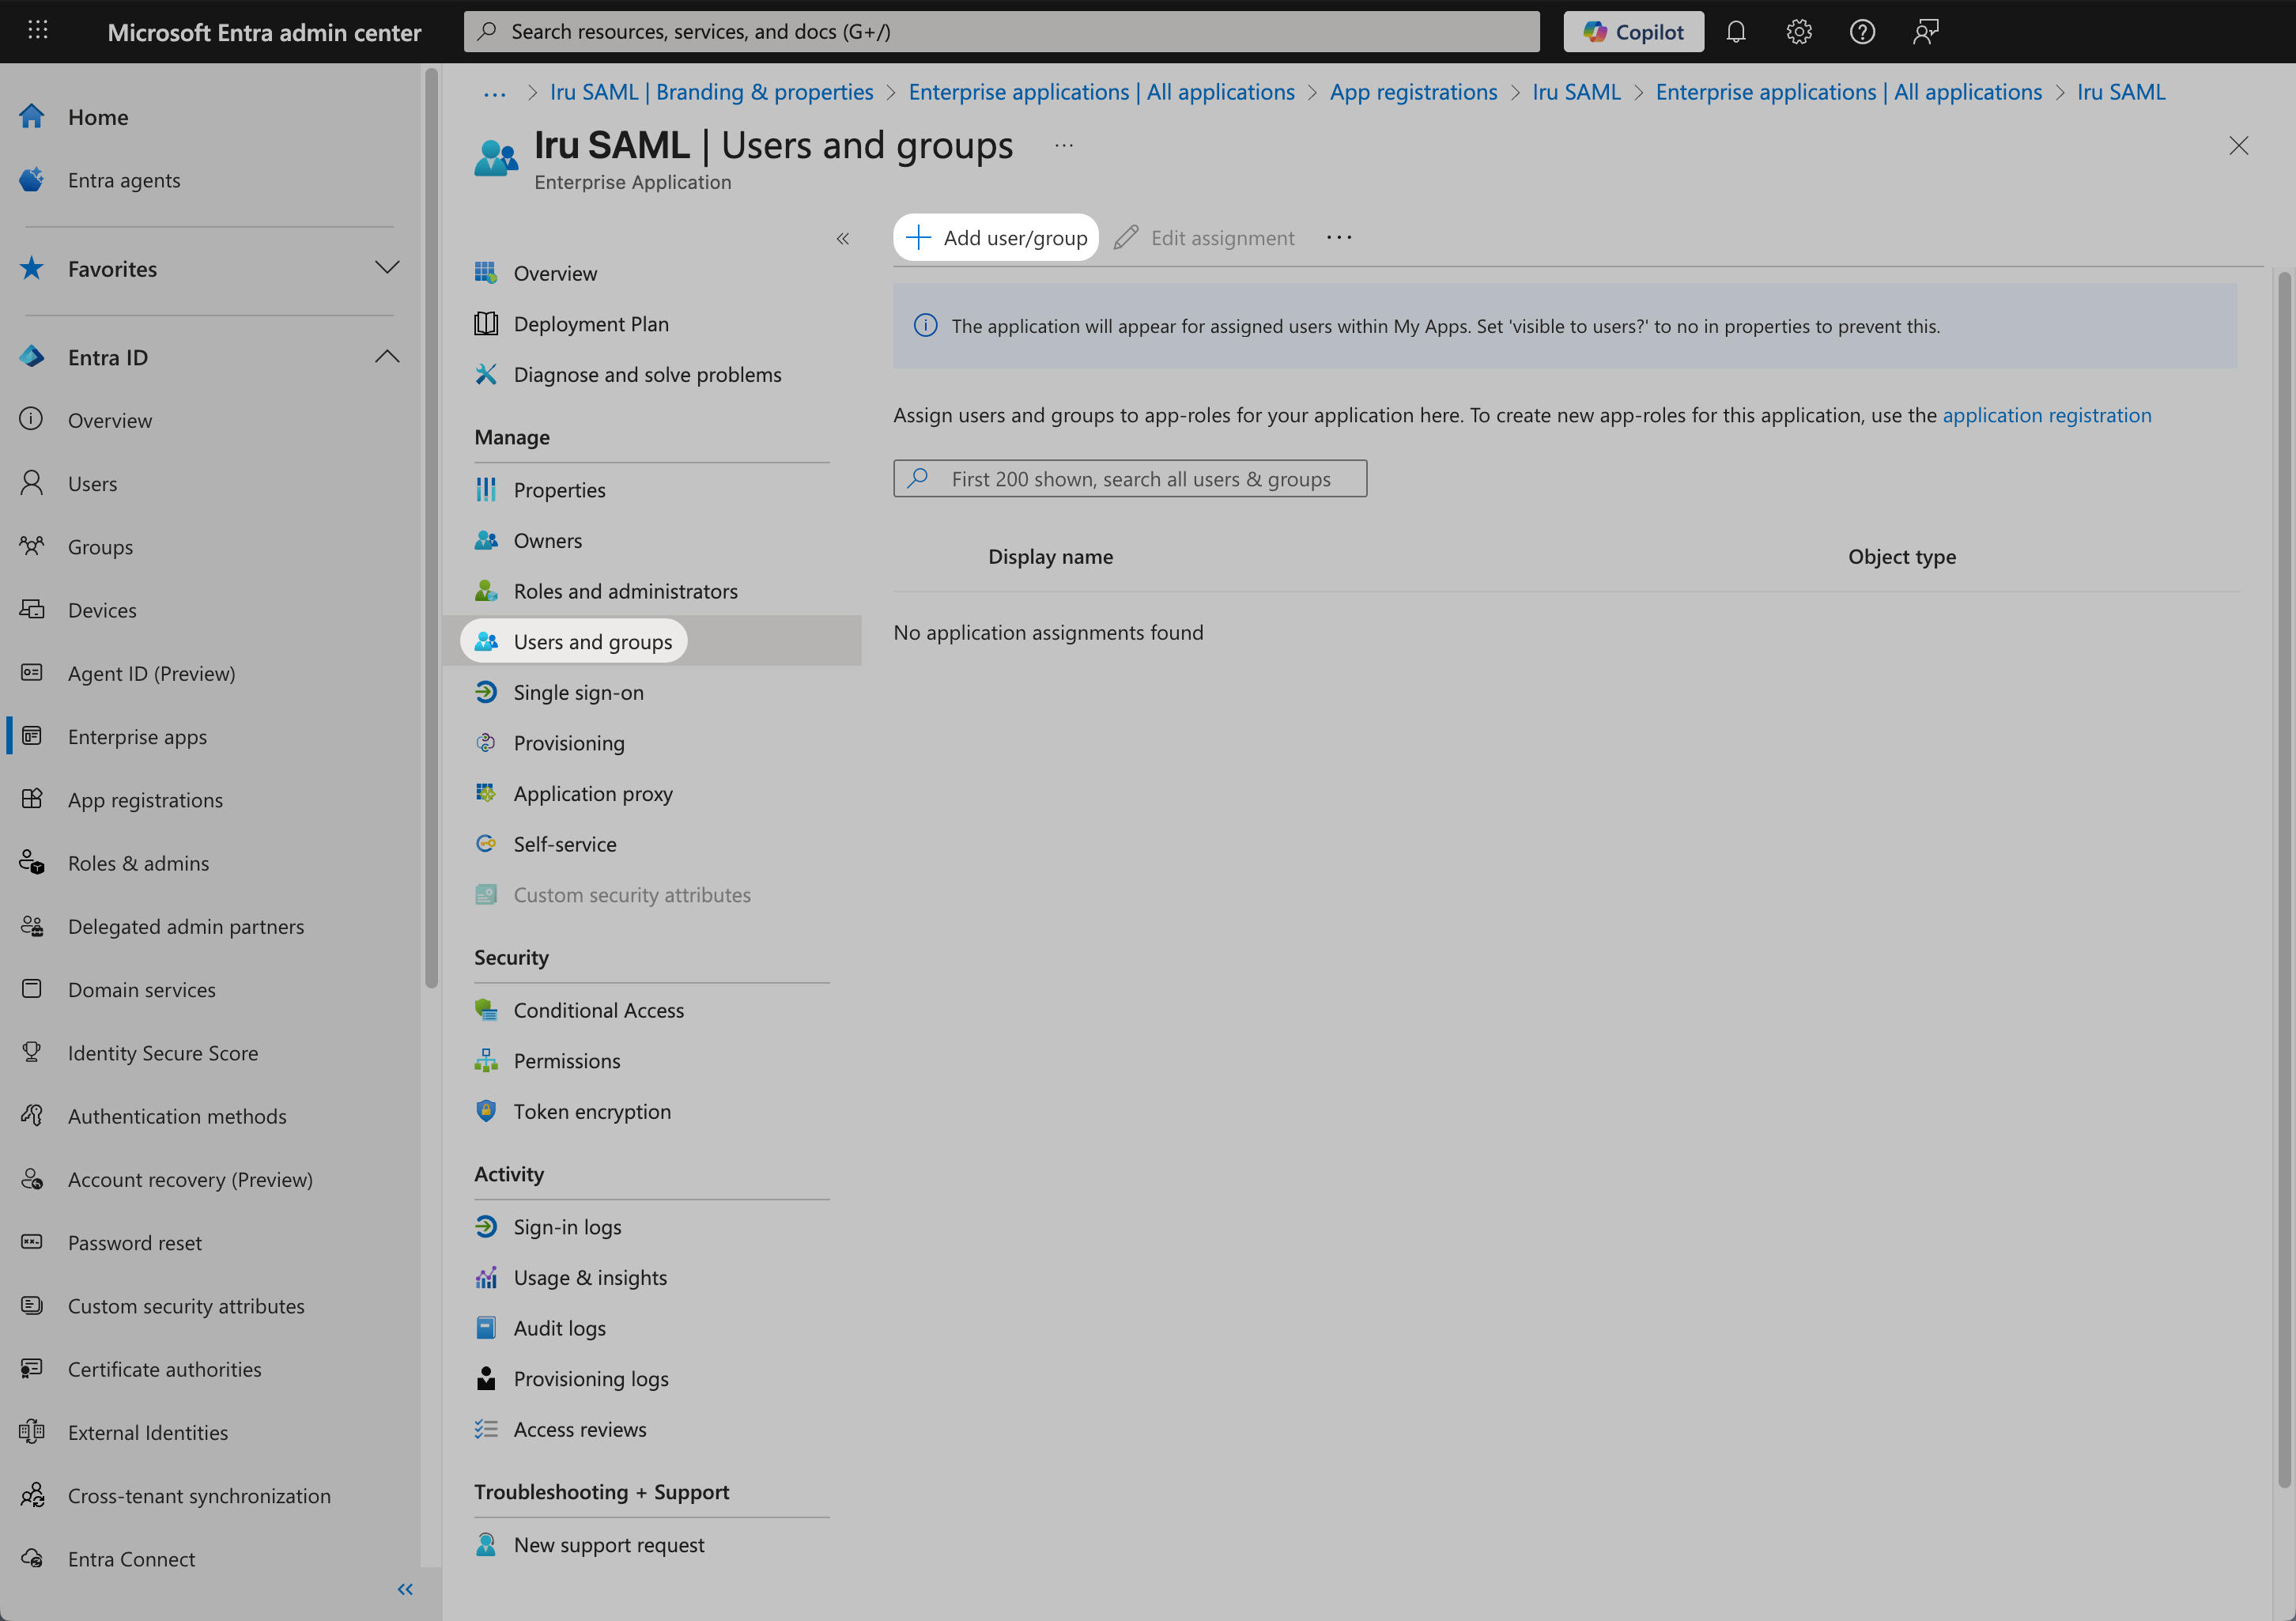
In **Enterprise apps** navigate to your newly created app.
Under **Manage**, select **Users and Groups**.
On the menu, select **Add user/group**.
The Microsoft Entra Identifier is used in the Iru configuration as the IdP Entity ID.
### Assigning Users and Groups
In **Enterprise apps** navigate to your newly created app.
Under **Manage**, select **Users and Groups**.
On the menu, select **Add user/group**.
 On the **Add Assignment** dialog, select the link under **Users and groups**.
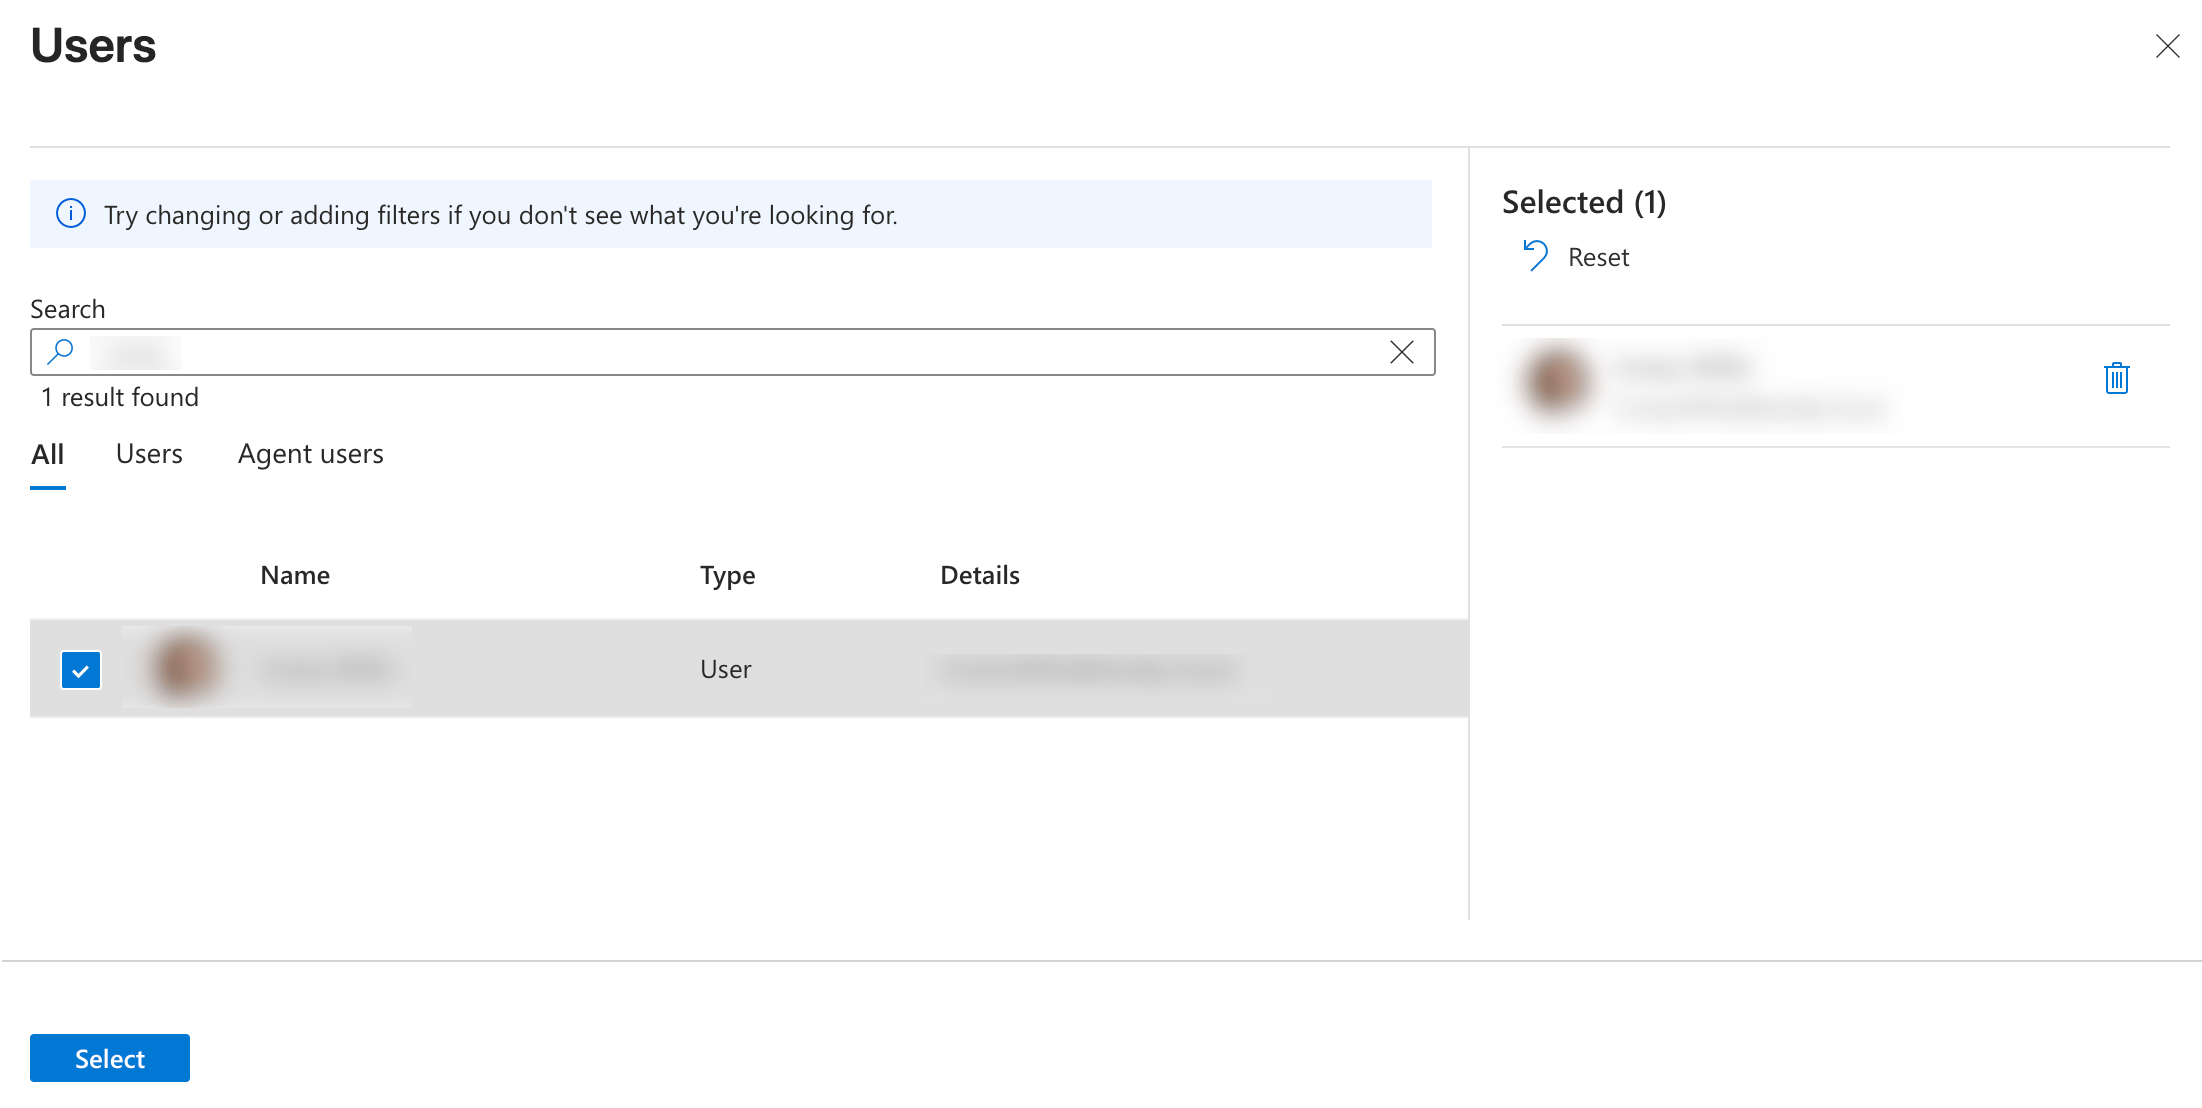
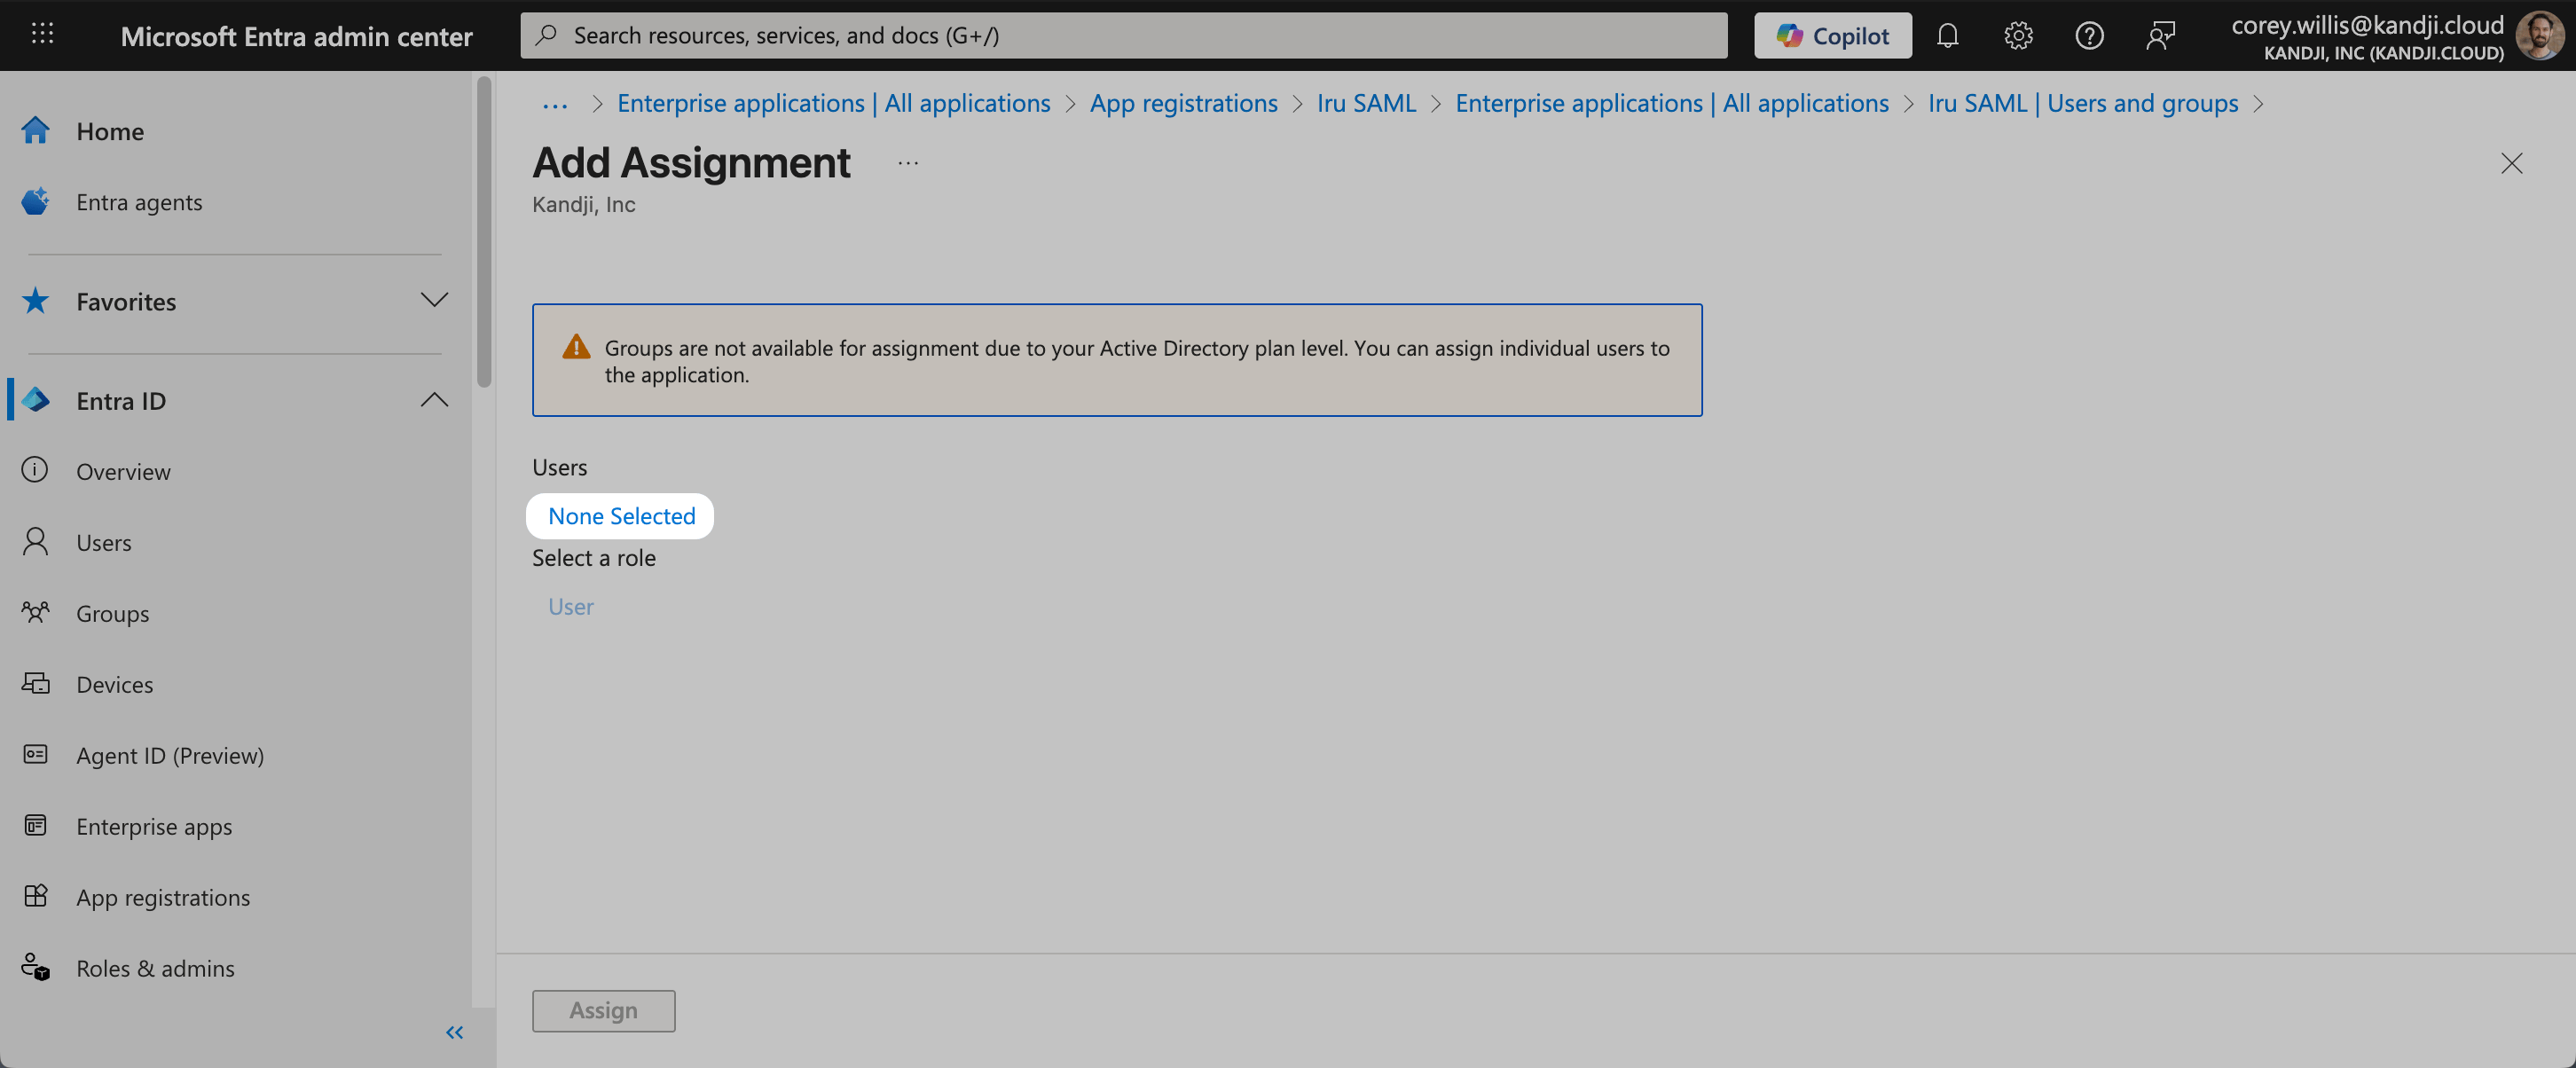 A list of users and security groups is displayed. You can search for a certain user or group, as well as select multiple users and groups that appear in the list.
After you have selected your users and groups, select **Select**.
A list of users and security groups is displayed. You can search for a certain user or group, as well as select multiple users and groups that appear in the list.
After you have selected your users and groups, select **Select**.
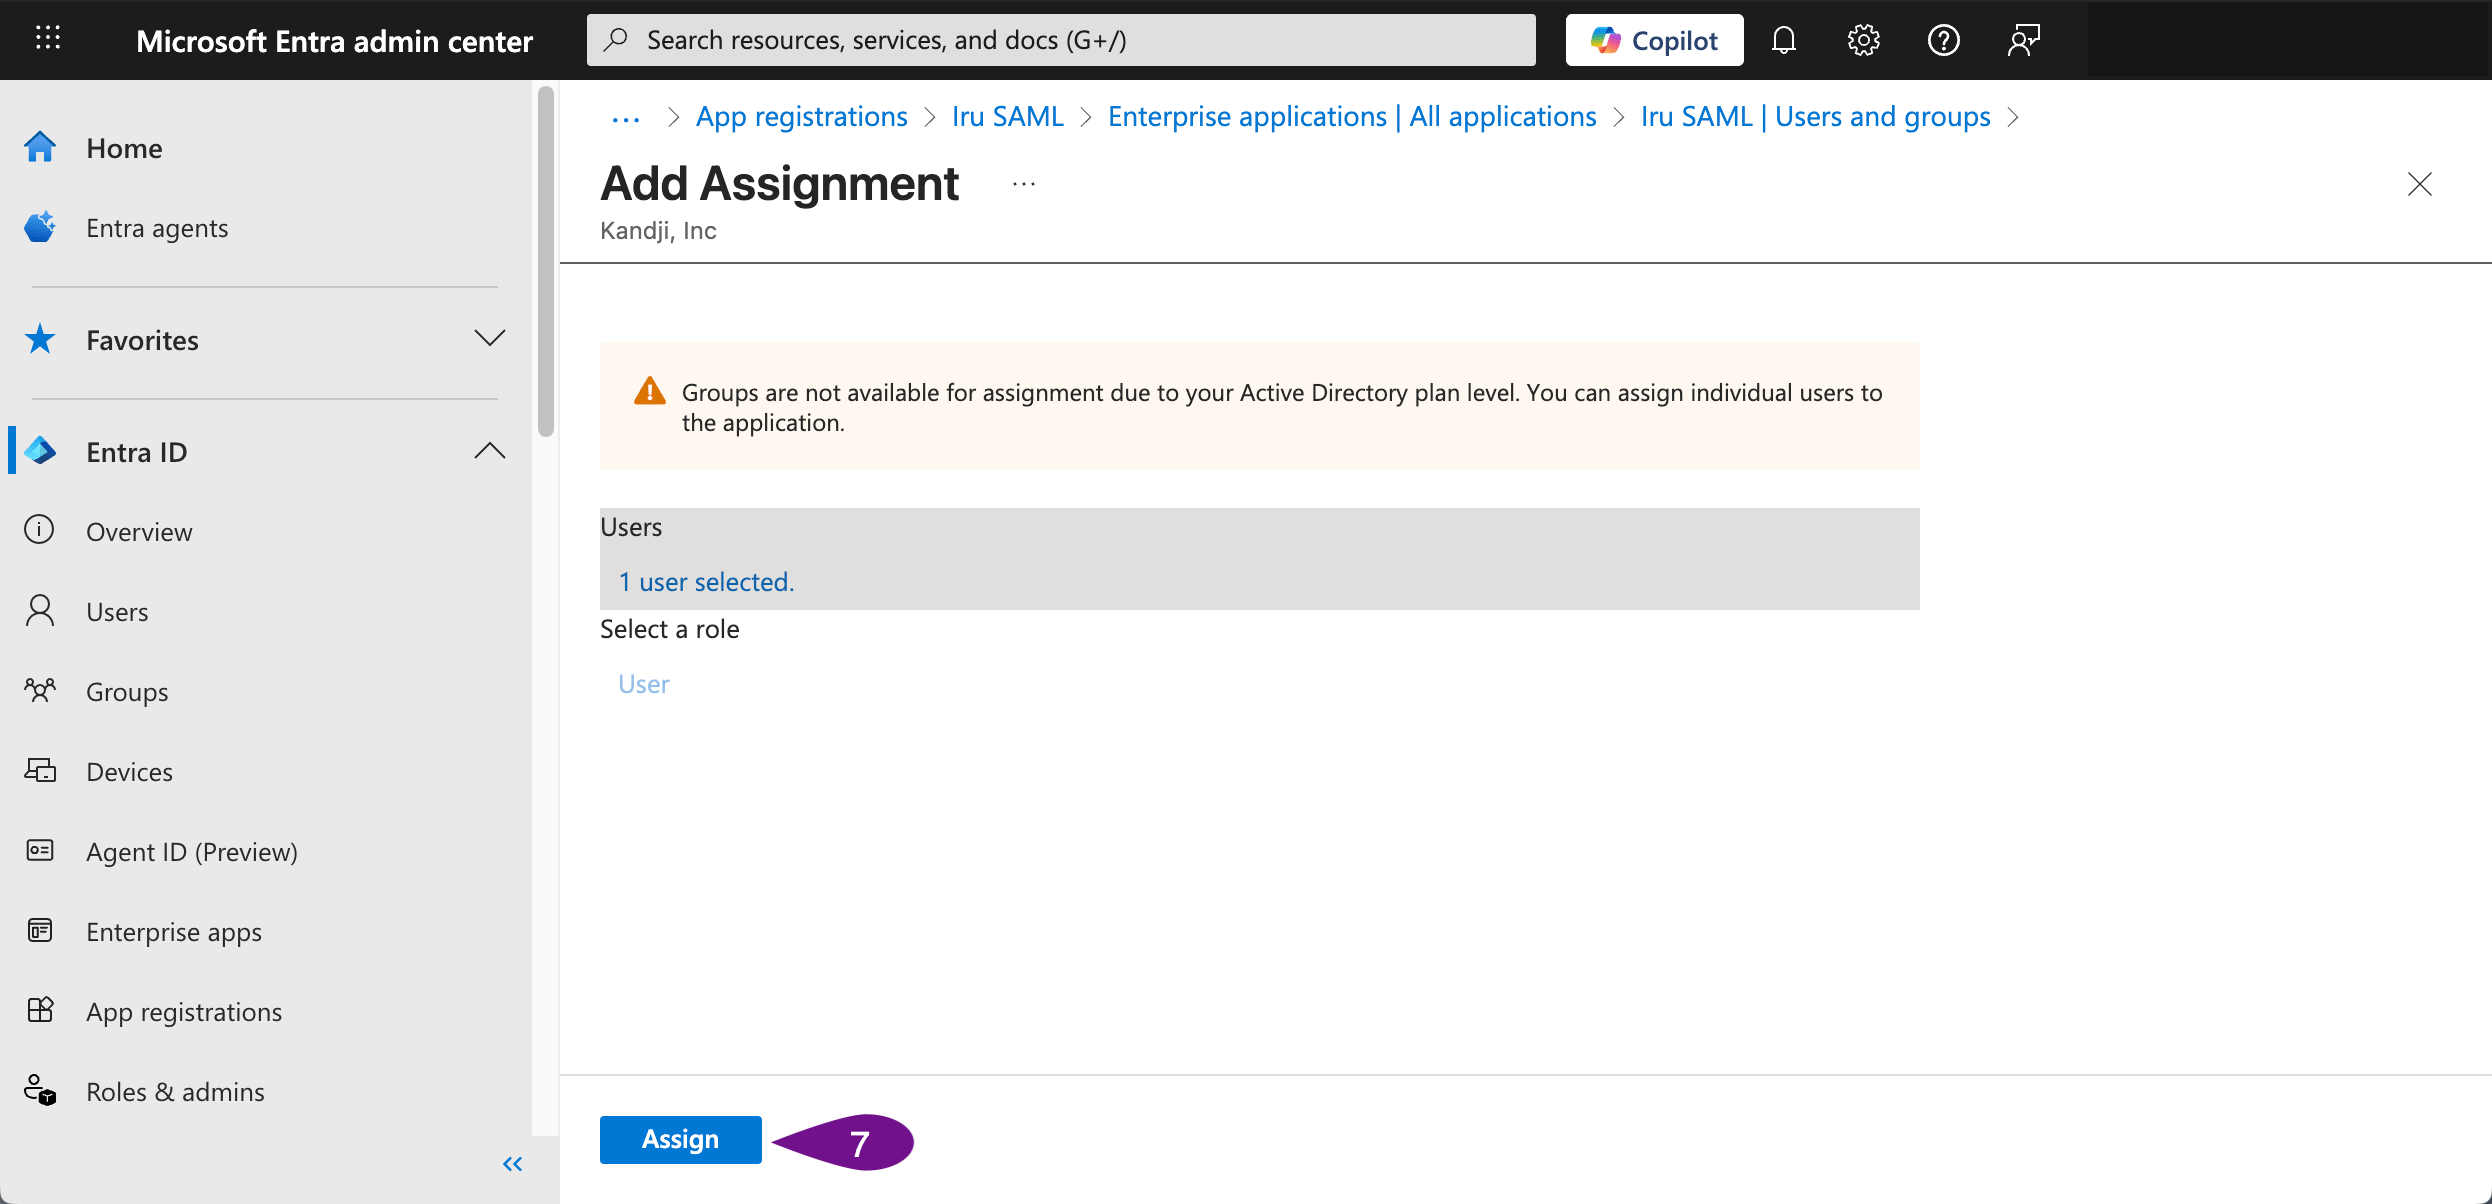
 Select **Assign** to finish assigning users and groups to the app.
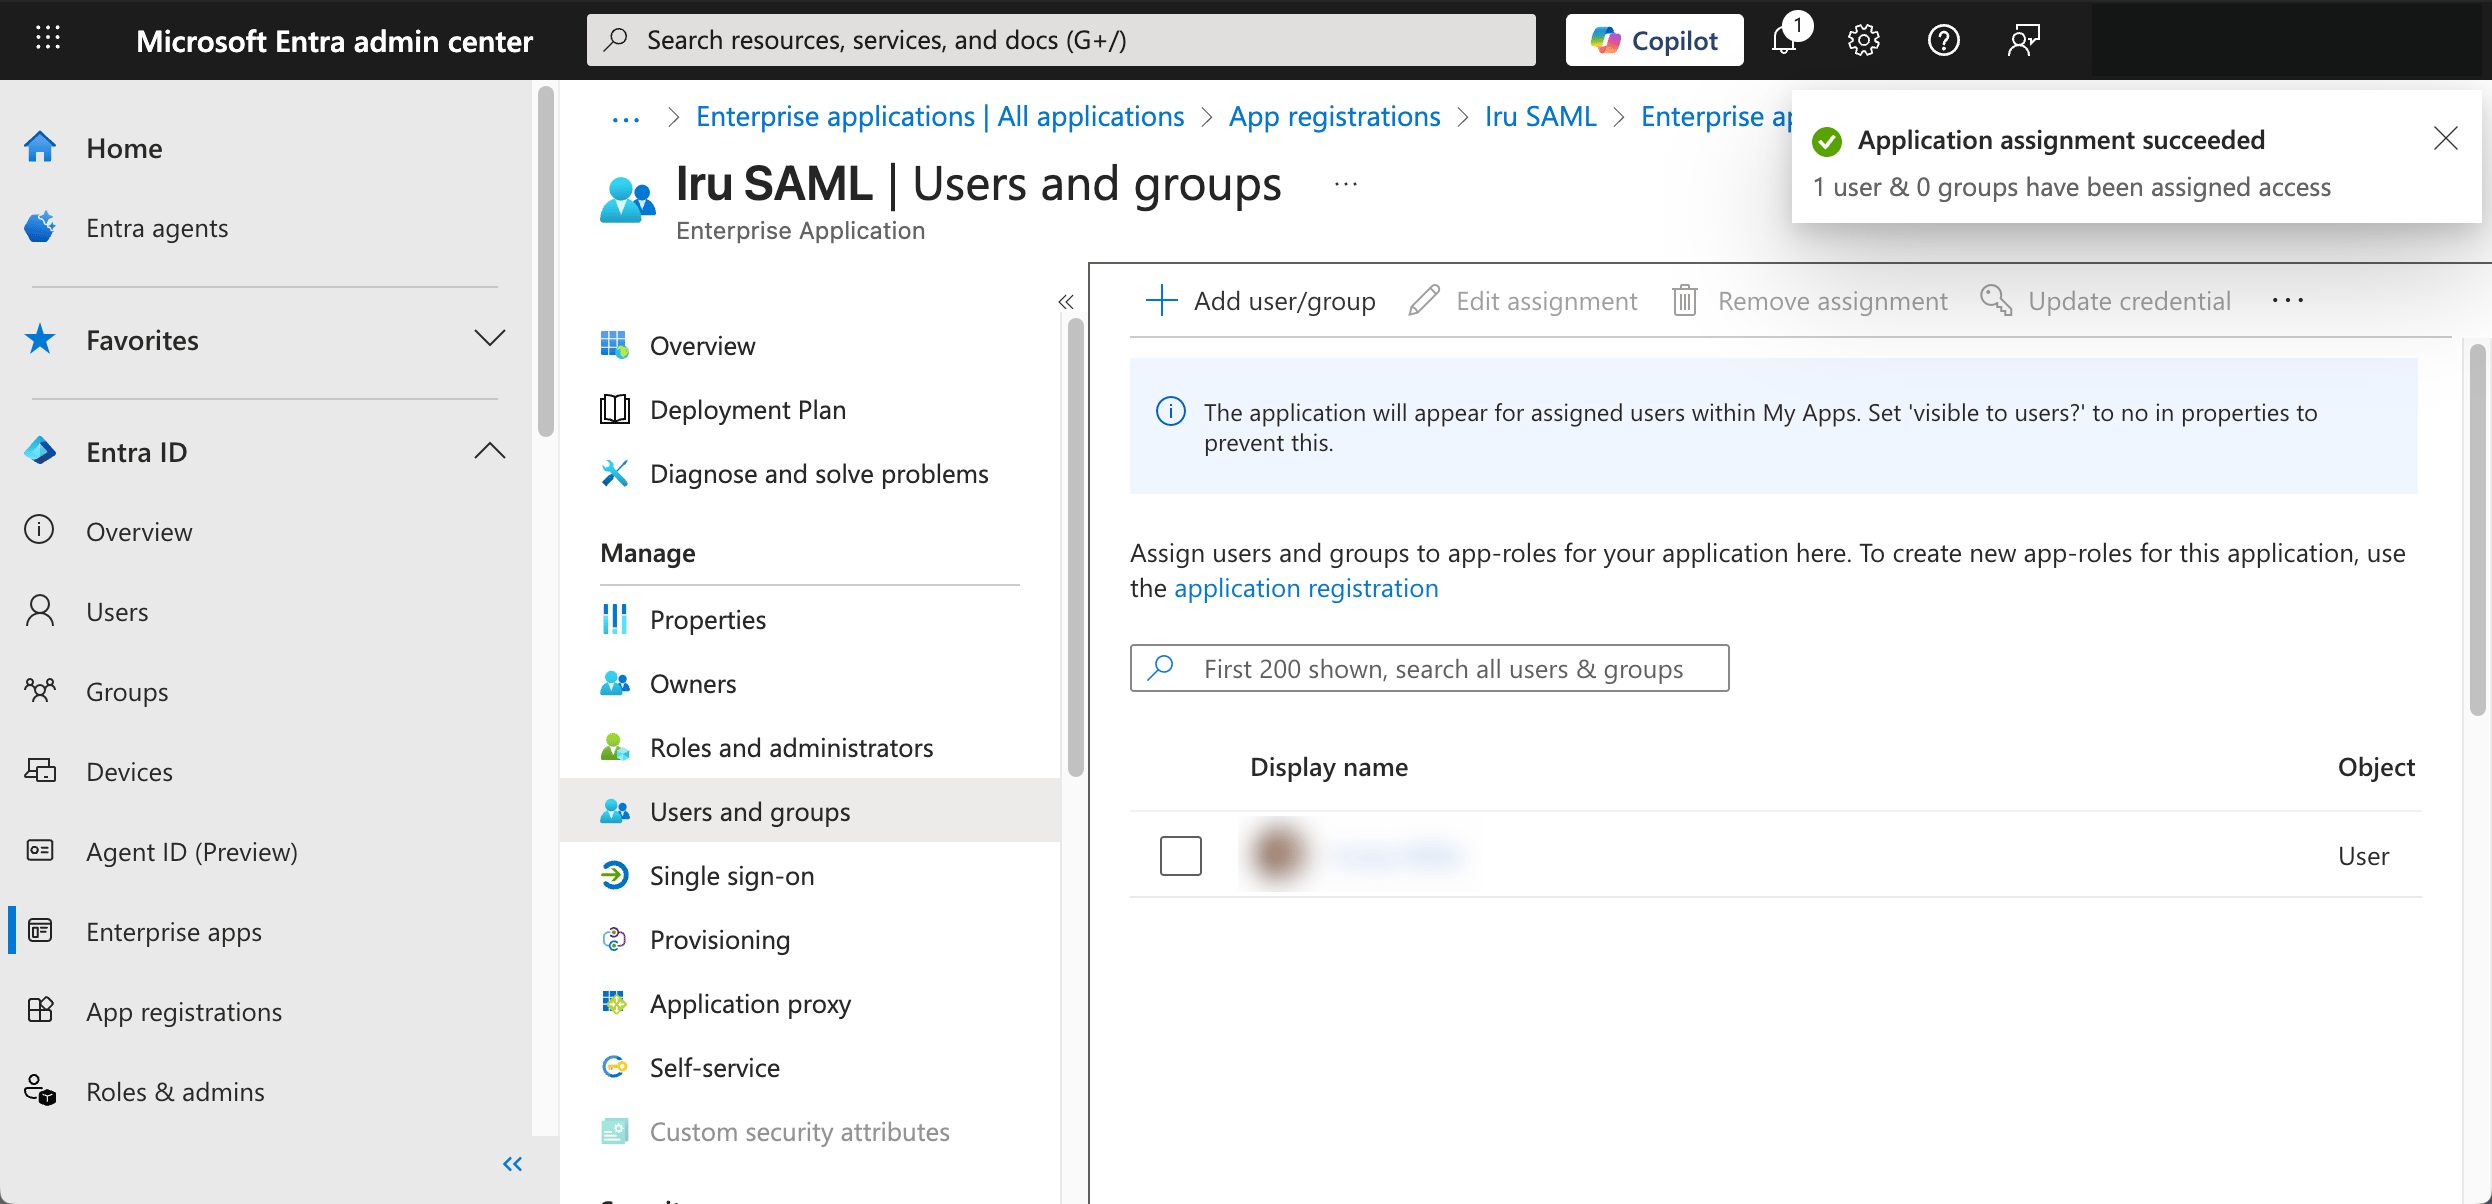
 Confirm that the users and groups you added appear in the **Users and groups** list.
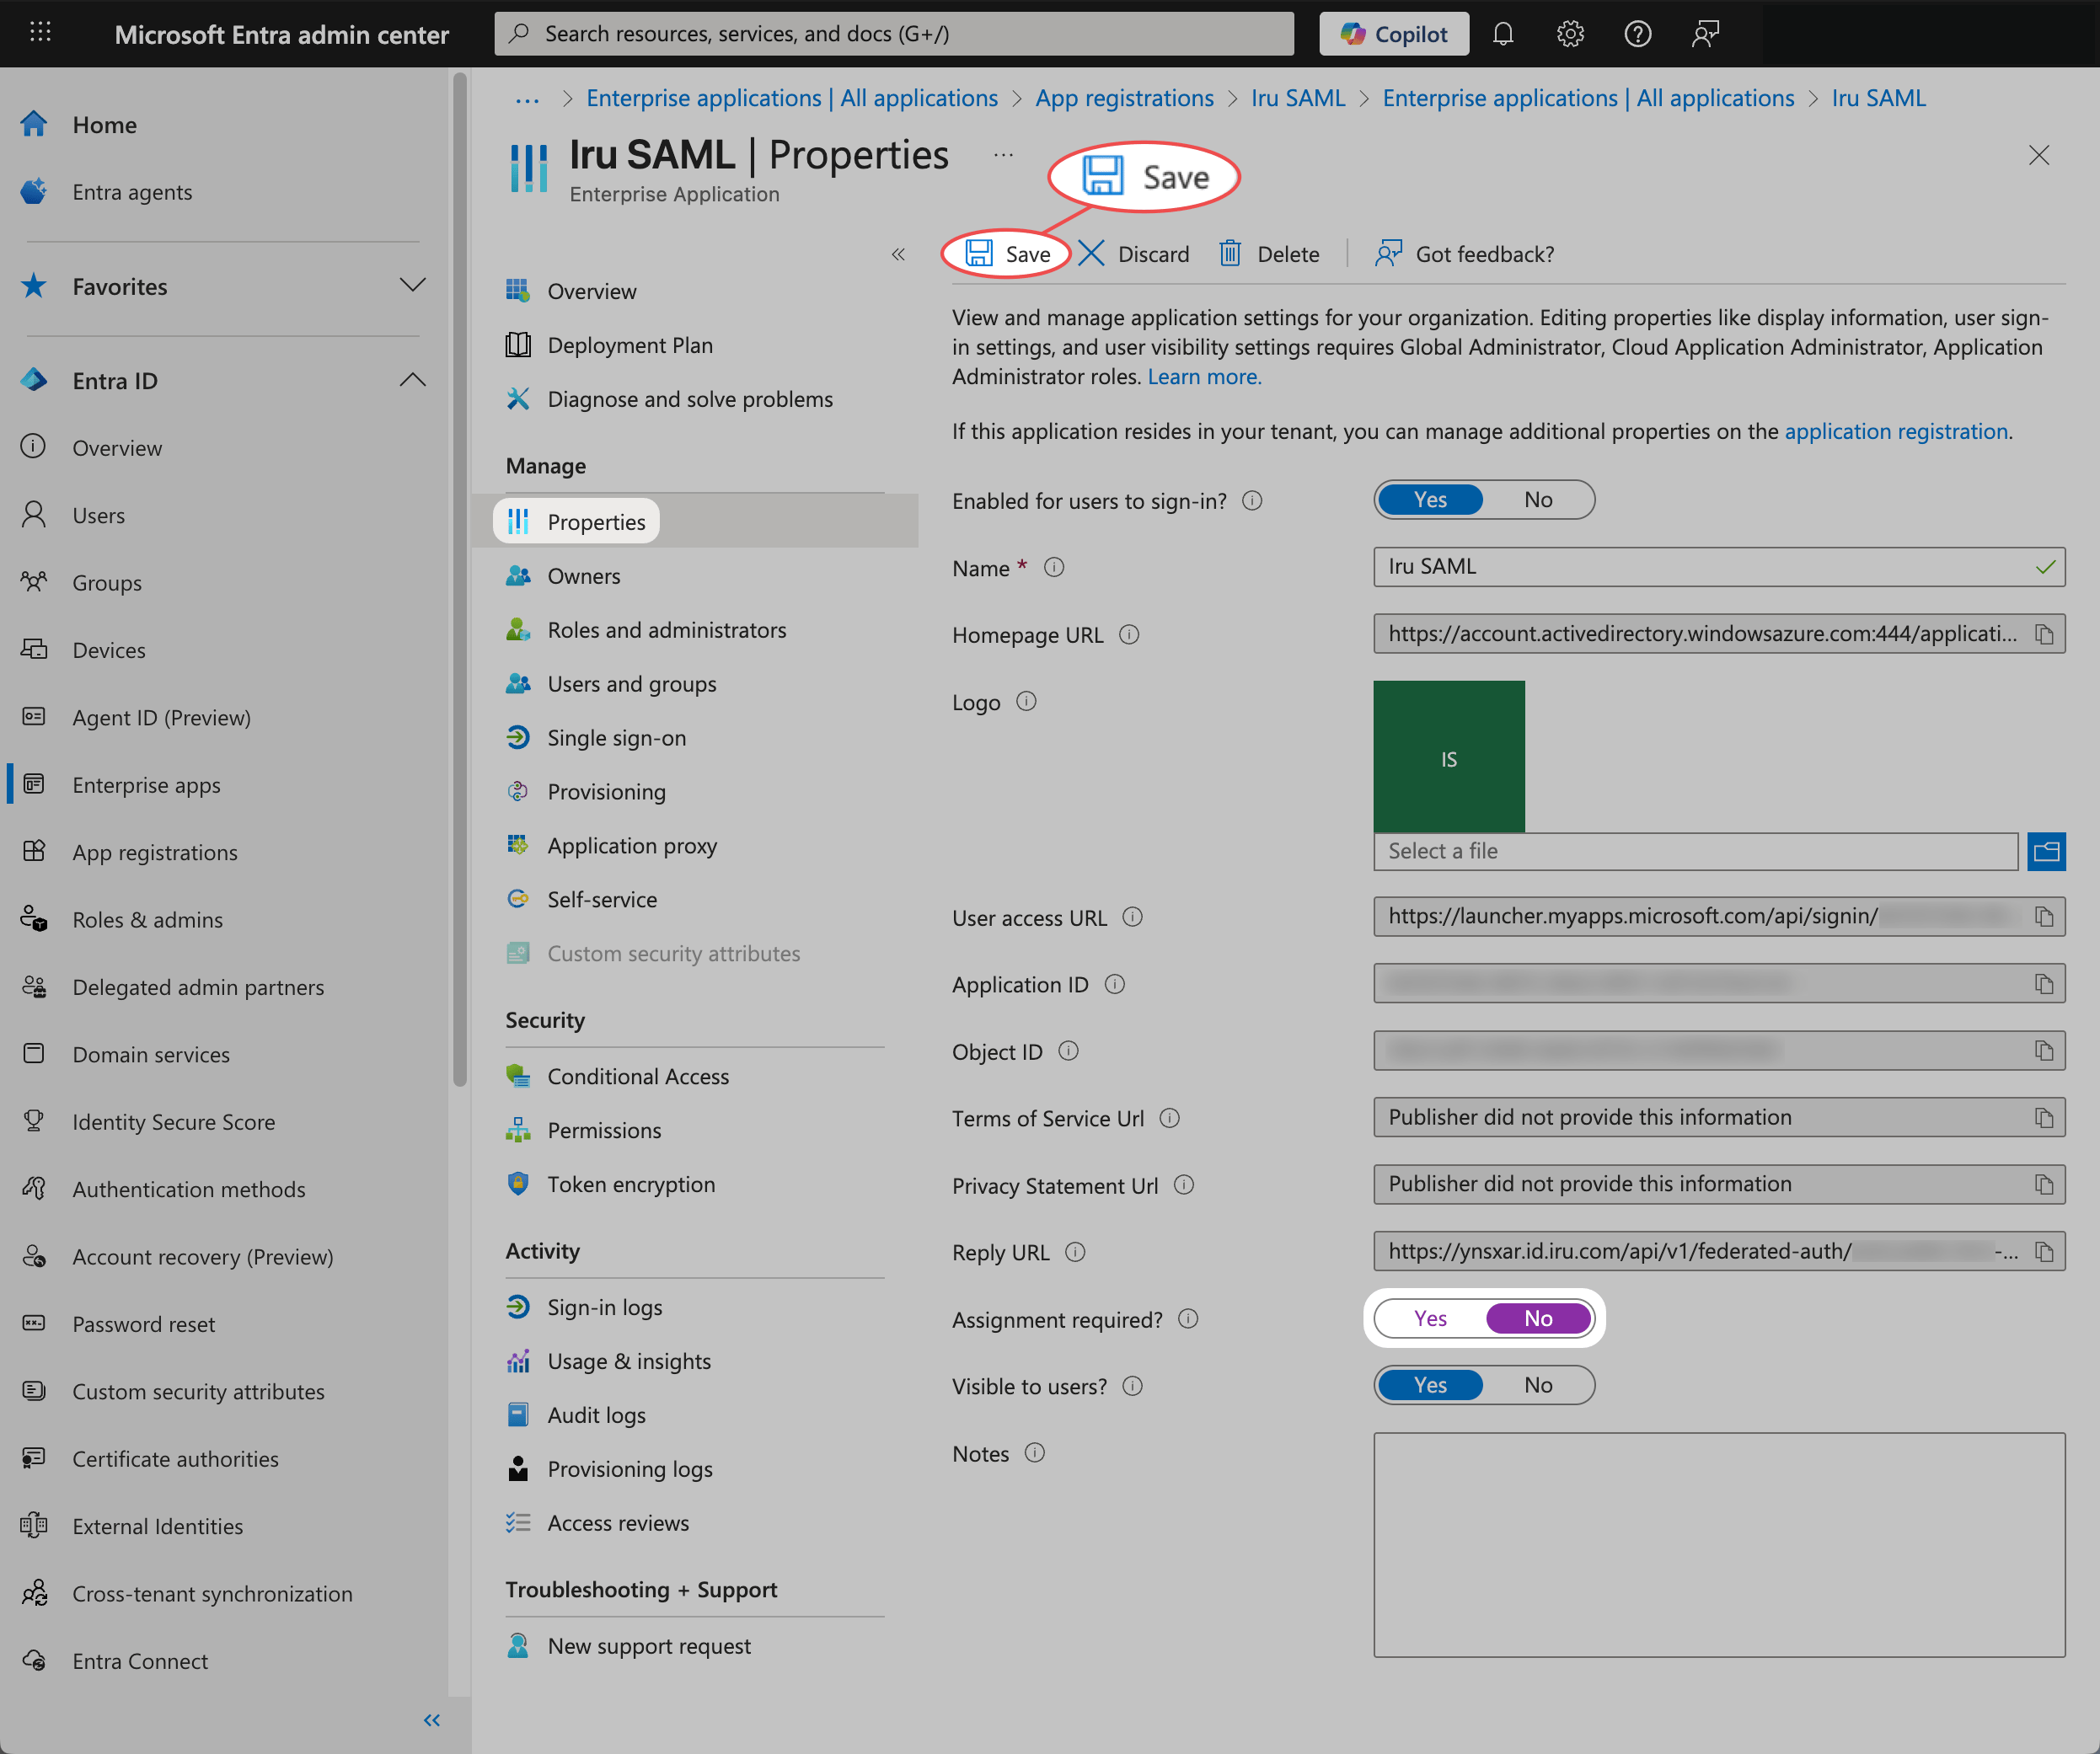
 Alternatively, if you don't want to assign users and groups, you can set the app to not require assignment.
Navigate to your newly created app in **Enterprise apps**.
Click **Properties** under Manage.
Set **Assignment required?** to **No**.
Click **Save**.
Alternatively, if you don't want to assign users and groups, you can set the app to not require assignment.
Navigate to your newly created app in **Enterprise apps**.
Click **Properties** under Manage.
Set **Assignment required?** to **No**.
Click **Save**.
 If you see a message about free tier limitations, it means that a free tier is being used. The Single Sign-On Enterprise App lets you add users (not groups) only.
After completing the Microsoft Entra ID configuration, return to the **Iru Web App Configuration** tab to finish setting up the SAML connection using the SSO URL, Entity ID, and certificate you copied from Microsoft Entra ID.
If you see a message about free tier limitations, it means that a free tier is being used. The Single Sign-On Enterprise App lets you add users (not groups) only.
After completing the Microsoft Entra ID configuration, return to the **Iru Web App Configuration** tab to finish setting up the SAML connection using the SSO URL, Entity ID, and certificate you copied from Microsoft Entra ID.