> ## Documentation Index
> Fetch the complete documentation index at: https://docs.iru.com/llms.txt
> Use this file to discover all available pages before exploring further.
# Single Sign-on with Microsoft Entra ID (Native)
> Configure native Microsoft Entra ID SSO for Iru Endpoint using OAuth2 and OpenID Connect. Enable one-click sign-in for admins with Entra credentials.
### About Microsoft Entra ID Native Integration
Microsoft Entra ID Native integration in Iru Endpoint lets you set up native Microsoft Entra ID integration for SSO. Users authenticate using their Microsoft Entra ID credentials through OAuth2/OpenID Connect.
#### How It Works
When users attempt to access Iru Endpoint, they're redirected to Microsoft Entra ID for authentication using OAuth2/OpenID Connect protocols. After successful authentication, Microsoft Entra ID sends an access token back to Iru Endpoint, which validates the user's identity and grants access. SSO can be used for [Iru Endpoint Web App](/en/endpoint/getting-started/foundation/admins-and-access) sign-in and for [Require Authentication with Automated Device Enrollment](/en/endpoint/enrollment/configure-require-authentication-for-enrollment).
Microsoft Entra ID [is the new name](https://learn.microsoft.com/en-us/azure/active-directory/fundamentals/new-name) for Azure AD (Azure Active Directory)
> Because client secrets have a maximum life of 24 months, we recommend that you configure [SAML based Single Sign-On](/en/endpoint/integrations/single-sign-on-integrations/single-sign-on-with-microsoft-entra-id-saml) instead of using the method described in this document.
### Prerequisites
Before you begin, ensure you have:
* [Access to the Iru Endpoint Web App](/en/endpoint/getting-started/foundation/admins-and-access) as an Admin or Account Owner
* An administrator account in Microsoft Entra ID with permissions to create app registrations (such as Global Administrator, Application Administrator, or Cloud Application Administrator)
### Configuring Iru Endpoint Connection
Follow these steps to configure the connection in Iru:
In Iru Endpoint, in the sidebar, click the [**Account Menu Button**](/en/iru/platform-overview/account-menu).
Click the **Access** option in the menu.
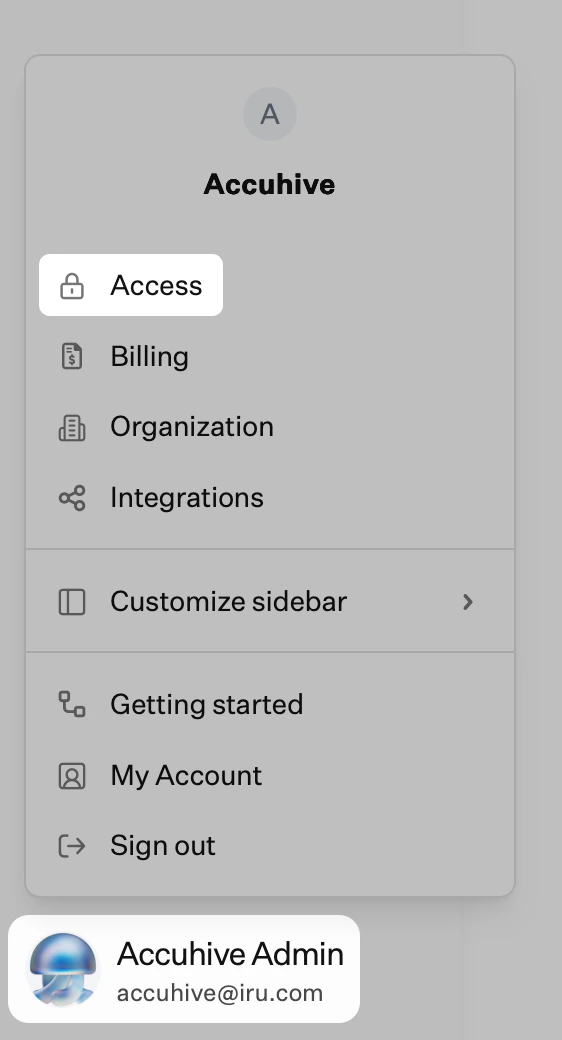 Select the **Admin and authentication** tab (selected by default) and scroll down to **Authentication methods**.
Click **+ Authentication method**.
Enter a display name for the SSO Connection.
Select **Microsoft Entra ID** for the Authentication method.
Click **Create**.
Copy the **Redirect URL** into a text document for later use. You'll need this for the Microsoft Entra ID configuration.
Select the **Admin and authentication** tab (selected by default) and scroll down to **Authentication methods**.
Click **+ Authentication method**.
Enter a display name for the SSO Connection.
Select **Microsoft Entra ID** for the Authentication method.
Click **Create**.
Copy the **Redirect URL** into a text document for later use. You'll need this for the Microsoft Entra ID configuration.
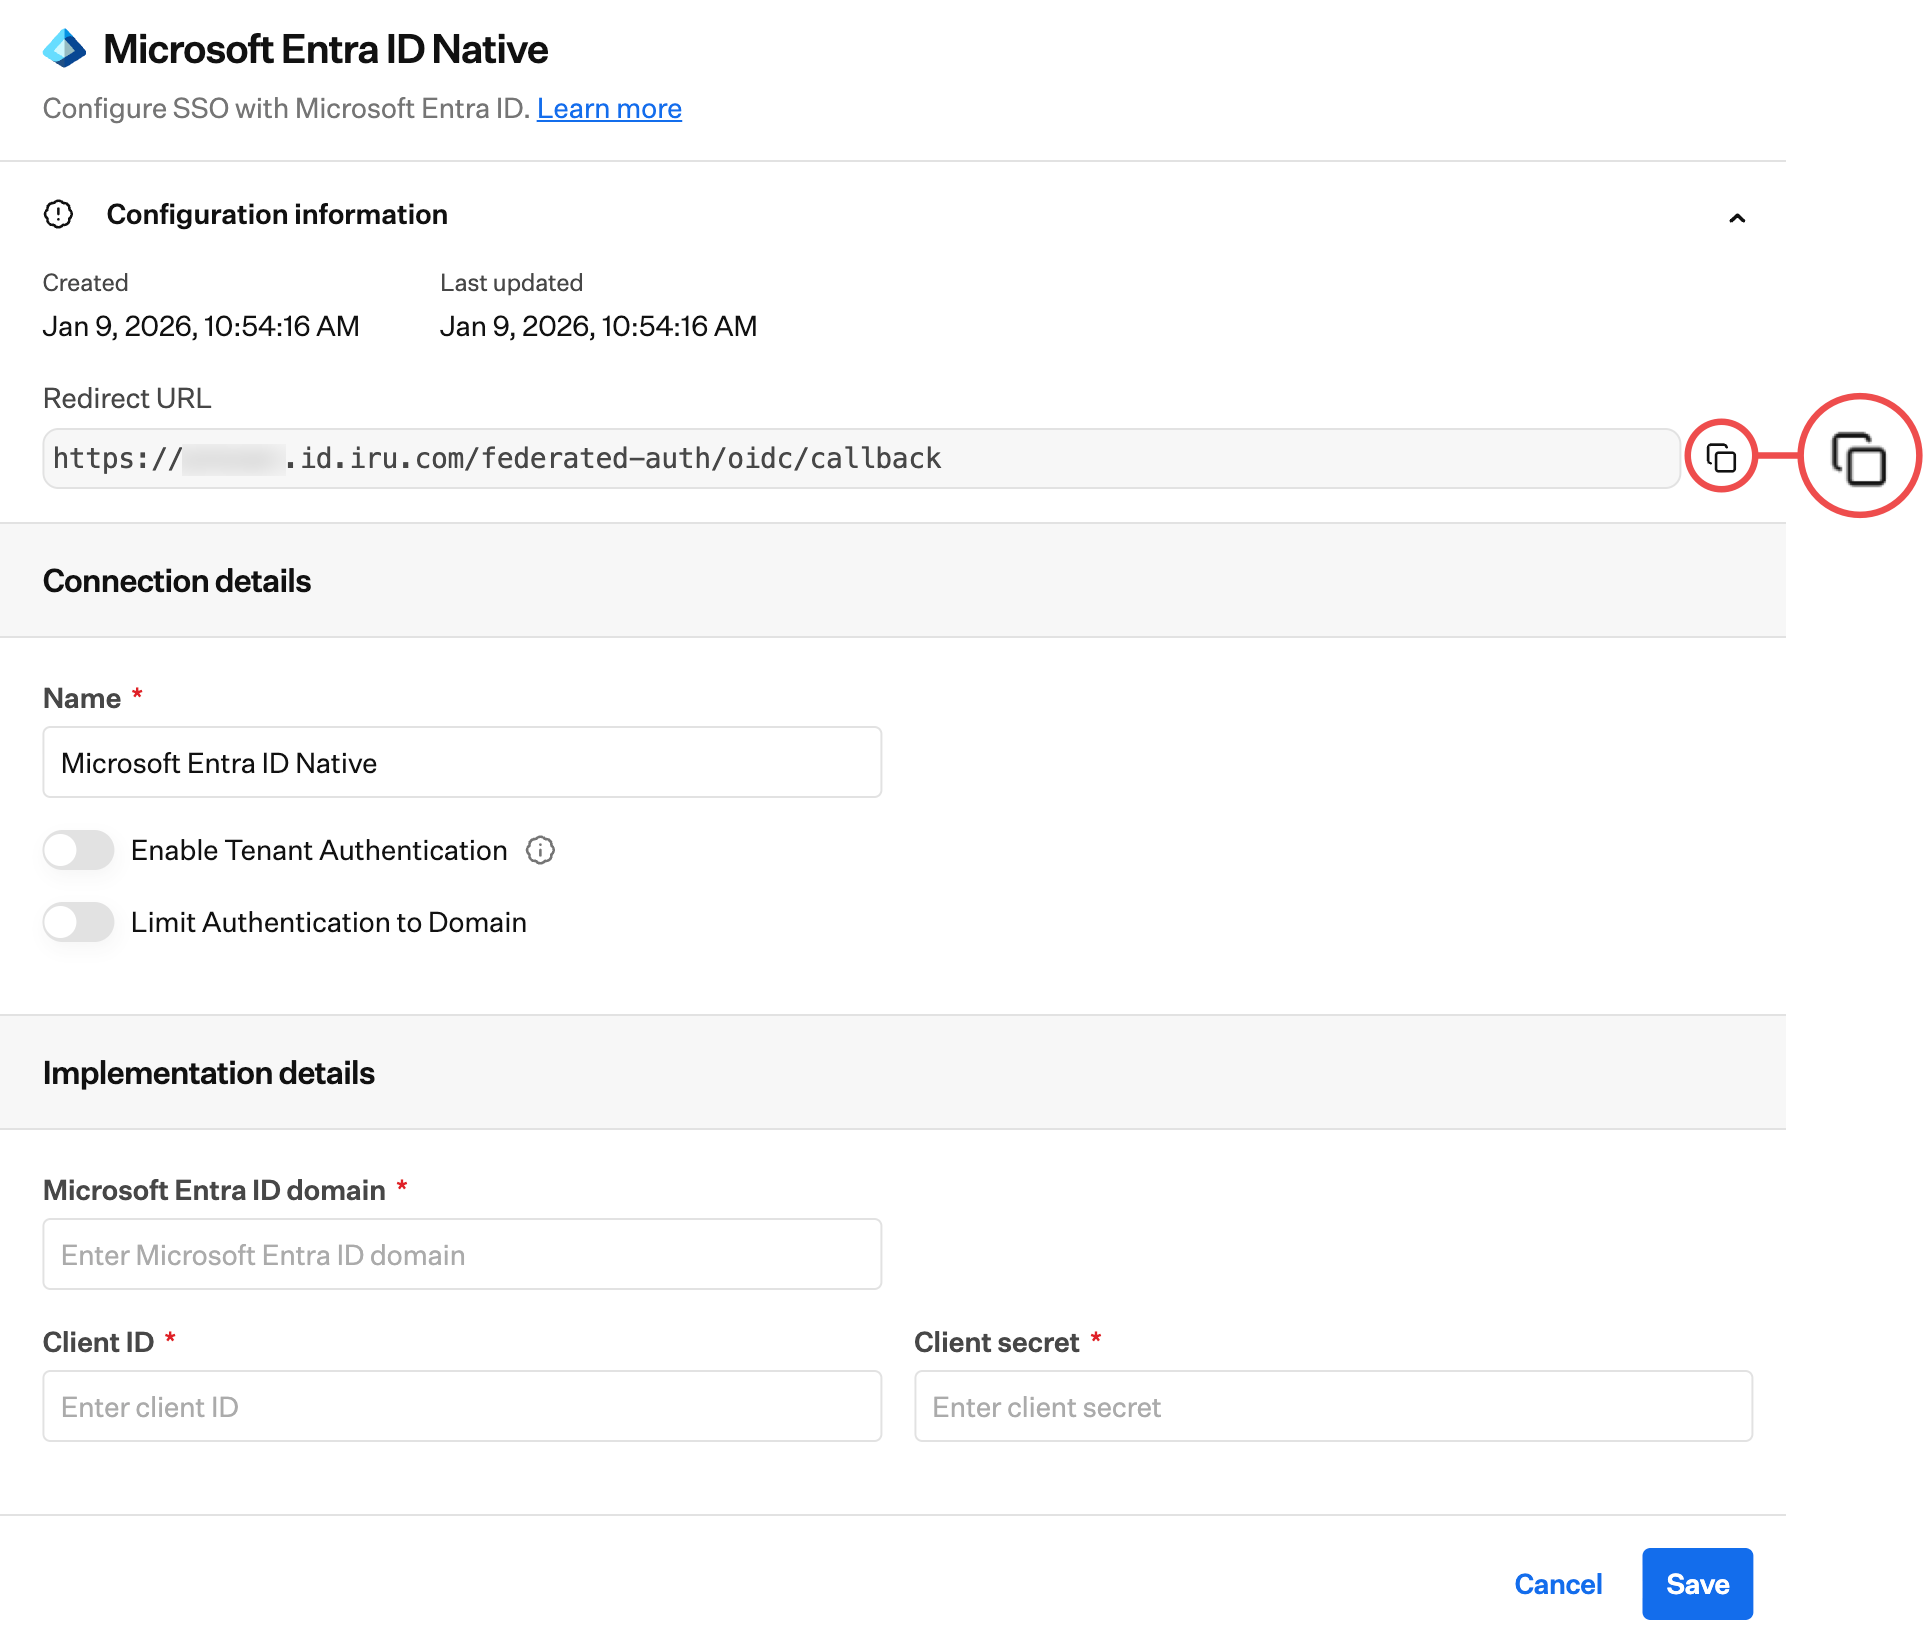 Keep the Iru Web App configuration modal open, then switch to the **Microsoft Entra ID Configuration** tab to continue.
Follow these steps to complete the configuration:
After completing the Microsoft Entra ID configuration, return here to finish setting up the SSO connection in Iru Endpoint. You'll need the Client ID and Client secret you copied from Microsoft Entra ID.
Enter the **Tenant ID** that the application was registered within into the **Microsoft Entra ID Domain** field. Please refer to [Microsoft's documentation to locate your Tenant ID](https://learn.microsoft.com/en-us/azure/cost-management-billing/manage/find-tenant-id-domain).
Enter the **Client ID** you previously copied from the Entra admin center.
Enter the **Client Secret** you previously copied from the Entra admin center.
Click **Save**.
Keep the Iru Web App configuration modal open, then switch to the **Microsoft Entra ID Configuration** tab to continue.
Follow these steps to complete the configuration:
After completing the Microsoft Entra ID configuration, return here to finish setting up the SSO connection in Iru Endpoint. You'll need the Client ID and Client secret you copied from Microsoft Entra ID.
Enter the **Tenant ID** that the application was registered within into the **Microsoft Entra ID Domain** field. Please refer to [Microsoft's documentation to locate your Tenant ID](https://learn.microsoft.com/en-us/azure/cost-management-billing/manage/find-tenant-id-domain).
Enter the **Client ID** you previously copied from the Entra admin center.
Enter the **Client Secret** you previously copied from the Entra admin center.
Click **Save**.
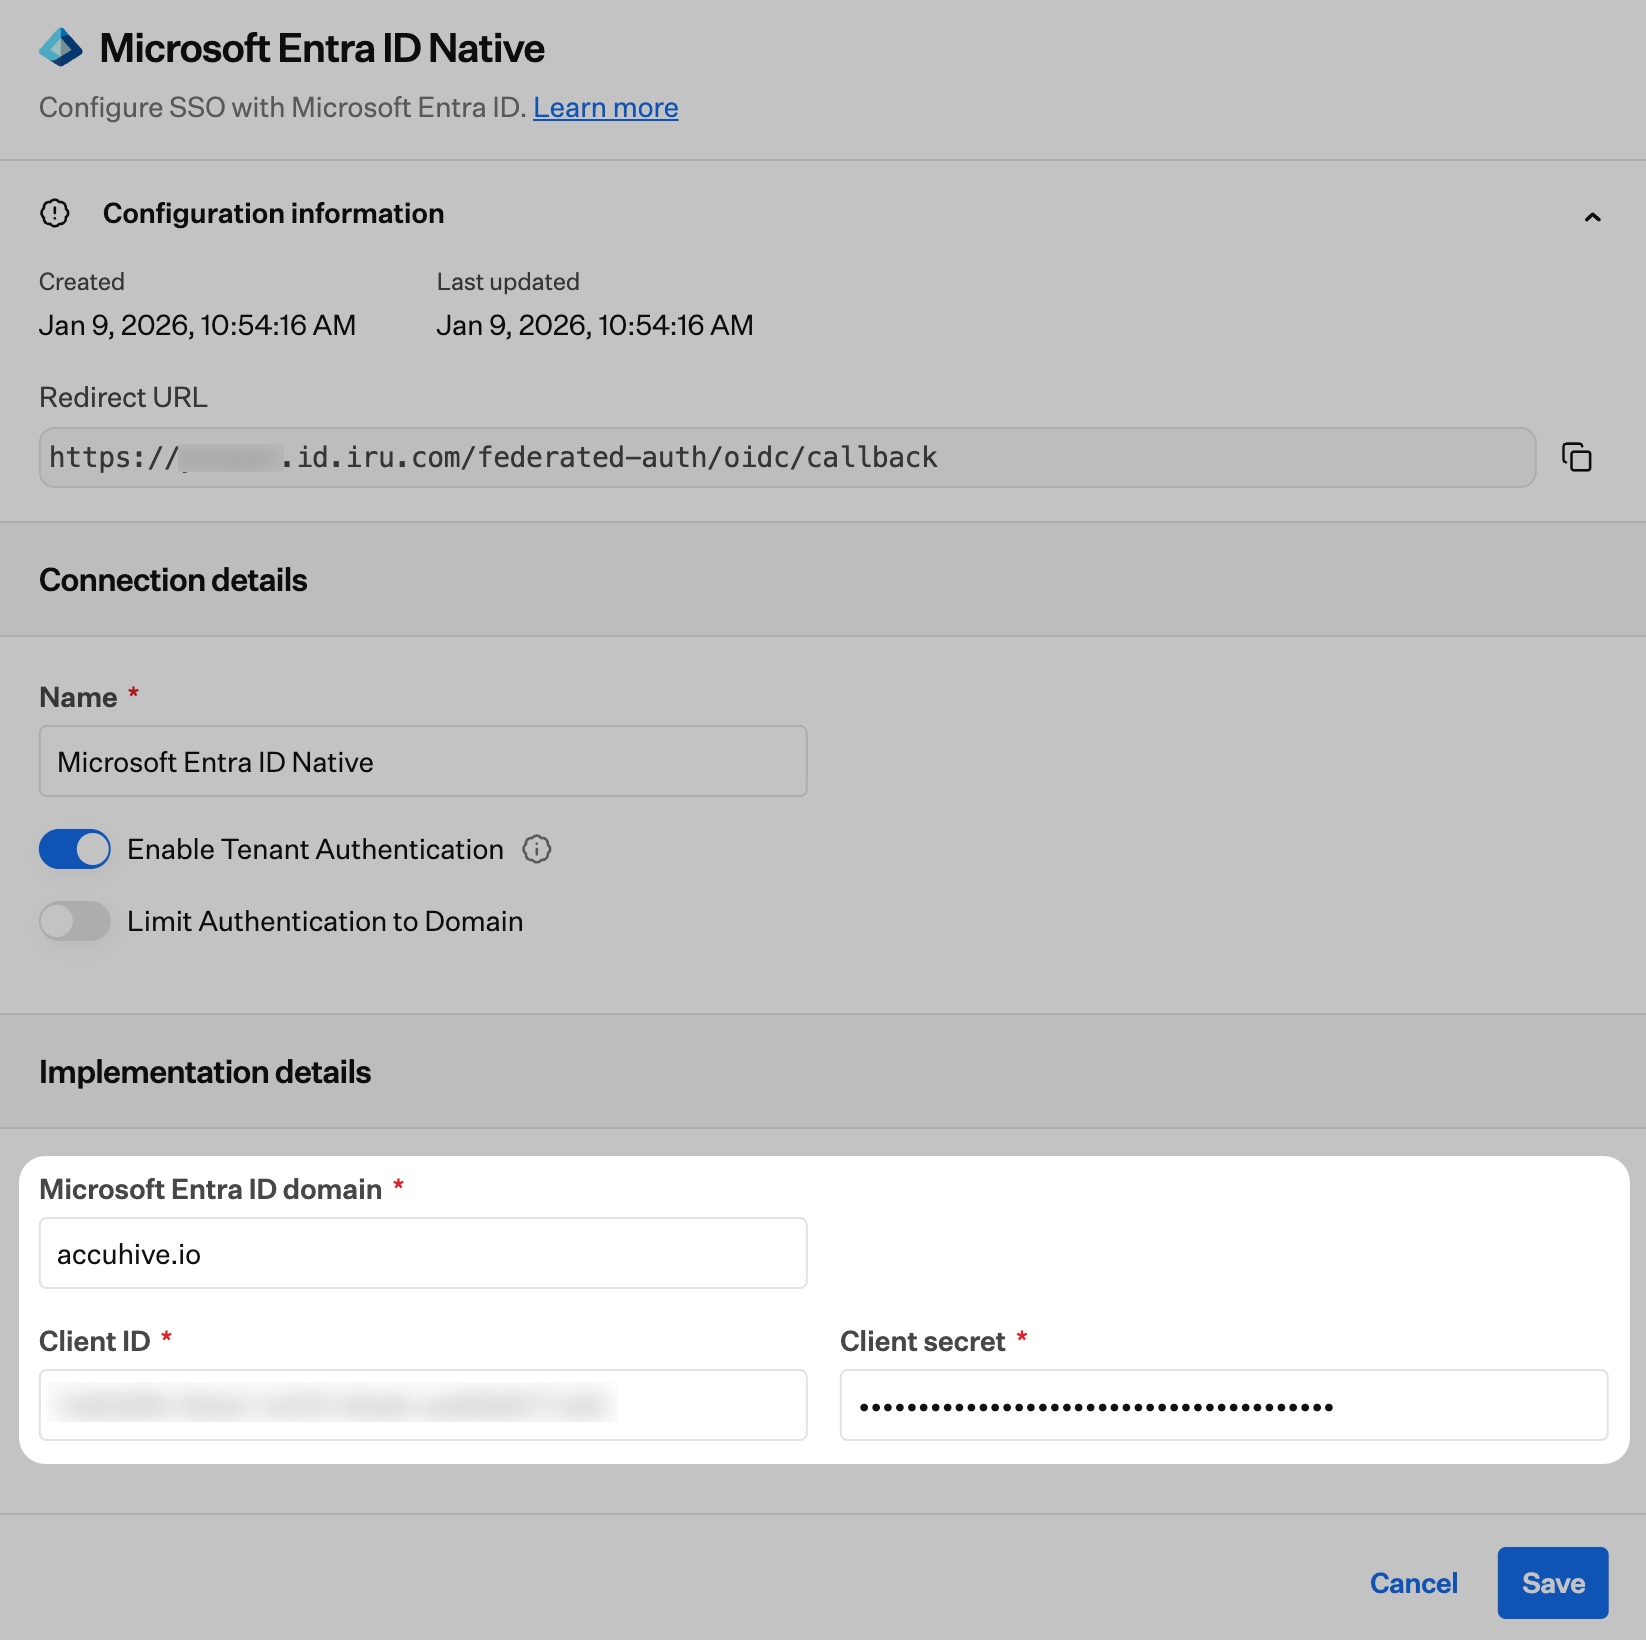 After saving, a new dialogue box will appear with a link to **authorize your connection.** A Microsoft Entra ID administrator for your domain must click the link and complete this process to authorize the application. This box will not go away after authorization is completed.
In the new window that launches, sign in and click **Accept**.
After clicking **Accept,** you will be brought to an authorization success page.
Your connection has now been successfully configured and may be enabled and tested.
If you encounter the error "Failed to obtain access token," it may be because the secret ID was used instead of the correct value.
### Allow for Tenant Authentication
Once you have configured the SAML connection in Iru Endpoint and your identity provider, you can allow its use for tenant authentication. For step-by-step instructions, please refer to the **Allowing Tenant Authentication and Managing Connections** section in our [Single Sign-on support article](/en/endpoint/integrations/single-sign-on-integrations/single-sign-on).
### Limit Authentication to Domain
When configuring the SAML connection, you can optionally limit authentication to one or more domains. This can be useful when the SSO connection could authenticate to multiple domains. You can limit the authentication to your Iru tenant to a subset of the available domains.
### Enforcing Single Sign-On
Once you have configured at least one Single Sign-on connection, you can disable Passkey, Google Social, and Microsoft Social connections. Disabling these connections will disable the ability for Iru Endpoint administrators in your tenant to authenticate via those methods. Please refer to our [Single Sign-on support article](/en/endpoint/integrations/single-sign-on-integrations/single-sign-on) for step-by-step instructions.
### Renewing the Client Secret
Follow the steps in the **Microsoft Entra ID Configuration** tab above to create a new client secret. Complete steps "Access Certificates and Secrets" through "Copy Secret Value" to create a new client secret and copy the value.
After copying the value, return to the **Iru Web App Configuration** tab and follow steps 1-3 from the **Configuring Iru Endpoint Connection** section.
Click on the ellipsis next to the SSO integration that was created earlier in this article.
Choose **Edit**.
After saving, a new dialogue box will appear with a link to **authorize your connection.** A Microsoft Entra ID administrator for your domain must click the link and complete this process to authorize the application. This box will not go away after authorization is completed.
In the new window that launches, sign in and click **Accept**.
After clicking **Accept,** you will be brought to an authorization success page.
Your connection has now been successfully configured and may be enabled and tested.
If you encounter the error "Failed to obtain access token," it may be because the secret ID was used instead of the correct value.
### Allow for Tenant Authentication
Once you have configured the SAML connection in Iru Endpoint and your identity provider, you can allow its use for tenant authentication. For step-by-step instructions, please refer to the **Allowing Tenant Authentication and Managing Connections** section in our [Single Sign-on support article](/en/endpoint/integrations/single-sign-on-integrations/single-sign-on).
### Limit Authentication to Domain
When configuring the SAML connection, you can optionally limit authentication to one or more domains. This can be useful when the SSO connection could authenticate to multiple domains. You can limit the authentication to your Iru tenant to a subset of the available domains.
### Enforcing Single Sign-On
Once you have configured at least one Single Sign-on connection, you can disable Passkey, Google Social, and Microsoft Social connections. Disabling these connections will disable the ability for Iru Endpoint administrators in your tenant to authenticate via those methods. Please refer to our [Single Sign-on support article](/en/endpoint/integrations/single-sign-on-integrations/single-sign-on) for step-by-step instructions.
### Renewing the Client Secret
Follow the steps in the **Microsoft Entra ID Configuration** tab above to create a new client secret. Complete steps "Access Certificates and Secrets" through "Copy Secret Value" to create a new client secret and copy the value.
After copying the value, return to the **Iru Web App Configuration** tab and follow steps 1-3 from the **Configuring Iru Endpoint Connection** section.
Click on the ellipsis next to the SSO integration that was created earlier in this article.
Choose **Edit**.
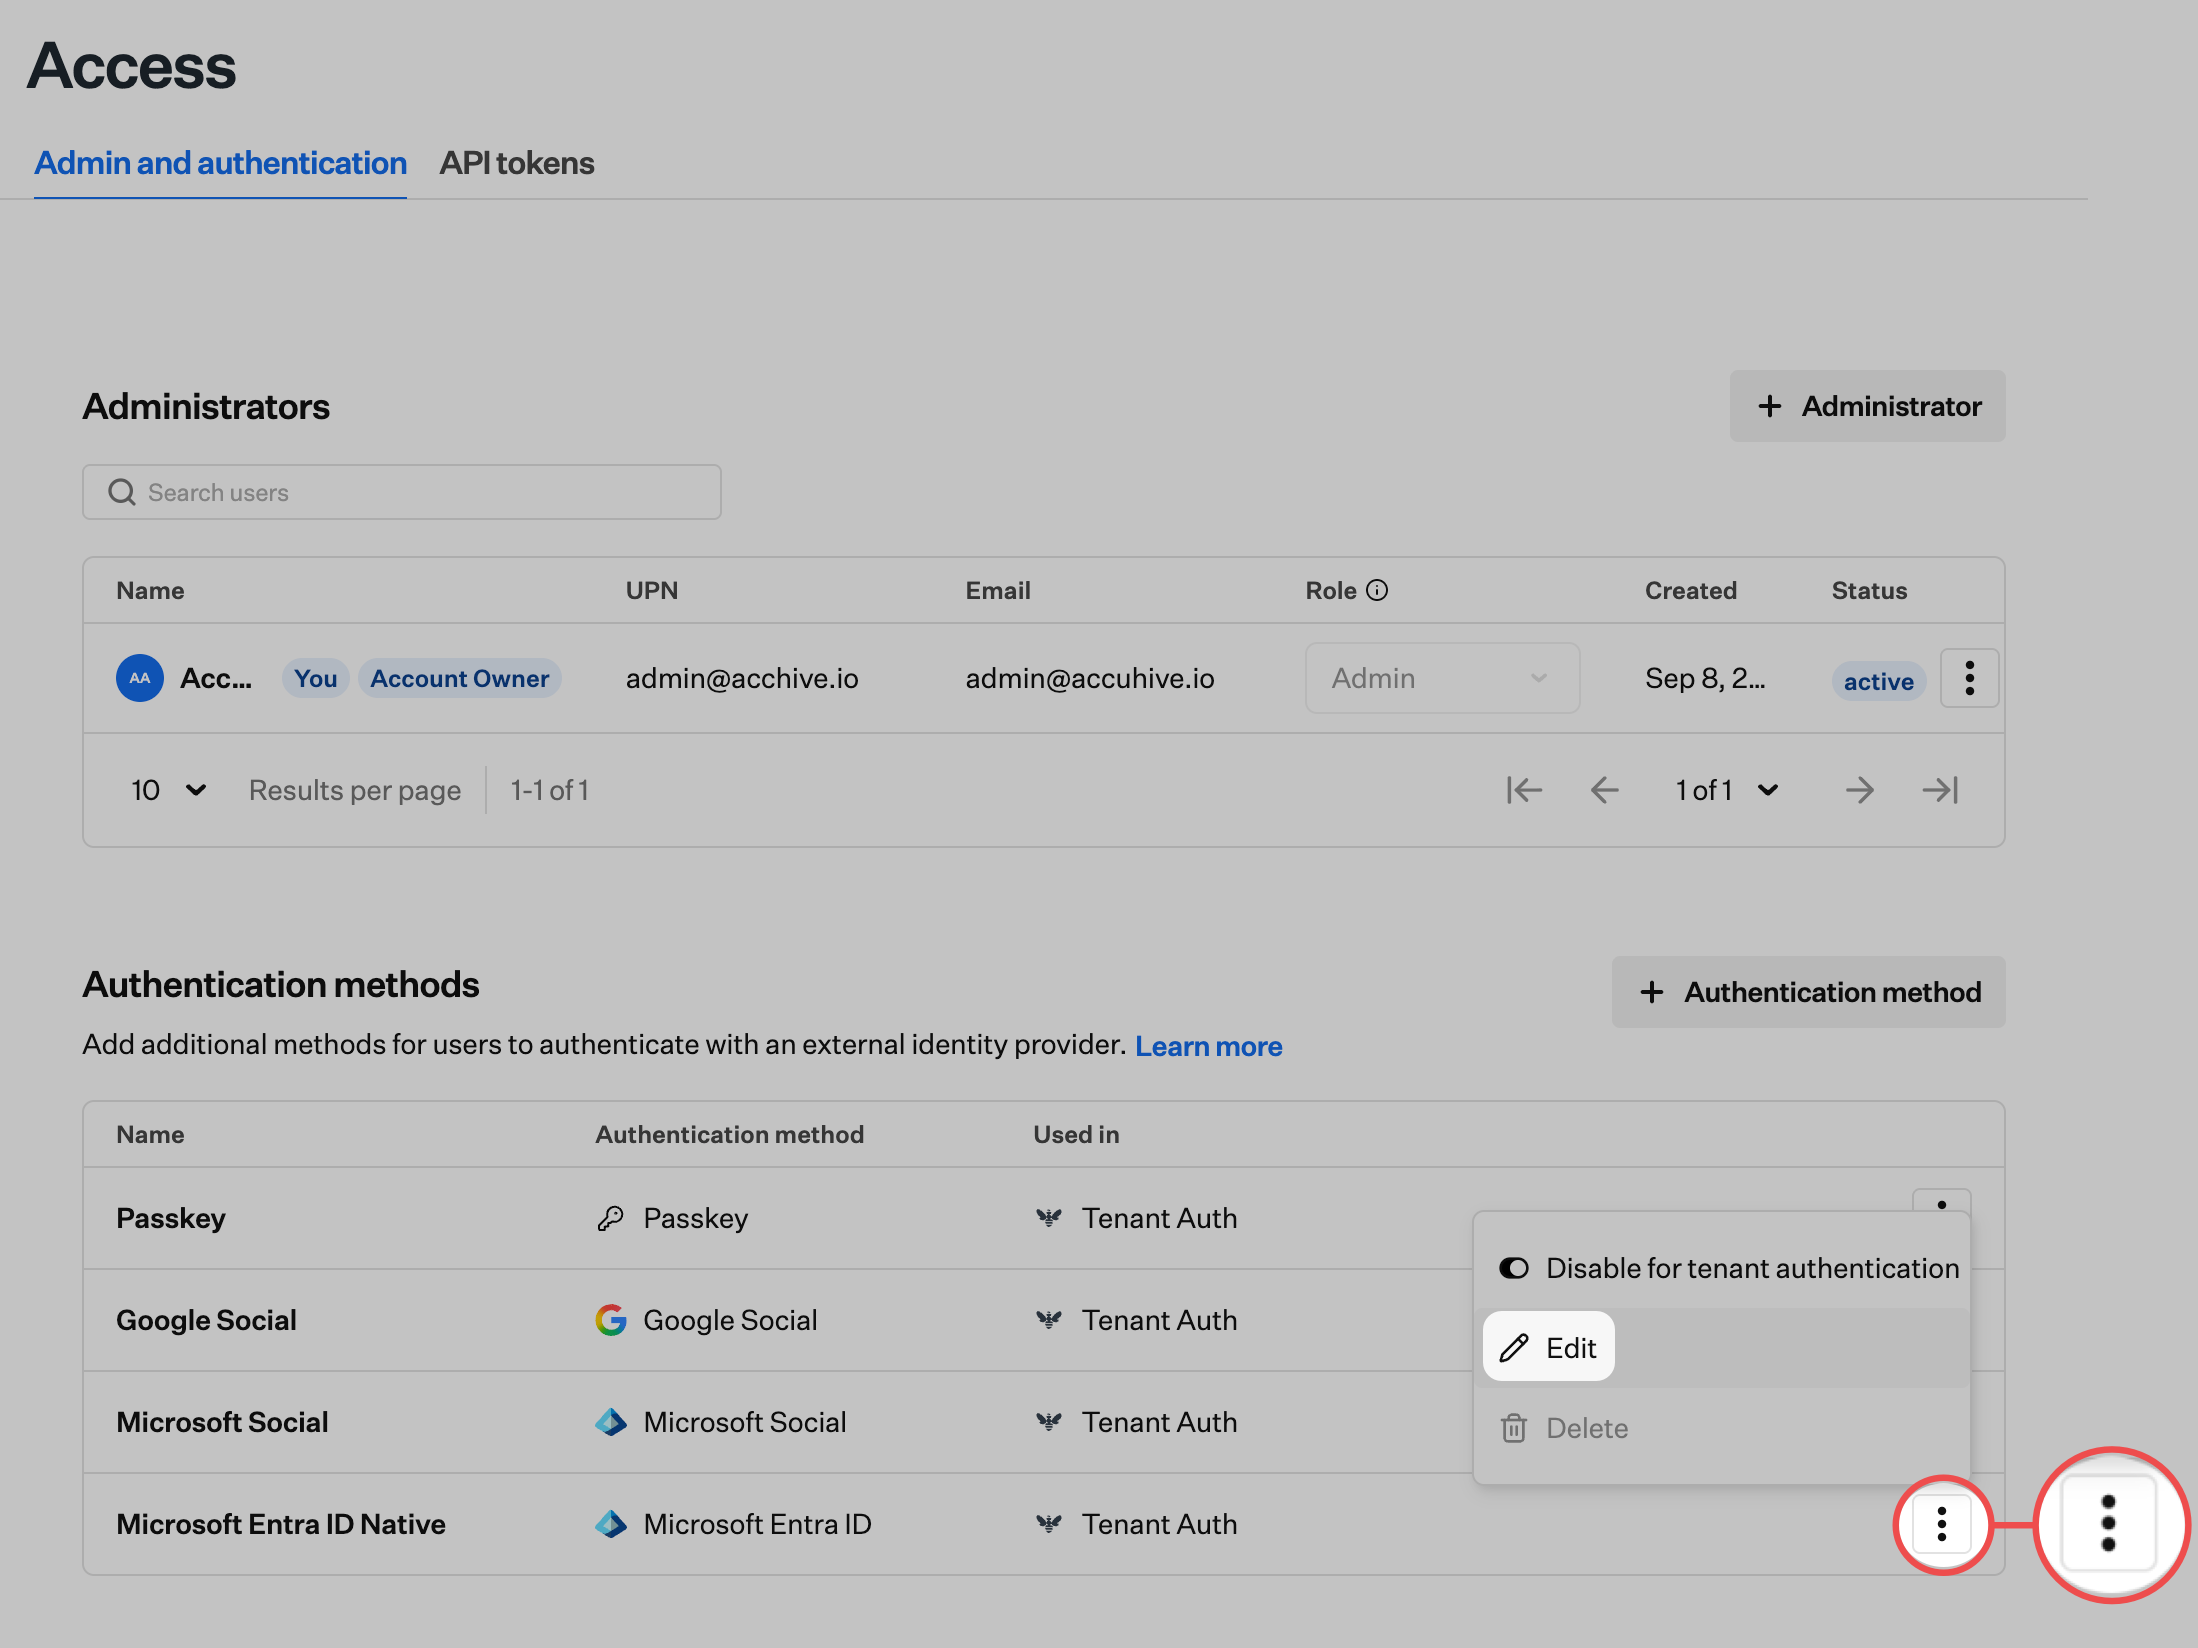 Click the **Edit client secret** button.
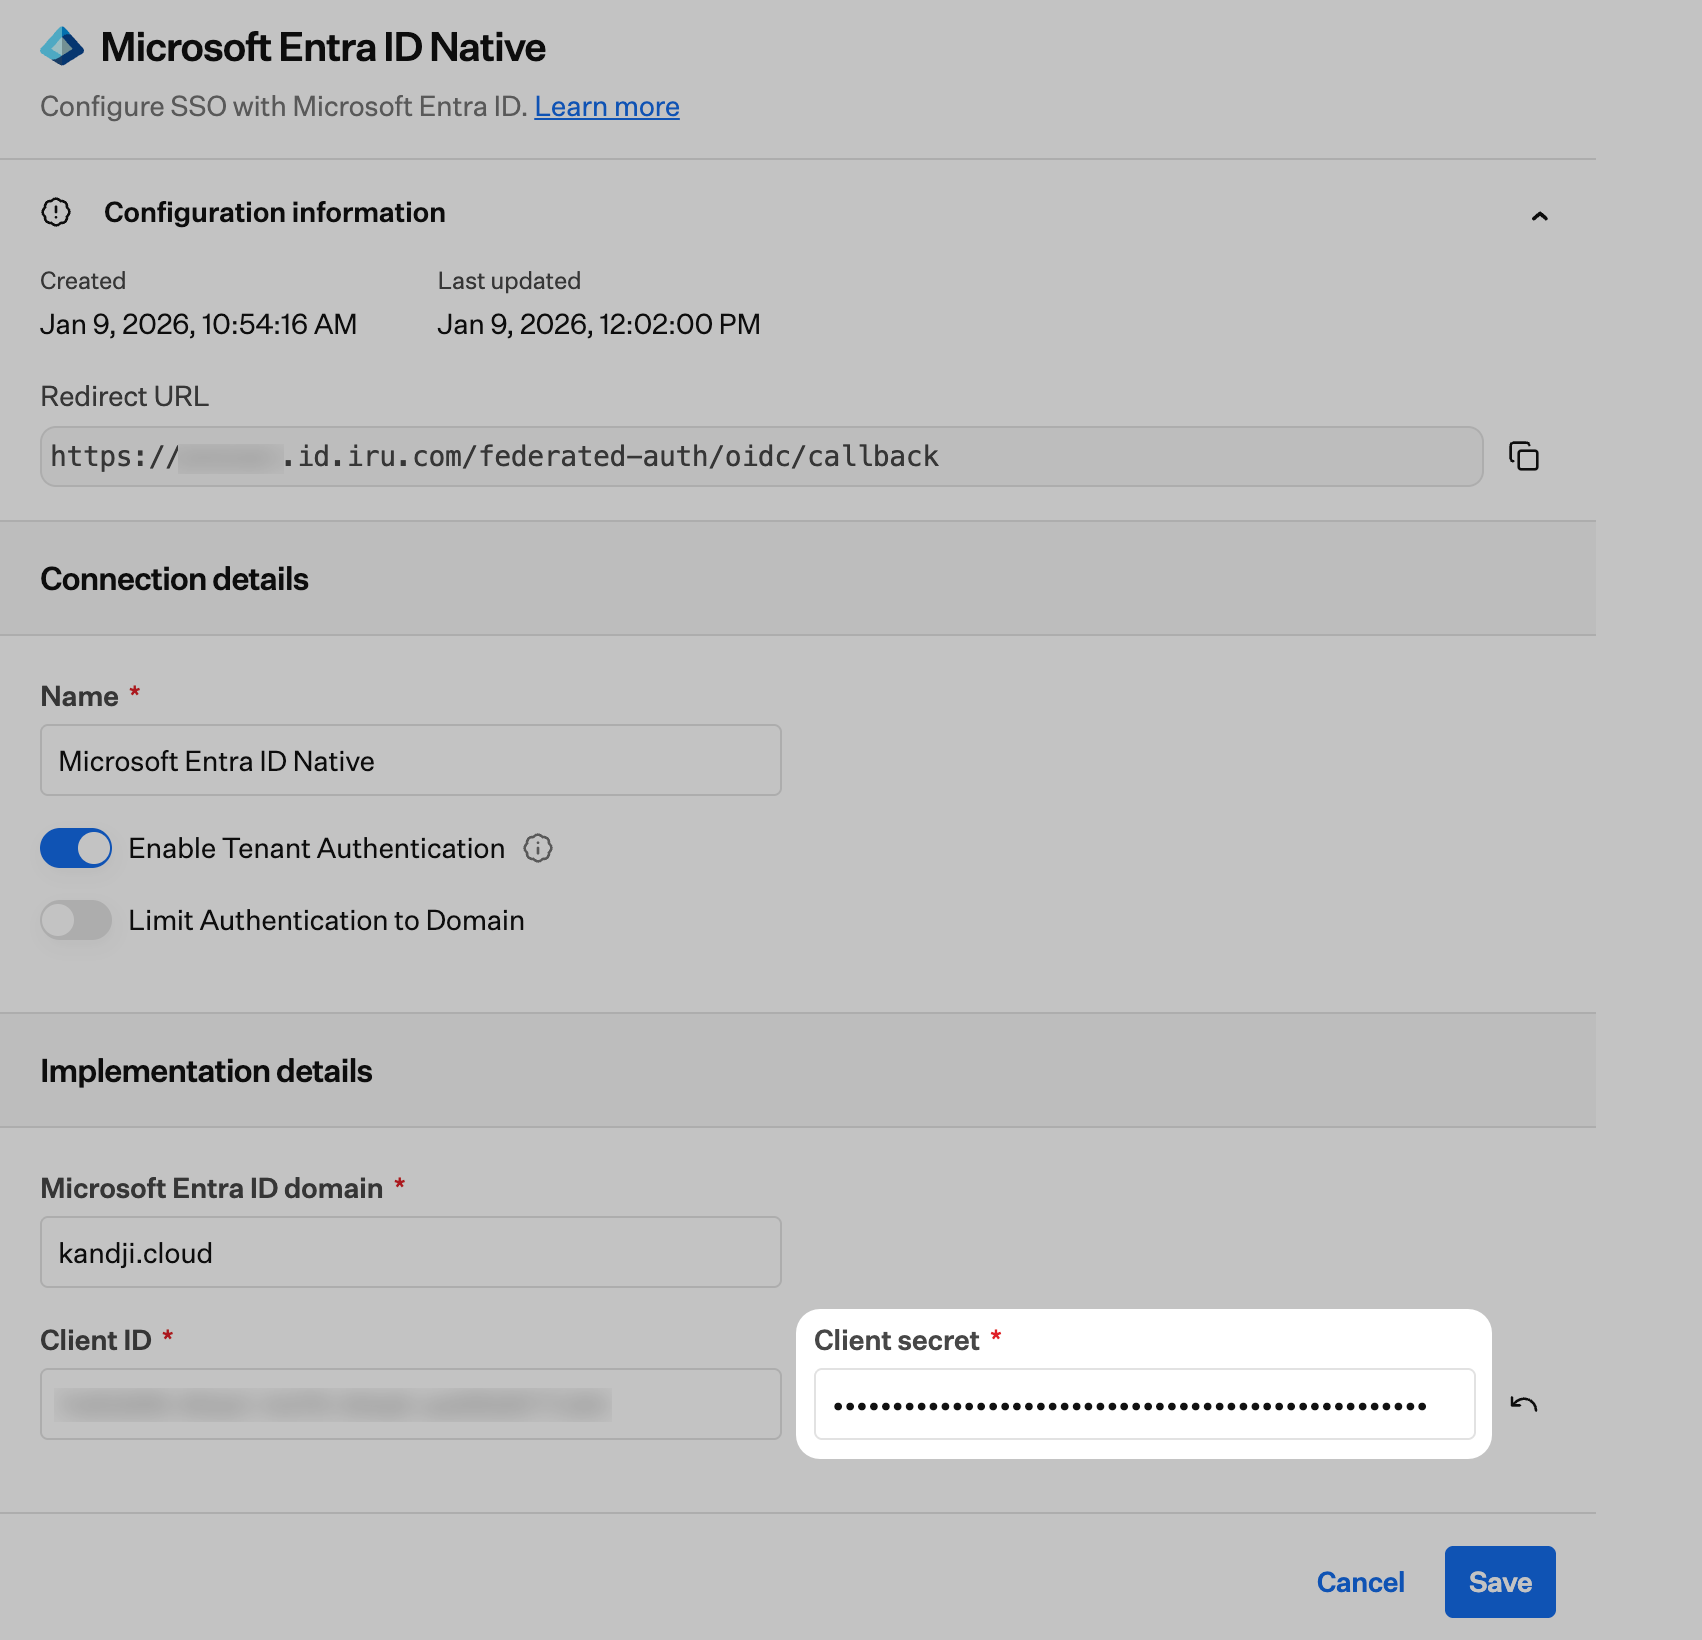
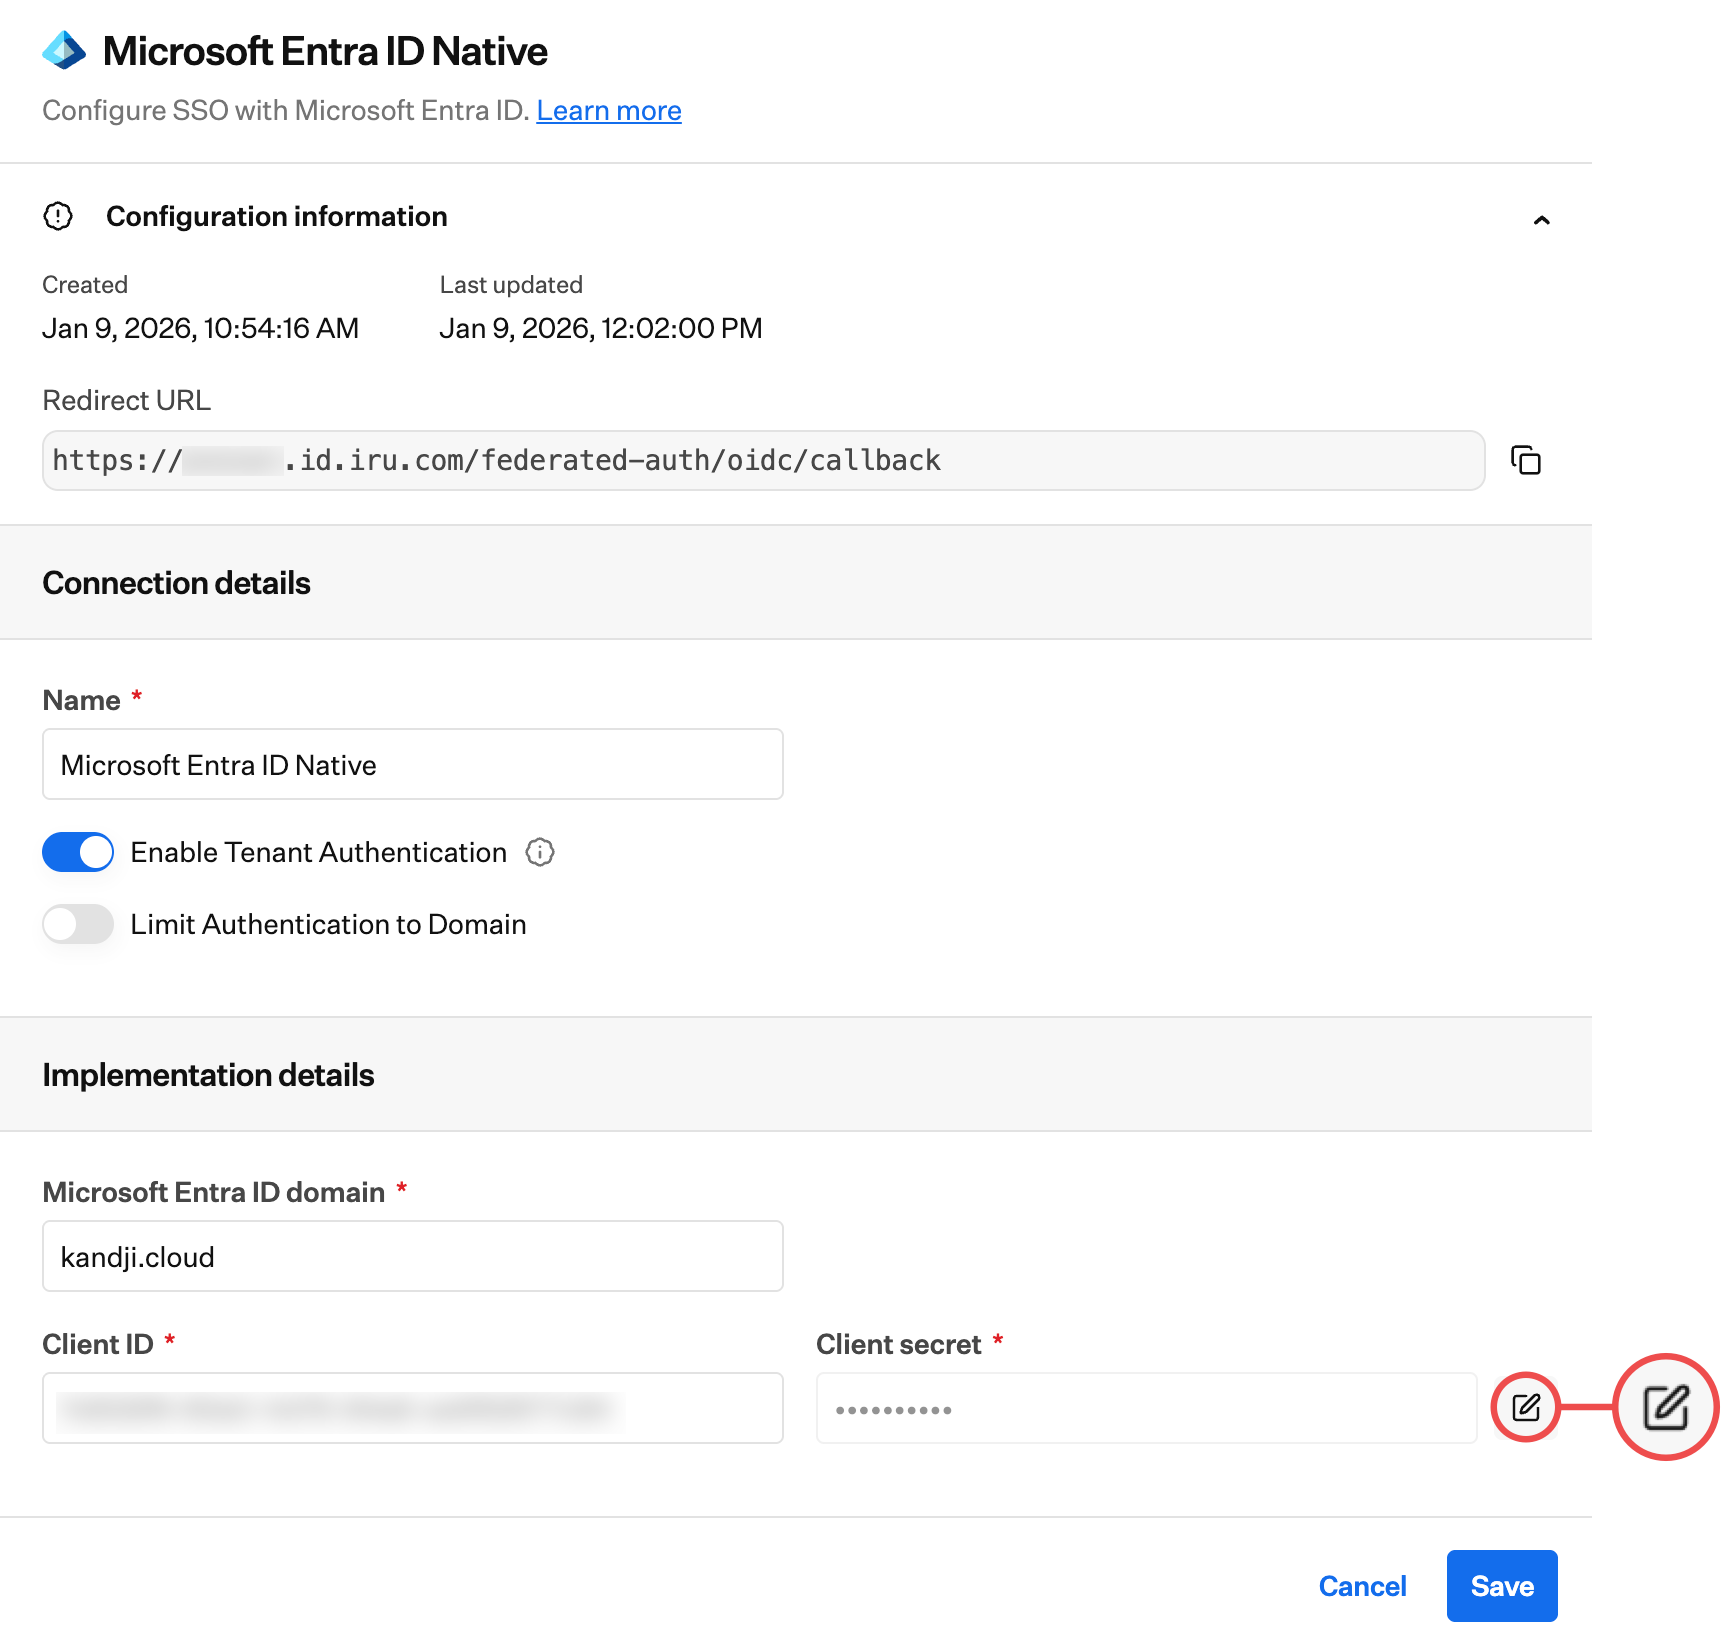 Paste the new **Client secret** value that was copied earlier.
Click **Save**.
Paste the new **Client secret** value that was copied earlier.
Click **Save**.
 Be sure to test the configuration by signing into the Iru Endpoint web app and choosing the Native SSO login option that was created. You'll want to test this with a private browser window/incognito window and verify that you are able to sign in to the Iru Endpoint web app.
You can then optionally delete the previous client secret from the App registration in Entra ID.
### Setting Up Microsoft Entra ID Application
Before starting the Microsoft Entra ID configuration, complete the initial setup in the **Iru Web App Configuration** tab to get the Redirect URL. You'll need this value to configure the Microsoft Entra ID application.
Follow these steps to configure your Microsoft Entra ID application:
Sign in to the [Microsoft Entra admin center](https://entra.microsoft.com).
In the left navigation bar, ensure that the **Entra ID** section is expanded.
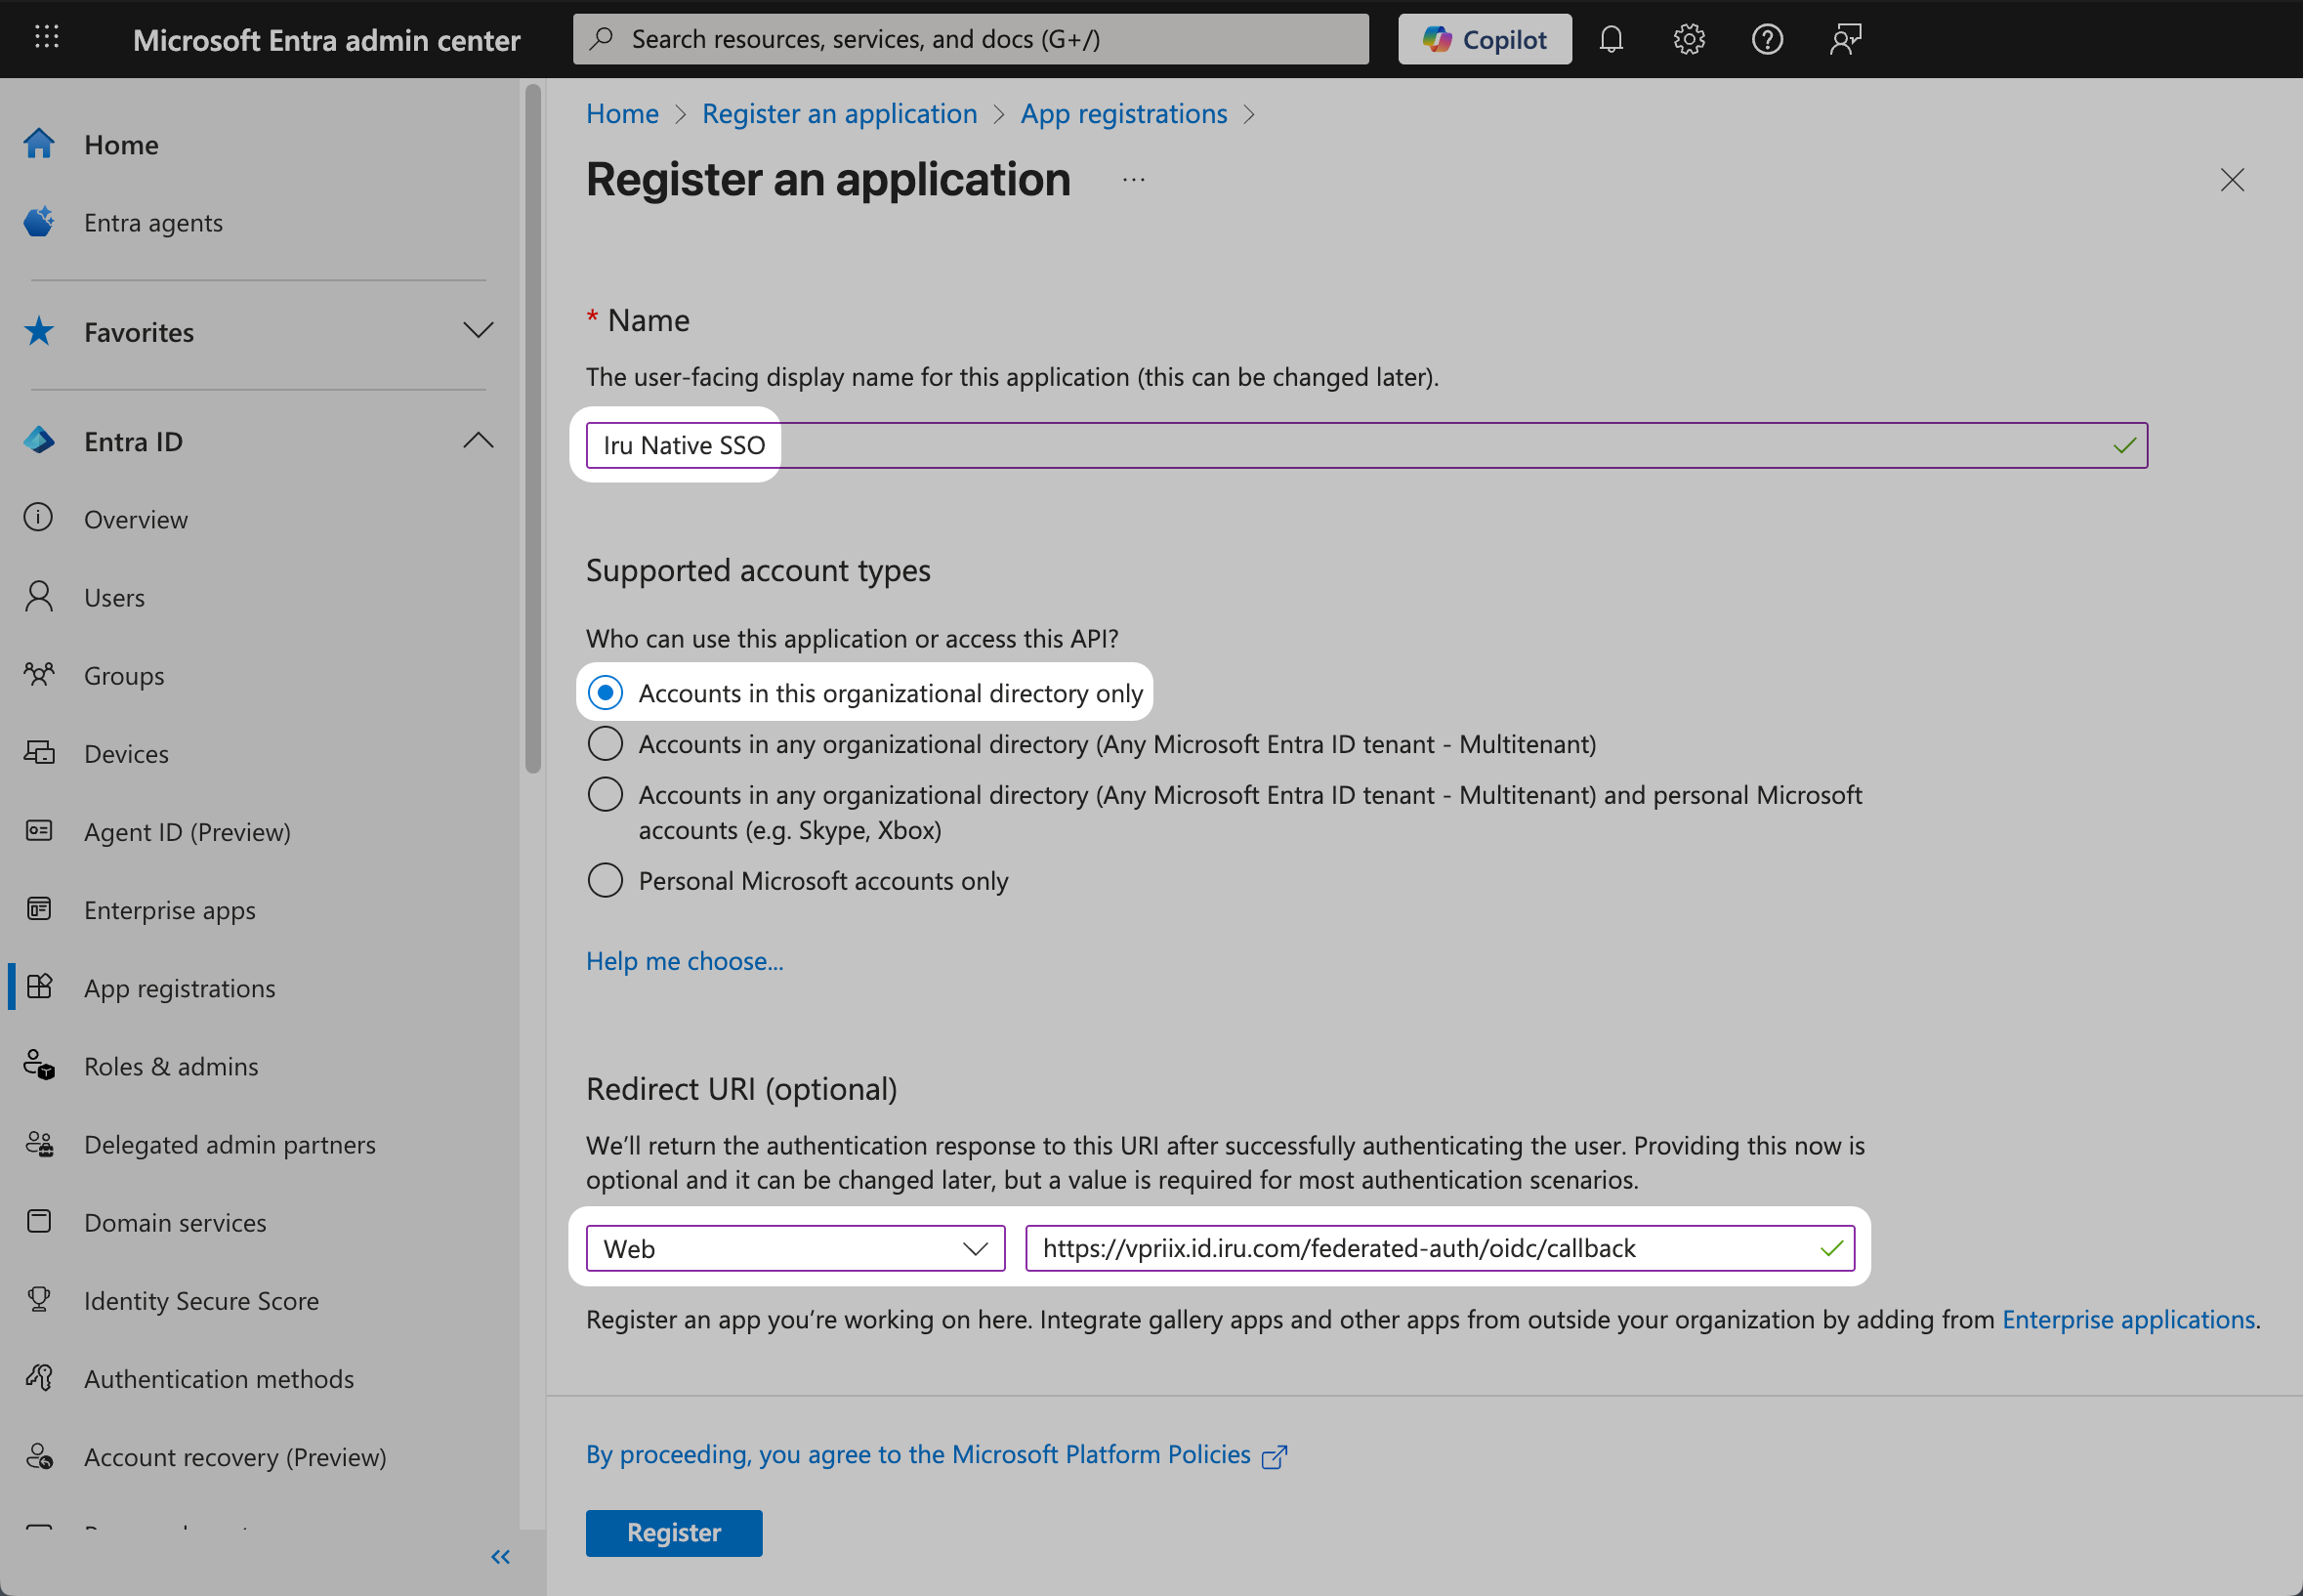
In the left navigation bar, click **App registrations**.
Click **+ New registration** to register a new application.
Be sure to test the configuration by signing into the Iru Endpoint web app and choosing the Native SSO login option that was created. You'll want to test this with a private browser window/incognito window and verify that you are able to sign in to the Iru Endpoint web app.
You can then optionally delete the previous client secret from the App registration in Entra ID.
### Setting Up Microsoft Entra ID Application
Before starting the Microsoft Entra ID configuration, complete the initial setup in the **Iru Web App Configuration** tab to get the Redirect URL. You'll need this value to configure the Microsoft Entra ID application.
Follow these steps to configure your Microsoft Entra ID application:
Sign in to the [Microsoft Entra admin center](https://entra.microsoft.com).
In the left navigation bar, ensure that the **Entra ID** section is expanded.
In the left navigation bar, click **App registrations**.
Click **+ New registration** to register a new application.
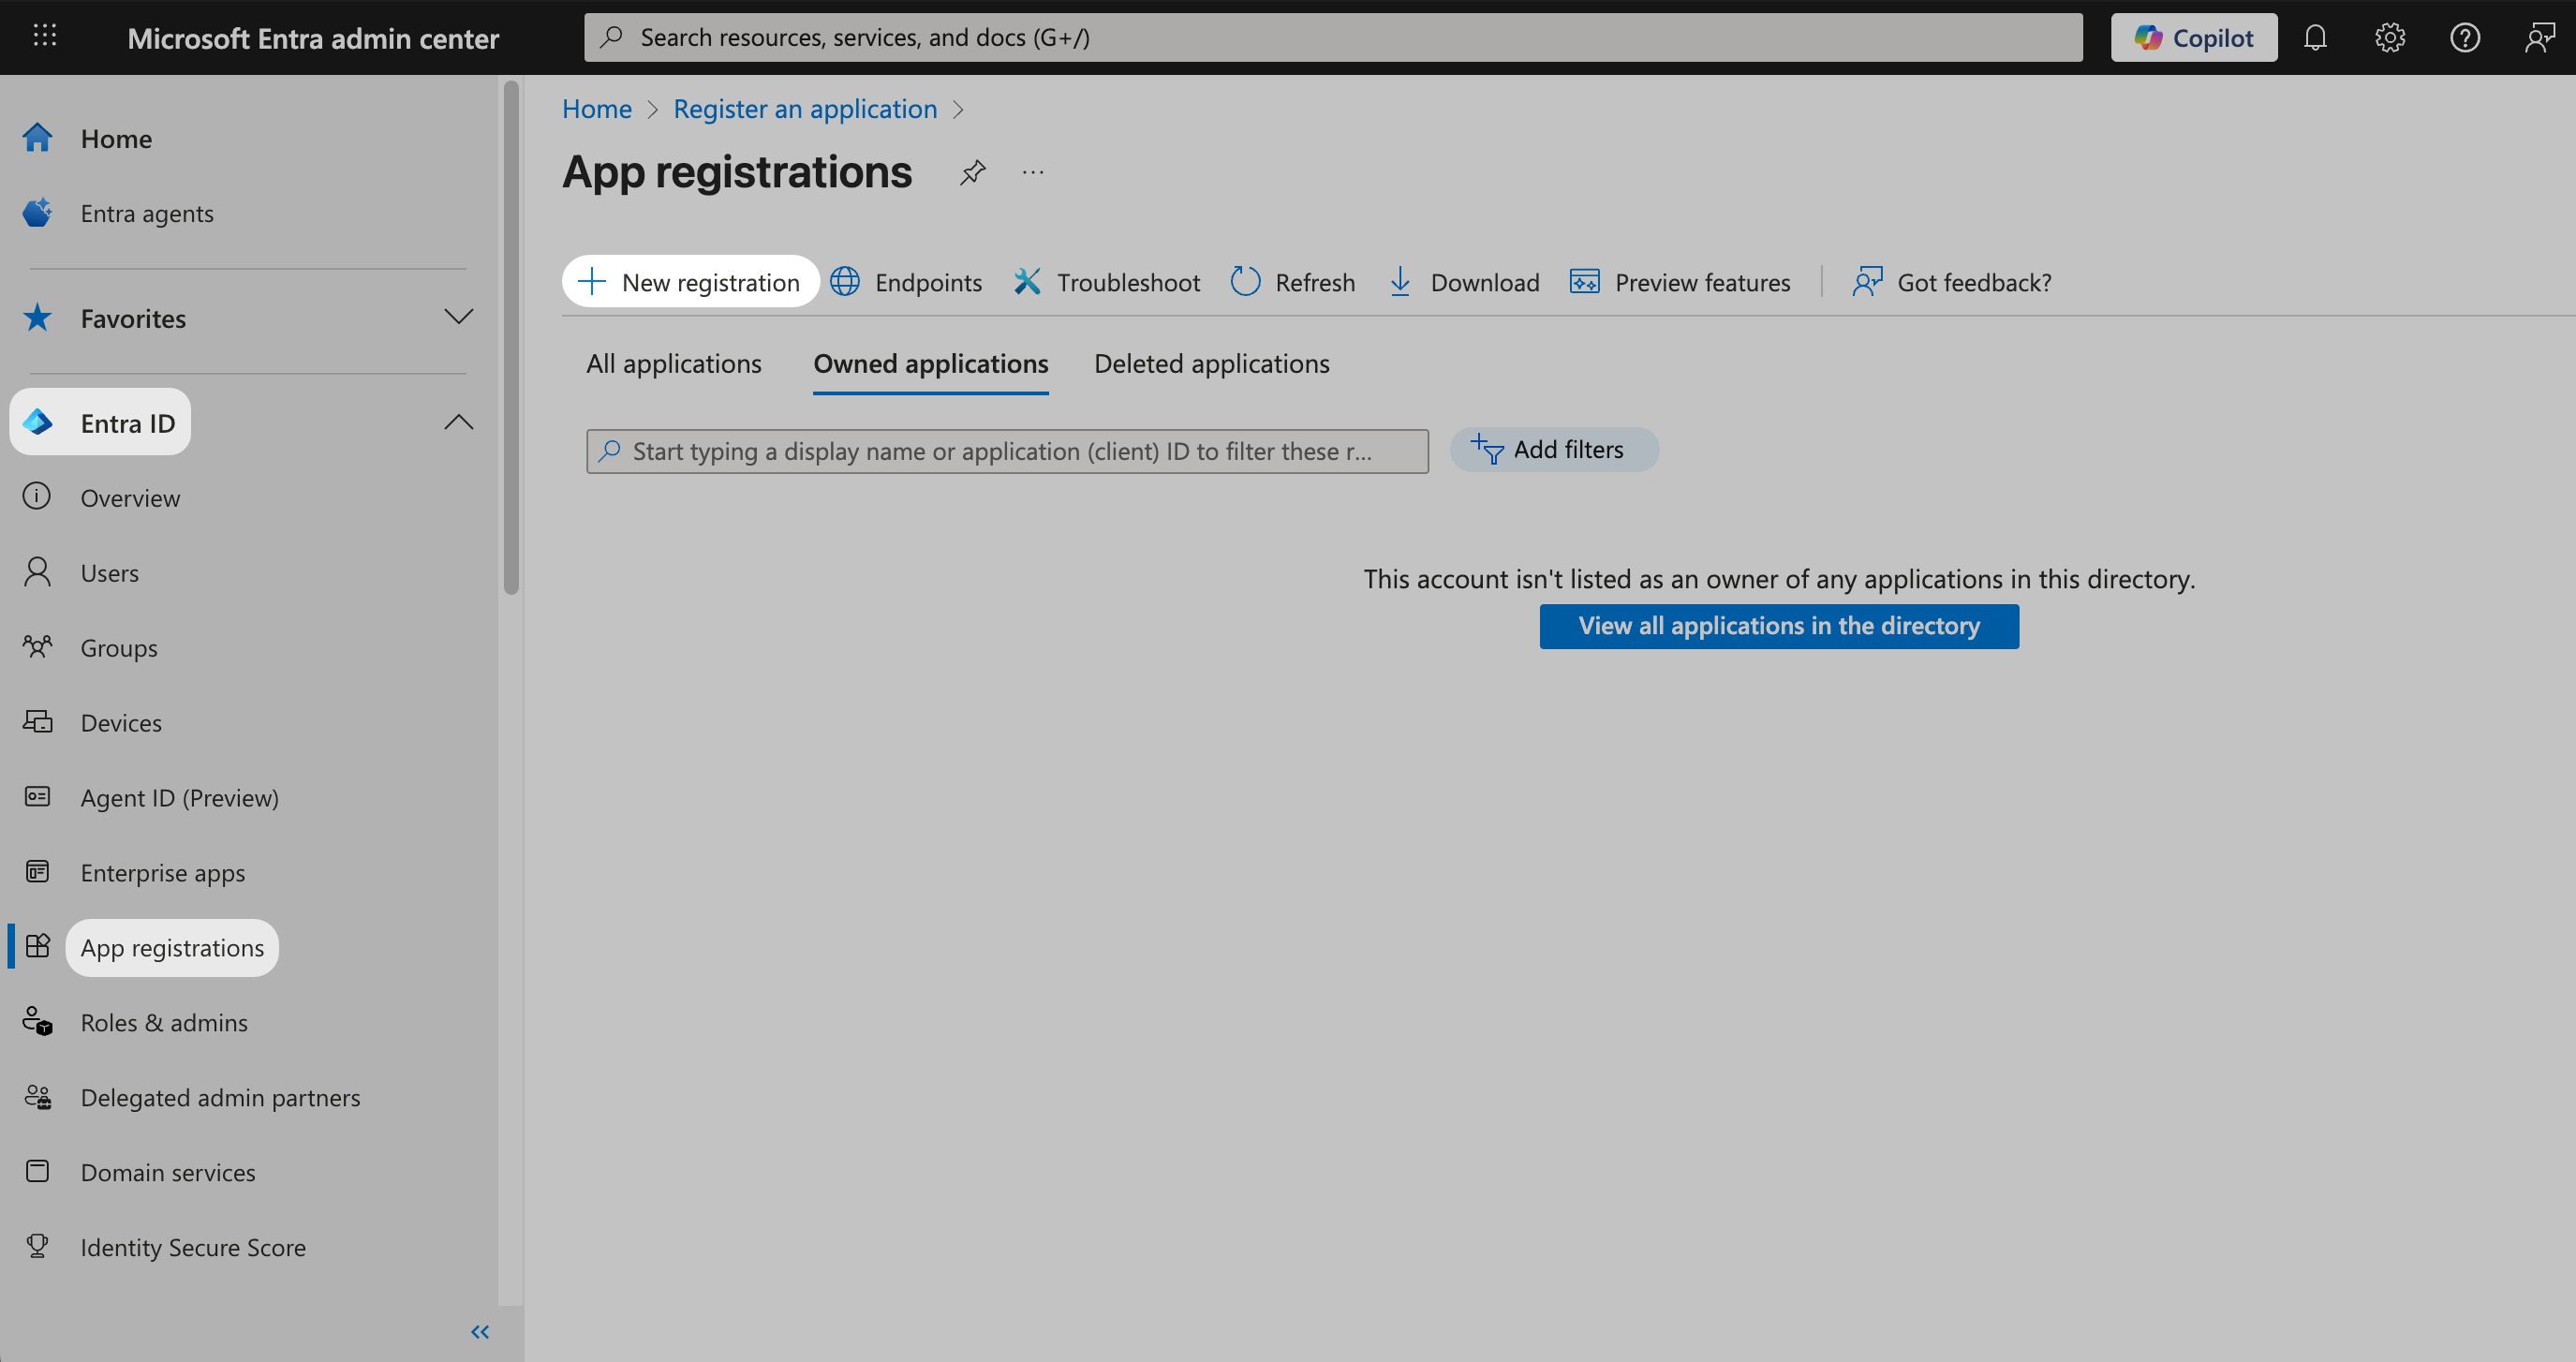 In the **Name** field, specify a name for the application (such as "Iru Native SSO").
For "**Supported account types**," select **Accounts in this organizational directory only**.
In the **Redirect URI** field, select **Web** from the dropdown menu.
Enter the complete Redirect URL you copied from the Iru Web App Configuration (e.g., `https://vpriix.id.iru.com/federated-auth/oidc/callback`).
Click **Register**.
In the **Name** field, specify a name for the application (such as "Iru Native SSO").
For "**Supported account types**," select **Accounts in this organizational directory only**.
In the **Redirect URI** field, select **Web** from the dropdown menu.
Enter the complete Redirect URL you copied from the Iru Web App Configuration (e.g., `https://vpriix.id.iru.com/federated-auth/oidc/callback`).
Click **Register**.
 On the new page, copy the **Application (client) ID** and save this for later. This will be used as the **Client ID** in Iru.
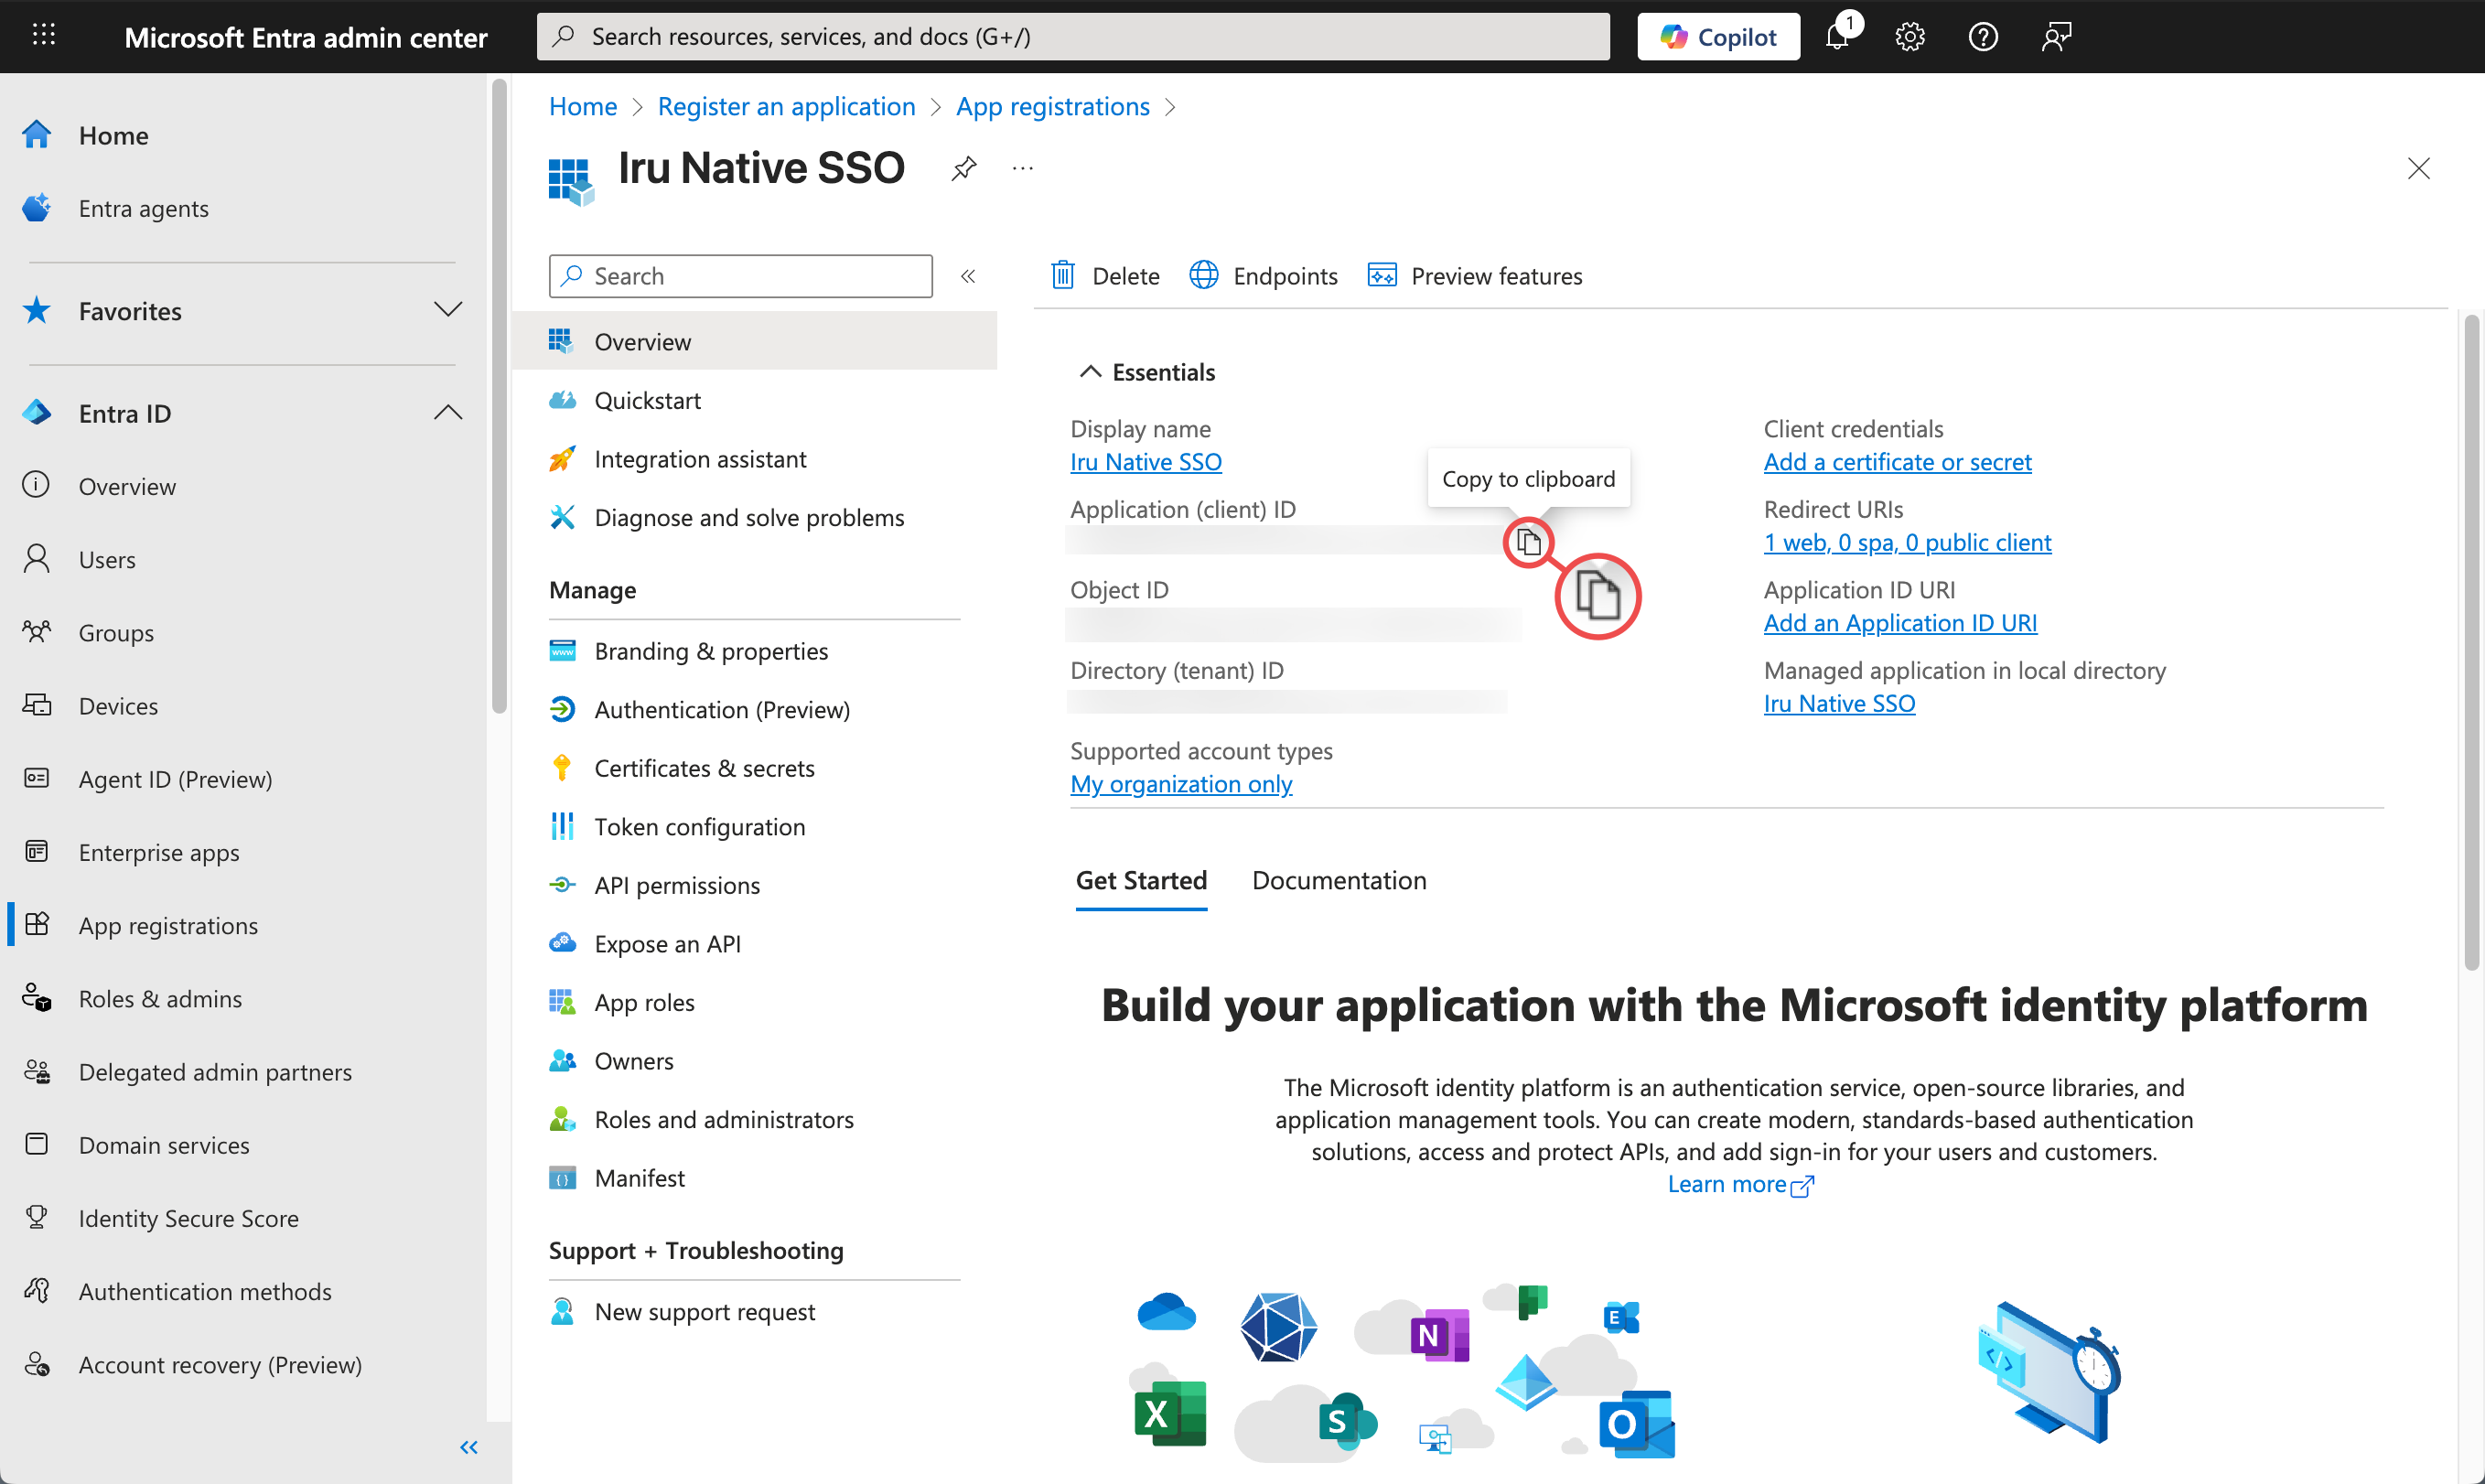 Click **Certificates and Secrets**.
Click **New client secret**.
Click **Certificates and Secrets**.
Click **New client secret**.
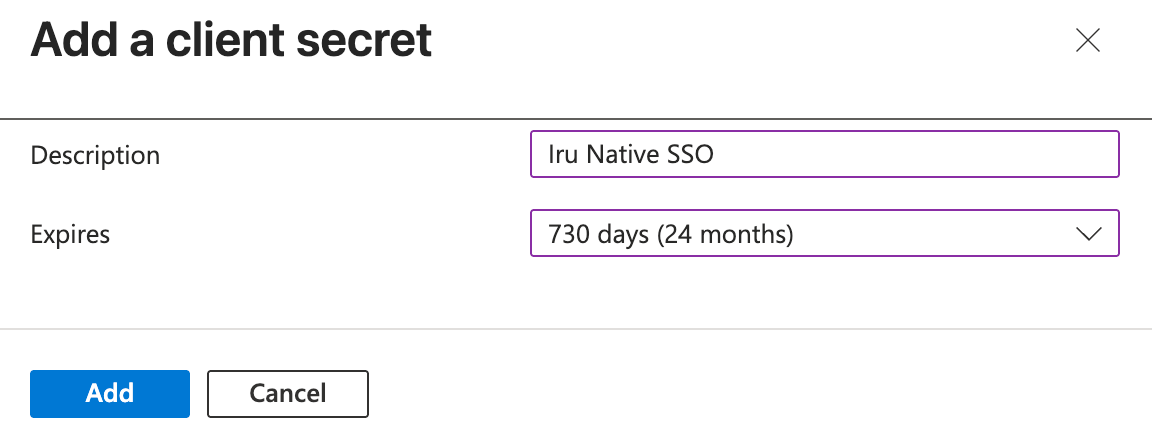
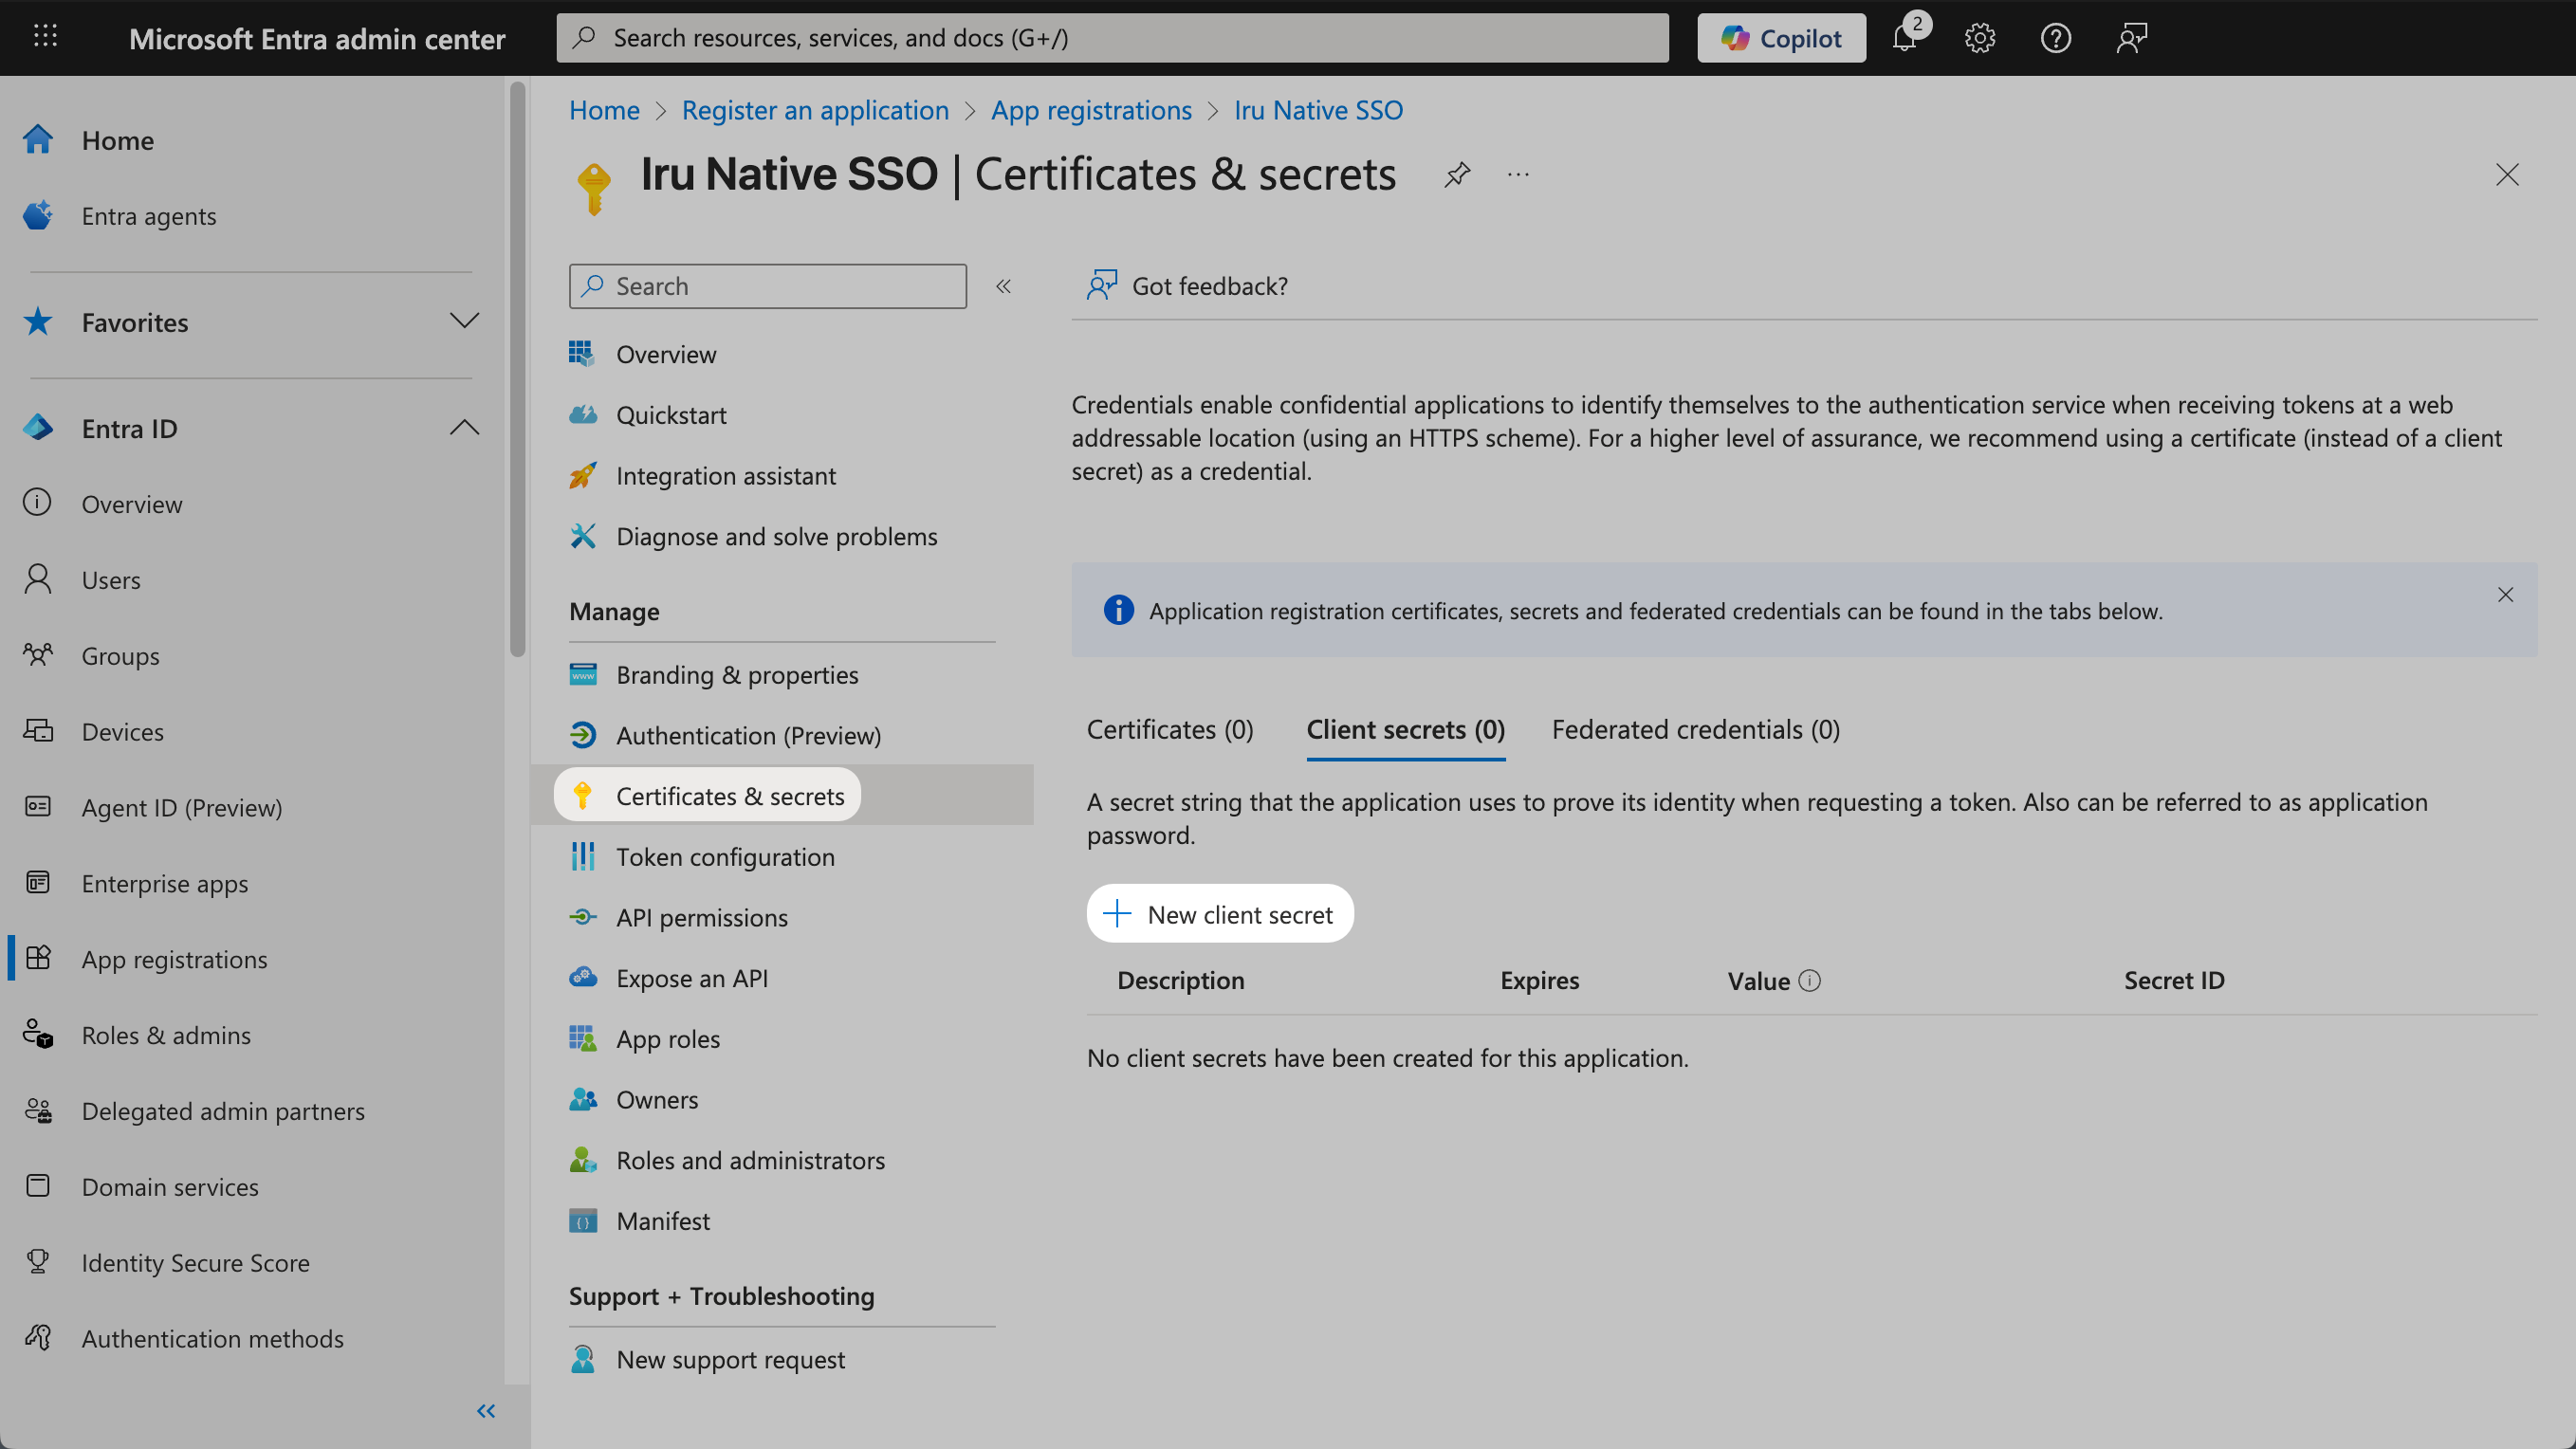 Give the client secret a **Description** such as "Iru Native SSO."
Set the expiration to **24 months**.
Click **Add**.
Give the client secret a **Description** such as "Iru Native SSO."
Set the expiration to **24 months**.
Click **Add**.
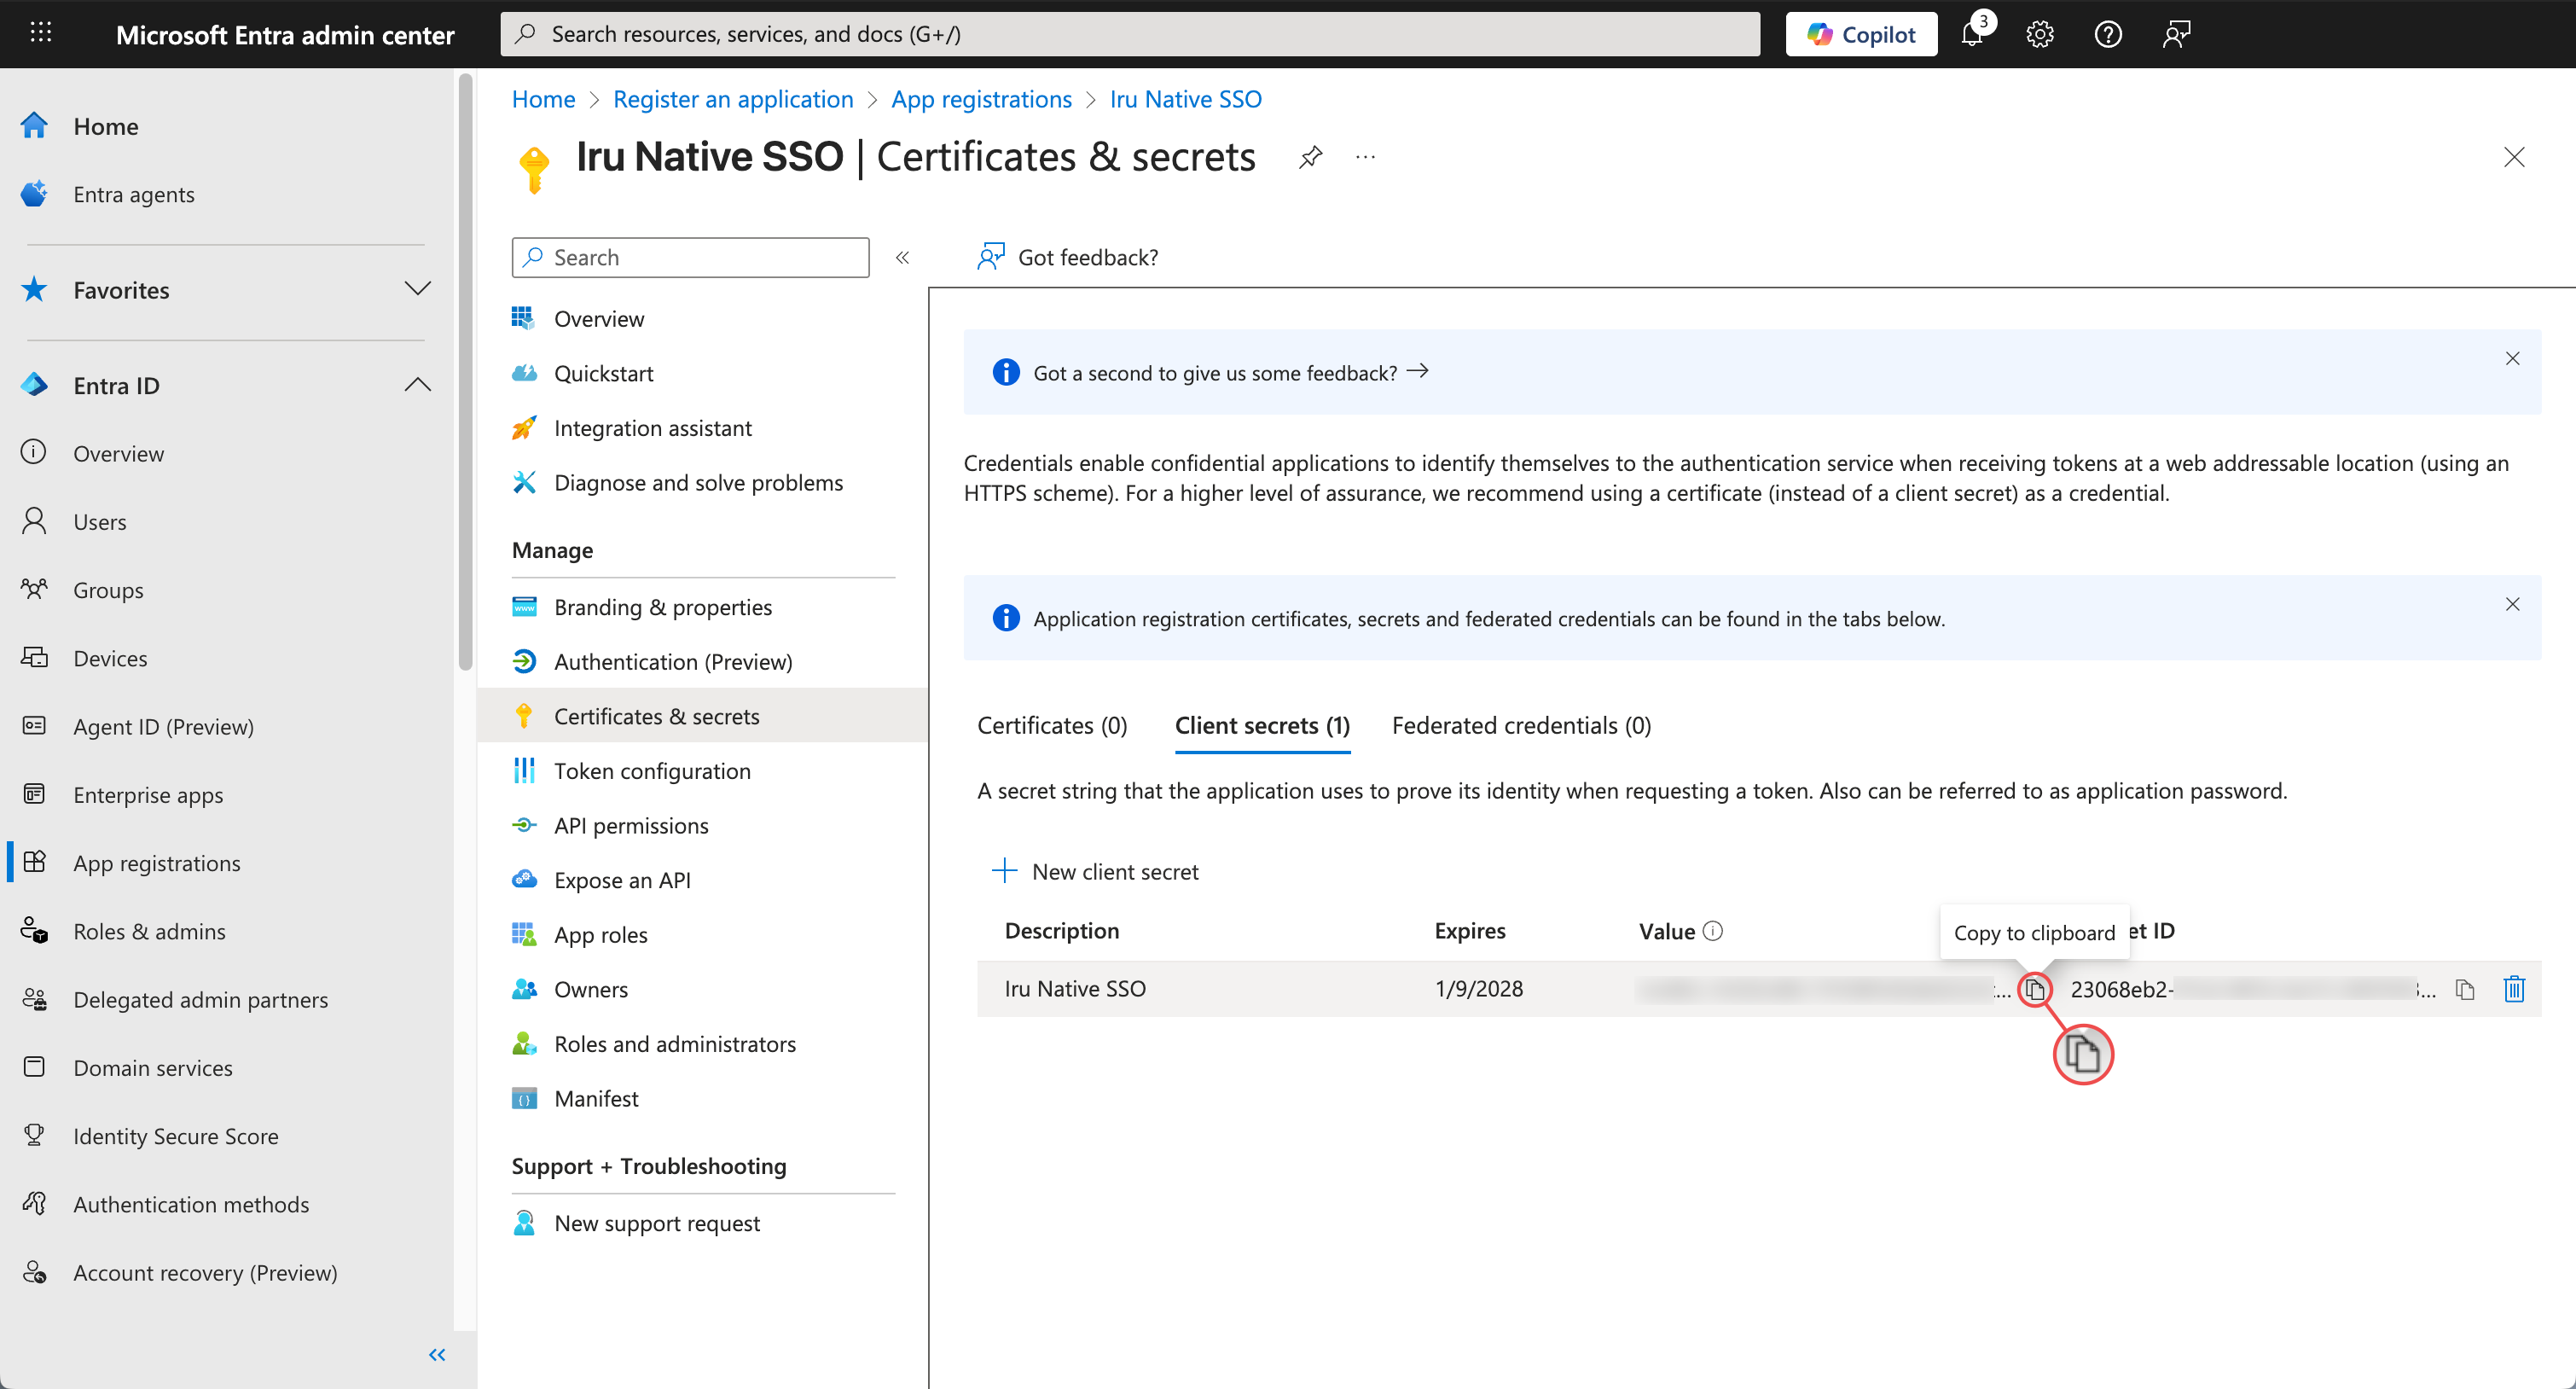
 Copy the **Value** of the client secret, and save this for later. **Note that the client secret Value is distinct from the client secret ID.**
 After completing the Microsoft Entra ID Configuration, return to the **Iru Web App Configuration** tab to finish setting up the SSO connection using the Client ID and Client secret you copied from Microsoft Entra ID.
## Considerations
**Security**: Ensure that your Microsoft Entra ID tenant has appropriate security policies configured for OAuth2/OpenID Connect authentication.
**Client Secret Management**: Client secrets expire after 24 months and must be renewed regularly. Consider using SAML-based SSO for longer-term solutions.
**Testing**: Always test the SSO integration with a small group of users before rolling out to your entire organization.
**User Management**: Users must exist in both Microsoft Entra ID and Iru Endpoint to successfully authenticate via SSO.
After completing the Microsoft Entra ID Configuration, return to the **Iru Web App Configuration** tab to finish setting up the SSO connection using the Client ID and Client secret you copied from Microsoft Entra ID.
## Considerations
**Security**: Ensure that your Microsoft Entra ID tenant has appropriate security policies configured for OAuth2/OpenID Connect authentication.
**Client Secret Management**: Client secrets expire after 24 months and must be renewed regularly. Consider using SAML-based SSO for longer-term solutions.
**Testing**: Always test the SSO integration with a small group of users before rolling out to your entire organization.
**User Management**: Users must exist in both Microsoft Entra ID and Iru Endpoint to successfully authenticate via SSO.