> ## Documentation Index
> Fetch the complete documentation index at: https://docs.iru.com/llms.txt
> Use this file to discover all available pages before exploring further.
# Single Sign-On with Google Workspace (Native)
> Configure native Google Workspace SSO for Iru Endpoint using OAuth2 and OpenID Connect. Enable one-click sign-in for admins with Google credentials.
### About Google Workspace Native Integration
Google Workspace Native integration in Iru Endpoint lets you set up native Google Workspace integration for SSO. Users authenticate using their Google Workspace credentials without requiring custom SAML configuration.
#### How It Works
When users attempt to access Iru Endpoint, they're redirected to Google Workspace for authentication using OAuth2/OpenID Connect protocols. After successful authentication, Google Workspace sends an access token back to Iru Endpoint, which validates the user's identity and grants access to the platform.
If you're [requiring authentication with Automated Device Enrollment](/en/endpoint/enrollment/configure-require-authentication-for-enrollment) for iOS enrollments and using Google Workspace as your identity provider, the Single Sign-On entry must be created [using Custom SAML](/en/endpoint/integrations/single-sign-on-integrations/single-sign-on-with-google-workspace-saml). The built-in Google Workspace integration is not supported.
### Prerequisites
Before you begin, ensure you have:
* [Access to the Iru Endpoint Web App](/en/endpoint/getting-started/foundation/admins-and-access) as an Admin or Account Owner
* A Super Admin account in Google Workspace to complete the Google Workspace configuration steps
### Configuring Iru Endpoint Connection
Follow these steps to configure the connection in Iru:
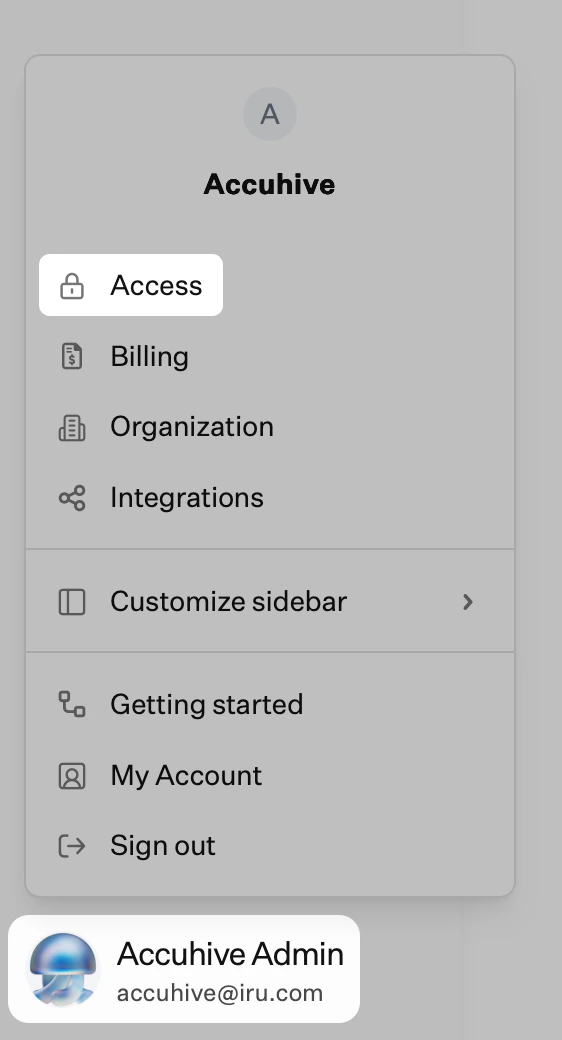
In Iru Endpoint, in the sidebar, click the [**Account Menu Button**](/en/iru/platform-overview/account-menu).
Click the **Access** option in the menu.
 Select the **Admin and authentication** tab (selected by default) and scroll down to **Authentication methods**.
Click **+ Authentication method**.
Enter a display name for the SSO Connection.
Select **Google Workspace**.
Click **Create**.
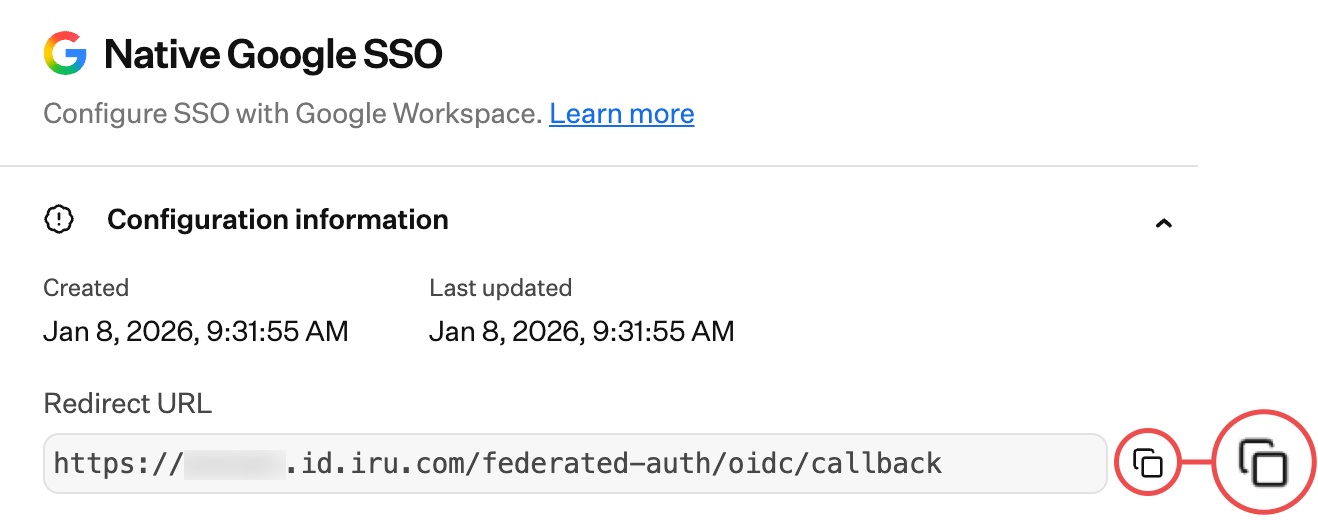
Copy the **Redirect URL** into a text document for later use. You'll need this for the Google Workspace configuration.
Select the **Admin and authentication** tab (selected by default) and scroll down to **Authentication methods**.
Click **+ Authentication method**.
Enter a display name for the SSO Connection.
Select **Google Workspace**.
Click **Create**.
Copy the **Redirect URL** into a text document for later use. You'll need this for the Google Workspace configuration.
 Keep the Iru Web App configuration modal open, then switch to the Google Workspace Configuration tab to continue.
After completing the Google Workspace configuration, return here to finish setting up the SSO connection in Iru Endpoint. You'll need the Client ID, and Client secret you copied from Google Workspace.
Follow these steps to complete the configuration:
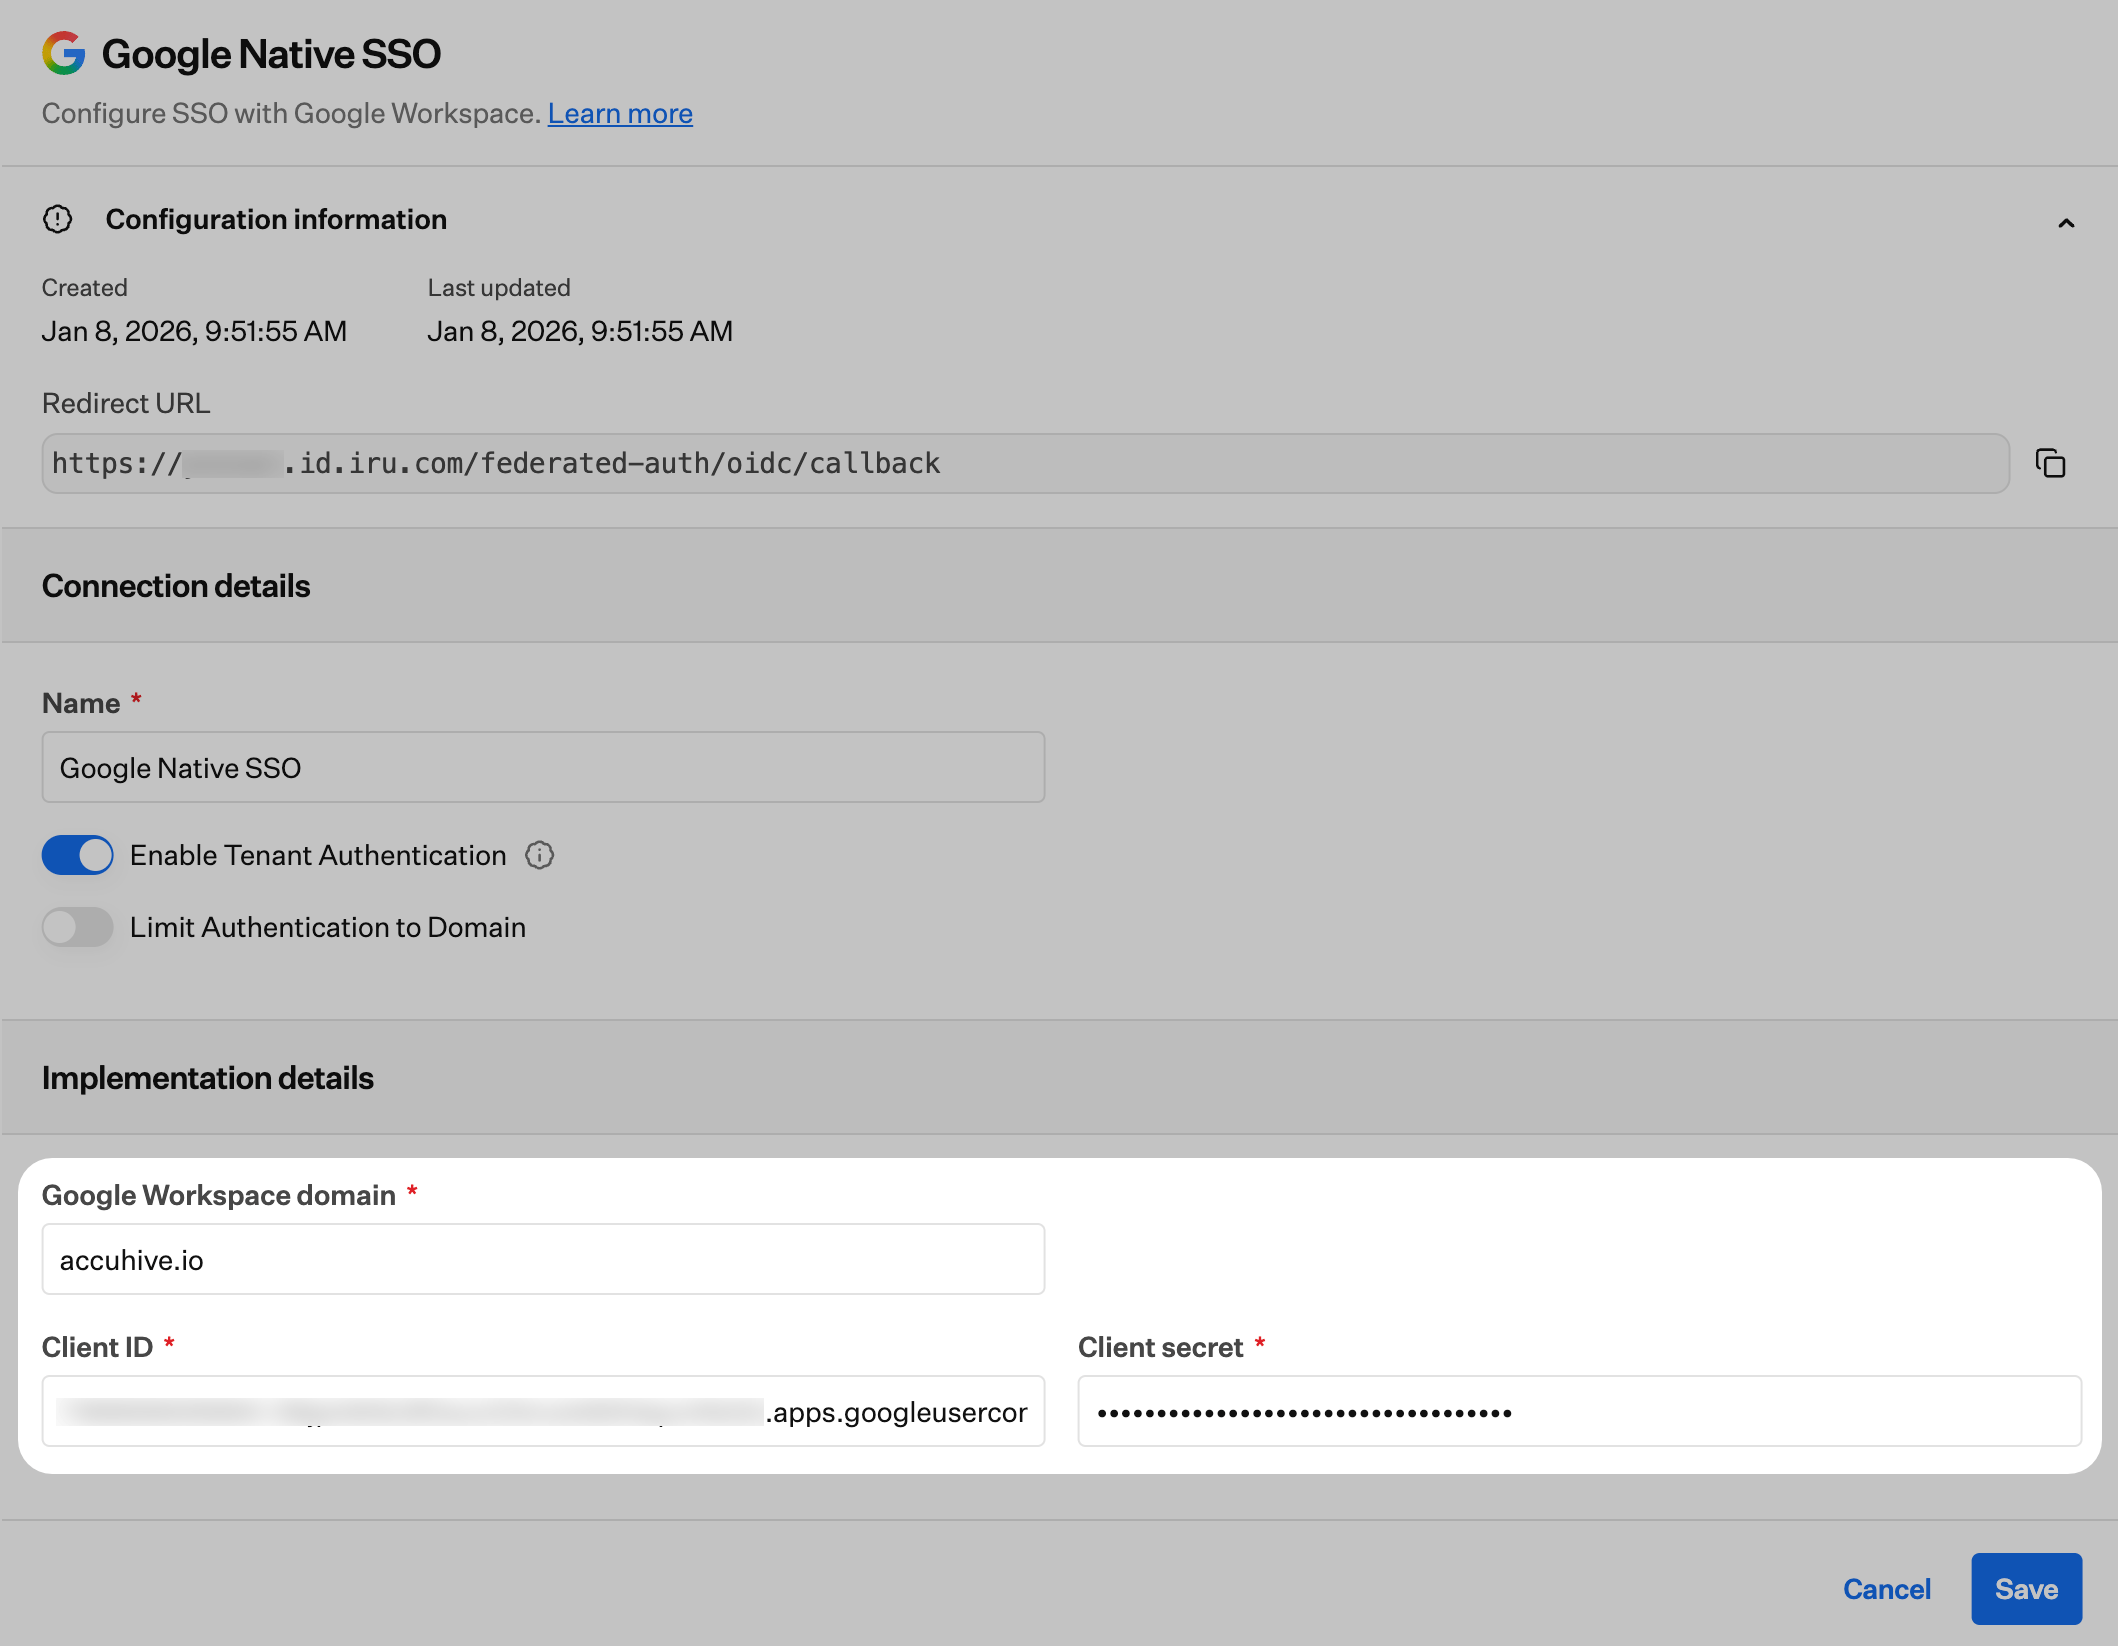
Enter your **Google Workspace domain** from Google Workspace.
Paste the **Client ID** you copied from Google Workspace into the **Client ID** field.
Paste the **Client secret** you copied from Google Workspace into the **Client secret** field.
Keep the Iru Web App configuration modal open, then switch to the Google Workspace Configuration tab to continue.
After completing the Google Workspace configuration, return here to finish setting up the SSO connection in Iru Endpoint. You'll need the Client ID, and Client secret you copied from Google Workspace.
Follow these steps to complete the configuration:
Enter your **Google Workspace domain** from Google Workspace.
Paste the **Client ID** you copied from Google Workspace into the **Client ID** field.
Paste the **Client secret** you copied from Google Workspace into the **Client secret** field.
 Click **Save**.
Your connection has now been successfully configured and may be enabled and tested.
### Allow for Tenant Authentication
Once you have configured the OIDC connection in Iru Endpoint and your identity provider, you can allow its use for tenant authentication. For step-by-step instructions, please refer to the **Allowing Tenant Authentication and Managing Connections** section in our [Single Sign-on support article](/en/endpoint/integrations/single-sign-on-integrations/single-sign-on).
### Limit Authentication to Domain
When configuring the OIDC connection, you can optionally limit authentication to one or more domains. This can be useful when the SSO connection could authenticate to multiple domains. You can limit the authentication to your Iru tenant to a subset of the available domains.
### Enforcing Single Sign-On
Once you have configured at least one Single Sign-on connection, you can disable Passkey, Google Social, and Microsoft Social connections. Disabling these connections will disable the ability for Iru Endpoint administrators in your tenant to authenticate via those methods. Please refer to our [Single Sign-on support article](/en/endpoint/integrations/single-sign-on-integrations/single-sign-on) for step-by-step instructions.
### Setting Up Google Workspace Application
Before starting the Google Workspace configuration, complete the initial setup in the **Iru Web App Configuration** tab to get the Redirect URL. You'll need this value to configure the Google Workspace application.
Follow these steps to configure your Google Workspace application:
**Log in** to the Google Developer [API Console.](https://console.developers.google.com/) Then click **Create project**.
Enter a **Project name**.
Select the **Organization** from the dropdown menu.
Select the **Location**.
Click **Save**.
Your connection has now been successfully configured and may be enabled and tested.
### Allow for Tenant Authentication
Once you have configured the OIDC connection in Iru Endpoint and your identity provider, you can allow its use for tenant authentication. For step-by-step instructions, please refer to the **Allowing Tenant Authentication and Managing Connections** section in our [Single Sign-on support article](/en/endpoint/integrations/single-sign-on-integrations/single-sign-on).
### Limit Authentication to Domain
When configuring the OIDC connection, you can optionally limit authentication to one or more domains. This can be useful when the SSO connection could authenticate to multiple domains. You can limit the authentication to your Iru tenant to a subset of the available domains.
### Enforcing Single Sign-On
Once you have configured at least one Single Sign-on connection, you can disable Passkey, Google Social, and Microsoft Social connections. Disabling these connections will disable the ability for Iru Endpoint administrators in your tenant to authenticate via those methods. Please refer to our [Single Sign-on support article](/en/endpoint/integrations/single-sign-on-integrations/single-sign-on) for step-by-step instructions.
### Setting Up Google Workspace Application
Before starting the Google Workspace configuration, complete the initial setup in the **Iru Web App Configuration** tab to get the Redirect URL. You'll need this value to configure the Google Workspace application.
Follow these steps to configure your Google Workspace application:
**Log in** to the Google Developer [API Console.](https://console.developers.google.com/) Then click **Create project**.
Enter a **Project name**.
Select the **Organization** from the dropdown menu.
Select the **Location**.
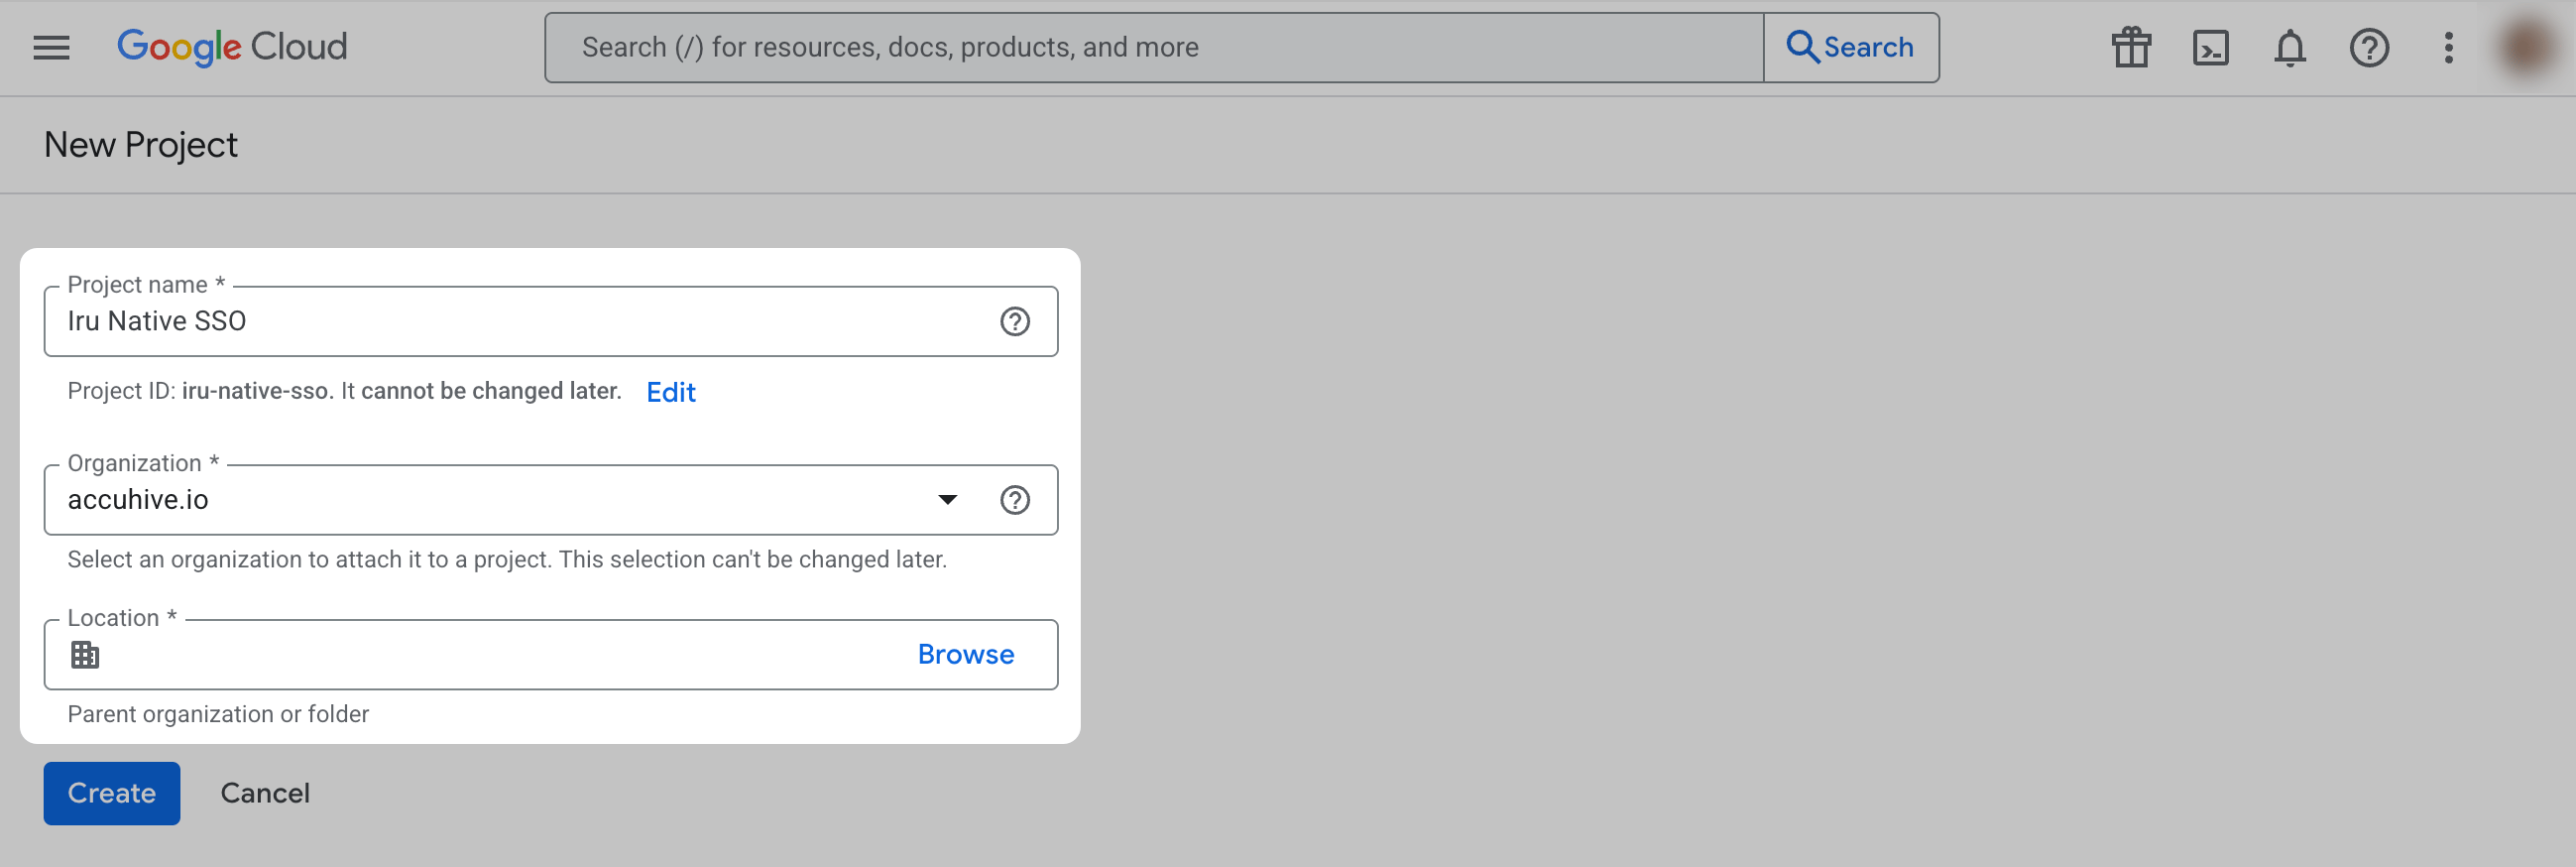 Click **Create**.
In the sidebar, click **Credentials**.
If this is your first time creating a client ID, you may also be prompted to [configure your consent screen](https://support.google.com/googleapi/answer/6158849#zippy=%2Cuser-consent).
Click **Create**.
In the sidebar, click **Credentials**.
If this is your first time creating a client ID, you may also be prompted to [configure your consent screen](https://support.google.com/googleapi/answer/6158849#zippy=%2Cuser-consent).
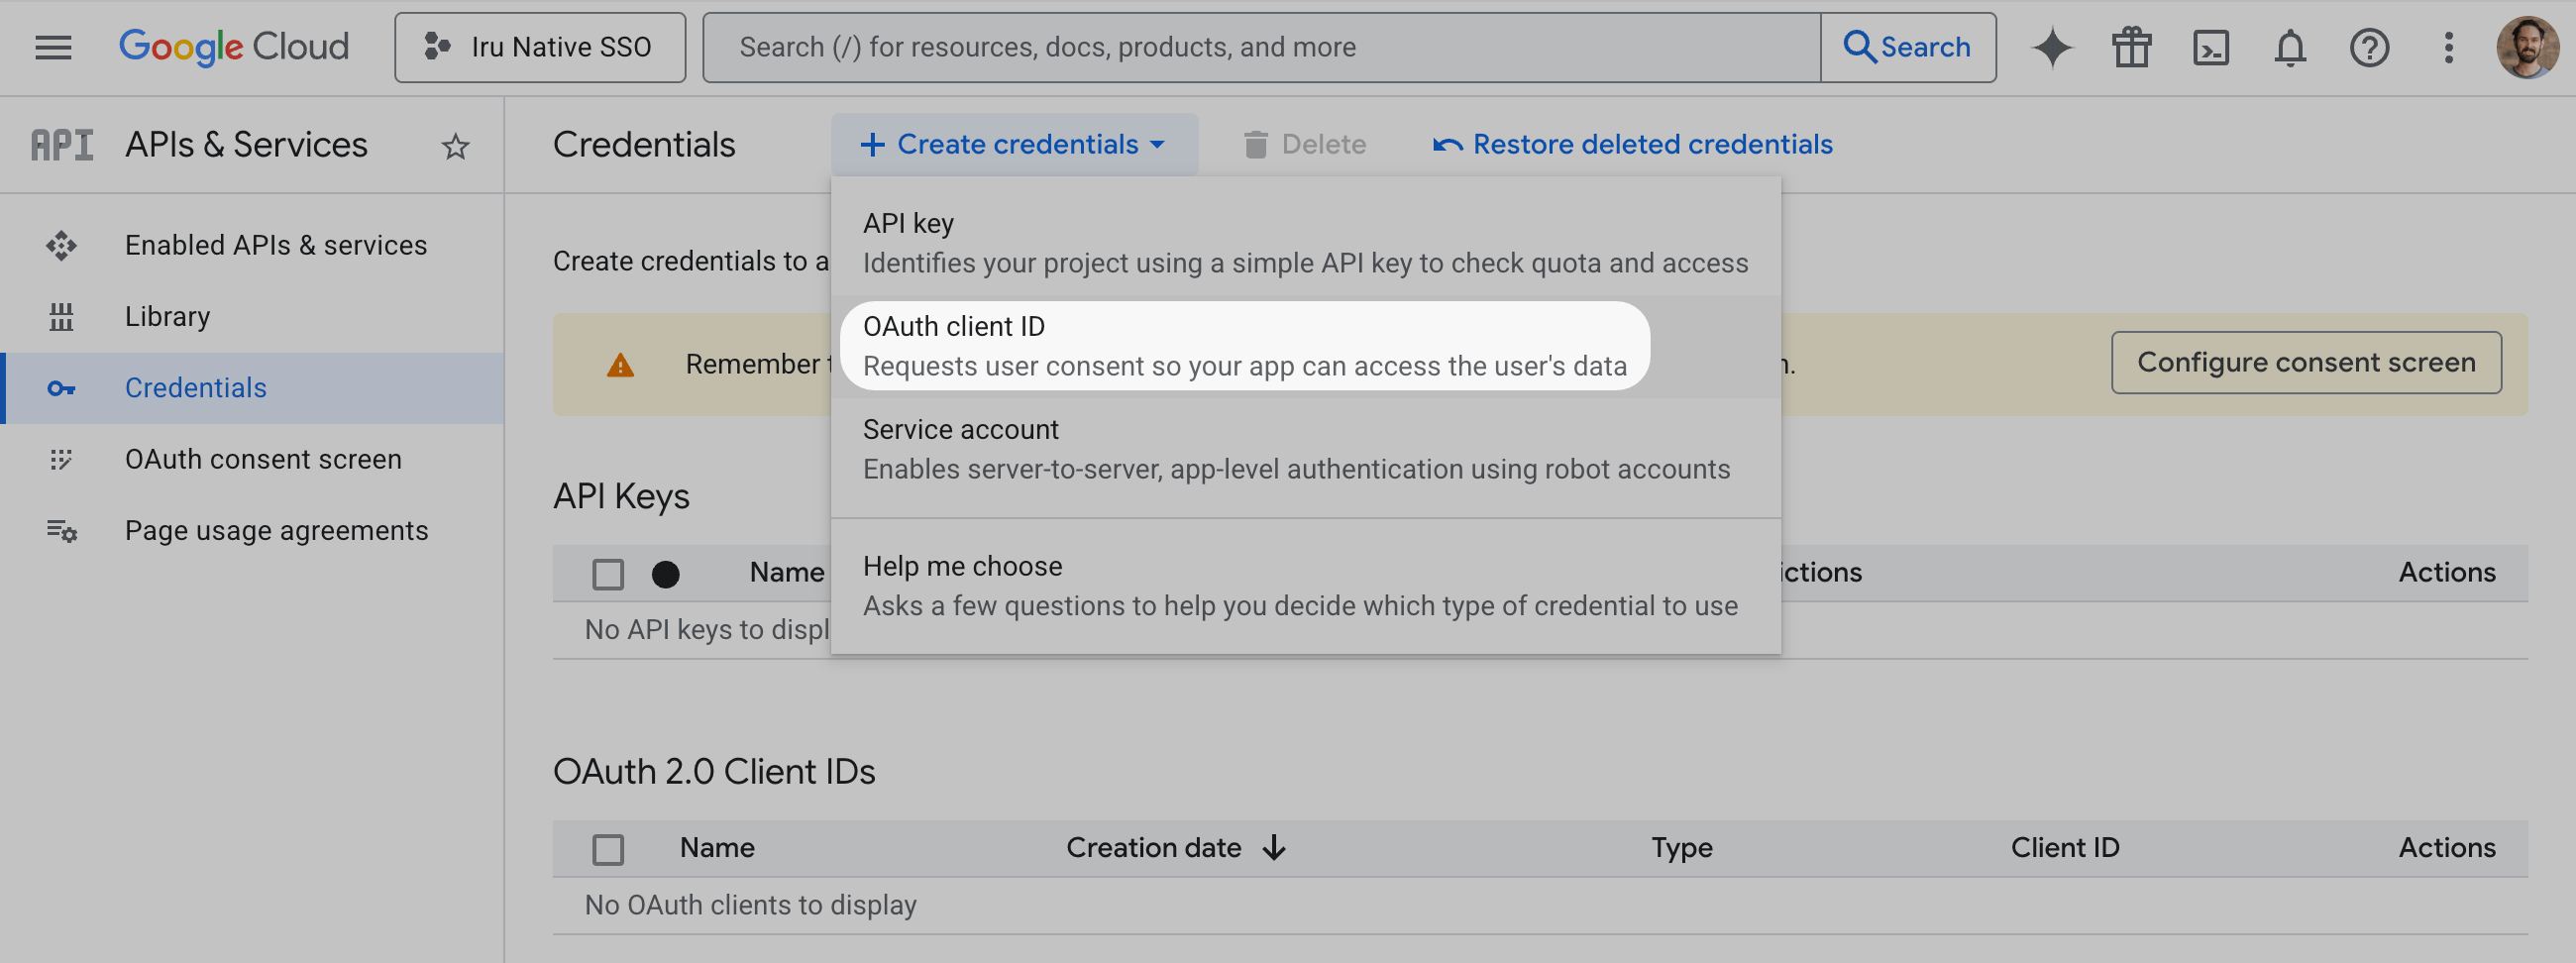
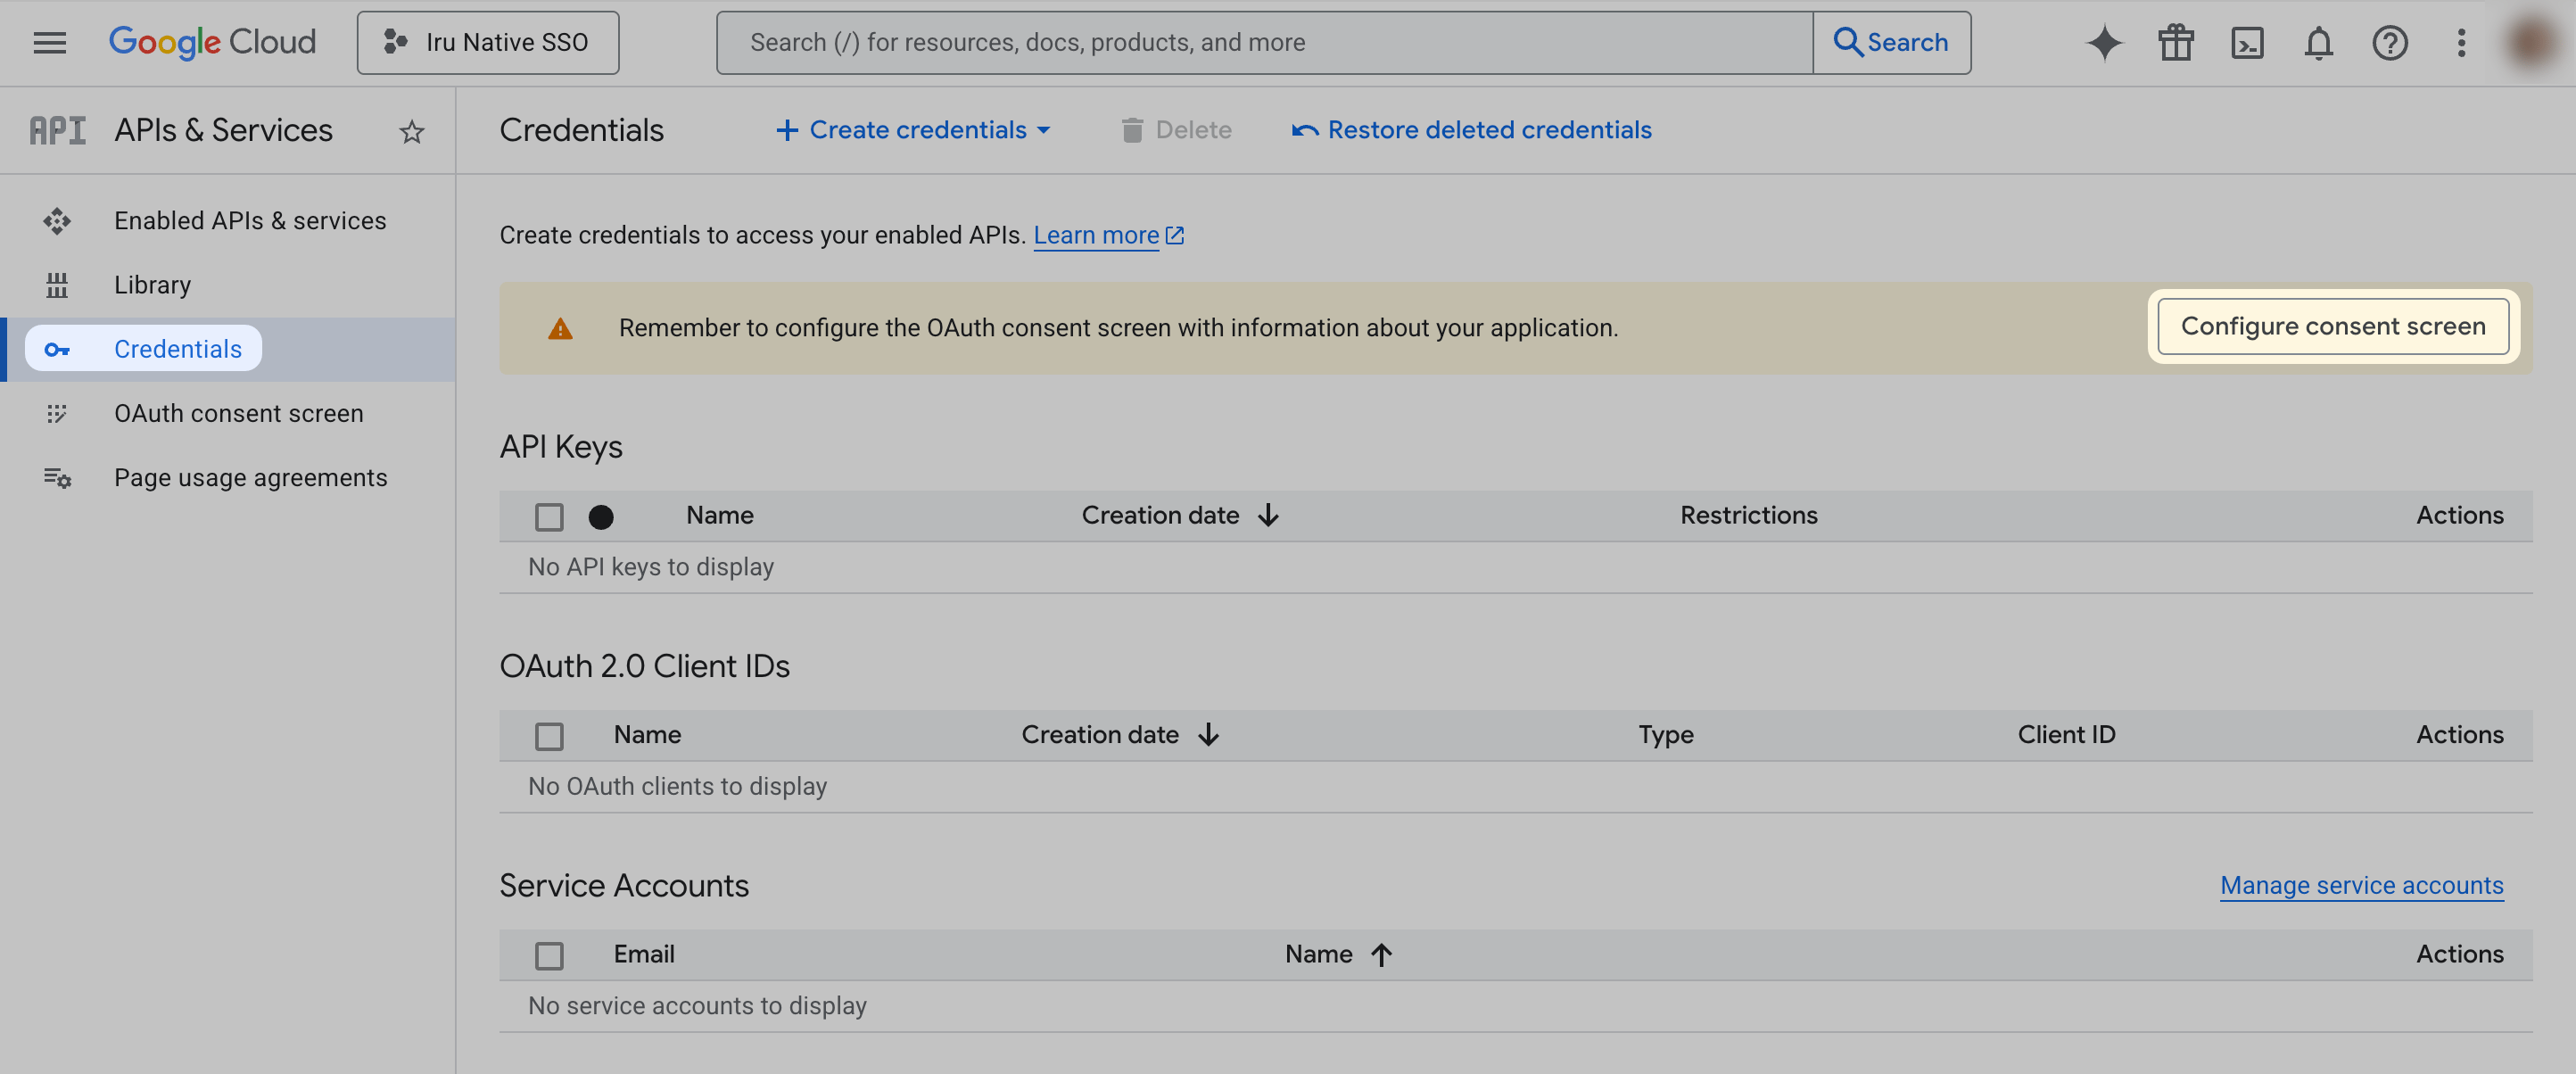 On the right side of the window, near the top, click **+ Create credentials**.
From the menu that appears, select **OAuth Client ID**.
On the right side of the window, near the top, click **+ Create credentials**.
From the menu that appears, select **OAuth Client ID**.
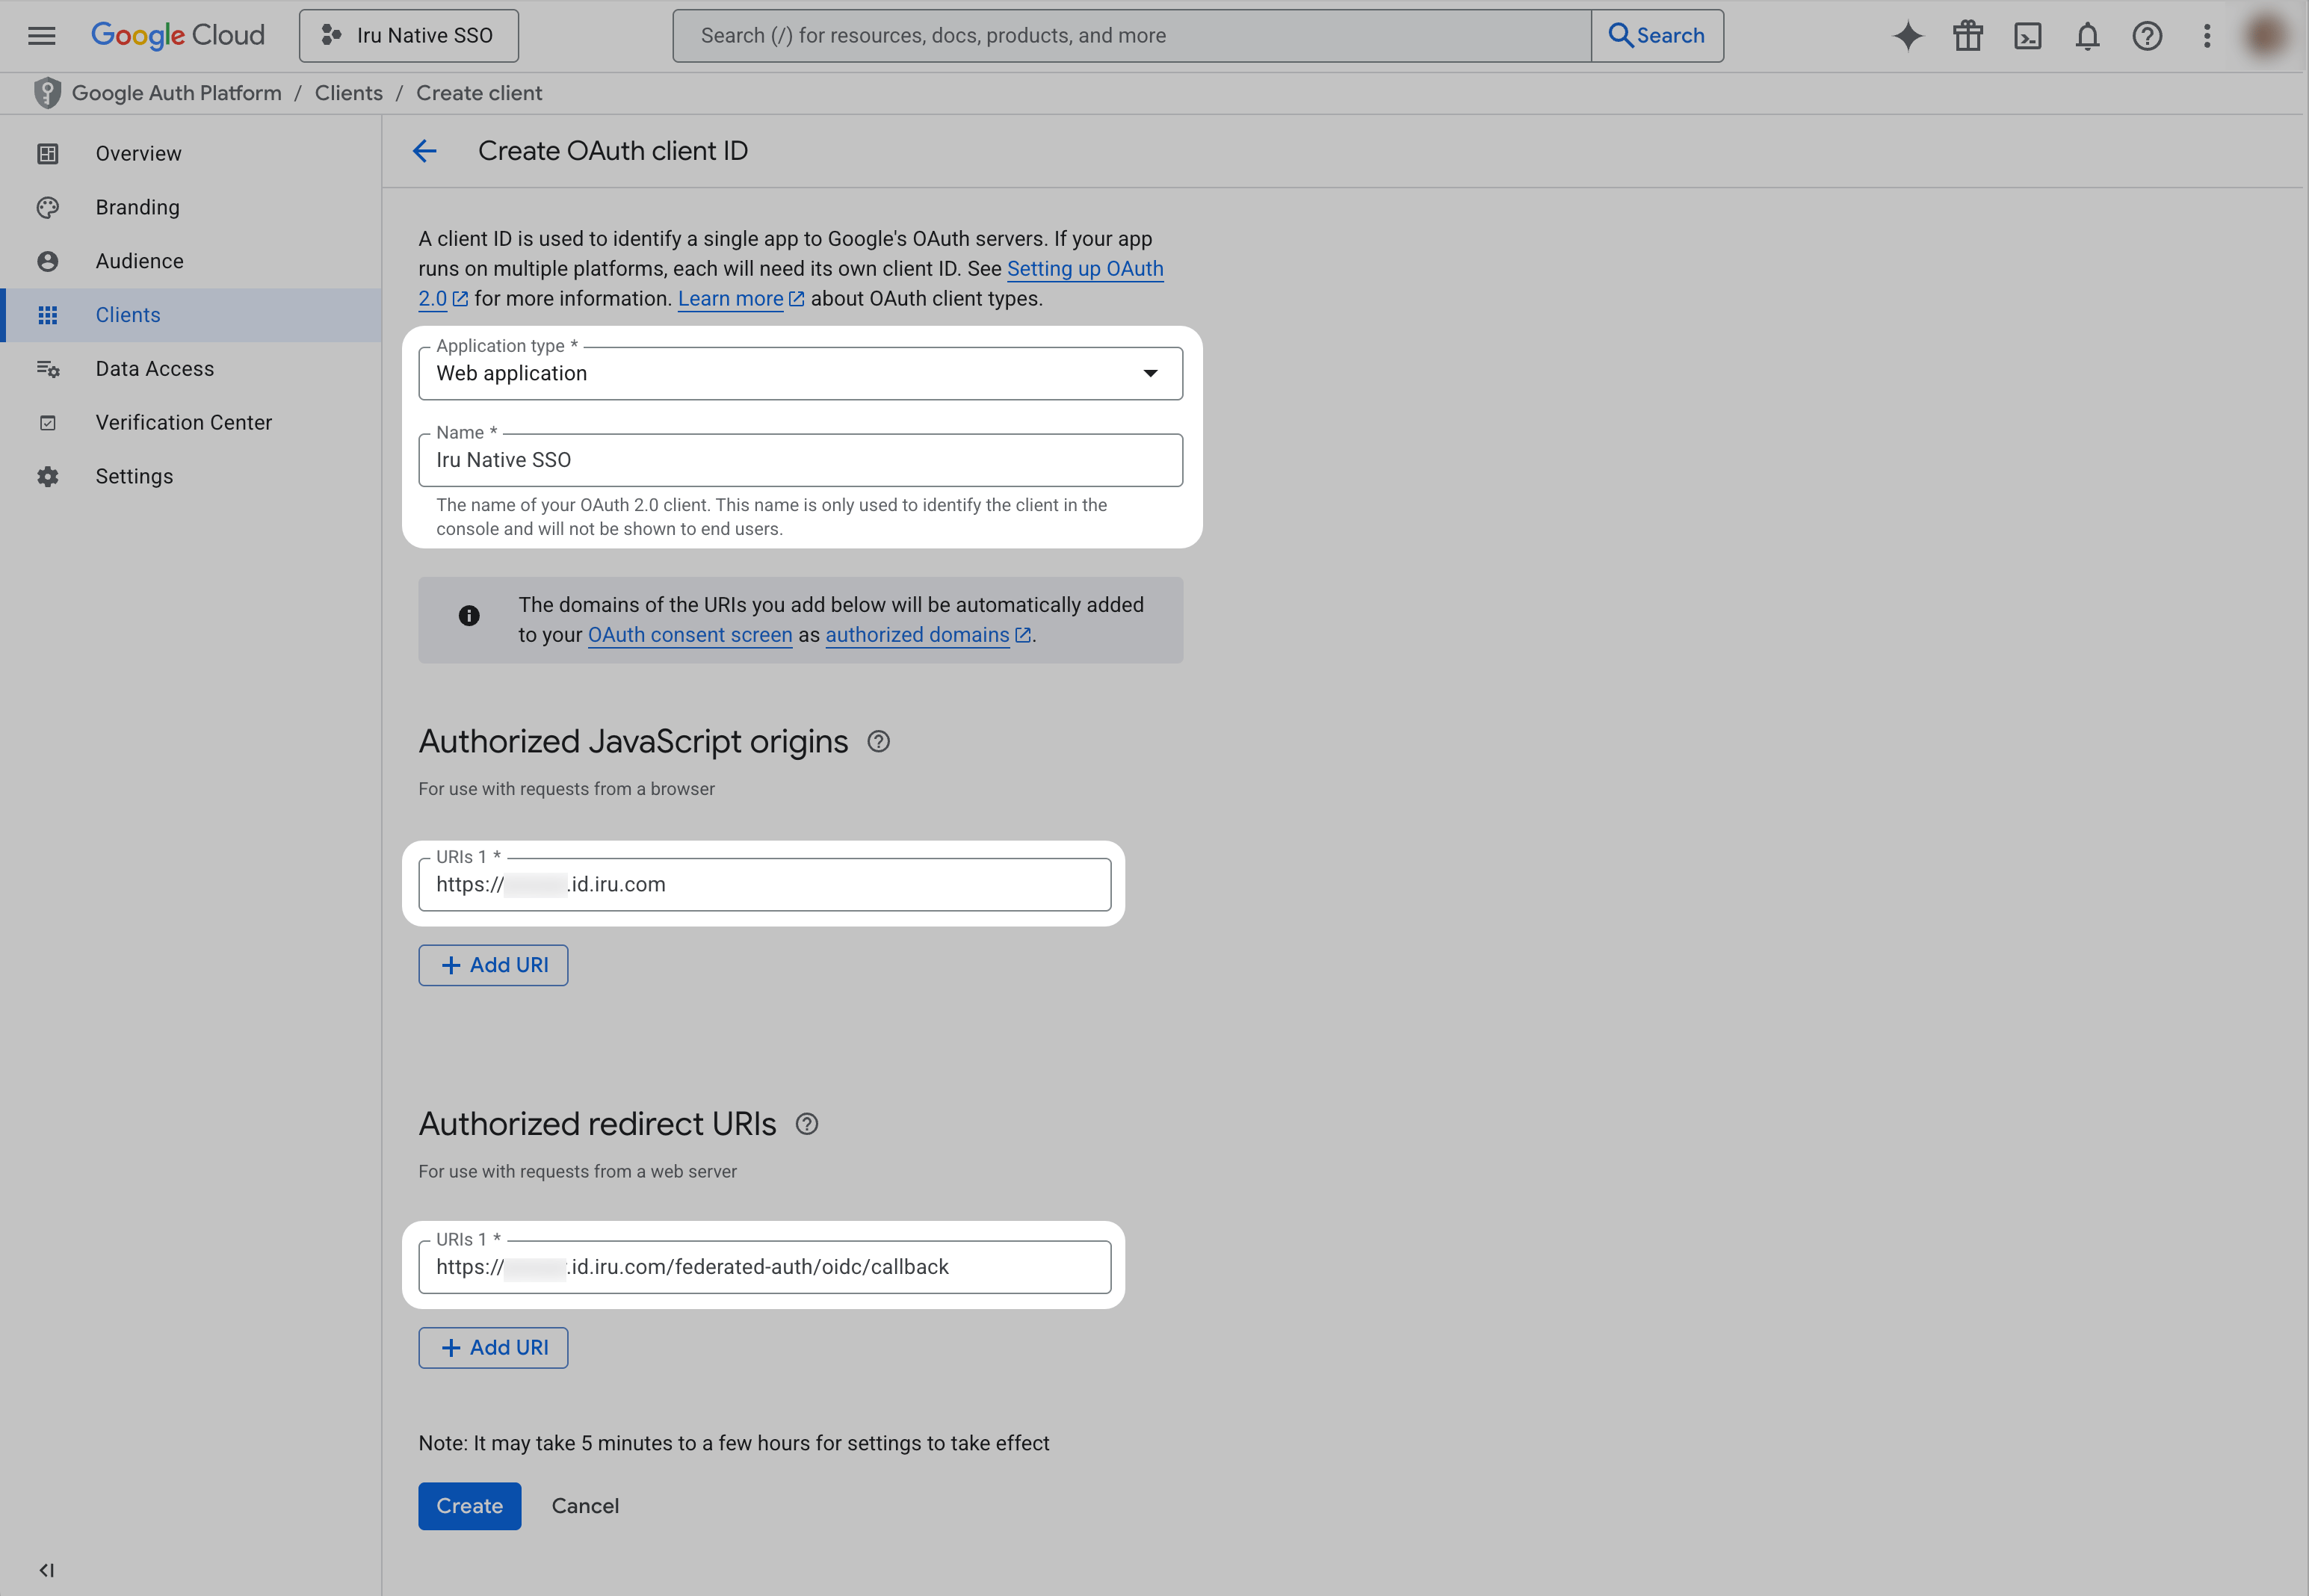
 For "**Application Type**," click the menu and select "**Web application**".
In the **Name** field, enter a **Name** for your OAuth client.
For **Authorized JavaScript Origins**, use just the domain section from the Redirect URL you copied from the Iru Web App Configuration (e.g., `https://vpriix.id.iru.com`). This domain is unique to each Iru tenant.
For **Authorized redirect URIs**, enter the complete Redirect URL you copied from the Iru Web App Configuration (e.g., `https://vpriix.id.iru.com/federated-auth/oidc/callback`).
For "**Application Type**," click the menu and select "**Web application**".
In the **Name** field, enter a **Name** for your OAuth client.
For **Authorized JavaScript Origins**, use just the domain section from the Redirect URL you copied from the Iru Web App Configuration (e.g., `https://vpriix.id.iru.com`). This domain is unique to each Iru tenant.
For **Authorized redirect URIs**, enter the complete Redirect URL you copied from the Iru Web App Configuration (e.g., `https://vpriix.id.iru.com/federated-auth/oidc/callback`).
 Click **Create**.
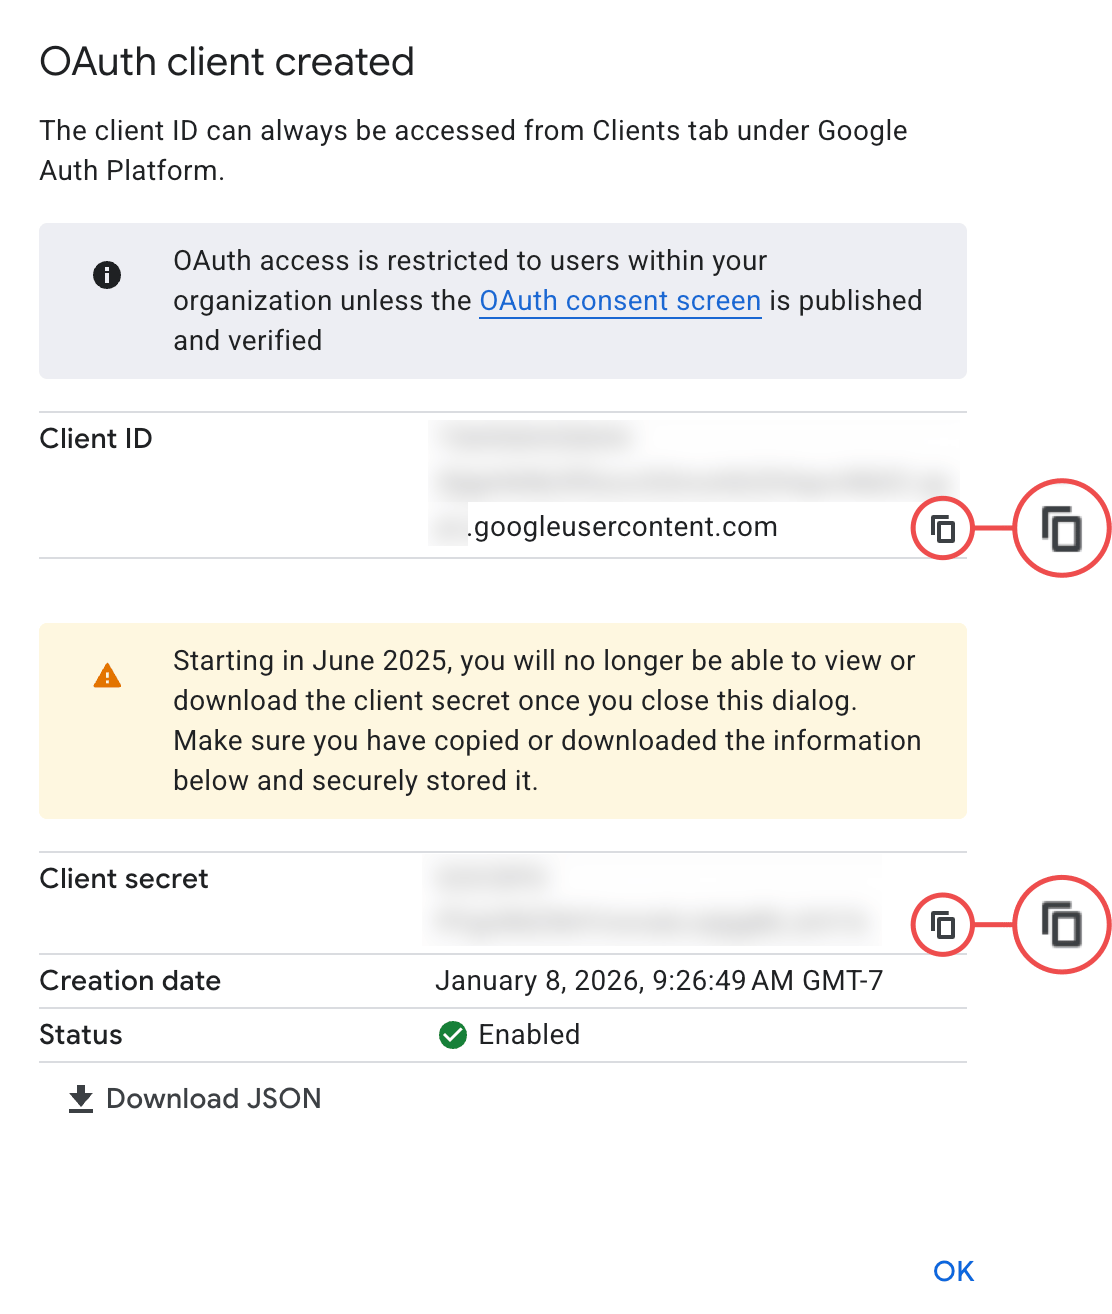
Copy the text from the **Client ID** field and save it for later use.
Copy the text from the **Client Secret** field and save it for later use.
Click **Create**.
Copy the text from the **Client ID** field and save it for later use.
Copy the text from the **Client Secret** field and save it for later use.
 Click **OK**.
After completing the Google Workspace Configuration, return to the **Iru Web App Configuration** tab to finish setting up the SSO connection using the Client ID, and Client secret you copied from Google Workspace.
Click **OK**.
After completing the Google Workspace Configuration, return to the **Iru Web App Configuration** tab to finish setting up the SSO connection using the Client ID, and Client secret you copied from Google Workspace.