> ## Documentation Index
> Fetch the complete documentation index at: https://docs.iru.com/llms.txt
> Use this file to discover all available pages before exploring further.
# Okta Device Trust: Integration Setup
> Set up Okta Device Trust integration with Iru Endpoint for passwordless authentication. Configure FastPass, device trust policies, and verification rules.
This guide applies to Mac computers, iOS devices, and iPadOS devices
**Product Name Update**: Throughout this guide, you may notice references to both "Kandji" and "Iru Endpoint." Our product is now called Iru Endpoint, but some integration interfaces may still display the previous name. This is a temporary situation that will be resolved as our integration partners update their systems.
### About Okta Device Trust Integration Setup
Okta Device Trust Integration Setup in Iru Endpoint lets you ensure that Iru Endpoint manages your devices before end users can access Okta-protected apps, enabling passwordless authentication and FastPass functionality.
### How It Works
Okta Device Trust lets you ensure that Iru Endpoint manages your Apple devices before end users can access Okta-protected apps from their devices. This integration enables Okta FastPass for a passwordless authentication experience, allowing users to sign in to Okta and their Okta resources without needing a password. For iOS, iPadOS, and macOS devices specifically, FastPass allows users to leverage Face ID and Touch ID to access resources. Okta FastPass is a feature of Okta Identity Engine.
### Before You Begin
Configure the following in your Okta tenant before you start integration setup in Iru Endpoint.
* The Okta tenant must be migrated from Okta Classic Engine to [Okta Identity Engine](https://help.okta.com/oie/en-us/content/topics/identity-engine/oie-index.htm).
* [Okta FastPass](https://help.okta.com/oie/en-us/content/topics/identity-engine/devices/fp/fp-main.htm) must be enabled in the Okta tenant.
* The Okta user setting up ODT should have the [super admin](https://help.okta.com/oie/en-us/content/topics/security/administrators-super-admin.htm) role in Okta. Super admin credentials are only needed for initial authentication and adding the API Service Integration.
* [Okta Adaptive MFA](https://www.okta.com/products/adaptive-multi-factor-authentication/) is required to add Device integrations in Okta.
### Prerequisites
Iru Endpoint checks for the following during integration setup and shows a warning if any are missing.
* Make **Okta Verify** available in your Library via [Apps and Books in Apple Business or Apple School Manager](/en/endpoint/settings/apple-integrations/add-apps-from-apps-and-books-to-iru-endpoint).
* On **macOS**, assign the **Okta Verify Auto App** from **Auto Apps**.
### Integration Setup
Log in to your Iru Endpoint tenant.
In the sidebar, click the [**Account Menu Button**](/en/iru/platform-overview/account-menu), then select **Integrations**.
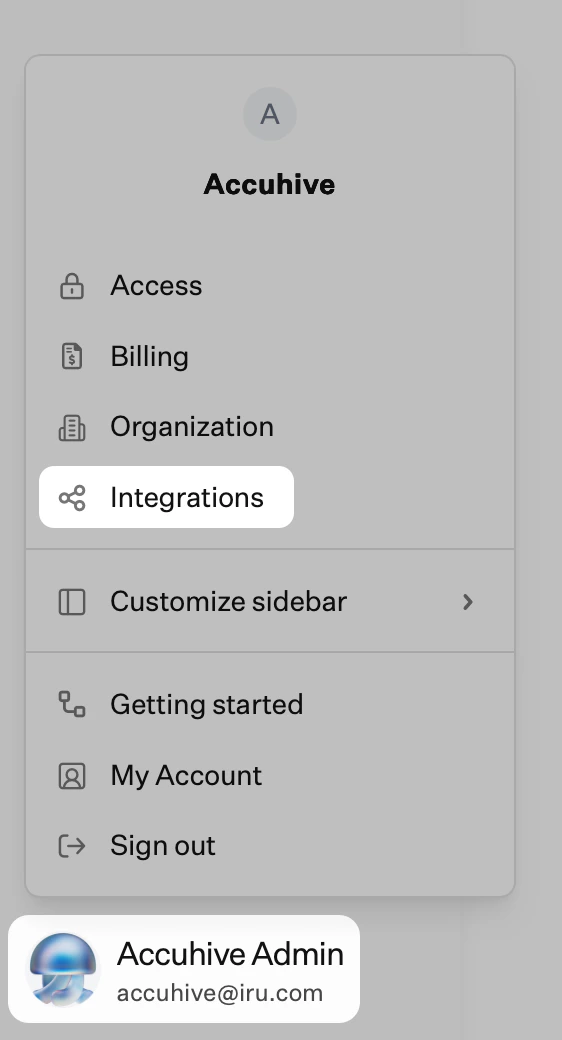 Click **Discover Integrations**.
In the Security section, find **Okta Device Trust**.
Click **Add and configure**.
In the **Welcome to Okta Device Trust** modal, click **Get Started**.
In the **Specify your Okta Domain** modal, enter your Okta tenant URL and click **Next**.
In the **Sign in with Okta** modal, click **Sign in with Okta**. This will open a new browser window and navigate you to your Okta tenant, where you will create an **API Service Integration**. Once that is done, you will return to Iru Endpoint to continue the ODT integration setup.
The Okta user used to configure ODT must have the [super admin](https://help.okta.com/oie/en-us/content/topics/security/administrators-super-admin.htm) role in Okta.
Once signed into Okta, you should be on the **Authorize Kandji Device Trust** integration page. On this page, click **Install & Authorize**. The Kandji API Service integration uses the following scopes:
* okta.devices.manage
* okta.devices.read
* okta.authenticators.read
On the **Copy your client secret** modal, copy the client secret to a safe place for use later in Iru Endpoint. This is the only time you will be able to view it.
Click **Done**.
On the **Kandji Device Trust** overview page, copy the **Client ID** to a safe place for use later in Iru Endpoint.
Head back to Iru Endpoint to continue the ODT integration setup.
In the **Complete the following tasks in Okta** modal, click **Next**.
In the **API Service Integration Credentials** modal, enter the Client ID and Client Secret copied from earlier.
Click **Connect to Okta**. Iru Endpoint will check in the background to ensure the Okta tenant is on Okta Identity Engine and Okta FastPass is enabled.
### Configuring Device Platforms in Okta
This section outlines creating device integration in Okta. This information is used when adding device platforms in Iru Endpoint.
Okta [Adaptive MFA](https://www.okta.com/products/adaptive-multi-factor-authentication/) is required to add Device integrations in Okta.
#### Adding Device Integrations in Okta
Log in to the Okta admin portal.
In the left-hand navigation, click **Security > Device Integrations**.
Click **Add platform**.
#### Adding macOS as a Device Integration
On the **Select platform** step, select **Desktop (Windows and macOS only)**.
Click **Next**.
On the **Configure management attestation** step, select **Use Okta as certificate authority**.
For **SCEP URL challenge type**, select **Dynamic SCEP URL** and **Generic**.
Next to **SCEP URL**, click **Generate**.
Copy the SCEP URL, Challenge URL, Username, and Password to a safe place. Later, in Iru Endpoint, this information will be used to set up MacOS as a device platform.
This will be the only time you can view the password. If needed, you can rotate it later in the menu from the main Device integrations page in Okta.
Click **Save**.
#### Adding iOS as a Device Integration
On the **Select platform** step, select **iOS**.
Click **Next**.
On the **Configure management attestation** step, copy the **Secret key** to a safe place for use later in Iru Endpoint when adding iOS as a device platform in Iru Endpoint.
This will be the only time you can view the secret key. If needed, you can rotate the key later in the menu from the main Device integrations page in Okta.
For **Device management provider**, enter a descriptive, user-friendly value.
For **Enrollment Portal link**, enter your Iru Endpoint tenant's Enrollment Portal link. (Example: `https://accuhive.iru.com/enroll` where `accuhive` should be your tenant subdomain.)
Click **Save**.
### Modifying a Device Integration in Okta
#### Rotating a macOS Challenge Password or iOS Secret
Go to the Device Integrations page.
Next to the integration that you want to change, click the **Actions** menu.
Click the reset option for that platform.
Click the **Reset** button in the modal that appears.
#### Deleting a macOS Challenge Password or iOS Secret
Go to the Device Integrations page.
Next to the integration that you want to change, click the **Actions** menu.
Click **Delete**.
Click the **Delete** button in the modal that appears.
### Configuring Device Platforms in Iru Endpoint
In the **Configure device platforms** modal, select the platforms to configure. You can configure macOS, iOS, or both.
Click **Next**.
If selecting macOS, enter the required information in the **Add macOS as a device platform** modal and click **Next**.
If selecting iOS, enter the required information in the **Add iOS as a device platform** modal and click **Finish setup**.
In the **Okta Device Trust setup complete** modal, you can choose **View integration settings** to see additional information about the ODT integration in Iru Endpoint or choose **Go to Library item** to configure Okta Verify for ODT deployment. On Mac, use the **Okta Verify Auto App**.
### Next Steps
Deploy ODT to your Apple devices using the [Okta Device Trust: Configuring the Okta Verify Library item](/en/endpoint/integrations/okta-device-trust-main/okta-device-trust-configuring-the-okta-verify-library-item) support article.
Click **Discover Integrations**.
In the Security section, find **Okta Device Trust**.
Click **Add and configure**.
In the **Welcome to Okta Device Trust** modal, click **Get Started**.
In the **Specify your Okta Domain** modal, enter your Okta tenant URL and click **Next**.
In the **Sign in with Okta** modal, click **Sign in with Okta**. This will open a new browser window and navigate you to your Okta tenant, where you will create an **API Service Integration**. Once that is done, you will return to Iru Endpoint to continue the ODT integration setup.
The Okta user used to configure ODT must have the [super admin](https://help.okta.com/oie/en-us/content/topics/security/administrators-super-admin.htm) role in Okta.
Once signed into Okta, you should be on the **Authorize Kandji Device Trust** integration page. On this page, click **Install & Authorize**. The Kandji API Service integration uses the following scopes:
* okta.devices.manage
* okta.devices.read
* okta.authenticators.read
On the **Copy your client secret** modal, copy the client secret to a safe place for use later in Iru Endpoint. This is the only time you will be able to view it.
Click **Done**.
On the **Kandji Device Trust** overview page, copy the **Client ID** to a safe place for use later in Iru Endpoint.
Head back to Iru Endpoint to continue the ODT integration setup.
In the **Complete the following tasks in Okta** modal, click **Next**.
In the **API Service Integration Credentials** modal, enter the Client ID and Client Secret copied from earlier.
Click **Connect to Okta**. Iru Endpoint will check in the background to ensure the Okta tenant is on Okta Identity Engine and Okta FastPass is enabled.
### Configuring Device Platforms in Okta
This section outlines creating device integration in Okta. This information is used when adding device platforms in Iru Endpoint.
Okta [Adaptive MFA](https://www.okta.com/products/adaptive-multi-factor-authentication/) is required to add Device integrations in Okta.
#### Adding Device Integrations in Okta
Log in to the Okta admin portal.
In the left-hand navigation, click **Security > Device Integrations**.
Click **Add platform**.
#### Adding macOS as a Device Integration
On the **Select platform** step, select **Desktop (Windows and macOS only)**.
Click **Next**.
On the **Configure management attestation** step, select **Use Okta as certificate authority**.
For **SCEP URL challenge type**, select **Dynamic SCEP URL** and **Generic**.
Next to **SCEP URL**, click **Generate**.
Copy the SCEP URL, Challenge URL, Username, and Password to a safe place. Later, in Iru Endpoint, this information will be used to set up MacOS as a device platform.
This will be the only time you can view the password. If needed, you can rotate it later in the menu from the main Device integrations page in Okta.
Click **Save**.
#### Adding iOS as a Device Integration
On the **Select platform** step, select **iOS**.
Click **Next**.
On the **Configure management attestation** step, copy the **Secret key** to a safe place for use later in Iru Endpoint when adding iOS as a device platform in Iru Endpoint.
This will be the only time you can view the secret key. If needed, you can rotate the key later in the menu from the main Device integrations page in Okta.
For **Device management provider**, enter a descriptive, user-friendly value.
For **Enrollment Portal link**, enter your Iru Endpoint tenant's Enrollment Portal link. (Example: `https://accuhive.iru.com/enroll` where `accuhive` should be your tenant subdomain.)
Click **Save**.
### Modifying a Device Integration in Okta
#### Rotating a macOS Challenge Password or iOS Secret
Go to the Device Integrations page.
Next to the integration that you want to change, click the **Actions** menu.
Click the reset option for that platform.
Click the **Reset** button in the modal that appears.
#### Deleting a macOS Challenge Password or iOS Secret
Go to the Device Integrations page.
Next to the integration that you want to change, click the **Actions** menu.
Click **Delete**.
Click the **Delete** button in the modal that appears.
### Configuring Device Platforms in Iru Endpoint
In the **Configure device platforms** modal, select the platforms to configure. You can configure macOS, iOS, or both.
Click **Next**.
If selecting macOS, enter the required information in the **Add macOS as a device platform** modal and click **Next**.
If selecting iOS, enter the required information in the **Add iOS as a device platform** modal and click **Finish setup**.
In the **Okta Device Trust setup complete** modal, you can choose **View integration settings** to see additional information about the ODT integration in Iru Endpoint or choose **Go to Library item** to configure Okta Verify for ODT deployment. On Mac, use the **Okta Verify Auto App**.
### Next Steps
Deploy ODT to your Apple devices using the [Okta Device Trust: Configuring the Okta Verify Library item](/en/endpoint/integrations/okta-device-trust-main/okta-device-trust-configuring-the-okta-verify-library-item) support article.