> ## Documentation Index
> Fetch the complete documentation index at: https://docs.iru.com/llms.txt
> Use this file to discover all available pages before exploring further.
# User Directory Integration Overview and Providers
> Overview of user directory integration in Iru Endpoint. Sync users and groups from Okta, Microsoft Entra ID, Google Workspace, or OneLogin to your account.
### User Directory Integration
User Directory Integration in Iru Endpoint allows you to connect your existing identity provider (like Microsoft Entra ID, Google Workspace, or Okta) to automatically sync user accounts and enable seamless authentication across your organization.
### Why Configure a Directory Integration?
Iru Endpoint lets you [assign users](/en/endpoint/devices/device-record-management/assigning-and-unassigning-users-to-devices) to specific devices. Using a directory integration to import users allows you to manage your Iru Endpoint user assignment centrally. You can configure automatic device assignment based on your directory settings. Device users in Iru Endpoint can only be created and assigned via a directory integration.
To import users, you can connect multiple Google Workspace, Microsoft Entra ID, or System for Cross-Domain Identity Management (SCIM) integrations. This article covers adding Active Directory and Google Workspace user directories to Iru Endpoint. These native methods are simple to configure and require only a directory administrator account with access to the directory you are trying to integrate. After the initial user sync, Iru Endpoint will import users and groups every four hours.
If you prefer user accounts be added and removed as they are created within your directory, use a SCIM integration. SCIM requires more upfront configuration but allows for Just-in-Time (JiT) account provisioning and de-provisioning. You can use SCIM with [Microsoft Entra ID](/en/endpoint/integrations/scim/scim-directory-integration-with-microsoft-entra-id), [Okta](/en/endpoint/integrations/scim/scim-directory-integration-with-okta), and other directory systems that support it. Refer to [SCIM Directory Integration](/en/endpoint/integrations/scim/scim-directory-integration) for more information.
### Adding Directory Integrations
#### Add a Microsoft Entra ID Integration
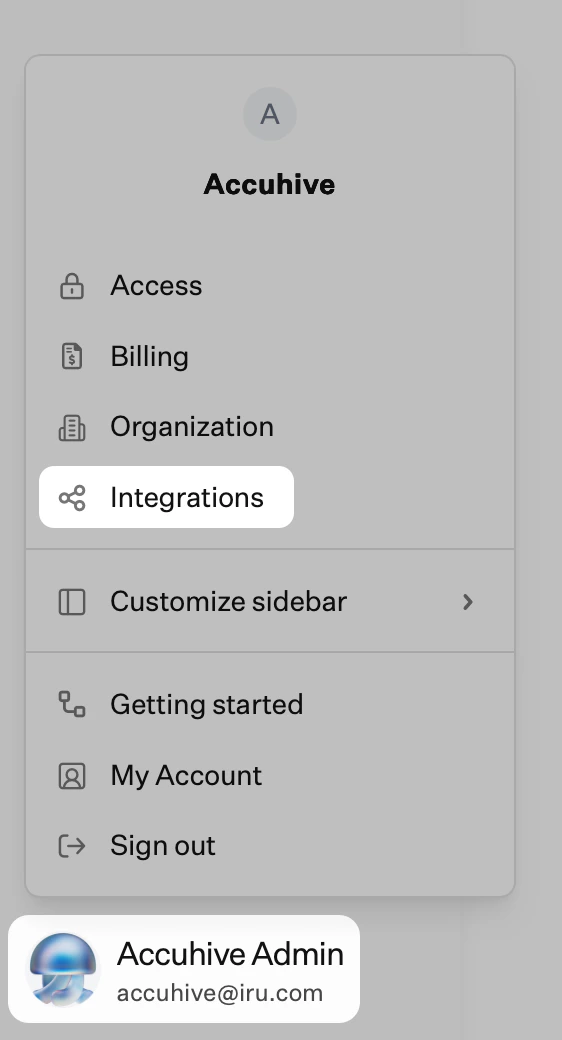
In the sidebar, click the [**Account Menu Button**](/en/iru/platform-overview/account-menu), then select **Integrations**.
 Click **Discover integrations** in the upper-right of the Integrations page.
Under Directory integrations, click **Add and configure** under Microsoft Entra ID.
Click **Get started**.
Enter a unique name, which will be used in Iru Endpoint to show the directory from which a user originates.
Click **Sign in with Microsoft Entra ID**.
If you are signing in with an account that is not a Global Administrator, you may need to request approval during that sign-in process. Once a Global Administrator approves the request, you can complete the sign-in process.
Sign in using a Microsoft Entra ID account with admin access to the directory you want to integrate.
Consent on behalf of your organization and click **Accept**. You will see the new user directory on the **Integrations** page.
The Google Workspace Integration in Iru Endpoint allows customers to sync all Google Workspace user and group objects into the user directory within Iru Endpoint. These delegated permissions are leveraged through the Google API to synchronize user directory information.
#### Add a Google Workspace Integration
In the sidebar, click the **Account Menu Button**, then select **Integrations**.
Click **Discover integrations** in the upper-right of the Integrations page.
Under Directory integrations, click **Add and configure** under Google Workspace.
Click **Get Started**.
Enter a unique name, which will be used in Iru Endpoint to show the directory from which a user originates.
Click **Sign in with Google**.
Sign in using a Google account with admin access to the directory you want to integrate.
Click **Allow**. You will see the new user directory on the **Integrations** page.
#### Google Workspace Permissions
The following permissions are automatically requested and required to successfully sync Google Workspace users into Iru Endpoint. A Google Administrator must have sufficient permissions to delegate the following permissions to Iru Endpoint.
| Permission | Display Text | Justification |
| ------------------------------ | ----------------------------------- | ------------------------------------------------------------------------------------------------------------- |
| openid | See info about users on your domain | Associate you with your personal info on Google |
| userinfo.profile | See info about users on your domain | See your personal info, including any personal info you've made publicly available |
| userinfo.email | See info about users on your domain | See your primary Google Account email address |
| admin.directory.group.readonly | View groups on your domain | View details (e.g., name, members) and metadata (e.g., login details) of groups on your domain |
| admin.directory.user.readonly | See info about users on your domain | Permission to see profile info about your domain users, such as their: Name, Email, Job Title, and Department |
#### Disconnect Integration from Google
Go to [https://myaccount.google.com/permissions.](https://myaccount.google.com/permissions) Ensure you are signed in with the same account that configured the integration originally.
Click Remove for the Iru Endpoint application in the list of applications.
### View Additional Information about a Directory Integration
Click the ellipsis on the Directory Integration you would like to view.
Select **View details**.
**Microsoft Entra ID and Google Workspace integrations** will show the administrator email account used to connect to the directory and the time of the last import.
**SCIM integrations** will show the Iru Endpoint email used to connect to the directory, the SCIM API URL, and the time of the last sync.
### Force a User Directory Sync
Microsoft Entra ID and Google Workspace directories sync automatically every four hours, but you can force an immediate sync. SCIM uses a push mechanism from the cloud directory so it is not necessary to force-sync a SCIM directory integration.
Click the ellipsis on the Directory Integration you would like to sync.
Select **Sync users**.
### Re-authenticate a Directory Integration
You might need to re-authenticate an existing Microsoft Entra ID or Google directory integration to update credentials, change the account that was used to create the integration, or to update permissions.
Click the ellipsis on the Directory Integration you would like to re-authenticate.
Select **Re-authenticate**.
Sign in using a Google or Microsoft Entra ID account with admin access. You will be redirected back to the Integrations page.
### Remove a Directory Integration
Removing the integration will remove users not assigned to devices from Iru Endpoint. Users assigned to devices will remain, but Iru Endpoint will no longer synchronize them with the directory.
Click the ellipsis on the Directory Integration you would like to delete.
Select **Delete integration**.
**Confirm** by typing the name of the integration.
Click **Delete**.
Click **Discover integrations** in the upper-right of the Integrations page.
Under Directory integrations, click **Add and configure** under Microsoft Entra ID.
Click **Get started**.
Enter a unique name, which will be used in Iru Endpoint to show the directory from which a user originates.
Click **Sign in with Microsoft Entra ID**.
If you are signing in with an account that is not a Global Administrator, you may need to request approval during that sign-in process. Once a Global Administrator approves the request, you can complete the sign-in process.
Sign in using a Microsoft Entra ID account with admin access to the directory you want to integrate.
Consent on behalf of your organization and click **Accept**. You will see the new user directory on the **Integrations** page.
The Google Workspace Integration in Iru Endpoint allows customers to sync all Google Workspace user and group objects into the user directory within Iru Endpoint. These delegated permissions are leveraged through the Google API to synchronize user directory information.
#### Add a Google Workspace Integration
In the sidebar, click the **Account Menu Button**, then select **Integrations**.
Click **Discover integrations** in the upper-right of the Integrations page.
Under Directory integrations, click **Add and configure** under Google Workspace.
Click **Get Started**.
Enter a unique name, which will be used in Iru Endpoint to show the directory from which a user originates.
Click **Sign in with Google**.
Sign in using a Google account with admin access to the directory you want to integrate.
Click **Allow**. You will see the new user directory on the **Integrations** page.
#### Google Workspace Permissions
The following permissions are automatically requested and required to successfully sync Google Workspace users into Iru Endpoint. A Google Administrator must have sufficient permissions to delegate the following permissions to Iru Endpoint.
| Permission | Display Text | Justification |
| ------------------------------ | ----------------------------------- | ------------------------------------------------------------------------------------------------------------- |
| openid | See info about users on your domain | Associate you with your personal info on Google |
| userinfo.profile | See info about users on your domain | See your personal info, including any personal info you've made publicly available |
| userinfo.email | See info about users on your domain | See your primary Google Account email address |
| admin.directory.group.readonly | View groups on your domain | View details (e.g., name, members) and metadata (e.g., login details) of groups on your domain |
| admin.directory.user.readonly | See info about users on your domain | Permission to see profile info about your domain users, such as their: Name, Email, Job Title, and Department |
#### Disconnect Integration from Google
Go to [https://myaccount.google.com/permissions.](https://myaccount.google.com/permissions) Ensure you are signed in with the same account that configured the integration originally.
Click Remove for the Iru Endpoint application in the list of applications.
### View Additional Information about a Directory Integration
Click the ellipsis on the Directory Integration you would like to view.
Select **View details**.
**Microsoft Entra ID and Google Workspace integrations** will show the administrator email account used to connect to the directory and the time of the last import.
**SCIM integrations** will show the Iru Endpoint email used to connect to the directory, the SCIM API URL, and the time of the last sync.
### Force a User Directory Sync
Microsoft Entra ID and Google Workspace directories sync automatically every four hours, but you can force an immediate sync. SCIM uses a push mechanism from the cloud directory so it is not necessary to force-sync a SCIM directory integration.
Click the ellipsis on the Directory Integration you would like to sync.
Select **Sync users**.
### Re-authenticate a Directory Integration
You might need to re-authenticate an existing Microsoft Entra ID or Google directory integration to update credentials, change the account that was used to create the integration, or to update permissions.
Click the ellipsis on the Directory Integration you would like to re-authenticate.
Select **Re-authenticate**.
Sign in using a Google or Microsoft Entra ID account with admin access. You will be redirected back to the Integrations page.
### Remove a Directory Integration
Removing the integration will remove users not assigned to devices from Iru Endpoint. Users assigned to devices will remain, but Iru Endpoint will no longer synchronize them with the directory.
Click the ellipsis on the Directory Integration you would like to delete.
Select **Delete integration**.
**Confirm** by typing the name of the integration.
Click **Delete**.