> ## Documentation Index
> Fetch the complete documentation index at: https://docs.iru.com/llms.txt
> Use this file to discover all available pages before exploring further.

# AD CS Integration: Overview

> Learn how the Iru Endpoint AD CS integration requests certificates from Microsoft Active Directory Certificate Services and delivers them to managed devices.

### What is Active Directory Certificate Services?

[Microsoft Active Directory Certificate Services](https://learn.microsoft.com/en-us/windows-server/identity/ad-cs/active-directory-certificate-services-overview) (AD CS) creates an on-premises public key infrastructure (PKI) that lets organizations issue, validate, and revoke certificates for internal use. The Iru Endpoint AD CS integration works with your existing Microsoft AD CS setup to request certificates from AD CS. You can then push these certificates to devices through configuration profiles, which enables certificate-based authentication so users can access corporate resources like enterprise Wi-Fi networks.

#### Kandji versus Iru Endpoint AD CS

On **Kandji**, AD CS uses the **legacy** Connector (Auth0 sign-in). After you [Upgrade to Iru](/en/iru/platform-overview/upgrade-to-iru), **Iru Endpoint** uses the **updated** Connector (Iru identity and registration approval). To move a Kandji AD CS deployment to Iru, see [Migrating from Kandji to Iru with AD CS](#migrating-from-kandji-to-iru-with-ad-cs). If you already run the **updated** Connector on Iru Endpoint and need a newer build, see [Updating the Iru AD CS Connector](#updating-the-iru-ad-cs-connector).

The **Iru** Connector has stricter **Windows Server**, **.NET**, **TPM**, and **firewall** expectations than a legacy Kandji setup. See [AD CS Connector Installation](/en/endpoint/integrations/certificate-services/active-directory-certificate-services/active-directory-certificate-services-ad-cs-integration-ad-cs-connector-installation#installation) for the host checklist and installation steps, and [Network requirements](#network-requirements) for allowlist differences by Connector generation.

### Certificate Request Flow

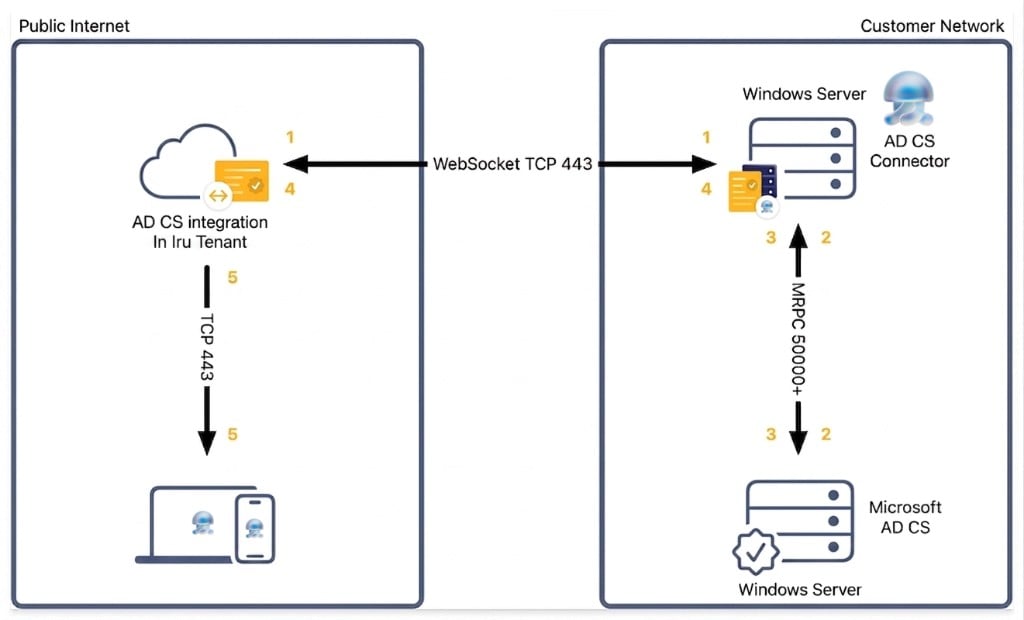
The diagram summarizes how certificate requests move between Iru Endpoint, the AD CS Connector on your network, Microsoft AD CS, and enrolled devices.

<Frame actions={false}>
  <img src="https://mintcdn.com/iru/LITOVaLBQCOy_8Cy/assets/media/images/iru-adcs-overview-certificate-request-flow.png?fit=max&auto=format&n=LITOVaLBQCOy_8Cy&q=85&s=5172062b7e1526118a47a768fbb680f5" alt="Network diagram of the AD CS certificate request flow: WebSocket over TCP 443 between the Iru tenant and the AD CS Connector, Microsoft RPC between the Connector and Microsoft AD CS, and TCP 443 to enrolled devices." width="1024" height="620" data-path="assets/media/images/iru-adcs-overview-certificate-request-flow.png" />
</Frame>

<Steps>
  <Step title="Send certificate request from Iru Endpoint">
    Iru Endpoint sends a certificate request to the Iru Endpoint AD CS Connector through a WebSocket connection over TCP port 443.
  </Step>

  <Step title="Generate key pair and submit signing request">
    The AD CS Connector generates the certificate key pair locally, then sends the certificate signing request to Microsoft AD CS using DCE/RPC. Private keys are delivered to managed endpoints through Library Items. The Connector does not store device identity private keys.
  </Step>

  <Step title="Issue certificate from AD CS">
    AD CS processes the request, issues the certificate, and sends the signed certificate back to the AD CS Connector.
  </Step>

  <Step title="Return encrypted certificate bundle to Iru Endpoint">
    The AD CS Connector sends back an encrypted .p12 file along with the request ID to Iru Endpoint over the WebSocket connection.
  </Step>

  <Step title="Deliver certificate to the client device">
    Iru Endpoint delivers the certificate bundle (.p12 file) to the client device through a configuration profile payload.
  </Step>
</Steps>

### AD CS setup path

Use the diagram as your rollout checklist. Start on the left with **Network allowlists**; complete the guidance in **[Network requirements](#network-requirements)** and the **AD CS Integration Network Requirements** tables in [Using Iru on Enterprise Networks](/en/iru/requirements/using-iru-on-enterprise-networks#ad-cs-integration-network-requirements), then follow the guides in order from left to right. Each article ends with **Next Steps** that point you to the following task.

<div
  style={{
display: 'flex',
justifyContent: 'center',
alignItems: 'center',
flexWrap: 'wrap',
gap: '0.35rem 0.2rem',
margin: '0.5rem 0',
}}
>
  <div style={{ border: '2px solid #5a0d6f', borderRadius: '6px', padding: '0.5rem 0.65rem', background: '#71118C', color: '#fff', fontWeight: 600, fontSize: '0.8rem', textAlign: 'center', lineHeight: 1.35, maxWidth: '11rem' }}>
    Network allowlists<br />Using Iru on Enterprise Networks
  </div>

  <Icon icon="chevron-right" size={14} style={{ color: 'var(--color-foreground-secondary, #86868b)', flexShrink: 0 }} />

  <div style={{ border: '2px solid #5a0d6f', borderRadius: '6px', padding: '0.5rem 0.65rem', background: '#71118C', color: '#fff', fontWeight: 600, fontSize: '0.8rem', textAlign: 'center', lineHeight: 1.35, maxWidth: '11rem' }}>
    Computer certificate template<br />in AD CS
  </div>

  <Icon icon="chevron-right" size={14} style={{ color: 'var(--color-foreground-secondary, #86868b)', flexShrink: 0 }} />

  <div style={{ border: '2px solid #71118C', borderRadius: '6px', padding: '0.5rem 0.65rem', background: '#8B1A8B', color: '#fff', fontWeight: 600, fontSize: '0.8rem', textAlign: 'center', lineHeight: 1.35, maxWidth: '11rem' }}>
    Configure AD CS integration<br />in Iru Endpoint
  </div>

  <Icon icon="chevron-right" size={14} style={{ color: 'var(--color-foreground-secondary, #86868b)', flexShrink: 0 }} />

  <div style={{ border: '2px solid #71118C', borderRadius: '6px', padding: '0.5rem 0.65rem', background: '#8B1A8B', color: '#fff', fontWeight: 600, fontSize: '0.8rem', textAlign: 'center', lineHeight: 1.35, maxWidth: '11rem' }}>
    Install AD CS Connector<br />on Windows Server
  </div>

  <Icon icon="chevron-right" size={14} style={{ color: 'var(--color-foreground-secondary, #86868b)', flexShrink: 0 }} />

  <div style={{ border: '2px solid #71118C', borderRadius: '6px', padding: '0.5rem 0.65rem', background: '#5a0d6f', color: '#fff', fontWeight: 600, fontSize: '0.8rem', textAlign: 'center', lineHeight: 1.35, maxWidth: '11rem' }}>
    Strong certificate mapping<br />when required
  </div>

  <Icon icon="chevron-right" size={14} style={{ color: 'var(--color-foreground-secondary, #86868b)', flexShrink: 0 }} />

  <div style={{ border: '2px solid #71118C', borderRadius: '6px', padding: '0.5rem 0.65rem', background: '#5a0d6f', color: '#fff', fontWeight: 600, fontSize: '0.8rem', textAlign: 'center', lineHeight: 1.35, maxWidth: '11rem' }}>
    Library Items<br />deploy to devices
  </div>
</div>

### Network Requirements

Confirm the following before you install the Connector or finish the integration wizard.
<AccordionGroup>
  <Accordion title="Network paths and firewall rules" icon="wifi">
    For hostnames, ports, protocols, and the difference between updated and legacy Connector rows, see the **AD CS Integration Network Requirements** section in [Using Iru on Enterprise Networks](/en/iru/requirements/using-iru-on-enterprise-networks#ad-cs-integration-network-requirements). The updated Connector does **not** use Auth0. Allow your Iru web app, Iru Identity, tenant API, and `adcsconn` destinations as documented there.
  </Accordion>

  <Accordion title="Legacy Connector still on the network" icon="clock-rotate-left">
    If any hosts still run the **legacy** Connector during migration, keep the legacy Auth0 allowlist rows from that article until each host runs the **updated** Connector. See [Migrating from Kandji to Iru with AD CS](#migrating-from-kandji-to-iru-with-ad-cs) for the full replacement workflow.
  </Accordion>
</AccordionGroup>

### Next Steps

After you finish this overview:

<Steps>
  <Step title="Create the computer certificate template on your issuing CA">
    See [AD CS Integration: Create a Computer Certificate Template](/en/endpoint/integrations/certificate-services/active-directory-certificate-services/active-directory-certificate-services-ad-cs-integration-create-a-computer-certificate-template).
  </Step>
</Steps>

### Connector Versions

#### Updated connector

The **updated** AD CS Connector is the Iru Endpoint package you download from **Integrations** > **Active Directory Certificate Services**. It uses Iru identity for sign-in and shows a **registration URL** after sign-in. Approve the Connector host in **Approve AD CS connector registration**. Product and security updates ship only for this package. Installers are **2.x** versions.

#### Legacy connector

The **legacy** AD CS Connector is the release for **Kandji** tenants. It uses Auth0-based sign-in. Iru Endpoint does not ship updates for it. After you upgrade the tenant to Iru, uninstall the legacy Connector from Windows Server and install the **updated** Connector from your **Iru** tenant.

### Updating the Iru AD CS Connector

Use this workflow when your tenant already runs on **Iru Endpoint** and you need a newer **updated** Connector build on Windows Server, or when you are refreshing the Connector on a host that has already registered with Iru identity.

<Note>
  This section is for **updated** Connector builds on an **Iru** tenant. If you are moving from **Kandji** with AD CS, complete [Migrating from Kandji to Iru with AD CS](#migrating-from-kandji-to-iru-with-ad-cs) first.
</Note>

On Windows Server, download the latest **Iru Endpoint AD CS Connector** from **Integrations** > **Active Directory Certificate Services**, run the installer, then complete sign-in and **registration URL** approval when prompted. The integration lists the Connector as **Pending** until you approve registration, then **Active**; the Connector app shows **Connected**.

<Steps>
  <Step title="Download and install the latest build">
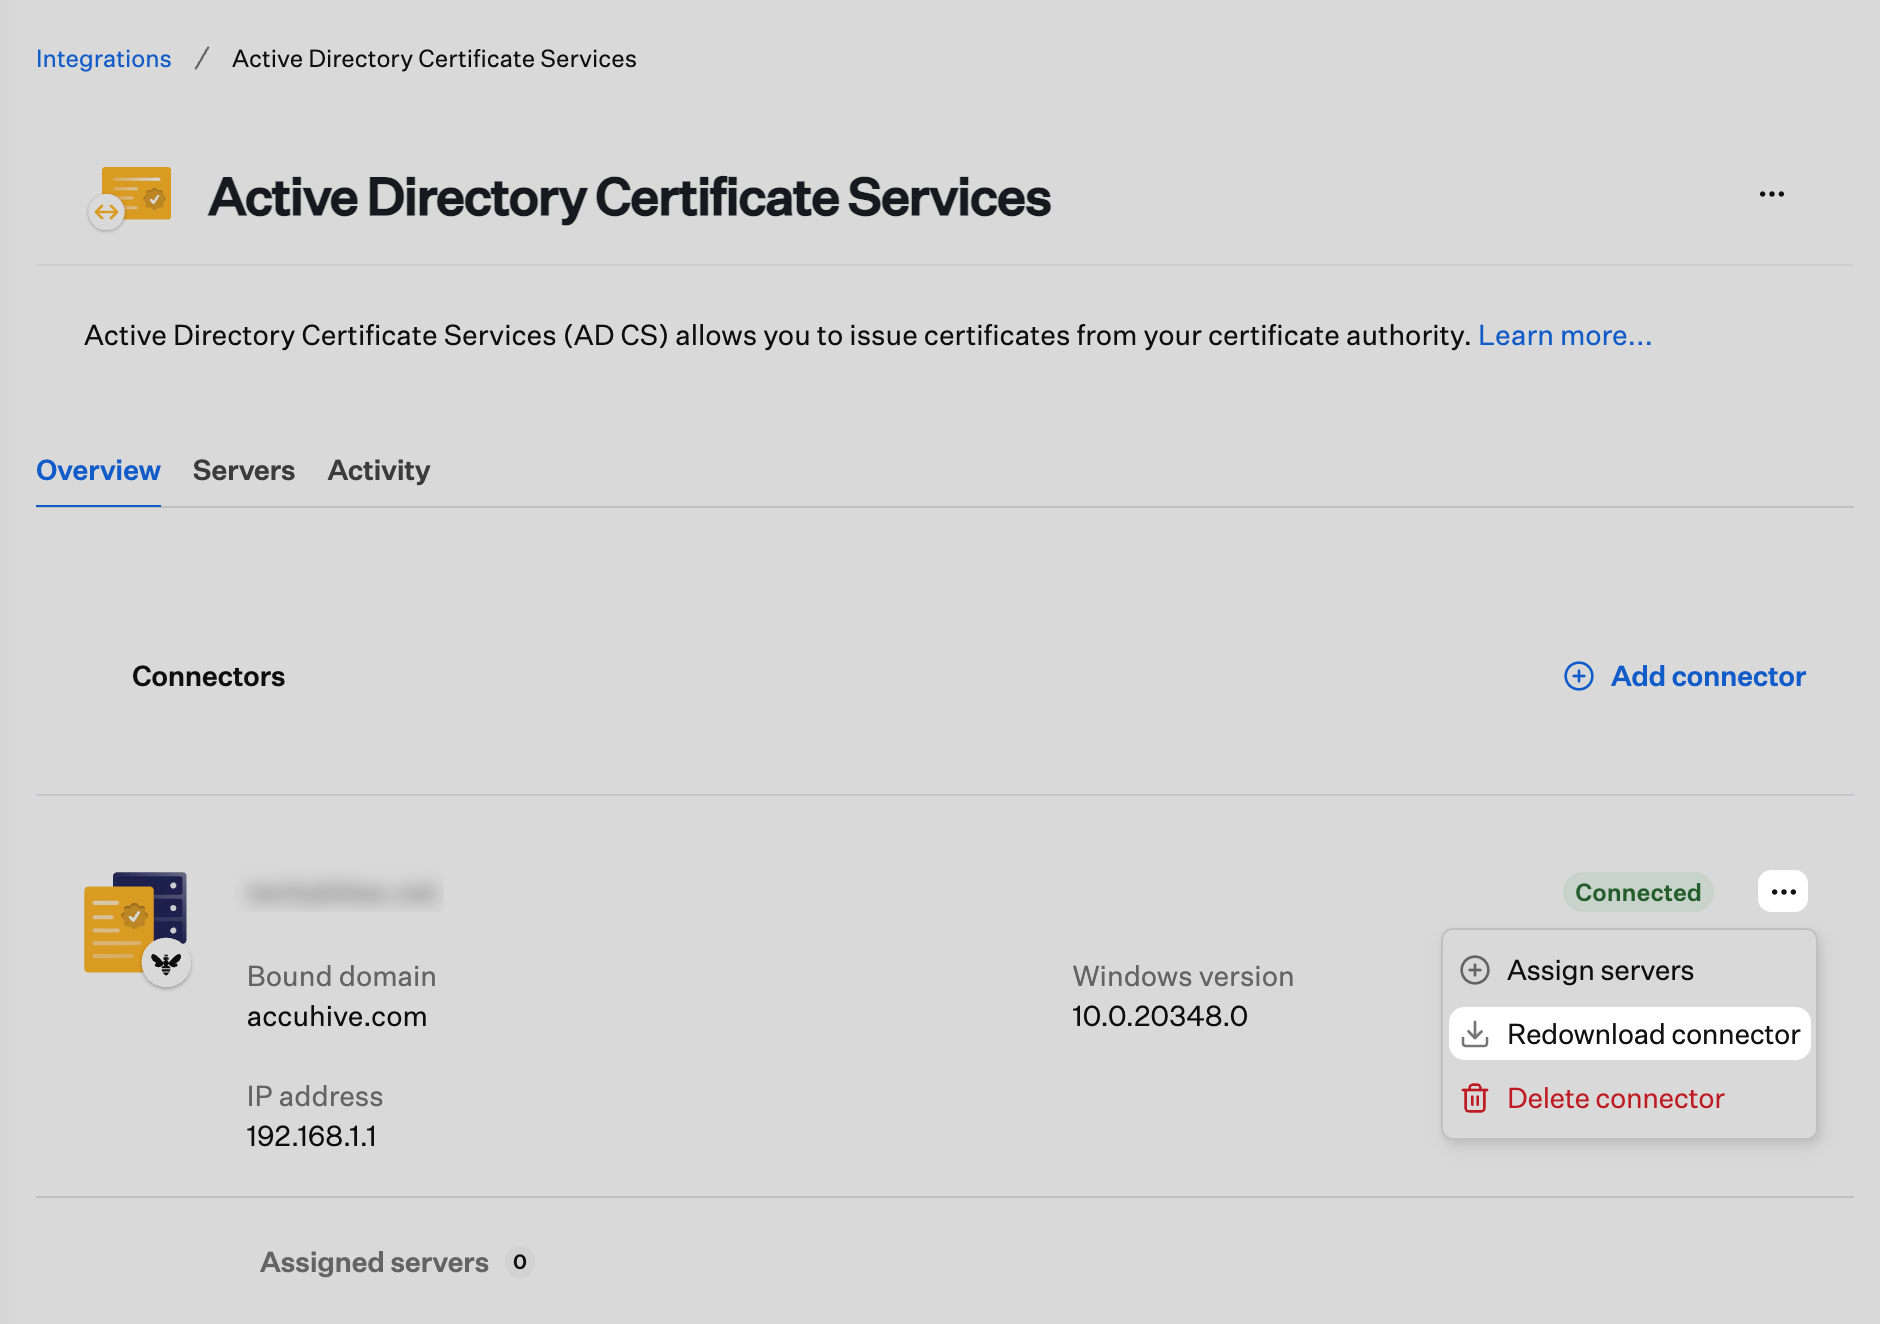
    From **Integrations** > **Active Directory Certificate Services**, download the latest **Iru Endpoint AD CS Connector**. On an existing Connector card, open the action menu (**...**) and click **Redownload Connector** instead. On the Connector Windows Server, run the installer. The updater may uninstall the previous build before installing the new one.

    <Frame>
      <img src="https://mintcdn.com/iru/LITOVaLBQCOy_8Cy/assets/media/images/iru-adcs-redownload-connector.png?fit=max&auto=format&n=LITOVaLBQCOy_8Cy&q=85&s=b7bb8ca65707f9a7c615a18c35a4cab3" alt="Connector action menu with Redownload connector highlighted to fetch the installer again." width="1880" height="1324" data-path="assets/media/images/iru-adcs-redownload-connector.png" />
    </Frame>
  </Step>

  <Step title="Sign in and approve registration">
    Re-enter your Iru tenant URL and complete sign-in when the Connector app prompts you. Open the **registration URL** in a browser and approve the device in **Approve AD CS connector registration** when Iru Endpoint requests it. For step-by-step initialization, see [Initialization](/en/endpoint/integrations/certificate-services/active-directory-certificate-services/active-directory-certificate-services-ad-cs-integration-ad-cs-connector-installation#initialization) in [AD CS Connector Installation](/en/endpoint/integrations/certificate-services/active-directory-certificate-services/active-directory-certificate-services-ad-cs-integration-ad-cs-connector-installation).
  </Step>

  <Step title="Verify Connector status">
    Confirm the Connector app shows **Connected** and the integration card shows **Active**. In **Control Panel** > **Programs and Features** (or **Settings** > **Apps** > **Installed apps** on Windows Server 2019 and later), confirm the installed **Iru Endpoint AD CS Connector** version is the current **2.x** build you expect.
  </Step>

  <Step title="Assign issuing CAs and remove a stale legacy row when needed">
    If a new **updated** Connector registration appears next to a **legacy** Connector row, open **Assign servers** on the **new** Connector card and attach each issuing CA that was assigned to the **legacy** Connector. When the updated Connector is **Connected** and CAs are assigned, open the action menu (**...**) on the **legacy** Connector card and delete that entry. If you are only upgrading builds on a host that already runs the **updated** Connector and the same Connector card stays **Active**, you do not need to reassign CAs or delete a legacy row.
  </Step>

  <Step title="Optional: Move the Connector to a different Windows Server">
    To use a new domain-joined Windows Server, download and install the latest Connector on that server, complete registration, then use **Assign servers** on the new Connector card to move issuing CAs off the old Connector entry. Decommission the old server when you are finished.
  </Step>
</Steps>

For install and uninstall details on the host, see [AD CS Connector Installation](/en/endpoint/integrations/certificate-services/active-directory-certificate-services/active-directory-certificate-services-ad-cs-integration-ad-cs-connector-installation).

### Migrating from Kandji to Iru with AD CS

Complete the platform upgrade to Iru before you replace the AD CS Connector on Windows Server. The legacy Connector may still appear **Connected** in Iru Endpoint immediately after tenant migration until you uninstall the legacy Connector on the server and register the **updated** Connector.

<Callout icon="info" color="#4f46e5" iconType="regular">
  In the Kandji web app, AD CS uses the **legacy** Connector. After upgrade, click the [**Account Menu Button**](/en/iru/platform-overview/account-menu) in the sidebar and open **Integrations**. **Settings** is no longer in that location on Iru Endpoint.
</Callout>

<Steps>
  <Step title="Upgrade the tenant to Iru">
    Follow [Upgrade to Iru](/en/iru/platform-overview/upgrade-to-iru) (**Upgrade Process** tab). In **Settings** > **Access**, click **Start migration**, configure your authentication connections, accept the disclaimer, and click **Complete migration**. Sign in to your new Iru domain (`{{subdomain}}.iru.com`). When the tenant upgrade is complete, return to [Migrating from Kandji to Iru with AD CS](#migrating-from-kandji-to-iru-with-ad-cs) and continue with the next step below to replace the AD CS Connector.
  </Step>

  <Step title="Open the AD CS integration in Iru Endpoint">
    In the sidebar, click the **Account Menu Button**, then **Integrations**. Open **Active Directory Certificate Services**. The integration may still show **Connected** if the **legacy** Connector is installed on Windows Server.
  </Step>

  <Step title="Uninstall the legacy Connector on Windows Server">
    On the Connector host, open **Control Panel** > **Programs and Features** (or **Settings** > **Apps** > **Installed apps**). Find the legacy **Iru Endpoint AD CS Connector** (or the Kandji-era AD CS Connector entry) and uninstall it. Follow the prompts until the uninstall completes. The legacy build is typically a **1.0.0.x** version. For full uninstall steps, including WebView runtime removal when required, see [Uninstalling the AD CS Connector](/en/endpoint/integrations/certificate-services/active-directory-certificate-services/active-directory-certificate-services-ad-cs-integration-ad-cs-connector-installation#uninstalling-the-ad-cs-connector) in [AD CS Connector Installation](/en/endpoint/integrations/certificate-services/active-directory-certificate-services/active-directory-certificate-services-ad-cs-integration-ad-cs-connector-installation).
  </Step>

  <Step title="Confirm the Connector shows Disconnected">
    Refresh the **Active Directory Certificate Services** page in Iru Endpoint. The Connector should show **Disconnected** after you remove the legacy package from the server.
  </Step>

  <Step title="Download the updated Connector">
    Click **Add connector**, then download the **Iru Endpoint AD CS Connector** installer from your **Iru** tenant. If your browser blocks the download, choose **Keep** or **Keep anyway** so the file saves. The integration lists the new Connector as **Pending** until you complete installation and registration.
  </Step>

  <Step title="Install the updated Connector">
    Transfer the installer to the Windows Server and run it. On **Authenticate with Certificate Authority**, select **Local System** unless your CA policy requires a service account, then click **Install**. When installation completes, click **Close**. See [Installation](/en/endpoint/integrations/certificate-services/active-directory-certificate-services/active-directory-certificate-services-ad-cs-integration-ad-cs-connector-installation#installation) in [AD CS Connector Installation](/en/endpoint/integrations/certificate-services/active-directory-certificate-services/active-directory-certificate-services-ad-cs-integration-ad-cs-connector-installation).
  </Step>

  <Step title="Sign in and approve registration">
    Open **Iru Endpoint AD CS Connector** from the Windows Start menu. In **Enter Iru domain**, enter your Iru tenant URL (for example `{{subdomain}}.iru.com`, the same hostname shown in the Iru Endpoint web app). Complete sign-in, open the **registration URL**, and approve the device in **Approve AD CS connector registration** when prompted. The Connector app should show **Connected**.
  </Step>

  <Step title="Verify connection and Connector version">
    Refresh the AD CS integration in Iru Endpoint and confirm the Connector shows **Connected**. On the Windows Server, open **Programs and Features** again and confirm the installed **Iru Endpoint AD CS Connector** is a **2.x** build, not the legacy **1.0.0.x** release.
  </Step>

  <Step title="Assign issuing CAs and remove the legacy row">
    On the AD CS **Overview** page, open **Assign servers** on the **new** Connector card and attach each issuing CA that was assigned to the **legacy** Connector. When the updated Connector is **Connected** and CAs are assigned, open the action menu (**...**) on the **legacy** Connector card and delete that entry.
  </Step>
</Steps>

<Warning>
  Keep **legacy** Auth0 firewall allowlist rows until each Connector host runs the **updated** Connector and you remove the legacy Connector entry from Iru Endpoint. See [Network requirements](#network-requirements) and [AD CS Integration Network Requirements](/en/iru/requirements/using-iru-on-enterprise-networks#ad-cs-integration-network-requirements) in [Using Iru on Enterprise Networks](/en/iru/requirements/using-iru-on-enterprise-networks).
</Warning>