> ## Documentation Index
> Fetch the complete documentation index at: https://docs.iru.com/llms.txt
> Use this file to discover all available pages before exploring further.
# AD CS Integration: Create a Computer Certificate Template
> Duplicate and configure an AD CS computer certificate template on your issuing Certification Authority for use with the Iru Endpoint AD CS integration.
### Prerequisites
Confirm the following before you create or duplicate a computer certificate template on your issuing CA.
You need access to an issuing CA in your Active Directory forest where you can open the Certificate Authority snap-in and manage certificate templates.
You need rights sufficient to duplicate the **Computer** template, adjust security (for example **Read** and **Enroll** for the AD CS Connector computer object or a service account), and publish the template for issuance.
### Required Settings for the Certificate Template
Below are the tabs and settings that should be configured in the certificate template:
* Template type: The template used should be based on the default Computer template.
* Certificate Authority compatibility: Windows Server 2016
* Certificate recipients: Windows 10/Windows Server 2016
* Subject name: Supply in the request
* Security: Grant **Read** and **Enroll** only to the identity that enrolls for the Connector (the Connector host computer account when the Connector runs as **Local System**, or a dedicated **service account** when the Connector uses **Service Account** at install). Remove broad inherited entries such as **Domain Computers** so other domain-joined computers cannot enroll.
If you would like to use an existing AD CS certificate template, the settings in the existing template must align with the settings listed above.
### Create an AD CS Computer Certificate Template
Log in to a Certificate Authority (CA) on your domain.
On the server, launch the Start menu and search for the Certificate Authority snap-in.
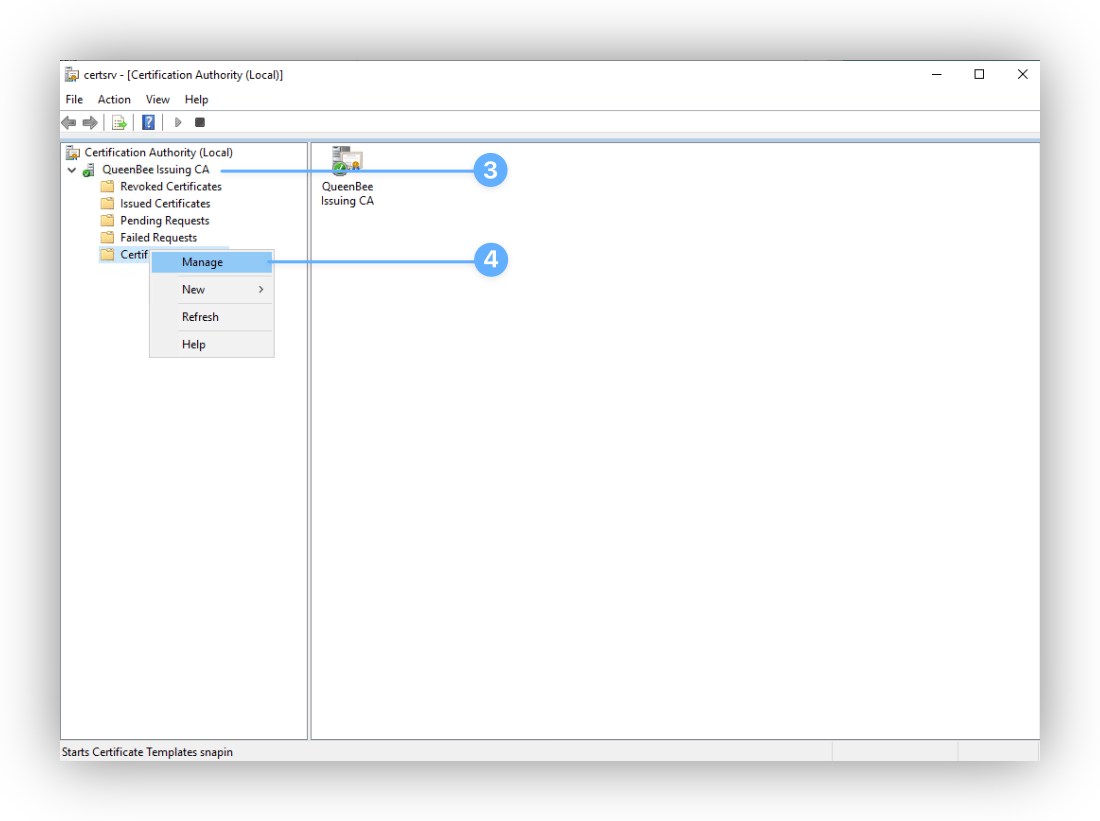
Once in the Certificate Authority snap-in, click Issuing CA. The name of the Issuing CA as it appears here in the snap-in will be needed when adding AD CS servers to the Iru Endpoint AD CS integration.
Right-click the Certificate Templates folder and click Manage.
 In the Certificate Templates window, find the Computer template and right-click it. Then, click Duplicate Template.
In the Properties window, click the General tab.
Set the display name and template name to something like `IruEndpointDevice`. The template name will be needed when creating Library Items that contain AD CS certificate settings.
Next, click the Compatibility tab.
For Certificate Authority, select Windows Server 2016. In the change dialog, click **OK**.
For Certificate Recipients, select Windows 10 / Windows Server 2016. In the change dialog, click **OK**.
Click the Subject Name tab.
Select the option to Supply in the request and click **OK** in the warning dialog.
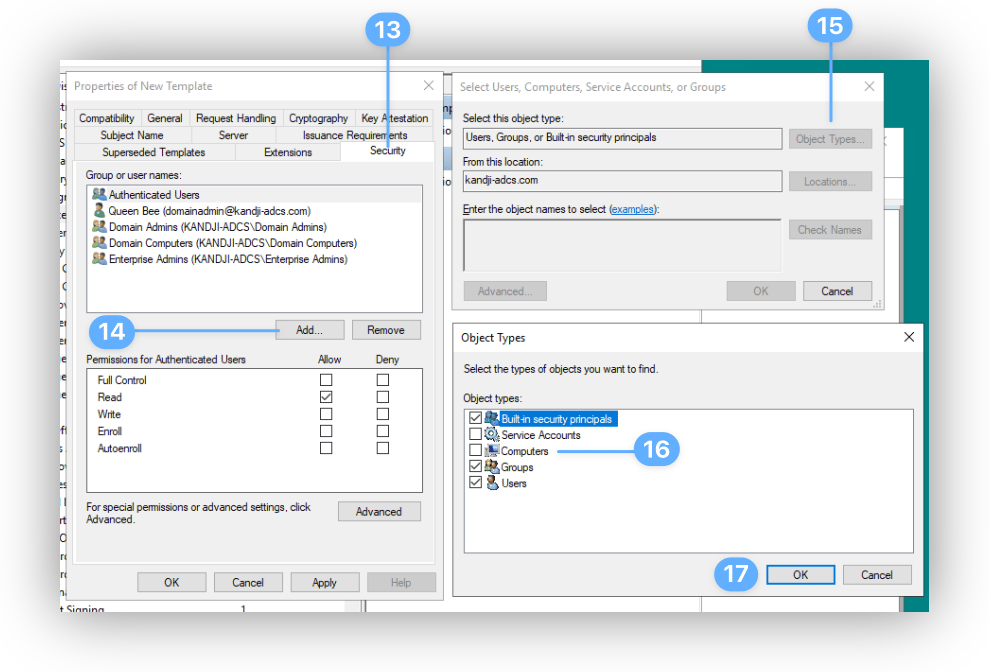
Click the **Security** tab.
The steps below add the Connector host **computer account**. Use this path when the Connector will run as **Local System** on the Windows Server (the default in [AD CS Connector Installation](/en/endpoint/integrations/certificate-services/active-directory-certificate-services/active-directory-certificate-services-ad-cs-integration-ad-cs-connector-installation#installation)).
Under **Groups or user names**, click **Add**.
In the Select Users, Computers, Service Accounts, or Groups window, click Object Types.
In the Object Types window, select Computers.
Click **OK**.
In the Certificate Templates window, find the Computer template and right-click it. Then, click Duplicate Template.
In the Properties window, click the General tab.
Set the display name and template name to something like `IruEndpointDevice`. The template name will be needed when creating Library Items that contain AD CS certificate settings.
Next, click the Compatibility tab.
For Certificate Authority, select Windows Server 2016. In the change dialog, click **OK**.
For Certificate Recipients, select Windows 10 / Windows Server 2016. In the change dialog, click **OK**.
Click the Subject Name tab.
Select the option to Supply in the request and click **OK** in the warning dialog.
Click the **Security** tab.
The steps below add the Connector host **computer account**. Use this path when the Connector will run as **Local System** on the Windows Server (the default in [AD CS Connector Installation](/en/endpoint/integrations/certificate-services/active-directory-certificate-services/active-directory-certificate-services-ad-cs-integration-ad-cs-connector-installation#installation)).
Under **Groups or user names**, click **Add**.
In the Select Users, Computers, Service Accounts, or Groups window, click Object Types.
In the Object Types window, select Computers.
Click **OK**.
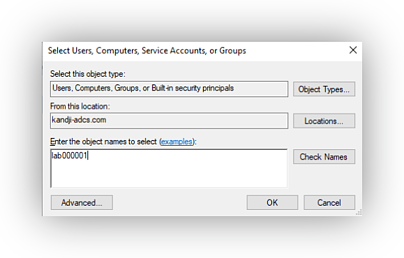
 In the object names search field, enter the name of the Windows server that will be used to host the AD CS Connector. In the screenshot below, `lab000001` is the computer name being used.
 With the Connector host computer still selected under **Groups or user names**, select **Read** and **Enroll** under **Allow** in the **Permissions** section.
**Service account enrollment instead:** If the Connector will use **Service Account** at install, skip the **Object Types** and **Computers** steps above. On the **Security** tab, click **Add**, enter the service account (leave default object types), grant **Read** and **Enroll**, then continue with the next step. Grant **Enroll** only to that service account, not to **Domain Computers**.
Remove inherited principals that grant **Enroll** to large groups, such as **Domain Computers**. Leave only the account you granted **Read** and **Enroll** in the previous steps (the Connector host computer account or your service account).
A duplicated **Computer** template often allows **Domain Computers** to enroll. On Windows Server 2019 and later, leaving that entry in place can let any domain-joined computer request a certificate from this template. Because the template uses **Supply in the request**, that certificate could represent another principal in your forest and be misused for authentication. Remove those broad principals; keep only your Connector enrollment account.
Click Apply and then OK.
Go back to the main Certificate Authority snap-in, right-click Certificate Templates again, and select New > Certificate Template to issue.
Select the template you created (in our example, `IruEndpointDevice`).
Click **OK**.
Confirm that the template is shown in the list.
### Next Steps
After the template appears in the issuance list:
Run the integration wizard and download the Connector installer in [AD CS Integration: Configure the Integration](/en/endpoint/integrations/certificate-services/active-directory-certificate-services/active-directory-certificate-services-ad-cs-integration-configure-the-integration).
With the Connector host computer still selected under **Groups or user names**, select **Read** and **Enroll** under **Allow** in the **Permissions** section.
**Service account enrollment instead:** If the Connector will use **Service Account** at install, skip the **Object Types** and **Computers** steps above. On the **Security** tab, click **Add**, enter the service account (leave default object types), grant **Read** and **Enroll**, then continue with the next step. Grant **Enroll** only to that service account, not to **Domain Computers**.
Remove inherited principals that grant **Enroll** to large groups, such as **Domain Computers**. Leave only the account you granted **Read** and **Enroll** in the previous steps (the Connector host computer account or your service account).
A duplicated **Computer** template often allows **Domain Computers** to enroll. On Windows Server 2019 and later, leaving that entry in place can let any domain-joined computer request a certificate from this template. Because the template uses **Supply in the request**, that certificate could represent another principal in your forest and be misused for authentication. Remove those broad principals; keep only your Connector enrollment account.
Click Apply and then OK.
Go back to the main Certificate Authority snap-in, right-click Certificate Templates again, and select New > Certificate Template to issue.
Select the template you created (in our example, `IruEndpointDevice`).
Click **OK**.
Confirm that the template is shown in the list.
### Next Steps
After the template appears in the issuance list:
Run the integration wizard and download the Connector installer in [AD CS Integration: Configure the Integration](/en/endpoint/integrations/certificate-services/active-directory-certificate-services/active-directory-certificate-services-ad-cs-integration-configure-the-integration).