> ## Documentation Index
> Fetch the complete documentation index at: https://docs.iru.com/llms.txt
> Use this file to discover all available pages before exploring further.
# AD CS Integration: AD CS Connector Installation
> Install and register the Iru Endpoint AD CS Connector on a domain-joined Windows Server to deliver certificates to enrolled Mac and Windows devices.
### About the AD CS Connector
This article explains how to install and register the Iru Endpoint AD CS Connector on a domain-joined Windows Server. The Connector does not install on Mac computers or Windows client endpoints. After the Connector is **Active** and **Connected** in Iru Endpoint, AD CS-issued certificates are delivered to enrolled Mac computers and Windows devices through Library Items.
For updating an **updated** Connector on Iru Endpoint or migrating from Kandji with AD CS, see [Updating the Iru AD CS Connector](/en/endpoint/integrations/certificate-services/active-directory-certificate-services/active-directory-certificate-services-ad-cs-integration-overview#updating-the-iru-ad-cs-connector) and [Migrating from Kandji to Iru with AD CS](/en/endpoint/integrations/certificate-services/active-directory-certificate-services/active-directory-certificate-services-ad-cs-integration-overview#migrating-from-kandji-to-iru-with-ad-cs) in **AD CS Integration: Overview**.
### How It Works
The Connector uses the WebSocket protocol over TCP port 443 for a persistent connection to Iru Endpoint and the Microsoft [Remote Procedure Call](https://docs.microsoft.com/en-us/windows/win32/rpc/rpc-start-page) (RPC) framework to communicate with your AD CS deployment. After registration, the Connector fulfills certificate requests initiated from Iru Endpoint.
### Prerequisites
Confirm the following before you install the Connector on Windows Server.
Ensure you have certificate templates in AD CS that match how you deploy to Apple and Windows devices, per your CA documentation and security standards. For the computer certificate on the Connector host, follow [AD CS Integration: Create a Computer Certificate Template](/en/endpoint/integrations/certificate-services/active-directory-certificate-services/active-directory-certificate-services-ad-cs-integration-create-a-computer-certificate-template).
Meet the **AD CS Integration Network Requirements** in [Using Iru on Enterprise Networks](/en/iru/requirements/using-iru-on-enterprise-networks#ad-cs-integration-network-requirements). For the updated Connector, allow your Iru web app, Iru Identity, tenant API (`subdomain.gateway.iru.com`, `subdomain.gateway.eu.iru.com`, `subdomain.clients.*`), and `adcsconn` endpoints as documented there. Do **not** rely on Auth0 allowlists alone for the updated Connector. Your network must allow traffic between Iru Endpoint, the Connector host, and AD CS, including HTTPS from the Connector to Iru Endpoint without SSL inspection breaking that path.
If any hosts still run the **legacy** Connector until you upgrade them to the updated Connector, keep the legacy Auth0 allowlist rows from [Using Iru on Enterprise Networks](/en/iru/requirements/using-iru-on-enterprise-networks#ad-cs-integration-network-requirements) until those hosts run the updated Connector.
Disable or bypass SSL inspection for required paths between Iru Endpoint and the Connector host when your security policy allows it.
Start AD CS integration in the Iru Endpoint web app far enough to obtain the installer. See [AD CS Integration: Configure the Integration](/en/endpoint/integrations/certificate-services/active-directory-certificate-services/active-directory-certificate-services-ad-cs-integration-configure-the-integration) for the full wizard, screenshots, and integration card behavior.
Download the latest **Iru Endpoint AD CS Connector** from the Connector integration card in your tenant when you install or upgrade. Installers for the **updated** Connector are **2.x** versions; **Integrations** always lists the newest one.
Use a physical or virtual **Windows Server 2019 or higher**, domain-joined to the Active Directory forest your issuing CAs serve, with **.NET 8 or later** and the Microsoft Edge WebView2 runtime that the installer provides. For TPM or vTPM and the full checklist, see [AD CS Connector Server Requirements](#ad-cs-connector-server-requirements) below.
You need administrative access to the Windows Server that hosts the Connector, and an **Iru Endpoint administrator** account to sign in inside the Connector app and complete browser approval.
### AD CS Connector Server Requirements
Install on a physical or virtual Windows Server that meets the following:
**Windows Server 2019 or higher**
**.NET 8 or later**
A functioning **Trusted Platform Module (TPM)** or **virtual TPM (vTPM)** is required. The Connector relies on TPM-backed cryptography. On a VM, enable vTPM in your hypervisor (for example, Hyper-V Generation 2 with vTPM). See the Microsoft Learn article [Trusted Platform Module technology overview](https://learn.microsoft.com/en-us/windows/security/hardware-security/tpm/trusted-platform-module-overview).
Microsoft Edge WebView2 (the Connector installer bundles a compatible runtime)
The server is domain-joined to the Active Directory forest your issuing CAs serve.
### Installation
Transfer the Connector installer file to the Windows server.
To begin the installation process, double-click the installer.
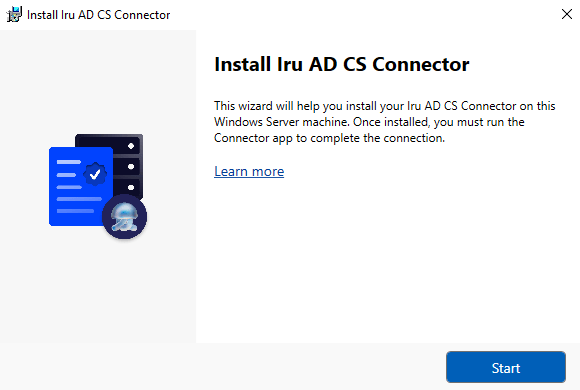
On the Install Iru Endpoint AD CS Connector screen, click **Start**.
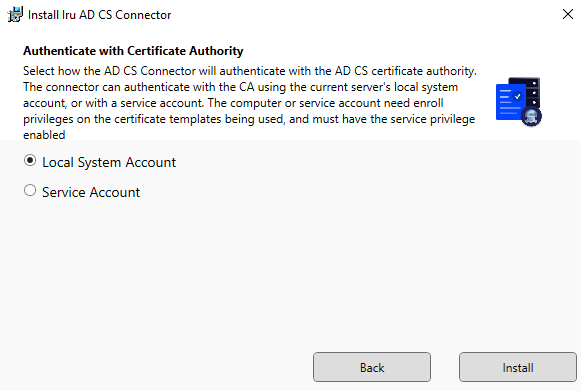
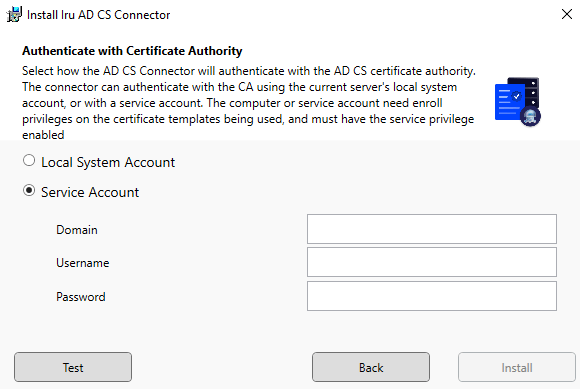
 On the **Authenticate with Certificate Authority** screen, click **Local System** unless your CA policy requires a dedicated account. If you use a service account, choose **Service Account**, enter credentials your CA allows for enrollment, then click **Install**. The account you chose must match the principal that has **Read** and **Enroll** on the computer certificate template in [AD CS Integration: Create a Computer Certificate Template](/en/endpoint/integrations/certificate-services/active-directory-certificate-services/active-directory-certificate-services-ad-cs-integration-create-a-computer-certificate-template). With **Local System** selected, click **Install**.
 When the UAC prompt appears, click **Yes**.
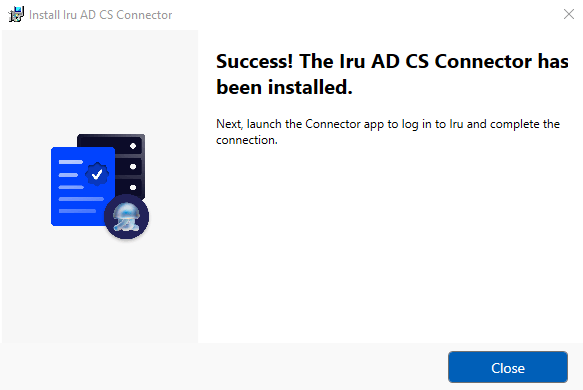
Once the Connector installation is complete, click **Close**.
When the UAC prompt appears, click **Yes**.
Once the Connector installation is complete, click **Close**.
 For the **updated** **Iru Endpoint AD CS Connector**, the Microsoft Edge WebView2 runtime is bundled with the installer. If needed, the runtime can be [downloaded from Microsoft](https://developer.microsoft.com/en-us/microsoft-edge/webview2/?form=MA13LH) and installed manually on the AD CS Connector Windows Server.
### Initialization
If the Connector does not open automatically, open **Iru Endpoint AD CS Connector** from the Windows Start menu. Confirm the tray icon appears.
In **Enter Iru domain**, enter your Iru Endpoint tenant URL. Use the **same** tenant where you downloaded the installer. Sign-in fails if you use the wrong tenant.
For the **updated** **Iru Endpoint AD CS Connector**, the Microsoft Edge WebView2 runtime is bundled with the installer. If needed, the runtime can be [downloaded from Microsoft](https://developer.microsoft.com/en-us/microsoft-edge/webview2/?form=MA13LH) and installed manually on the AD CS Connector Windows Server.
### Initialization
If the Connector does not open automatically, open **Iru Endpoint AD CS Connector** from the Windows Start menu. Confirm the tray icon appears.
In **Enter Iru domain**, enter your Iru Endpoint tenant URL. Use the **same** tenant where you downloaded the installer. Sign-in fails if you use the wrong tenant.
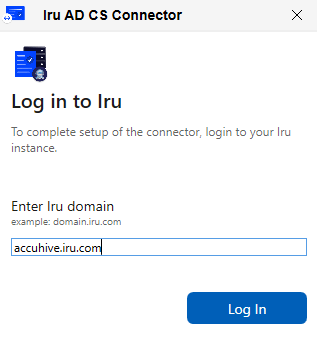 Complete sign-in in the WebView window using the method your tenant requires.
After sign-in, open the **registration URL** in a supported browser on a computer where you can approve the request. The registration link expires after **one hour**.
Complete sign-in in the WebView window using the method your tenant requires.
After sign-in, open the **registration URL** in a supported browser on a computer where you can approve the request. The registration link expires after **one hour**.
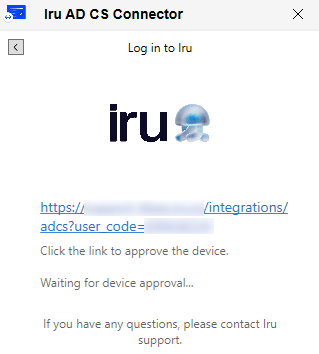 If the Connector shows **Unable to obtain a registration URL. Try again later.**, wait briefly and click **New URL**. If the problem persists, verify network access to Iru Endpoint and contact Iru Support with logs.
In the Iru Endpoint web app, go to **Approve AD CS connector registration**. Confirm the device name matches your Connector server, then click **Approve** or **Deny**.
If the Connector shows **Unable to obtain a registration URL. Try again later.**, wait briefly and click **New URL**. If the problem persists, verify network access to Iru Endpoint and contact Iru Support with logs.
In the Iru Endpoint web app, go to **Approve AD CS connector registration**. Confirm the device name matches your Connector server, then click **Approve** or **Deny**.
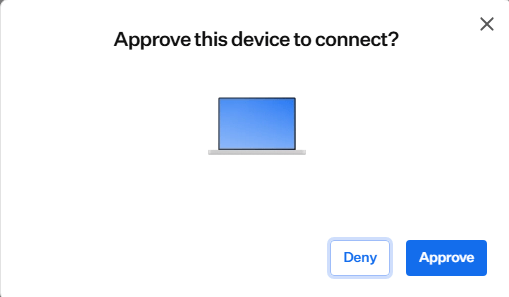 If you approve, the Connector shows **Connected** and the integration lists the Connector as **Active**. If you deny, Iru Endpoint removes the Connector entry. Sign in again from the Connector app and click **New URL** if you need another registration link.
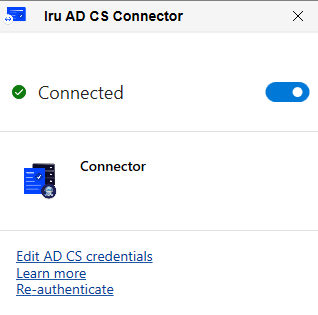 You can close the Connector window. It continues running in the tray.
Add issuing CAs under the **Servers** tab and use **Assign servers** as described in [Add AD CS servers and assign them to the Connector](#add-ad-cs-servers-and-assign-them-to-the-connector). You can also complete assignment from [AD CS Integration: Configure the Integration](/en/endpoint/integrations/certificate-services/active-directory-certificate-services/active-directory-certificate-services-ad-cs-integration-configure-the-integration#assigning-an-ad-cs-server-to-a-connector).
Return to Iru Endpoint to [assign AD CS servers to the Connector](/en/endpoint/integrations/certificate-services/active-directory-certificate-services/active-directory-certificate-services-ad-cs-integration-configure-the-integration#assigning-an-ad-cs-server-to-a-connector), then add Library Items to deliver AD CS certificates to devices. For Library Item examples, see [Deliver certificates to Mac computers and Windows devices](#deliver-certificates-to-mac-computers-and-windows-devices).
### Add AD CS servers and assign them to the Connector
When the Connector is **Active** in Iru Endpoint and **Connected** from the Windows host:
In the AD CS integration, open the **Servers** tab.
Add each issuing CA using `ca_server_fqdn\issuing_ca_name` in **Server name** (for example, `subordinateca.example.com\Contoso Issuing CA`). The issuing CA name appears in the Certificate Authority console on the issuing CA server. Click **Add** for each server. New servers show **Disconnected** until you assign them to an **Active**, **Connected** Connector.
On the Connector overview, open the action menu (**…**) on the Connector card, then click **Assign servers**. Select the AD CS servers this Connector should use, then confirm.
For screenshots of the integration page, see [AD CS Integration: Configure the Integration](/en/endpoint/integrations/certificate-services/active-directory-certificate-services/active-directory-certificate-services-ad-cs-integration-configure-the-integration).
### Deliver certificates to Mac computers and Windows devices
When at least one Connector is **Active** and **Connected**, and your AD CS servers are assigned, Iru Endpoint can deliver AD CS-backed Library Items to enrolled devices.
Go to **Library** and click **Add Library Item**.
Add a Library Item that issues certificates through AD CS, such as **Certificate**, **Wi-Fi**, or **VPN**.
Select the issuing CA and template. Set subject, subject alternative name, and key usage to match your PKI and how Mac computers and Windows devices use the certificate.
Assign the Library Item to the **Blueprints** that should receive it. Use one Library Item when Mac and Windows share the same template and policy. Create separate items when templates or identities differ by platform.
Let devices check in. Confirm installation with **Keychain Access** on Mac and **certlm.msc** or **Certificates** in the Microsoft Management Console on Windows, based on your certificate store design.
### Next Steps
After the Connector is **Active**, **Connected**, and AD CS servers are assigned:
If you use AD CS for user-based 802.1X or similar, see [Active Directory Strong Certificate Mapping Configuration](/en/endpoint/integrations/certificate-services/active-directory-certificate-services/active-directory-certificate-services-ad-cs-strong-mapping-configuration).
Build [Certificate](/en/endpoint/library/library-items-profiles/configure-the-certificate-library-item), [Wi-Fi](/en/endpoint/library/library-items-profiles/configure-the-wi-fi-library-item), [Ethernet](/en/endpoint/library/library-items-profiles/configure-the-ethernet-library-item), or **VPN** Library Items and assign them to Blueprints.
See [AD CS Integration: Overview](/en/endpoint/integrations/certificate-services/active-directory-certificate-services/active-directory-certificate-services-ad-cs-integration-overview) for the **AD CS setup path** diagram and rollout order.
### Add another Connector host
In **Integrations**, open **Active Directory Certificate Services**, then click **Add connector**.
Download the installer and repeat install, sign-in, and registration approval on another domain-joined Windows Server.
Assign AD CS servers to each Connector according to your network and availability design.
### Updating the AD CS Connector
On Windows Server, upgrading the **Iru Endpoint AD CS Connector** on an **Iru** tenant uses the workflow in [Updating the Iru AD CS Connector](/en/endpoint/integrations/certificate-services/active-directory-certificate-services/active-directory-certificate-services-ad-cs-integration-overview#updating-the-iru-ad-cs-connector) in **AD CS Integration: Overview**. If you are moving from **Kandji** with AD CS, follow [Migrating from Kandji to Iru with AD CS](/en/endpoint/integrations/certificate-services/active-directory-certificate-services/active-directory-certificate-services-ad-cs-integration-overview#migrating-from-kandji-to-iru-with-ad-cs) instead. That path includes tenant upgrade, uninstalling the legacy Connector, and registering the **updated** Connector.
### Uninstalling the AD CS Connector
You can remove the Connector and Edge runtime from **Control Panel** > **Programs and Features**. On Windows Server 2019 and later, you can use **Settings** > **Apps** > **Installed apps** instead.
Go to the Windows Start menu and open **Control Panel** > **Programs and Features**, or open **Settings** > **Apps** > **Installed apps** on Windows Server 2019 and later.
Find the **Iru Endpoint AD CS Connector** and click **Uninstall**.
When the Uninstall Iru Endpoint AD CS Connector window appears, click **Uninstall**.
When the uninstallation is complete, click **Close**.
Find **Microsoft Edge WebView2 Runtime** and click **Uninstall**.
Once the components are uninstalled, open **File Explorer**, go to `C:\ProgramData`, then delete the **iru** folder if your security policy requires a clean host. `ProgramData` is hidden by default.
### Troubleshooting
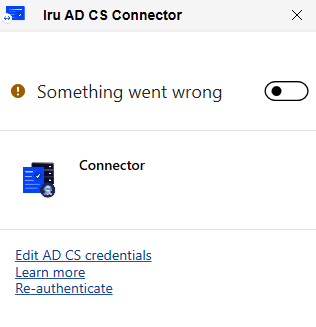
If the Connector window reports **Something went wrong** with the toggle off, verify network access to Iru Endpoint, confirm TPM readiness on the server, then try **Re-authenticate** or restart the Connector app from the Windows Start menu. If the state persists, collect logs from `C:\ProgramData\iru` and contact Iru Support.
You can close the Connector window. It continues running in the tray.
Add issuing CAs under the **Servers** tab and use **Assign servers** as described in [Add AD CS servers and assign them to the Connector](#add-ad-cs-servers-and-assign-them-to-the-connector). You can also complete assignment from [AD CS Integration: Configure the Integration](/en/endpoint/integrations/certificate-services/active-directory-certificate-services/active-directory-certificate-services-ad-cs-integration-configure-the-integration#assigning-an-ad-cs-server-to-a-connector).
Return to Iru Endpoint to [assign AD CS servers to the Connector](/en/endpoint/integrations/certificate-services/active-directory-certificate-services/active-directory-certificate-services-ad-cs-integration-configure-the-integration#assigning-an-ad-cs-server-to-a-connector), then add Library Items to deliver AD CS certificates to devices. For Library Item examples, see [Deliver certificates to Mac computers and Windows devices](#deliver-certificates-to-mac-computers-and-windows-devices).
### Add AD CS servers and assign them to the Connector
When the Connector is **Active** in Iru Endpoint and **Connected** from the Windows host:
In the AD CS integration, open the **Servers** tab.
Add each issuing CA using `ca_server_fqdn\issuing_ca_name` in **Server name** (for example, `subordinateca.example.com\Contoso Issuing CA`). The issuing CA name appears in the Certificate Authority console on the issuing CA server. Click **Add** for each server. New servers show **Disconnected** until you assign them to an **Active**, **Connected** Connector.
On the Connector overview, open the action menu (**…**) on the Connector card, then click **Assign servers**. Select the AD CS servers this Connector should use, then confirm.
For screenshots of the integration page, see [AD CS Integration: Configure the Integration](/en/endpoint/integrations/certificate-services/active-directory-certificate-services/active-directory-certificate-services-ad-cs-integration-configure-the-integration).
### Deliver certificates to Mac computers and Windows devices
When at least one Connector is **Active** and **Connected**, and your AD CS servers are assigned, Iru Endpoint can deliver AD CS-backed Library Items to enrolled devices.
Go to **Library** and click **Add Library Item**.
Add a Library Item that issues certificates through AD CS, such as **Certificate**, **Wi-Fi**, or **VPN**.
Select the issuing CA and template. Set subject, subject alternative name, and key usage to match your PKI and how Mac computers and Windows devices use the certificate.
Assign the Library Item to the **Blueprints** that should receive it. Use one Library Item when Mac and Windows share the same template and policy. Create separate items when templates or identities differ by platform.
Let devices check in. Confirm installation with **Keychain Access** on Mac and **certlm.msc** or **Certificates** in the Microsoft Management Console on Windows, based on your certificate store design.
### Next Steps
After the Connector is **Active**, **Connected**, and AD CS servers are assigned:
If you use AD CS for user-based 802.1X or similar, see [Active Directory Strong Certificate Mapping Configuration](/en/endpoint/integrations/certificate-services/active-directory-certificate-services/active-directory-certificate-services-ad-cs-strong-mapping-configuration).
Build [Certificate](/en/endpoint/library/library-items-profiles/configure-the-certificate-library-item), [Wi-Fi](/en/endpoint/library/library-items-profiles/configure-the-wi-fi-library-item), [Ethernet](/en/endpoint/library/library-items-profiles/configure-the-ethernet-library-item), or **VPN** Library Items and assign them to Blueprints.
See [AD CS Integration: Overview](/en/endpoint/integrations/certificate-services/active-directory-certificate-services/active-directory-certificate-services-ad-cs-integration-overview) for the **AD CS setup path** diagram and rollout order.
### Add another Connector host
In **Integrations**, open **Active Directory Certificate Services**, then click **Add connector**.
Download the installer and repeat install, sign-in, and registration approval on another domain-joined Windows Server.
Assign AD CS servers to each Connector according to your network and availability design.
### Updating the AD CS Connector
On Windows Server, upgrading the **Iru Endpoint AD CS Connector** on an **Iru** tenant uses the workflow in [Updating the Iru AD CS Connector](/en/endpoint/integrations/certificate-services/active-directory-certificate-services/active-directory-certificate-services-ad-cs-integration-overview#updating-the-iru-ad-cs-connector) in **AD CS Integration: Overview**. If you are moving from **Kandji** with AD CS, follow [Migrating from Kandji to Iru with AD CS](/en/endpoint/integrations/certificate-services/active-directory-certificate-services/active-directory-certificate-services-ad-cs-integration-overview#migrating-from-kandji-to-iru-with-ad-cs) instead. That path includes tenant upgrade, uninstalling the legacy Connector, and registering the **updated** Connector.
### Uninstalling the AD CS Connector
You can remove the Connector and Edge runtime from **Control Panel** > **Programs and Features**. On Windows Server 2019 and later, you can use **Settings** > **Apps** > **Installed apps** instead.
Go to the Windows Start menu and open **Control Panel** > **Programs and Features**, or open **Settings** > **Apps** > **Installed apps** on Windows Server 2019 and later.
Find the **Iru Endpoint AD CS Connector** and click **Uninstall**.
When the Uninstall Iru Endpoint AD CS Connector window appears, click **Uninstall**.
When the uninstallation is complete, click **Close**.
Find **Microsoft Edge WebView2 Runtime** and click **Uninstall**.
Once the components are uninstalled, open **File Explorer**, go to `C:\ProgramData`, then delete the **iru** folder if your security policy requires a clean host. `ProgramData` is hidden by default.
### Troubleshooting
If the Connector window reports **Something went wrong** with the toggle off, verify network access to Iru Endpoint, confirm TPM readiness on the server, then try **Re-authenticate** or restart the Connector app from the Windows Start menu. If the state persists, collect logs from `C:\ProgramData\iru` and contact Iru Support.
 During [Initialization](#initialization), the Connector signs in to your Iru tenant in a WebView window. If sign-in fails, loops, or the window shows **Try Again**, cached sign-in data for the Windows user profile that runs the Connector may be stale.
First confirm you entered the correct Iru tenant URL (the same tenant where you downloaded the installer from **Integrations** > **Active Directory Certificate Services**) and that the server can reach Iru Endpoint. See [AD CS Integration Network Requirements](/en/iru/requirements/using-iru-on-enterprise-networks#ad-cs-integration-network-requirements) in [Using Iru on Enterprise Networks](/en/iru/requirements/using-iru-on-enterprise-networks). You can also click **Re-authenticate** in the Connector app when it is available.
To clear cached Connector data:
1. Close **Iru Endpoint AD CS Connector** from the Windows notification area or Task Manager.
2. Open **File Explorer** and go to `%LOCALAPPDATA%\Iru` (for example `C:\Users\\AppData\Local\Iru`).
3. Delete all files and folders inside **Iru**.
4. Open **Iru Endpoint AD CS Connector** again and repeat [Initialization](#initialization), starting at **Enter tenant URL**.
Do not delete `C:\ProgramData\iru` for this step. That directory stores Connector logs and service files, not WebView sign-in cache. See **Review data directory contents** in this section.
If authentication still fails after you clear `%LOCALAPPDATA%\Iru`, collect logs from `C:\ProgramData\iru` and contact Iru Support.
Confirm you opened the **registration URL**, approved the request under **Approve AD CS connector registration**, and signed in to the correct tenant. Click **New URL** in the Connector app if the registration code expired. If the Iru Endpoint web app reports that the **registration URL** has expired when you try to approve, use **Registration URL expired when you approve registration** in this Troubleshooting section.
If **Approve AD CS connector registration** in the Iru Endpoint web app reports that the **registration URL** has expired, you are past the point where **New URL** in the Connector app alone can recover the registration. On the Windows Server, uninstall **Iru Endpoint AD CS Connector** (and the bundled WebView runtime, and remove `C:\ProgramData\iru` if needed) using [Uninstalling the AD CS Connector](#uninstalling-the-ad-cs-connector). Then download the latest installer from **Integrations** > **Active Directory Certificate Services** and repeat [Installation](#installation) and [Initialization](#initialization) on that host.
The Connector must be **Active** in Iru Endpoint and **Connected** from the Windows host before you can assign servers.
Confirm AD CS servers are added and assigned, the Library Item targets the correct Blueprints, and Mac computers and Windows devices are enrolled. Validate template permissions and subject rules against a test device on each platform.
The AD CS Connector app is installed at `C:\Program Files\Iru\AD CS Connector`.
Logs, settings, and service files can be found at `C:\ProgramData\iru`. This is a hidden directory on the Windows server.
Use the Windows Event Viewer to review AD CS Connector logs at `Event Viewer > Applications and Services Logs > Iru`.
Windows installer logs can be enabled using the [Microsoft guide](https://docs.microsoft.com/en-us/troubleshoot/windows-client/application-management/enable-windows-installer-logging).
The AD CS Connector runs as a Windows service. Confirm it is running in the **Services** application (`services.msc`).
In Task Manager, the Connector process is called **adcs-connector-app**. If the WebView sign-in surface does not render after you enter the Iru Endpoint tenant domain, end the **adcs-connector-app** process and launch **Iru Endpoint AD CS Connector** again from the Windows Start menu.
For additional questions, please [contact support](/en/iru/iru-support/access-to-iru-support).
### Best Practices
Ensure proper network connectivity between the AD CS Connector and your Iru Endpoint tenant, and confirm TCP port 443 is accessible for WebSocket communication.
Disable SSL inspection for required network communications between Iru Endpoint and the AD CS Connector to avoid connection and authentication issues.
Use a dedicated service account for the AD CS Connector when your CA template allows it, so enrollment permissions stay scoped to that account.
Install the latest **Iru Endpoint AD CS Connector** from your Iru Endpoint tenant (**Integrations** > **Active Directory Certificate Services**) so you receive fixes and security updates. Those updates apply to the **updated** Connector; the legacy Connector does not receive them.
### Considerations
The Connector app and **Approve AD CS connector registration** must target the same Iru Endpoint tenant you intend to connect.
The Windows server hosting the AD CS Connector must be bound to your Active Directory domain for certificate operations to succeed.
Inspect log files under `C:\ProgramData\iru` on the Windows server (this directory is hidden by default). Use these logs together with the Connector application and Windows Event Viewer when you diagnose connection, authentication, or certificate issues.
On the Connector Windows Server, open PowerShell and run `Get-Tpm`. Confirm **TpmPresent**, **TpmEnabled**, and **TpmActivated** reflect a usable TPM. For property definitions, see the Microsoft [Get-Tpm](https://learn.microsoft.com/en-us/powershell/module/trustedplatformmodule/get-tpm) reference. For VMs, confirm vTPM is enabled in the hypervisor settings. If TPM is unavailable, resolve firmware, hypervisor, or guest settings before production use.
If Connector logs include **`System.Security.Cryptography.CryptographicException`** with the following message, TPM may not be enabled or ready for use; rerun the checks above and review firmware settings:
**System.Security.Cryptography.CryptographicException:** The device that is required by this cryptographic provider is not ready for use.
During [Initialization](#initialization), the Connector signs in to your Iru tenant in a WebView window. If sign-in fails, loops, or the window shows **Try Again**, cached sign-in data for the Windows user profile that runs the Connector may be stale.
First confirm you entered the correct Iru tenant URL (the same tenant where you downloaded the installer from **Integrations** > **Active Directory Certificate Services**) and that the server can reach Iru Endpoint. See [AD CS Integration Network Requirements](/en/iru/requirements/using-iru-on-enterprise-networks#ad-cs-integration-network-requirements) in [Using Iru on Enterprise Networks](/en/iru/requirements/using-iru-on-enterprise-networks). You can also click **Re-authenticate** in the Connector app when it is available.
To clear cached Connector data:
1. Close **Iru Endpoint AD CS Connector** from the Windows notification area or Task Manager.
2. Open **File Explorer** and go to `%LOCALAPPDATA%\Iru` (for example `C:\Users\\AppData\Local\Iru`).
3. Delete all files and folders inside **Iru**.
4. Open **Iru Endpoint AD CS Connector** again and repeat [Initialization](#initialization), starting at **Enter tenant URL**.
Do not delete `C:\ProgramData\iru` for this step. That directory stores Connector logs and service files, not WebView sign-in cache. See **Review data directory contents** in this section.
If authentication still fails after you clear `%LOCALAPPDATA%\Iru`, collect logs from `C:\ProgramData\iru` and contact Iru Support.
Confirm you opened the **registration URL**, approved the request under **Approve AD CS connector registration**, and signed in to the correct tenant. Click **New URL** in the Connector app if the registration code expired. If the Iru Endpoint web app reports that the **registration URL** has expired when you try to approve, use **Registration URL expired when you approve registration** in this Troubleshooting section.
If **Approve AD CS connector registration** in the Iru Endpoint web app reports that the **registration URL** has expired, you are past the point where **New URL** in the Connector app alone can recover the registration. On the Windows Server, uninstall **Iru Endpoint AD CS Connector** (and the bundled WebView runtime, and remove `C:\ProgramData\iru` if needed) using [Uninstalling the AD CS Connector](#uninstalling-the-ad-cs-connector). Then download the latest installer from **Integrations** > **Active Directory Certificate Services** and repeat [Installation](#installation) and [Initialization](#initialization) on that host.
The Connector must be **Active** in Iru Endpoint and **Connected** from the Windows host before you can assign servers.
Confirm AD CS servers are added and assigned, the Library Item targets the correct Blueprints, and Mac computers and Windows devices are enrolled. Validate template permissions and subject rules against a test device on each platform.
The AD CS Connector app is installed at `C:\Program Files\Iru\AD CS Connector`.
Logs, settings, and service files can be found at `C:\ProgramData\iru`. This is a hidden directory on the Windows server.
Use the Windows Event Viewer to review AD CS Connector logs at `Event Viewer > Applications and Services Logs > Iru`.
Windows installer logs can be enabled using the [Microsoft guide](https://docs.microsoft.com/en-us/troubleshoot/windows-client/application-management/enable-windows-installer-logging).
The AD CS Connector runs as a Windows service. Confirm it is running in the **Services** application (`services.msc`).
In Task Manager, the Connector process is called **adcs-connector-app**. If the WebView sign-in surface does not render after you enter the Iru Endpoint tenant domain, end the **adcs-connector-app** process and launch **Iru Endpoint AD CS Connector** again from the Windows Start menu.
For additional questions, please [contact support](/en/iru/iru-support/access-to-iru-support).
### Best Practices
Ensure proper network connectivity between the AD CS Connector and your Iru Endpoint tenant, and confirm TCP port 443 is accessible for WebSocket communication.
Disable SSL inspection for required network communications between Iru Endpoint and the AD CS Connector to avoid connection and authentication issues.
Use a dedicated service account for the AD CS Connector when your CA template allows it, so enrollment permissions stay scoped to that account.
Install the latest **Iru Endpoint AD CS Connector** from your Iru Endpoint tenant (**Integrations** > **Active Directory Certificate Services**) so you receive fixes and security updates. Those updates apply to the **updated** Connector; the legacy Connector does not receive them.
### Considerations
The Connector app and **Approve AD CS connector registration** must target the same Iru Endpoint tenant you intend to connect.
The Windows server hosting the AD CS Connector must be bound to your Active Directory domain for certificate operations to succeed.
Inspect log files under `C:\ProgramData\iru` on the Windows server (this directory is hidden by default). Use these logs together with the Connector application and Windows Event Viewer when you diagnose connection, authentication, or certificate issues.
On the Connector Windows Server, open PowerShell and run `Get-Tpm`. Confirm **TpmPresent**, **TpmEnabled**, and **TpmActivated** reflect a usable TPM. For property definitions, see the Microsoft [Get-Tpm](https://learn.microsoft.com/en-us/powershell/module/trustedplatformmodule/get-tpm) reference. For VMs, confirm vTPM is enabled in the hypervisor settings. If TPM is unavailable, resolve firmware, hypervisor, or guest settings before production use.
If Connector logs include **`System.Security.Cryptography.CryptographicException`** with the following message, TPM may not be enabled or ready for use; rerun the checks above and review firmware settings:
**System.Security.Cryptography.CryptographicException:** The device that is required by this cryptographic provider is not ready for use.