> ## Documentation Index
> Fetch the complete documentation index at: https://docs.iru.com/llms.txt
> Use this file to discover all available pages before exploring further.
# Windows Setup
> Configure Windows platform settings in Iru Endpoint. Set up enrollment prerequisites and prepare your tenant for Windows device management.
This guide applies to Windows devices
Set up the Windows platform to enroll and manage Windows 11 computers from one place. Enable Windows in Organization settings, then configure Blueprints and Library, then set up enrollment. Iru Endpoint supports Windows 11 (24H2 or 25H2 only) on Pro, Pro Education, Enterprise, or Education editions.
## Enable Windows platform
Only users with the **Account Owner** role can enable or disable platforms. See [Team Member Role Permissions](/en/iru/access/team-member-role-permissions) for more details.
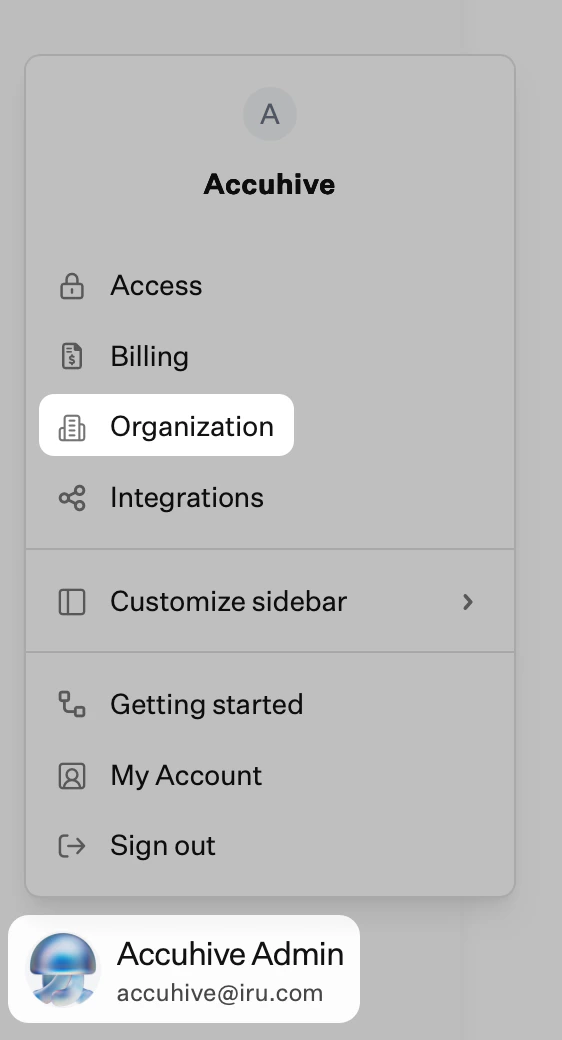
In Iru Endpoint, in the sidebar, click the [**Account Menu Button**](/en/iru/platform-overview/account-menu).
Click **Organization** in the menu.
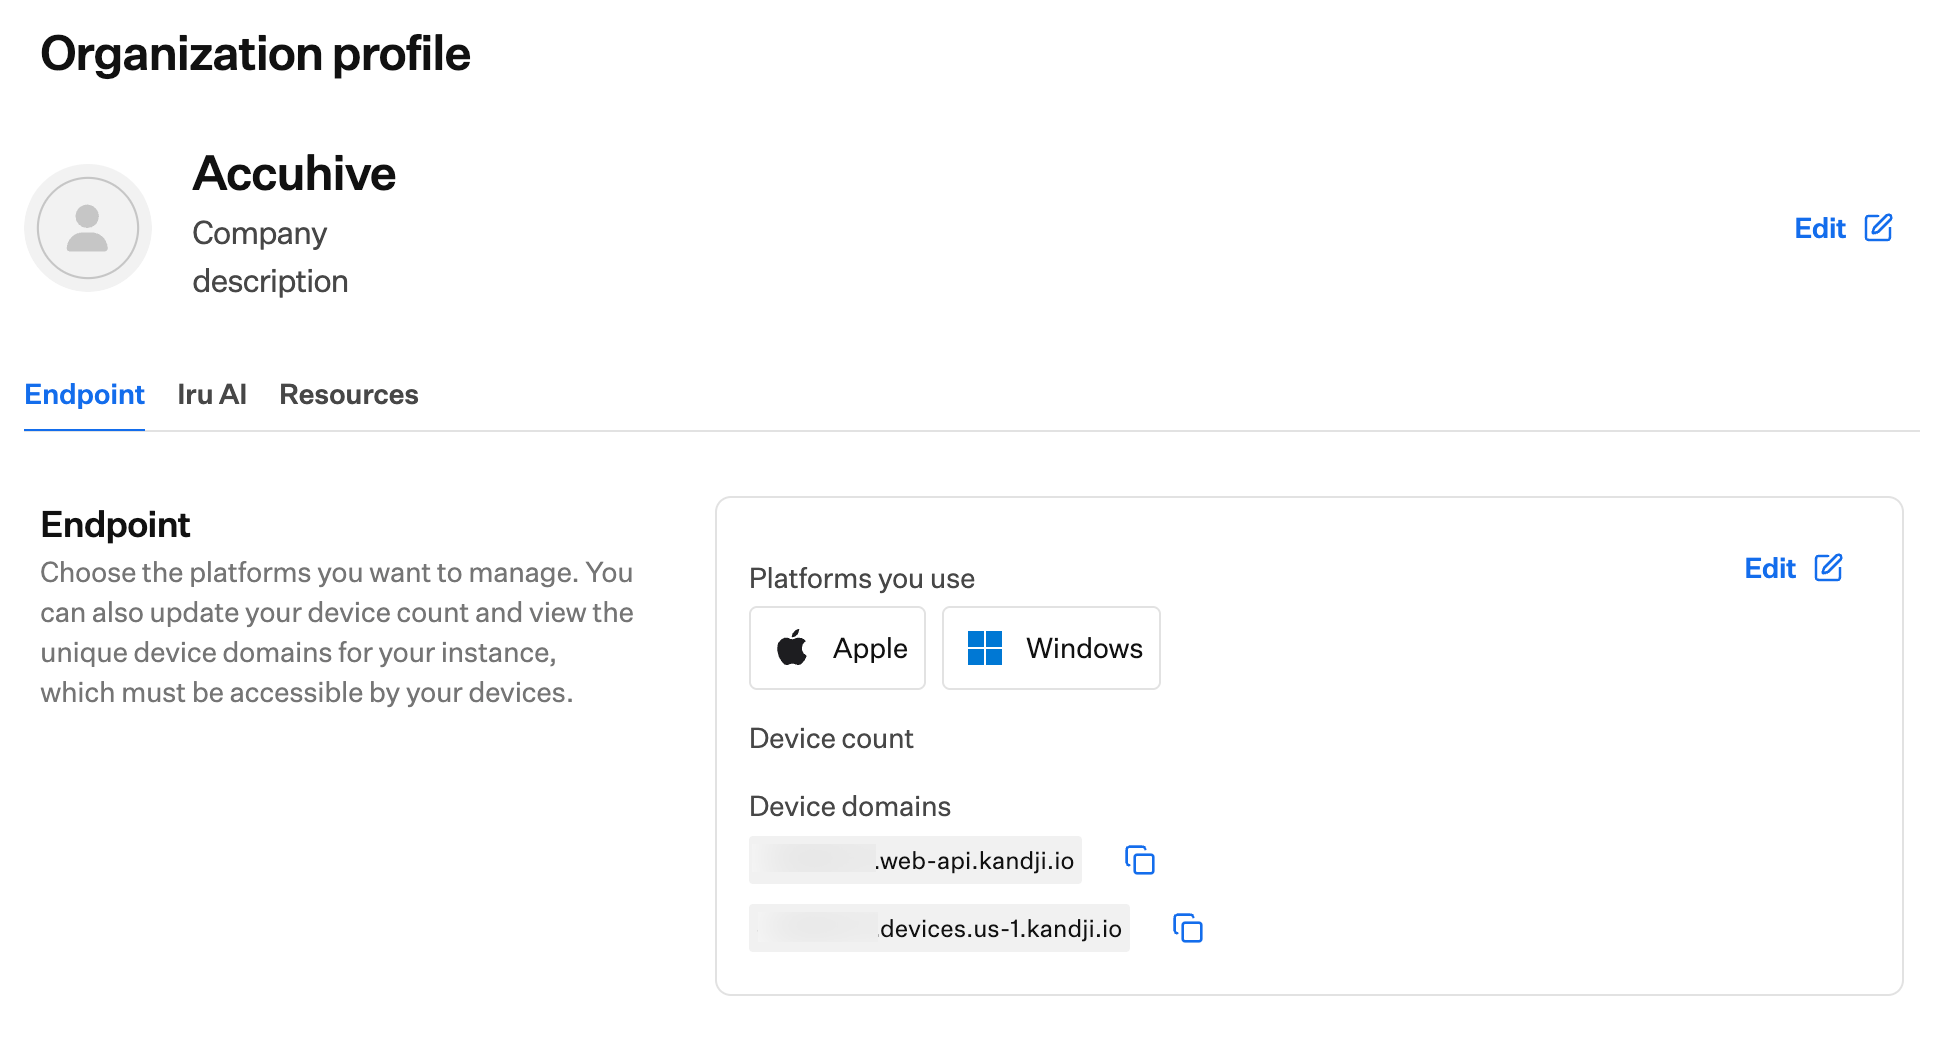
 Select the **Endpoint** tab.
Under **Platforms you use**, click **Edit**.
Select the **Endpoint** tab.
Under **Platforms you use**, click **Edit**.
 Select **Windows** (and optionally Android if you plan to manage both platforms), then click **Save changes** at the bottom of the page.
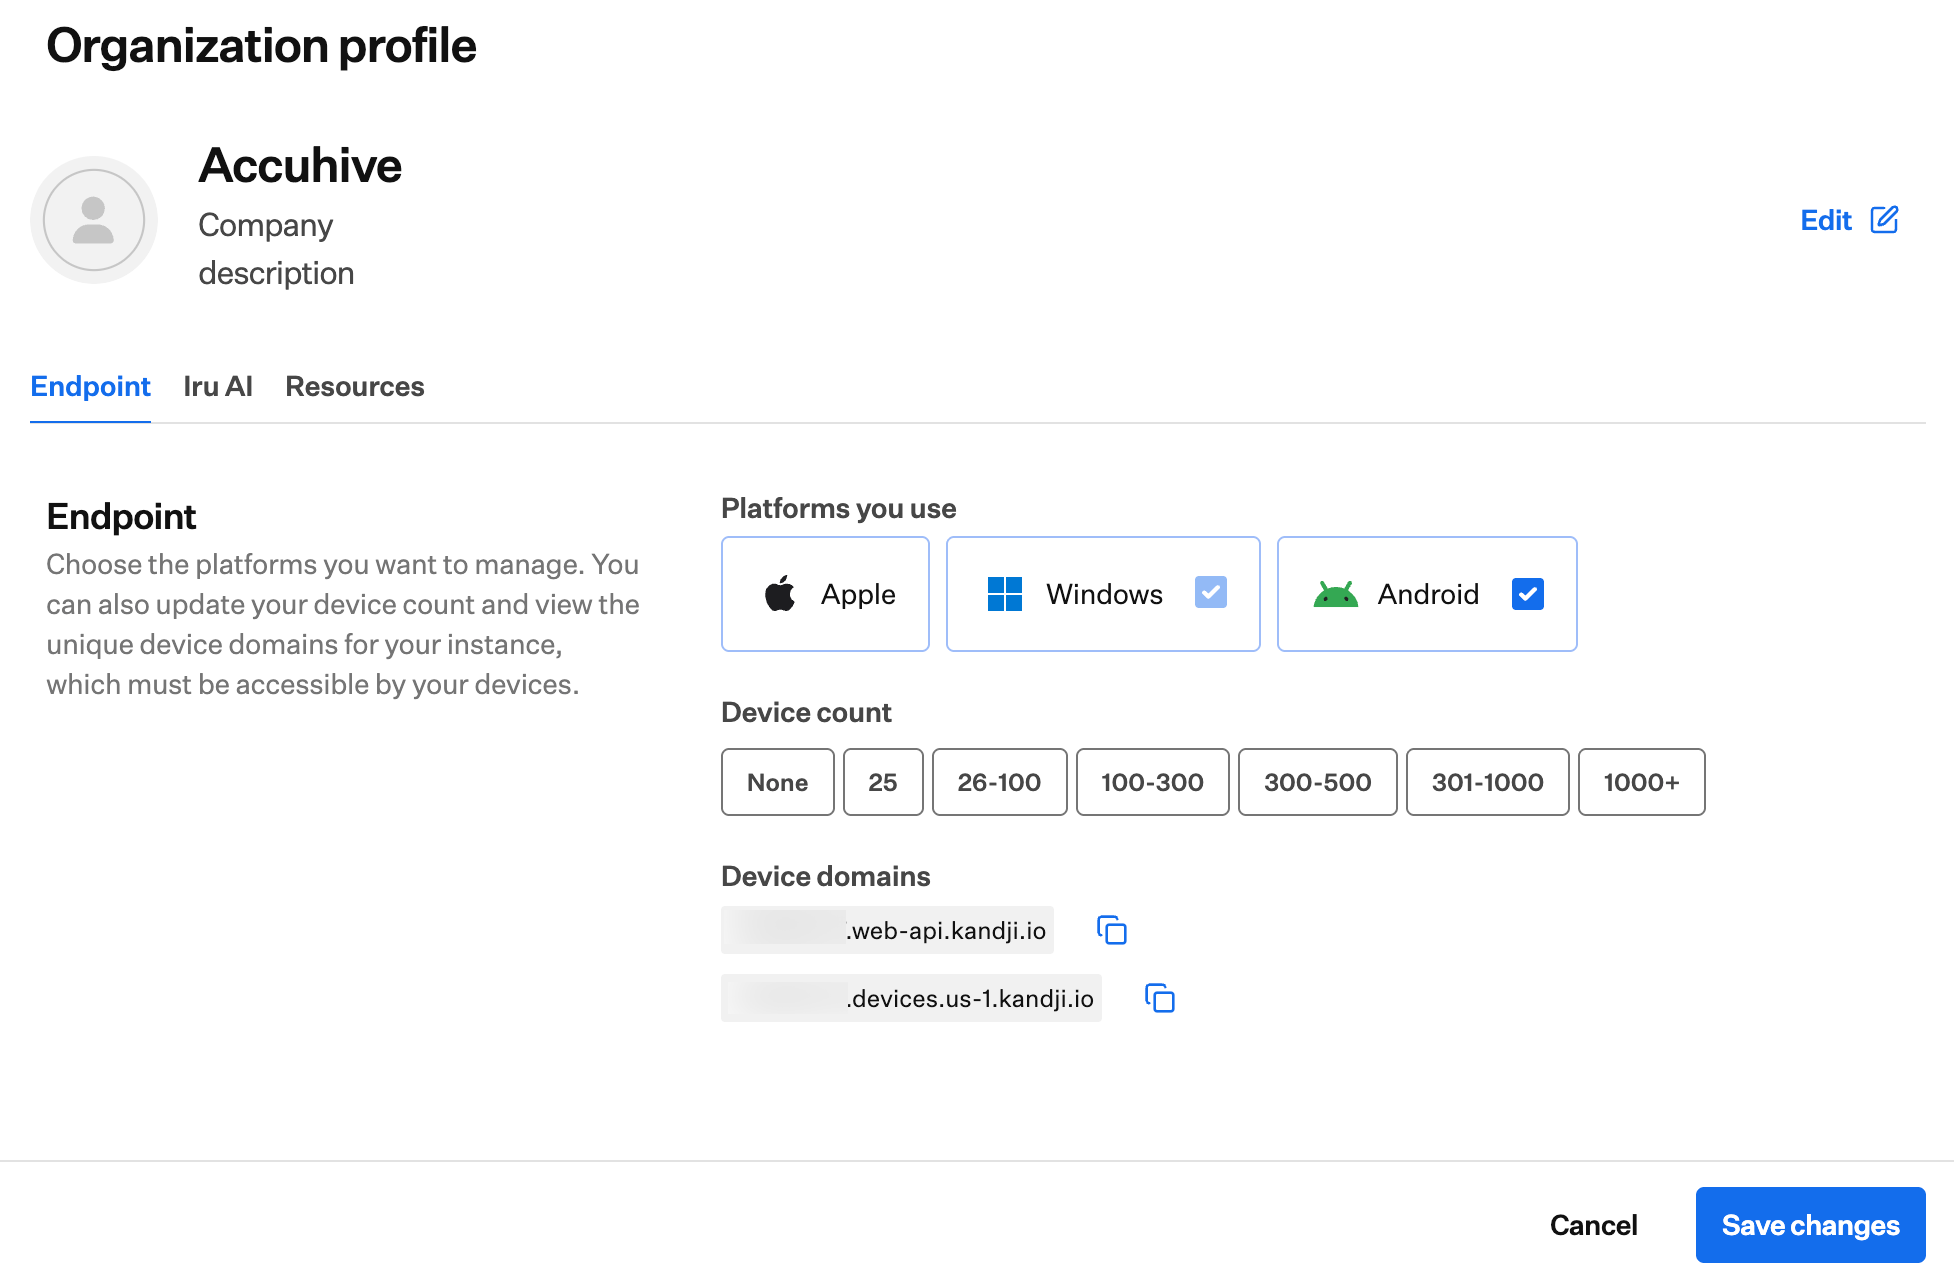 You can optionally enable Android at the same time when selecting platforms. The Android platform requires additional configuration. See [Android Setup](/en/endpoint/getting-started/platform-setup/android-setup) to configure the platform.
## Windows Management Requirements
Before enrolling Windows devices, ensure you have:
* **Windows 11** (24H2 or 25H2 only).
* **Pro, Pro Education, Enterprise, or Education** editions.
* **Microsoft Edge browser** (required for enrollment; see [Microsoft's Mobile Device Management (MDM) enrollment documentation](https://learn.microsoft.com/en-us/windows/client-management/mdm-enrollment-of-windows-devices#connect-your-windows-device-to-work-using-a-deep-link)).
* **Network connectivity** to Iru Endpoint services. For domains, ports, and firewall configuration, see [Using Iru on Enterprise Networks](/en/iru/requirements/using-iru-on-enterprise-networks).
* **Serial number** (required for enrollment). On virtual machines, you can assign a stable serial number.
* **(Recommended)** Single sign-on (SSO) configured for secure authentication.
## Windows Management Capabilities
Iru Endpoint provides the following Windows management features:
* **Device enrollment** via enrollment portal or [Windows Autopilot](/en/endpoint/settings/windows-integrations/configure-windows-autopilot) (Microsoft Entra ID zero-touch).
* **Application deployment** and management.
* **Policy enforcement** and compliance monitoring.
* **Security configuration** and updates.
* **User and device inventory** management.
For detailed information about Windows enrollment, see [Configuring Windows Enrollment](/en/endpoint/enrollment/windows/configuring-windows-enrollment) and [User Experience with Windows Enrollment](/en/endpoint/enrollment/windows/user-experience-with-windows-enrollment). To enroll new hardware during OOBE with Microsoft Entra ID, see [Configure Windows Autopilot](/en/endpoint/settings/windows-integrations/configure-windows-autopilot).
## Next Steps
After enabling the Windows platform:
Create and configure Blueprints so policies and apps are ready before enrollment. See [Configuring Blueprints](/en/endpoint/getting-started/blueprints-and-library/configuring-blueprints) and [Managing Library](/en/endpoint/getting-started/blueprints-and-library/managing-library).
To manage Apple or Android devices as well, see [Apple Setup](/en/endpoint/getting-started/platform-setup/apple-setup) or [Android Setup](/en/endpoint/getting-started/platform-setup/android-setup).
Once Blueprints are configured, set up enrollment: [Windows Enrollment](/en/endpoint/getting-started/enrollment/windows-enrollment), [Apple Enrollment](/en/endpoint/getting-started/enrollment/apple-enrollment), or [Android Enrollment](/en/endpoint/getting-started/enrollment/android-enrollment).
You can optionally enable Android at the same time when selecting platforms. The Android platform requires additional configuration. See [Android Setup](/en/endpoint/getting-started/platform-setup/android-setup) to configure the platform.
## Windows Management Requirements
Before enrolling Windows devices, ensure you have:
* **Windows 11** (24H2 or 25H2 only).
* **Pro, Pro Education, Enterprise, or Education** editions.
* **Microsoft Edge browser** (required for enrollment; see [Microsoft's Mobile Device Management (MDM) enrollment documentation](https://learn.microsoft.com/en-us/windows/client-management/mdm-enrollment-of-windows-devices#connect-your-windows-device-to-work-using-a-deep-link)).
* **Network connectivity** to Iru Endpoint services. For domains, ports, and firewall configuration, see [Using Iru on Enterprise Networks](/en/iru/requirements/using-iru-on-enterprise-networks).
* **Serial number** (required for enrollment). On virtual machines, you can assign a stable serial number.
* **(Recommended)** Single sign-on (SSO) configured for secure authentication.
## Windows Management Capabilities
Iru Endpoint provides the following Windows management features:
* **Device enrollment** via enrollment portal or [Windows Autopilot](/en/endpoint/settings/windows-integrations/configure-windows-autopilot) (Microsoft Entra ID zero-touch).
* **Application deployment** and management.
* **Policy enforcement** and compliance monitoring.
* **Security configuration** and updates.
* **User and device inventory** management.
For detailed information about Windows enrollment, see [Configuring Windows Enrollment](/en/endpoint/enrollment/windows/configuring-windows-enrollment) and [User Experience with Windows Enrollment](/en/endpoint/enrollment/windows/user-experience-with-windows-enrollment). To enroll new hardware during OOBE with Microsoft Entra ID, see [Configure Windows Autopilot](/en/endpoint/settings/windows-integrations/configure-windows-autopilot).
## Next Steps
After enabling the Windows platform:
Create and configure Blueprints so policies and apps are ready before enrollment. See [Configuring Blueprints](/en/endpoint/getting-started/blueprints-and-library/configuring-blueprints) and [Managing Library](/en/endpoint/getting-started/blueprints-and-library/managing-library).
To manage Apple or Android devices as well, see [Apple Setup](/en/endpoint/getting-started/platform-setup/apple-setup) or [Android Setup](/en/endpoint/getting-started/platform-setup/android-setup).
Once Blueprints are configured, set up enrollment: [Windows Enrollment](/en/endpoint/getting-started/enrollment/windows-enrollment), [Apple Enrollment](/en/endpoint/getting-started/enrollment/apple-enrollment), or [Android Enrollment](/en/endpoint/getting-started/enrollment/android-enrollment).