> ## Documentation Index
> Fetch the complete documentation index at: https://docs.iru.com/llms.txt
> Use this file to discover all available pages before exploring further.
# Android Setup
> Set up Android Enterprise integration in Iru Endpoint. Connect your managed Google Play account and configure Android device management capabilities.
This guide applies to Android devices
Set up the Android Enterprise integration so you can enroll and manage Android devices with work profiles from one platform. Enable Android in Organization settings and configure Android Enterprise (Google); then configure Blueprints and Library, then set up enrollment. Iru Endpoint uses the Android Management API for company-owned work profile management.
## Prerequisites
Before you begin, ensure you have:
* **Super admin** access to your organization's Google Admin console ([learn more about super admin roles](https://support.google.com/a/answer/2405986?hl=en\&sjid=10473235341862195521-NA))
* **Company-owned devices** in factory reset state for enrollment
* **Android 13 and higher**
* **Third-party Android mobile Management** enabled in Google Workspace (see steps below)
### Enable third-party Android mobile Management in Google Workspace
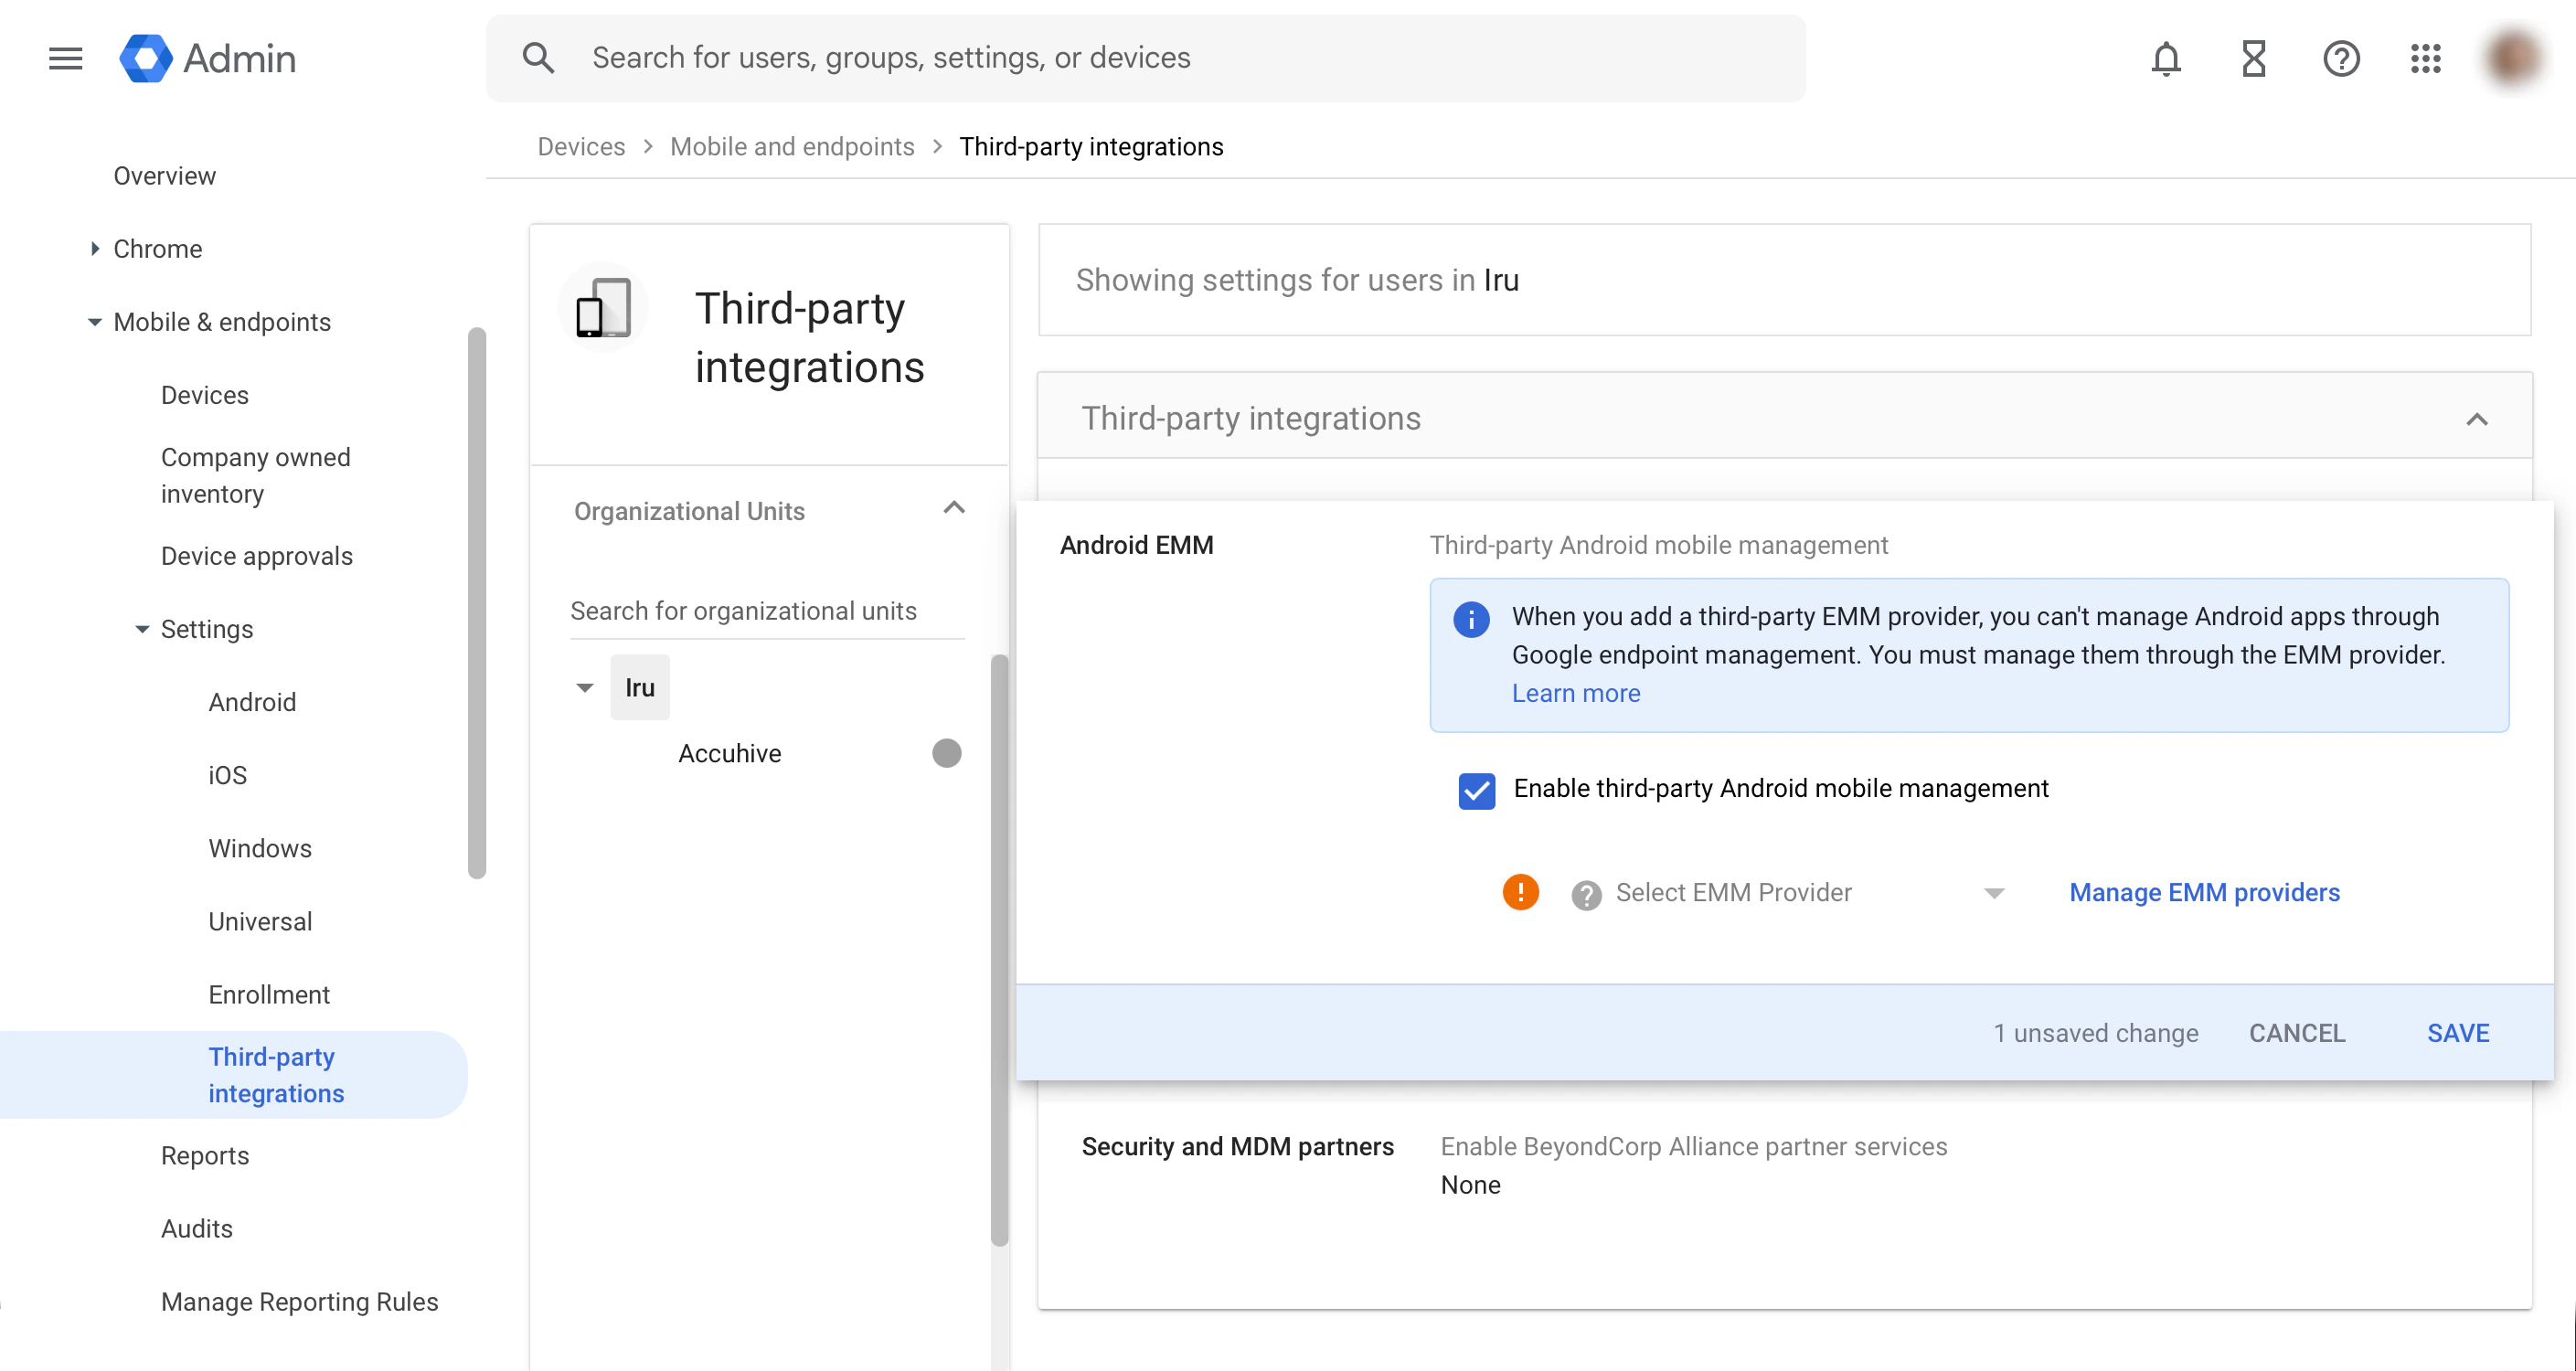
In a web browser, use your organization's super administrator account to sign in to your organization's Google Admin console at [admin.google.com](https://admin.google.com).
Go to **Devices** → **Mobile & endpoints** → **Settings** → **Third-party integrations**.
Select the related organization unit, then select the **Android EMM** block.
Check the box for **Enable third-party Android mobile management**, then click **SAVE**.
 ## Enable Android platform
Only users with the **Account Owner** role can enable or disable platforms. See [Team Member Role Permissions](/en/iru/access/team-member-role-permissions) for more details.
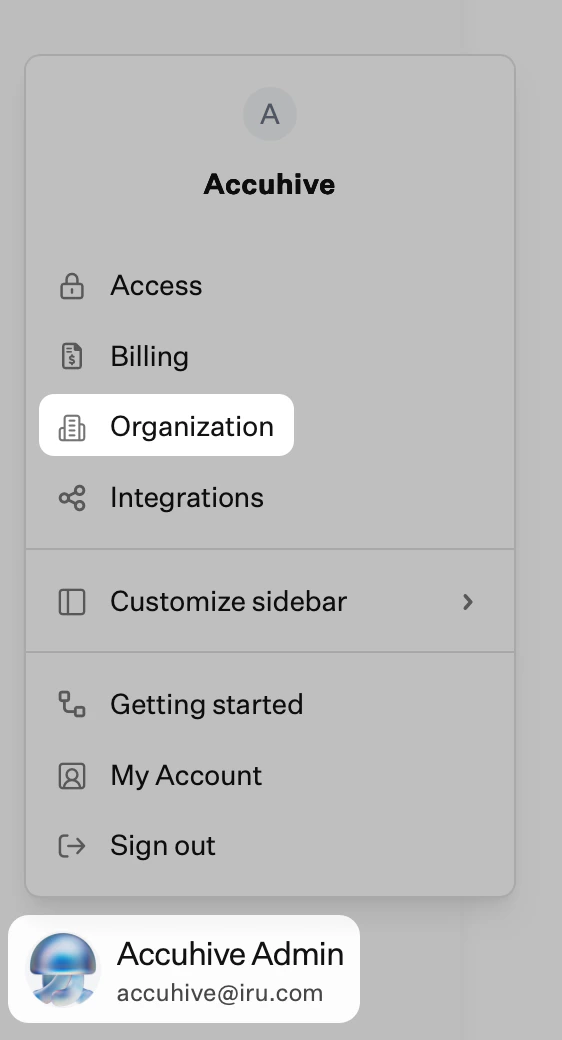
In Iru Endpoint, in the sidebar, click the [**Account Menu Button**](/en/iru/platform-overview/account-menu).
Click **Organization** in the menu.
## Enable Android platform
Only users with the **Account Owner** role can enable or disable platforms. See [Team Member Role Permissions](/en/iru/access/team-member-role-permissions) for more details.
In Iru Endpoint, in the sidebar, click the [**Account Menu Button**](/en/iru/platform-overview/account-menu).
Click **Organization** in the menu.
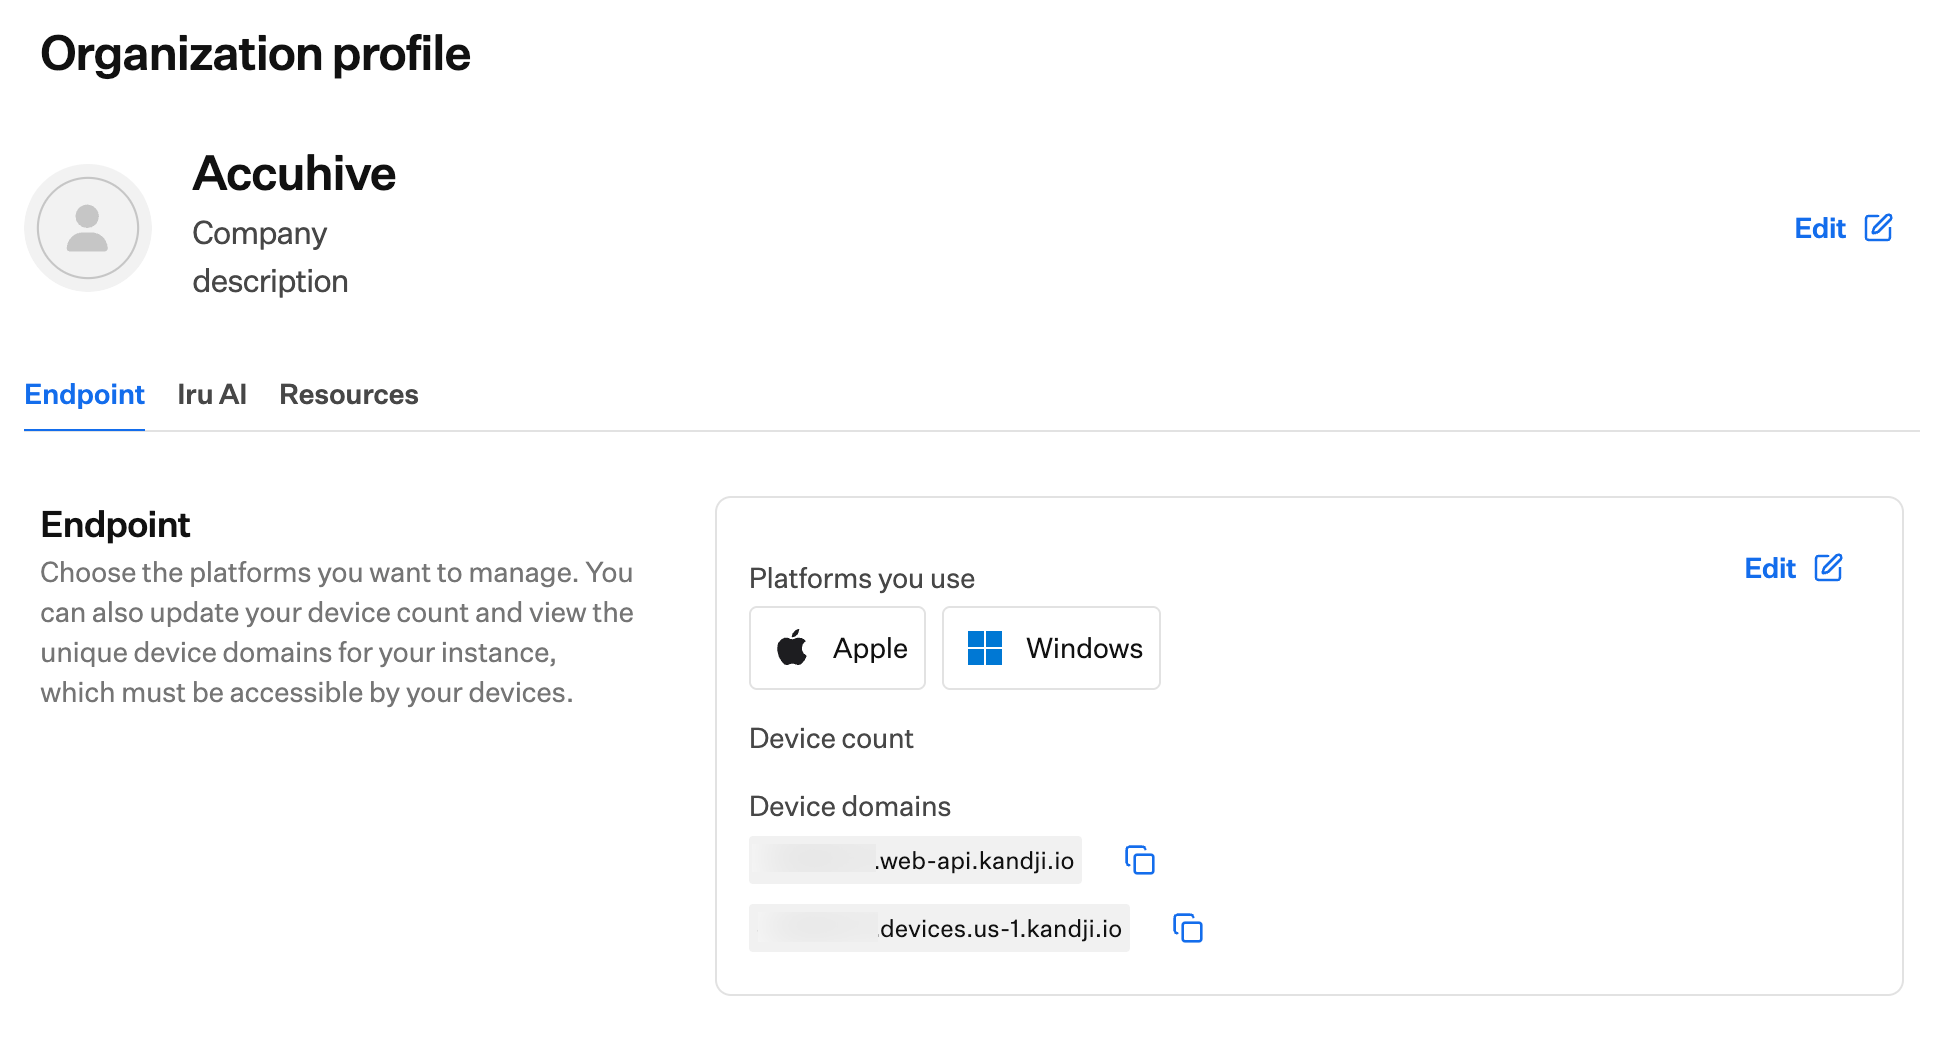
 Select the **Endpoint** tab.
Under **Platforms you use**, click **Edit**.
Select the **Endpoint** tab.
Under **Platforms you use**, click **Edit**.
 Select **Android** (and optionally Windows if you plan to manage both platforms), then click **Save changes** at the bottom of the page.
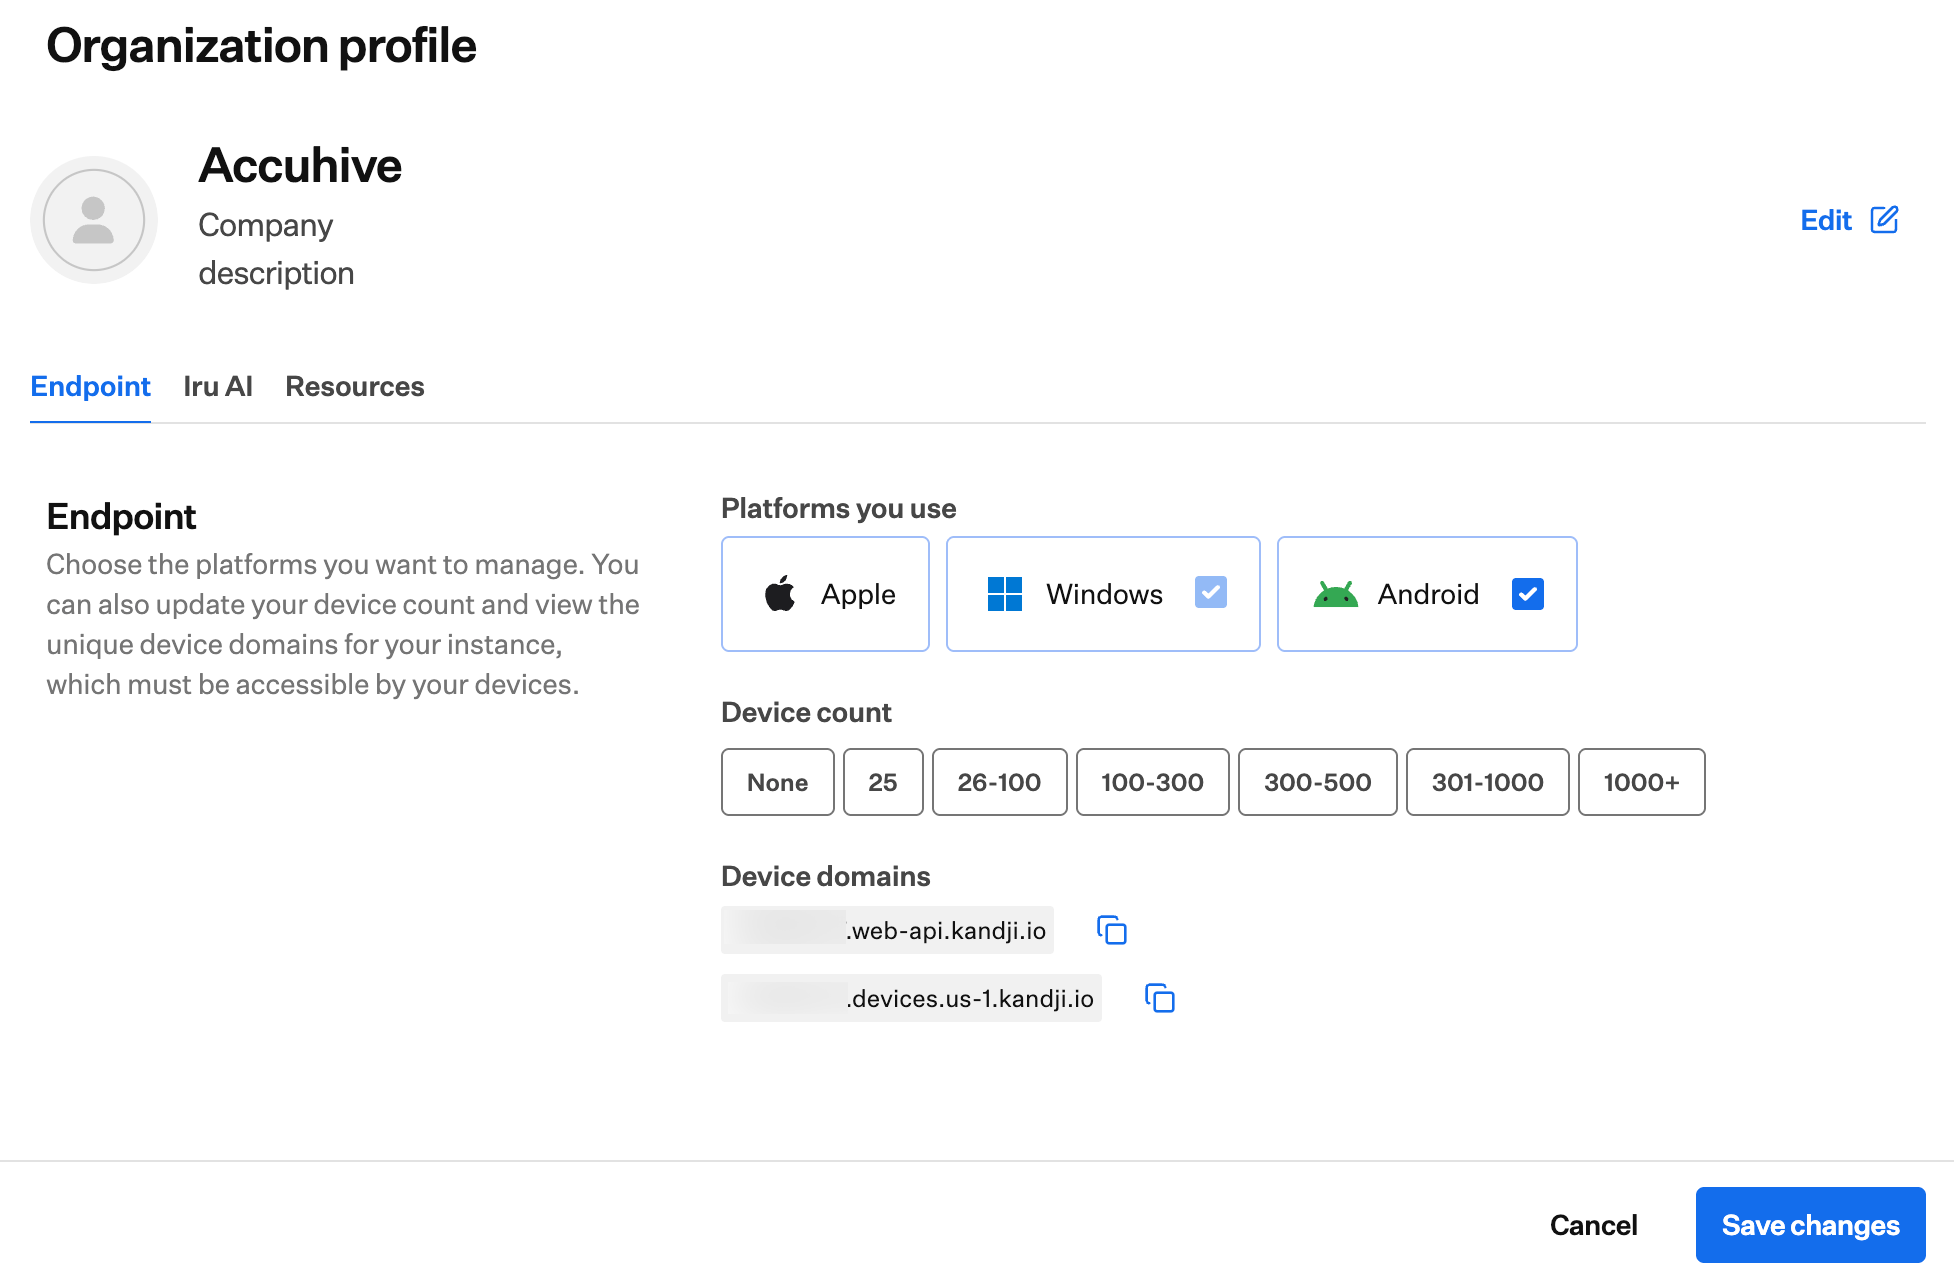 You can optionally enable the Windows platform at the same time when selecting platforms.
## Configure Android Enterprise
If the Configure Android Enterprise window is not open, go to [**Account Menu Button**](/en/iru/platform-overview/account-menu) → **Integrations**, select **Android** under **Platform integrations**, then click **Configure Android Enterprise**.
Only the **Account Owner** can configure Android Enterprise. See [Team Member Role Permissions](/en/iru/access/team-member-role-permissions) for roles and permissions.
Enter a name for your Android Enterprise integration.
Click **Continue with Google** and sign in with your Google Admin account (super admin role required). Select **Next** when prompted (your Iru Endpoint admin email may be pre-filled).
Select **Allow** to allow Iru Endpoint to manage your Android devices.
Choose how users sign in to the work profile: select **Enable** to allow users to sign in with their managed Google account, or select **Skip** to prevent sign-in with a managed Google account in the work profile.
You will be redirected back to the **Integrations** → **Android** page.
Verify that the Android Enterprise integration is active and configured.
You can optionally enable the Windows platform at the same time when selecting platforms.
## Configure Android Enterprise
If the Configure Android Enterprise window is not open, go to [**Account Menu Button**](/en/iru/platform-overview/account-menu) → **Integrations**, select **Android** under **Platform integrations**, then click **Configure Android Enterprise**.
Only the **Account Owner** can configure Android Enterprise. See [Team Member Role Permissions](/en/iru/access/team-member-role-permissions) for roles and permissions.
Enter a name for your Android Enterprise integration.
Click **Continue with Google** and sign in with your Google Admin account (super admin role required). Select **Next** when prompted (your Iru Endpoint admin email may be pre-filled).
Select **Allow** to allow Iru Endpoint to manage your Android devices.
Choose how users sign in to the work profile: select **Enable** to allow users to sign in with their managed Google account, or select **Skip** to prevent sign-in with a managed Google account in the work profile.
You will be redirected back to the **Integrations** → **Android** page.
Verify that the Android Enterprise integration is active and configured.
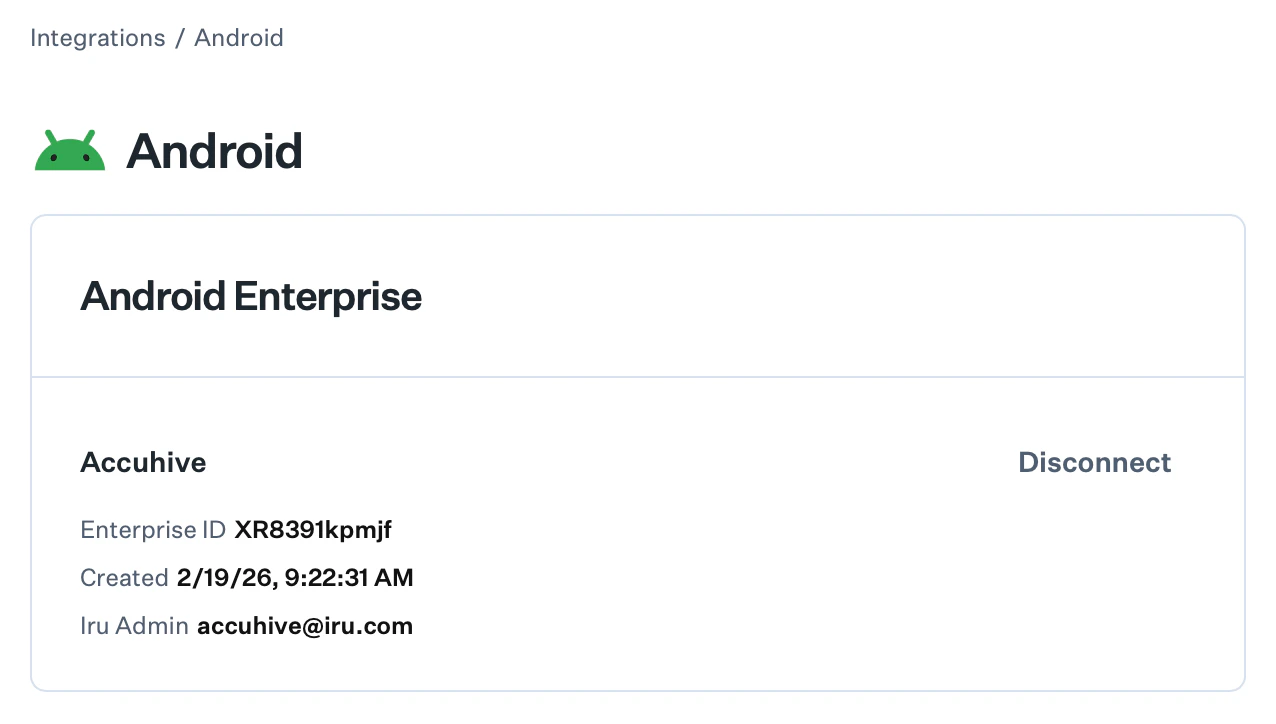 Keep a note of the **Enterprise ID** shown here; you will use it in the next section when selecting the EMM provider in Google Workspace.
## Set EMM in Google Workspace
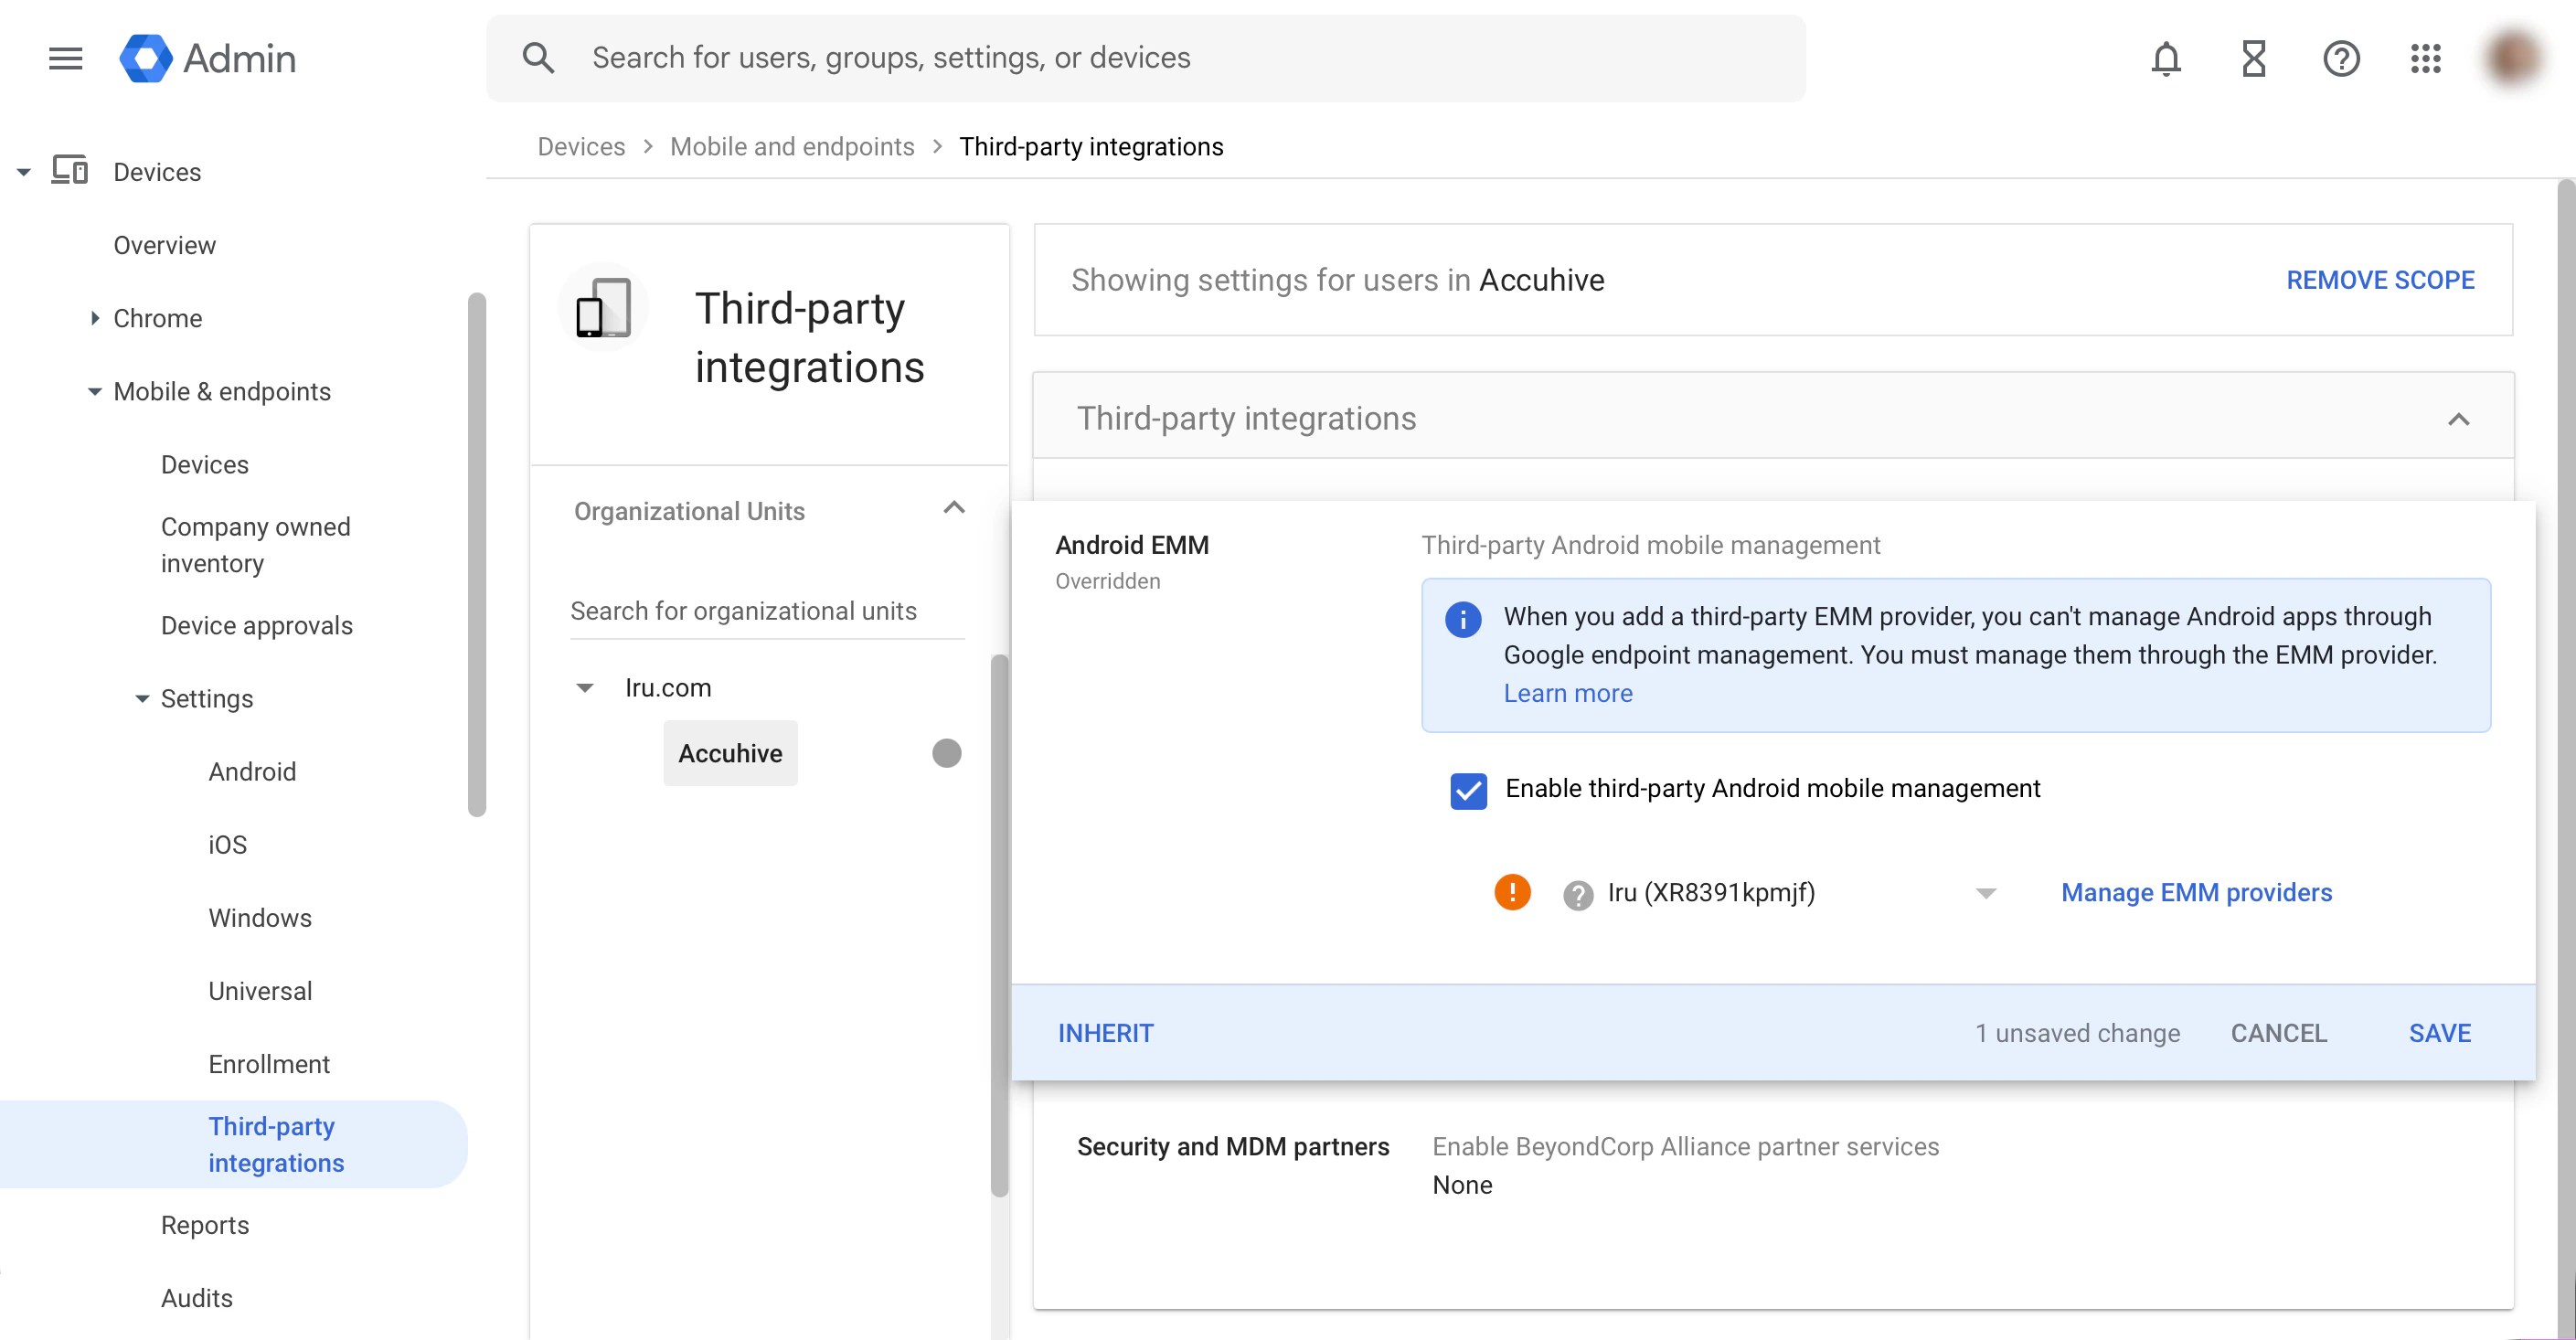
After configuring Android Enterprise in Iru, return to Google Workspace and select the EMM that matches the Enterprise ID shown in Iru. This links your Google organization to the Iru Endpoint Android integration.
In a web browser, use your organization's super administrator account to sign in to your organization's Google Admin console at [admin.google.com](https://admin.google.com).
Go to **Devices** → **Mobile & endpoints** → **Settings** → **Third-party integrations**.
Select the related organization unit, then select the **Android EMM** block.
Enable third-party Android mobile management if not already enabled, then select the EMM that matches the **Enterprise ID** from your Iru Endpoint Android integration.
Click **SAVE**.
Keep a note of the **Enterprise ID** shown here; you will use it in the next section when selecting the EMM provider in Google Workspace.
## Set EMM in Google Workspace
After configuring Android Enterprise in Iru, return to Google Workspace and select the EMM that matches the Enterprise ID shown in Iru. This links your Google organization to the Iru Endpoint Android integration.
In a web browser, use your organization's super administrator account to sign in to your organization's Google Admin console at [admin.google.com](https://admin.google.com).
Go to **Devices** → **Mobile & endpoints** → **Settings** → **Third-party integrations**.
Select the related organization unit, then select the **Android EMM** block.
Enable third-party Android mobile management if not already enabled, then select the EMM that matches the **Enterprise ID** from your Iru Endpoint Android integration.
Click **SAVE**.
 ## Disconnecting Android Enterprise
To disconnect Android Enterprise, remove the integration from Iru Endpoint. Iru coordinates the EMM binding cleanup with Google when you delete the integration.
If you are removing management from enrolled devices, delete each Android device record from Iru Endpoint first. See [Deleting a Device Record and Uninstalling Iru Endpoint](/en/endpoint/devices/device-record-management/deleting-a-device-record-and-uninstalling-iru-endpoint).
In Iru Endpoint, go to [**Account Menu Button**](/en/iru/platform-overview/account-menu) → **Integrations**, then select **Android** under **Platform integrations**.
Open the action menu (**...**) on the Android Enterprise integration and select **Delete integration**. Confirm the removal when prompted.
Only the **Account Owner** can remove the Android Enterprise integration. See [Team Member Role Permissions](/en/iru/access/team-member-role-permissions).
**Do not disconnect from Google Admin.** Removing Iru as your EMM provider in Google Admin (via **Remove** next to your EMM binding) disconnects the integration outside of Iru Endpoint. After that, you may be unable to delete Android device records or remove the Android Enterprise integration from Iru Endpoint.
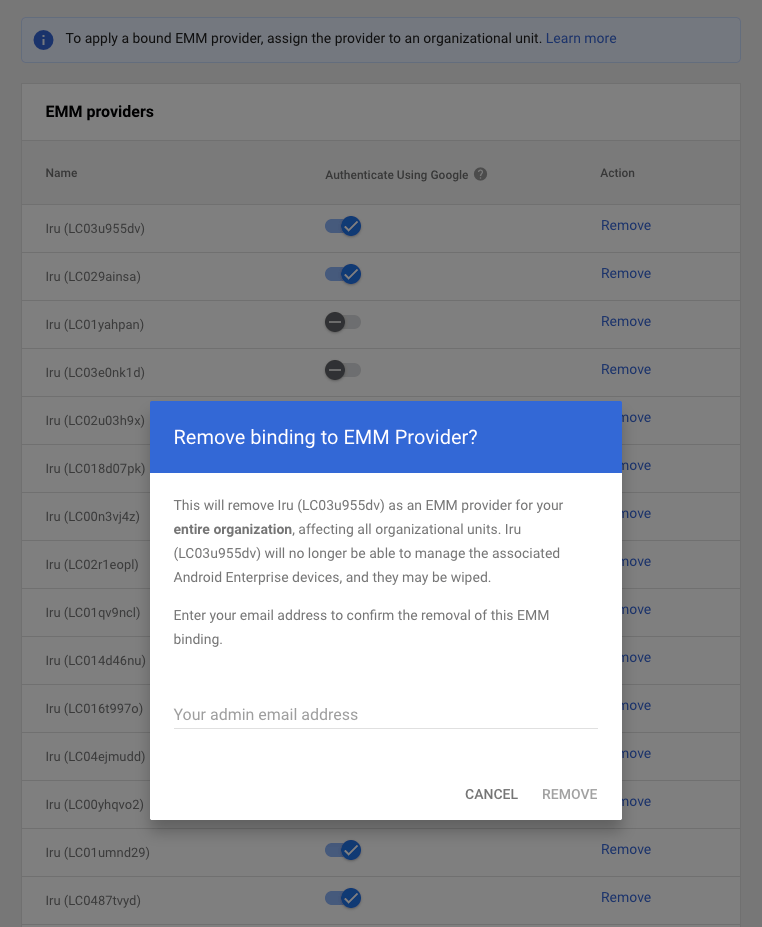
In Google Admin, do not click **Remove** next to your Iru EMM provider. The confirmation dialog below removes the binding for your entire organization. Associated Android Enterprise devices may be wiped.
## Disconnecting Android Enterprise
To disconnect Android Enterprise, remove the integration from Iru Endpoint. Iru coordinates the EMM binding cleanup with Google when you delete the integration.
If you are removing management from enrolled devices, delete each Android device record from Iru Endpoint first. See [Deleting a Device Record and Uninstalling Iru Endpoint](/en/endpoint/devices/device-record-management/deleting-a-device-record-and-uninstalling-iru-endpoint).
In Iru Endpoint, go to [**Account Menu Button**](/en/iru/platform-overview/account-menu) → **Integrations**, then select **Android** under **Platform integrations**.
Open the action menu (**...**) on the Android Enterprise integration and select **Delete integration**. Confirm the removal when prompted.
Only the **Account Owner** can remove the Android Enterprise integration. See [Team Member Role Permissions](/en/iru/access/team-member-role-permissions).
**Do not disconnect from Google Admin.** Removing Iru as your EMM provider in Google Admin (via **Remove** next to your EMM binding) disconnects the integration outside of Iru Endpoint. After that, you may be unable to delete Android device records or remove the Android Enterprise integration from Iru Endpoint.
In Google Admin, do not click **Remove** next to your Iru EMM provider. The confirmation dialog below removes the binding for your entire organization. Associated Android Enterprise devices may be wiped.
 ## Android Management Requirements
Before enrolling Android devices, ensure you have completed the Prerequisites above and have:
* **Android Enterprise** configured in Iru Endpoint (completed in this guide).
* **Blueprint** configured for Android devices.
* **(Recommended)** **Single sign-on (SSO)** configured for secure authentication.
## Android Management Capabilities
Iru Endpoint provides the following Android management features:
* **Work profile management** for company-owned devices.
* **Application deployment** and management.
* **Policy enforcement** and compliance monitoring.
* **Security configuration** and updates.
* **Device inventory** and reporting.
## Considerations
* **Account Owner required**: Only the Account Owner can configure Android Enterprise.
* **Google Admin access**: You need admin access to the Google Admin console.
* **Factory reset required**: Devices must be in factory reset state for enrollment.
* **Work profile only**: Iru Endpoint supports company-owned work profile management.
* **Disconnect through Iru**: Remove the Android Enterprise integration from Iru Endpoint, not from Google Admin. See [Disconnecting Android Enterprise](#disconnecting-android-enterprise).
For detailed information about Android enrollment, see [Configuring Android Enrollment](/en/endpoint/enrollment/android/configuring-android-enrollment) and [User Experience with Android Enrollment](/en/endpoint/enrollment/android/user-experience-with-android-enrollment).
## Next Steps
After configuring Android Enterprise:
Create and configure Blueprints so policies and apps are ready before enrollment. See [Configuring Blueprints](/en/endpoint/getting-started/blueprints-and-library/configuring-blueprints) and [Managing Library](/en/endpoint/getting-started/blueprints-and-library/managing-library).
To manage Apple or Windows devices as well, see [Apple Setup](/en/endpoint/getting-started/platform-setup/apple-setup) or [Windows Setup](/en/endpoint/getting-started/platform-setup/windows-setup).
Once Blueprints are configured, set up enrollment: [Android Enrollment](/en/endpoint/getting-started/enrollment/android-enrollment), [Apple Enrollment](/en/endpoint/getting-started/enrollment/apple-enrollment), or [Windows Enrollment](/en/endpoint/getting-started/enrollment/windows-enrollment).
## Android Management Requirements
Before enrolling Android devices, ensure you have completed the Prerequisites above and have:
* **Android Enterprise** configured in Iru Endpoint (completed in this guide).
* **Blueprint** configured for Android devices.
* **(Recommended)** **Single sign-on (SSO)** configured for secure authentication.
## Android Management Capabilities
Iru Endpoint provides the following Android management features:
* **Work profile management** for company-owned devices.
* **Application deployment** and management.
* **Policy enforcement** and compliance monitoring.
* **Security configuration** and updates.
* **Device inventory** and reporting.
## Considerations
* **Account Owner required**: Only the Account Owner can configure Android Enterprise.
* **Google Admin access**: You need admin access to the Google Admin console.
* **Factory reset required**: Devices must be in factory reset state for enrollment.
* **Work profile only**: Iru Endpoint supports company-owned work profile management.
* **Disconnect through Iru**: Remove the Android Enterprise integration from Iru Endpoint, not from Google Admin. See [Disconnecting Android Enterprise](#disconnecting-android-enterprise).
For detailed information about Android enrollment, see [Configuring Android Enrollment](/en/endpoint/enrollment/android/configuring-android-enrollment) and [User Experience with Android Enrollment](/en/endpoint/enrollment/android/user-experience-with-android-enrollment).
## Next Steps
After configuring Android Enterprise:
Create and configure Blueprints so policies and apps are ready before enrollment. See [Configuring Blueprints](/en/endpoint/getting-started/blueprints-and-library/configuring-blueprints) and [Managing Library](/en/endpoint/getting-started/blueprints-and-library/managing-library).
To manage Apple or Windows devices as well, see [Apple Setup](/en/endpoint/getting-started/platform-setup/apple-setup) or [Windows Setup](/en/endpoint/getting-started/platform-setup/windows-setup).
Once Blueprints are configured, set up enrollment: [Android Enrollment](/en/endpoint/getting-started/enrollment/android-enrollment), [Apple Enrollment](/en/endpoint/getting-started/enrollment/apple-enrollment), or [Windows Enrollment](/en/endpoint/getting-started/enrollment/windows-enrollment).