> ## Documentation Index
> Fetch the complete documentation index at: https://docs.iru.com/llms.txt
> Use this file to discover all available pages before exploring further.
# Set Up User Directory Integration in Iru Endpoint
> Connect your identity provider to Iru Endpoint for automatic user and group synchronization. Integrate with Okta, Entra ID, Google, or OneLogin.
Connect your organization's identity provider to sync users and associate devices with users. [User assignment to devices](/en/endpoint/devices/device-record-management/assigning-and-unassigning-users-to-devices) in Iru Endpoint is done via directory integration; users are synced from your IdP. Directory integration is optional but recommended for accurate inventory and user-to-device assignment across your fleet.
## Configure Directory Integration
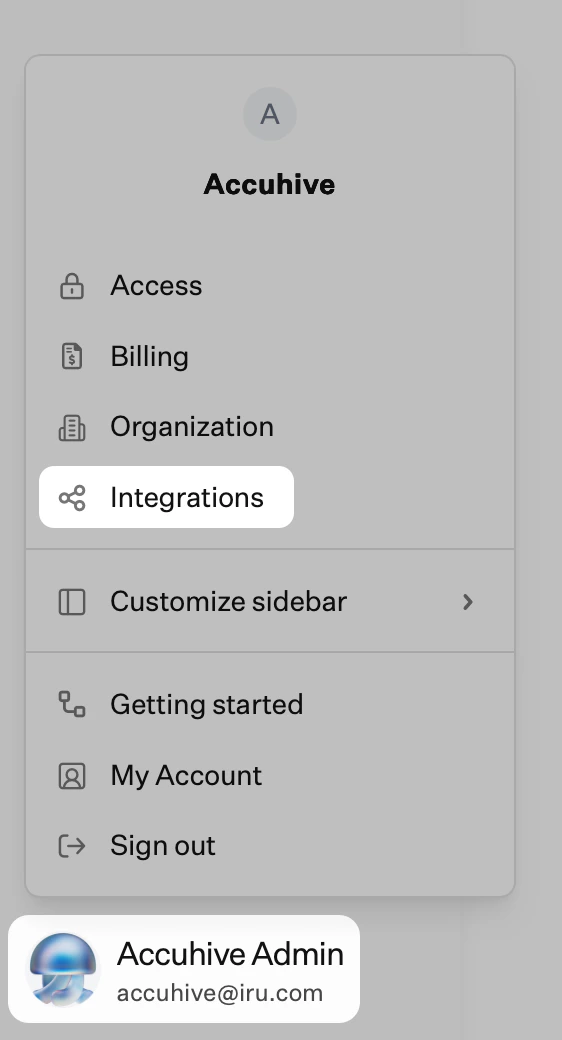
In Iru Endpoint, in the sidebar, click the [**Account Menu Button**](/en/iru/platform-overview/account-menu).
Click the **Integrations** option in the menu.
 Click **Discover integrations** in the upper right of the Integrations page.
Under **Directory integrations**, click **Add and configure** for the integration you want: **Microsoft Entra ID**, **Google Workspace**, or **SCIM protocol** (for providers like Okta).
Follow the on-screen setup (e.g., **Get started**, integration name, sign-in with your IdP). Complete consent or **Allow** as prompted so the directory appears on the Integrations page.
Users sync automatically every four hours. Verify users appear under **Users** in Iru Endpoint; you can force a sync from the ellipsis on the integration → **Sync users**.
## Supported Directory Integrations
Iru Endpoint supports the following directory integrations:
* **[Microsoft Entra ID](/en/endpoint/integrations/directory-services/user-directory-integration)**: Native integration for Microsoft Entra ID (formerly Azure AD).
* **[Google Workspace](/en/endpoint/integrations/directory-services/user-directory-integration)**: Native integration for Google Workspace.
* **[SCIM Integration](/en/endpoint/integrations/scim/scim-directory-integration)**: For providers like Okta, OneLogin, JumpCloud.
## Benefits
* **User-Device Mapping**: Automatically associate devices with users.
* **Inventory Management**: Better tracking of who has which device.
* **Automated Assignment**: Devices can be automatically assigned to users.
* **Compliance Reporting**: Richer reporting with user context.
## Considerations
* Directory integration is **optional** but recommended for better inventory management. Device users in Iru Endpoint can only be created and assigned via a directory integration.
* Users appear under **Users** once synced; Microsoft Entra ID and Google Workspace sync automatically every four hours.
* SCIM allows Just-in-Time provisioning and de-provisioning; see [SCIM Directory Integration](/en/endpoint/integrations/scim/scim-directory-integration) for setup.
* Integration requires an account with admin access to the directory you want to integrate.
For detailed configuration instructions, see [User Directory Integration](/en/endpoint/integrations/directory-services/user-directory-integration).
## Next Steps
After configuring directory integration:
Set up the platforms you plan to manage. You can enable one, two, or all three:
* **[Apple Setup](/en/endpoint/getting-started/platform-setup/apple-setup)**: Configure APNs, Apple Business or Apple School Manager, and Apps and Books
* **[Windows Setup](/en/endpoint/getting-started/platform-setup/windows-setup)**: Enable the Windows platform and configure settings
* **[Android Setup](/en/endpoint/getting-started/platform-setup/android-setup)**: Enable Android and configure Android Enterprise
Use [Configuring Blueprints](/en/endpoint/getting-started/blueprints-and-library/configuring-blueprints) and [Managing Library](/en/endpoint/getting-started/blueprints-and-library/managing-library) to get policies and apps ready before enrollment.
Once Blueprints are configured, set up [Apple Enrollment](/en/endpoint/getting-started/enrollment/apple-enrollment), [Windows Enrollment](/en/endpoint/getting-started/enrollment/windows-enrollment), or [Android Enrollment](/en/endpoint/getting-started/enrollment/android-enrollment).
Click **Discover integrations** in the upper right of the Integrations page.
Under **Directory integrations**, click **Add and configure** for the integration you want: **Microsoft Entra ID**, **Google Workspace**, or **SCIM protocol** (for providers like Okta).
Follow the on-screen setup (e.g., **Get started**, integration name, sign-in with your IdP). Complete consent or **Allow** as prompted so the directory appears on the Integrations page.
Users sync automatically every four hours. Verify users appear under **Users** in Iru Endpoint; you can force a sync from the ellipsis on the integration → **Sync users**.
## Supported Directory Integrations
Iru Endpoint supports the following directory integrations:
* **[Microsoft Entra ID](/en/endpoint/integrations/directory-services/user-directory-integration)**: Native integration for Microsoft Entra ID (formerly Azure AD).
* **[Google Workspace](/en/endpoint/integrations/directory-services/user-directory-integration)**: Native integration for Google Workspace.
* **[SCIM Integration](/en/endpoint/integrations/scim/scim-directory-integration)**: For providers like Okta, OneLogin, JumpCloud.
## Benefits
* **User-Device Mapping**: Automatically associate devices with users.
* **Inventory Management**: Better tracking of who has which device.
* **Automated Assignment**: Devices can be automatically assigned to users.
* **Compliance Reporting**: Richer reporting with user context.
## Considerations
* Directory integration is **optional** but recommended for better inventory management. Device users in Iru Endpoint can only be created and assigned via a directory integration.
* Users appear under **Users** once synced; Microsoft Entra ID and Google Workspace sync automatically every four hours.
* SCIM allows Just-in-Time provisioning and de-provisioning; see [SCIM Directory Integration](/en/endpoint/integrations/scim/scim-directory-integration) for setup.
* Integration requires an account with admin access to the directory you want to integrate.
For detailed configuration instructions, see [User Directory Integration](/en/endpoint/integrations/directory-services/user-directory-integration).
## Next Steps
After configuring directory integration:
Set up the platforms you plan to manage. You can enable one, two, or all three:
* **[Apple Setup](/en/endpoint/getting-started/platform-setup/apple-setup)**: Configure APNs, Apple Business or Apple School Manager, and Apps and Books
* **[Windows Setup](/en/endpoint/getting-started/platform-setup/windows-setup)**: Enable the Windows platform and configure settings
* **[Android Setup](/en/endpoint/getting-started/platform-setup/android-setup)**: Enable Android and configure Android Enterprise
Use [Configuring Blueprints](/en/endpoint/getting-started/blueprints-and-library/configuring-blueprints) and [Managing Library](/en/endpoint/getting-started/blueprints-and-library/managing-library) to get policies and apps ready before enrollment.
Once Blueprints are configured, set up [Apple Enrollment](/en/endpoint/getting-started/enrollment/apple-enrollment), [Windows Enrollment](/en/endpoint/getting-started/enrollment/windows-enrollment), or [Android Enrollment](/en/endpoint/getting-started/enrollment/android-enrollment).