> ## Documentation Index
> Fetch the complete documentation index at: https://docs.iru.com/llms.txt
> Use this file to discover all available pages before exploring further.
# SSO Setup
> Configure single sign-on (SSO) for Iru Endpoint admin access. Connect your identity provider using SAML or native integrations for secure login.
Set up Single Sign-On (SSO) so team members can sign in to the Iru Endpoint Web App with your existing identity provider. The same SSO connection can be used for [Require Authentication with Automated Device Enrollment (ADE)](/en/endpoint/enrollment/configure-require-authentication-for-enrollment), keeping access secure and consistent from admin sign-in through device enrollment.
## Configure SSO
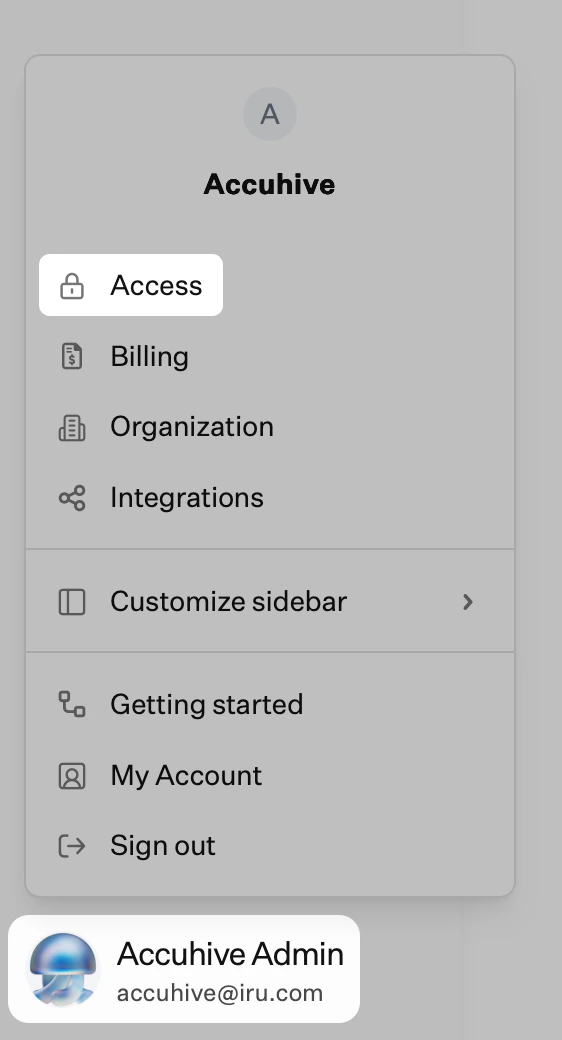
In Iru Endpoint, in the sidebar, click the [**Account Menu Button**](/en/iru/platform-overview/account-menu).
Click the **Access** option in the menu.
 Select the **Admin and authentication** tab (if needed) and scroll to **Authentication methods**. Click **+ Authentication method**.
Enter a display name, select the connection type (**Microsoft Entra ID**, **Google Workspace**, or **Custom SAML** for other providers), and click **Create**.
Follow the configuration prompts in Iru Endpoint and in your identity provider (e.g., redirect URL, client ID, client secret). Finish the setup in Iru Endpoint as prompted.
When the connection is configured, click the **ellipsis** next to the connection name and select **Allow for tenant authentication** so team members can sign in with SSO.
Test sign-in in a private browser window before disabling other authentication methods.
## Supported SSO connection types
Iru Endpoint supports the following SSO connection types:
* [Microsoft Entra ID (Native)](/en/endpoint/integrations/single-sign-on-integrations/single-sign-on-with-microsoft-entra-id-native) and [Microsoft Entra ID (SAML)](/en/endpoint/integrations/single-sign-on-integrations/single-sign-on-with-microsoft-entra-id-saml)
* [Google Workspace (Native)](/en/endpoint/integrations/single-sign-on-integrations/single-sign-on-with-google-workspace-native) and [Google Workspace (SAML)](/en/endpoint/integrations/single-sign-on-integrations/single-sign-on-with-google-workspace-saml)
* [Okta (SAML)](/en/endpoint/integrations/single-sign-on-integrations/single-sign-on-with-okta-saml), [JumpCloud (SAML)](/en/endpoint/integrations/single-sign-on-integrations/single-sign-on-with-jumpcloud-saml), [OneLogin (SAML)](/en/endpoint/integrations/single-sign-on-integrations/single-sign-on-with-onelogin-saml), and [Custom SAML](/en/endpoint/integrations/single-sign-on-integrations/saml-based-single-sign-on)
## Considerations
* **[Passkey, Google Social, and Microsoft Social](/en/iru/access/passkeys-and-social-login)** remain available by default. You can disable them after SSO is configured and tested (ellipsis → **Disable for tenant authentication**).
* An SSO connection can be used for [Require Authentication during enrollment](/en/endpoint/enrollment/configure-require-authentication-for-enrollment) without being allowed for tenant authentication.
* Team members must be invited in **Access** before they can sign in with SSO. Test in a private browser window before disabling other authentication methods to avoid lockout.
For detailed configuration for each provider, see [Single Sign-On](/en/endpoint/integrations/single-sign-on-integrations/single-sign-on).
## Next Steps
After configuring SSO:
See [User Directory Integration](/en/endpoint/getting-started/foundation/user-directory-integration) to sync users.
Set up the platforms you plan to manage. You can enable one, two, or all three:
* **[Apple Setup](/en/endpoint/getting-started/platform-setup/apple-setup)**: Configure APNs, Apple Business or Apple School Manager, and Apps and Books
* **[Windows Setup](/en/endpoint/getting-started/platform-setup/windows-setup)**: Enable the Windows platform and configure settings
* **[Android Setup](/en/endpoint/getting-started/platform-setup/android-setup)**: Enable Android and configure Android Enterprise
Select the **Admin and authentication** tab (if needed) and scroll to **Authentication methods**. Click **+ Authentication method**.
Enter a display name, select the connection type (**Microsoft Entra ID**, **Google Workspace**, or **Custom SAML** for other providers), and click **Create**.
Follow the configuration prompts in Iru Endpoint and in your identity provider (e.g., redirect URL, client ID, client secret). Finish the setup in Iru Endpoint as prompted.
When the connection is configured, click the **ellipsis** next to the connection name and select **Allow for tenant authentication** so team members can sign in with SSO.
Test sign-in in a private browser window before disabling other authentication methods.
## Supported SSO connection types
Iru Endpoint supports the following SSO connection types:
* [Microsoft Entra ID (Native)](/en/endpoint/integrations/single-sign-on-integrations/single-sign-on-with-microsoft-entra-id-native) and [Microsoft Entra ID (SAML)](/en/endpoint/integrations/single-sign-on-integrations/single-sign-on-with-microsoft-entra-id-saml)
* [Google Workspace (Native)](/en/endpoint/integrations/single-sign-on-integrations/single-sign-on-with-google-workspace-native) and [Google Workspace (SAML)](/en/endpoint/integrations/single-sign-on-integrations/single-sign-on-with-google-workspace-saml)
* [Okta (SAML)](/en/endpoint/integrations/single-sign-on-integrations/single-sign-on-with-okta-saml), [JumpCloud (SAML)](/en/endpoint/integrations/single-sign-on-integrations/single-sign-on-with-jumpcloud-saml), [OneLogin (SAML)](/en/endpoint/integrations/single-sign-on-integrations/single-sign-on-with-onelogin-saml), and [Custom SAML](/en/endpoint/integrations/single-sign-on-integrations/saml-based-single-sign-on)
## Considerations
* **[Passkey, Google Social, and Microsoft Social](/en/iru/access/passkeys-and-social-login)** remain available by default. You can disable them after SSO is configured and tested (ellipsis → **Disable for tenant authentication**).
* An SSO connection can be used for [Require Authentication during enrollment](/en/endpoint/enrollment/configure-require-authentication-for-enrollment) without being allowed for tenant authentication.
* Team members must be invited in **Access** before they can sign in with SSO. Test in a private browser window before disabling other authentication methods to avoid lockout.
For detailed configuration for each provider, see [Single Sign-On](/en/endpoint/integrations/single-sign-on-integrations/single-sign-on).
## Next Steps
After configuring SSO:
See [User Directory Integration](/en/endpoint/getting-started/foundation/user-directory-integration) to sync users.
Set up the platforms you plan to manage. You can enable one, two, or all three:
* **[Apple Setup](/en/endpoint/getting-started/platform-setup/apple-setup)**: Configure APNs, Apple Business or Apple School Manager, and Apps and Books
* **[Windows Setup](/en/endpoint/getting-started/platform-setup/windows-setup)**: Enable the Windows platform and configure settings
* **[Android Setup](/en/endpoint/getting-started/platform-setup/android-setup)**: Enable Android and configure Android Enterprise