> ## Documentation Index
> Fetch the complete documentation index at: https://docs.iru.com/llms.txt
> Use this file to discover all available pages before exploring further.
# Apple Enrollment
> Set up Apple device enrollment in Iru Endpoint as part of initial setup. Configure ADE, create enrollment URLs, and enroll your first Apple device.
This guide applies to Mac computers, iOS devices, iPadOS devices, Apple TV, and Apple Vision Pro
**Apple Business Manager** is now **Apple Business**. **Apple School Manager** is unchanged. For more information, see [Introducing Apple Business](https://www.apple.com/newsroom/2026/03/introducing-apple-business-a-new-all-in-one-platform-for-businesses-of-all-sizes/) and [Apple Business Manager is now Apple Business](https://support.apple.com/guide/apple-business-manager/apple-business-manager-is-now-apple-business-axmd79d79dea/web).
Set up Apple enrollment so you can add Mac computers, iPhone, iPad, Apple TV, and Apple Vision Pro devices to Iru Endpoint and get the right apps, settings, and security controls applied so people can get to work.
As of **April 8, 2026**, apps were updated from **Kandji** 
 to **Iru**
  branding. App names changed from **Kandji Self Service** to **Iru Self Service** and from **Kandji Agent** to **Iru Agent**. The manual enrollment portal now uses Iru branding. Please update **scripts, automations, and utilities** that still reference the old app names.
### How It Works
Iru Endpoint supports two approaches: **Automated Device Enrollment (ADE)** for corporate-owned devices (they enroll automatically during setup), and **manual enrollment** through the Enrollment Portal for Bring Your Own Device (BYOD). For ADE, you assign devices in Apple Business or Apple School Manager to Iru Endpoint, then assign them to a Blueprint in Iru Endpoint. For manual enrollment, you share the Enrollment Portal link and Enrollment code with users; they enter the Enrollment code, then sign in (if you require authentication) and install the enrollment profile. In both cases, devices are assigned to a Blueprint and configured according to your policies.
## Automated Device Enrollment (ADE)
ADE allows devices to enroll automatically during the initial setup process. This is the recommended method for corporate-owned devices.
### Prerequisites
* [Apple Push Notification service (APNs)](/en/endpoint/settings/apple-integrations/configure-apple-push-notification-service) configured in Iru Endpoint
* Apple Business or Apple School Manager account configured
* [Automated Device Enrollment token](/en/endpoint/settings/apple-integrations/configure-automated-device-enrollment) set up in Iru Endpoint
* Devices added to your Apple Business or Apple School Manager account
* Blueprints configured for device assignment
### ADE Enrollment Flow
When users set up their devices, each device connects to Apple's servers during setup and Iru Endpoint automatically applies the assigned Blueprint. Each device gets enrolled and configured according to your policies, then the user completes setup with pre-configured settings.
### Assign devices in Apple Business or Apple School Manager
In Apple Business or Apple School Manager, navigate to **Devices**.
Select the devices you want to assign.
Choose **Assign to Mobile Device Management (MDM) Server**.
Select Iru Endpoint as the MDM server.
Confirm the assignment when prompted.
### Configure Blueprint assignment
In Iru Endpoint, navigate to **Enrollment** → **Automated Device Enrollment**.
Filter by **Awaiting Enrollment** (or **All**) to view unenrolled devices.
Select the devices and assign them to the appropriate **Blueprint**.
Configure any required authentication settings. See [Require Authentication with Automated Device Enrollment](/en/endpoint/enrollment/configure-require-authentication-for-enrollment) for details.
Confirm devices appear and use **Fetch devices** to sync from Apple if they do not.
### ADE Library Item Assignment
Optionally set or override the ADE Library Item for a device (or multiple devices) instead of using the one from its Blueprint or Blueprint Routing.
In Iru Endpoint, go to **Enrollment** → **Automated Device Enrollment**.
Filter by **Awaiting Enrollment** (or **All**) to view unenrolled devices, then select the device(s) whose ADE Library Item you want to set or override.
The **ADE Library Item** column shows the name of the ADE Library Item assigned to the Blueprint selected for enrollment or Blueprint Routing, or **None** if none is assigned.
branding. App names changed from **Kandji Self Service** to **Iru Self Service** and from **Kandji Agent** to **Iru Agent**. The manual enrollment portal now uses Iru branding. Please update **scripts, automations, and utilities** that still reference the old app names.
### How It Works
Iru Endpoint supports two approaches: **Automated Device Enrollment (ADE)** for corporate-owned devices (they enroll automatically during setup), and **manual enrollment** through the Enrollment Portal for Bring Your Own Device (BYOD). For ADE, you assign devices in Apple Business or Apple School Manager to Iru Endpoint, then assign them to a Blueprint in Iru Endpoint. For manual enrollment, you share the Enrollment Portal link and Enrollment code with users; they enter the Enrollment code, then sign in (if you require authentication) and install the enrollment profile. In both cases, devices are assigned to a Blueprint and configured according to your policies.
## Automated Device Enrollment (ADE)
ADE allows devices to enroll automatically during the initial setup process. This is the recommended method for corporate-owned devices.
### Prerequisites
* [Apple Push Notification service (APNs)](/en/endpoint/settings/apple-integrations/configure-apple-push-notification-service) configured in Iru Endpoint
* Apple Business or Apple School Manager account configured
* [Automated Device Enrollment token](/en/endpoint/settings/apple-integrations/configure-automated-device-enrollment) set up in Iru Endpoint
* Devices added to your Apple Business or Apple School Manager account
* Blueprints configured for device assignment
### ADE Enrollment Flow
When users set up their devices, each device connects to Apple's servers during setup and Iru Endpoint automatically applies the assigned Blueprint. Each device gets enrolled and configured according to your policies, then the user completes setup with pre-configured settings.
### Assign devices in Apple Business or Apple School Manager
In Apple Business or Apple School Manager, navigate to **Devices**.
Select the devices you want to assign.
Choose **Assign to Mobile Device Management (MDM) Server**.
Select Iru Endpoint as the MDM server.
Confirm the assignment when prompted.
### Configure Blueprint assignment
In Iru Endpoint, navigate to **Enrollment** → **Automated Device Enrollment**.
Filter by **Awaiting Enrollment** (or **All**) to view unenrolled devices.
Select the devices and assign them to the appropriate **Blueprint**.
Configure any required authentication settings. See [Require Authentication with Automated Device Enrollment](/en/endpoint/enrollment/configure-require-authentication-for-enrollment) for details.
Confirm devices appear and use **Fetch devices** to sync from Apple if they do not.
### ADE Library Item Assignment
Optionally set or override the ADE Library Item for a device (or multiple devices) instead of using the one from its Blueprint or Blueprint Routing.
In Iru Endpoint, go to **Enrollment** → **Automated Device Enrollment**.
Filter by **Awaiting Enrollment** (or **All**) to view unenrolled devices, then select the device(s) whose ADE Library Item you want to set or override.
The **ADE Library Item** column shows the name of the ADE Library Item assigned to the Blueprint selected for enrollment or Blueprint Routing, or **None** if none is assigned.
 To override the assignment so you can choose a different ADE Library Item, click **Unlink from Blueprint** or **Unlink from Blueprint Routing**, whichever appears.
Once unlinked, choose **Re-link to Blueprint** or **Re-link to Blueprint Routing**, or select an **ADE Library Item** from the list. You can do this for one device or for many via multi-select.
To override the assignment so you can choose a different ADE Library Item, click **Unlink from Blueprint** or **Unlink from Blueprint Routing**, whichever appears.
Once unlinked, choose **Re-link to Blueprint** or **Re-link to Blueprint Routing**, or select an **ADE Library Item** from the list. You can do this for one device or for many via multi-select.
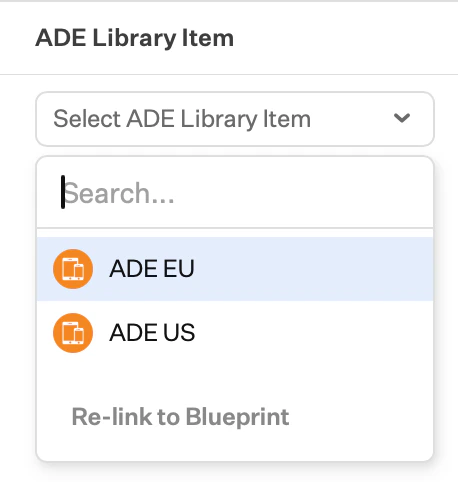 A direct assignment is sticky and will always apply to the device unless you manually re-link it to the Blueprint or Blueprint Routing. Re-linking can be done one device at a time or in bulk.
## Manual Enrollment
Manual enrollment allows users to enroll their devices through the Iru Endpoint Enrollment Portal.
### Setup Manual Enrollment
a. Go to **Endpoint** → **Enrollment** → **Manual Enrollment** in Iru Endpoint.
b. Ensure the **Enrollment Portal** is active.
c. Determine which **Blueprint** you want devices to be added to after enrollment.
a. Click the **Blueprint** and select **Require authentication** if you want users to authenticate prior to enrollment.
b. This integrates with your Single Sign-On (SSO) configuration for secure enrollment. If you see a banner that **No single sign-on connections are configured**, go to **Access** ([**Account Menu Button**](/en/iru/platform-overview/account-menu) → **Access**) and configure Single sign-on, then return and select **Require authentication**. See [SSO Setup](/en/endpoint/getting-started/foundation/sso-setup) for setup steps.
a. Copy the **Enrollment Portal link** from **Enrollment** → **Manual Enrollment**.
b. Copy the **Enrollment code** for the Blueprint you chose.
c. Share the Enrollment Portal link and Enrollment code with your end users.
d. Provide a short note that they'll enter the Enrollment code, then sign in (if required), and follow on-screen prompts to complete enrollment.
### User Enrollment Process
When users access the Enrollment Portal, they'll enter the provided Enrollment code and authenticate using SSO if you've enabled that option. They then download and install the enrollment profile to complete enrollment and receive device configuration.
## Enrollment Authentication
### SSO Authentication
To enhance security, you can require SSO authentication during enrollment. Configure SSO in Iru Endpoint (see [SSO Setup](/en/endpoint/getting-started/foundation/sso-setup)), then enable **Require authentication** on your Blueprint. Users will authenticate with their identity provider before enrollment.
### Enrollment Codes
Each Blueprint has a unique Enrollment code that users need to enroll their devices. You can share codes directly with users, use SSO authentication to automatically assign users to the correct Blueprint, or create multiple Blueprints for different user groups or departments.
## Best Practices
Test your Blueprints on designated testing devices before enrolling production hardware. Use Automated Device Enrollment for corporate-owned devices, as it provides the best user experience. Enable SSO authentication for secure enrollment and provide clear instructions to users about the enrollment process. You can monitor enrollment success and troubleshoot issues using the [Activity Page](/en/endpoint/devices/activity-page).
## Troubleshooting
### Trial Tenant Device Limit
Trial tenants are limited to a total of 10 devices. Once this limit is reached, a banner will be displayed until the device count becomes less than 10 again.
### Common Issues
If devices aren't appearing, check your Apple Business or Apple School Manager configuration and device assignment. For enrollment failures, verify your Blueprint configuration and network connectivity. If you're seeing authentication issues, check that SSO is configured correctly and that users have the right access.
### Support Resources
Check the [Activity Page](/en/endpoint/devices/activity-page) for enrollment logs and errors, and review Device records for enrollment status. [Contact Support](/en/iru/iru-support/access-to-iru-support) if you need additional assistance.
## Related Articles
Configure dynamic Blueprint assignment during device enrollment using Assignment Rules
Configure Apple device enrollment with Automated Device Enrollment (ADE)
What to expect when enrolling your device through the Enrollment Portal
Configure authentication requirements for device enrollment across Apple, Windows, and Android platforms
## Next Steps
After setting up Apple enrollment:
Test the process with a few devices and monitor compliance and policy enforcement on the [Activity Page](/en/endpoint/devices/activity-page).
To enroll Windows or Android devices as well, see [Windows Enrollment](/en/endpoint/getting-started/enrollment/windows-enrollment) or [Android Enrollment](/en/endpoint/getting-started/enrollment/android-enrollment).
If you missed a step or want to review the path, see [Getting Started](/en/endpoint/getting-started/getting-started) for the full guide.
A direct assignment is sticky and will always apply to the device unless you manually re-link it to the Blueprint or Blueprint Routing. Re-linking can be done one device at a time or in bulk.
## Manual Enrollment
Manual enrollment allows users to enroll their devices through the Iru Endpoint Enrollment Portal.
### Setup Manual Enrollment
a. Go to **Endpoint** → **Enrollment** → **Manual Enrollment** in Iru Endpoint.
b. Ensure the **Enrollment Portal** is active.
c. Determine which **Blueprint** you want devices to be added to after enrollment.
a. Click the **Blueprint** and select **Require authentication** if you want users to authenticate prior to enrollment.
b. This integrates with your Single Sign-On (SSO) configuration for secure enrollment. If you see a banner that **No single sign-on connections are configured**, go to **Access** ([**Account Menu Button**](/en/iru/platform-overview/account-menu) → **Access**) and configure Single sign-on, then return and select **Require authentication**. See [SSO Setup](/en/endpoint/getting-started/foundation/sso-setup) for setup steps.
a. Copy the **Enrollment Portal link** from **Enrollment** → **Manual Enrollment**.
b. Copy the **Enrollment code** for the Blueprint you chose.
c. Share the Enrollment Portal link and Enrollment code with your end users.
d. Provide a short note that they'll enter the Enrollment code, then sign in (if required), and follow on-screen prompts to complete enrollment.
### User Enrollment Process
When users access the Enrollment Portal, they'll enter the provided Enrollment code and authenticate using SSO if you've enabled that option. They then download and install the enrollment profile to complete enrollment and receive device configuration.
## Enrollment Authentication
### SSO Authentication
To enhance security, you can require SSO authentication during enrollment. Configure SSO in Iru Endpoint (see [SSO Setup](/en/endpoint/getting-started/foundation/sso-setup)), then enable **Require authentication** on your Blueprint. Users will authenticate with their identity provider before enrollment.
### Enrollment Codes
Each Blueprint has a unique Enrollment code that users need to enroll their devices. You can share codes directly with users, use SSO authentication to automatically assign users to the correct Blueprint, or create multiple Blueprints for different user groups or departments.
## Best Practices
Test your Blueprints on designated testing devices before enrolling production hardware. Use Automated Device Enrollment for corporate-owned devices, as it provides the best user experience. Enable SSO authentication for secure enrollment and provide clear instructions to users about the enrollment process. You can monitor enrollment success and troubleshoot issues using the [Activity Page](/en/endpoint/devices/activity-page).
## Troubleshooting
### Trial Tenant Device Limit
Trial tenants are limited to a total of 10 devices. Once this limit is reached, a banner will be displayed until the device count becomes less than 10 again.
### Common Issues
If devices aren't appearing, check your Apple Business or Apple School Manager configuration and device assignment. For enrollment failures, verify your Blueprint configuration and network connectivity. If you're seeing authentication issues, check that SSO is configured correctly and that users have the right access.
### Support Resources
Check the [Activity Page](/en/endpoint/devices/activity-page) for enrollment logs and errors, and review Device records for enrollment status. [Contact Support](/en/iru/iru-support/access-to-iru-support) if you need additional assistance.
## Related Articles
Configure dynamic Blueprint assignment during device enrollment using Assignment Rules
Configure Apple device enrollment with Automated Device Enrollment (ADE)
What to expect when enrolling your device through the Enrollment Portal
Configure authentication requirements for device enrollment across Apple, Windows, and Android platforms
## Next Steps
After setting up Apple enrollment:
Test the process with a few devices and monitor compliance and policy enforcement on the [Activity Page](/en/endpoint/devices/activity-page).
To enroll Windows or Android devices as well, see [Windows Enrollment](/en/endpoint/getting-started/enrollment/windows-enrollment) or [Android Enrollment](/en/endpoint/getting-started/enrollment/android-enrollment).
If you missed a step or want to review the path, see [Getting Started](/en/endpoint/getting-started/getting-started) for the full guide.