> ## Documentation Index
> Fetch the complete documentation index at: https://docs.iru.com/llms.txt
> Use this file to discover all available pages before exploring further.
# Configuring Apple Enrollment
> Configure Apple enrollment in Iru Endpoint: ADE, manual enrollment, enrollment codes, Setup Assistant, MDM profiles, and Blueprints.
This guide applies to Apple devices
**Apple Business Manager** is now **Apple Business**. **Apple School Manager** is unchanged. For more information, see [Introducing Apple Business](https://www.apple.com/newsroom/2026/03/introducing-apple-business-a-new-all-in-one-platform-for-businesses-of-all-sizes/) and [Apple Business Manager is now Apple Business](https://support.apple.com/guide/apple-business-manager/apple-business-manager-is-now-apple-business-axmd79d79dea/web).
This guide covers Apple device enrollment in Iru Endpoint, including Automated Device Enrollment (ADE) for zero-touch deployment, manual enrollment, and enrollment codes. Through Apple Business or Apple School Manager integration, you can customize Setup Assistant, manage accounts, and configure activation lock options.
## Create an Automated Device Enrollment Library Item
To add this Library Item to your Iru Endpoint Library, follow the steps outlined in the [Library Overview](/en/endpoint/library/library-items-profiles/library-overview) article.
### Universal Settings
In this section, configure universal Automated Device Enrollment settings that apply across supported Apple device types. The platform-specific sections that follow provide additional settings for each Apple platform.
When **Require authentication** is enabled, the enrolling user must complete single sign-on before Setup Assistant can continue. This applies to all Apple platforms except tvOS. See [Require Authentication with Automated Device Enrollment](/en/endpoint/enrollment/configure-require-authentication-for-enrollment) for details.
 If you use [Passport](/en/endpoint/library/passport/configure-the-passport-library-item), turn off **Prefill initial account creation details** and **Lock pre-filled account creation details**; they conflict with Passport’s account creation flow and can cause Setup Assistant errors.
By default, when enrolling devices through Automated Device Enrollment, the MDM profile is not removable. This is by design to keep company devices managed securely. You can select **Allow MDM Profile Removal** if you have a test environment or a specific need to make the profile removable. Iru Endpoint recommends against using this for production environments.
If you use [Passport](/en/endpoint/library/passport/configure-the-passport-library-item), turn off **Prefill initial account creation details** and **Lock pre-filled account creation details**; they conflict with Passport’s account creation flow and can cause Setup Assistant errors.
By default, when enrolling devices through Automated Device Enrollment, the MDM profile is not removable. This is by design to keep company devices managed securely. You can select **Allow MDM Profile Removal** if you have a test environment or a specific need to make the profile removable. Iru Endpoint recommends against using this for production environments.
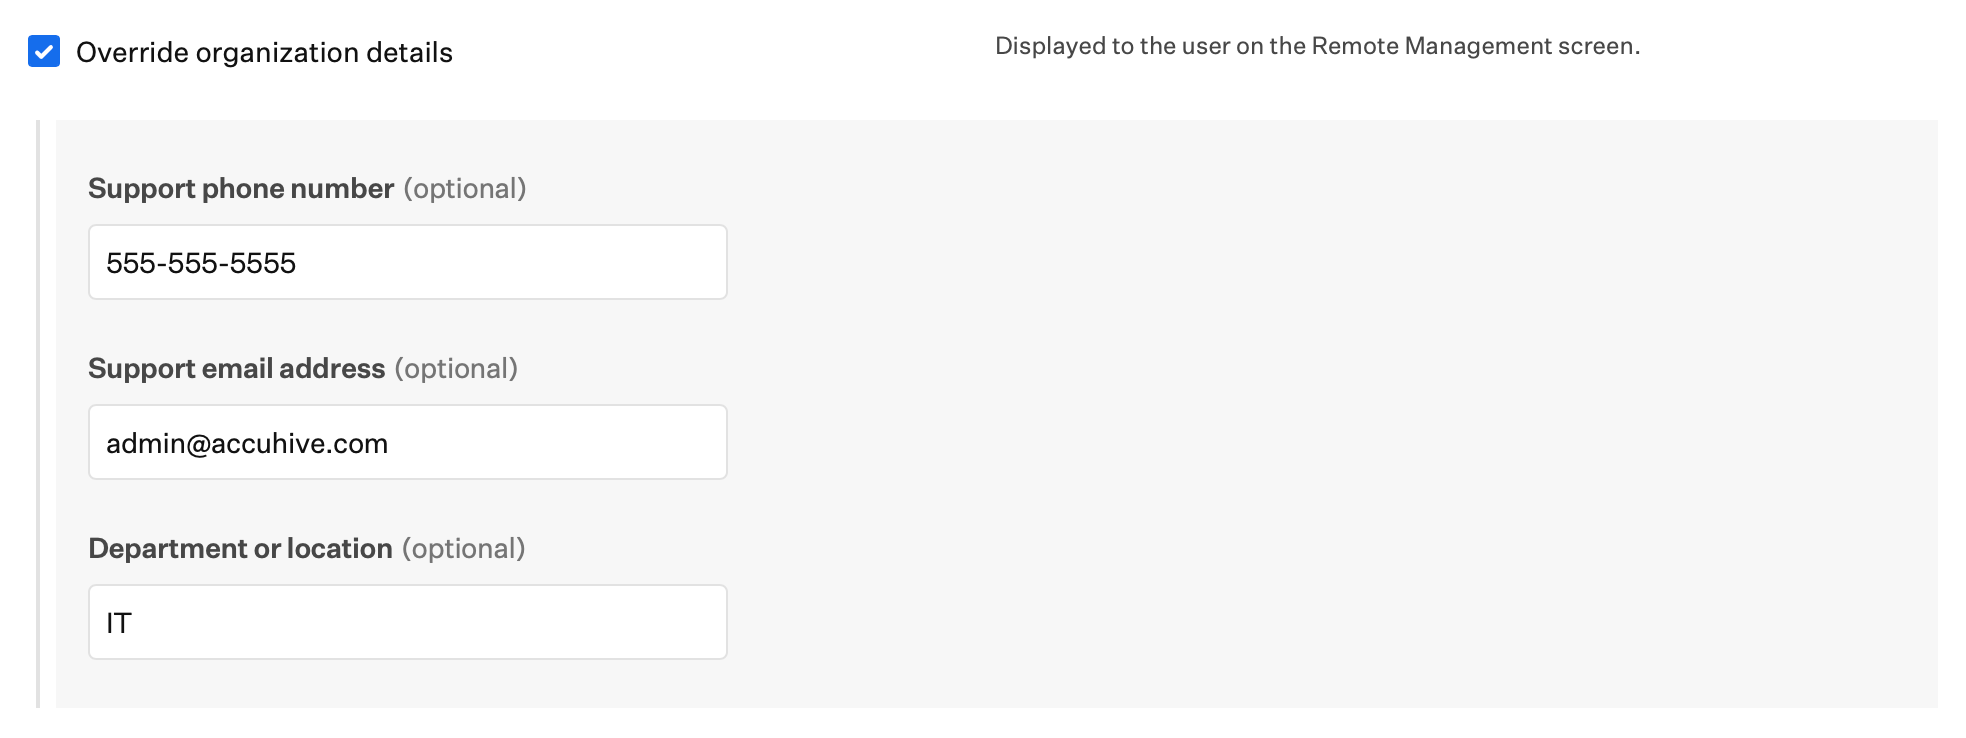
 Optionally override the location and contact information for this configuration. These details are shown to users on the Remote Management screen during enrollment.
 Enrollment-time settings in this Automated Device Enrollment Library Item do not retroactively update devices that were enrolled before you save. In other words, changes apply only to devices that enroll after you save. This does not change how Library Items and Blueprint configuration sync to devices that are already enrolled.
### Options Common to Platform-Specific Sections
These Automated Device Enrollment options work the same way on every Apple platform. Open the platform section you need in the Library Item and configure the setting there. Anything that only applies to certain platforms is documented under that platform later in this article.
#### Install Library Items during Setup Assistant
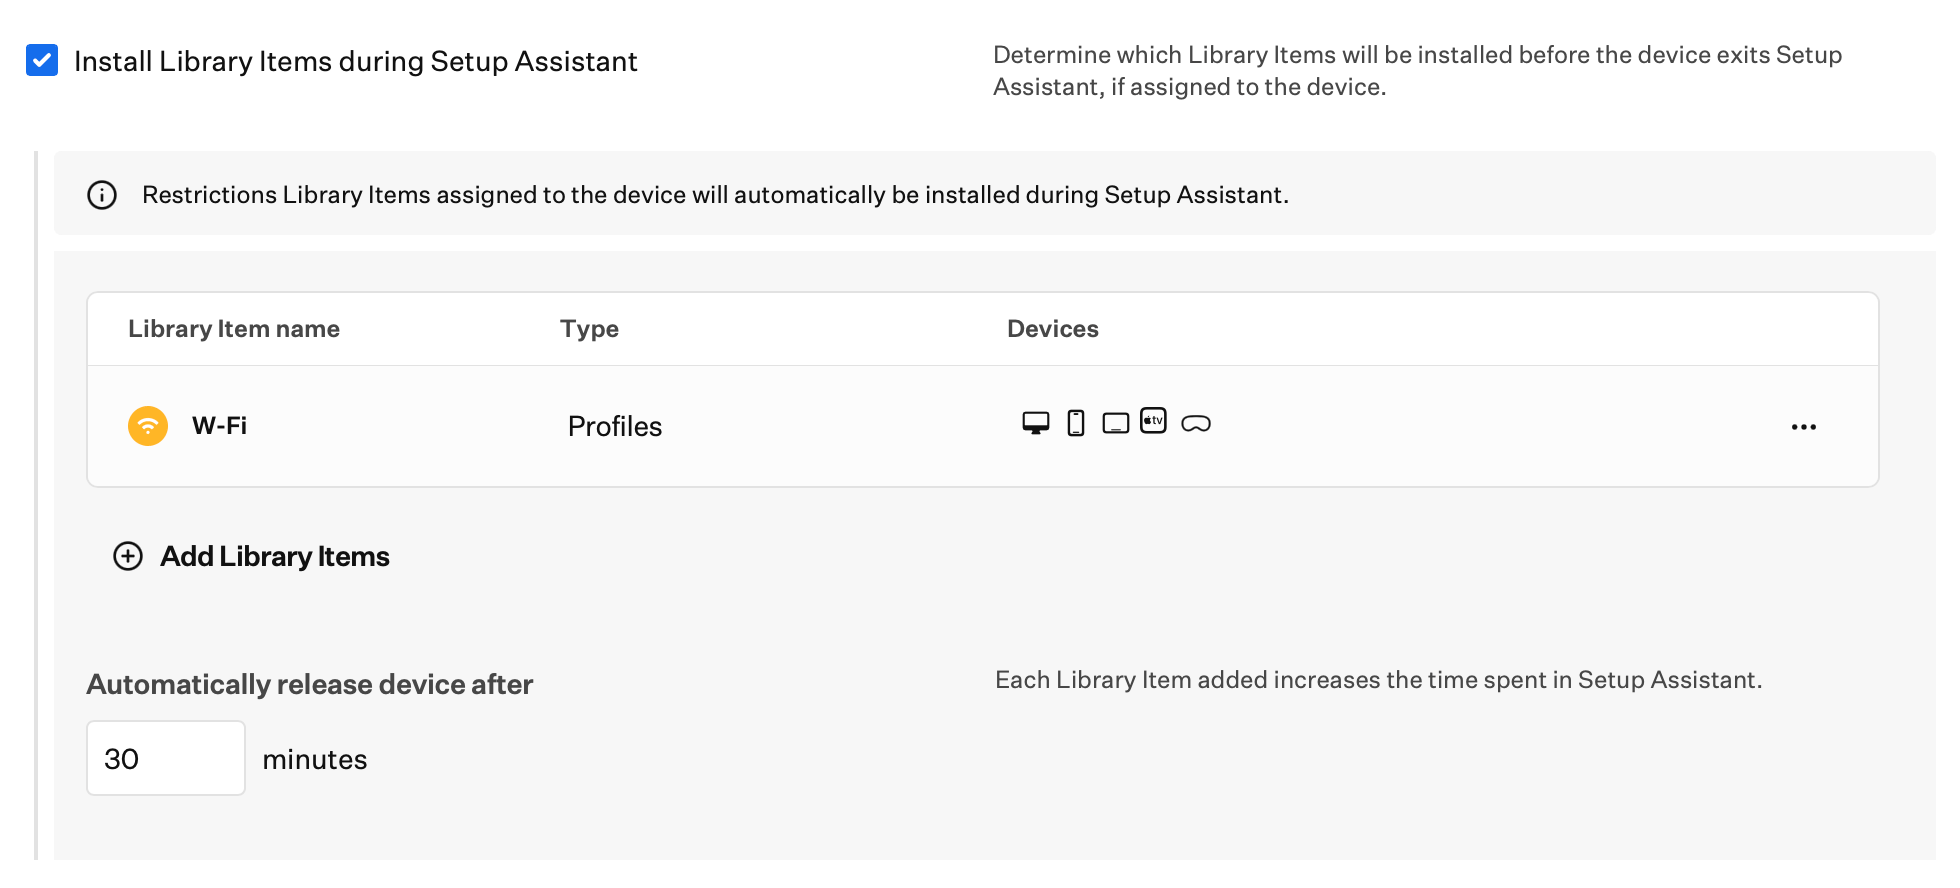
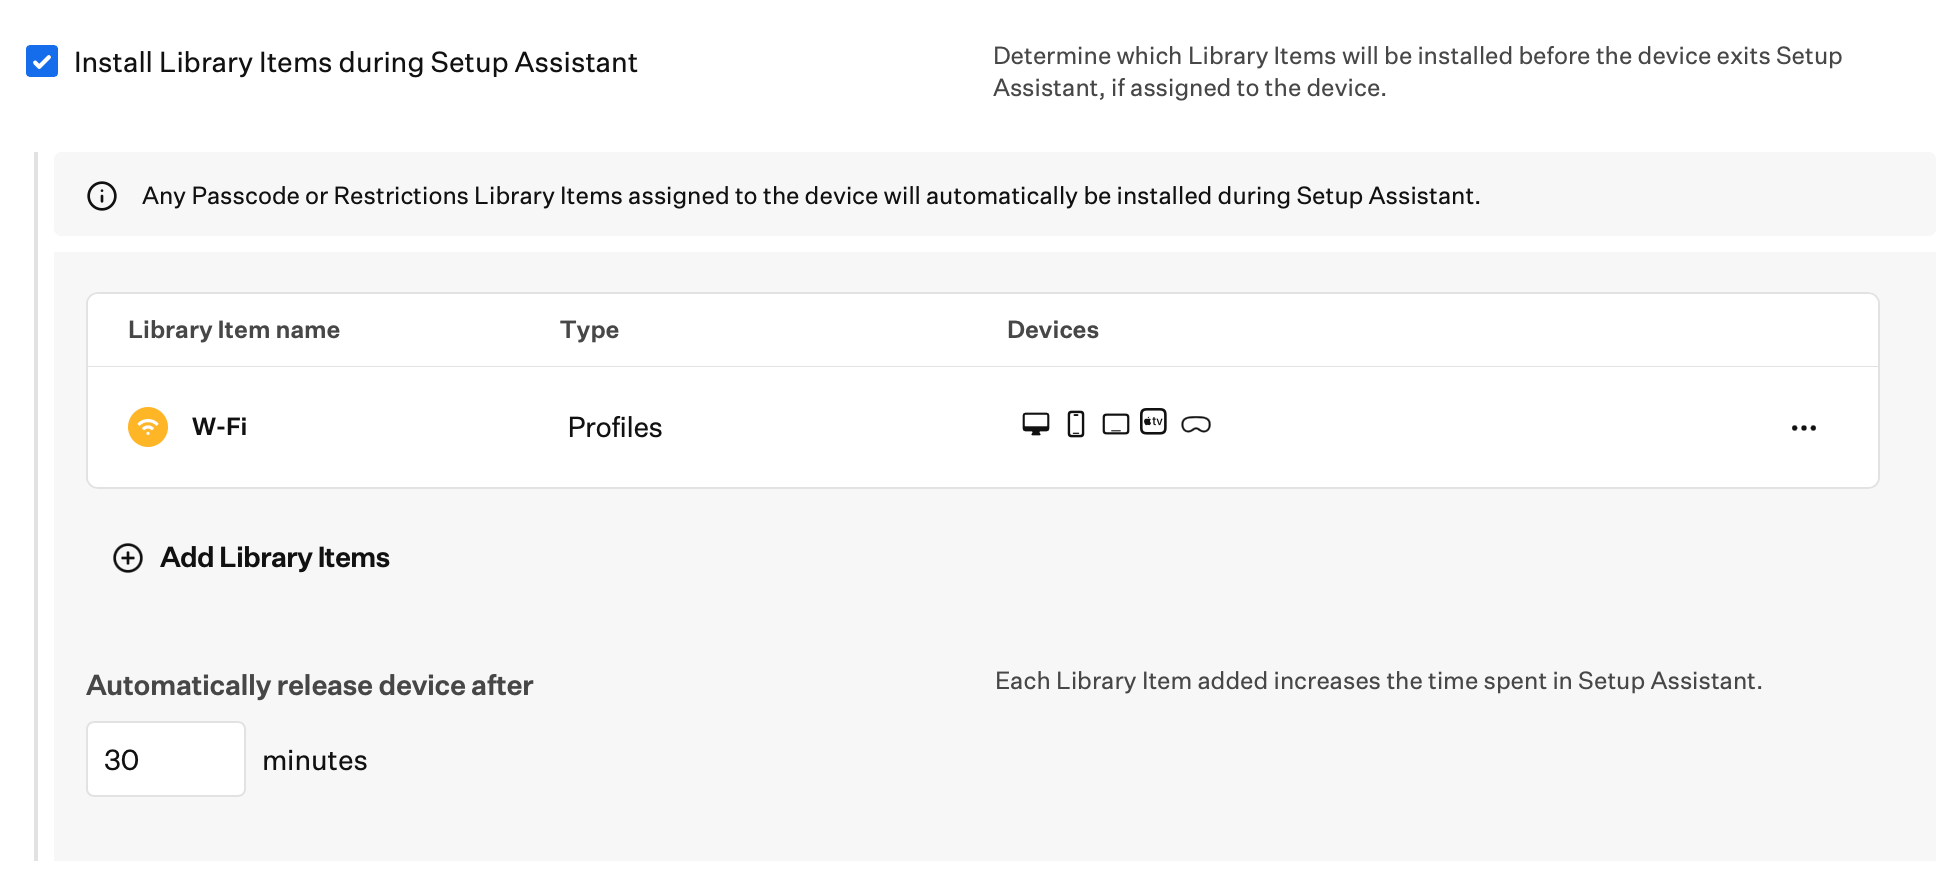
For **Mac**, **iPhone**, **iPad**, **Apple TV**, and **Vision**, the Automated Device Enrollment Library Item includes **Install Library Items during Setup Assistant**. When you enable it, you build a list of eligible Library Items that must finish installing while the device is still in Setup Assistant.
**Passcode**, **Restrictions**, **FileVault**, and **Migration Assistant** install during Setup Assistant on **Automated Device Enrollment** when they are assigned on the **Blueprint**, whether **Install Library Items during Setup Assistant** is on or off.
While the device installs this list of Library Items, Setup Assistant displays **Configuring** with the device type (for example **Configuring iPhone** or **Configuring Mac**), **Getting configuration from** your organization's name as registered with Apple Business or Apple School Manager, and a spinning gear. The names of individual Library Items are not displayed, and there is no progress indicator. After these Library Items have been installed, Setup Assistant continues through any remaining Setup Assistant panes so the user can start using the device.
Iru Endpoint displays eligible Library Items in the **Select Library Items to require during Setup Assistant** drawer:
* Eligible Library Items for the platform appear in the drawer regardless of the device's Blueprint.
* Library Items that always install during Setup Assistant appear in the drawer and cannot be deselected.
* Library Items that cannot install during Setup Assistant do not appear in the drawer.
* Library Items configured for Self Service only (for example some App Store or in-house app setups) do not appear in the drawer; those installs are user-initiated after setup, not during enrollment.
**Selected Library Items install only when they are assigned to the device.** Include every Library Item to install during Setup Assistant. **Blueprint** scoping still determines what applies. For example, a **Custom Profile** on the list will not install if your Blueprint does not scope it to the device. See [Blueprints](/en/endpoint/getting-started/blueprints-and-library/configuring-blueprints) and [Using Conditional Logic in Blueprints](/en/endpoint/blueprints/assignment-maps/using-conditional-logic-in-blueprints).
Use these steps in your Automated Device Enrollment Library Item:
In the Automated Device Enrollment Library Item, select **Mac**, **iPhone**, **iPad**, **Apple TV**, or **Vision**, then turn on **Install Library Items during Setup Assistant** for each platform where you want this behavior.
Select **Add Library Items** to open a drawer listing every eligible Library Item in your Iru Endpoint tenant. Use search and filters to find items, select what you need, then click **Done**.
Enrollment-time settings in this Automated Device Enrollment Library Item do not retroactively update devices that were enrolled before you save. In other words, changes apply only to devices that enroll after you save. This does not change how Library Items and Blueprint configuration sync to devices that are already enrolled.
### Options Common to Platform-Specific Sections
These Automated Device Enrollment options work the same way on every Apple platform. Open the platform section you need in the Library Item and configure the setting there. Anything that only applies to certain platforms is documented under that platform later in this article.
#### Install Library Items during Setup Assistant
For **Mac**, **iPhone**, **iPad**, **Apple TV**, and **Vision**, the Automated Device Enrollment Library Item includes **Install Library Items during Setup Assistant**. When you enable it, you build a list of eligible Library Items that must finish installing while the device is still in Setup Assistant.
**Passcode**, **Restrictions**, **FileVault**, and **Migration Assistant** install during Setup Assistant on **Automated Device Enrollment** when they are assigned on the **Blueprint**, whether **Install Library Items during Setup Assistant** is on or off.
While the device installs this list of Library Items, Setup Assistant displays **Configuring** with the device type (for example **Configuring iPhone** or **Configuring Mac**), **Getting configuration from** your organization's name as registered with Apple Business or Apple School Manager, and a spinning gear. The names of individual Library Items are not displayed, and there is no progress indicator. After these Library Items have been installed, Setup Assistant continues through any remaining Setup Assistant panes so the user can start using the device.
Iru Endpoint displays eligible Library Items in the **Select Library Items to require during Setup Assistant** drawer:
* Eligible Library Items for the platform appear in the drawer regardless of the device's Blueprint.
* Library Items that always install during Setup Assistant appear in the drawer and cannot be deselected.
* Library Items that cannot install during Setup Assistant do not appear in the drawer.
* Library Items configured for Self Service only (for example some App Store or in-house app setups) do not appear in the drawer; those installs are user-initiated after setup, not during enrollment.
**Selected Library Items install only when they are assigned to the device.** Include every Library Item to install during Setup Assistant. **Blueprint** scoping still determines what applies. For example, a **Custom Profile** on the list will not install if your Blueprint does not scope it to the device. See [Blueprints](/en/endpoint/getting-started/blueprints-and-library/configuring-blueprints) and [Using Conditional Logic in Blueprints](/en/endpoint/blueprints/assignment-maps/using-conditional-logic-in-blueprints).
Use these steps in your Automated Device Enrollment Library Item:
In the Automated Device Enrollment Library Item, select **Mac**, **iPhone**, **iPad**, **Apple TV**, or **Vision**, then turn on **Install Library Items during Setup Assistant** for each platform where you want this behavior.
Select **Add Library Items** to open a drawer listing every eligible Library Item in your Iru Endpoint tenant. Use search and filters to find items, select what you need, then click **Done**.
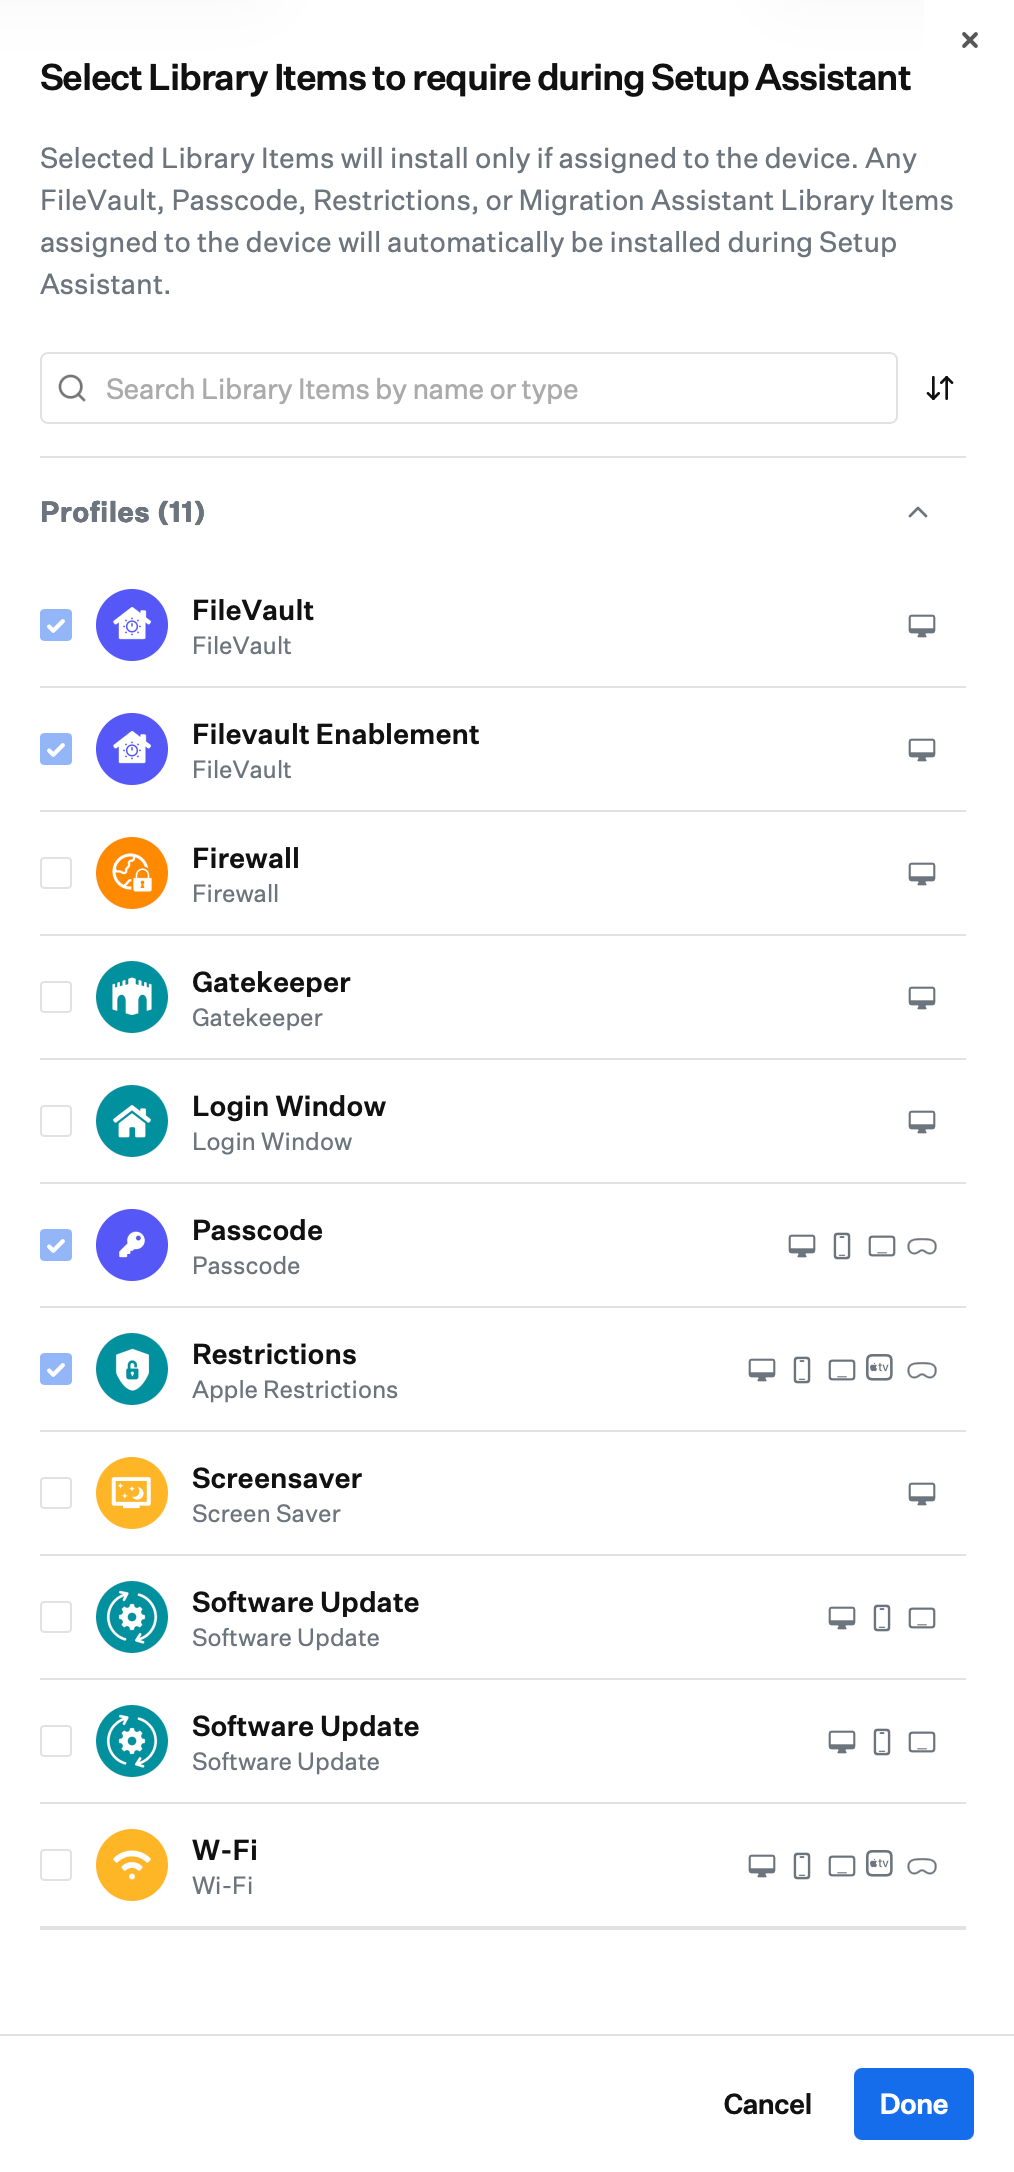 Only Library Items compatible with the platform section you are configuring appear. For example, if you add Library Items from the **iPhone** section, the list only shows items that support iPhone devices. Each row also shows the supported device types.
Passport does **not** appear in this drawer for Mac setup. Passport settings are not applied to the device as an install-time Library Item in Setup Assistant; Passport fetches its own settings.
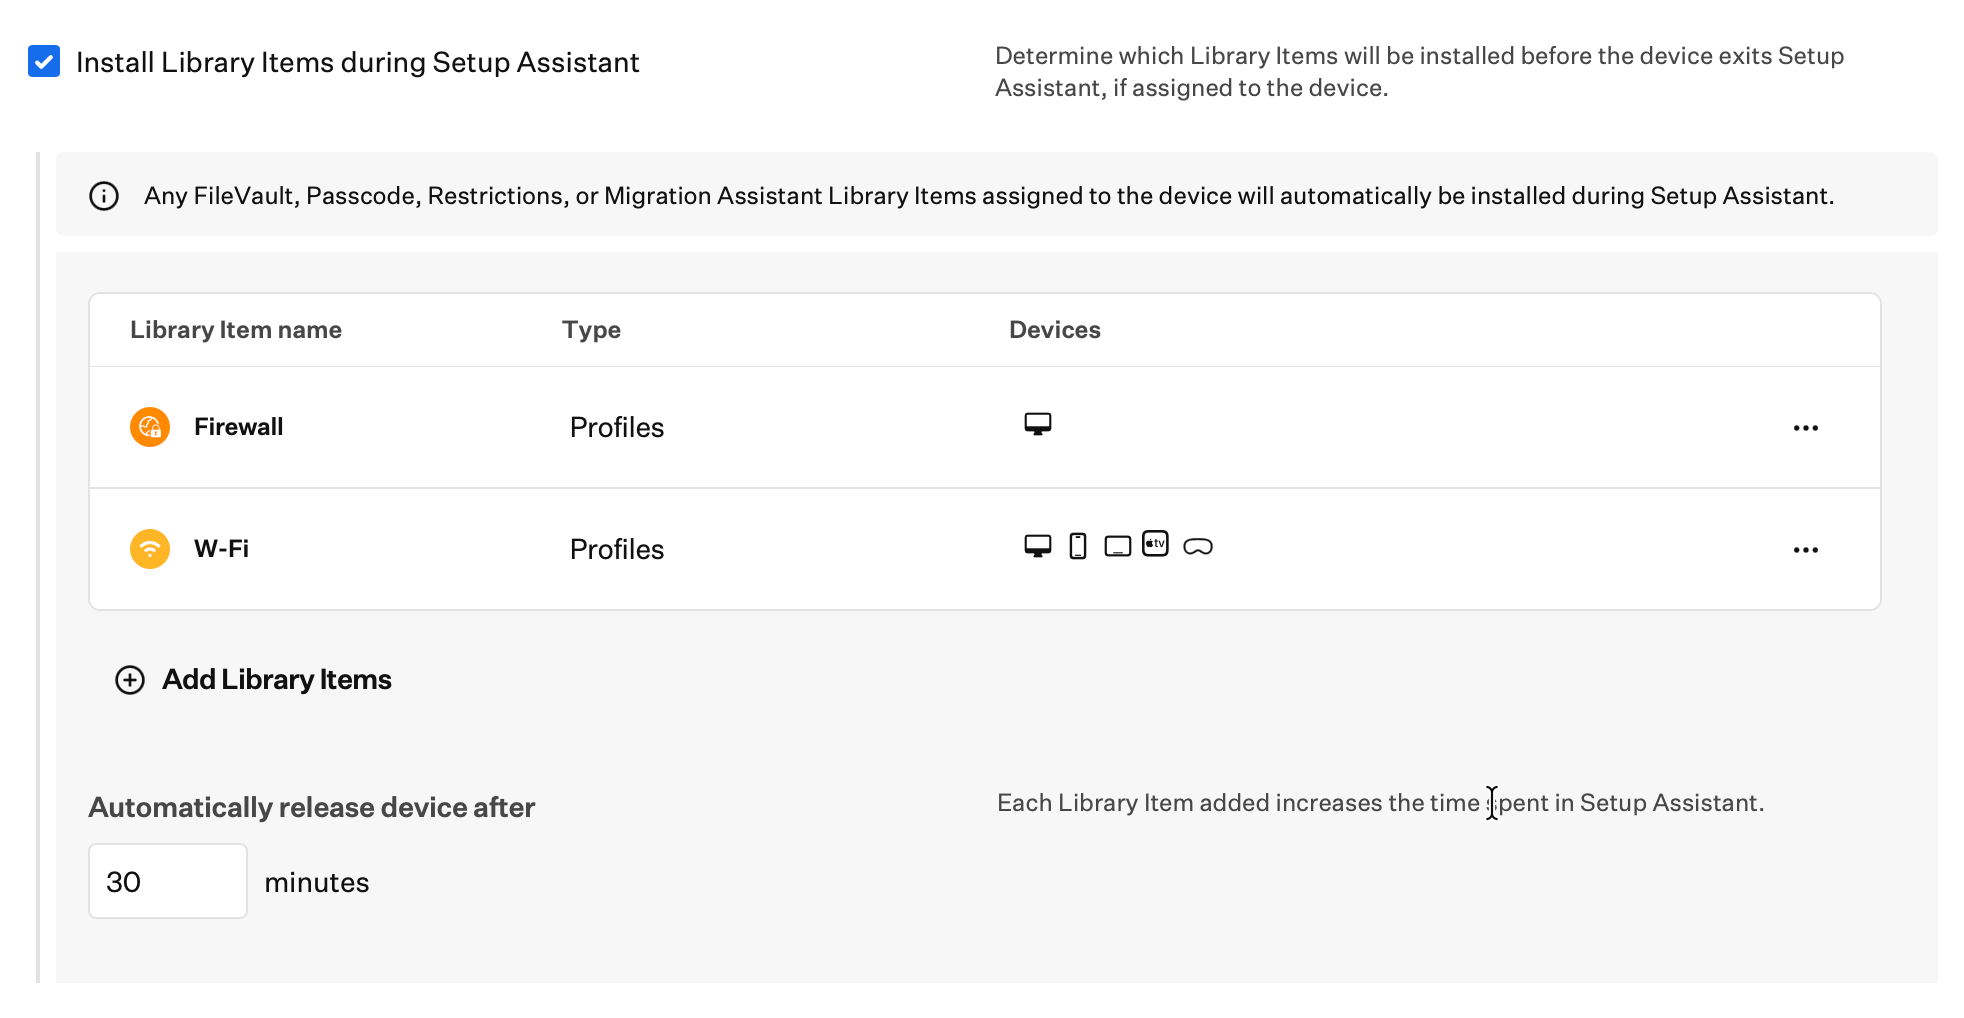
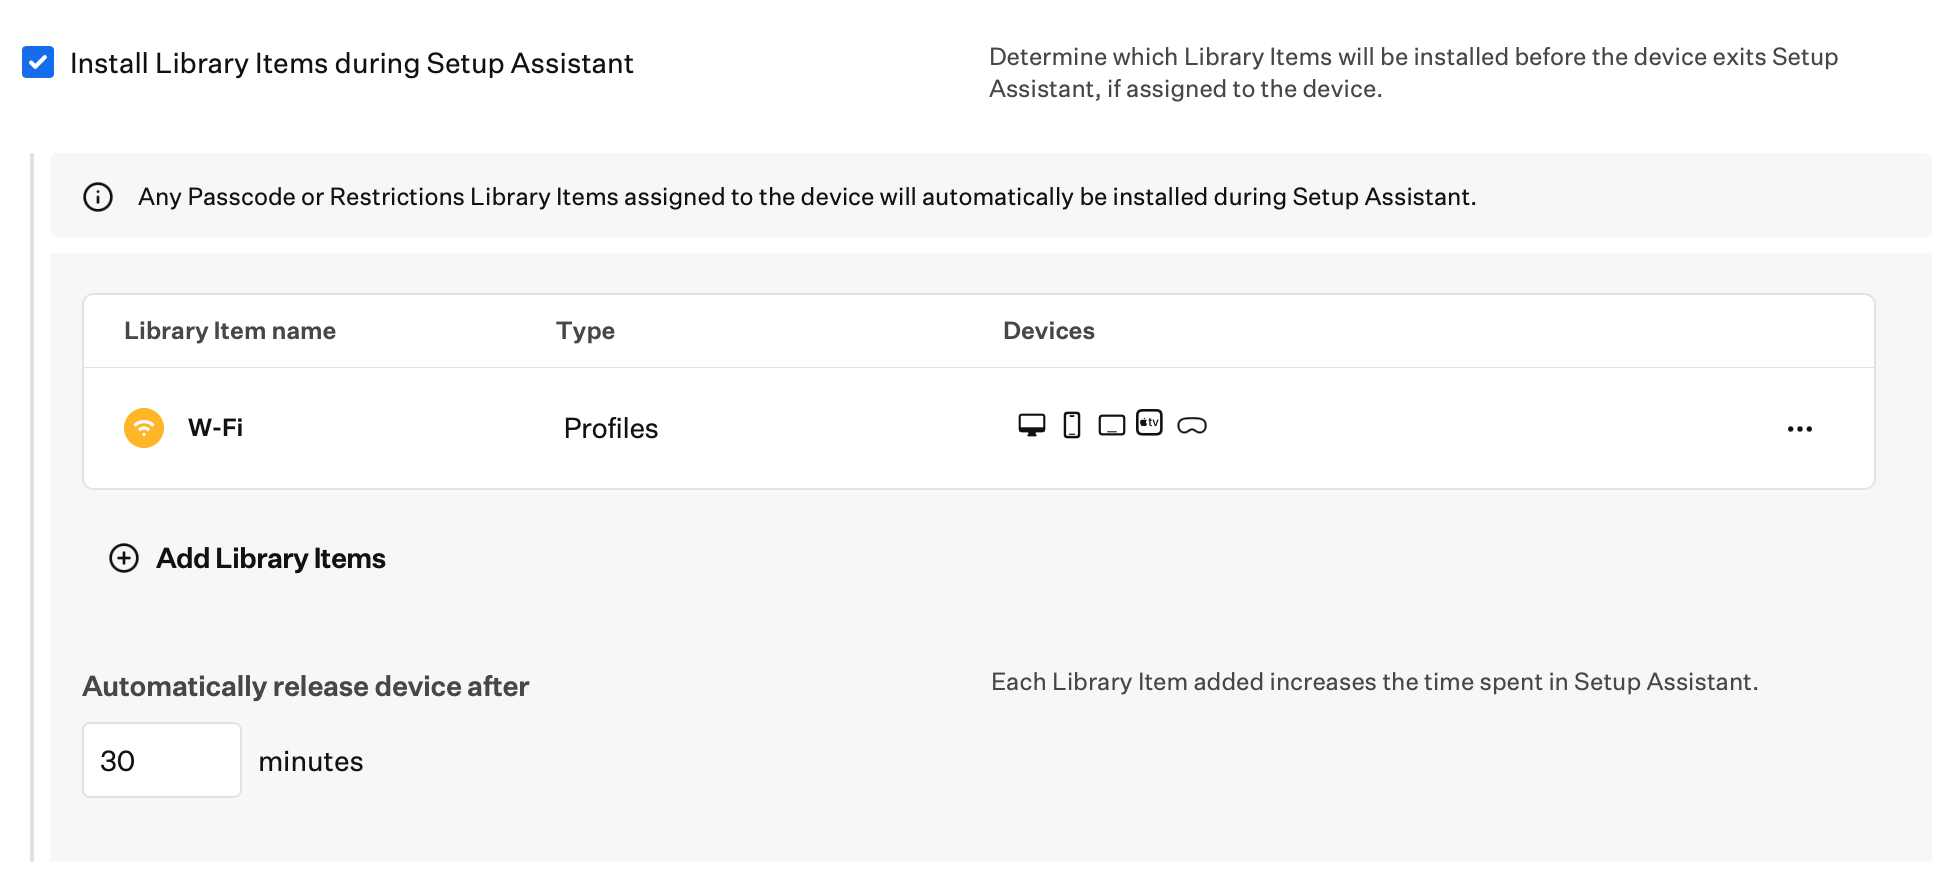
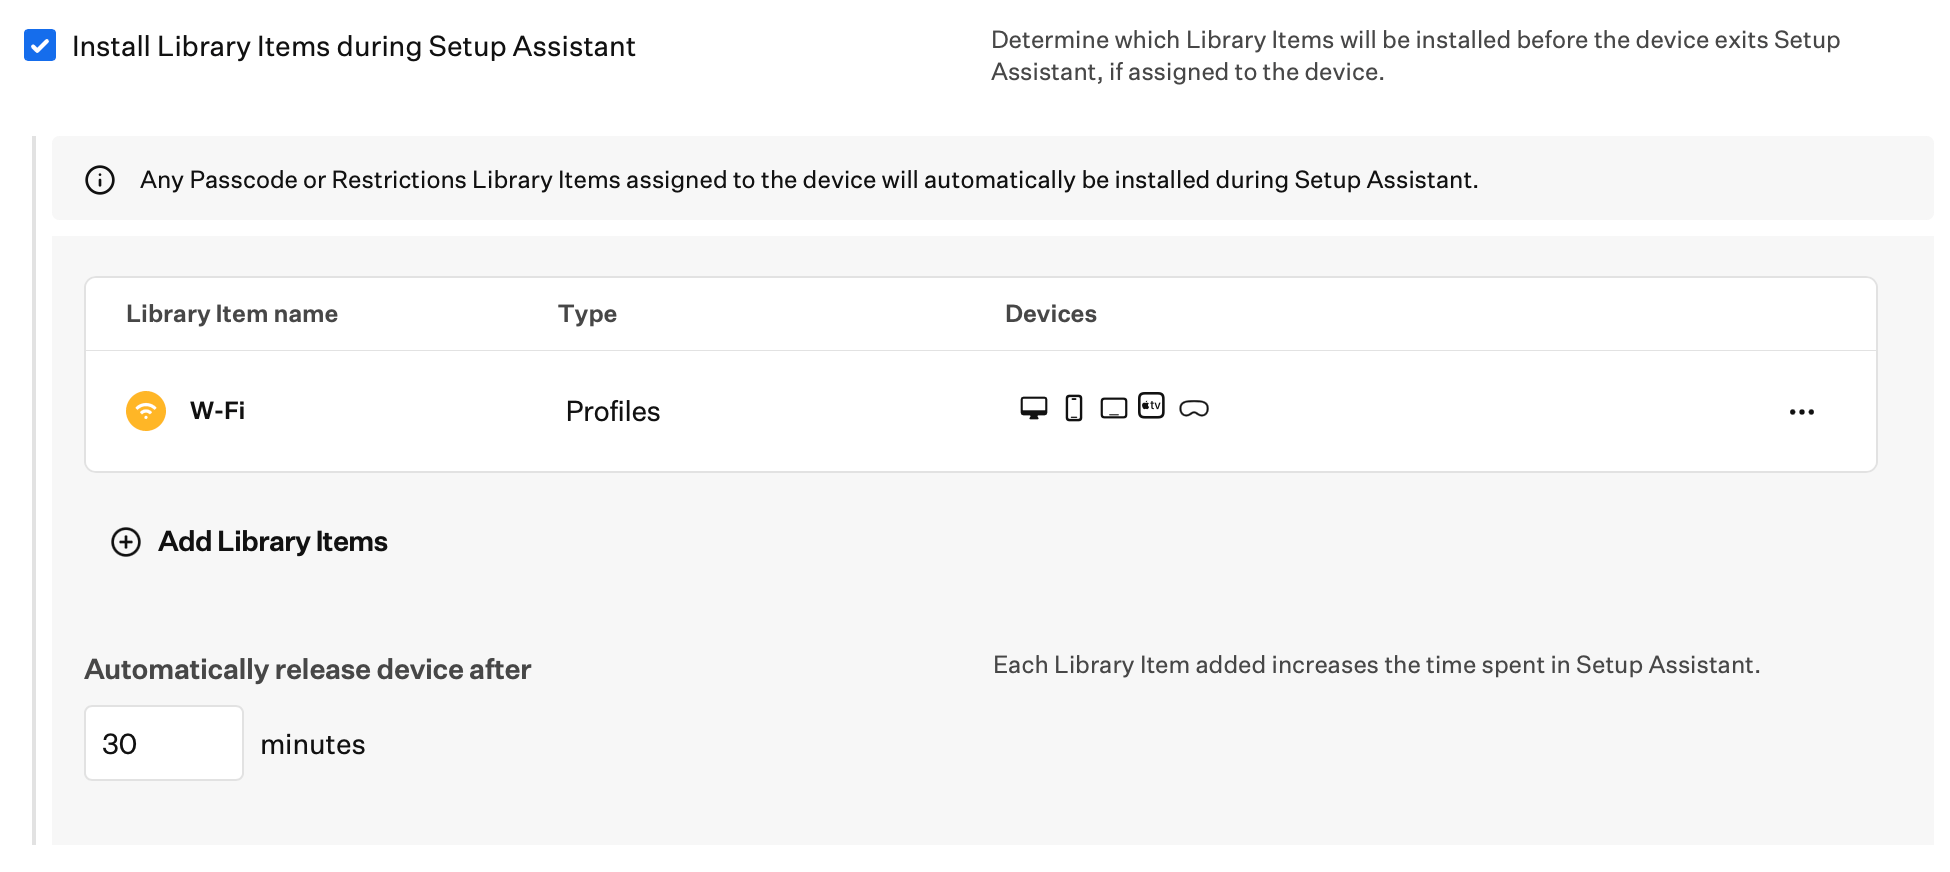
By default, the device is released from Setup Assistant after **15 minutes** if something blocks completion. You can change this fail-safe to any value from **1** to **120** minutes (two hours). The device leaves Setup Assistant when every selected Library Item is confirmed installed **or** when that maximum time is reached, whichever comes first. Each Library Item you add increases the time spent in Setup Assistant. If a device is stuck on **Configuring** before the timeout, you can [release the hold manually](#manually-release-devices-held-in-setup-assistant) from the device record.
**Install Library Items during Setup Assistant considerations**
For Mac onboarding you may also use the [Liftoff Library Item](/en/endpoint/library/library-items-profiles/configure-the-liftoff-library-item). These behaviors differ:
* **Enrollment scope**: **Install Library Items during Setup Assistant** applies only to devices enrolled through Automated Device Enrollment (ADE). It does not run on manually enrolled devices. Liftoff supports manual enrollment, ADE, or both, depending on the **Enrollment trigger** you choose in the Liftoff Library Item.
* **What gets installed**: For ADE, you explicitly choose which eligible Library Items install during Setup Assistant using **Select Library Items to require during Setup Assistant**. Liftoff does not offer that kind of pick list; it presents installation for the Library Item types Liftoff covers (see [How Liftoff Works](/en/endpoint/library/library-items-profiles/configure-the-liftoff-library-item#how-liftoff-works)), and all assignments of those types on the Blueprint follow Liftoff’s flow without per-item selection in Liftoff.
* **Using both on one Blueprint**: If you enable **Install Library Items during Setup Assistant** and assign Liftoff to the same Blueprint, Setup Assistant installs only the Library Items you selected for ADE. After Setup Assistant completes, Liftoff installs any Blueprint-assigned items within Liftoff’s scope that were not already installed during Setup Assistant.
Larger lists and app installs keep the user on a **Configuring**-style screen longer while downloads and installs finish. If you add many items, particularly applications, plan for longer setup times and stronger network conditions on the device.
Avoid assigning Library Items to **Install Library Items during Setup Assistant** when their installers or scripts depend on conditions that are not true during Setup Assistant. That includes scripts that wait for the Dock or a logged-in desktop user, long sleeps or wait loops, branching logic that only succeeds after setup completes, installers that trigger an immediate restart or auto-launch apps right after install, and anything else that can stall or compete with enrollment-time work. Items like these interrupt Setup Assistant and can leave people on **Configuring** with an unclear or uneven ADE experience.
Related options and behaviors documented elsewhere:
* **Mac Custom App**: [Restart after successful install](/en/endpoint/library/library-items-profiles/custom-apps-overview#restart); [Pre- and post-install scripts](/en/endpoint/library/library-items-profiles/custom-apps-overview#pre-and-post-install-scripts)
* **Custom Script**: [Restart after a successful execution](/en/endpoint/library/library-items-profiles/custom-scripts-overview#remediation-and-restart-options) (under **Restart Options**)
* **macOS Auto App**: [Options](/en/endpoint/library/auto-apps/understanding-auto-app-settings-for-macos#options) (includes **Add to Dock during install**, **Run preinstall script**, and **Run postinstall script**)
#### Manually release devices held in Setup Assistant
When a device is held in Setup Assistant, it stays on the **Configuring** screen while Apple reports it as awaiting configuration. The hold ends when required work finishes, when **Automatically release device after** is reached, or when you release it manually.
You can release any device that reports as awaiting configuration. That usually matters when:
* The device is enrolling with Automated Device Enrollment and [Install Library Items during Setup Assistant](#install-library-items-during-setup-assistant) is enabled, and a Library Item stalls (for example a large app download, a pending Apps and Books license, or poor connectivity).
* The device is migrating into Iru Endpoint with [App Preservation](#app-preservation), and Setup Assistant is waiting while managed apps are preserved.
**Release hold** sends Apple's DeviceConfigured MDM command so the device can continue through any remaining Setup Assistant panes. Supported on Mac, iPhone, iPad, Apple TV, and Vision.
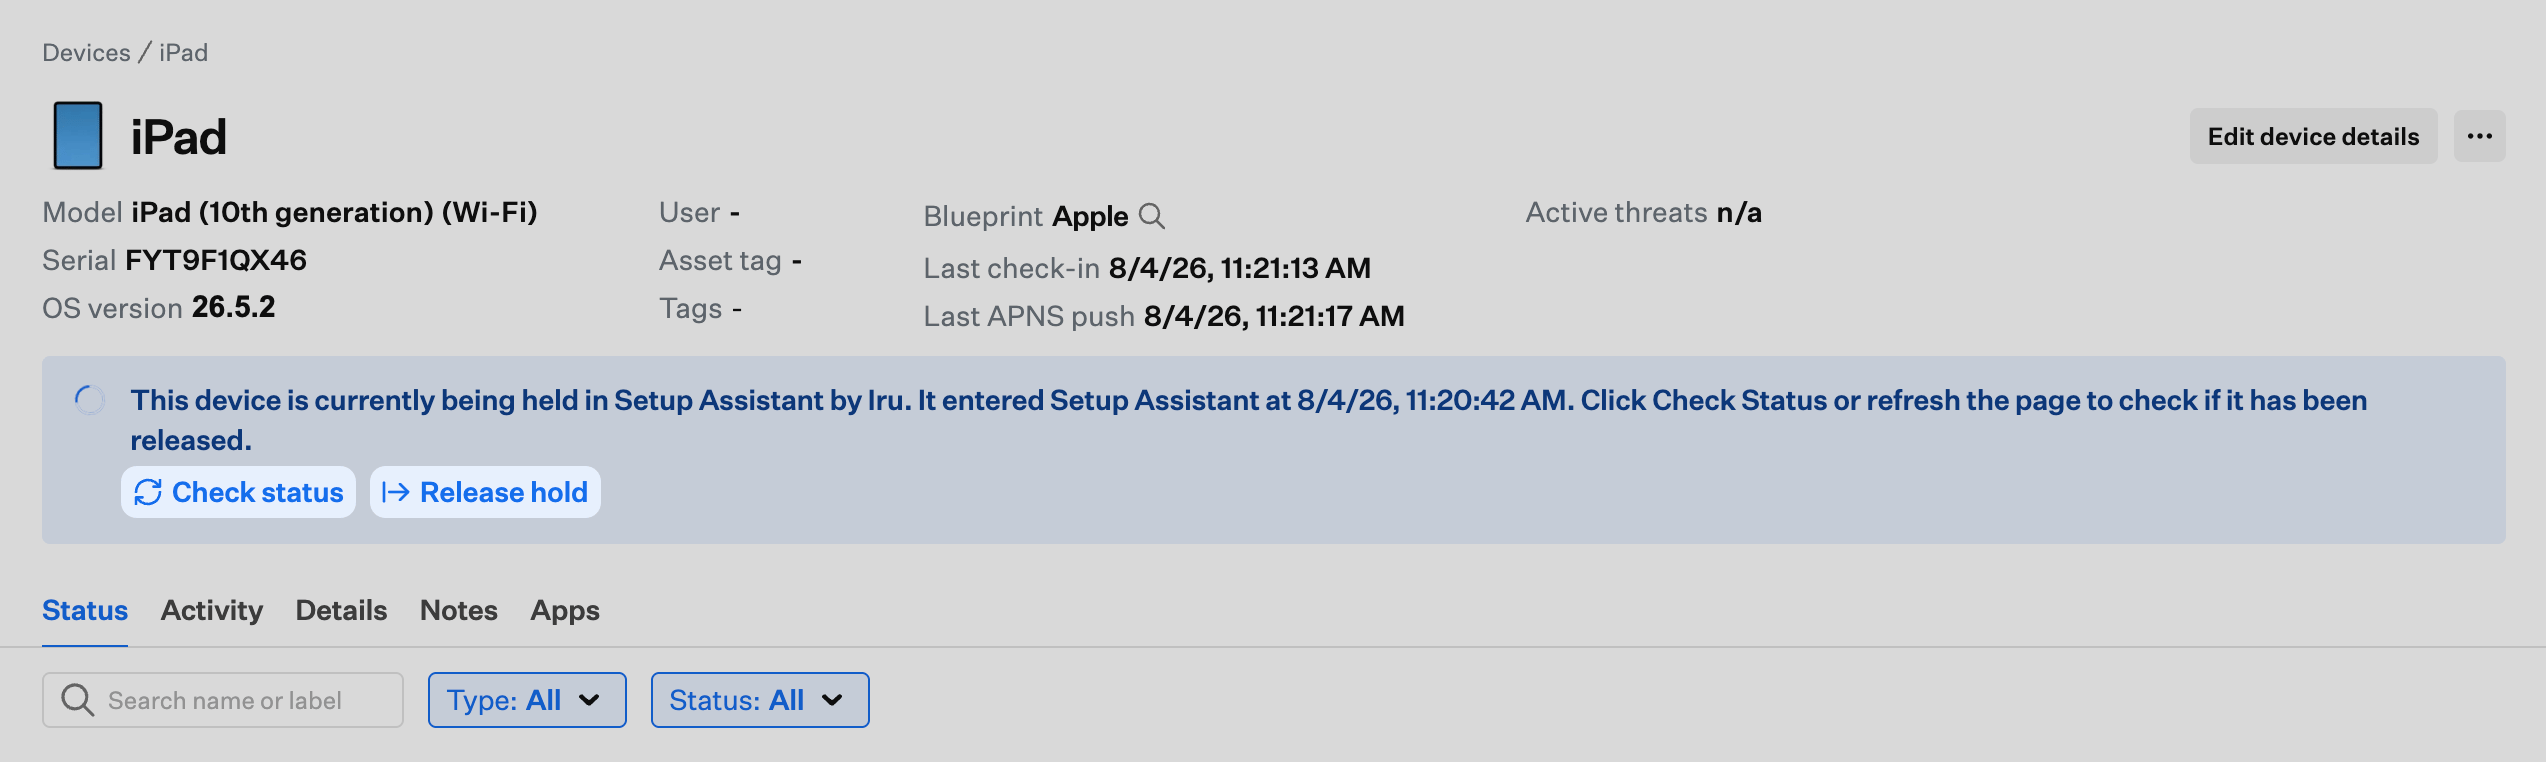
Go to **Devices** and open the device that is held in Setup Assistant. A banner at the top of the record shows when the hold began (in your local time zone).
Click **Release hold** to send the DeviceConfigured command. The device leaves the **Configuring** screen and continues Setup Assistant so the user can finish setup. While a release is in progress, **Release hold** is disabled so the command is not sent twice.
Click **Check status** to refresh the hold state without reloading the page. The banner clears after the device leaves Setup Assistant, whether you released it manually, the timeout released it, or required Library Items finished installing.
Only Library Items compatible with the platform section you are configuring appear. For example, if you add Library Items from the **iPhone** section, the list only shows items that support iPhone devices. Each row also shows the supported device types.
Passport does **not** appear in this drawer for Mac setup. Passport settings are not applied to the device as an install-time Library Item in Setup Assistant; Passport fetches its own settings.
By default, the device is released from Setup Assistant after **15 minutes** if something blocks completion. You can change this fail-safe to any value from **1** to **120** minutes (two hours). The device leaves Setup Assistant when every selected Library Item is confirmed installed **or** when that maximum time is reached, whichever comes first. Each Library Item you add increases the time spent in Setup Assistant. If a device is stuck on **Configuring** before the timeout, you can [release the hold manually](#manually-release-devices-held-in-setup-assistant) from the device record.
**Install Library Items during Setup Assistant considerations**
For Mac onboarding you may also use the [Liftoff Library Item](/en/endpoint/library/library-items-profiles/configure-the-liftoff-library-item). These behaviors differ:
* **Enrollment scope**: **Install Library Items during Setup Assistant** applies only to devices enrolled through Automated Device Enrollment (ADE). It does not run on manually enrolled devices. Liftoff supports manual enrollment, ADE, or both, depending on the **Enrollment trigger** you choose in the Liftoff Library Item.
* **What gets installed**: For ADE, you explicitly choose which eligible Library Items install during Setup Assistant using **Select Library Items to require during Setup Assistant**. Liftoff does not offer that kind of pick list; it presents installation for the Library Item types Liftoff covers (see [How Liftoff Works](/en/endpoint/library/library-items-profiles/configure-the-liftoff-library-item#how-liftoff-works)), and all assignments of those types on the Blueprint follow Liftoff’s flow without per-item selection in Liftoff.
* **Using both on one Blueprint**: If you enable **Install Library Items during Setup Assistant** and assign Liftoff to the same Blueprint, Setup Assistant installs only the Library Items you selected for ADE. After Setup Assistant completes, Liftoff installs any Blueprint-assigned items within Liftoff’s scope that were not already installed during Setup Assistant.
Larger lists and app installs keep the user on a **Configuring**-style screen longer while downloads and installs finish. If you add many items, particularly applications, plan for longer setup times and stronger network conditions on the device.
Avoid assigning Library Items to **Install Library Items during Setup Assistant** when their installers or scripts depend on conditions that are not true during Setup Assistant. That includes scripts that wait for the Dock or a logged-in desktop user, long sleeps or wait loops, branching logic that only succeeds after setup completes, installers that trigger an immediate restart or auto-launch apps right after install, and anything else that can stall or compete with enrollment-time work. Items like these interrupt Setup Assistant and can leave people on **Configuring** with an unclear or uneven ADE experience.
Related options and behaviors documented elsewhere:
* **Mac Custom App**: [Restart after successful install](/en/endpoint/library/library-items-profiles/custom-apps-overview#restart); [Pre- and post-install scripts](/en/endpoint/library/library-items-profiles/custom-apps-overview#pre-and-post-install-scripts)
* **Custom Script**: [Restart after a successful execution](/en/endpoint/library/library-items-profiles/custom-scripts-overview#remediation-and-restart-options) (under **Restart Options**)
* **macOS Auto App**: [Options](/en/endpoint/library/auto-apps/understanding-auto-app-settings-for-macos#options) (includes **Add to Dock during install**, **Run preinstall script**, and **Run postinstall script**)
#### Manually release devices held in Setup Assistant
When a device is held in Setup Assistant, it stays on the **Configuring** screen while Apple reports it as awaiting configuration. The hold ends when required work finishes, when **Automatically release device after** is reached, or when you release it manually.
You can release any device that reports as awaiting configuration. That usually matters when:
* The device is enrolling with Automated Device Enrollment and [Install Library Items during Setup Assistant](#install-library-items-during-setup-assistant) is enabled, and a Library Item stalls (for example a large app download, a pending Apps and Books license, or poor connectivity).
* The device is migrating into Iru Endpoint with [App Preservation](#app-preservation), and Setup Assistant is waiting while managed apps are preserved.
**Release hold** sends Apple's DeviceConfigured MDM command so the device can continue through any remaining Setup Assistant panes. Supported on Mac, iPhone, iPad, Apple TV, and Vision.
Go to **Devices** and open the device that is held in Setup Assistant. A banner at the top of the record shows when the hold began (in your local time zone).
Click **Release hold** to send the DeviceConfigured command. The device leaves the **Configuring** screen and continues Setup Assistant so the user can finish setup. While a release is in progress, **Release hold** is disabled so the command is not sent twice.
Click **Check status** to refresh the hold state without reloading the page. The banner clears after the device leaves Setup Assistant, whether you released it manually, the timeout released it, or required Library Items finished installing.
 You can also send the release with the Iru Enterprise API.
**Manual release considerations**
* Use manual release when a device is stuck, not as the usual way to finish enrollment. Library Items that had not finished installing continue through the device's Blueprint after Setup Assistant completes.
* **Release hold** appears only while the device reports as awaiting configuration. If the device is not held, the command returns an error, including when you send it through the Enterprise API.
* The banner does not refresh on its own. Use **Check status** or reload the page to confirm the device was released.
* For Apple's command reference, see [DeviceConfigured](https://developer.apple.com/documentation/devicemanagement/device-configured-command).
#### Require Minimum OS Version
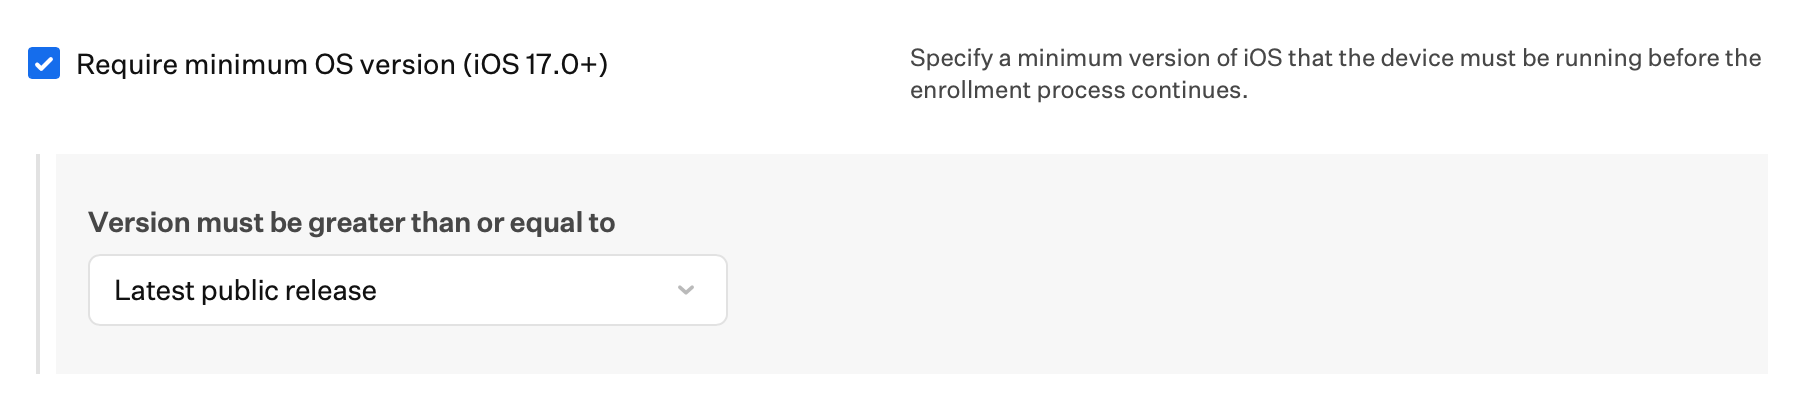
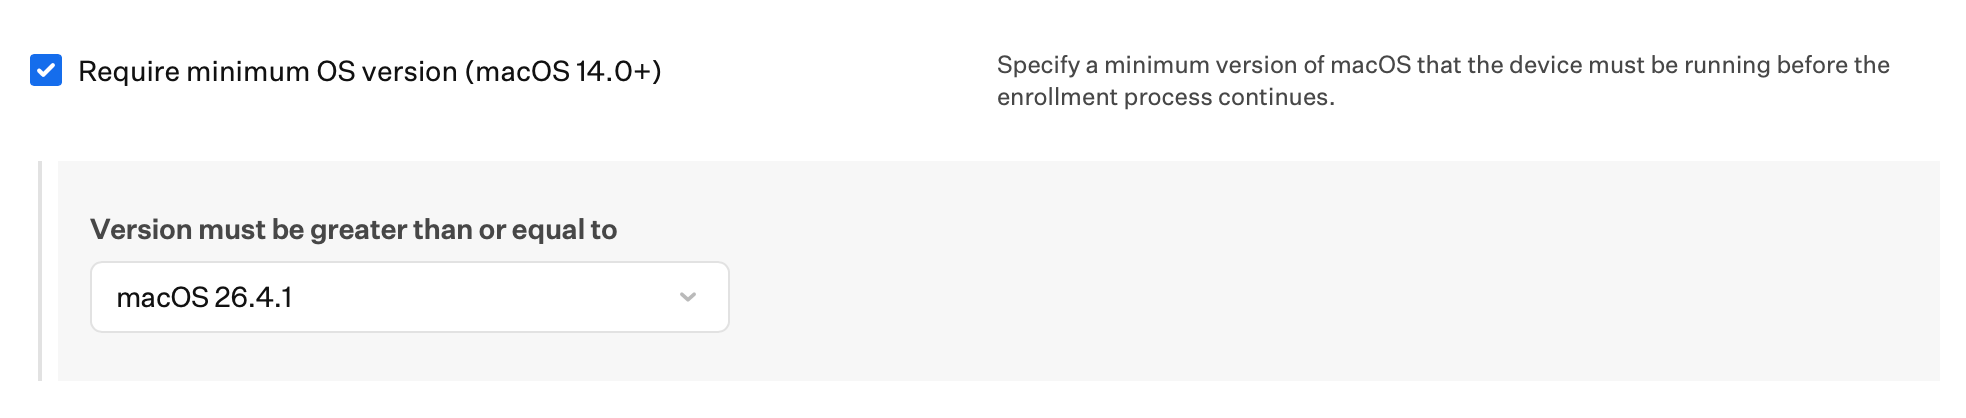
In the **Mac**, **iPhone**, and **iPad** sections of the Automated Device Enrollment Library Item, **Require minimum OS version** tells the device to finish an operating system update *before* enrollment completes. You set the required minimum OS version in those sections. Apple runs that update during Setup Assistant. This is separate from Managed OS policies you configure for after enrollment.
Choose **Version must be greater than or equal to** for a specific OS version, **Latest public release** for the newest public release from Apple (Mac, iPhone, and iPad), or **Custom** with **This is a beta version** and a **Seed Token** for beta enrollment. This is the same flow as [Managed OS **Enforce a Specific Version**](/en/endpoint/library/managed-os/configure-managed-os-for-macos#enforce-a-specific-version). For beta targets, Iru applies **Software Update Settings** (beta enrollment) and then **Software Update Enforcement** (to the specified version) during enrollment. Use this option when the beta upgrade or update must finish *before* the device enrolls into Iru Endpoint. For Managed OS and Software Update Library Item options after enrollment, see [Testing Apple Beta Releases](/en/endpoint/devices/device-configurations/apple/testing-apple-beta-releases#ways-to-manage-apple-beta-program-enrollment).
The **Seed Token** list can be long and difficult to navigate.
Changing this option for a device type takes effect without resyncing ADE settings to Apple.
You can also send the release with the Iru Enterprise API.
**Manual release considerations**
* Use manual release when a device is stuck, not as the usual way to finish enrollment. Library Items that had not finished installing continue through the device's Blueprint after Setup Assistant completes.
* **Release hold** appears only while the device reports as awaiting configuration. If the device is not held, the command returns an error, including when you send it through the Enterprise API.
* The banner does not refresh on its own. Use **Check status** or reload the page to confirm the device was released.
* For Apple's command reference, see [DeviceConfigured](https://developer.apple.com/documentation/devicemanagement/device-configured-command).
#### Require Minimum OS Version
In the **Mac**, **iPhone**, and **iPad** sections of the Automated Device Enrollment Library Item, **Require minimum OS version** tells the device to finish an operating system update *before* enrollment completes. You set the required minimum OS version in those sections. Apple runs that update during Setup Assistant. This is separate from Managed OS policies you configure for after enrollment.
Choose **Version must be greater than or equal to** for a specific OS version, **Latest public release** for the newest public release from Apple (Mac, iPhone, and iPad), or **Custom** with **This is a beta version** and a **Seed Token** for beta enrollment. This is the same flow as [Managed OS **Enforce a Specific Version**](/en/endpoint/library/managed-os/configure-managed-os-for-macos#enforce-a-specific-version). For beta targets, Iru applies **Software Update Settings** (beta enrollment) and then **Software Update Enforcement** (to the specified version) during enrollment. Use this option when the beta upgrade or update must finish *before* the device enrolls into Iru Endpoint. For Managed OS and Software Update Library Item options after enrollment, see [Testing Apple Beta Releases](/en/endpoint/devices/device-configurations/apple/testing-apple-beta-releases#ways-to-manage-apple-beta-program-enrollment).
The **Seed Token** list can be long and difficult to navigate.
Changing this option for a device type takes effect without resyncing ADE settings to Apple.
 #### App Preservation
For **iPhone** and **iPad** devices running iOS 26+ and iPadOS 26+, you can enable **Preserve managed apps during migration** so that when devices are migrated from another device management service to Iru Endpoint, any apps installed on the migrating device that are also present in the device's new Iru Blueprint (and their associated data) remain installed and configured on the device after migration. This avoids re-downloading business-critical apps and preserves user data. Use the **Preserve managed apps during migration** checkbox in the **iPhone** and **iPad** device sections. For more information, see [App Preservation](/en/endpoint/enrollment/apple/device-management-migration#app-preservation) in the Device Management Migration article. While apps are being preserved, the device can be held in Setup Assistant. See [Manually release devices held in Setup Assistant](#manually-release-devices-held-in-setup-assistant) if you need to end the hold early.
#### App Preservation
For **iPhone** and **iPad** devices running iOS 26+ and iPadOS 26+, you can enable **Preserve managed apps during migration** so that when devices are migrated from another device management service to Iru Endpoint, any apps installed on the migrating device that are also present in the device's new Iru Blueprint (and their associated data) remain installed and configured on the device after migration. This avoids re-downloading business-critical apps and preserves user data. Use the **Preserve managed apps during migration** checkbox in the **iPhone** and **iPad** device sections. For more information, see [App Preservation](/en/endpoint/enrollment/apple/device-management-migration#app-preservation) in the Device Management Migration article. While apps are being preserved, the device can be held in Setup Assistant. See [Manually release devices held in Setup Assistant](#manually-release-devices-held-in-setup-assistant) if you need to end the hold early.
 ### Mac
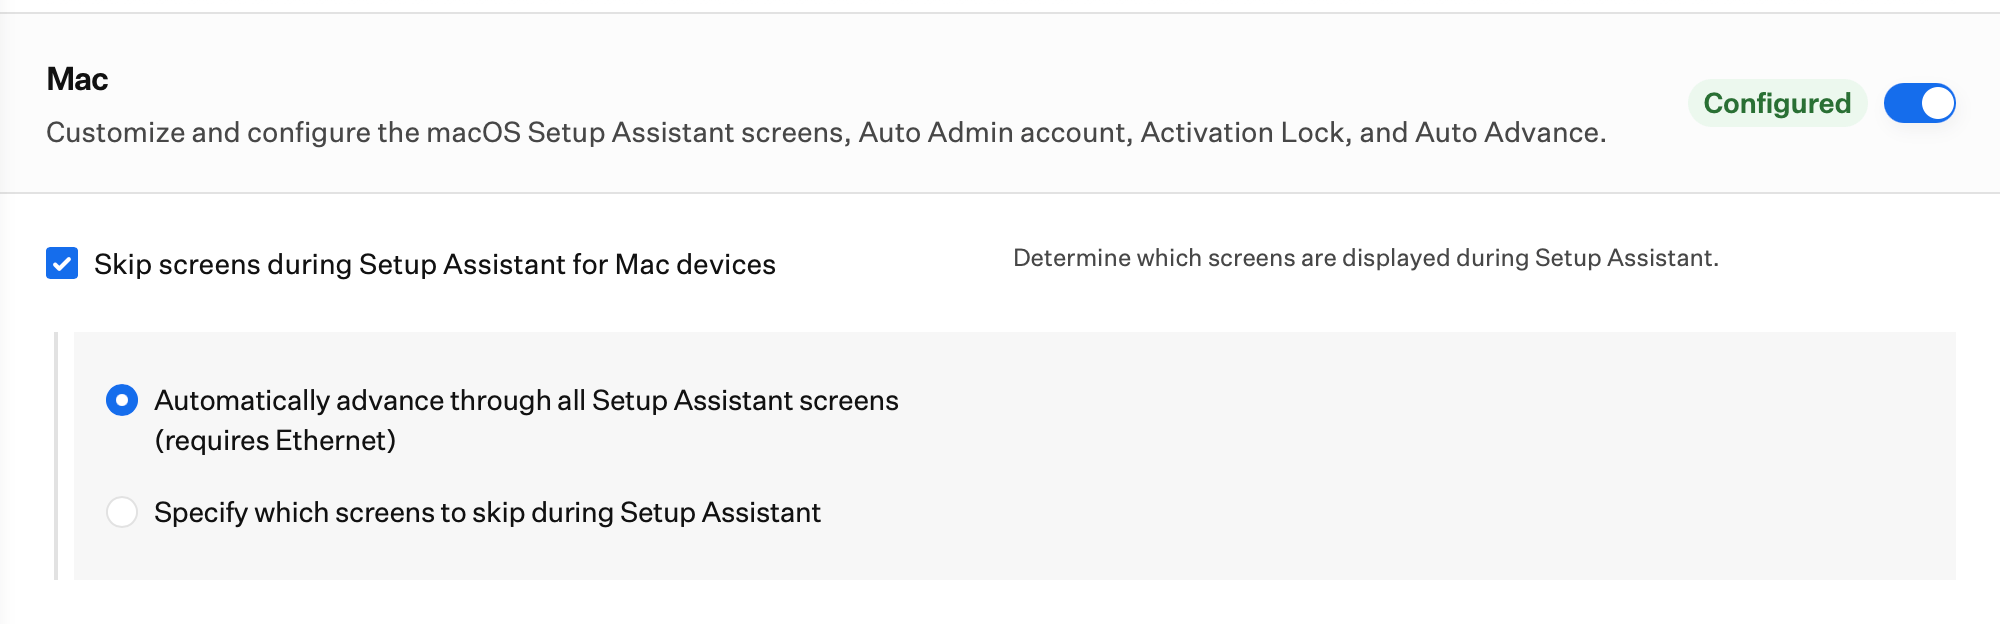
Customize the setup experience and configuration for Mac computers. It is recommended not to skip the Location Services unless your organization has a specific need. Location services are leveraged to set the Time Zone and other location-dependent settings.
Configure the Setup Assistant screens to skip for Mac computers during Automated Device Enrollment. You can skip specific screens or Auto Advance through Setup Assistant.
### Mac
Customize the setup experience and configuration for Mac computers. It is recommended not to skip the Location Services unless your organization has a specific need. Location services are leveraged to set the Time Zone and other location-dependent settings.
Configure the Setup Assistant screens to skip for Mac computers during Automated Device Enrollment. You can skip specific screens or Auto Advance through Setup Assistant.
 In the **Mac** section, enable **Install Library Items during Setup Assistant** when installs from this section's list must finish during enrollment setup. See [Install Library Items during Setup Assistant](#install-library-items-during-setup-assistant) for the install experience, building the list, and timeouts.
 Use **Activation Lock** to choose whether an end user may enable user-based Activation Lock with Find My and a personal [Apple Account](/en/endpoint/enrollment/apple/apple-accounts-overview).
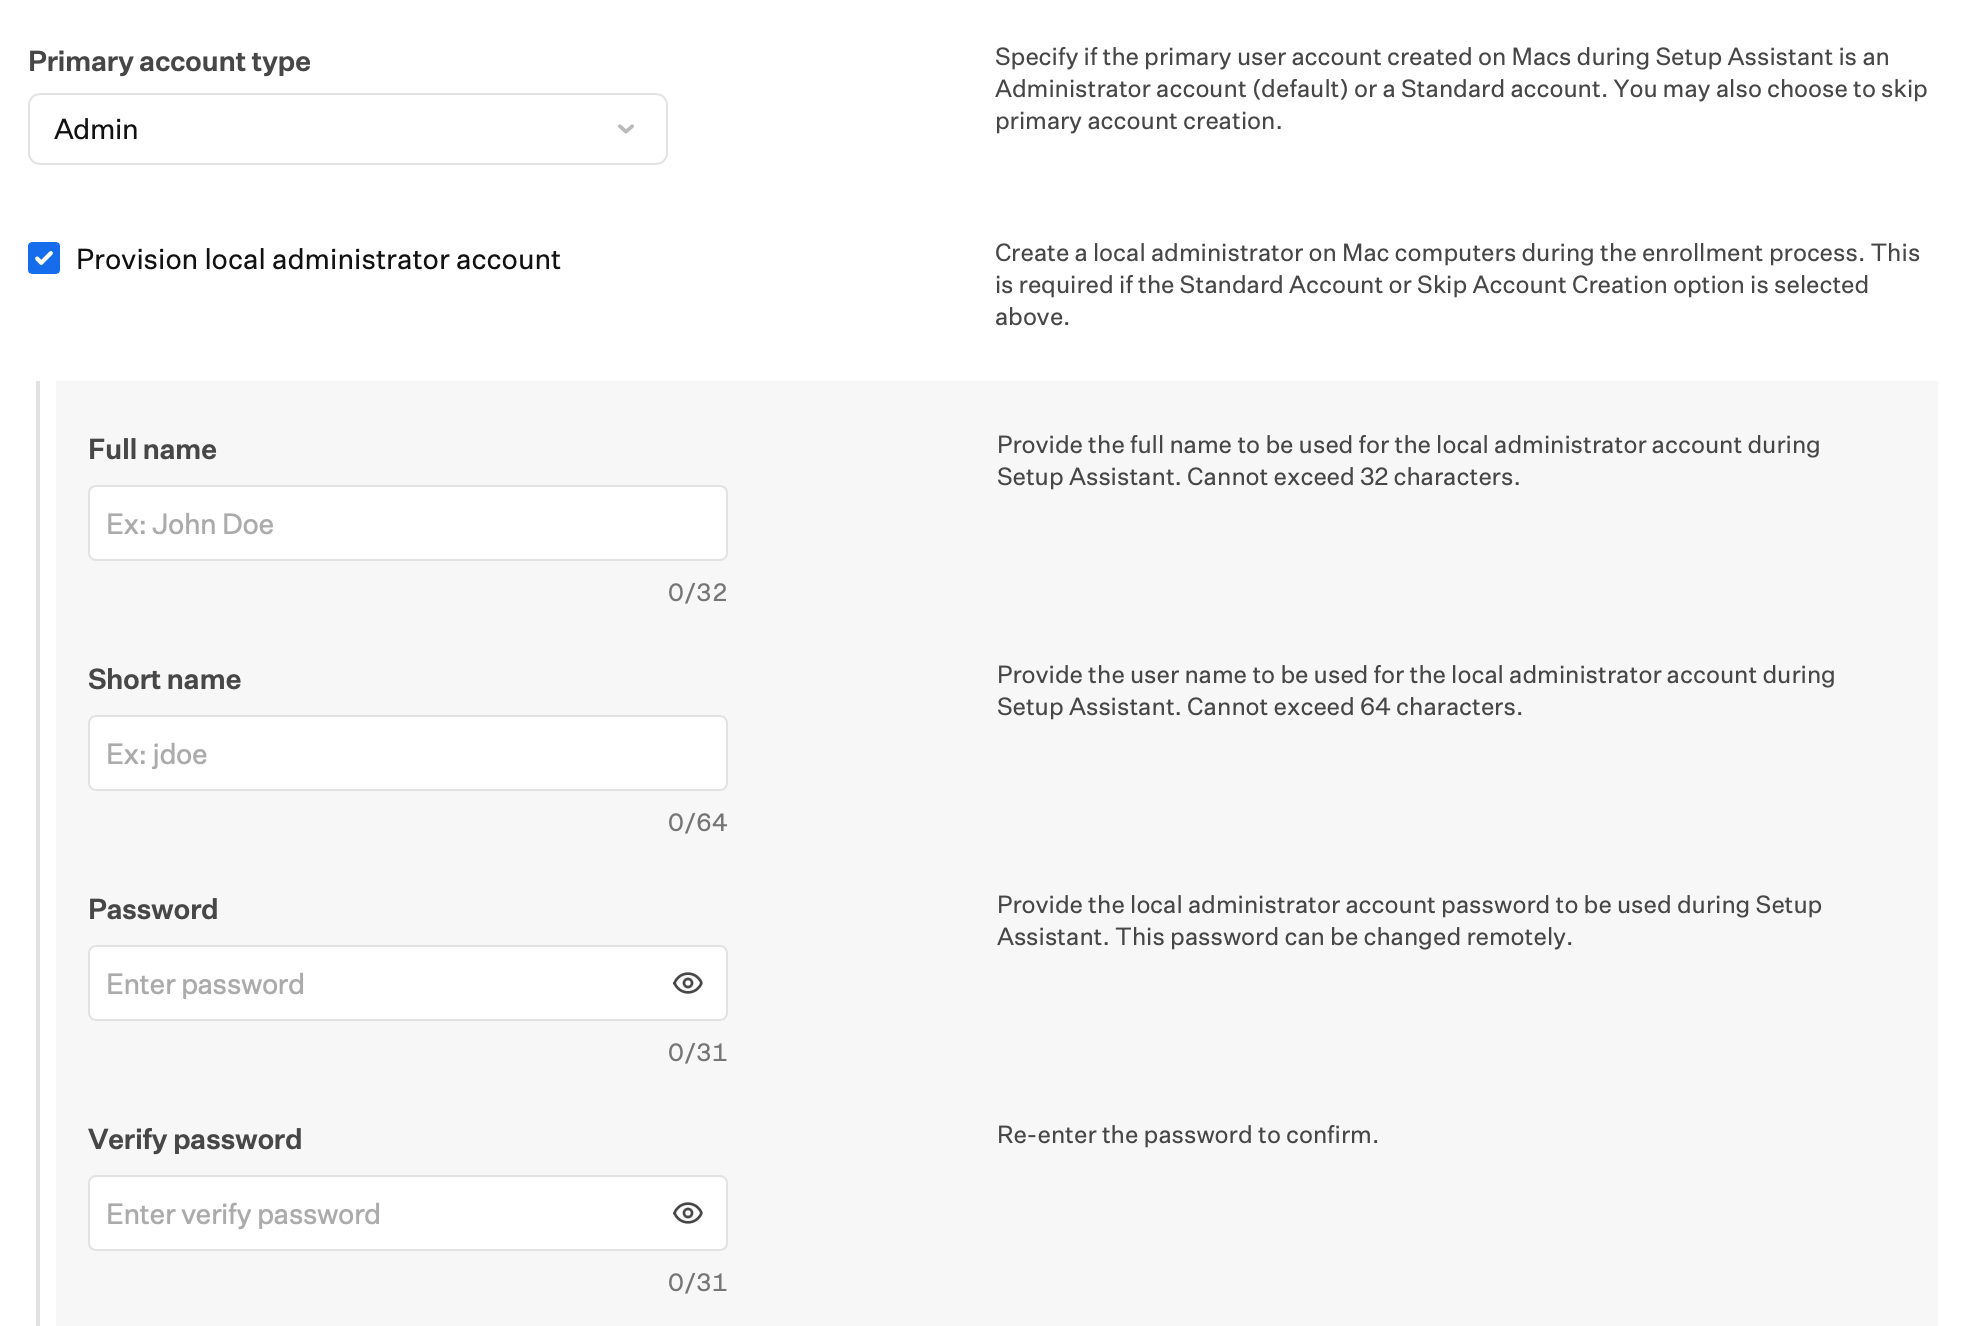
 Use **Primary account type** to choose whether the first account created during Setup Assistant is an administrator account, a standard account, or whether account creation is skipped. If the primary account is a standard user, you must provision an additional local administrator (see the next step).
If you deploy **Passport**, you should also skip primary account creation so the user account can be created after Setup Assistant through the Passport sign-in flow. For more information, see [Passport compatibility with macOS and Iru Endpoint features](/en/endpoint/library/passport/passport-compatibility-with-macos-and-iru-endpoint-features#primary-account-creation).
Optionally turn on **Provision local administrator account** to create a local administrator during enrollment. This is required if the primary account is a standard user or if you skip creating the primary account during Setup Assistant.
Global Variables can be leveraged in the **Full name** and **Short name** fields. Such as \$FULL\_NAME or \$EMAIL\_PREFIX. This can be useful if you are requiring authentication and automatically assigning the user to the device record.
Global Variables cannot be used for the **Password**.
Use **Primary account type** to choose whether the first account created during Setup Assistant is an administrator account, a standard account, or whether account creation is skipped. If the primary account is a standard user, you must provision an additional local administrator (see the next step).
If you deploy **Passport**, you should also skip primary account creation so the user account can be created after Setup Assistant through the Passport sign-in flow. For more information, see [Passport compatibility with macOS and Iru Endpoint features](/en/endpoint/library/passport/passport-compatibility-with-macos-and-iru-endpoint-features#primary-account-creation).
Optionally turn on **Provision local administrator account** to create a local administrator during enrollment. This is required if the primary account is a standard user or if you skip creating the primary account during Setup Assistant.
Global Variables can be leveraged in the **Full name** and **Short name** fields. Such as \$FULL\_NAME or \$EMAIL\_PREFIX. This can be useful if you are requiring authentication and automatically assigning the user to the device record.
Global Variables cannot be used for the **Password**.
 Hide the additional administrator account if desired by selecting **Hide Account**.
Select **MDM-enabled user** when the additional local administrator account (auto admin) should be the account designated for user-level MDM profiles. You are choosing which account MDM applies user-channel management to; that account still must register as the MDM-enabled user through an interactive sign-in as described in the warning below.
In the rare case where the auto admin account is the primary user of the Mac, still select **MDM-enabled user** so the additional administrator account remains the one specified for user-level MDM profiles.
If you turn on **MDM-enabled user**, the additional local administrator (auto admin) account does not register as the MDM-enabled user until someone signs in to that account at the Mac login window using the keyboard (enter the auto admin user name and password).
This option is uncommon and may cause problems in your environment. [Contact Iru Support](/en/iru/iru-support/access-to-iru-support) before you enable it.
Hide the additional administrator account if desired by selecting **Hide Account**.
Select **MDM-enabled user** when the additional local administrator account (auto admin) should be the account designated for user-level MDM profiles. You are choosing which account MDM applies user-channel management to; that account still must register as the MDM-enabled user through an interactive sign-in as described in the warning below.
In the rare case where the auto admin account is the primary user of the Mac, still select **MDM-enabled user** so the additional administrator account remains the one specified for user-level MDM profiles.
If you turn on **MDM-enabled user**, the additional local administrator (auto admin) account does not register as the MDM-enabled user until someone signs in to that account at the Mac login window using the keyboard (enter the auto admin user name and password).
This option is uncommon and may cause problems in your environment. [Contact Iru Support](/en/iru/iru-support/access-to-iru-support) before you enable it.
 Optionally use [**Require a minimum OS version**](#require-minimum-os-version). When the option is on, set **Version must be greater than or equal to** to a specific macOS version, to **Latest public release** to require the newest public macOS from Apple, or to **Custom** with **This is a beta version** and a **Seed Token** for beta enrollment during setup. If the installed macOS version does not meet that requirement, Setup Assistant shows a **Software Update** pane with a **60** second countdown before the device updates to a macOS version that meets the requirement.
 **Options for Automatically advance through all Setup Assistant screens**
The following two options are available only when **Automatically advance through all Setup Assistant screens** is selected. Both require Ethernet: **Set region for Mac devices** and **Set language for Mac devices**.
Setting the region and language allows a new Mac to enroll and set itself up automatically, without anyone touching the keyboard and mouse. It may take a few minutes from the time the Mac starts up until the Auto-advance process begins. Resist the temptation to touch it!
Specify the region for Mac devices.
**Options for Automatically advance through all Setup Assistant screens**
The following two options are available only when **Automatically advance through all Setup Assistant screens** is selected. Both require Ethernet: **Set region for Mac devices** and **Set language for Mac devices**.
Setting the region and language allows a new Mac to enroll and set itself up automatically, without anyone touching the keyboard and mouse. It may take a few minutes from the time the Mac starts up until the Auto-advance process begins. Resist the temptation to touch it!
Specify the region for Mac devices.
 Specify the language for Mac devices.
 ### iPhone
Customize the setup experience and configuration for iPhone devices. It is recommended not to skip the Location Services unless your organization has a specific need. Location services are leveraged to set the Time Zone and other location-dependent settings.
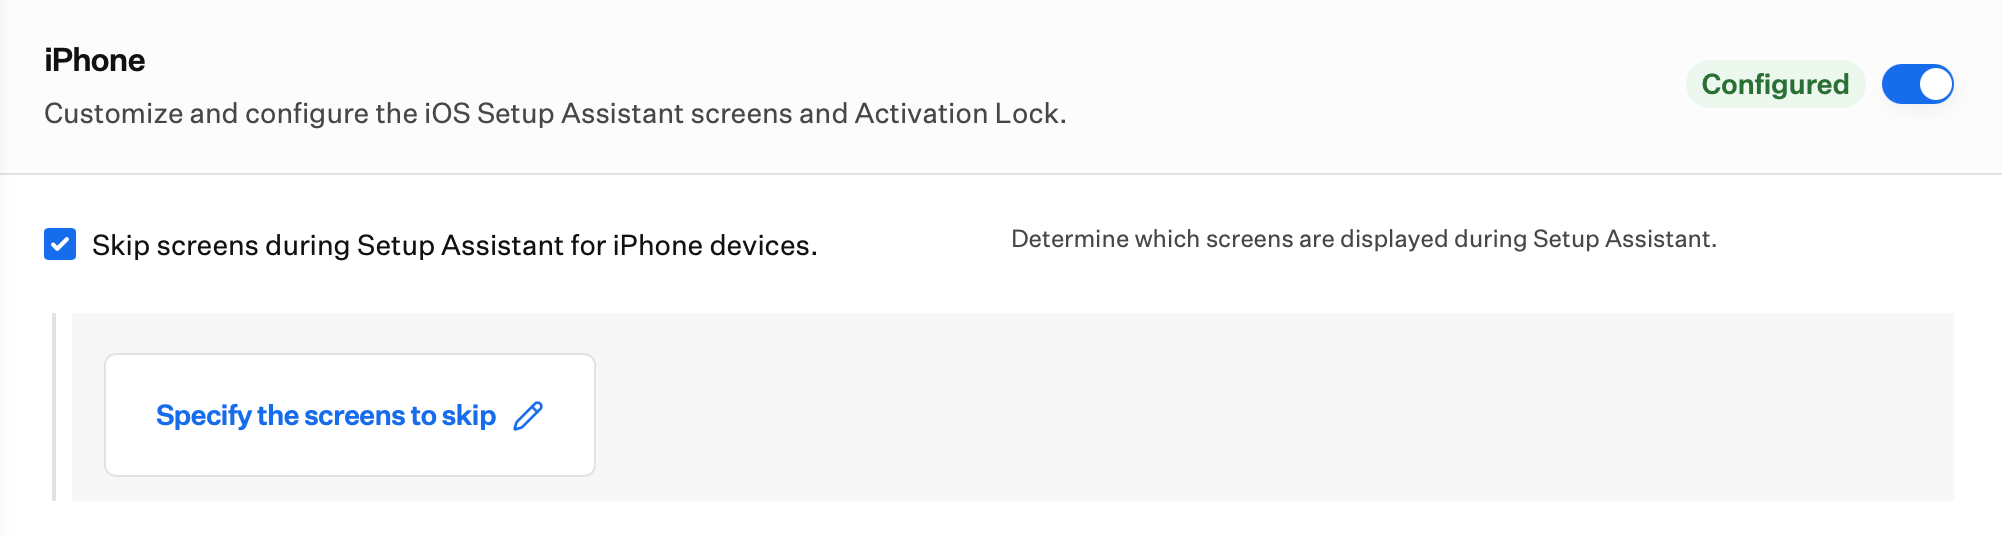
Use **Skip screens during Setup Assistant for iPhone devices** to choose which Setup Assistant screens appear. When skipping is enabled, select **Specify the screens to skip** to edit the list. You can skip specific screens or specify current and future Setup Assistant panes.
**Skip all Setup Assistant screens** does not auto-advance through Setup Assistant. Auto-advance is only available in macOS and tvOS.
### iPhone
Customize the setup experience and configuration for iPhone devices. It is recommended not to skip the Location Services unless your organization has a specific need. Location services are leveraged to set the Time Zone and other location-dependent settings.
Use **Skip screens during Setup Assistant for iPhone devices** to choose which Setup Assistant screens appear. When skipping is enabled, select **Specify the screens to skip** to edit the list. You can skip specific screens or specify current and future Setup Assistant panes.
**Skip all Setup Assistant screens** does not auto-advance through Setup Assistant. Auto-advance is only available in macOS and tvOS.
 In the **iPhone** section, enable **Install Library Items during Setup Assistant** when installs from this section's list must finish during enrollment setup. See [Install Library Items during Setup Assistant](#install-library-items-during-setup-assistant) for the install experience, building the list, and timeouts.
 Optionally enable **Prevent MDM profile installation when restoring from backup**. When it is on, the MDM profile is not installed from a backup restored onto the same device; the device installs its MDM profile through Automated Device Enrollment instead.
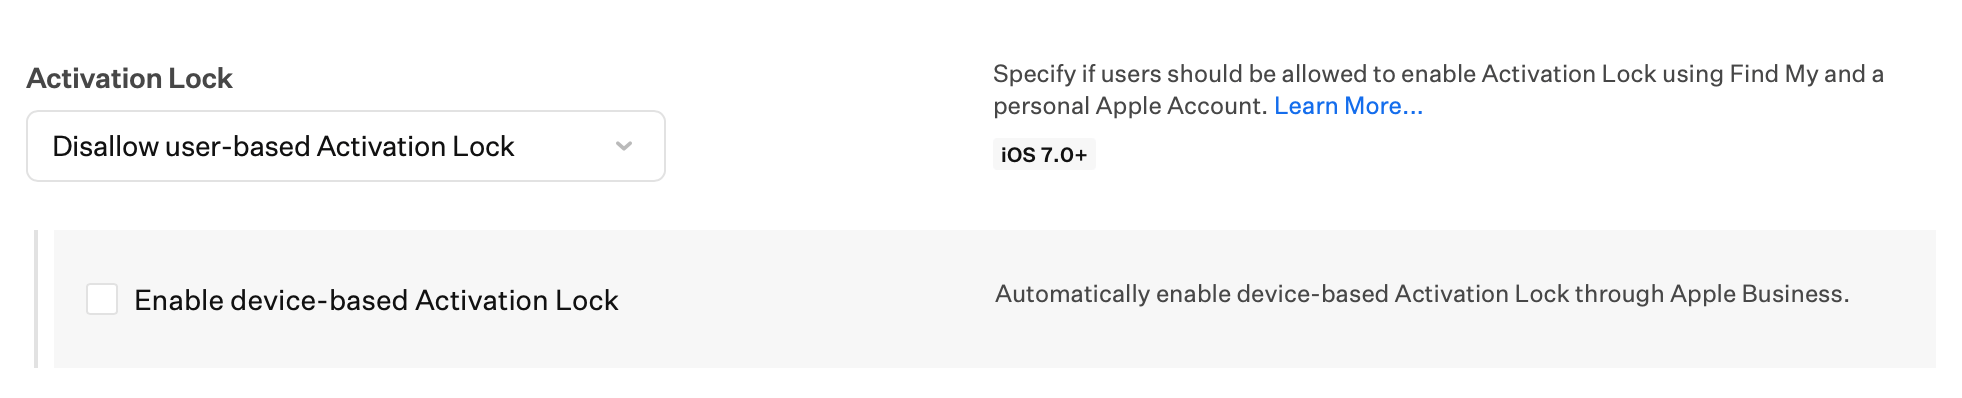
 Use **Activation Lock** to choose whether users may enable user-based Activation Lock with Find My and a personal Apple Account.
Optionally turn on **Enable device-based Activation Lock** to enable device-based Activation Lock through Apple Business or Apple School Manager.
Use **Activation Lock** to choose whether users may enable user-based Activation Lock with Find My and a personal Apple Account.
Optionally turn on **Enable device-based Activation Lock** to enable device-based Activation Lock through Apple Business or Apple School Manager.
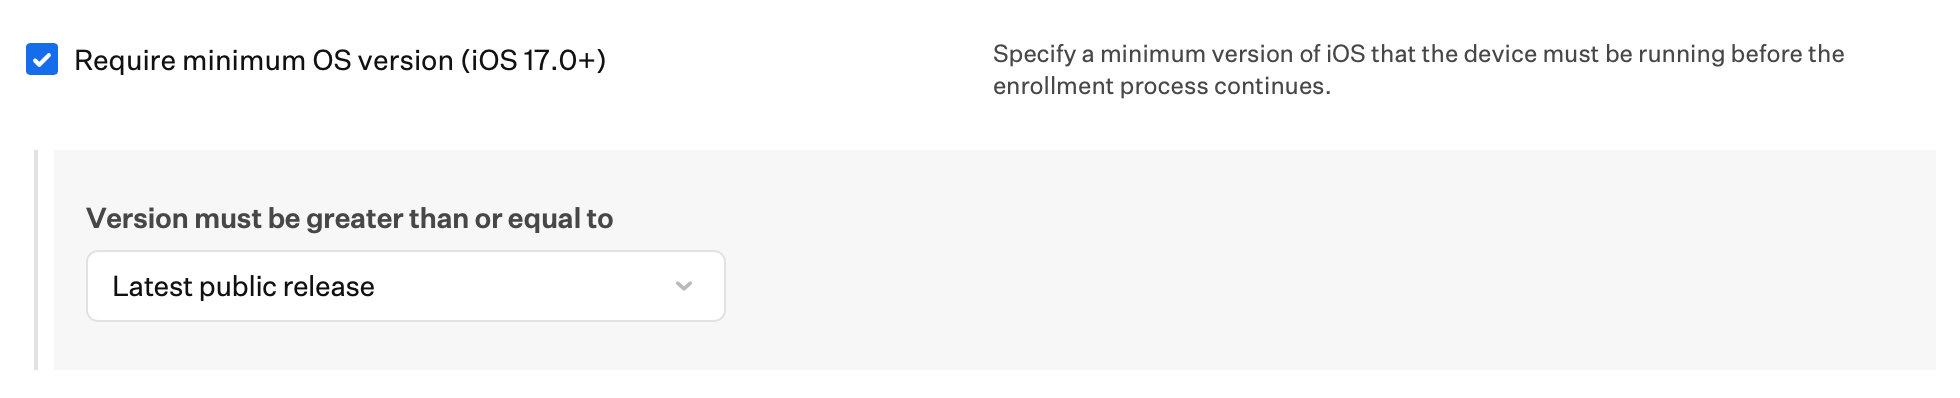
 Optionally use [**Require a minimum OS version**](#require-minimum-os-version). When the option is on, set **Version must be greater than or equal to** to a specific iOS version, to **Latest public release** to require the newest public iOS from Apple, or to **Custom** with **This is a beta version** and a **Seed Token** for beta enrollment during setup.
If the installed version is below that minimum, Setup Assistant presents **Software Update** so the device can update before enrollment completes. The value in **Version must be greater than or equal to** is the minimum the device must meet before setup continues; it is not the OS build **Software Update** will install. When an update is required, Apple installs the **latest public release** available for that device. The list selection does not cap the update to that exact version.
Optionally use [**Require a minimum OS version**](#require-minimum-os-version). When the option is on, set **Version must be greater than or equal to** to a specific iOS version, to **Latest public release** to require the newest public iOS from Apple, or to **Custom** with **This is a beta version** and a **Seed Token** for beta enrollment during setup.
If the installed version is below that minimum, Setup Assistant presents **Software Update** so the device can update before enrollment completes. The value in **Version must be greater than or equal to** is the minimum the device must meet before setup continues; it is not the OS build **Software Update** will install. When an update is required, Apple installs the **latest public release** available for that device. The list selection does not cap the update to that exact version.
 When migrating devices from another device management service, check **Preserve managed apps during migration** if you want apps installed on the migrating device that are also present in the device's new Iru Blueprint (and their associated data) to be preserved on the device after migration. For more information, see [Device Management Migration](/en/endpoint/enrollment/apple/device-management-migration#app-preservation).
 ### iPad
Customize the setup experience and configuration for iPad devices. It is recommended not to skip the Location Services unless your organization has a specific need. Location services are leveraged to set the Time Zone and other location-dependent settings.
Use **Skip screens during Setup Assistant for iPad devices** to choose which Setup Assistant screens appear. When skipping is enabled, select **Specify the screens to skip** to edit the list. You can skip specific screens or specify current and future Setup Assistant panes.
**Skip all Setup Assistant screens** does not auto-advance through Setup Assistant. Auto-advance is only available in macOS and tvOS.
### iPad
Customize the setup experience and configuration for iPad devices. It is recommended not to skip the Location Services unless your organization has a specific need. Location services are leveraged to set the Time Zone and other location-dependent settings.
Use **Skip screens during Setup Assistant for iPad devices** to choose which Setup Assistant screens appear. When skipping is enabled, select **Specify the screens to skip** to edit the list. You can skip specific screens or specify current and future Setup Assistant panes.
**Skip all Setup Assistant screens** does not auto-advance through Setup Assistant. Auto-advance is only available in macOS and tvOS.
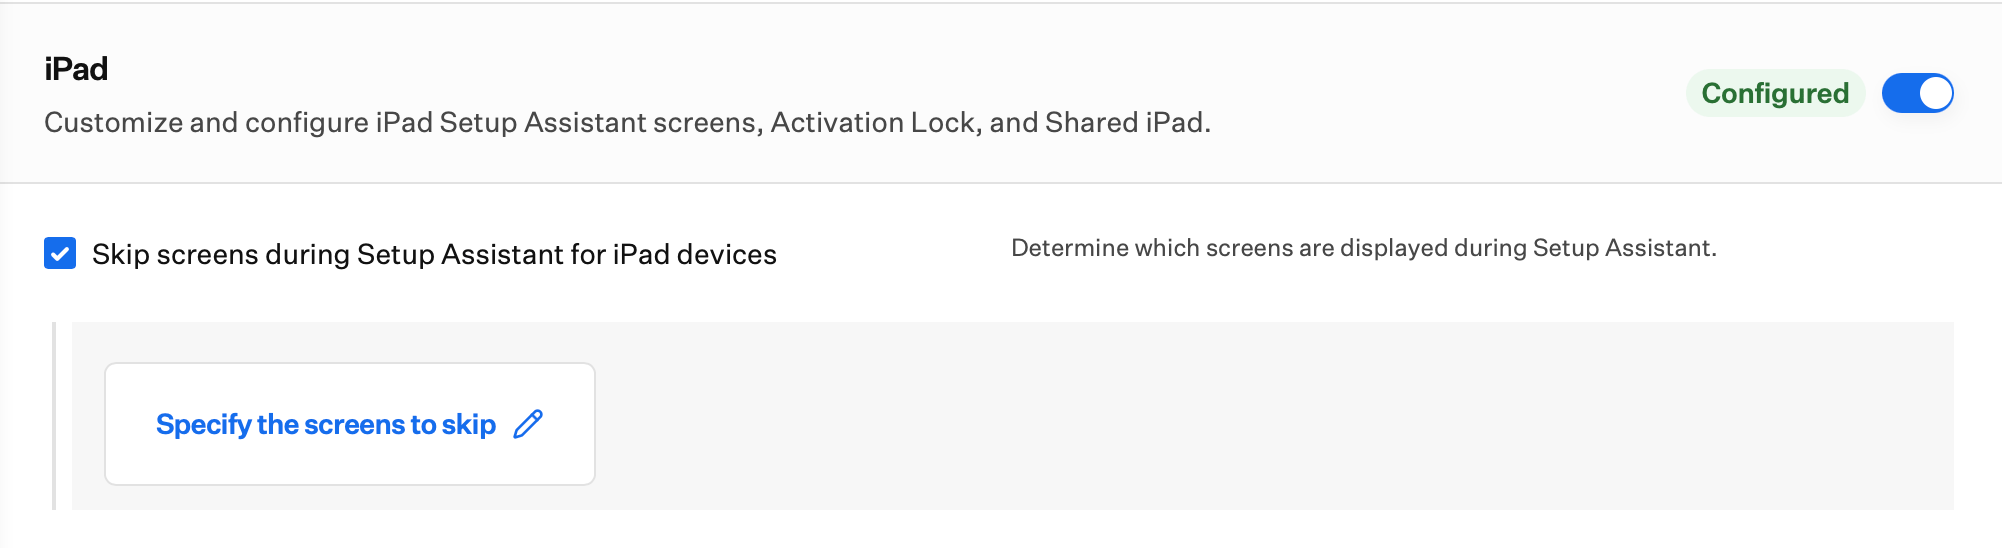 In the **iPad** section, enable **Install Library Items during Setup Assistant** when installs from this section's list must finish during enrollment setup. See [Install Library Items during Setup Assistant](#install-library-items-during-setup-assistant) for the install experience, building the list, and timeouts.
 Optionally enable **Prevent MDM profile installation when restoring from backup**. When it is on, the MDM profile is not installed from a backup restored onto the same device; the device installs its MDM profile through Automated Device Enrollment instead.
 Optionally turn on **Shared iPad** in the **iPad** section when you want a multi-user iPad experience during enrollment.
Shared iPad can only be enabled during Automated Device Enrollment.
See [Configure Shared iPad](/en/endpoint/devices/device-features/apple/configure-shared-ipad) for each setting in the Shared iPad section, including how **User configuration** changes which fields appear.
Optionally turn on **Shared iPad** in the **iPad** section when you want a multi-user iPad experience during enrollment.
Shared iPad can only be enabled during Automated Device Enrollment.
See [Configure Shared iPad](/en/endpoint/devices/device-features/apple/configure-shared-ipad) for each setting in the Shared iPad section, including how **User configuration** changes which fields appear.
 Use **Activation Lock** to choose whether users may enable user-based Activation Lock with Find My and a personal Apple Account.
Optionally turn on **Enable device-based Activation Lock** to enable device-based Activation Lock through Apple Business or Apple School Manager.
Use **Activation Lock** to choose whether users may enable user-based Activation Lock with Find My and a personal Apple Account.
Optionally turn on **Enable device-based Activation Lock** to enable device-based Activation Lock through Apple Business or Apple School Manager.
 Optionally use [**Require a minimum OS version**](#require-minimum-os-version). When the option is on, set **Version must be greater than or equal to** to a specific iPadOS version, to **Latest public release** to require the newest public iPadOS from Apple, or to **Custom** with **This is a beta version** and a **Seed Token** for beta enrollment during setup.
If the installed version is below that minimum, Setup Assistant presents **Software Update** so the device can update before enrollment completes. The value in **Version must be greater than or equal to** is the minimum the device must meet before setup continues; it is not the OS build **Software Update** will install. When an update is required, Apple installs the **latest public release** available for that device. The list selection does not cap the update to that exact version.
Optionally use [**Require a minimum OS version**](#require-minimum-os-version). When the option is on, set **Version must be greater than or equal to** to a specific iPadOS version, to **Latest public release** to require the newest public iPadOS from Apple, or to **Custom** with **This is a beta version** and a **Seed Token** for beta enrollment during setup.
If the installed version is below that minimum, Setup Assistant presents **Software Update** so the device can update before enrollment completes. The value in **Version must be greater than or equal to** is the minimum the device must meet before setup continues; it is not the OS build **Software Update** will install. When an update is required, Apple installs the **latest public release** available for that device. The list selection does not cap the update to that exact version.
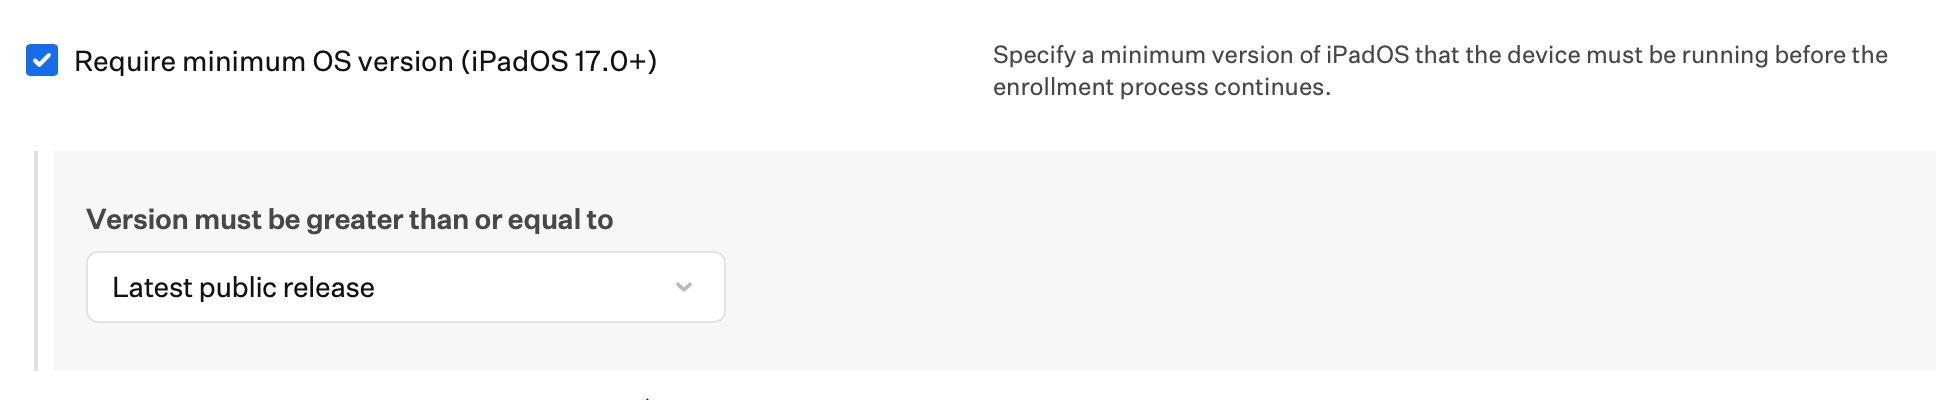 When migrating devices from another device management service, check **Preserve managed apps during migration** if you want apps installed on the migrating device that are also present in the device's new Iru Blueprint (and their associated data) to be preserved on the device after migration. For more information, see [Device Management Migration](/en/endpoint/enrollment/apple/device-management-migration#app-preservation).
 ### Apple TV
Customize the setup experience and configuration for Apple TV devices. Optionally configure Auto Advance, and specify the Language and Region.
Under **Skip screens during Setup Assistant for Apple TV devices**, choose how Setup Assistant runs: **Automatically advance through all Setup Assistant screens** (requires Ethernet) or **Specify which screens to skip during Setup Assistant**. When you choose to specify screens, select **Specify the screens to skip** to edit the list. Either choice determines which Setup Assistant screens appear on the device.
### Apple TV
Customize the setup experience and configuration for Apple TV devices. Optionally configure Auto Advance, and specify the Language and Region.
Under **Skip screens during Setup Assistant for Apple TV devices**, choose how Setup Assistant runs: **Automatically advance through all Setup Assistant screens** (requires Ethernet) or **Specify which screens to skip during Setup Assistant**. When you choose to specify screens, select **Specify the screens to skip** to edit the list. Either choice determines which Setup Assistant screens appear on the device.
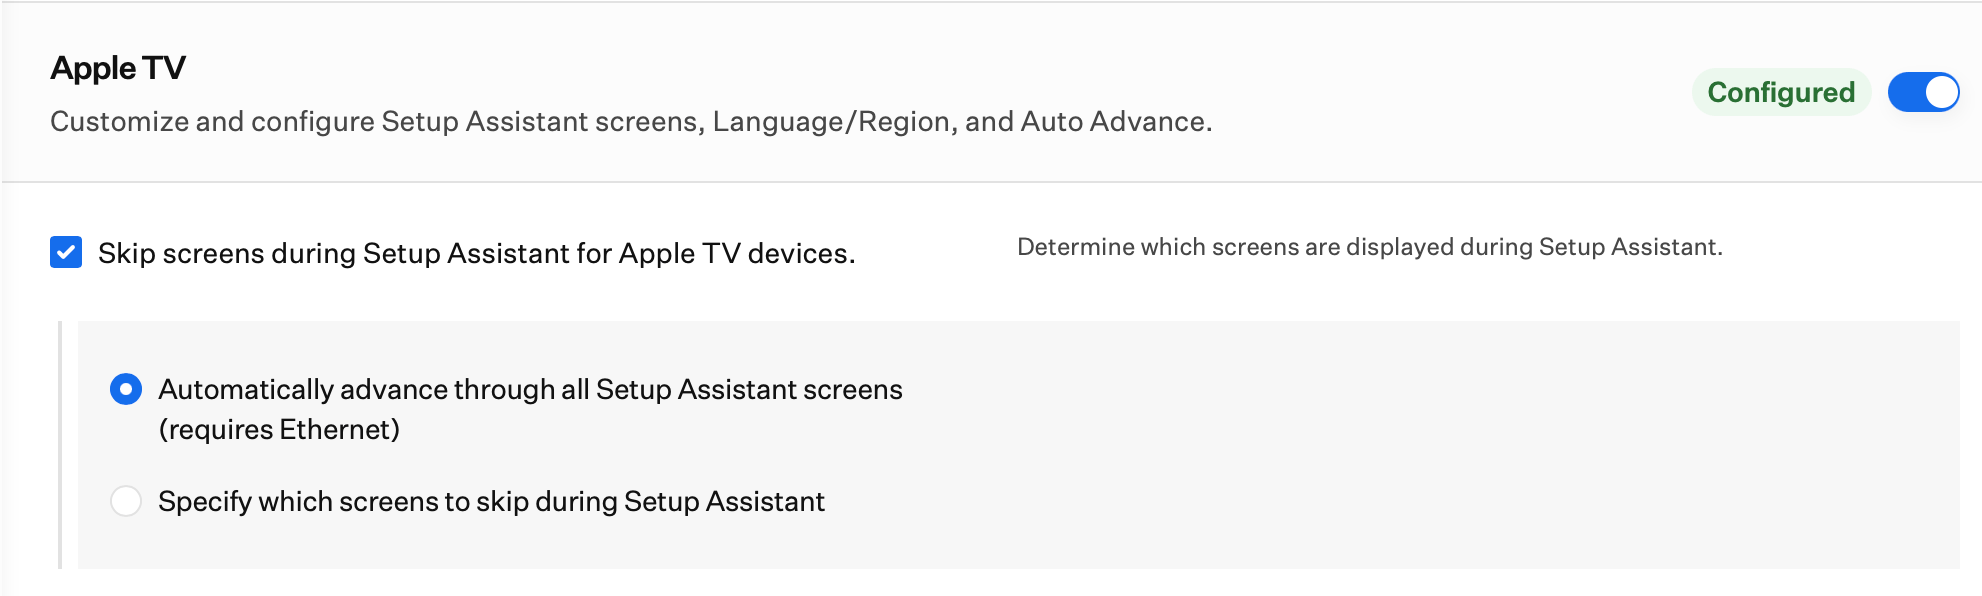 In the **Apple TV** section, enable **Install Library Items during Setup Assistant** when installs from this section's list must finish during enrollment setup. See [Install Library Items during Setup Assistant](#install-library-items-during-setup-assistant) for the install experience, building the list, and timeouts.
 **Options for Automatically advance through all Setup Assistant screens**
The following two options are available only when **Automatically advance through all Setup Assistant screens** is selected. Both require Ethernet: **Set region for Apple TV devices** and **Set language for Apple TV devices**.
Setting the region and language lets Apple TV finish Setup Assistant automatically. From startup, it may take a few minutes before the Auto-advance process begins; keep the device connected to Ethernet until setup continues on its own.
Specify the region for Apple TV devices.
**Options for Automatically advance through all Setup Assistant screens**
The following two options are available only when **Automatically advance through all Setup Assistant screens** is selected. Both require Ethernet: **Set region for Apple TV devices** and **Set language for Apple TV devices**.
Setting the region and language lets Apple TV finish Setup Assistant automatically. From startup, it may take a few minutes before the Auto-advance process begins; keep the device connected to Ethernet until setup continues on its own.
Specify the region for Apple TV devices.
 Specify the language for Apple TV devices.
 ### Vision
Customize the setup experience and configuration for visionOS devices.
Use **Skip screens during Setup Assistant for Vision devices** to choose which Setup Assistant screens appear. When skipping is enabled, select the pencil icon to edit which panes are skipped.
### Vision
Customize the setup experience and configuration for visionOS devices.
Use **Skip screens during Setup Assistant for Vision devices** to choose which Setup Assistant screens appear. When skipping is enabled, select the pencil icon to edit which panes are skipped.
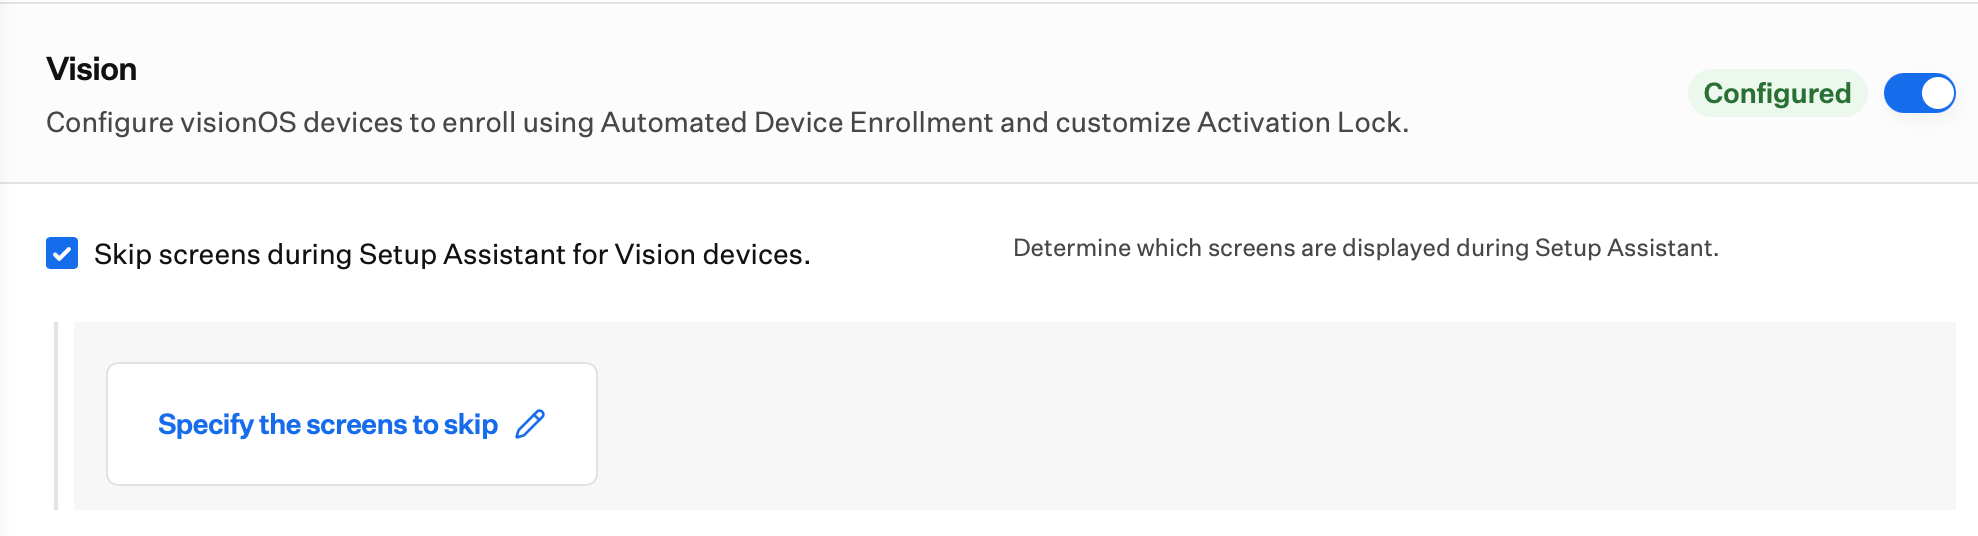 In the **Vision** section, enable **Install Library Items during Setup Assistant** when installs from this section's list must finish during enrollment setup. See [Install Library Items during Setup Assistant](#install-library-items-during-setup-assistant) for the install experience, building the list, and timeouts.
 Optionally enable **Prevent MDM profile installation when restoring from backup**. When it is on, the MDM profile is not installed from a backup restored onto the same device; the device installs its MDM profile through Automated Device Enrollment instead.
 Use **Activation Lock** to choose whether users may enable user-based Activation Lock with Find My and a personal Apple Account.
Optionally turn on **Enable device-based Activation Lock** to enable device-based Activation Lock through Apple Business or Apple School Manager.
Use **Activation Lock** to choose whether users may enable user-based Activation Lock with Find My and a personal Apple Account.
Optionally turn on **Enable device-based Activation Lock** to enable device-based Activation Lock through Apple Business or Apple School Manager.
 ## Change Default ADE Blueprint
The default Blueprint can be changed at any time inside the Iru Endpoint Web App.
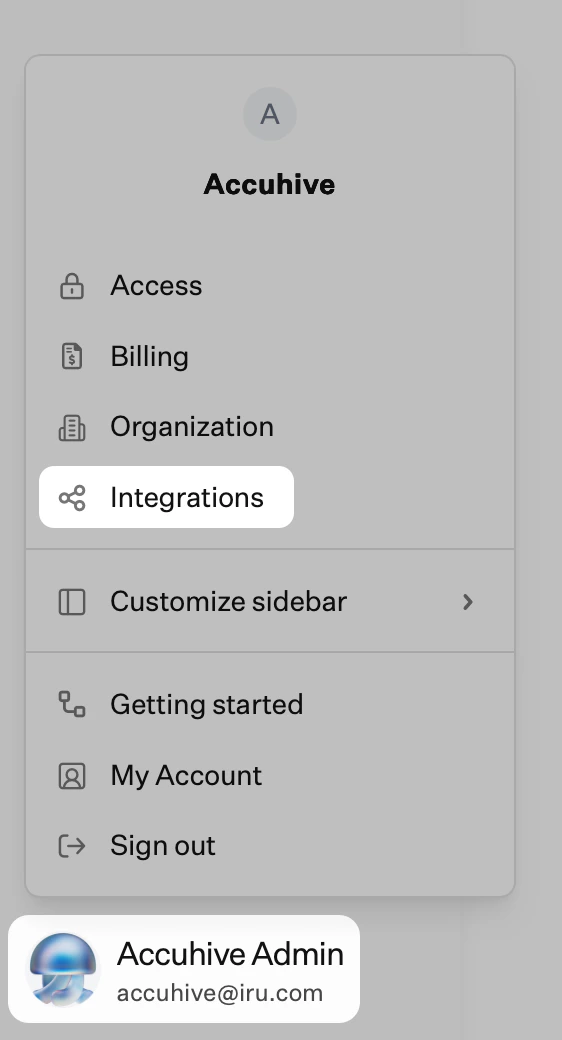
In the sidebar, click the [**Account Menu Button**](/en/iru/platform-overview/account-menu), then select **Integrations**.
## Change Default ADE Blueprint
The default Blueprint can be changed at any time inside the Iru Endpoint Web App.
In the sidebar, click the [**Account Menu Button**](/en/iru/platform-overview/account-menu), then select **Integrations**.
 Select the **Apple integrations** section.
Click **Edit Defaults** in the Automated Device Enrollment section.
Click the Default Blueprint dropdown menu.
Select the desired Blueprint from the list.
Click **Save**.
## Enrollment Portal Link and Enrollment Code
You can also provide the Enrollment Portal link with the Enrollment code embedded in the URL for easier deployment. The format for the shareable link is listed below. The **EnrollmentCodeHere** portion should be the Enrollment code without the dash between the two sets of numbers.
```text Shareable enrollment URL (Apple) icon="link" theme={null}
https://subdomain.iru.com/enroll/access-code/EnrollmentCodeHere
```
## Generating a New Enrollment Code
Iru Endpoint allows you to generate a new random **Enrollment code** for each Blueprint. Generating a new code is helpful should the code be distributed to unauthorized users. A new code prevents unwanted devices from being enrolled into that Blueprint.
Select **Enrollment** in the navigation bar.
Navigate to the **Manual Enrollment** section.
Click the arrow next to the name of the Blueprint where you'd like to change the code.
Click **Change code**.
Distribute the new **Enrollment code** to your desired users.
Once changed, the previous code will no longer be valid for new device enrollments.
By design, when Stolen Device Protection is enabled on devices running iOS 17.3 or later, MDM enrollment is restricted.
## Troubleshooting
If a mobile device is already set up and enrolled in another MDM through Automated Device Enrollment, use one of these approaches:
* In Apple Business or Apple School Manager, reassign the device to Iru Endpoint, then erase and re-enroll the device if you need to keep it supervised in Iru Endpoint.
* Remove management for the device in the other MDM, then use the [Iru Endpoint Enrollment Portal](/en/endpoint/settings/apple-integrations/configure-automated-device-enrollment#enrollment-portal-for-manual-enrollment) for manual enrollment. Only macOS devices remain **Supervised** when you use this path.
If you need more help with the migration, [contact support](/en/iru/iru-support/access-to-iru-support).
On **macOS Ventura** and later, Mac computers that are registered to your organization must connect to a network during Setup Assistant after an erase or reset. If that connection is missing, the user can complete setup in a way that skips Automated Device Enrollment.
Enroll the Mac into **Iru Endpoint** first. That enrollment is how admins ensure newly provisioned devices can no longer skip Automated Device Enrollment.
During Automated Device Enrollment, users may stay on **Configuring** while the device completes [Install Library Items during Setup Assistant](#install-library-items-during-setup-assistant). Setup Assistant waits until each selected Library Item is **confirmed installed** (not only downloading). The device can also exit when **Automatically release device after** is reached, whichever comes first. Long install lists, **App Store** applications, and a slow or unreliable network are the most common reasons this phase runs longer than expected.
Try the following:
* Remove Library Items from the Setup Assistant install list when they do not need to finish during initial setup. Large applications are the most common candidates; assign them so they install after enrollment instead.
* When downloads or installs are slow, check the device’s Wi-Fi connection, captive portal behavior, and any bandwidth limits during setup.
* If a device is stuck on **Configuring**, [release the hold manually](#manually-release-devices-held-in-setup-assistant) from the device record.
* If users are blocked because an install never completes, lower **Automatically release device after** (minimum **1** minute) so the device leaves Setup Assistant when the timer ends, even when not every Library Item finished. Raise the value only when you need additional time for a longer list, up to **120** minutes.
## Apple-Specific Troubleshooting
If you don't see your devices available for assignment in your Apple Business or Apple School Manager account, there can be several reasons, with different solutions for each.
* **You purchased your devices directly from Apple.**
* You may not have registered your **Apple Customer Number** in Apple’s portal. In **Apple Business**, choose **Devices** → **Inventory**, then **Get Started** (first number) or **Add** (additional numbers), pick **Apple Customer Number** as the type, and finish the prompts. See [Manage device suppliers in Apple Business](https://support.apple.com/guide/business/manage-device-suppliers-axmef1c47493/web). In **Apple School Manager**, use Apple’s help for your region to add customer numbers linked to your organization (labels and steps can differ from Apple Business).
* To find your Apple Customer Number, check with your Apple account executive, your purchasing department, or Apple sales support. When using an Apple Customer Number, all devices purchased from Apple since March 1, 2011, will be added to your Apple Business or Apple School Manager account.
* **You purchased your devices from an Apple Authorized Reseller or a carrier.**
* You may not have established a link between your Apple Business or Apple School Manager account and the reseller.
* Ask your reseller for its **Reseller Number** (or equivalent identifier) and add it in **Apple Business** under **Devices** → **Inventory** using **Get Started** or **Add**, choosing the reseller number type when prompted ([Manage device suppliers in Apple Business](https://support.apple.com/guide/business/manage-device-suppliers-axmef1c47493/web)). In **Apple School Manager**, follow Apple’s documentation for linking resellers or carriers.
* Provide your reseller with your **Organization ID**. In **Apple Business**, open **Settings** → **Organization** and find it under **Details**. In **Apple School Manager**, locate the organization identifier in your portal using [Apple School Manager](https://support.apple.com/guide/apple-school-manager/) documentation. Share that ID with your reseller along with the serial numbers or orders you want added to your Apple Business or Apple School Manager account. Your reseller can choose the "Look-Back" period for devices to be added.
* Your devices may not have been purchased through a Device Enrollment-enabled reseller or were not purchased as a business from Apple.
During initial setup, macOS allows users to sync their Desktop and Documents folders with iCloud. However, if the Mac later enrolls in Iru Endpoint and this feature is disabled, macOS will remove the previously synced data from the Mac.
**Although this may be alarming for users, their data should still reside in their iCloud account.**
* When disallowing iCloud Syncing and access to other iCloud features, we highly recommend informing your team before enrolling in Iru Endpoint so that they can make changes to ensure they have access to any critical data.
* The **Restrictions Profile** Library Item contains settings related to iCloud that may be disabling the use of various iCloud functionality.
* A list of Preferred Device Enrollment Resellers [is available here](https://support.apple.com/en-us/HT213320).
* For information about customer numbers and adding devices to Apple Business or Apple School Manager, see Apple's [Using Automated Device Enrollment Support Article](https://support.apple.com/en-us/HT204142).
## Related Articles
Set up Automated Device Enrollment for zero-touch deployment and lifecycle management of corporate Apple devices
Configure authentication requirements for device enrollment across Apple, Windows, and Android platforms
Understand Apple device supervision
Configure and manage Activation Lock for Apple devices
Configure dynamic Blueprint assignment during device enrollment using Assignment Rules
Curate, create, and manage Library Items and add them to Blueprints
Select the **Apple integrations** section.
Click **Edit Defaults** in the Automated Device Enrollment section.
Click the Default Blueprint dropdown menu.
Select the desired Blueprint from the list.
Click **Save**.
## Enrollment Portal Link and Enrollment Code
You can also provide the Enrollment Portal link with the Enrollment code embedded in the URL for easier deployment. The format for the shareable link is listed below. The **EnrollmentCodeHere** portion should be the Enrollment code without the dash between the two sets of numbers.
```text Shareable enrollment URL (Apple) icon="link" theme={null}
https://subdomain.iru.com/enroll/access-code/EnrollmentCodeHere
```
## Generating a New Enrollment Code
Iru Endpoint allows you to generate a new random **Enrollment code** for each Blueprint. Generating a new code is helpful should the code be distributed to unauthorized users. A new code prevents unwanted devices from being enrolled into that Blueprint.
Select **Enrollment** in the navigation bar.
Navigate to the **Manual Enrollment** section.
Click the arrow next to the name of the Blueprint where you'd like to change the code.
Click **Change code**.
Distribute the new **Enrollment code** to your desired users.
Once changed, the previous code will no longer be valid for new device enrollments.
By design, when Stolen Device Protection is enabled on devices running iOS 17.3 or later, MDM enrollment is restricted.
## Troubleshooting
If a mobile device is already set up and enrolled in another MDM through Automated Device Enrollment, use one of these approaches:
* In Apple Business or Apple School Manager, reassign the device to Iru Endpoint, then erase and re-enroll the device if you need to keep it supervised in Iru Endpoint.
* Remove management for the device in the other MDM, then use the [Iru Endpoint Enrollment Portal](/en/endpoint/settings/apple-integrations/configure-automated-device-enrollment#enrollment-portal-for-manual-enrollment) for manual enrollment. Only macOS devices remain **Supervised** when you use this path.
If you need more help with the migration, [contact support](/en/iru/iru-support/access-to-iru-support).
On **macOS Ventura** and later, Mac computers that are registered to your organization must connect to a network during Setup Assistant after an erase or reset. If that connection is missing, the user can complete setup in a way that skips Automated Device Enrollment.
Enroll the Mac into **Iru Endpoint** first. That enrollment is how admins ensure newly provisioned devices can no longer skip Automated Device Enrollment.
During Automated Device Enrollment, users may stay on **Configuring** while the device completes [Install Library Items during Setup Assistant](#install-library-items-during-setup-assistant). Setup Assistant waits until each selected Library Item is **confirmed installed** (not only downloading). The device can also exit when **Automatically release device after** is reached, whichever comes first. Long install lists, **App Store** applications, and a slow or unreliable network are the most common reasons this phase runs longer than expected.
Try the following:
* Remove Library Items from the Setup Assistant install list when they do not need to finish during initial setup. Large applications are the most common candidates; assign them so they install after enrollment instead.
* When downloads or installs are slow, check the device’s Wi-Fi connection, captive portal behavior, and any bandwidth limits during setup.
* If a device is stuck on **Configuring**, [release the hold manually](#manually-release-devices-held-in-setup-assistant) from the device record.
* If users are blocked because an install never completes, lower **Automatically release device after** (minimum **1** minute) so the device leaves Setup Assistant when the timer ends, even when not every Library Item finished. Raise the value only when you need additional time for a longer list, up to **120** minutes.
## Apple-Specific Troubleshooting
If you don't see your devices available for assignment in your Apple Business or Apple School Manager account, there can be several reasons, with different solutions for each.
* **You purchased your devices directly from Apple.**
* You may not have registered your **Apple Customer Number** in Apple’s portal. In **Apple Business**, choose **Devices** → **Inventory**, then **Get Started** (first number) or **Add** (additional numbers), pick **Apple Customer Number** as the type, and finish the prompts. See [Manage device suppliers in Apple Business](https://support.apple.com/guide/business/manage-device-suppliers-axmef1c47493/web). In **Apple School Manager**, use Apple’s help for your region to add customer numbers linked to your organization (labels and steps can differ from Apple Business).
* To find your Apple Customer Number, check with your Apple account executive, your purchasing department, or Apple sales support. When using an Apple Customer Number, all devices purchased from Apple since March 1, 2011, will be added to your Apple Business or Apple School Manager account.
* **You purchased your devices from an Apple Authorized Reseller or a carrier.**
* You may not have established a link between your Apple Business or Apple School Manager account and the reseller.
* Ask your reseller for its **Reseller Number** (or equivalent identifier) and add it in **Apple Business** under **Devices** → **Inventory** using **Get Started** or **Add**, choosing the reseller number type when prompted ([Manage device suppliers in Apple Business](https://support.apple.com/guide/business/manage-device-suppliers-axmef1c47493/web)). In **Apple School Manager**, follow Apple’s documentation for linking resellers or carriers.
* Provide your reseller with your **Organization ID**. In **Apple Business**, open **Settings** → **Organization** and find it under **Details**. In **Apple School Manager**, locate the organization identifier in your portal using [Apple School Manager](https://support.apple.com/guide/apple-school-manager/) documentation. Share that ID with your reseller along with the serial numbers or orders you want added to your Apple Business or Apple School Manager account. Your reseller can choose the "Look-Back" period for devices to be added.
* Your devices may not have been purchased through a Device Enrollment-enabled reseller or were not purchased as a business from Apple.
During initial setup, macOS allows users to sync their Desktop and Documents folders with iCloud. However, if the Mac later enrolls in Iru Endpoint and this feature is disabled, macOS will remove the previously synced data from the Mac.
**Although this may be alarming for users, their data should still reside in their iCloud account.**
* When disallowing iCloud Syncing and access to other iCloud features, we highly recommend informing your team before enrolling in Iru Endpoint so that they can make changes to ensure they have access to any critical data.
* The **Restrictions Profile** Library Item contains settings related to iCloud that may be disabling the use of various iCloud functionality.
* A list of Preferred Device Enrollment Resellers [is available here](https://support.apple.com/en-us/HT213320).
* For information about customer numbers and adding devices to Apple Business or Apple School Manager, see Apple's [Using Automated Device Enrollment Support Article](https://support.apple.com/en-us/HT204142).
## Related Articles
Set up Automated Device Enrollment for zero-touch deployment and lifecycle management of corporate Apple devices
Configure authentication requirements for device enrollment across Apple, Windows, and Android platforms
Understand Apple device supervision
Configure and manage Activation Lock for Apple devices
Configure dynamic Blueprint assignment during device enrollment using Assignment Rules
Curate, create, and manage Library Items and add them to Blueprints