> ## Documentation Index
> Fetch the complete documentation index at: https://docs.iru.com/llms.txt
> Use this file to discover all available pages before exploring further.
# Understanding Threat Events
> Understand threat events in Iru EDR including detection types, severity levels, and classification categories. Investigate and respond to security alerts.
This guide applies to Mac computers and Windows devices
### About Threat Events
Endpoint Detection and Response (EDR) creates a threat event when it identifies malware or potentially unwanted programs (PUPs) on a device. Each threat event includes details such as the threat name, classification, process involved, detection date, and current status. You can find all threat events on the Detections page for devices linked to Blueprints with EDR. Additionally, these events are viewable on individual device records.
Threat events are created in both Detect and Protect posture. In Protect posture, the threat is also quarantined.
Threat events are created in Detect posture and reported without automatic quarantine.
### How It Works
The threat events are automatically created when Iru Endpoint EDR identifies potential security risks on managed devices. The system organizes threat events in a threat-centric table view, grouping events by file hash for file detections and by detection rule for behavioral detections. This structure simplifies assessing a threat's impact across your Mac fleet. Each grouped event includes a side panel that provides detailed insights into the threat, enabling security teams to quickly understand the scope and severity of detected threats.
### Understanding Event Information
Each threat event in the threat-centric table view provides essential information to assist InfoSec teams in investigating threats.
* **Threat ID**: Displays the SHA-256 hash value of the detected threat
* **Process**: Shows the most recently detected process responsible for the threat
* **Classification**: Indicates the classification category of the threat event
* **Detection Date**: Records the date when EDR identified the threat
* **Devices**: Lists the total number of Mac devices affected by the threat event
* **Threat Status**: Provides a comprehensive view of all threat statuses (Detected, Remediated, and Released) across all devices for the grouped threat event
### Understanding Detection Severity Levels
Iru Endpoint EDR includes severity scoring to help InfoSec teams quickly assess the criticality of detected threats. Each detection event is assigned one of five severity levels: Critical, High, Medium, Low, and Informational.
The detections table includes a **Severity** column that displays the corresponding severity level for each detection. You can sort and filter detections based on severity for both file detections and behavioral detections.
The Detections page also features a **Detections By Severity** pie chart that provides a visual breakdown of detections organized by their severity levels.
### Understanding Threat Classifications
Iru Endpoint EDR classifies threats into four categories for file detections (malware, potentially unwanted program (PUP), benign, and unknown) and two categories for behavioral detections: malicious and suspicious.
#### File Detection Classifications
* **Malware**: This term refers to malicious software designed to harm devices, individuals, or organizations
* **Potentially Unwanted Program (PUP)**: These are applications that might be unwanted on a device. PUPs often use high system resources, affecting performance, displaying unwanted ads, and collecting personal information. Unlike malware, PUPs are not intended to cause harm and are usually installed inadvertently with other software, often found in bundled packages
* **Benign**: This classification is for files initially flagged as malicious but later determined to be non-malicious after further analysis. If you encounter benign threat events, it might be because the item was in your EDR Library Item block list at the time of detection or quarantine
* **Unknown**: This category is for files that Iru Endpoint EDR cannot definitively classify as either malicious or benign based on the available data. Classification may change if more information becomes available or if the file is re-analyzed.
#### Behavioral Detection Classifications
* **Malicious**: A classification that refers to a behavioral activity that intends to cause harm
* **Suspicious**: A classification that refers to behavioral activity that does not immediately indicate harm but warrants attention for further investigation
### Understanding Threat Statuses
All threat events will have a status associated with them. The various statuses that a threat event may have are:
#### File Detection Statuses
* **Quarantined**: A detected threat that was automatically quarantined in Protect posture (macOS)
* **Not Quarantined**: A detected threat that was not quarantined in Detect posture
* **Released**: A threat that was initially quarantined but later released and restored to its original location (macOS)
* **Resolved**: A detected threat that is no longer at the last detected file path and was not quarantined by the agent
#### Behavioral Detection Statuses
* **Detected**: Malicious behavioral activity was identified but not blocked (Detect posture)
* **Blocked**: Malicious behavioral activity was identified and blocked (Protect posture)
* **Informational**: Suspicious behavioral activity was detected and flagged for visibility
On macOS, quarantining of Malware and PUP is determined by the posture mode configured in the EDR Library Item. Please see [Configure the EDR Library Item](/en/endpoint/endpoint-detection-response-edr/configure-the-edr-library-item) for more information on how to configure posture modes in your environment.
### Viewing Detections
In the left-hand navigation bar, select **Detections** (under **Endpoint**).
Use the **Detection type** filter to show **File detections**, **Behavioral detections**, or both in the same table.
### Filtering Threat Events
You can filter threat events for both file and behavioral detections based on their status for easier visualization and remediation.
At the top of the Detections page, click the date range beside **Viewing** (default **Last 30 days**) to limit threat events to a period, such as **Last 7 days** or **Custom date range**.
Filter by **Classification** to show only certain threat types. For file detections, choose malware, PUP, benign, or unknown; for behavioral detections, choose malicious or suspicious.
Choose **Threat status** to filter by remediation state (Quarantined, Not quarantined, Released, Resolved for file detections; Detected, Blocked, or Informational for behavioral). You can select one or multiple.
Filter by **Status** to focus on workflow state: **New** (last 24 hours), **Open**, **Closed**, or **Archived**, so you can triage what needs attention versus what’s been handled.
Filter by **Severity** (Critical, High, Medium, Low, or Informational) to prioritize which threats to investigate or remediate first.
Filter by **Tags** to show only threats that have a specific admin-defined tag, or leave as All to include every tag.
Use the **MITRE** filter to narrow the list by MITRE ATT\&CK technique. Search or select specific techniques to show only behavioral events that match the selected techniques.
Click **Clear all** to remove all filters and return to the default view for the selected date range.
 ### Side Panel
The threat-centric table view features a side panel for each grouped event, which can be opened by clicking on a threat event row to access detailed information about that specific threat.
For file detections, the side panel includes:
* Latest file name associated with the threat
* A global view of all threat statuses (Detected, Remediated, and Released) for the grouped threat event across all devices
* First and last detection dates across all devices
* Insights on all unique file paths found related to the threat
For behavioral detections, the side panel includes:
* The latest process name associated with the grouped event
* A global view of all threat statuses (Detected, Remediated, and Released) across all devices
* A description of the malicious or suspicious activity
* The malware family associated with the behavioral activity
* Informational tags providing additional context
* The first and last detection dates across all devices
#### Device Cards
Device cards in the side panel represent devices where the malicious file was found. From the side panel, you can also perform response actions such as [isolating devices](/en/endpoint/endpoint-detection-response-edr/device-isolation) to quarantine them from the network during active security incidents.
For file detections, these cards will display information such as:
* **Device Name**
* **Serial Number**
* **Blueprint and Library Item**
* **Malware and PUP Posture Mode**
* **Actionable Events**
* **Threat event details:**
* **Threat Status** - The current status of the threat on the device.
* **Path** - The file path where the threat was detected.
* **User** - The user associated with the process when the threat was detected.
* **Detection Date** - The date when EDR identified the threat.
* **Quarantine Date** - The date when EDR quarantined the threat.
* **Resolved Date** - The date when the threat was marked as resolved in the web app.
* **Release Date** - The date when the threat was released from quarantine on the device.
* **Application Bundle Path** - The path to the application bundle.
For behavioral detections, these cards will display information such as:
* **Device name**
* **Serial number**
* **Blueprint and Library Item**
* **Malicious behavioral detection posture mode information**
* **Threat event details:**
* **Threat Status** - The current status of the threat on the device.
* **Detection date** - The date when EDR identified the threat.
* **Rule version** - Current rule version
* **Parent and target process information:**
* Parent and target process name
* Parent and target process ID
* Process owner
* Image paths for parent and target processes
* Command line arguments for parent and target processes
* SHA-256 hash of the parent and target processes
### Viewing Threat Events in the Side Panel
#### For File Detections
On the left-hand navigation bar, select **Detections** (under **Endpoint**).
In the **Detection type** filter, select **File detections** to focus on file-based threat events.
Click on any **threat event** to open the side panel.
In the **Devices** tab, view the device cards for all devices where the malicious hash was detected. Click any device card to expand it and view associated threat events. From this view, you can also [isolate devices](/en/endpoint/endpoint-detection-response-edr/device-isolation) from the network using the Globe icon.
#### For Behavioral Detections
In the left-hand navigation bar, select **Detections** (under **Endpoint**).
In the **Detection type** filter, select **Behavioral detections** to focus on behavioral threat events.
Click on any **threat event** to open the side panel.
### Rechecking the Status of a Threat
When the Malware or PUP posture modes are set to Detect, you can manually check a threat's status in the side panel to see if it's still present at the file path. If the threat is no longer there, its status will update from 'Not quarantined' to 'Resolved.' If the threat is still present, its status will remain unchanged.
On the left-hand navigation bar, select **Detections** (under **Endpoint**).
Click on any **threat event** to open the side panel.
Click the desired **device card** to expand it and view the device's threat events. From this expanded view, you can also access response actions including [device isolation](/en/endpoint/endpoint-detection-response-edr/device-isolation).
Click **Recheck status**.
### Side Panel
The threat-centric table view features a side panel for each grouped event, which can be opened by clicking on a threat event row to access detailed information about that specific threat.
For file detections, the side panel includes:
* Latest file name associated with the threat
* A global view of all threat statuses (Detected, Remediated, and Released) for the grouped threat event across all devices
* First and last detection dates across all devices
* Insights on all unique file paths found related to the threat
For behavioral detections, the side panel includes:
* The latest process name associated with the grouped event
* A global view of all threat statuses (Detected, Remediated, and Released) across all devices
* A description of the malicious or suspicious activity
* The malware family associated with the behavioral activity
* Informational tags providing additional context
* The first and last detection dates across all devices
#### Device Cards
Device cards in the side panel represent devices where the malicious file was found. From the side panel, you can also perform response actions such as [isolating devices](/en/endpoint/endpoint-detection-response-edr/device-isolation) to quarantine them from the network during active security incidents.
For file detections, these cards will display information such as:
* **Device Name**
* **Serial Number**
* **Blueprint and Library Item**
* **Malware and PUP Posture Mode**
* **Actionable Events**
* **Threat event details:**
* **Threat Status** - The current status of the threat on the device.
* **Path** - The file path where the threat was detected.
* **User** - The user associated with the process when the threat was detected.
* **Detection Date** - The date when EDR identified the threat.
* **Quarantine Date** - The date when EDR quarantined the threat.
* **Resolved Date** - The date when the threat was marked as resolved in the web app.
* **Release Date** - The date when the threat was released from quarantine on the device.
* **Application Bundle Path** - The path to the application bundle.
For behavioral detections, these cards will display information such as:
* **Device name**
* **Serial number**
* **Blueprint and Library Item**
* **Malicious behavioral detection posture mode information**
* **Threat event details:**
* **Threat Status** - The current status of the threat on the device.
* **Detection date** - The date when EDR identified the threat.
* **Rule version** - Current rule version
* **Parent and target process information:**
* Parent and target process name
* Parent and target process ID
* Process owner
* Image paths for parent and target processes
* Command line arguments for parent and target processes
* SHA-256 hash of the parent and target processes
### Viewing Threat Events in the Side Panel
#### For File Detections
On the left-hand navigation bar, select **Detections** (under **Endpoint**).
In the **Detection type** filter, select **File detections** to focus on file-based threat events.
Click on any **threat event** to open the side panel.
In the **Devices** tab, view the device cards for all devices where the malicious hash was detected. Click any device card to expand it and view associated threat events. From this view, you can also [isolate devices](/en/endpoint/endpoint-detection-response-edr/device-isolation) from the network using the Globe icon.
#### For Behavioral Detections
In the left-hand navigation bar, select **Detections** (under **Endpoint**).
In the **Detection type** filter, select **Behavioral detections** to focus on behavioral threat events.
Click on any **threat event** to open the side panel.
### Rechecking the Status of a Threat
When the Malware or PUP posture modes are set to Detect, you can manually check a threat's status in the side panel to see if it's still present at the file path. If the threat is no longer there, its status will update from 'Not quarantined' to 'Resolved.' If the threat is still present, its status will remain unchanged.
On the left-hand navigation bar, select **Detections** (under **Endpoint**).
Click on any **threat event** to open the side panel.
Click the desired **device card** to expand it and view the device's threat events. From this expanded view, you can also access response actions including [device isolation](/en/endpoint/endpoint-detection-response-edr/device-isolation).
Click **Recheck status**.
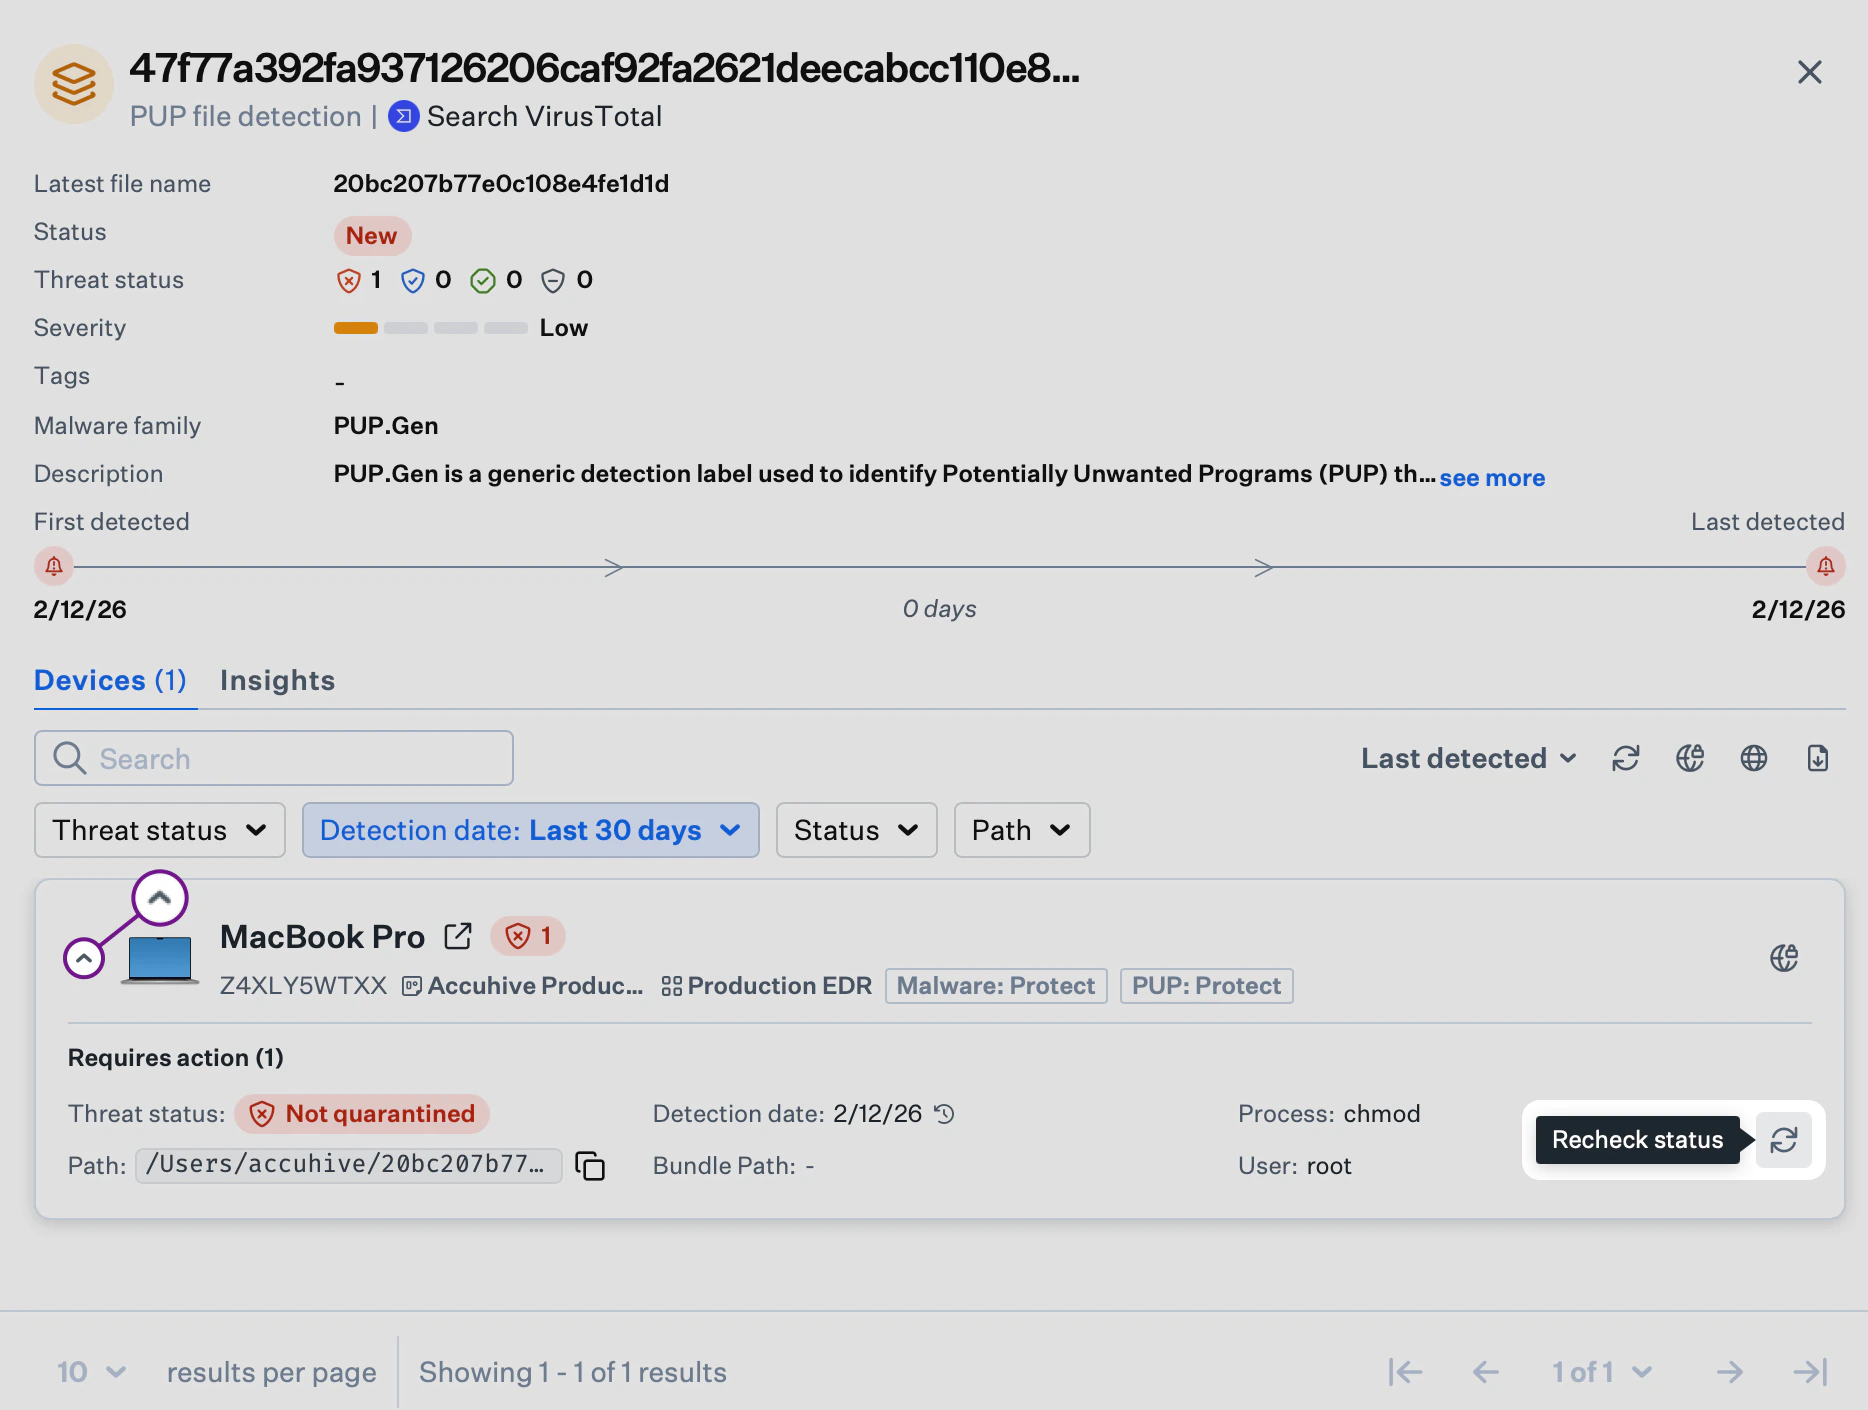 On macOS, when threats are initially detected and removed from a device, their status will change from **Not quarantined** to **Resolved** once the Malware or PUP posture modes in the EDR Library Item are set to Protect mode. This update also occurs when a new Blueprint with these settings is applied to the device.
### Releasing a Threat Event
There might be situations where InfoSec teams need to release a threat event for specific files or applications that were mistakenly quarantined, such as a security tool or application used by the organization. Releasing a threat event involves adding the item to the Allow list for the associated EDR Library Item.
The threat event release action will only apply to the Blueprints assigned to the EDR Library Item. Releasing a threat will release it from all Mac computers where the threat has been detected.
On the left-hand navigation bar, select **Detections** (under **Endpoint**).
Click on any **threat event** to open the side panel.
Click the desired **device card** to expand it and view the device's threat events.
Click **Release threat**.
On macOS, when threats are initially detected and removed from a device, their status will change from **Not quarantined** to **Resolved** once the Malware or PUP posture modes in the EDR Library Item are set to Protect mode. This update also occurs when a new Blueprint with these settings is applied to the device.
### Releasing a Threat Event
There might be situations where InfoSec teams need to release a threat event for specific files or applications that were mistakenly quarantined, such as a security tool or application used by the organization. Releasing a threat event involves adding the item to the Allow list for the associated EDR Library Item.
The threat event release action will only apply to the Blueprints assigned to the EDR Library Item. Releasing a threat will release it from all Mac computers where the threat has been detected.
On the left-hand navigation bar, select **Detections** (under **Endpoint**).
Click on any **threat event** to open the side panel.
Click the desired **device card** to expand it and view the device's threat events.
Click **Release threat**.
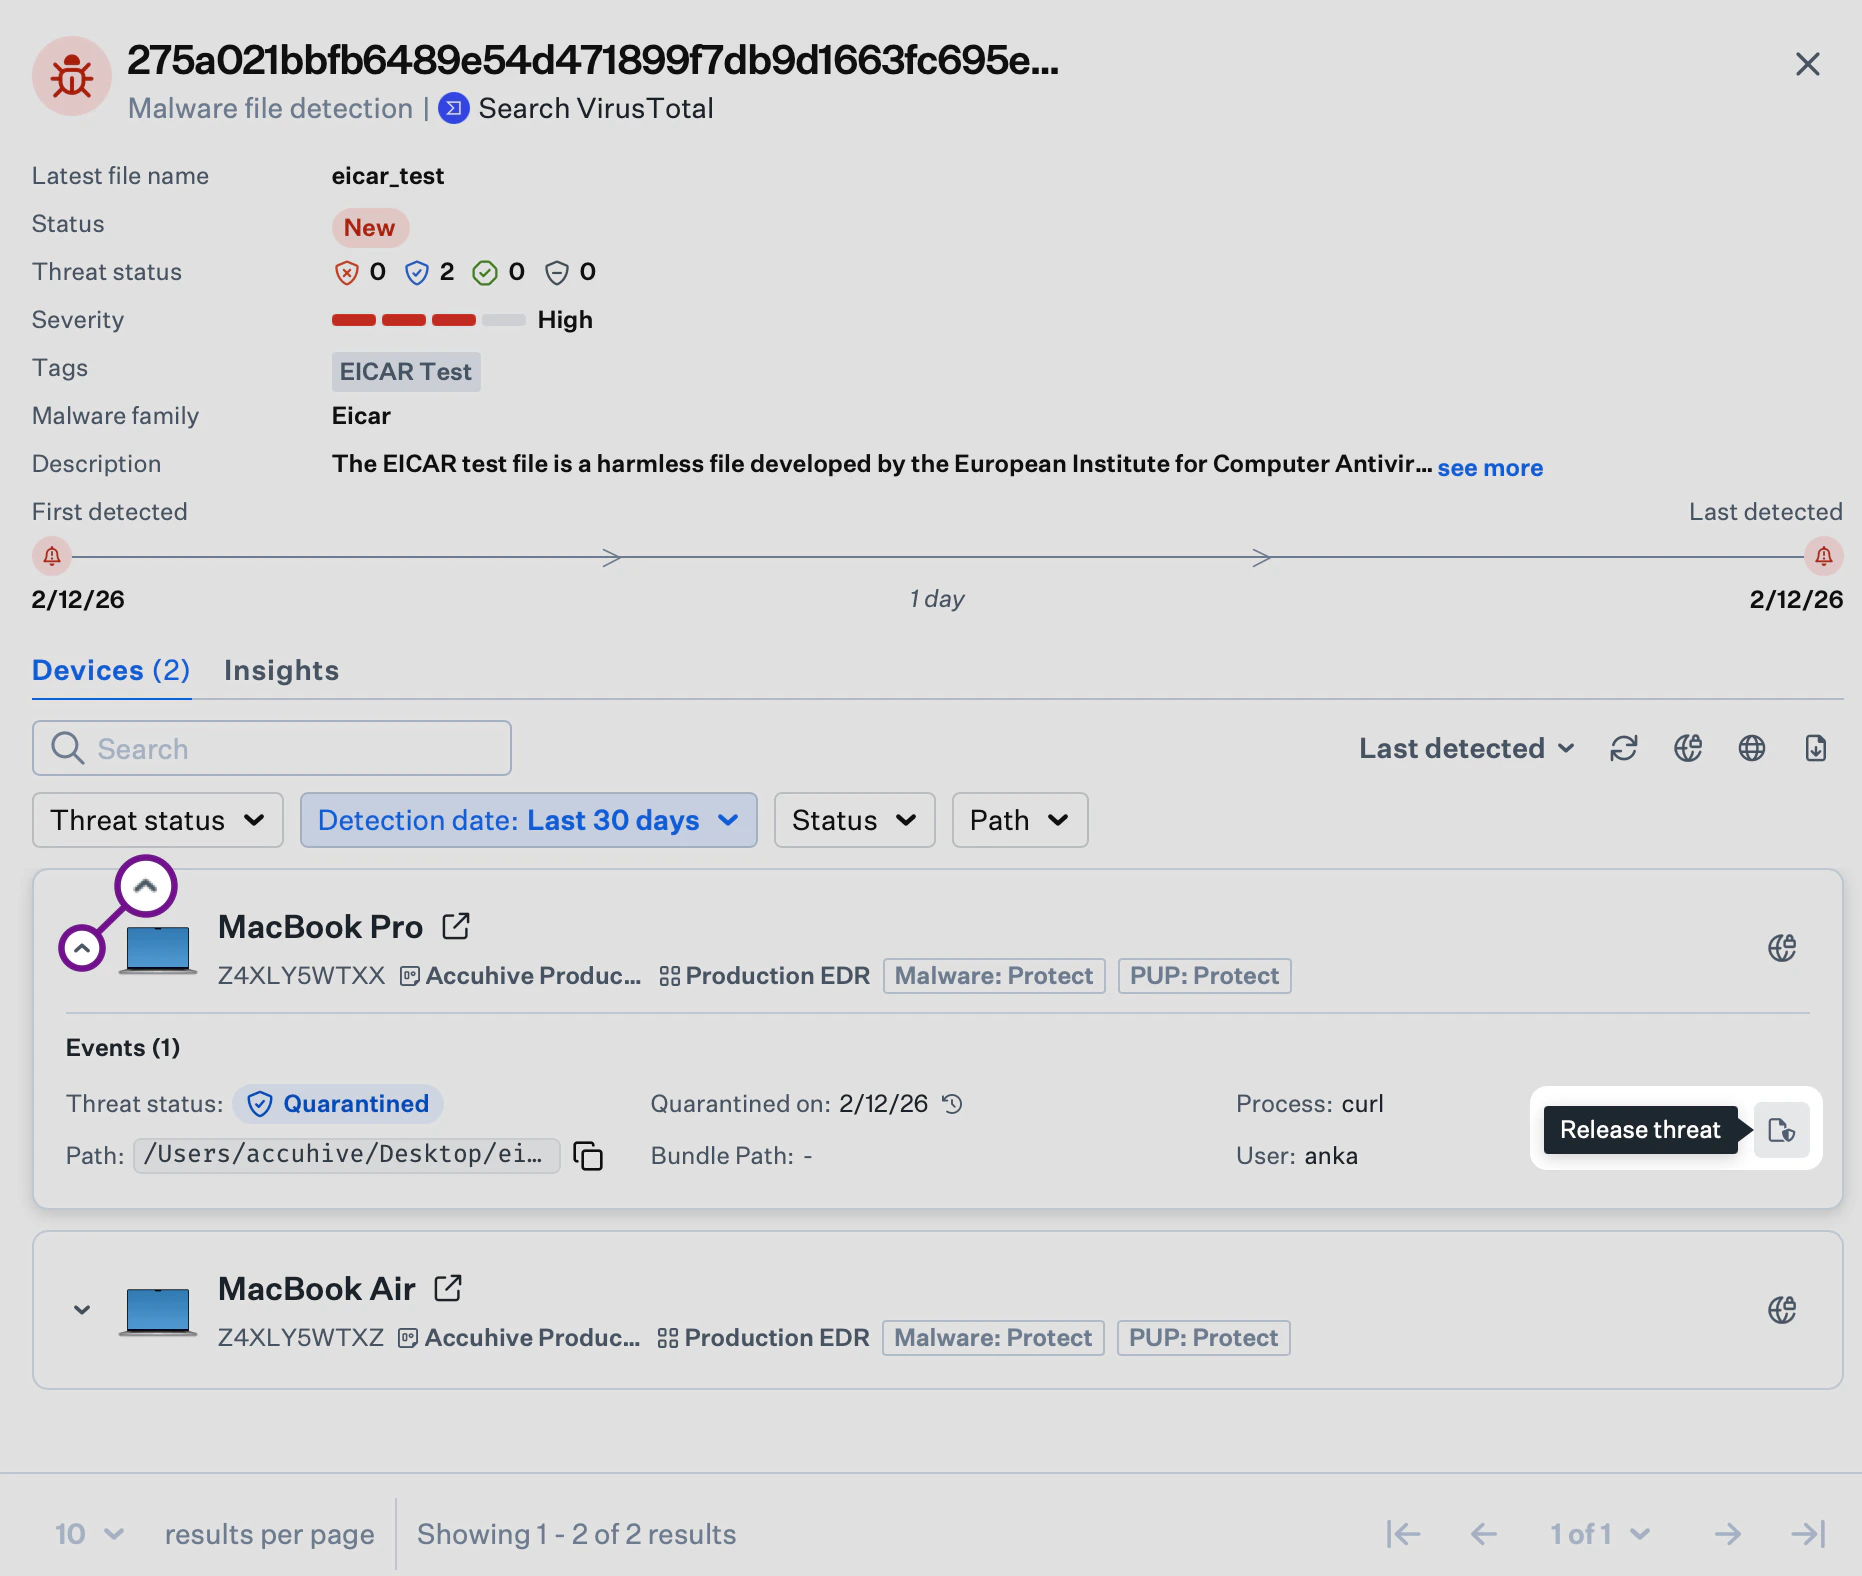 Enter an **Item Name**.
Optionally, enter an internal note stating why the threat event is being released.
Type **RELEASE** to release the threat.
Click **Add and Release** to add the threat to your Allow list and release the threat.
### Performing a VirusTotal Search
VirusTotal is a powerful tool that provides in-depth analysis and insights into files and URLs. The web app includes a convenient feature for searching hashes within VirusTotal, allowing you to access additional contextual information directly from a threat event entry without leaving the app.
On the left-hand navigation bar, select **Detections** (under **Endpoint**).
Click on the desired threat event to open the side panel.
Click **Search VirusTotal** at the top of the side panel.
Enter an **Item Name**.
Optionally, enter an internal note stating why the threat event is being released.
Type **RELEASE** to release the threat.
Click **Add and Release** to add the threat to your Allow list and release the threat.
### Performing a VirusTotal Search
VirusTotal is a powerful tool that provides in-depth analysis and insights into files and URLs. The web app includes a convenient feature for searching hashes within VirusTotal, allowing you to access additional contextual information directly from a threat event entry without leaving the app.
On the left-hand navigation bar, select **Detections** (under **Endpoint**).
Click on the desired threat event to open the side panel.
Click **Search VirusTotal** at the top of the side panel.
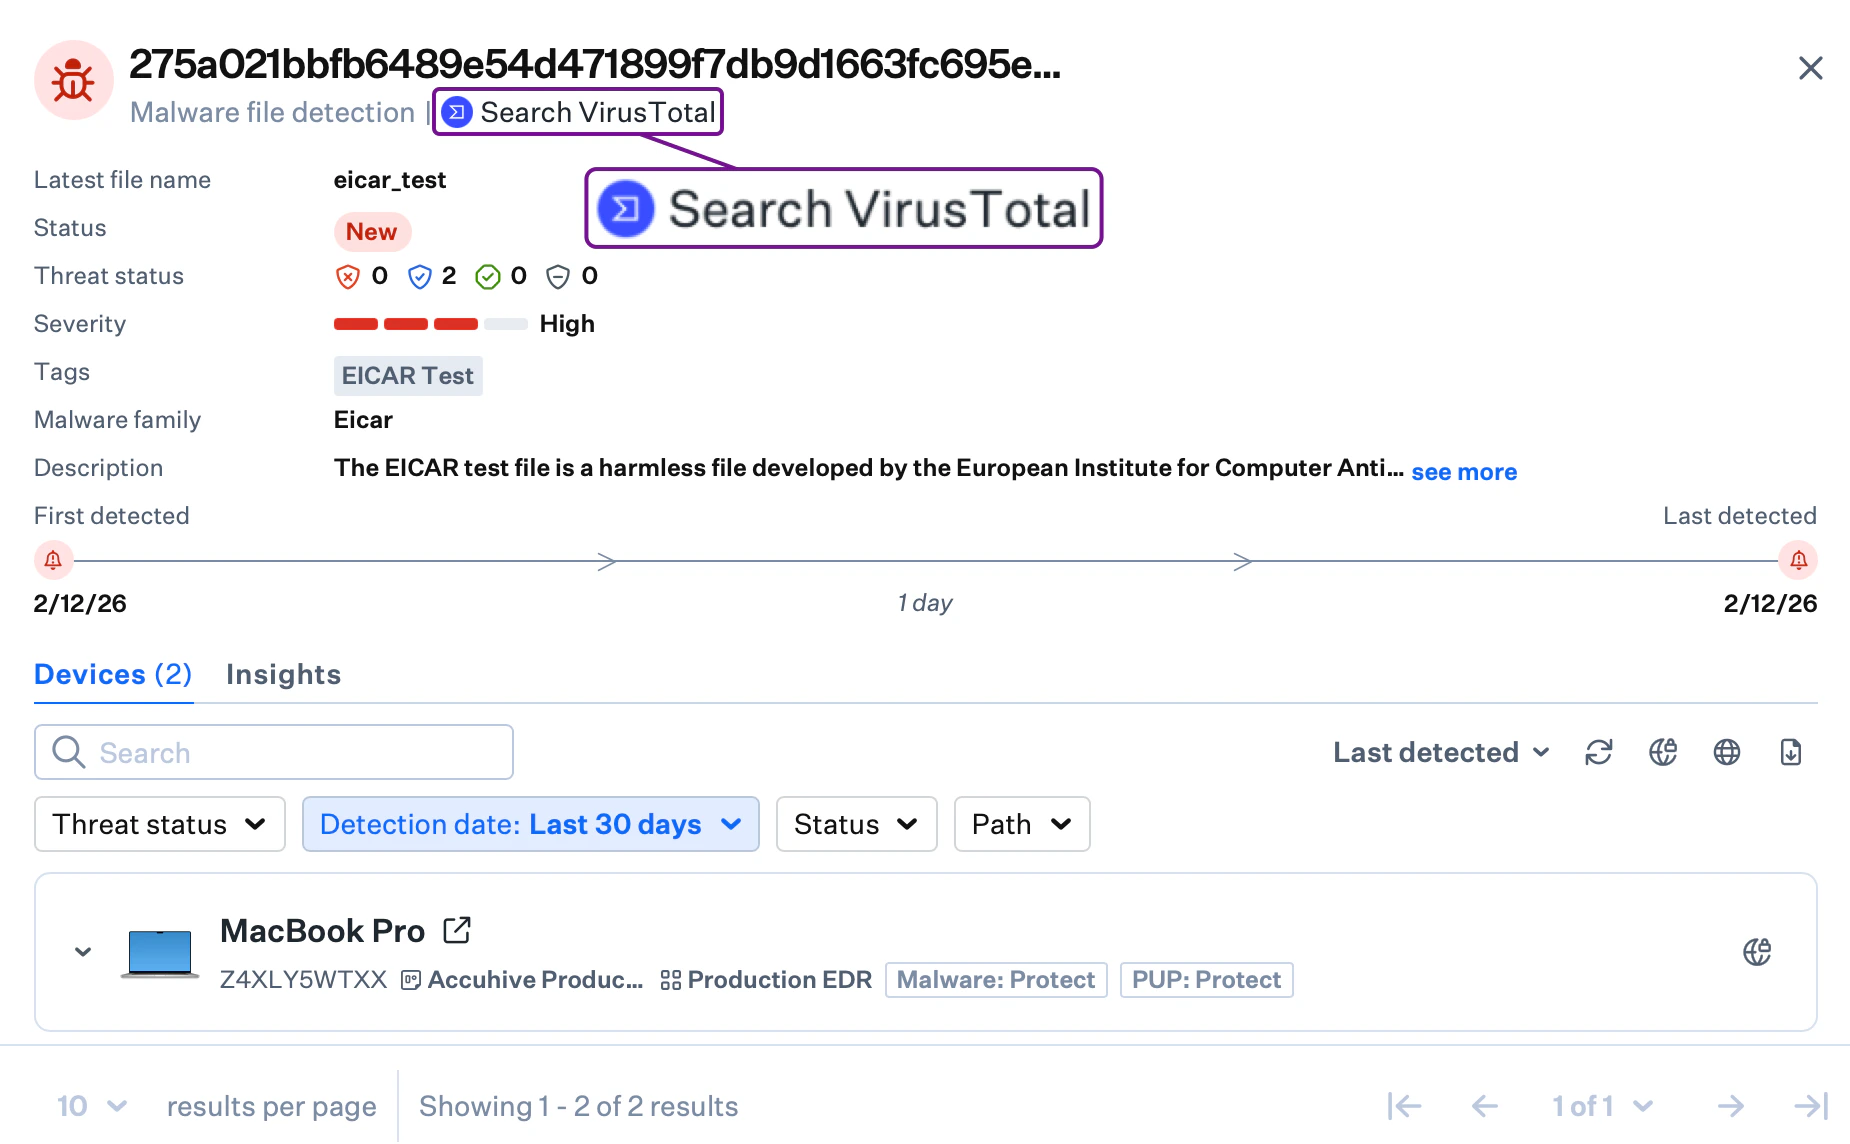 Iru Endpoint EDR may classify certain hashes as malware or PUP, even if VirusTotal has no detections on them or considers them non-malicious; this is expected due to Iru Endpoint EDR's utilization of multiple threat sources.
### Exporting Threat Events in CSV
In addition to using the Iru Endpoint API, InfoSec and IT teams can export the list of threat events directly from the admin console. The export icon in the threat-centric view applies the current filter settings and generates a CSV file with detailed information about each threat event in separate columns. This feature is available in both the main Detections module view and the Detections tab under Device Record.
On the left-hand navigation bar, select **Detections** (under **Endpoint**).
Optionally use the **Detection type** filter to select **File detections** or **Behavioral detections** before exporting.
Click the **Export** icon on the far right of the threat events list view. A CSV export file will download automatically.
### Considerations
* **Threat Classification**: Understand the difference between file detection classifications (malware, PUP, benign, unknown) and behavioral detection classifications (malicious, suspicious) for proper threat assessment
* **Status Management**: Regularly review and update threat statuses to maintain accurate security posture and ensure proper remediation tracking
* **Severity Prioritization**: Use severity levels (Critical, High, Medium, Low, Informational) to prioritize threat response efforts and allocate resources effectively
* **Posture Configuration**: On macOS, ensure EDR Library Items are configured with appropriate posture modes (Detect vs. Protect) based on your security requirements. Windows EDR uses Detect mode for file detections.
* **Threat Investigation**: Utilize the side panel and device cards to gather comprehensive information about threats, including file paths, user context, and detection timelines
* **False Positive Management**: Be prepared to release legitimate applications that may be mistakenly quarantined, using the threat release process with proper documentation
* **External Validation**: Use VirusTotal integration to cross-reference threat intelligence and validate threat classifications
* **Data Export**: Leverage CSV export functionality for threat analysis, reporting, and integration with other security tools
* **Bulk Operations**: Consider using bulk actions for efficient threat management when dealing with widespread threats across multiple devices, including [bulk device isolation](/en/endpoint/endpoint-detection-response-edr/device-isolation) capabilities
* **Regular Monitoring**: Establish regular review processes for threat events to ensure timely response and proper classification of security incidents
Iru Endpoint EDR may classify certain hashes as malware or PUP, even if VirusTotal has no detections on them or considers them non-malicious; this is expected due to Iru Endpoint EDR's utilization of multiple threat sources.
### Exporting Threat Events in CSV
In addition to using the Iru Endpoint API, InfoSec and IT teams can export the list of threat events directly from the admin console. The export icon in the threat-centric view applies the current filter settings and generates a CSV file with detailed information about each threat event in separate columns. This feature is available in both the main Detections module view and the Detections tab under Device Record.
On the left-hand navigation bar, select **Detections** (under **Endpoint**).
Optionally use the **Detection type** filter to select **File detections** or **Behavioral detections** before exporting.
Click the **Export** icon on the far right of the threat events list view. A CSV export file will download automatically.
### Considerations
* **Threat Classification**: Understand the difference between file detection classifications (malware, PUP, benign, unknown) and behavioral detection classifications (malicious, suspicious) for proper threat assessment
* **Status Management**: Regularly review and update threat statuses to maintain accurate security posture and ensure proper remediation tracking
* **Severity Prioritization**: Use severity levels (Critical, High, Medium, Low, Informational) to prioritize threat response efforts and allocate resources effectively
* **Posture Configuration**: On macOS, ensure EDR Library Items are configured with appropriate posture modes (Detect vs. Protect) based on your security requirements. Windows EDR uses Detect mode for file detections.
* **Threat Investigation**: Utilize the side panel and device cards to gather comprehensive information about threats, including file paths, user context, and detection timelines
* **False Positive Management**: Be prepared to release legitimate applications that may be mistakenly quarantined, using the threat release process with proper documentation
* **External Validation**: Use VirusTotal integration to cross-reference threat intelligence and validate threat classifications
* **Data Export**: Leverage CSV export functionality for threat analysis, reporting, and integration with other security tools
* **Bulk Operations**: Consider using bulk actions for efficient threat management when dealing with widespread threats across multiple devices, including [bulk device isolation](/en/endpoint/endpoint-detection-response-edr/device-isolation) capabilities
* **Regular Monitoring**: Establish regular review processes for threat events to ensure timely response and proper classification of security incidents