> ## Documentation Index
> Fetch the complete documentation index at: https://docs.iru.com/llms.txt
> Use this file to discover all available pages before exploring further.
# Iru API Overview
> Create API tokens in Access, scope permissions, and use the Iru Endpoint REST API to read fleet data, run device actions, and automate Library workflows.
An **API** (Application Programming Interface) is how other **systems** talk to Iru Endpoint with structured **requests and responses** instead of only the Web App. The **[Iru Endpoint Management API reference](https://api-docs.kandji.io/)** documents each call: what to send, what you get back, parameters, and examples for scripts and integrations.
This article focuses on **API tokens** in **Access**: creating credentials, choosing permissions, reviewing activity, and revoking access when you are done. After you [create a token](#generate-an-api-token), you use it with the reference to work with devices, apps, Library items, Blueprints, tenant activity, device actions, Library uploads, and Automated Device Enrollment (ADE) tokens for your organization. For guides that show how the API is used in practice, see [Related articles](#related-articles).
### Generate an API Token
Iru Endpoint uses tenant-level bearer tokens to control access to the API. To generate one:
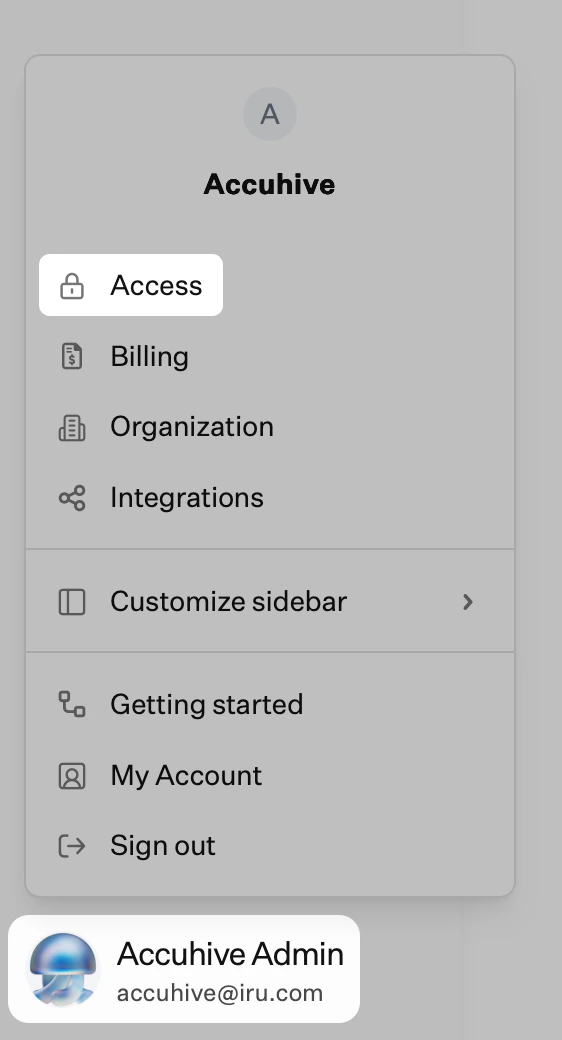
In the sidebar, click the [**Account Menu Button**](/en/iru/platform-overview/account-menu), then select **Access**.
 In **Access**, click the **API tokens** tab.
On the **API tokens** page, look for **Your organization's API URL**. The line shows your tenant hostname in this form (your value will differ):
**Your organization's API URL is:** `accuhive.api.kandji.io`
Make a note of this hostname. You use it with the Iru Endpoint API and your bearer token.
Click **Add Token** to create a new API token.
In **Access**, click the **API tokens** tab.
On the **API tokens** page, look for **Your organization's API URL**. The line shows your tenant hostname in this form (your value will differ):
**Your organization's API URL is:** `accuhive.api.kandji.io`
Make a note of this hostname. You use it with the Iru Endpoint API and your bearer token.
Click **Add Token** to create a new API token.
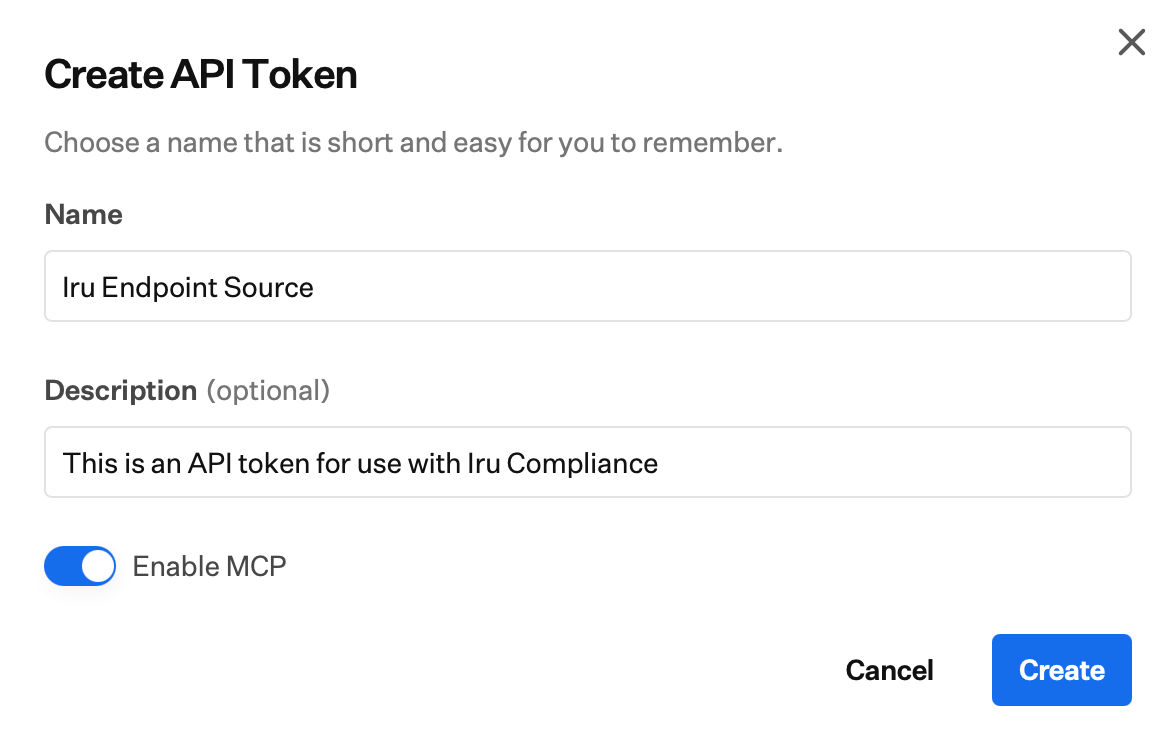
 Provide a **Name** and a **Description** for your API token.
If you want this token to work with Model Context Protocol (MCP) clients (for example Cursor, Claude Desktop, or OpenAI Codex), turn on **Enable MCP**. See [Iru MCP](/en/endpoint/integrations/ai-assistants/iru-mcp) for MCP configuration, permissions, and supported clients.
Click **Create.**
Provide a **Name** and a **Description** for your API token.
If you want this token to work with Model Context Protocol (MCP) clients (for example Cursor, Claude Desktop, or OpenAI Codex), turn on **Enable MCP**. See [Iru MCP](/en/endpoint/integrations/ai-assistants/iru-mcp) for MCP configuration, permissions, and supported clients.
Click **Create.**
 Iru Endpoint will display a modal with the API token. Click the visibility symbol to expose it or use the **Copy Token** button to copy the API token to your clipboard, storing it in a safe place.
If you turned on **Enable MCP**, the same one-time success screen also shows an **MCP configuration** block next to the token. Use **Copy MCP configuration** to copy the JSON snippet (your MCP URL and the values an MCP client uses to authenticate) and store it alongside the token. See [Iru MCP](/en/endpoint/integrations/ai-assistants/iru-mcp#copy-your-token-and-mcp-configuration) for how to use that snippet in Cursor, Claude Desktop, or other supported clients.
You will not be able to see the token or the MCP configuration again.
Click **Next.**
Iru Endpoint will display a modal with the API token. Click the visibility symbol to expose it or use the **Copy Token** button to copy the API token to your clipboard, storing it in a safe place.
If you turned on **Enable MCP**, the same one-time success screen also shows an **MCP configuration** block next to the token. Use **Copy MCP configuration** to copy the JSON snippet (your MCP URL and the values an MCP client uses to authenticate) and store it alongside the token. See [Iru MCP](/en/endpoint/integrations/ai-assistants/iru-mcp#copy-your-token-and-mcp-configuration) for how to use that snippet in Cursor, Claude Desktop, or other supported clients.
You will not be able to see the token or the MCP configuration again.
Click **Next.**
 Click **Configure** to manage the API permissions for this specific token or **Skip** to change them later.
 Check or uncheck the box next to each permission you want to change. If you check or uncheck the box at the top of a section (for example **Blueprints Management**), every permission in that section is checked or unchecked together.
After making your modifications, click **Save**.
### Edit Token
On the **API tokens** page, click a **token name**, or click the vertical **ellipsis** and then **View**, to open that token and its permissions.
Check or uncheck the box next to each permission you want to change. If you check or uncheck the box at the top of a section (for example **Blueprints Management**), every permission in that section is checked or unchecked together.
After making your modifications, click **Save**.
### Edit Token
On the **API tokens** page, click a **token name**, or click the vertical **ellipsis** and then **View**, to open that token and its permissions.
 Click **Edit** to change the token's API permissions. If none are assigned yet, you can use **Configure Permissions** instead. **Edit** works whether the token already has permissions or not.
 Check or uncheck the box next to each permission you want to change. If you check or uncheck the box at the top of a section (for example **Blueprints Management**), every permission in that section is checked or unchecked together.
Click **Save**.
### View Activity
The [Unified Activity](/en/iru/platform-overview/unified-activity) timeline lists tenant-wide API token activity: **API token created**, **API token updated**, and **API token deleted**. Filter by **Activity type** to narrow the timeline. The steps below show token-specific activity on the token detail page.
On the **API tokens** page, click a **token name**, or click the vertical **ellipsis** and then **View**, to open that token and its permissions.
Click the **Activity** tab. The timeline lists lifecycle events and API usage.
In the timeline, click a row to expand it and read its fields.
**Collapsed row**
* Chevron, event icon, title, actor (admin **display name** or a dash when there is no administrator), short date (`M/D/YY`).
**Expanded detail**
* Expanded rows show full timestamps (`M/D/YY, h:mm:ss AM` or `PM`) for time fields, plus the event-specific fields in each accordion below.
**Summary:** Key icon, **Token created**, creator display name, short date (`M/D/YY`).
**Expanded**
* **Created by:** same display name as the summary row.
* **Created at:** when the token was created.
**Summary:** Icon, **Token name changed**, editor display name, short date (`M/D/YY`).
**Expanded**
* Same administrator **by** / **at** layout as **Token created** and **Token permissions edited**: who renamed the token and when.
**Summary:** Padlock icon, **Token permissions edited**, editor display name, short date (`M/D/YY`).
**Expanded**
* **Edited by** and **Edited at** (who saved the change and when).
* **Permissions enabled:** one `METHOD /path` per line for permissions turned on in that save (for example `GET /blueprint-routing`, `PATCH /blueprint-routing`).
* **Permissions disabled:** same format for permissions turned off (for example `GET /devices-list`).
* One save can list routes under **both** sections. If nothing was turned on or off in that save, the matching section has no lines.
**Summary:** Eye icon, **Token accessed**, dash in the actor column (no admin; the client used the token), short date (`M/D/YY`).
**Expanded**
* **Accessed by:** the caller's **public IPv4** address.
* **Accessed at:** when the token was used.
* **Endpoints accessed:** one or more lines, each `METHOD /path` (for example `GET /devices-list`).
### Revoke a Token
Revoking stops the token from working with the Management API. If **Enable MCP** was on for that token, this access is also disabled when the token is revoked. See [Iru MCP](/en/endpoint/integrations/ai-assistants/iru-mcp) for MCP client configuration.
Revoking a token removes all **Activity** recorded for that token. That history cannot be recovered.
To keep **Activity** history but stop using the token, [edit the token](#edit-token) instead: open it, click **Edit**, remove all API permissions, then **Save**.
On the **API tokens** page, click the vertical **ellipsis** next to the token you want to revoke, then click **Revoke**. Or open the token, click **Edit**, then **Revoke** at the bottom left.
Check or uncheck the box next to each permission you want to change. If you check or uncheck the box at the top of a section (for example **Blueprints Management**), every permission in that section is checked or unchecked together.
Click **Save**.
### View Activity
The [Unified Activity](/en/iru/platform-overview/unified-activity) timeline lists tenant-wide API token activity: **API token created**, **API token updated**, and **API token deleted**. Filter by **Activity type** to narrow the timeline. The steps below show token-specific activity on the token detail page.
On the **API tokens** page, click a **token name**, or click the vertical **ellipsis** and then **View**, to open that token and its permissions.
Click the **Activity** tab. The timeline lists lifecycle events and API usage.
In the timeline, click a row to expand it and read its fields.
**Collapsed row**
* Chevron, event icon, title, actor (admin **display name** or a dash when there is no administrator), short date (`M/D/YY`).
**Expanded detail**
* Expanded rows show full timestamps (`M/D/YY, h:mm:ss AM` or `PM`) for time fields, plus the event-specific fields in each accordion below.
**Summary:** Key icon, **Token created**, creator display name, short date (`M/D/YY`).
**Expanded**
* **Created by:** same display name as the summary row.
* **Created at:** when the token was created.
**Summary:** Icon, **Token name changed**, editor display name, short date (`M/D/YY`).
**Expanded**
* Same administrator **by** / **at** layout as **Token created** and **Token permissions edited**: who renamed the token and when.
**Summary:** Padlock icon, **Token permissions edited**, editor display name, short date (`M/D/YY`).
**Expanded**
* **Edited by** and **Edited at** (who saved the change and when).
* **Permissions enabled:** one `METHOD /path` per line for permissions turned on in that save (for example `GET /blueprint-routing`, `PATCH /blueprint-routing`).
* **Permissions disabled:** same format for permissions turned off (for example `GET /devices-list`).
* One save can list routes under **both** sections. If nothing was turned on or off in that save, the matching section has no lines.
**Summary:** Eye icon, **Token accessed**, dash in the actor column (no admin; the client used the token), short date (`M/D/YY`).
**Expanded**
* **Accessed by:** the caller's **public IPv4** address.
* **Accessed at:** when the token was used.
* **Endpoints accessed:** one or more lines, each `METHOD /path` (for example `GET /devices-list`).
### Revoke a Token
Revoking stops the token from working with the Management API. If **Enable MCP** was on for that token, this access is also disabled when the token is revoked. See [Iru MCP](/en/endpoint/integrations/ai-assistants/iru-mcp) for MCP client configuration.
Revoking a token removes all **Activity** recorded for that token. That history cannot be recovered.
To keep **Activity** history but stop using the token, [edit the token](#edit-token) instead: open it, click **Edit**, remove all API permissions, then **Save**.
On the **API tokens** page, click the vertical **ellipsis** next to the token you want to revoke, then click **Revoke**. Or open the token, click **Edit**, then **Revoke** at the bottom left.
 Enter the **token name** exactly as it appears in the prompt.
Click **Revoke** to confirm.
After revocation, the token disappears from the list and you can't review its **Activity** anymore.
### Best Practices
Create a **unique API token** for each integration or use case so you can rotate or revoke one connection without affecting others.
Use clear, descriptive **Name** and **Description** values in the **Iru Endpoint** Web App so tokens are easy to recognize on the **API tokens** page in **Access**.
### Considerations
If you remove an administrator from the Iru Endpoint Web App, **API tokens they created stay in place and keep working** until they are revoked. Deleting the user does **not** automatically revoke those tokens. Open **Access**, go to **API tokens**, and **Revoke** (or rotate by creating a new token and revoking the old one) if you need to stop access.
Anyone with permission to use the **Access** page can **manage every API token** in the tenant: edit **Permissions**, **rename** the token, review **Activity**, and **revoke** it. You do not need to be the user who originally created the token.
The **secret** (the string you use as a **bearer token**) is shown **only once**, when the token is first created. After that, other administrators can still administer the token in **Access**, but they **cannot see that secret again** unless the creator **shared** it with them at creation time (for example in a password manager or secure message). Anyone with **Access** can still revoke the token or narrow its permissions if the secret might have been exposed.
The Iru Endpoint Management API currently has an API rate limit of **10,000 requests per hour per customer**, documented in the introduction of the [Iru Endpoint Management API documentation](https://api-docs.kandji.io/).
When **Iru Compliance** collects evidence through the [**Iru Endpoint** Compliance source](/en/compliance/sources/iru-endpoint-source), it calls the Management API with your API token. **Those requests count toward the same hourly limit** for your tenant.
### Troubleshooting
The Iru Endpoint Management API enforces **10,000 requests per hour per customer** (see [Considerations](#considerations) and the [Iru Endpoint Management API documentation](https://api-docs.kandji.io/)). **All API tokens in your tenant share that same limit.** There is no separate rate limit per token.
When a request is blocked for exceeding the limit, the response body includes:
```json lines theme={null}
{
"message": "API rate limit exceeded"
}
```
To see whether a specific integration or script is driving volume, open **Access**, select each token, and review **Activity** for that token ([View Activity](#view-activity)). Expanding **Token accessed** entries shows which endpoints were called so you can throttle or fix the client, rotate credentials, or adjust automation as needed.
If the token does not have the API permissions required for the endpoint you are calling, you may receive a response like:
```json lines theme={null}
{
"detail": "You do not have permission to perform this action."
}
```
In **Access**, open the token, select **Edit**, and enable the permissions that match the routes your integration uses ([Edit token](#edit-token)).
### Related Articles
Browse endpoints, parameters, and request and response examples.
Connect third-party products and map the API permissions each one needs.
Import the published collection and send authenticated requests.
How **Iru Compliance** uses your token on the Management API for evidence.
Publish and update in-house apps using the API and the Web App.
Query and export fleet data with Prism's API-first analytics workflows.
Renew, update, or delete ADE tokens using an API token from Access.
Connect multiple Apple Business or Apple School Manager accounts or organizational units to Iru Endpoint.
Connect Okta Workflows to Iru Endpoint with an API token and device permissions.
Deliver tenant activity logs to Amazon S3 and review logged event types in the API documentation.
Enter the **token name** exactly as it appears in the prompt.
Click **Revoke** to confirm.
After revocation, the token disappears from the list and you can't review its **Activity** anymore.
### Best Practices
Create a **unique API token** for each integration or use case so you can rotate or revoke one connection without affecting others.
Use clear, descriptive **Name** and **Description** values in the **Iru Endpoint** Web App so tokens are easy to recognize on the **API tokens** page in **Access**.
### Considerations
If you remove an administrator from the Iru Endpoint Web App, **API tokens they created stay in place and keep working** until they are revoked. Deleting the user does **not** automatically revoke those tokens. Open **Access**, go to **API tokens**, and **Revoke** (or rotate by creating a new token and revoking the old one) if you need to stop access.
Anyone with permission to use the **Access** page can **manage every API token** in the tenant: edit **Permissions**, **rename** the token, review **Activity**, and **revoke** it. You do not need to be the user who originally created the token.
The **secret** (the string you use as a **bearer token**) is shown **only once**, when the token is first created. After that, other administrators can still administer the token in **Access**, but they **cannot see that secret again** unless the creator **shared** it with them at creation time (for example in a password manager or secure message). Anyone with **Access** can still revoke the token or narrow its permissions if the secret might have been exposed.
The Iru Endpoint Management API currently has an API rate limit of **10,000 requests per hour per customer**, documented in the introduction of the [Iru Endpoint Management API documentation](https://api-docs.kandji.io/).
When **Iru Compliance** collects evidence through the [**Iru Endpoint** Compliance source](/en/compliance/sources/iru-endpoint-source), it calls the Management API with your API token. **Those requests count toward the same hourly limit** for your tenant.
### Troubleshooting
The Iru Endpoint Management API enforces **10,000 requests per hour per customer** (see [Considerations](#considerations) and the [Iru Endpoint Management API documentation](https://api-docs.kandji.io/)). **All API tokens in your tenant share that same limit.** There is no separate rate limit per token.
When a request is blocked for exceeding the limit, the response body includes:
```json lines theme={null}
{
"message": "API rate limit exceeded"
}
```
To see whether a specific integration or script is driving volume, open **Access**, select each token, and review **Activity** for that token ([View Activity](#view-activity)). Expanding **Token accessed** entries shows which endpoints were called so you can throttle or fix the client, rotate credentials, or adjust automation as needed.
If the token does not have the API permissions required for the endpoint you are calling, you may receive a response like:
```json lines theme={null}
{
"detail": "You do not have permission to perform this action."
}
```
In **Access**, open the token, select **Edit**, and enable the permissions that match the routes your integration uses ([Edit token](#edit-token)).
### Related Articles
Browse endpoints, parameters, and request and response examples.
Connect third-party products and map the API permissions each one needs.
Import the published collection and send authenticated requests.
How **Iru Compliance** uses your token on the Management API for evidence.
Publish and update in-house apps using the API and the Web App.
Query and export fleet data with Prism's API-first analytics workflows.
Renew, update, or delete ADE tokens using an API token from Access.
Connect multiple Apple Business or Apple School Manager accounts or organizational units to Iru Endpoint.
Connect Okta Workflows to Iru Endpoint with an API token and device permissions.
Deliver tenant activity logs to Amazon S3 and review logged event types in the API documentation.